If you are one of the hoteliers, who is receiving bookings for his rooms from various OTAs and booking websites
But finding it difficult to manage the rate, availability, and inventory of your rooms simultaneously in real-time, then Qloapps Channel Manager is what you need.
This mismanagement of bookings from various channels manually leads to problems like over-bookings, inconsistent inventory management, and missed opportunities.
Then it’s time to use an online channel manager for your booking management.
In this blog, we’ll explore QloApps Channel Manager, a smart tool that helps hotels manage bookings, rates, and inventory across multiple channels in real time.
What is the role of a Channel Manager?
Online Channel Manager is a centralised platform that helps hoteliers add and update the availability, rates, and inventory of the property on various Online travel agency channels with single click.
It automatically syncs the booking received by any channel on PMS and various OTAs in real-time.
How to start using QloApps Channel Manager?
To use QloApps Channel Manager, you have to first create an account. Let’s first discuss how you can create an account for QloApps Channel Manager.
Process of Account Creation for QloApps Channel Manager
To create a new account for QloApps Channel Manager, click on Sign Up and fill up the following details in the registration form:
- Name: Enter your name.
- Email: Fill in the email id.
- Phone Number: Enter your phone number
- Hotel Name: Mention the name of the hotel.
- Password: Fill in the password for login purposes.
- Confirm Password: Confirm the password.
After filling in all the details, click on Sign Up and your online channel manager account with a 15-day free trial period will get activated.
Note: In the trial plan, the price and inventory of the hotel will not be synchronized. To synchronize the inventory and price you need to upgrade the plan.
Login process to QloApps Channel Manager
Registered User
If you are already a registered user, then simply fill in your email and password and login to your QloApps channel manager account.

How to Cancel the QloApps Channel Manager Subscription?
After you purchase the subscription, you can also cancel it using the option of “cancel subscription“.
- To cancel the subscription, click on the “cancel subscription” and then the below window will appear.
- Click on ” Cancel Membership” and then the subscription will continue till the end of the due date and cancellation will be effective at the end of the billing cycle.
QloApps Channel Manager Dashboard
QloApps Dashboard helps you monitor the daily operations of your property.
It also provides you with insights into your hotel performance and sales on various channels to help you make well-informed future decisions.
The dashboard page of the channel manager is further divided into various sections. Let’s discuss these sections in detail.
Through the date range selection option in the horizontal panel, you can filter the data displayed on the dashboard as per your preferred date range.
Also, Using the day, month, and week buttons, you can choose the view mode of the data. You can monitor the data for the whole day, week, month, or year on your dashboard.

Data and Insight sections of the Dashboard
The 11 sections on the dashboard that highlight the various insights into your property and its performance and daily operations are as follows:
Today’s Operations:
This section displays the real-time present-day data of the arrivals, departures, In-house guests, and received and canceled Bookings of your property.

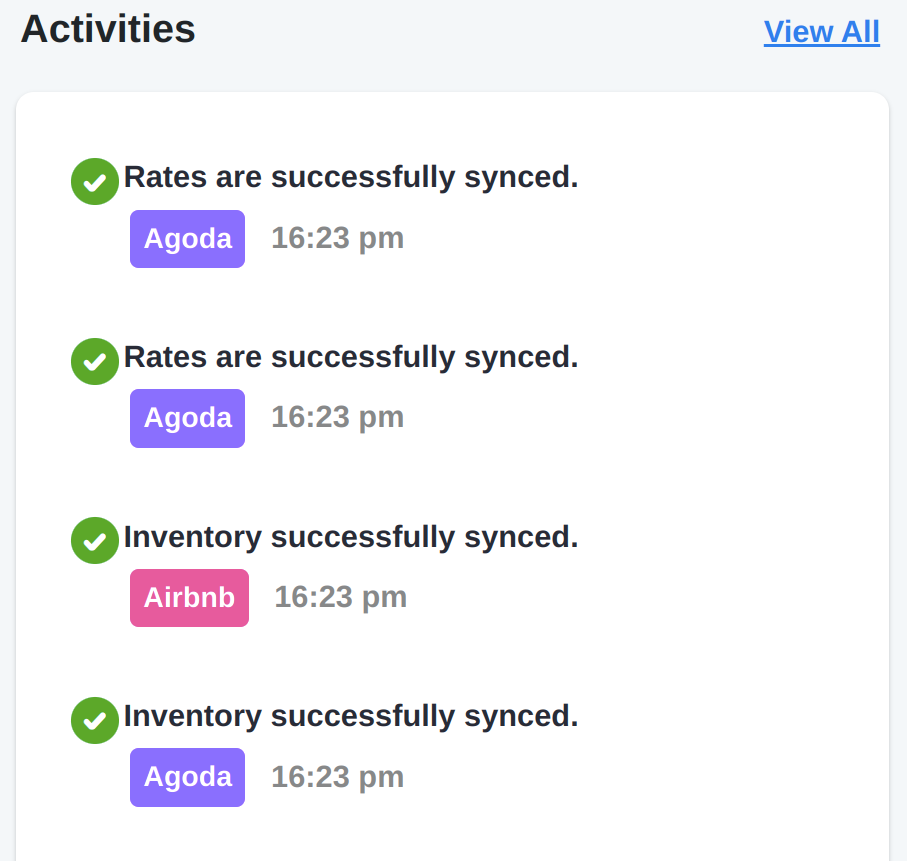
Activities:
This section updates you about any new activity that takes place in your channel manager such as rate and inventory synchronization updates.
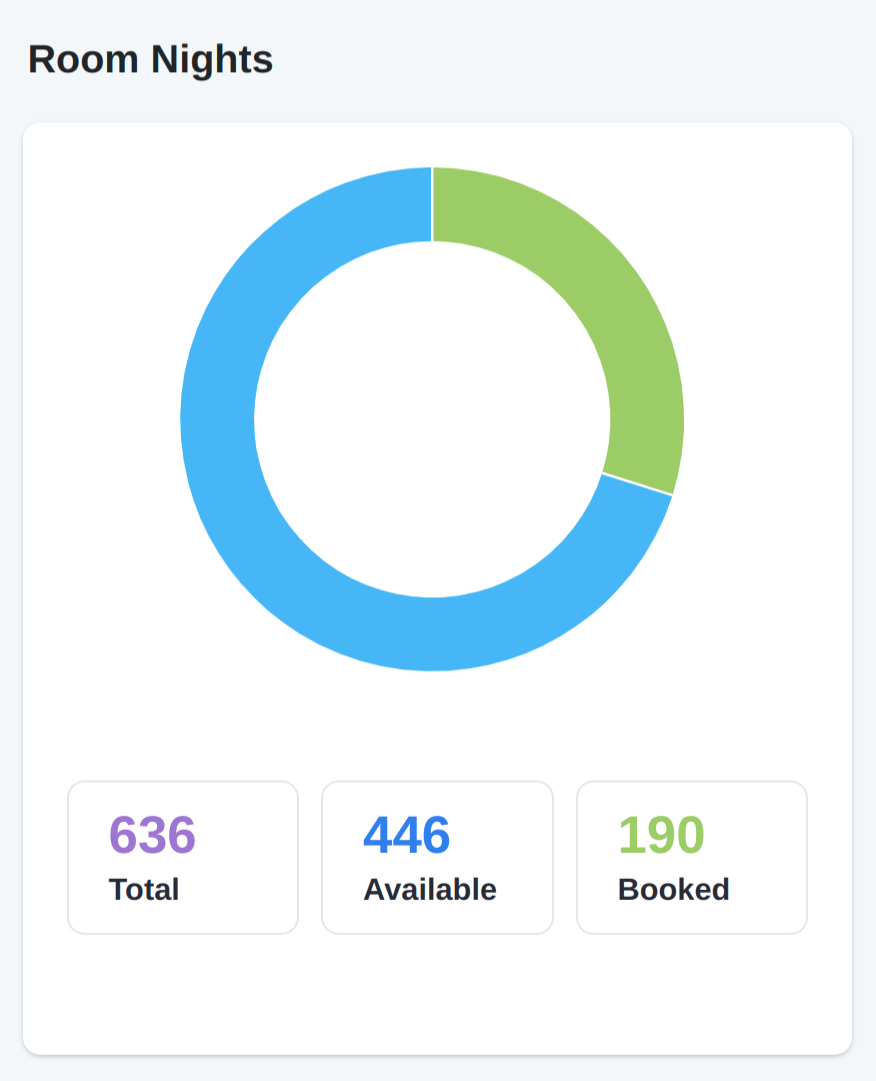
Room Nights:
This section displays the total, available, and booked room nights of your property in a selected period.
Channels:
This section displays the performance of various channels on which you have listed your property based on the number of bookings and the amount of revenue each channel provides.

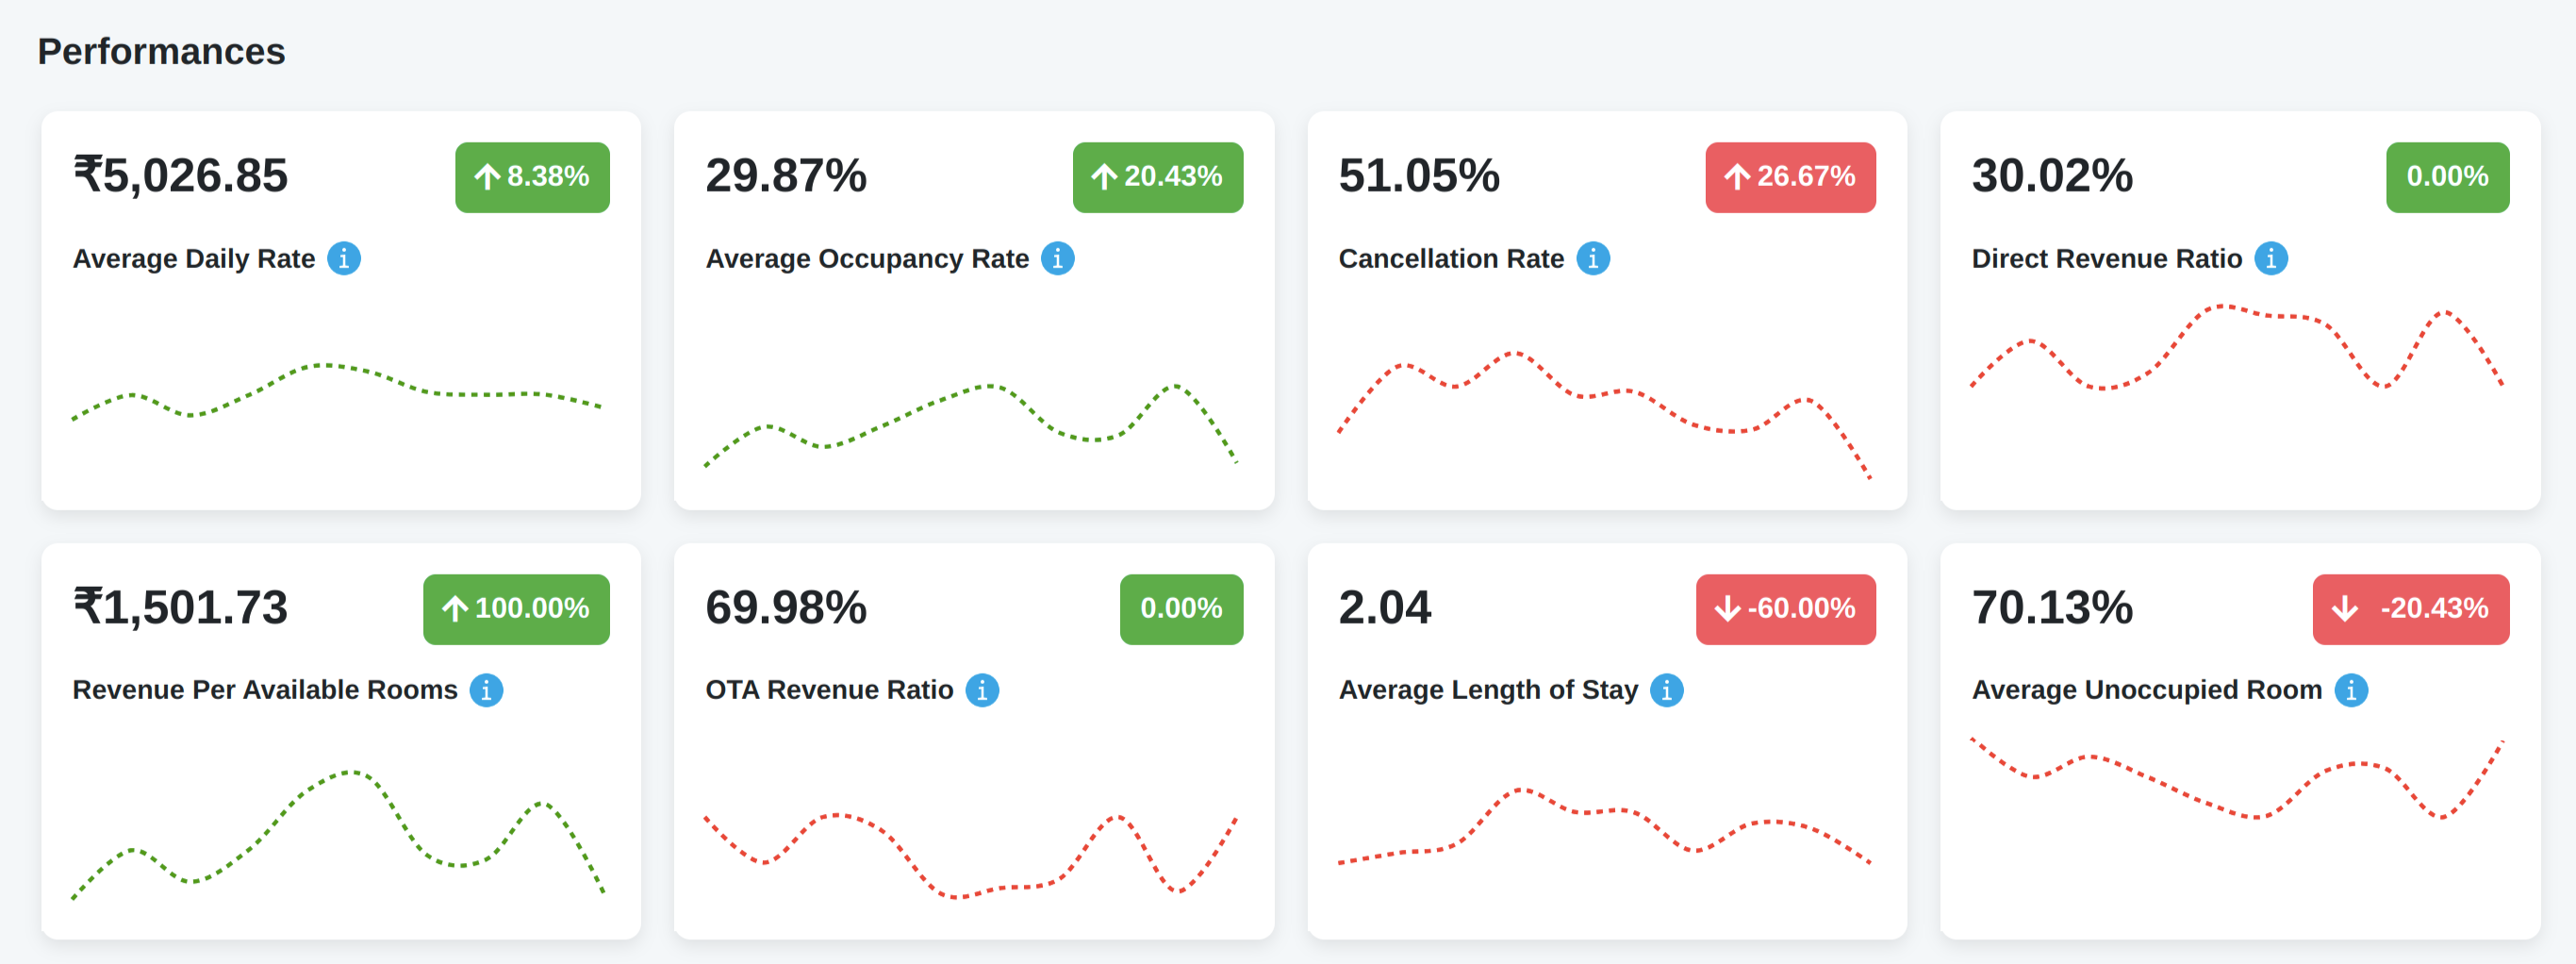
Performance:
It provides you with an overview of how your property is performing in the hotel market by evaluating it on various parameters such as ADR, AOR, CR, DRR, RPAR, Average LOS, etc.
This dynamic section also compares the performance of your hotel on the current day with the previous day and displays its growth rate for each parameter.
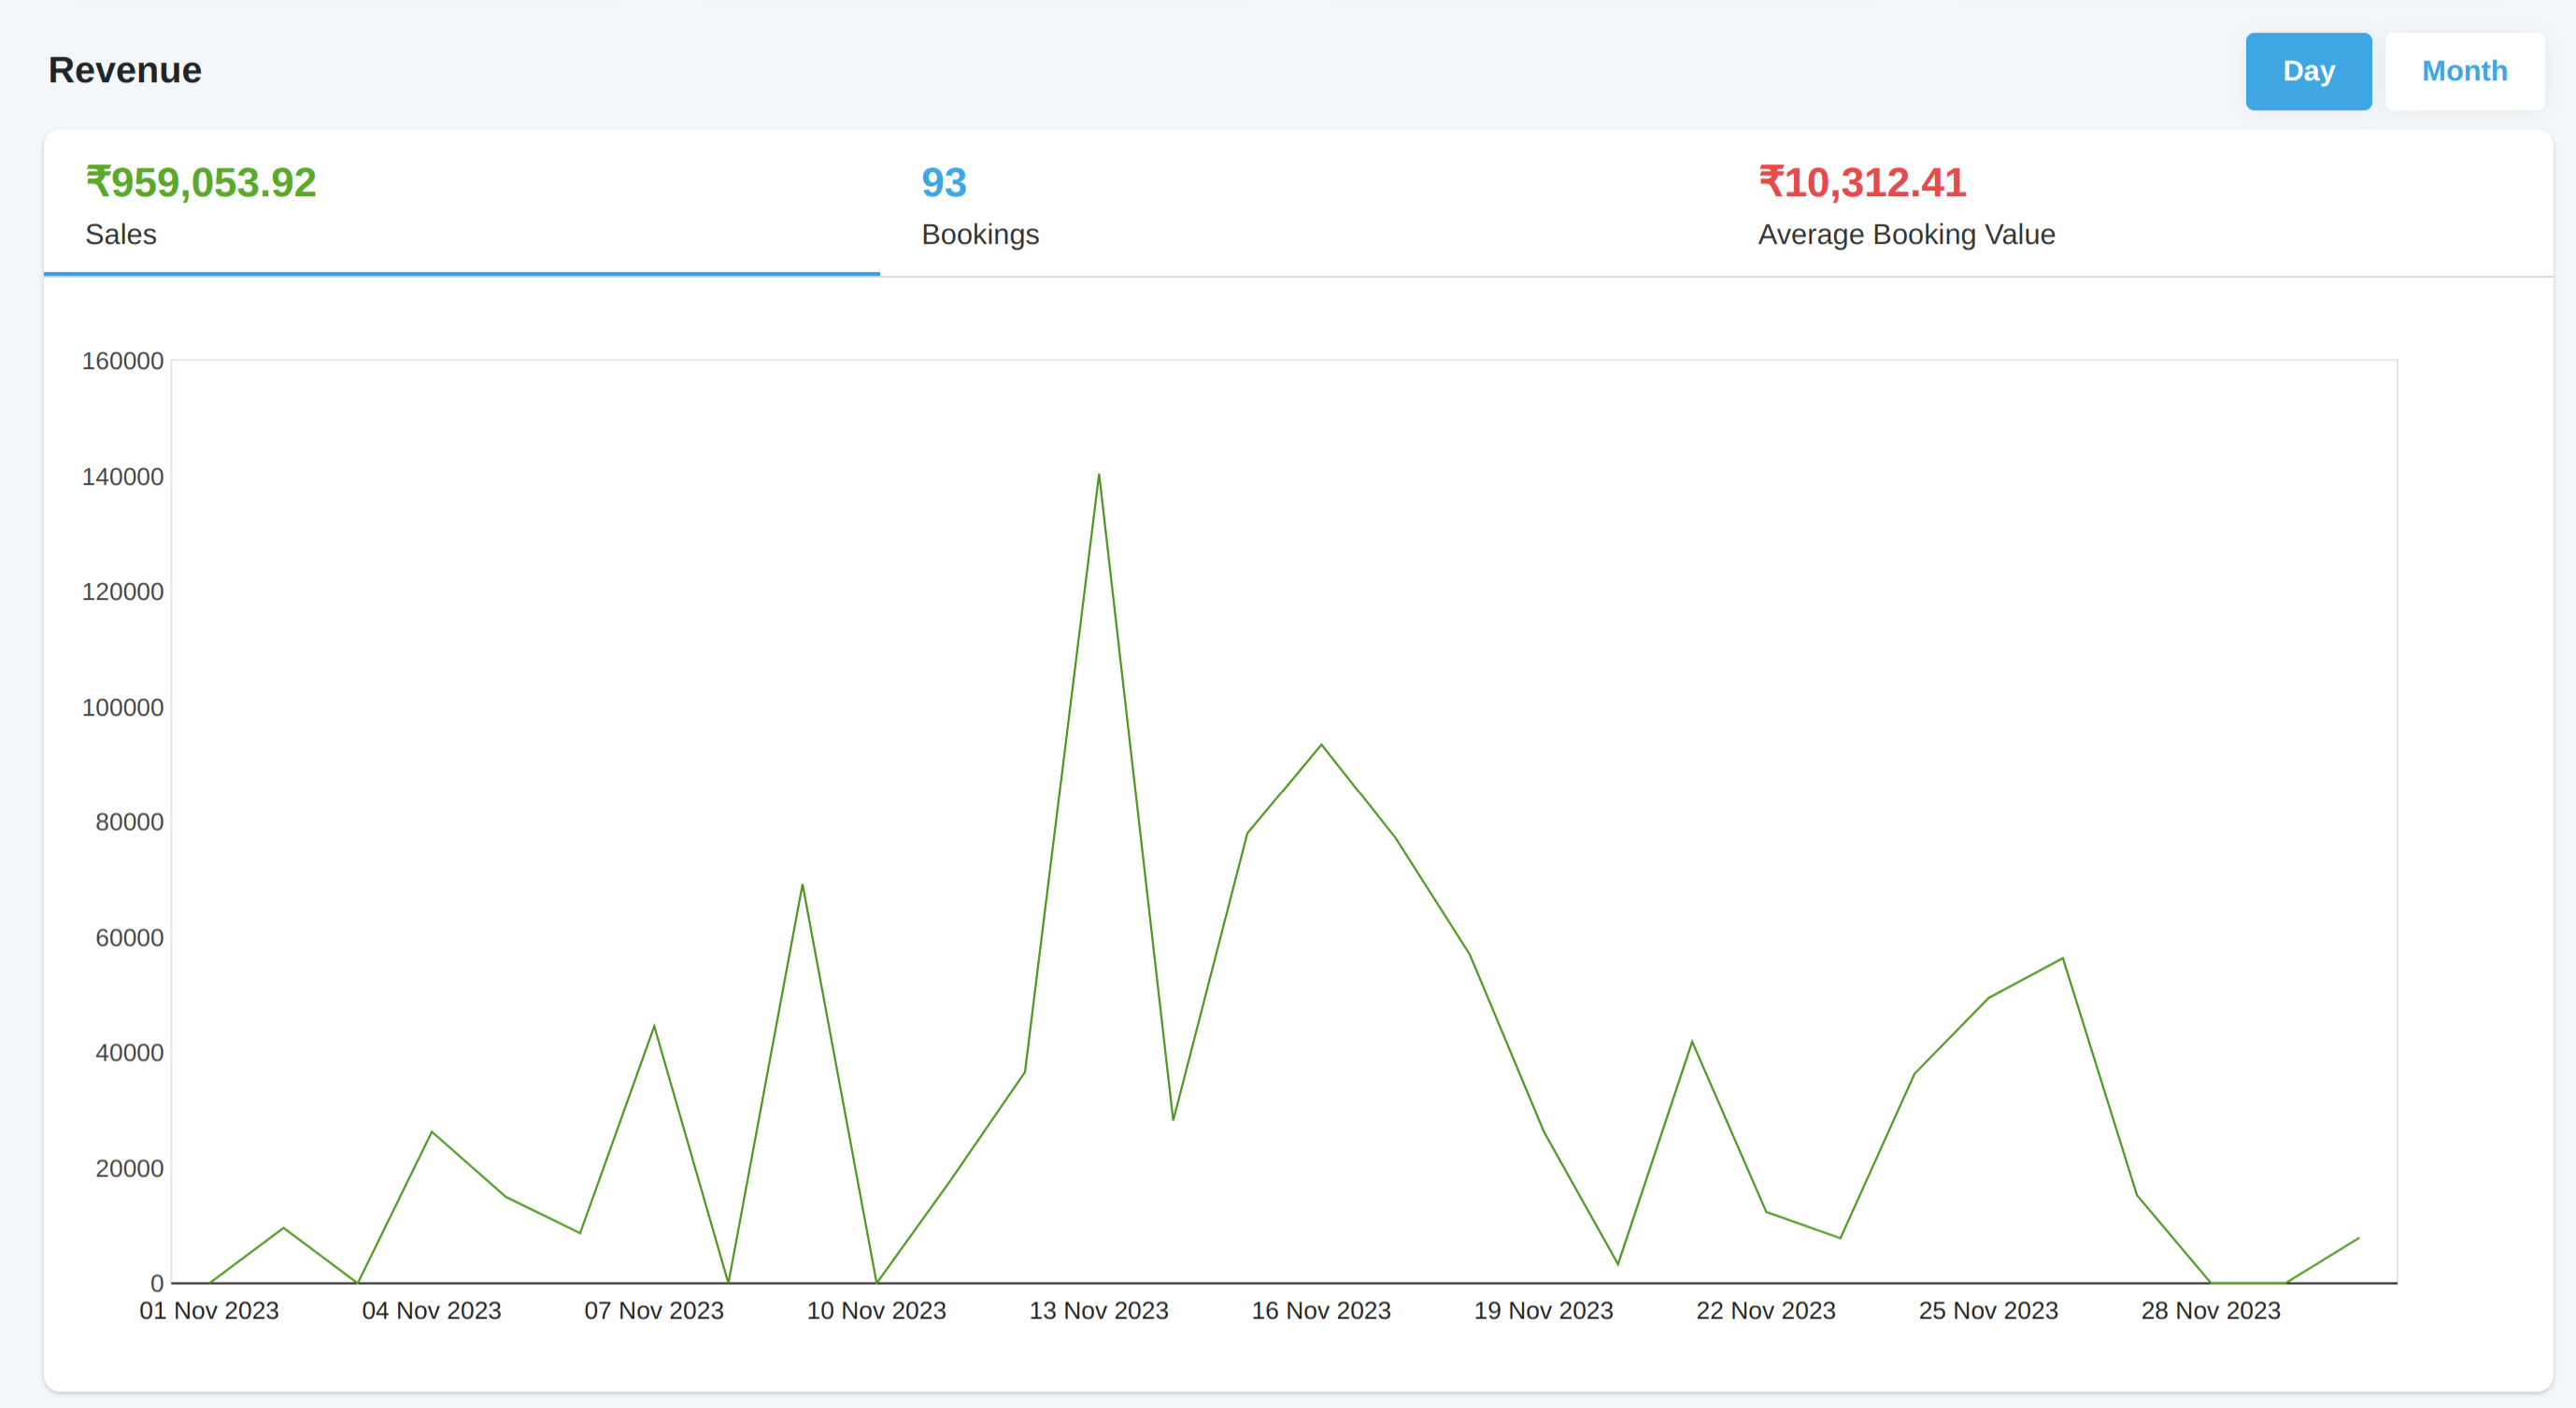
Revenue:
It displays the sales, bookings, and average booking value of your property in a day or month.
Rooms:
This section demonstrates the data on the number of rooms that were available and occupied rooms of your hotel in the last 15, 30, or 45 days.

Room Type:
In this section, you can monitor the performance of your room types based on the number of types it was booked, the revenue it earned you, and the number of nights for which it was booked.

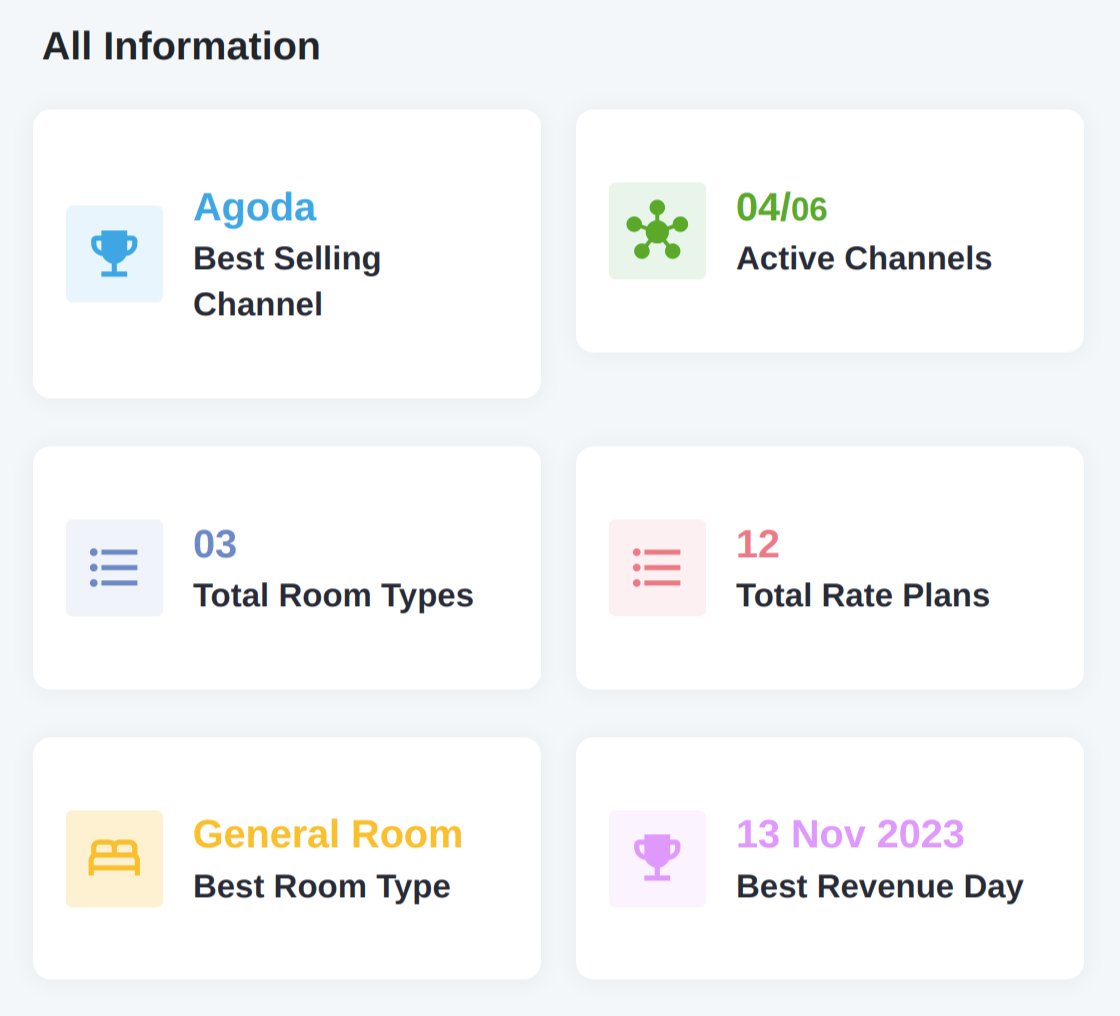
All Information:
This section provides you with a comprehensive overview of the total and best-performing channels and room types of your property.
Daywise Stay:
Through this section, you can interpret which day works well for your hotel business. It displays the number of guests that stay on each day of the week in your property.

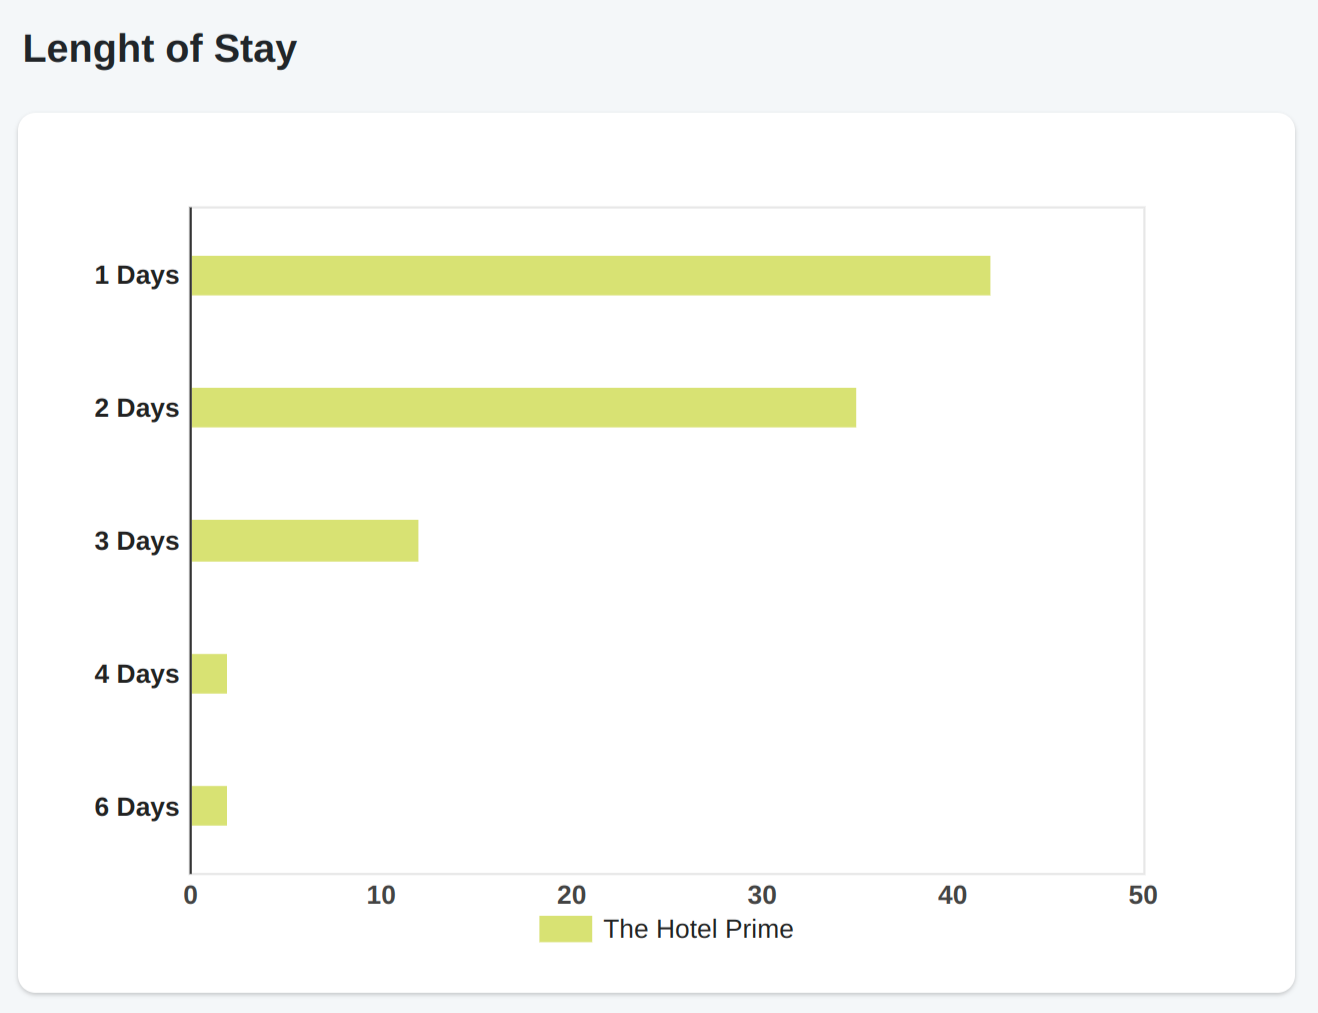
Length of stay:
Through this section, you can interpret the most preferred duration of stay for which your guests book your property.
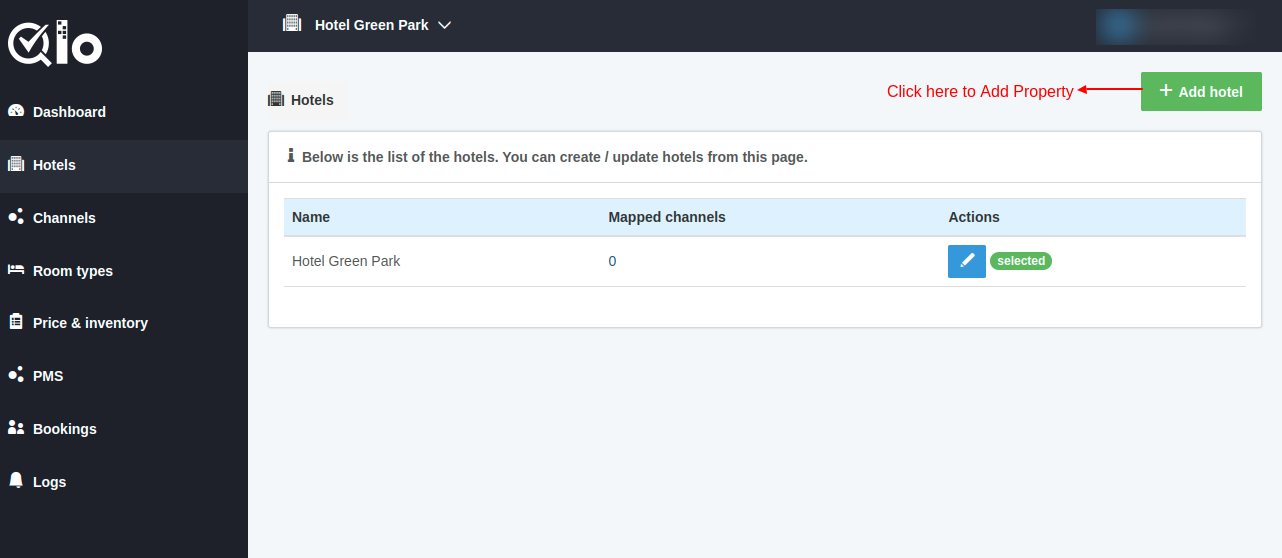
How to Add Your Property in QloApps Channel Manager?
To add a new property in QloApps, first, go to the ” Hotels” Tab from the menu and then click on “Add Hotel”.
When you click on “Add hotel” the below window will open. Next, fill in the details of the hotel in two tabs:
Information Tab
In the “Information” tab fill the given details:
- Hotel Name: Enter the name of the hotel.
- Time Zone: Select the time zone of the hotel.
- Currency: Select the currency used by the hotel.

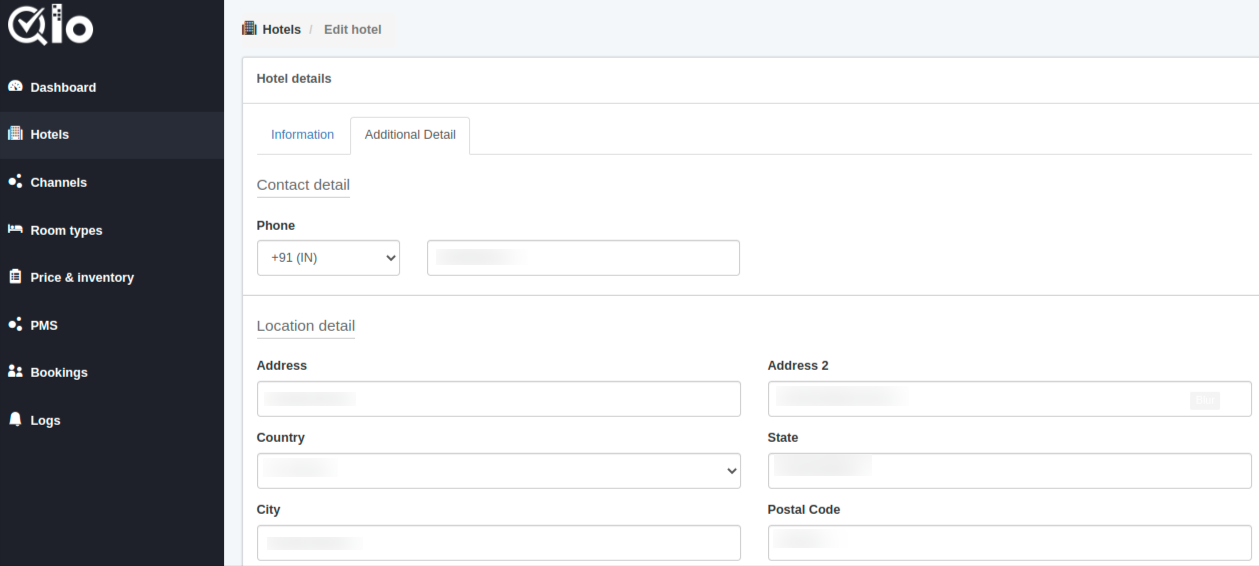
Additional Details
In the “Additional Detail” tab fill in the following details:
- Contact detail:
- Phone: Select the dial code from the drop-down and mention the phone number.
- Location Detail:
- Address: Fill in the address of the hotel
- Address 2: Fill the second line of the hotel address
- Country: Select the country from the drop-down
- State: Enter the state of the hotel
- City: Fill the city of the hotel
- Postal code: Mention the PIN code of the hotel
After adding the details of the hotel, you have to select the location of your hotel on Google Maps.
Once you added the location on the map then mention the “Website Link“. Write the website link in the format like “https.//example.com“.
You can also create an advanced landing page URL so that guests can reach the specific page to complete the booking.
Then finally click on “Update”. Hence the hotel will be added successfully.
Once we add a hotel, users can see the added hotel on the hotel listing page. Here users can edit and delete the hotel.
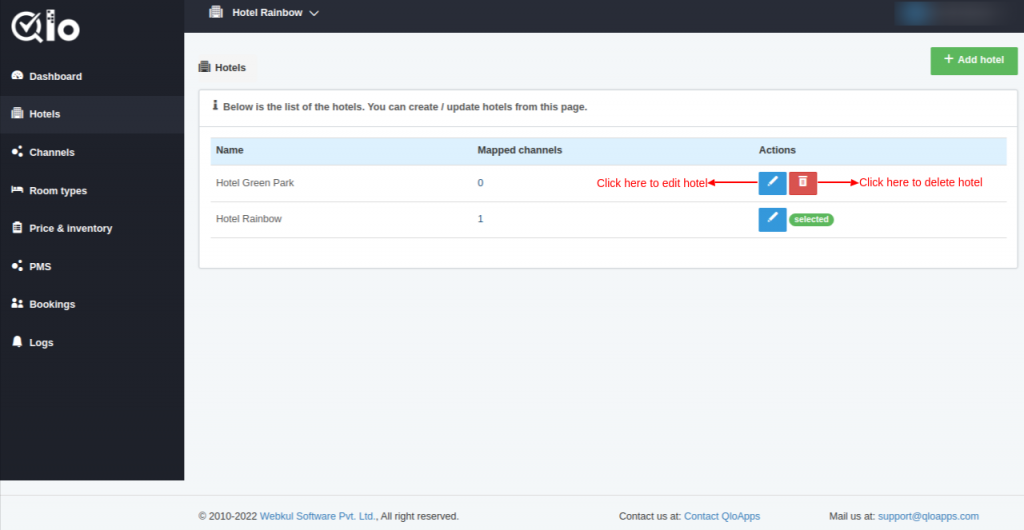
After creating the hotel, the hotel logo is there in the header. The admin can choose any hotel in the header to create the data.
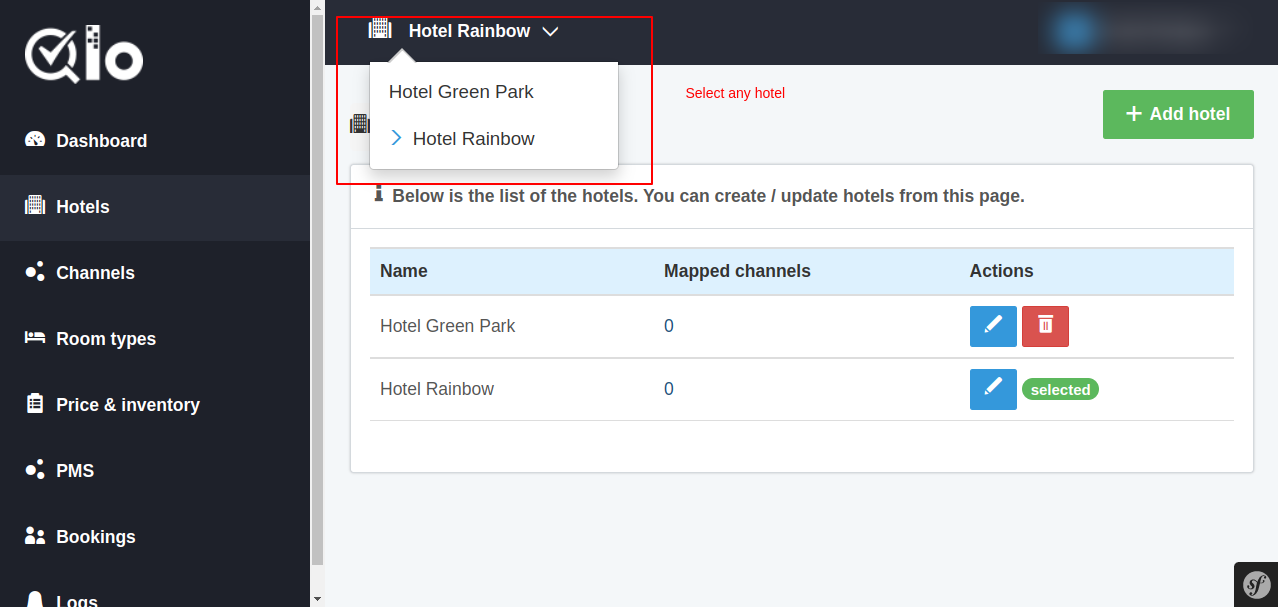
Note: The hotel selected from the dropdown will be managed by the channel manager.
After creating and selecting the hotel, let’s discuss how you can create the room types of the hotel.
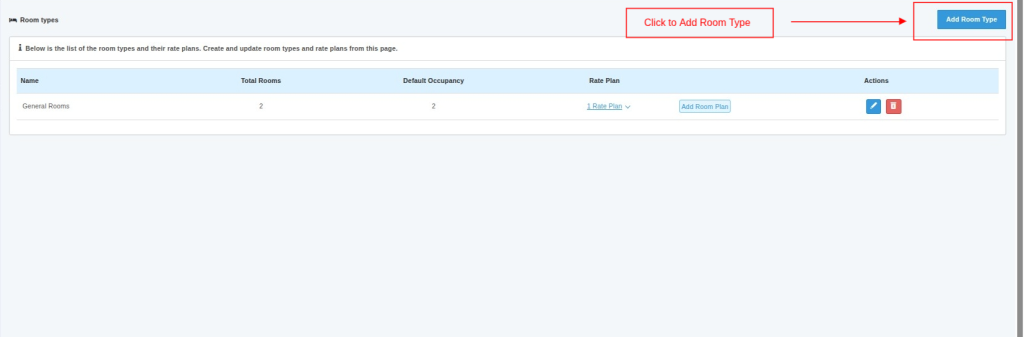
How to add room types of property in QloApps Channel Manager?
To add a new room type, Go to the Room Types Tab from the menu and then click on Add Room Type.
Now, we have to fill in following the details about the room type:
- Name: Enter the name of the room type
- Total Room: Enter the total count of any room type
- Default Occupancy: Default occupancy of the room type
- Maximum Adults: Maximum number of Adults allowed in the room
- Maximum Children: Maximum Number of children allowed in the room type
- Max Infants: Number of total infants are permitted in the room
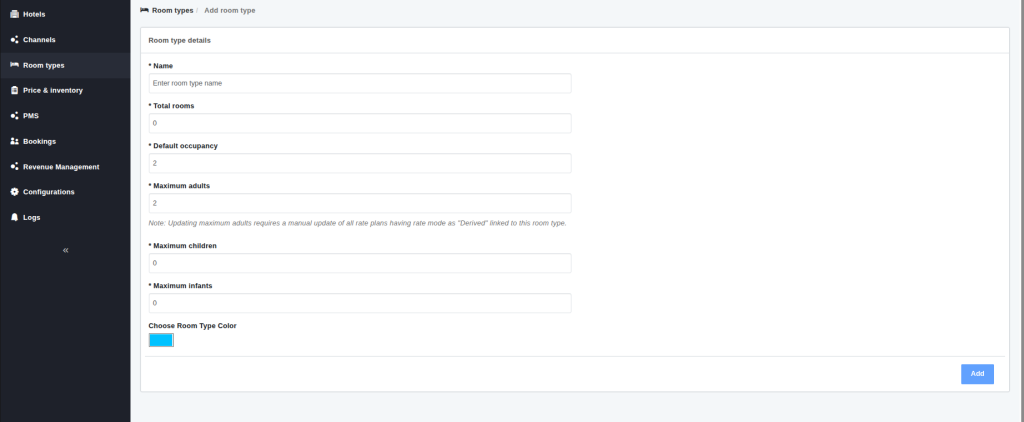
After filling in all the details, click on ” Add” and save the room type.
The saved room type will be added to the list of created room types. You can now, add the rate plans of the room type or edit the room type and delete the room type.

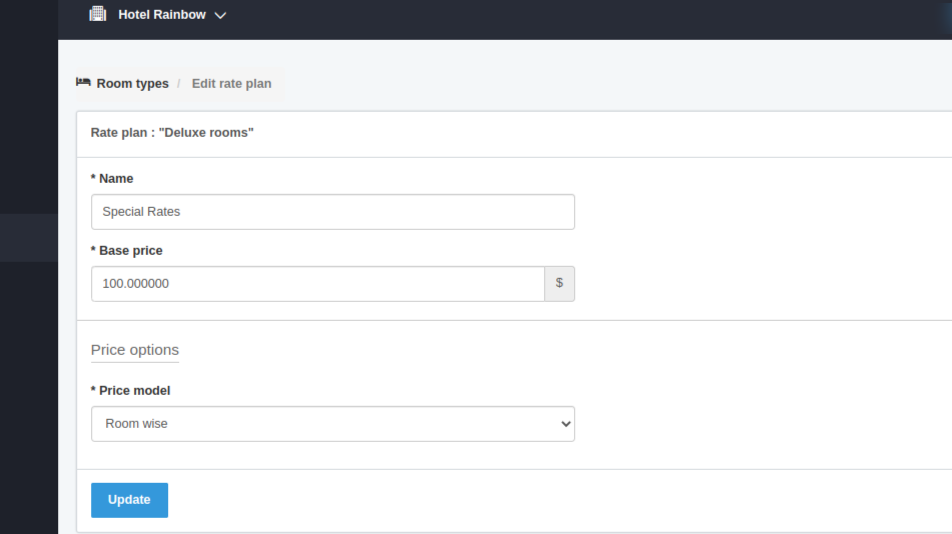
How to Create a Rate Plan for the Room Type?
To create a rate plan for the room type, click on the options menu and select Add Rate plan from the dropdown menu.
Now, fill in the details about the rate plan in the following 2 sections:
Information Tab
- Name Mention the name of the rate plan.
- Base Price: Fill in the base price of the room type.
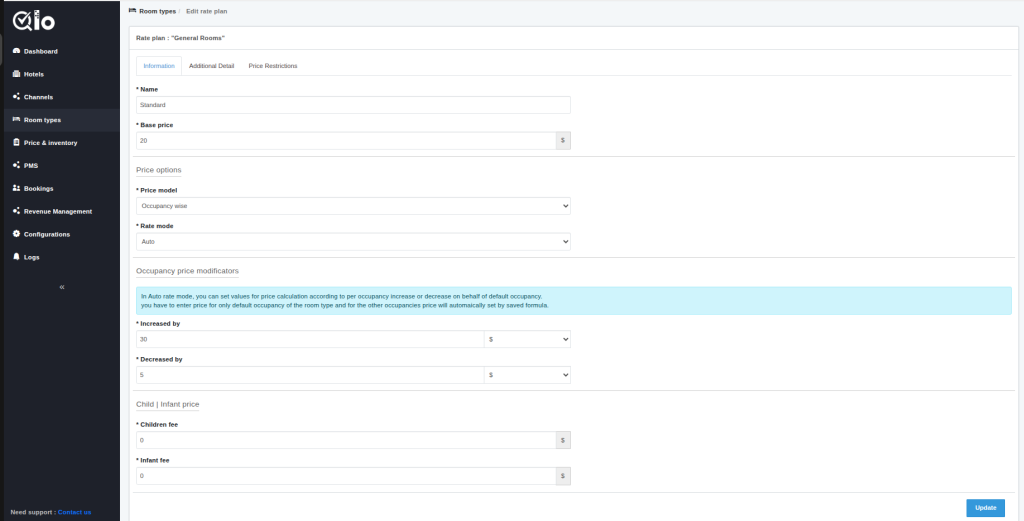
Price Options
- Price Model: Select one of the two (Occupancy Wise or Room Wise) Price model of the room type i.e. decide whether you want to price the rate plan of the room type based on occupancy or room.
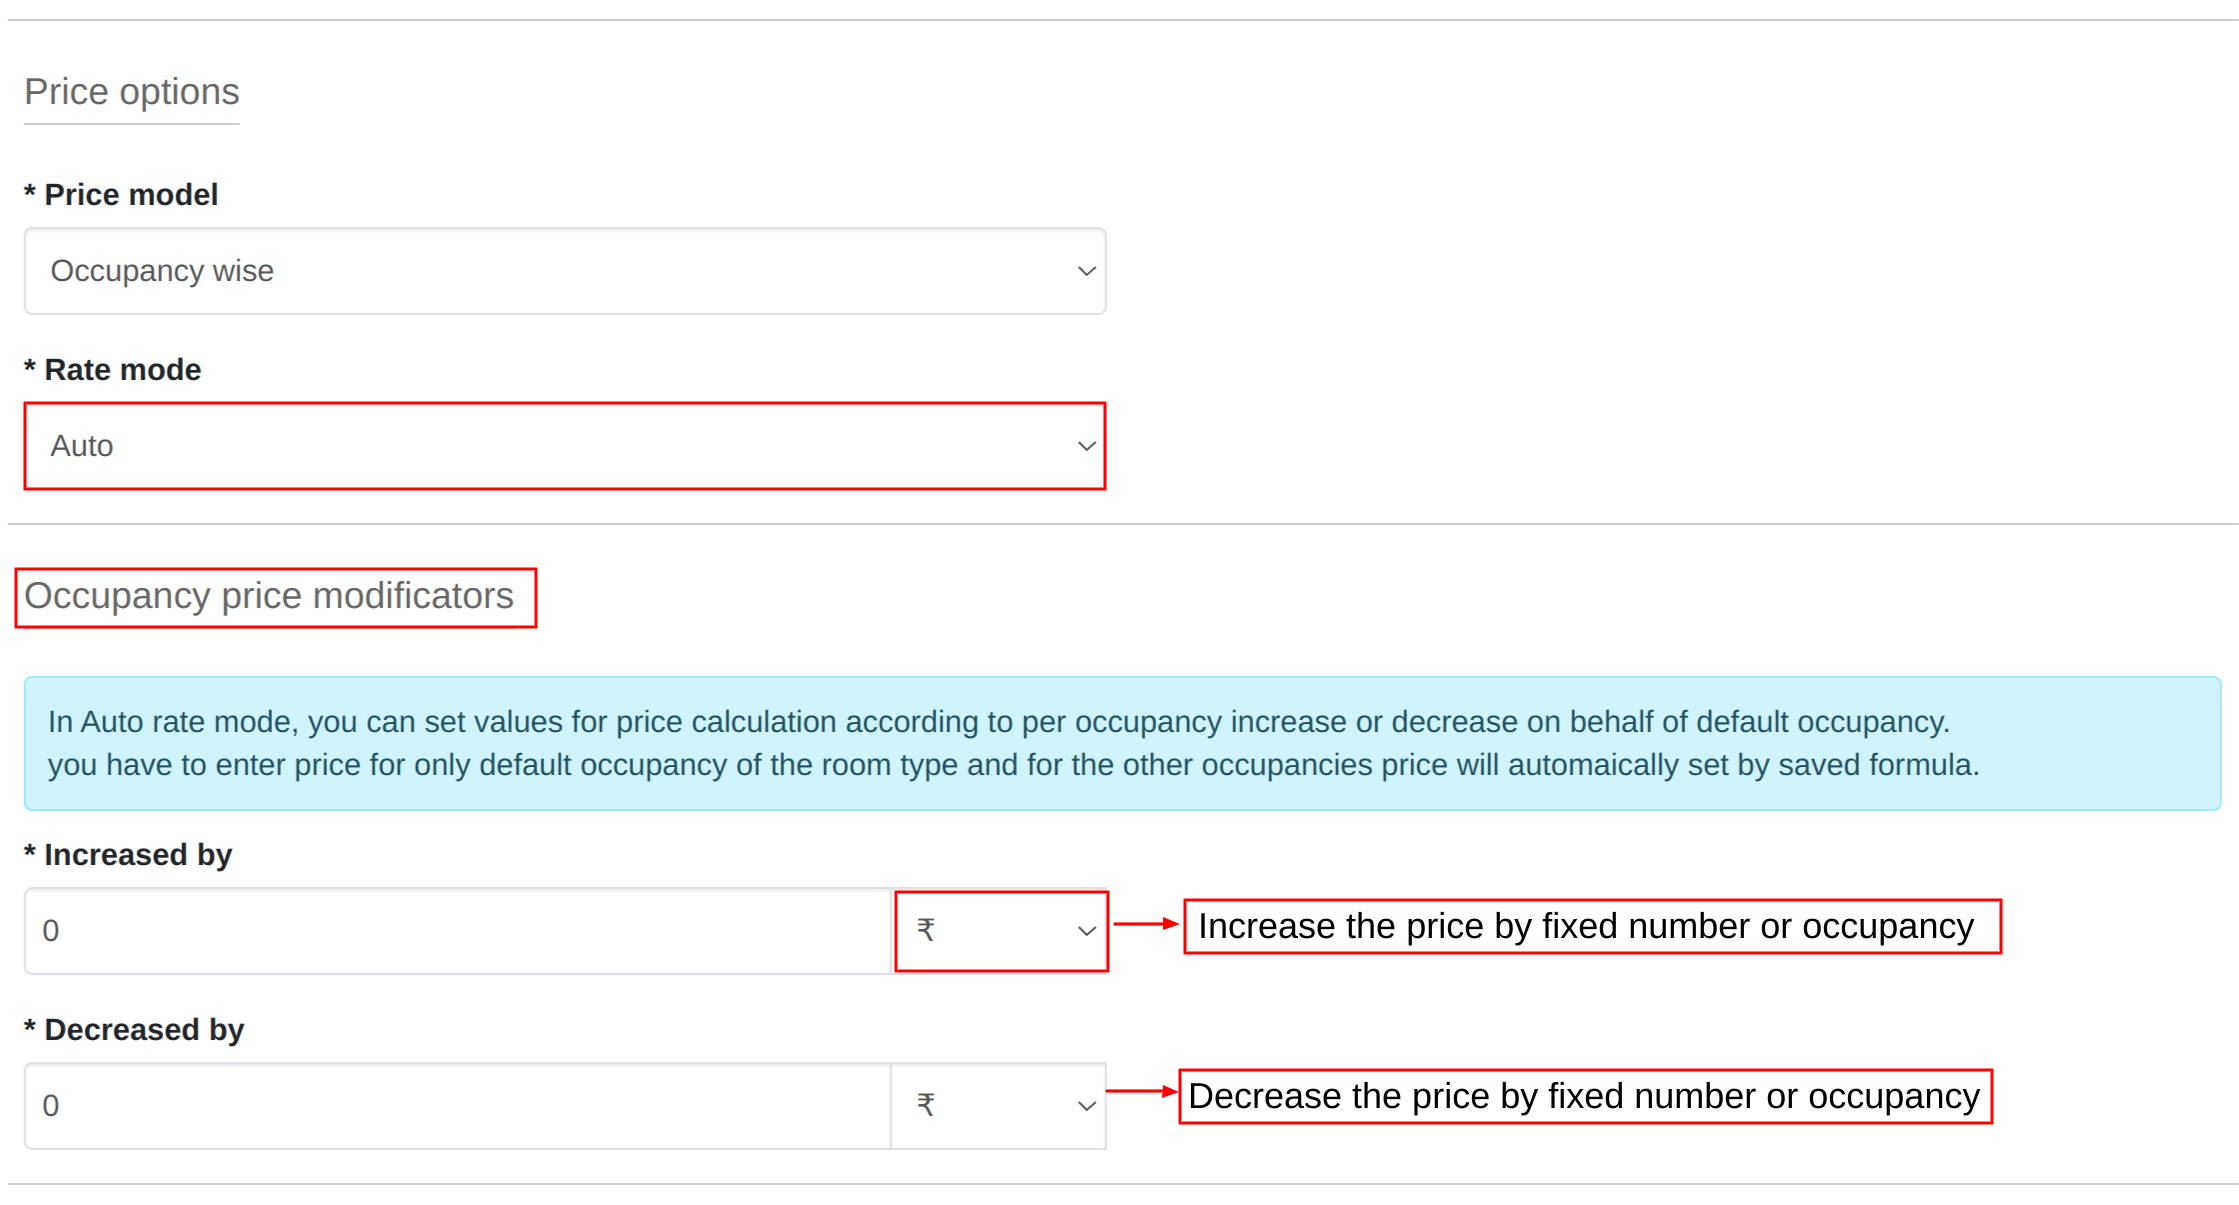
- If you select the Occupancy-wise price model, then there will be three modes in which the price of the room type will be calculated and updated on various channels:
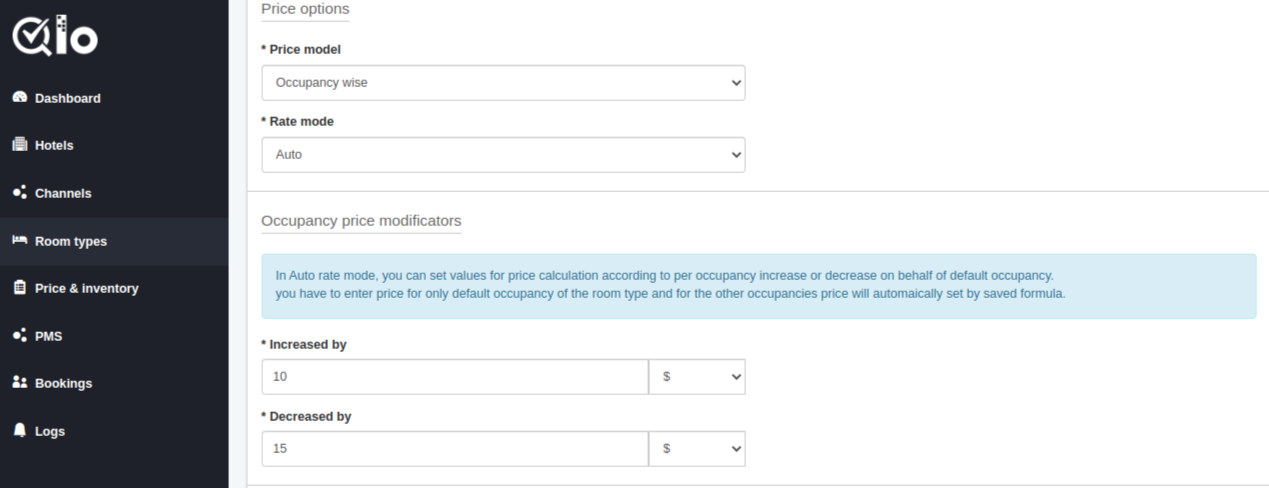
1. Auto Price Mode: In Auto Rate mode, you can set values for price calculation according to per occupancy increase or decrease on behalf of default occupancy.
You have to enter a price for only the default occupancy of the room type and for the other occupancies price will automatically be set by the saved formula.
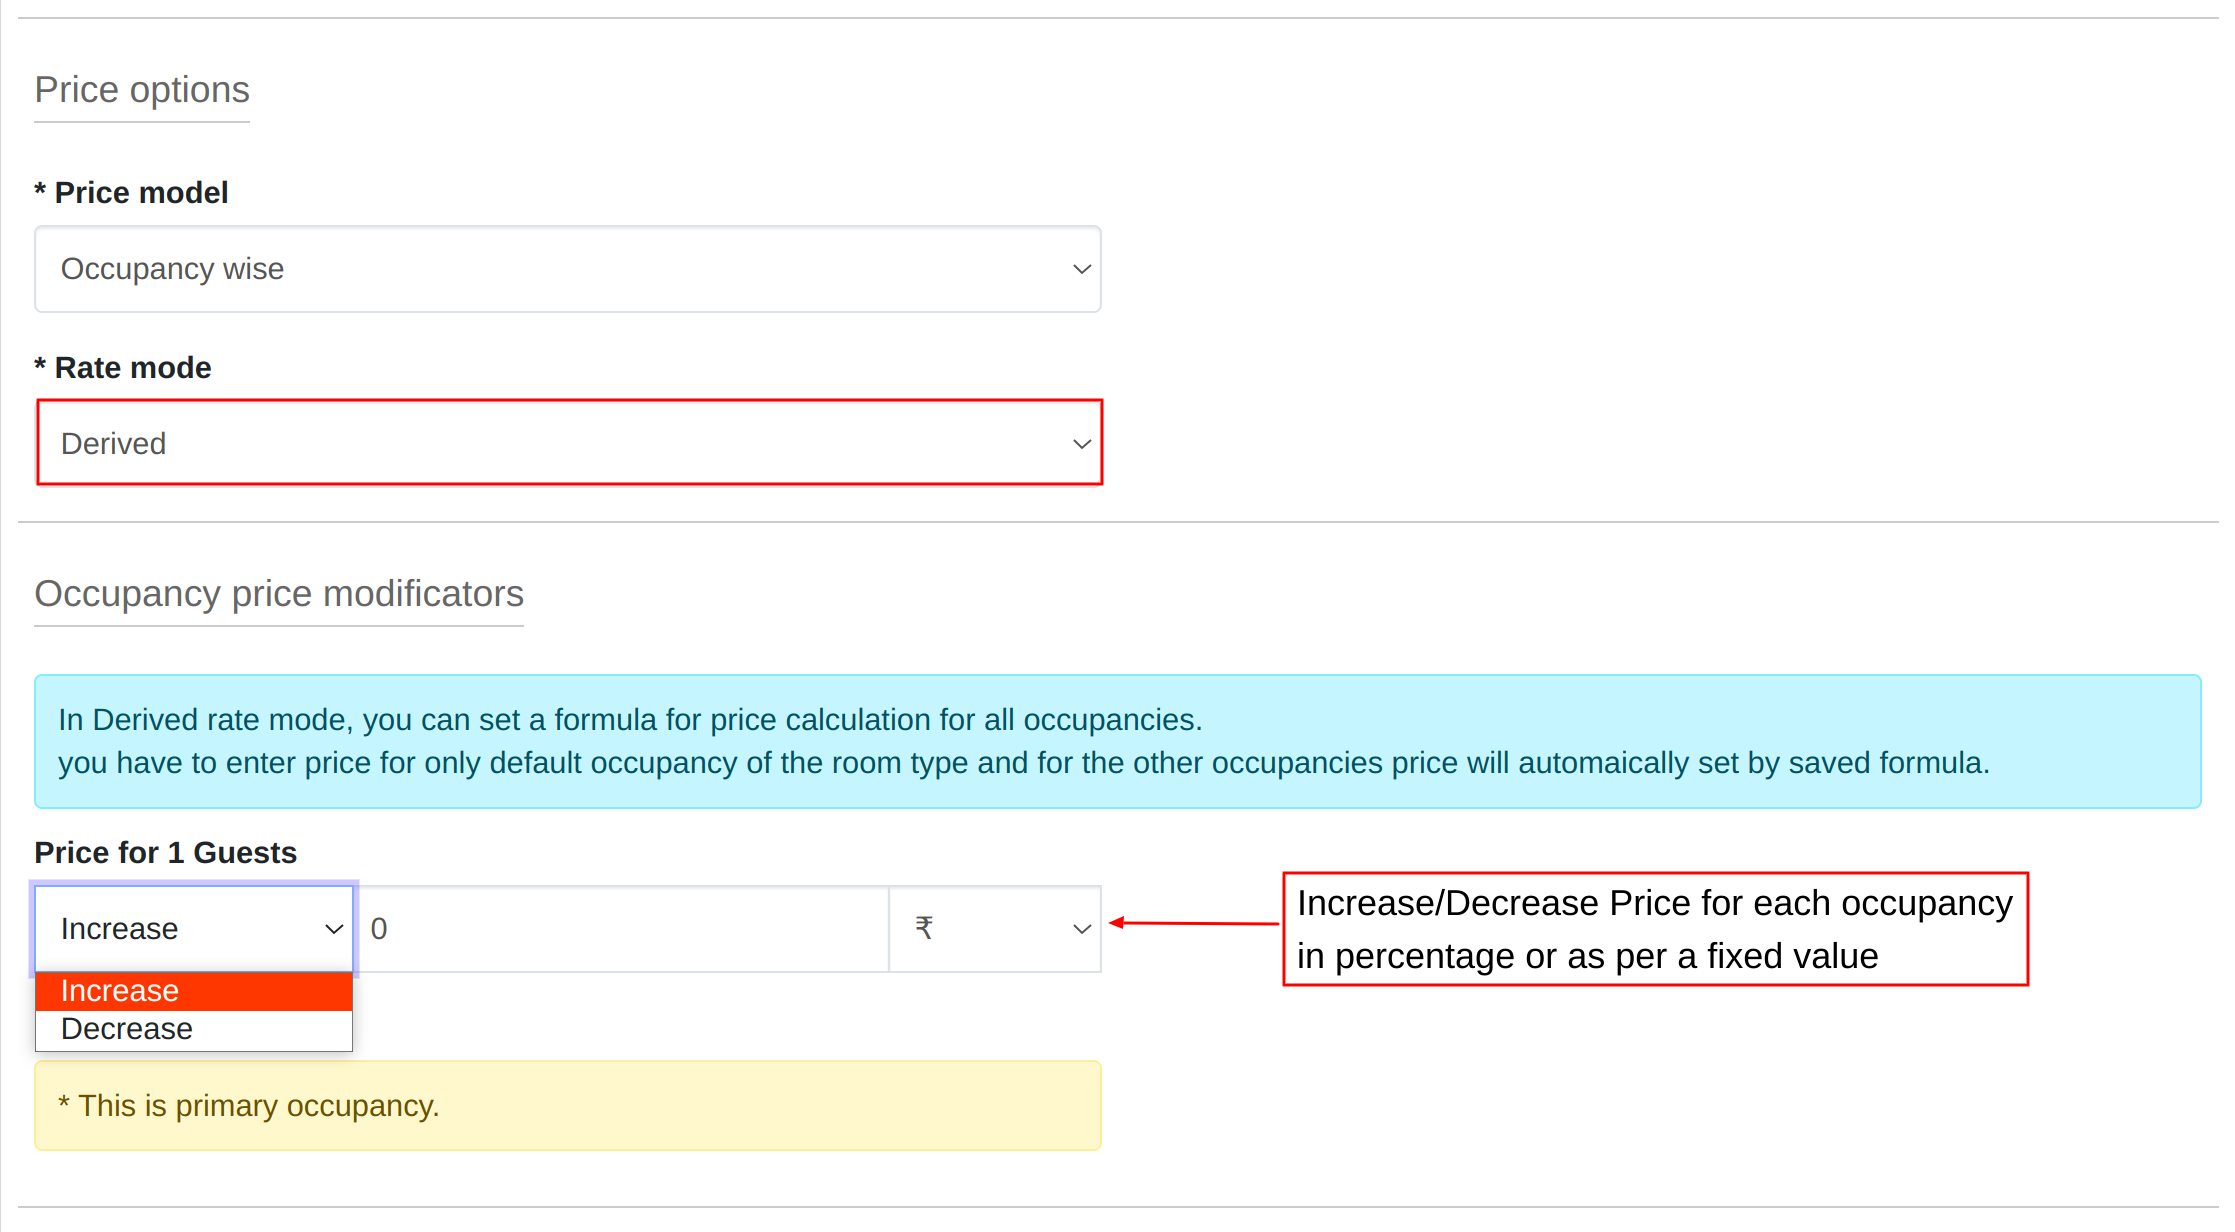
2. Derived Price Mode: In Derived rate mode, you can set a formula for price calculation for all occupancies.
You have to enter the price for only the default occupancy of the room type and for the other occupancies price will automatically be set by the saved formula.
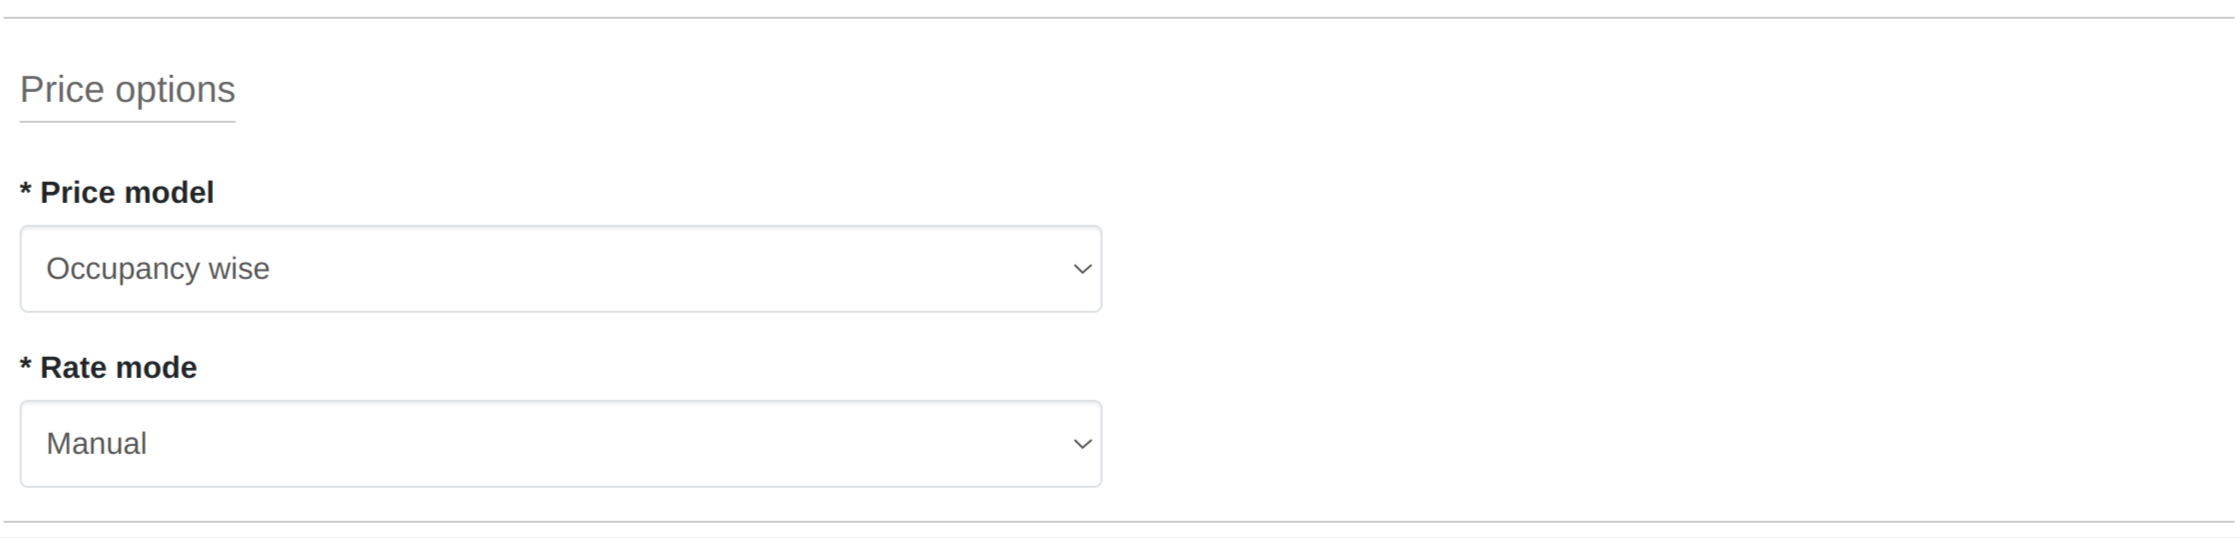
3. Manual Rate Mode: In Manual Rate Mode, you have to manually enter prices for all occupancies while sending rates.
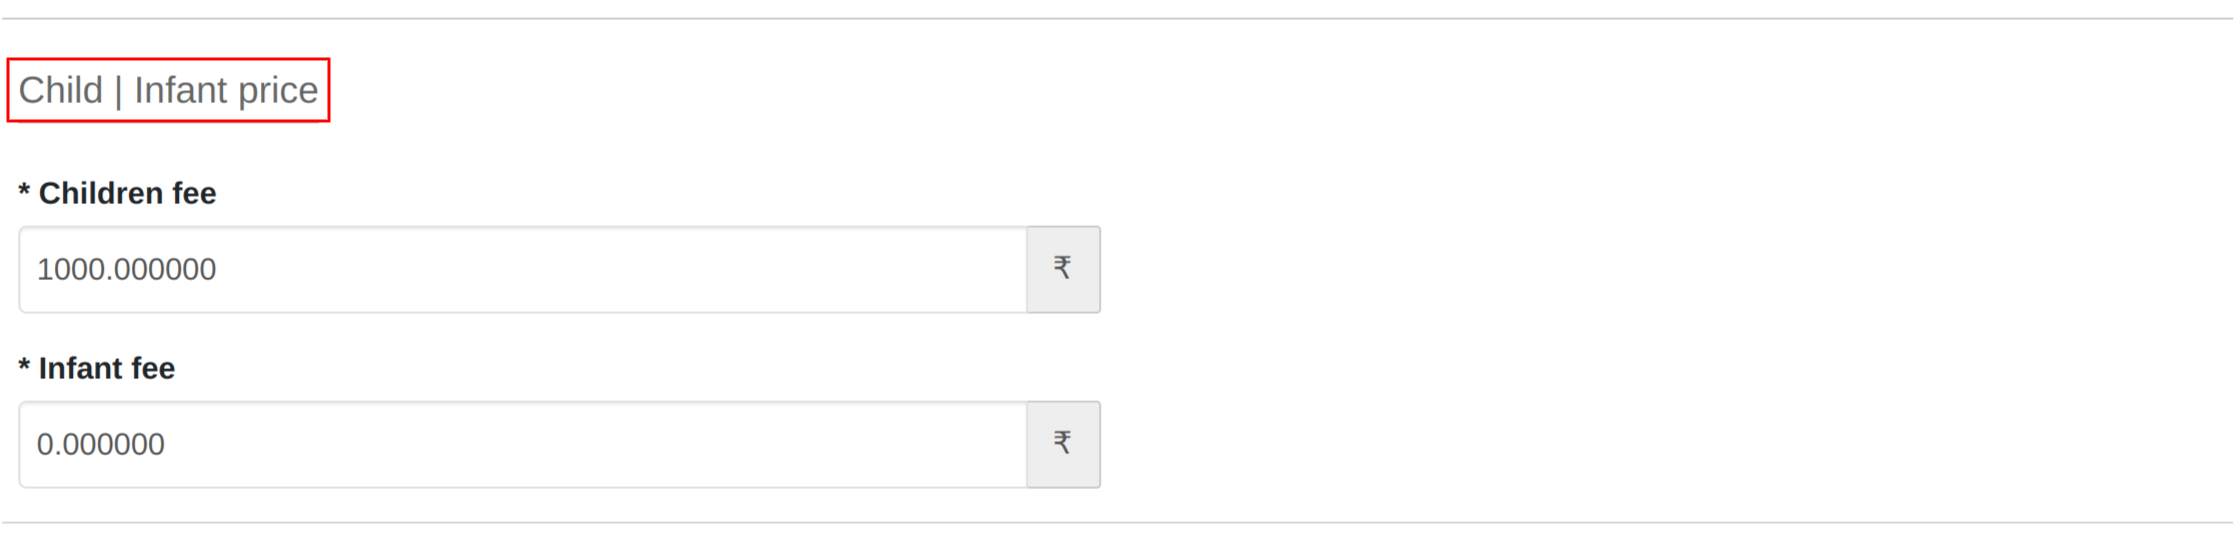
Child/ Infant Price
In this section, you have to enter the price for the child guest of the room type.
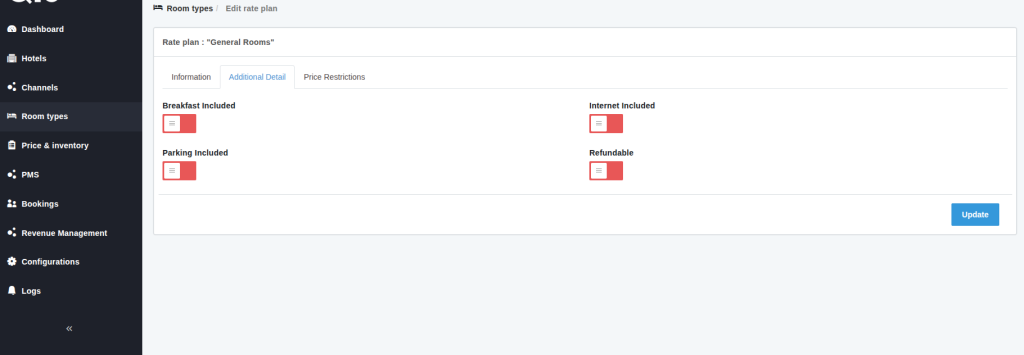
Additional Detail Tab
You can set the following additional details from here:
- Breakfast included: Click on the switch button to enable/disable the breakfast option.
- Parking Included: Click on the switch button to enable/disable the parking option.
- Internet Included: Click on the Internet button to enable/disable the Internet option.
- Refundable: To enable the refund option click on the refundable switch. The refund option will appear when the refundable field is enabled.
- Refundable Until Days: Number of days in advance of check-in that a full refund can be requested.
- Refundable Until Time: The latest time of day, in the local time of the hotel, that a full refund request will be honored.
Once you set up all the additional facilities, click on ” Update”.
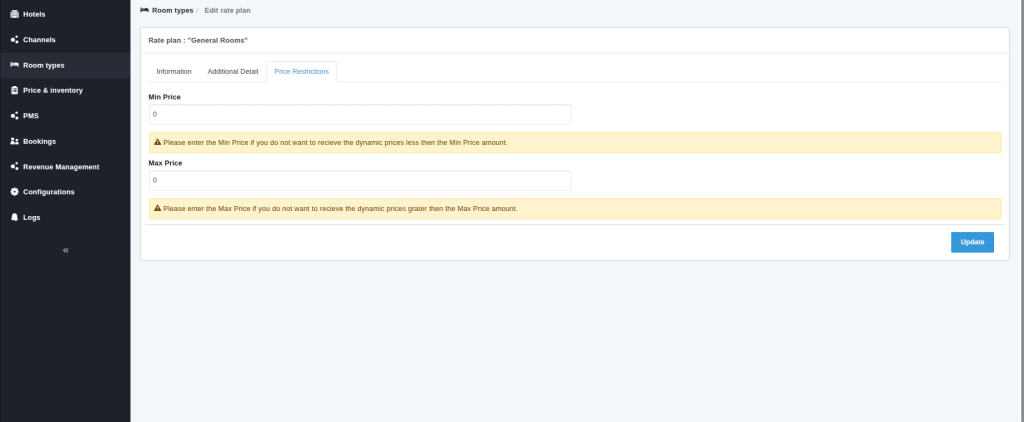
Price Restriction
Min Price: Please enter the Min Price if you do not want to receive the dynamic prices less than the Min Price amount.
Max Price: Please enter the Max Price if you do not want to receive the dynamic prices greater than the Max Price amount.
Process to Set Channels With QloApps Channel Manager?
After creating the property and its room type, you can create a channel for the property at QloApps Channel Manager.
To add and sync a new channel in QloApps Channel Manager, go to the Channels Tab and click on ” Add Channel”.
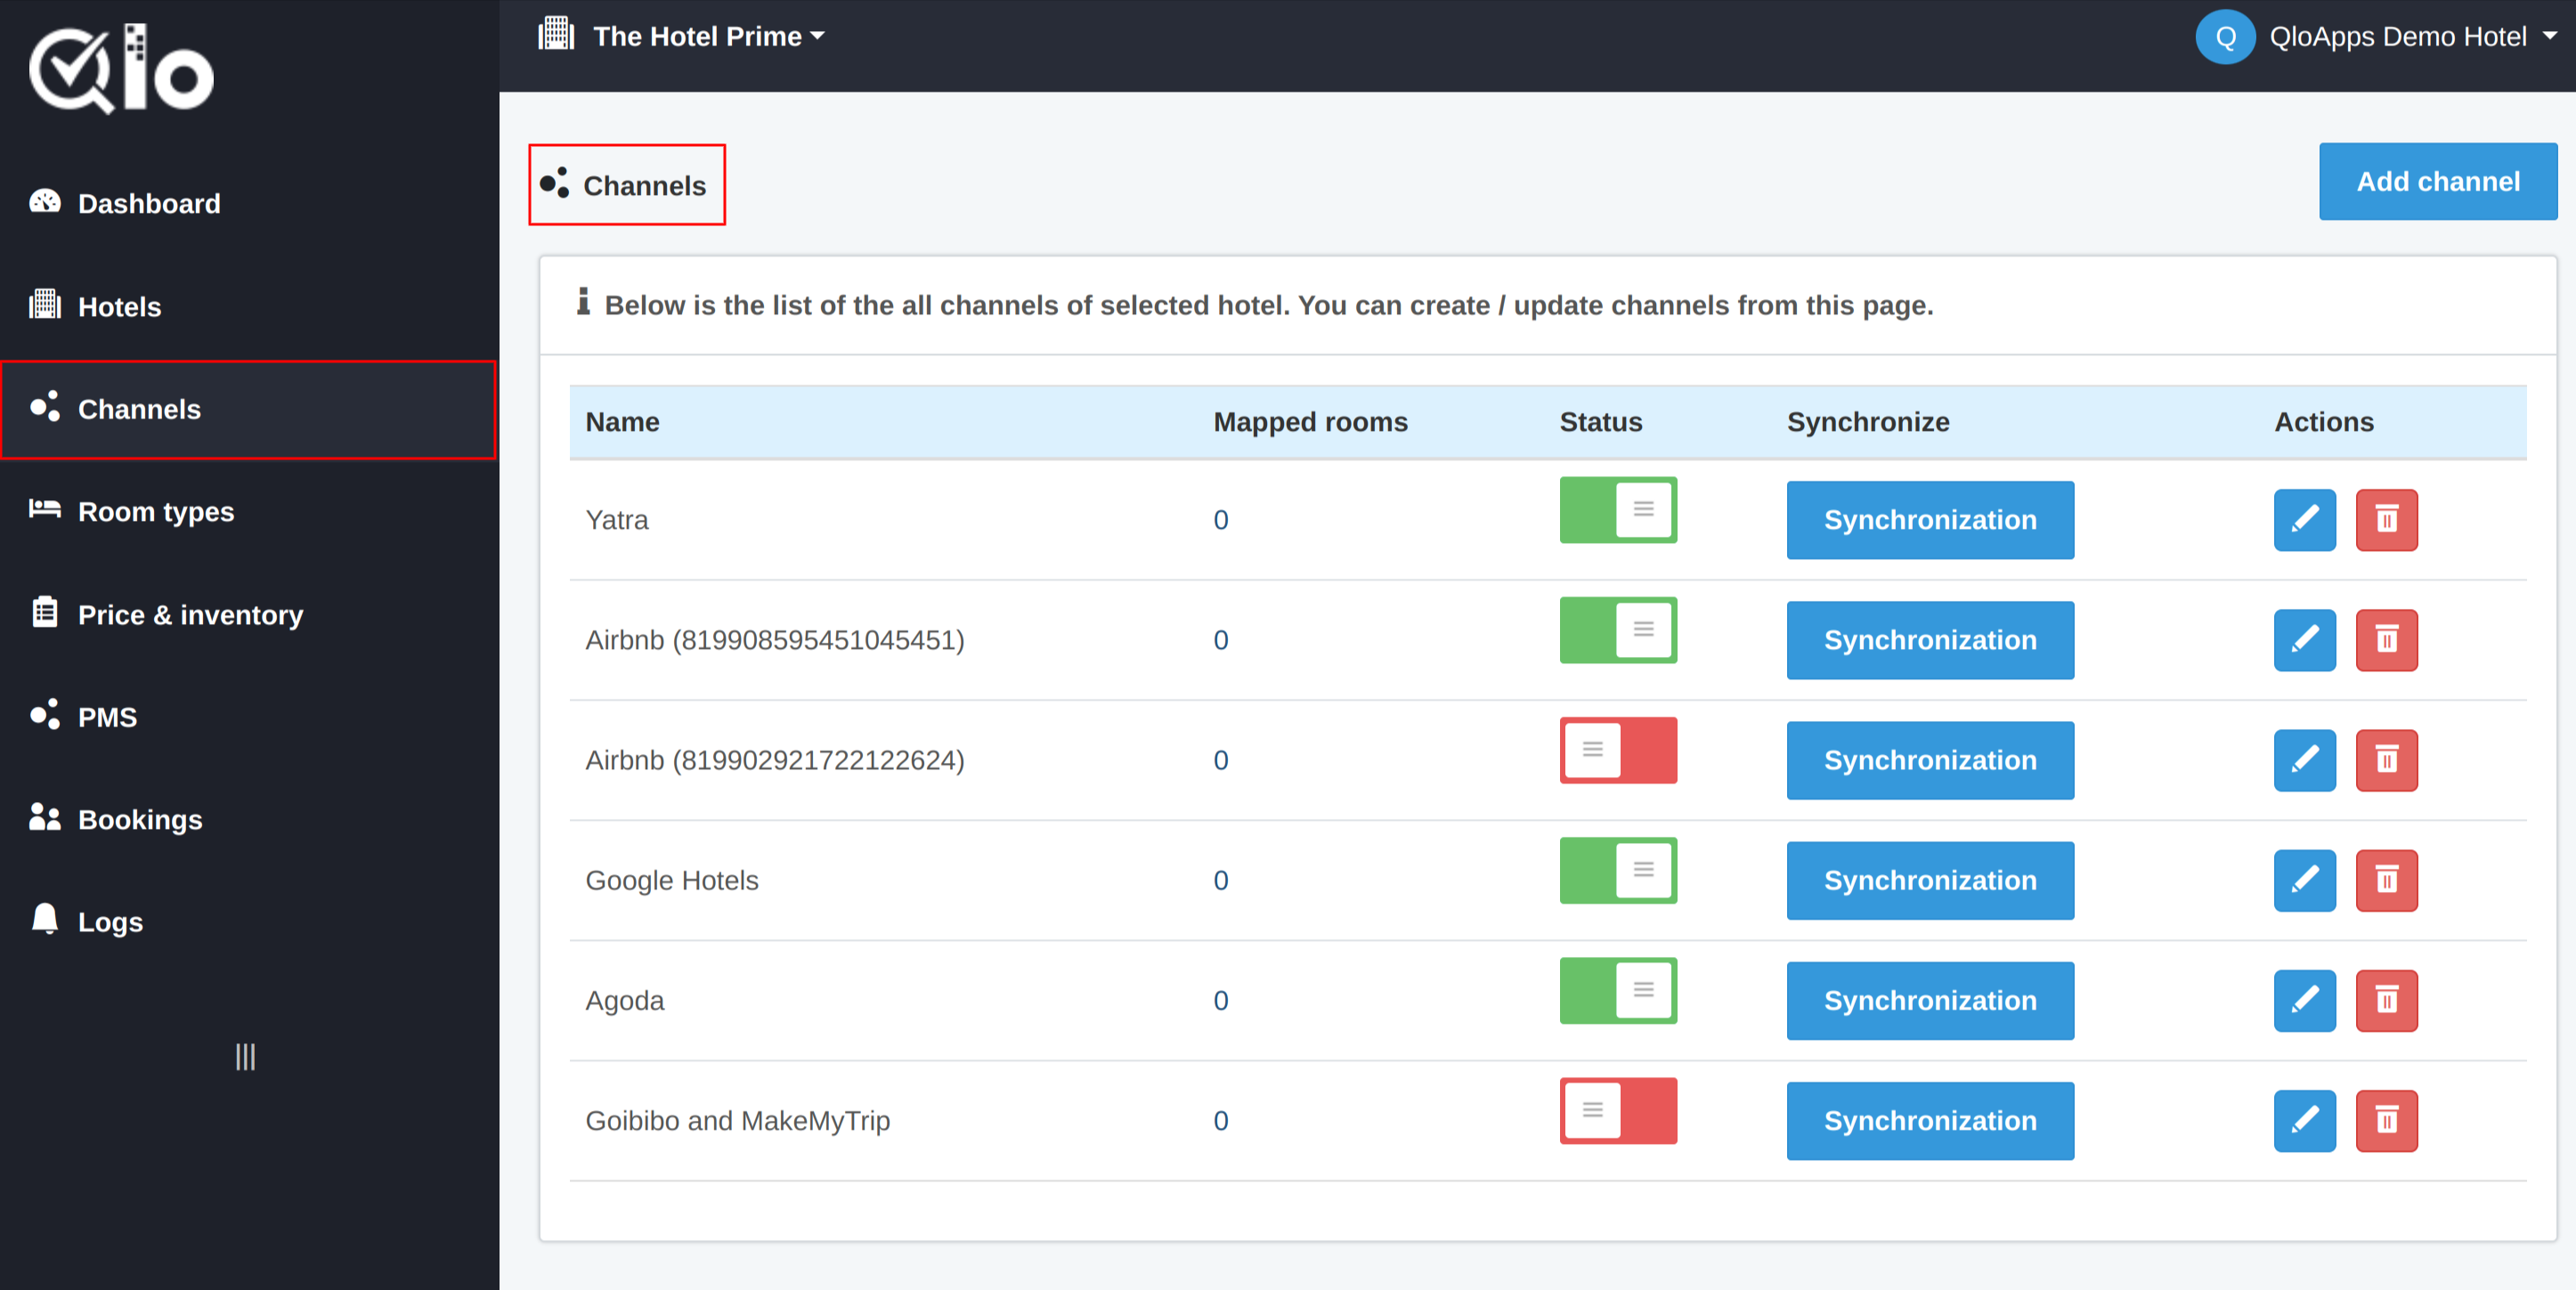
Note: Before adding channels at QloApps Channel Manager for your property, you have to complete the setup process of the channel at the OTA (channel) account.
Follow the below guides for the channels set up and synchronization at the channel’s account:
- Set up Booking.com channel for QloApps Channel Manager
- Set up Expedia Channel for QloApps Channel Manager
- Set up for Goibibo & MakeMyTrip for QloApps Channel Manager
- Set up for Agoda for QloApps Channel Manager
- Set up for Despegar for QloApps Channel Manager
- Set up for Yatra for QloApps Channel Manager
- Set up for Bakuun for QloApps Channel Manager
- Set up for Airbnb for QloApps Channel Manager
- Set up for HostelWorld for QloApps Channel Manager
- Set up for HyperGuest for QloApps Channel Manager
- Set up for PriceLab for QloApps Channel Manager
- Set up for Trip.com and Ctrip for QloApps Channel Manager
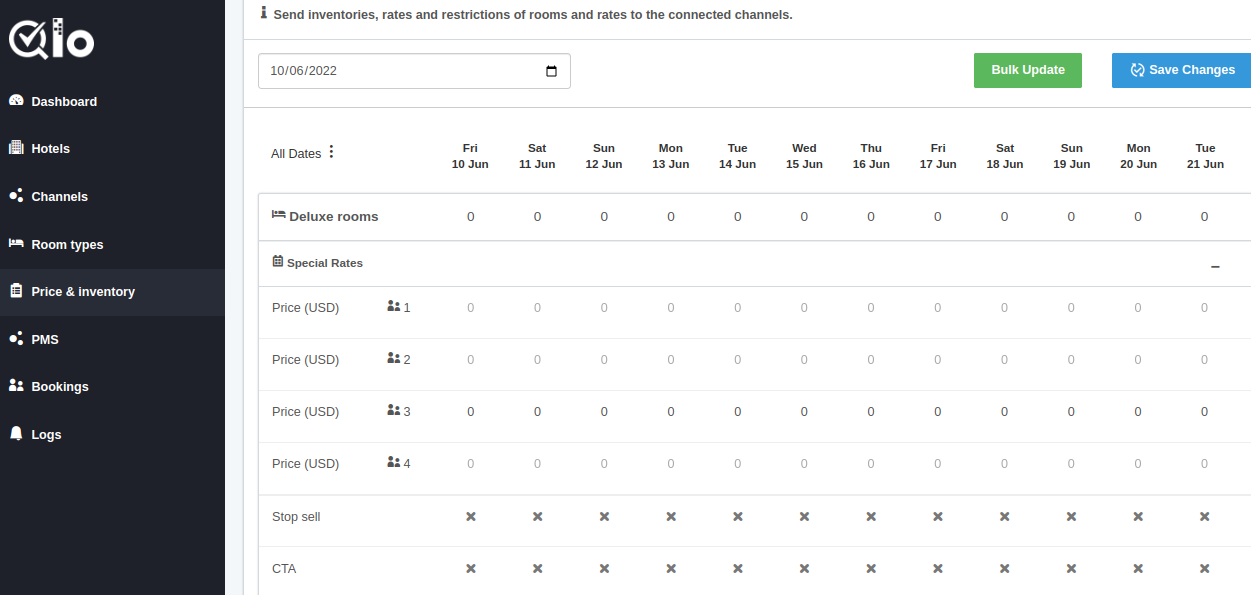
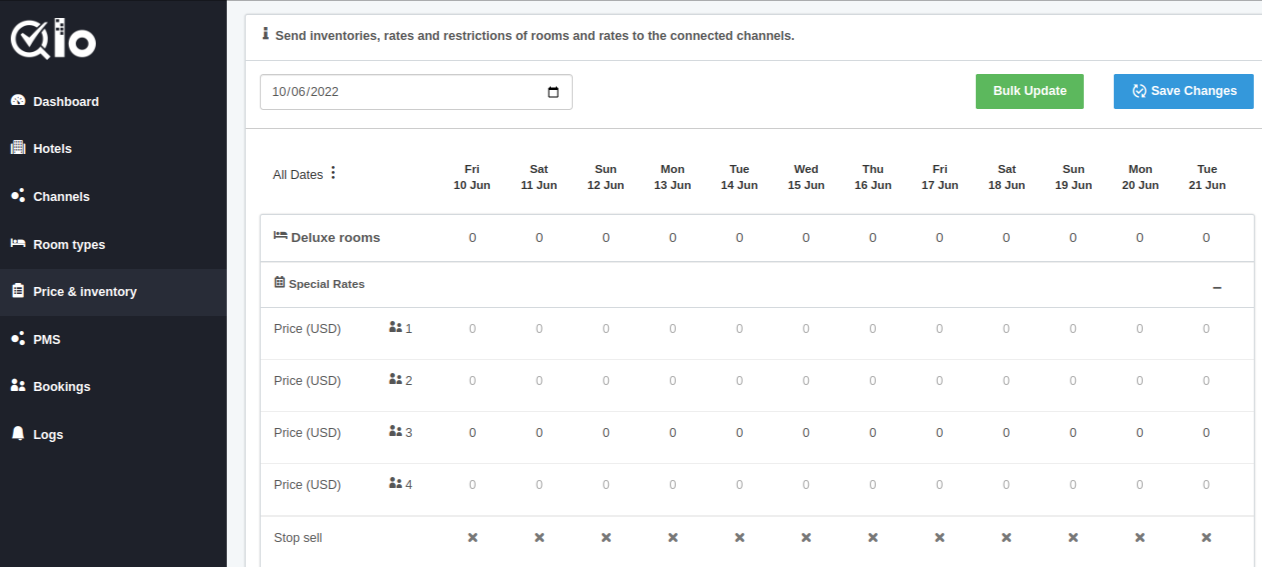
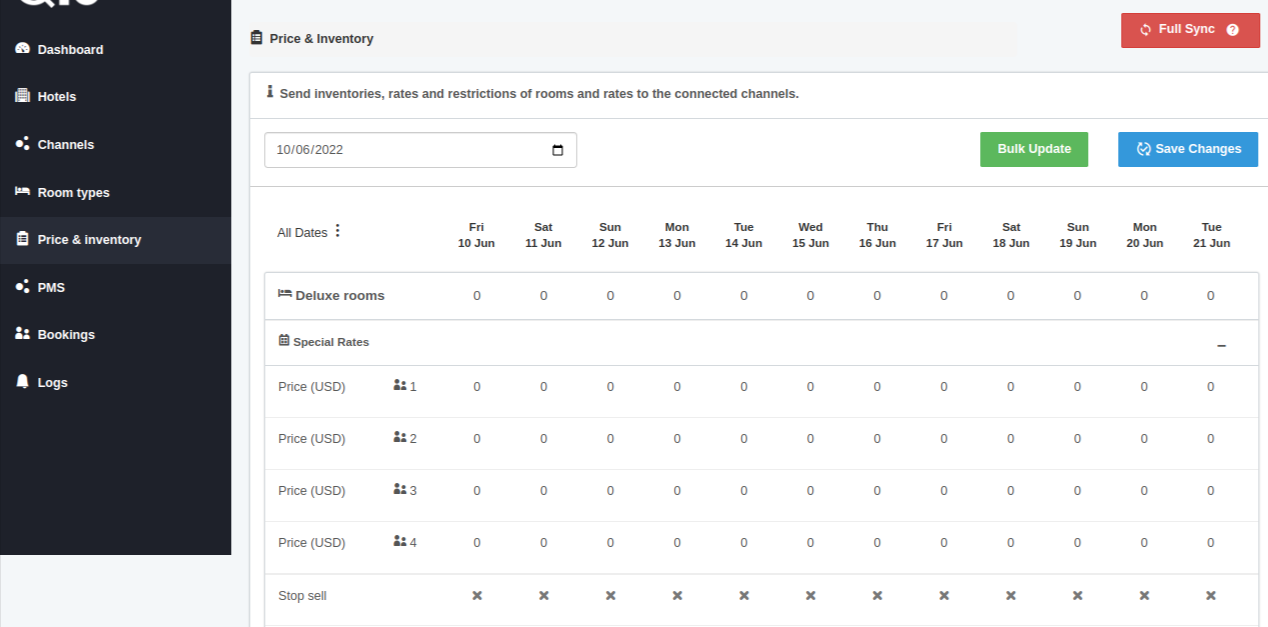
Price And Inventory Management
Using the Price and Inventory Tab, the user can add and update the inventories and rates to the connected channels.
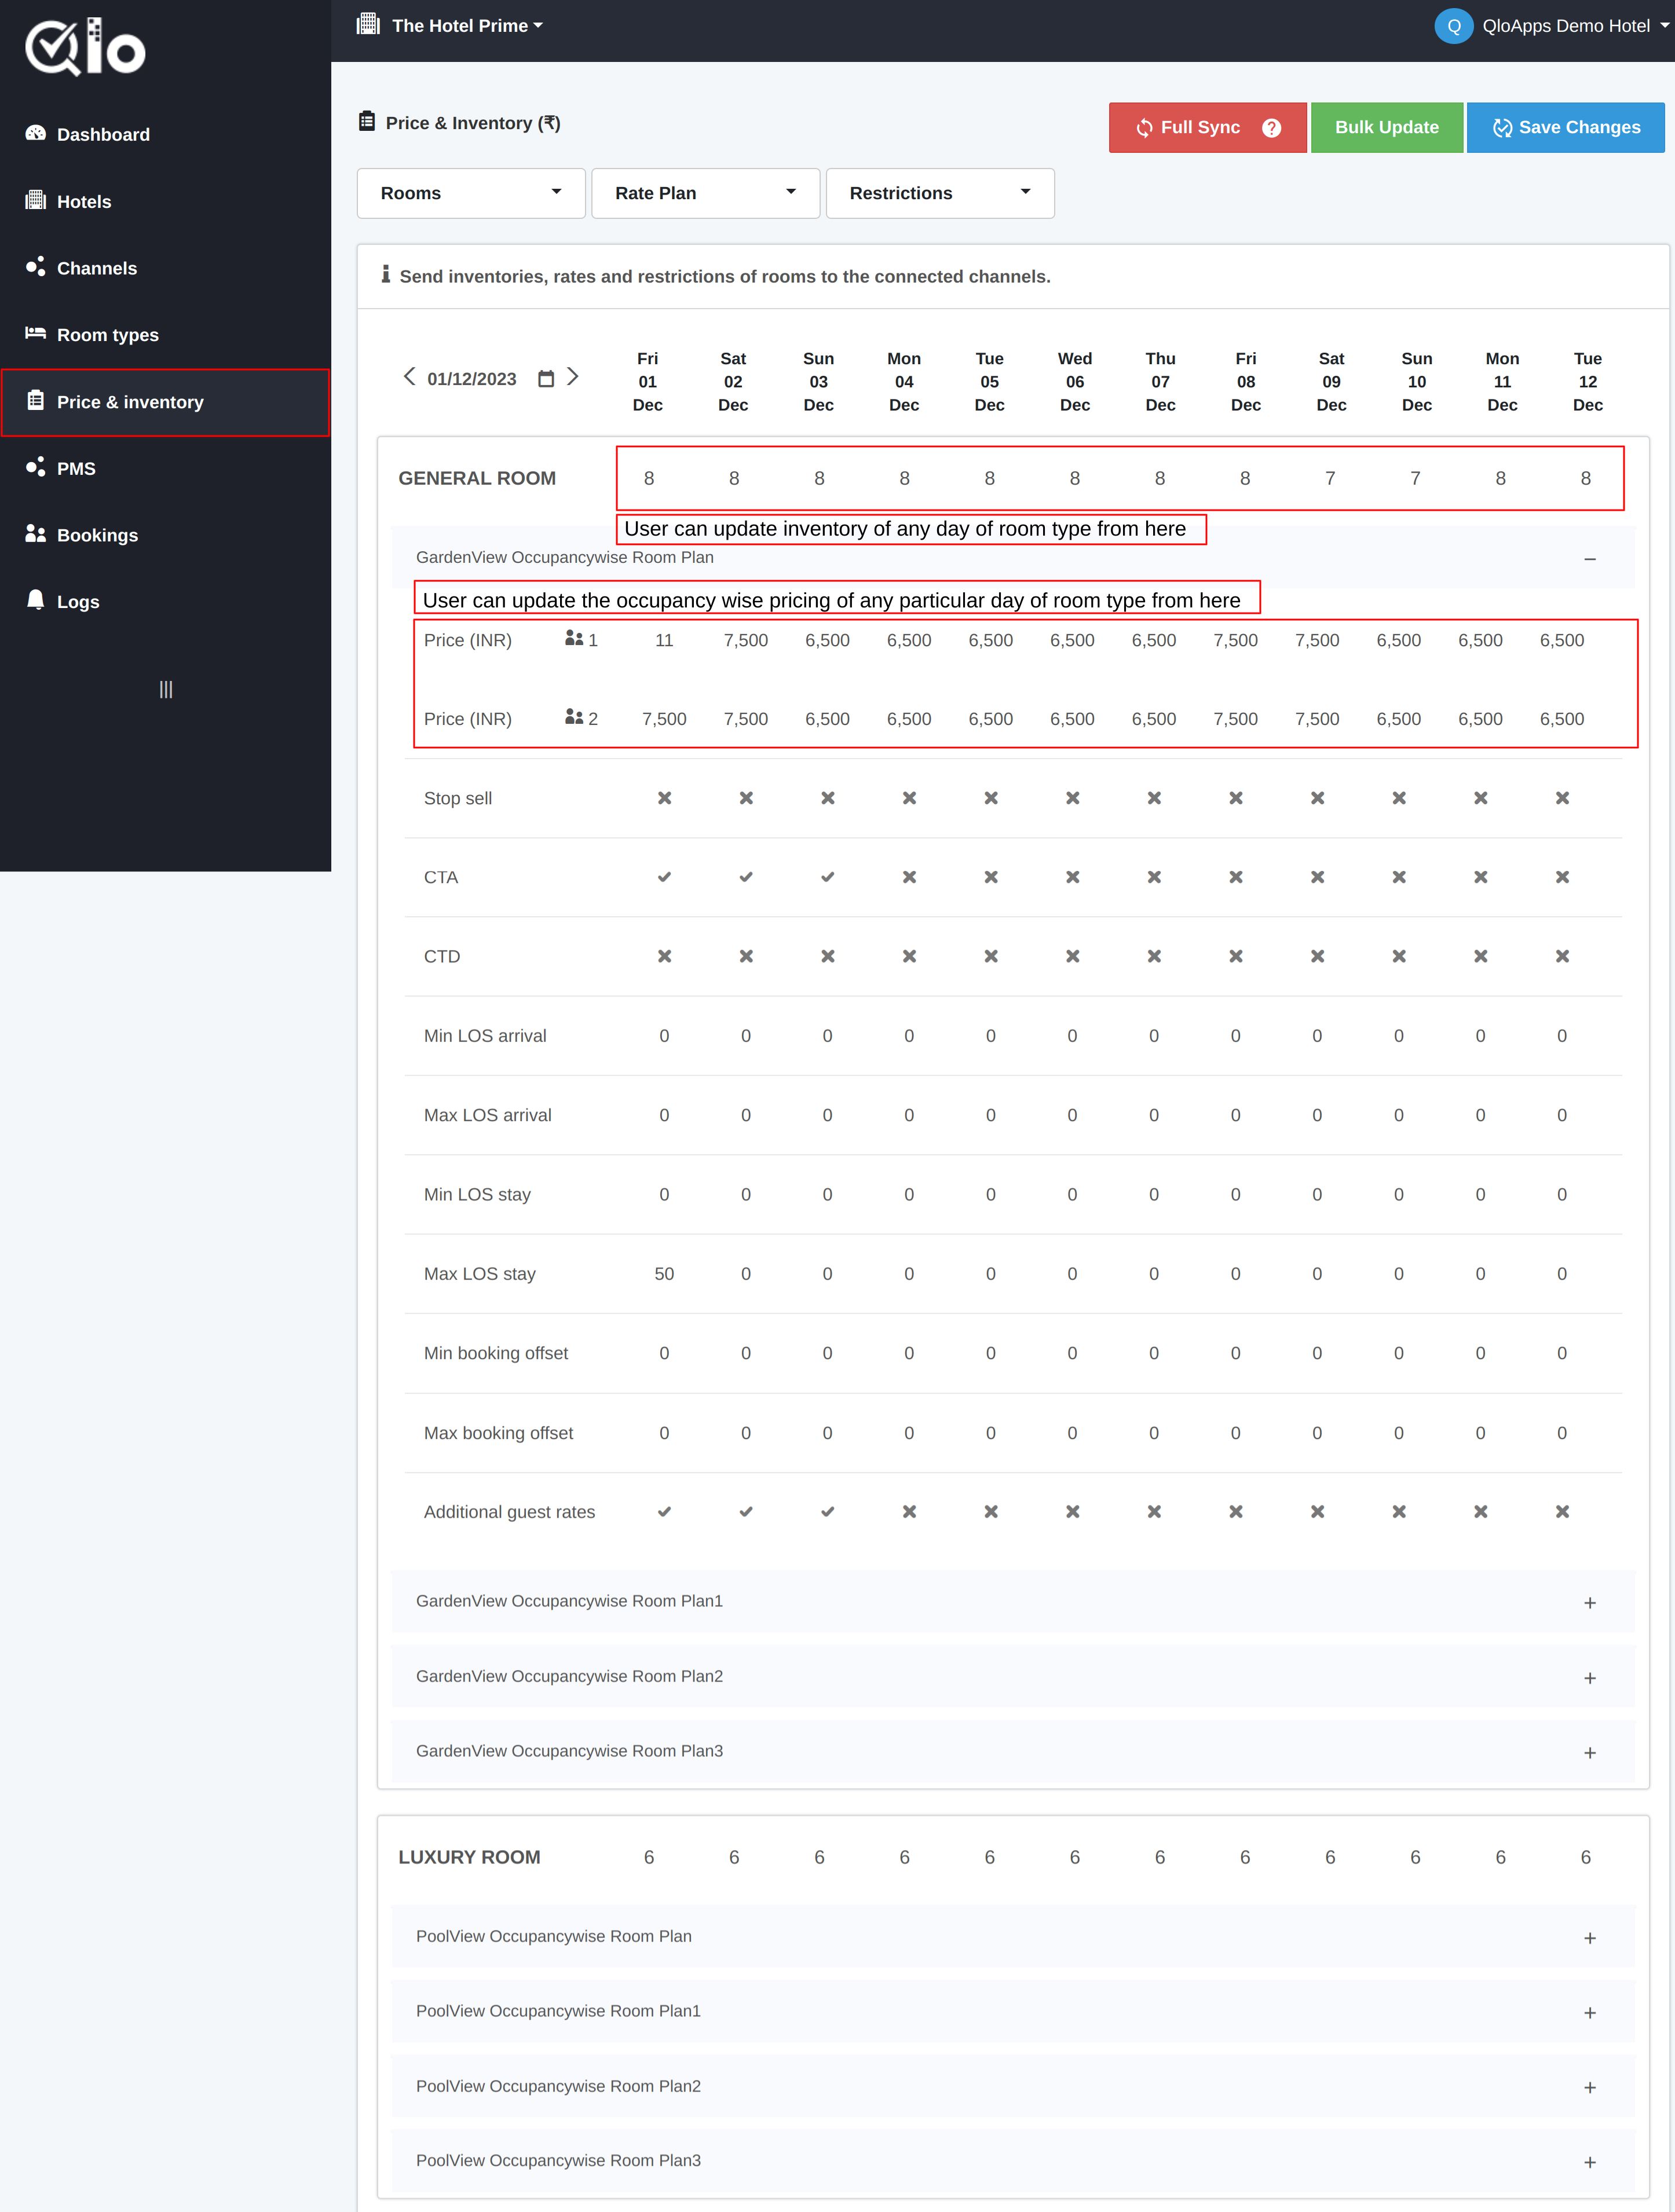
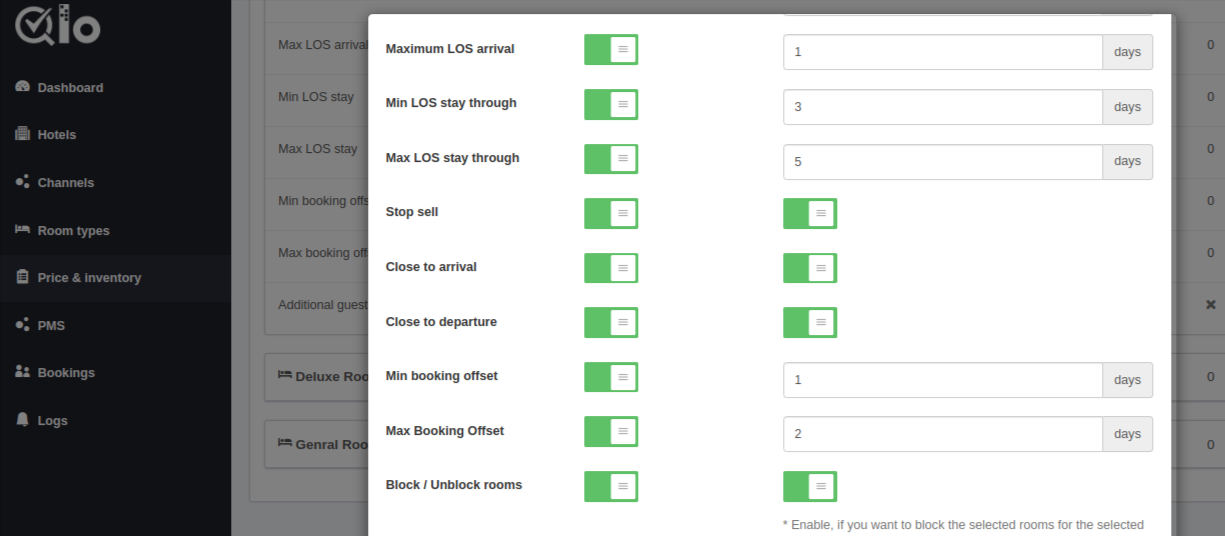
They can also set the following restrictions on any room plan:
- Stop Sell: Applying this restriction will allow you to stop the sale of the rate plan on any channel.
- CTA (Close To Arrival): Enabling this restriction for a particular day will block your guest from arriving at your property on that particular day.
- CTD (Close to Departure): This restriction will restrict your guests from departing from your property on a particular day on which this restriction is applicable.
- Min LOS Arrival: Set a minimum length of stay for which your guest will have to book your room based on the date of arrival.
- Max LOS Arrival: Set a maximum length of stay for which your guest will have to book your room based on the date of arrival.
- Min LOS Stay: Set a minimum length of stay for which your guest can book your room.
- Max LOS Stay: Set a maximum length of stay for which your guest can book your room.
- Min Booking Offset: Set a minimum duration in which the guest can book the room from the check-in date.
- Max Booking Offset: Set a minimum duration in which the guest can book the room from the check-in date.
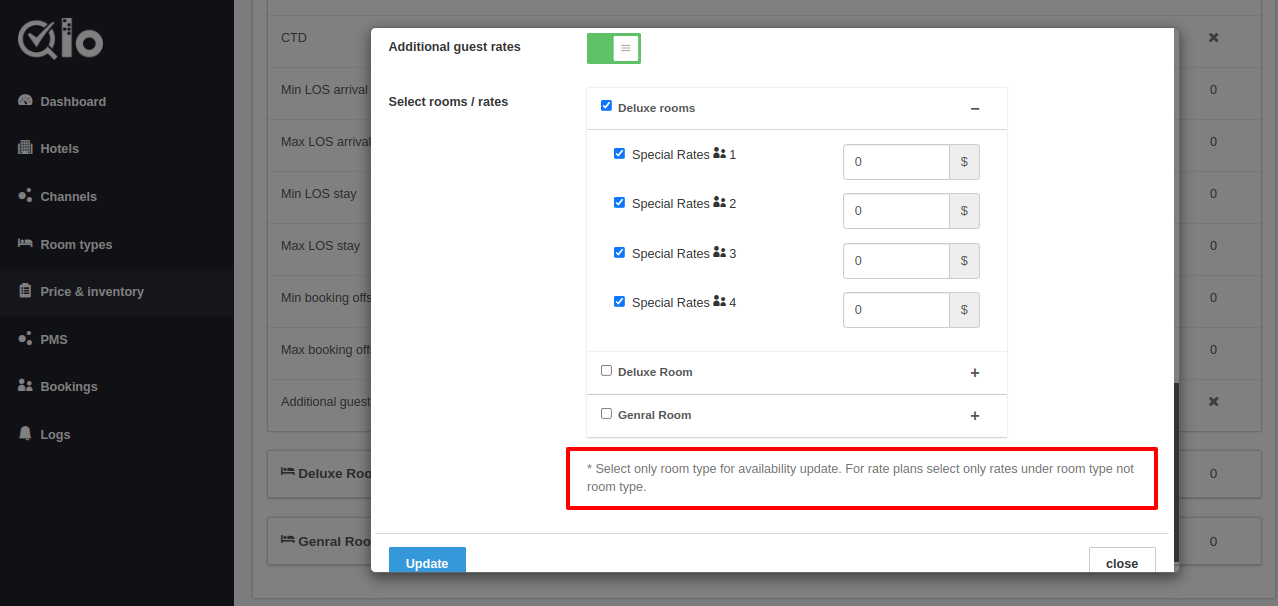
- Additional Guest Rate: Set the extra price for extra children and adults.
Note: In booking.com and Expedia this restriction is not applicable.
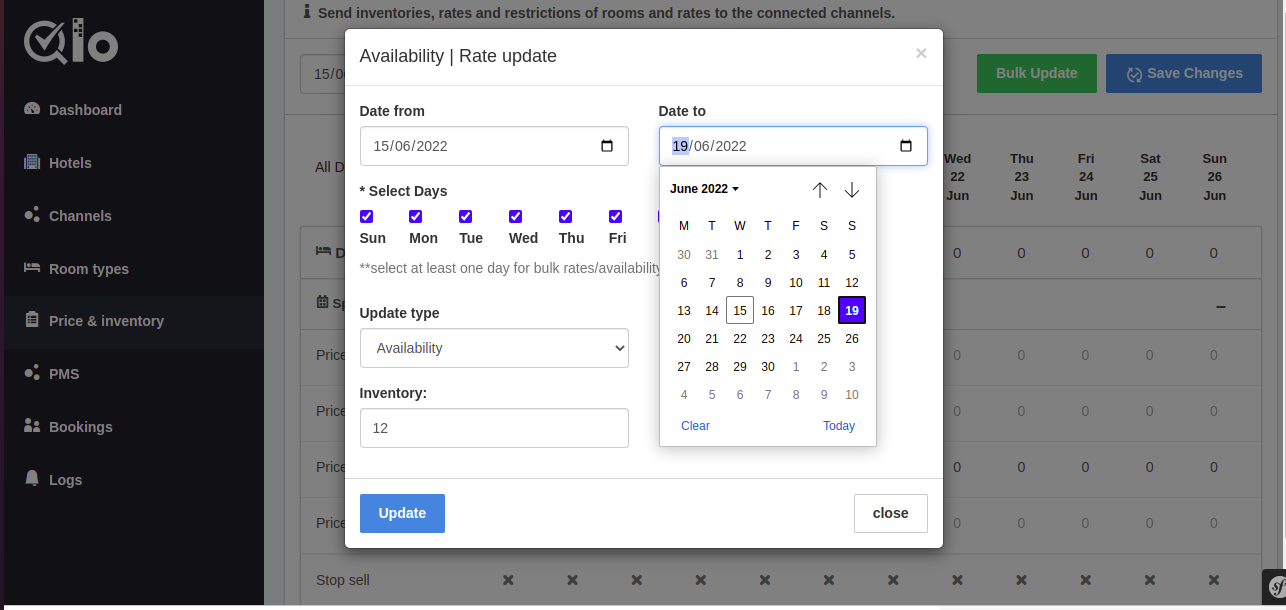
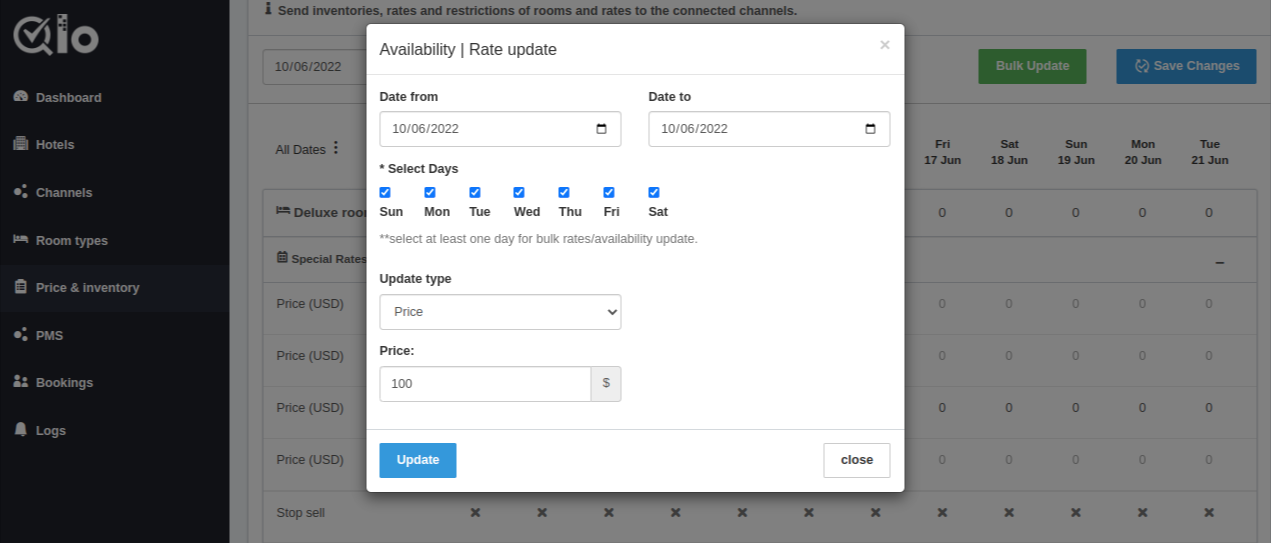
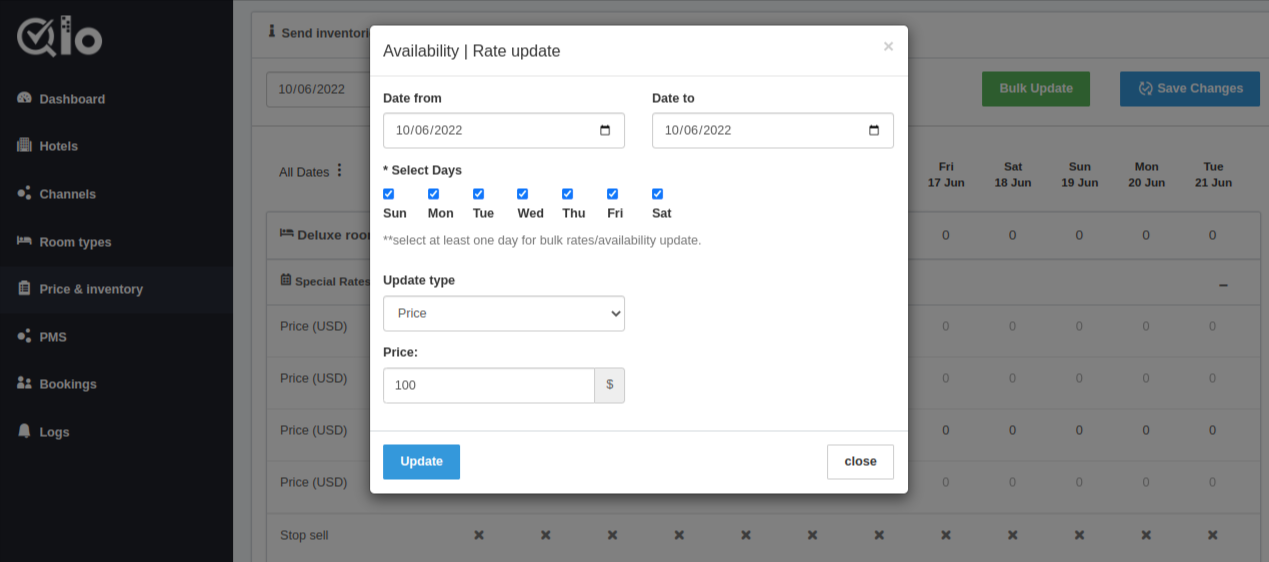
Single Click Update For Rate Inventory And Restriction
Here users can update the inventory for multiple dates. To update the rate inventory and restrictions:
- Select the Date From to Date To.
- Select the Update Type.
- Mention the number of inventory you want to update.
Combinations of Rate Plan
There are 4 combinations to make a rate plan and update price and inventory.
Update Room Price In Price And Inventory
In the room type edit rate plan select the price model as Room price.
Now on the Price and Inventory page, the user can enter the price of any room type that he wants for any particular date.
Price Model As Occupancy Base Price And Rate Mode Is Auto
Here in the occupancy price modifications panel enter the value that will be increased by or decreased on a percentage basis or price and update.
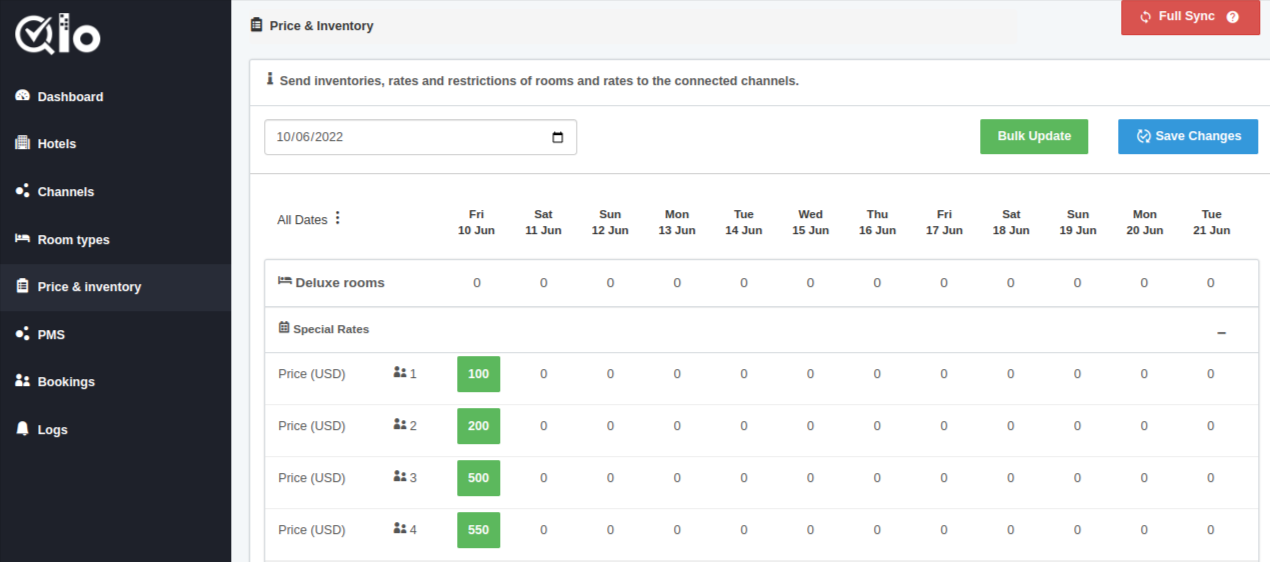
Now Go to price and inventory.
Here user will enter the value of the price for the default occupancy.
Now on this value, the price for 1 occupancy, 2 occupancy, and others will be calculated for chosen dates.
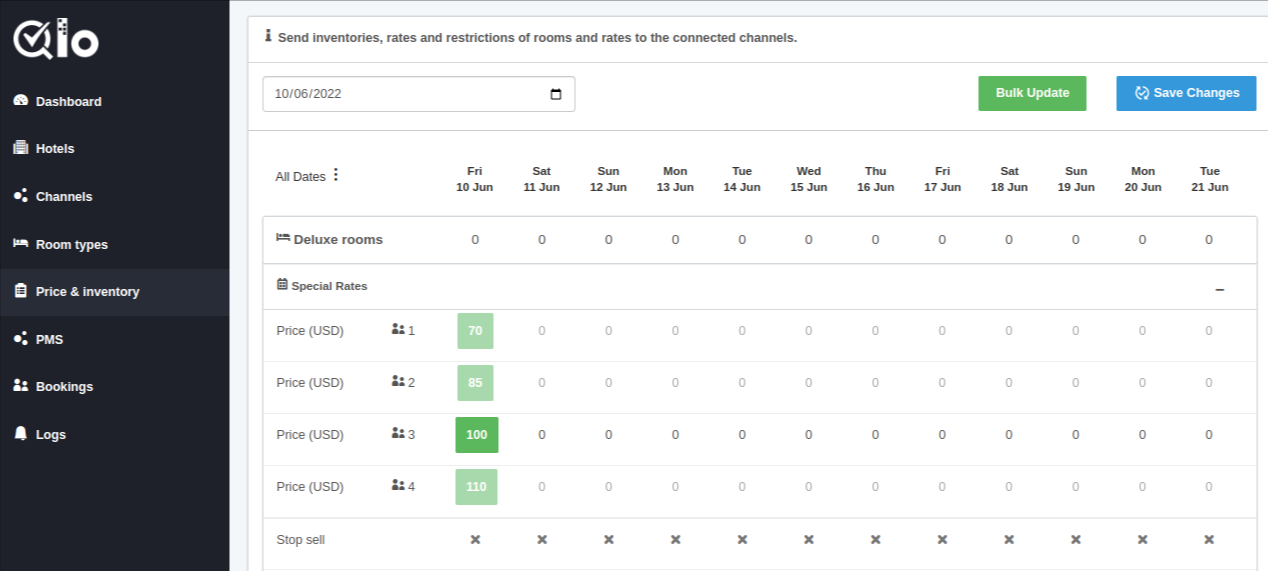
Here are the selected dates and the values that will become green.
This means that the data gets updated but it is not syncing with the channel managers.
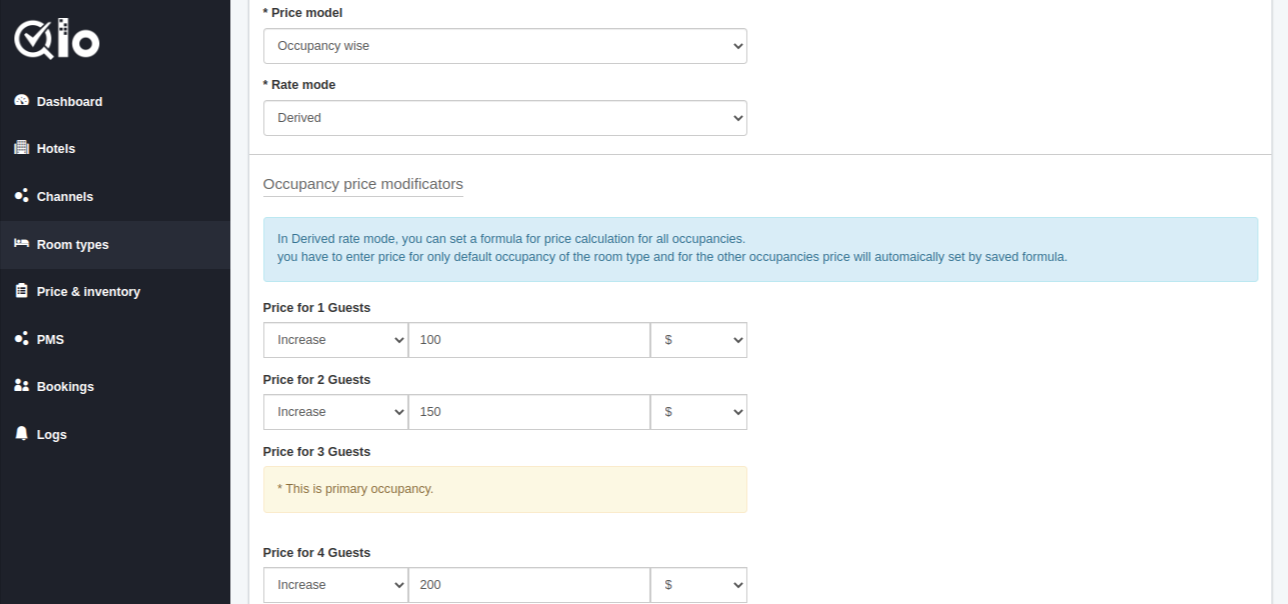
Price Model As Occupancy Base Price And Rate Mode Is Derived
In-room type and Rate plan go to the Occupancy price modifications panel.
Here the user will fill in the rate that will increase or decrease the price either percentage-wise or price-wise for each occupancy option as given below the image.
Price for 1 Guest
Price for 2 Guest
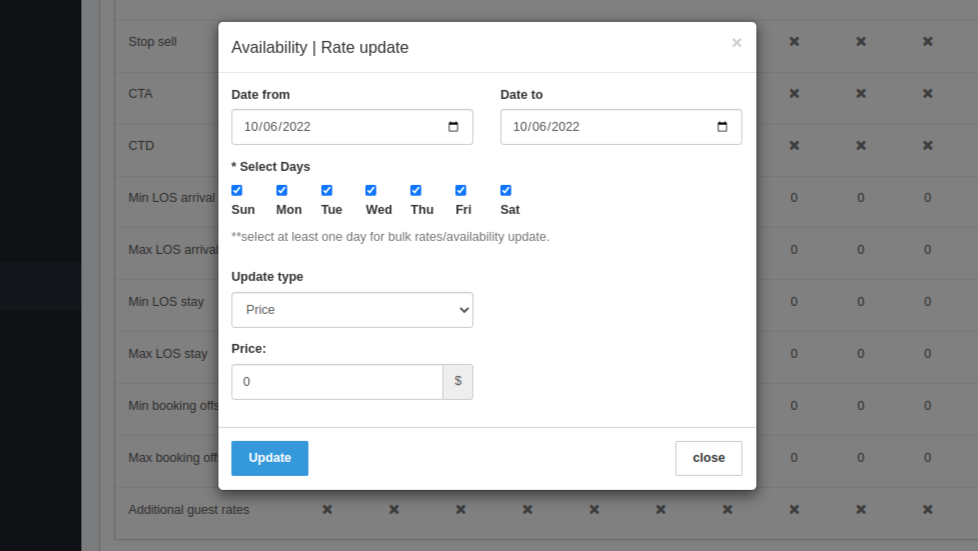
After that, go to Price and inventory. Here enter the select default occupancy under the selected date.
Choose the update type as the price and enter the price.
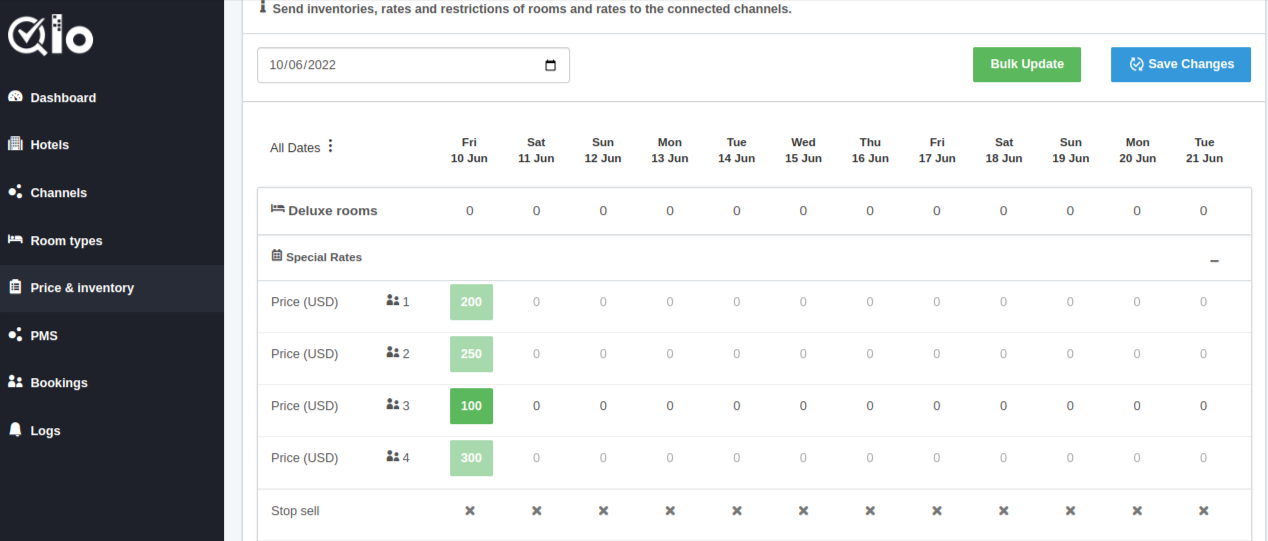
Now you can see that the price for 1 occupancy and the price for 2 occupancies will get updated automatically based on the price we have entered.
Price Model As Occupancy Base Price And Rate Mode Is Manual
In-room type and rate, plan to go to the Occupancy price modifications panel.
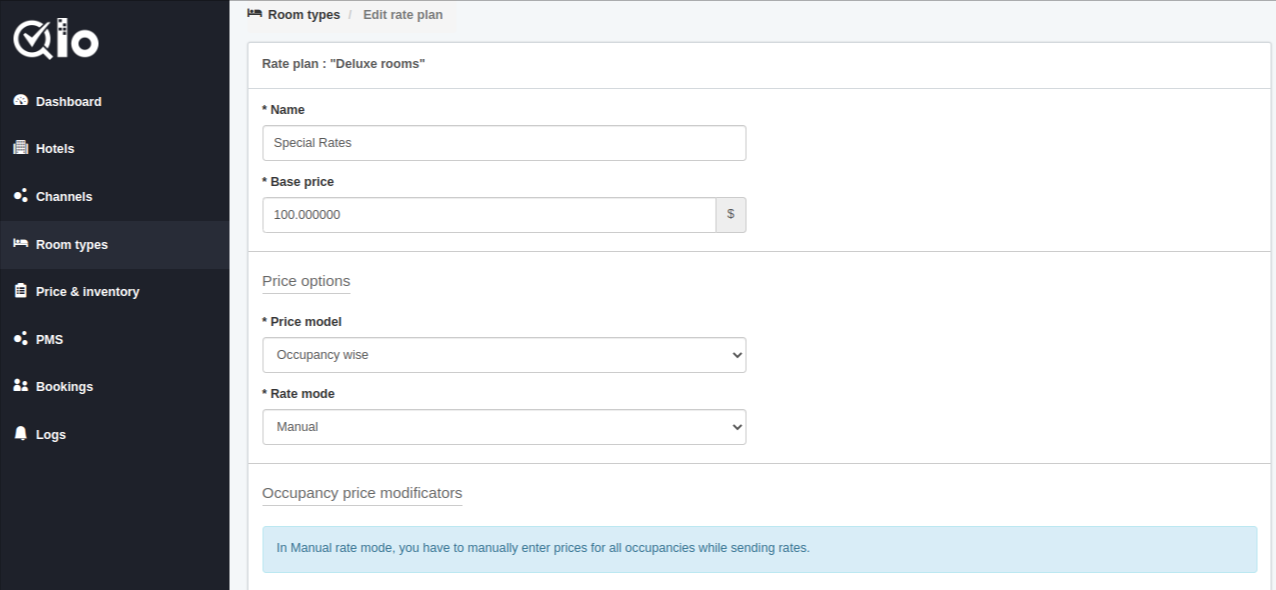
in the occupancy modification panel, you can see it is mentioned here that “In Manual rate mode, you have to manually enter prices for all occupancies while sending rates.”
Now Go to Price and inventory.
We can see that for each occupancy and each date, we have to enter the price manually.
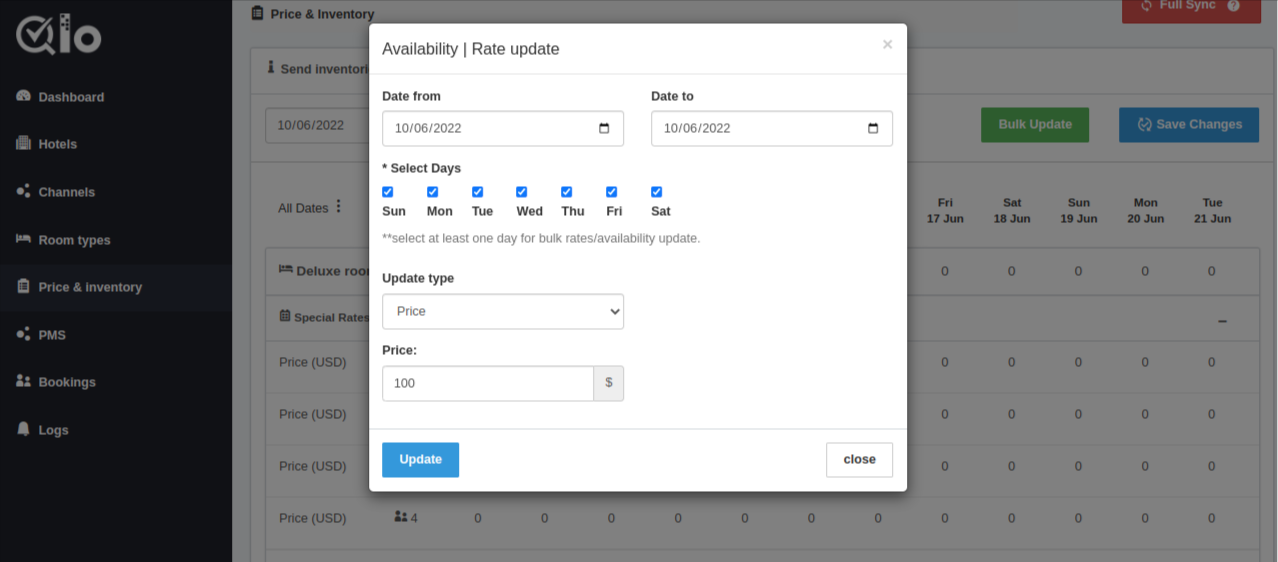
Bulk Update
In the bulk update, the user can select multiple date ranges. For multiple date ranges the other prices and updates will get updated.
Go to Bulk Update. Select the Date From and Date To. By this, you will add one date range.
Click on Add Date range to add another date range. Now enable and disable any parameter as per your choice.

The user can select multiple date ranges for different months. After that update the price and other parameters.
But that will get updates only for one room type. After this select pricing for that room type.
Note:
The user can send the same rate and inventory to the given channel. The channels are Booking.com, Expedia, Agoda, Ctrip, Airbnb, and Despegar.
Currently, if the rate and inventory get updated on any of the given channels, then it will also get updated on the other channels.
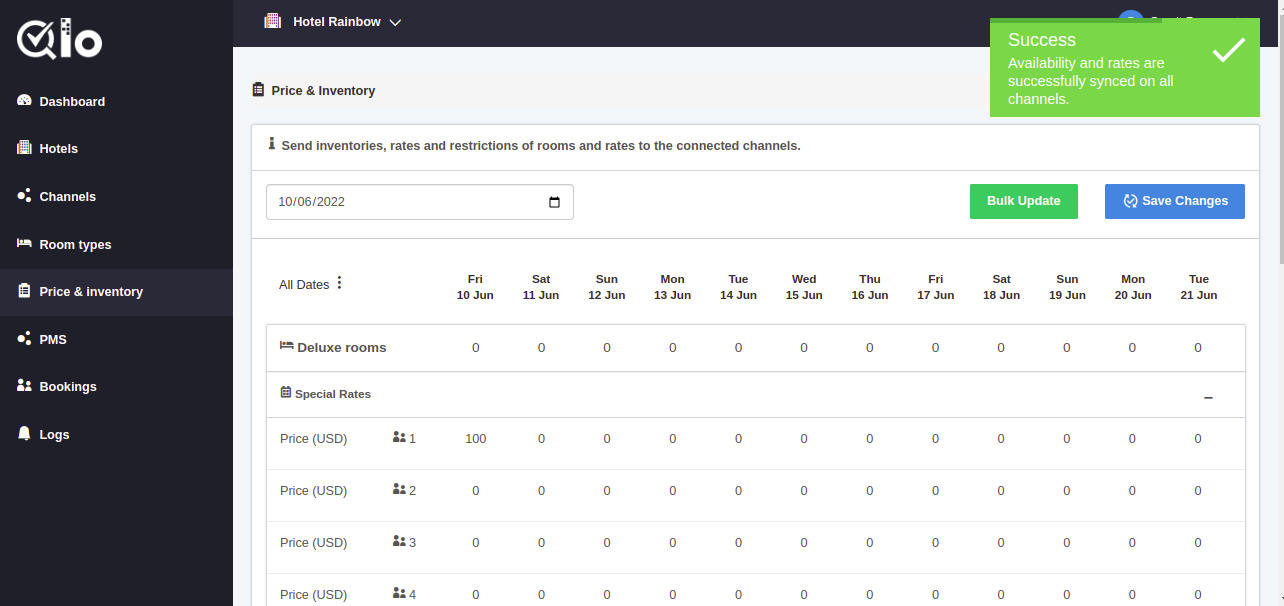
Full Sync
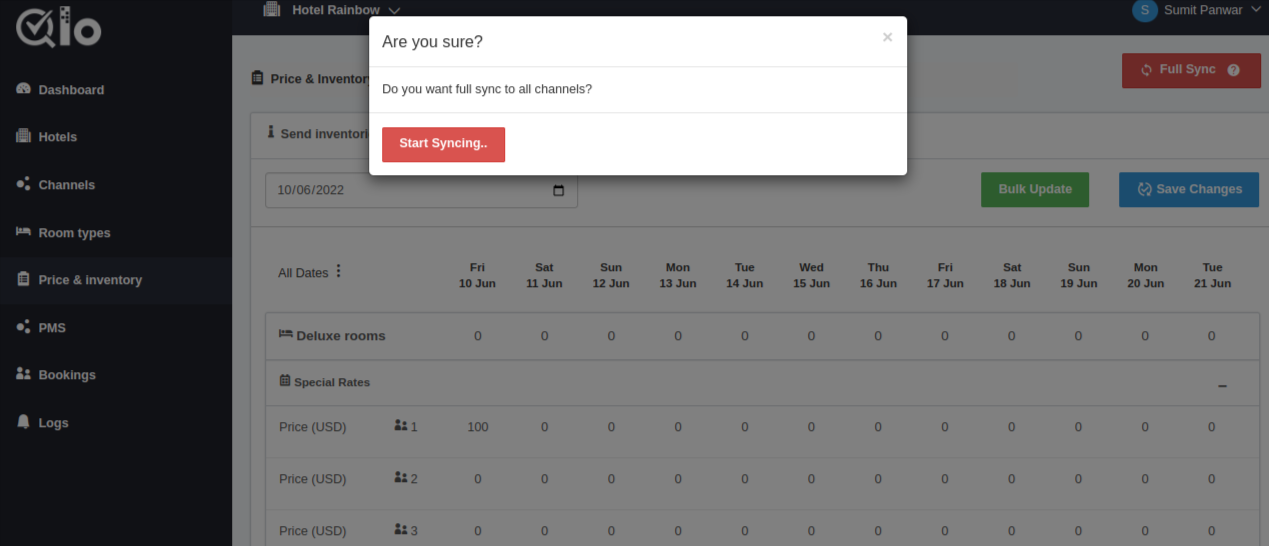
After that, completing all the above processes click on Full Sync to update the price and inventory on the channels.
PMS Connection in QloApps Channel Manager
PMS means property management system.
A hotel property management system (PMS) is a collection of tools that hotel owners and operators use to control various aspects of running a hotel on a daily basis.
This includes bookings, front desk operations, housekeeping, maintenance, billing and invoicing, analytics, and reporting.
Here, we have integrated QloApps PMS with the QloApps Channel Manager.
If you have a running website with QloApps, you can sync the bookings with the connected distribution channel easily.
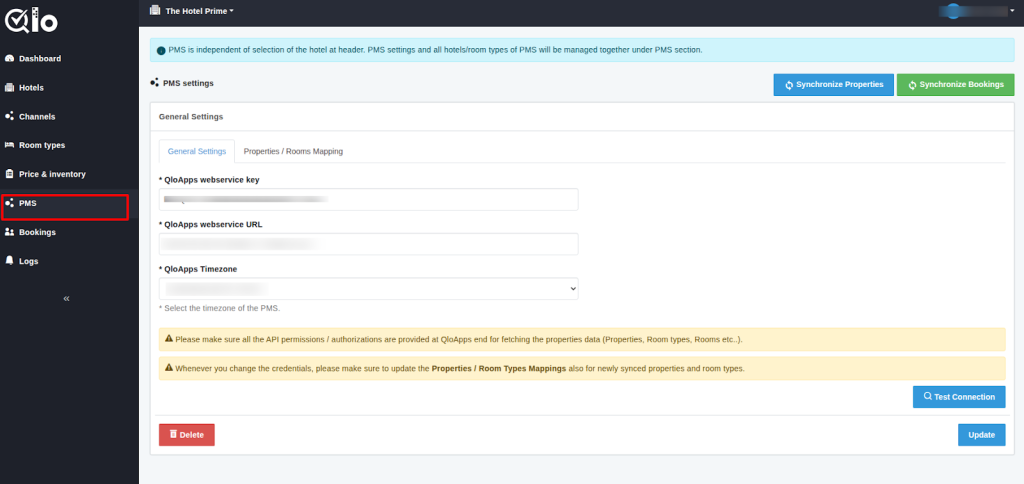
General Settings
Here you will have to fill out the QloApps credential:
How to get credentials from QloApps?
Here we have given the process of how to get the QloApps credentials
Credentials for API Key( webservice key)
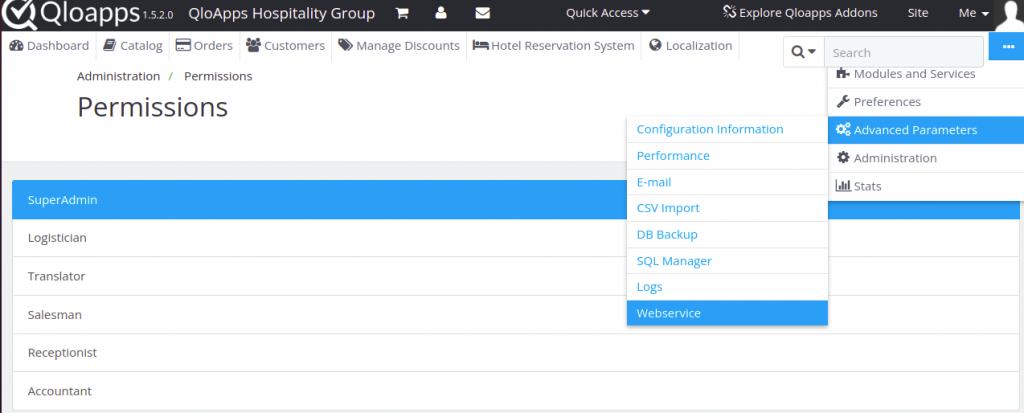
Go to Advance parameter>webservices
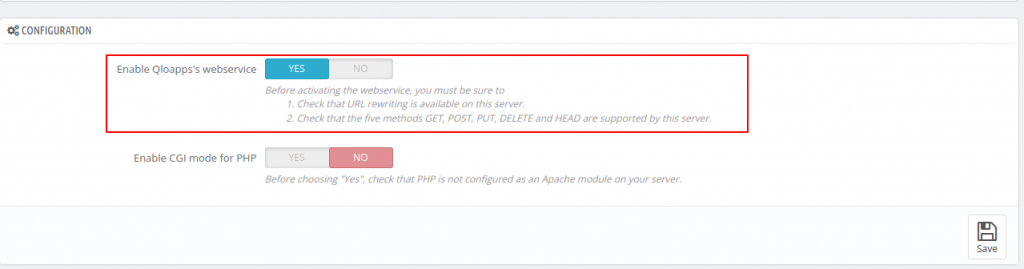
After this, in the Configuration panel Enable QloApps’s web service.
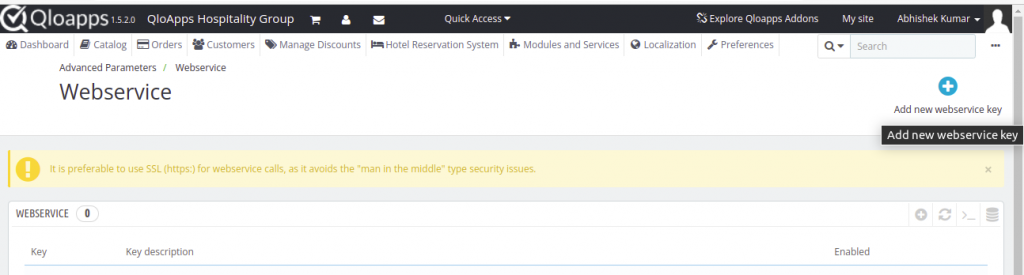
In the webservice Account panel click on Add new Webservice key. Click on Generate to get a new key.
For all the resources grant all the permission to add, delete, modify the view, and fast view. Then Click on save.
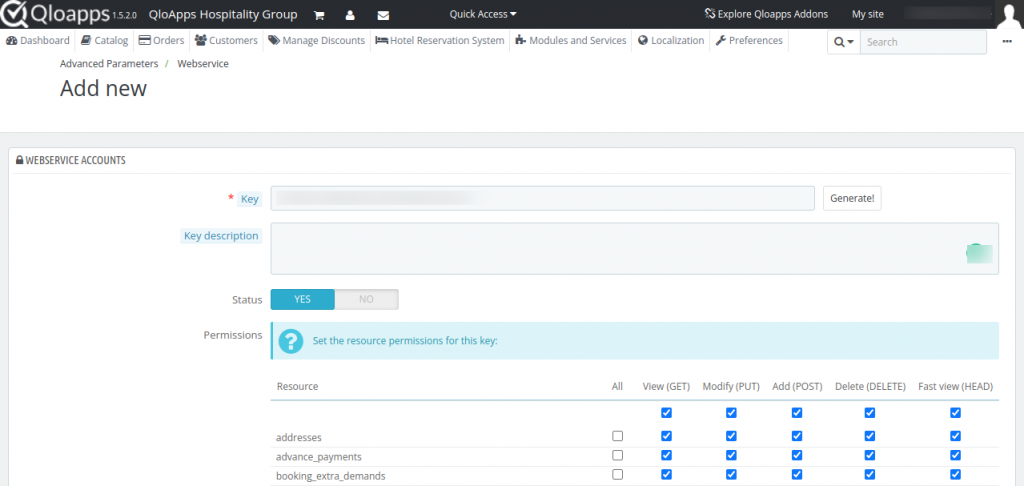
Copy the key from here.
Now in the QloApps channel manager in PMS paste the key in the QloApps webservice key.
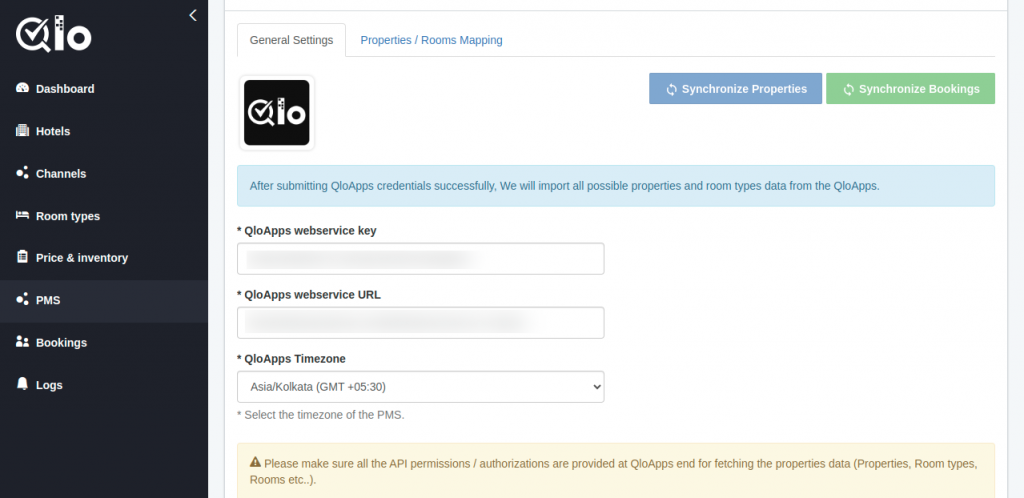
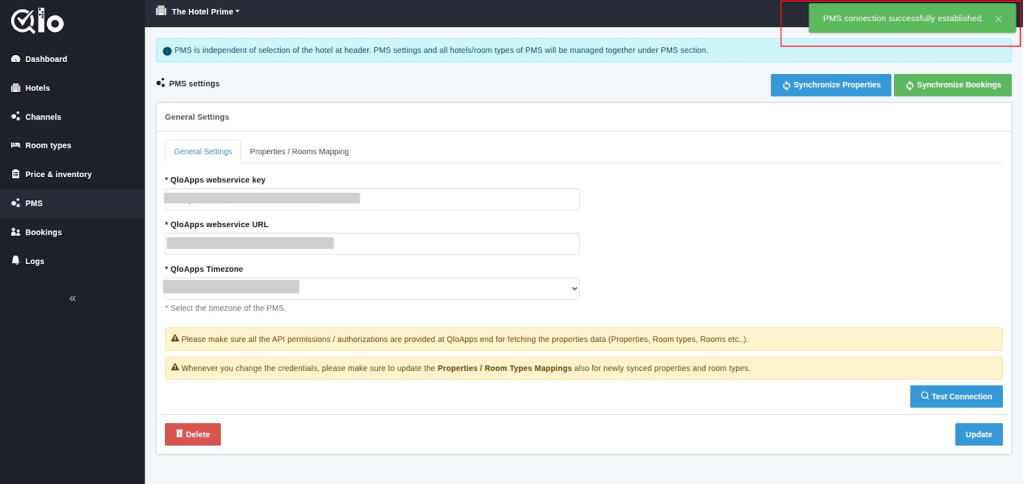
After filling the required fields, click on Test connection button

Credentials for API URL( webservice URL)
If QloApps is installed in the root folder of your server, the API URL will be: http://example.com/qloapps/api/cm_api
If QloApps is installed in a subfolder (qloapps/) of the root folder on your server, then API URL will be: http://example.com/qloapps/api/cm_api
Credentials for QloApps TimeZone
To Get the QloApps TimeZone you will go to the QloApps backend.
Go to Localization >Localization.
Here in the Configuration Panel, you will get the time zone. For reference see the below image.

Fill this time zone given in the image to fill the QloApps Timezone in the QloApps Channel manager.
Hence, you can fill all three fields QloApps webservice key, QloApps webservice URL, and QloApps Timezone easily.
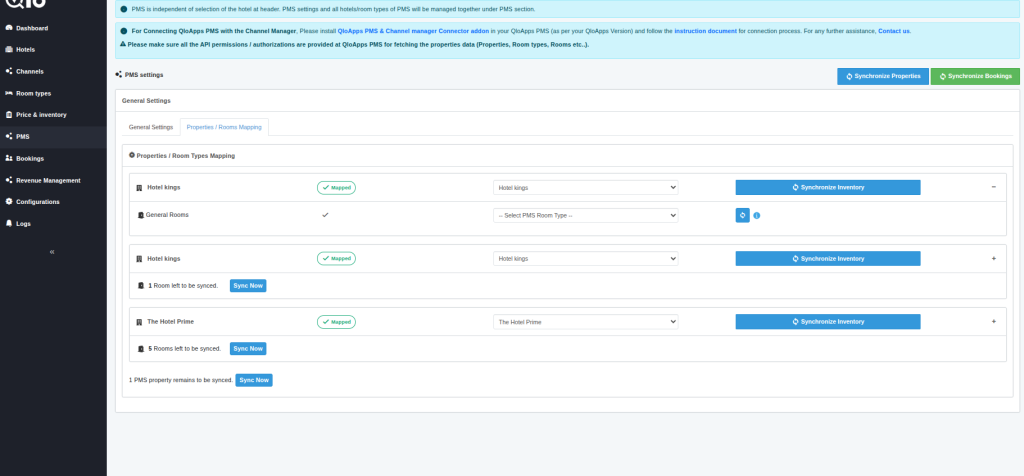
Properties / Room Mapping
The Property & Room Type Mapping section allows you to map your PMS properties and room types with the corresponding properties and room types available in the Channel Manager.
Proper mapping ensures seamless synchronization of inventory, rates, availability, and bookings between both systems.
Property Mapping
- Select the PMS property from the dropdown list corresponding to the Channel Manager property.
- Once the property is successfully mapped, the status will be displayed as Mapped.
- Expand the property section to view and map the associated room types.
Room Type Mapping
- For each Channel Manager room type, select the corresponding PMS room type from the dropdown.
- Save the mapping to establish the connection between the PMS and Channel Manager room types.
- A successful mapping ensures that inventory and booking data can be synchronized accurately.
Inventory Synchronization
To keep room inventory updated between the PMS and Channel Manager, inventory synchronization can be triggered at two levels:
Property-Level Inventory Synchronization
- The Synchronize Inventory button available at the property level pulls inventory data for all mapped room types under the selected property.
- Use this option when you want to update inventory for the entire property in a single action.
Room-Level Inventory Synchronization
- The Synchronize Inventory button available beside each mapped room type pulls inventory only for that specific room type.
- Use this option when inventory updates are required for an individual room type without affecting others.
Note: The Inventory Synchronization feature is currently available only for users who have installed and configured the PMS & Channel Manager Connector Module.
Sync Status Indicators
- Mapped: Indicates that the property or room type has been successfully mapped.
- Rooms left to be synced: Indicates the number of room types that are yet to be synchronized.
- Sync Now: Allows you to immediately synchronize the pending property or room type inventory data from the PMS.
By completing the mapping and synchronization process, you can ensure accurate inventory management and reduce the risk of overbookings across connected sales channels.
Then synchronize it by going into general settings.
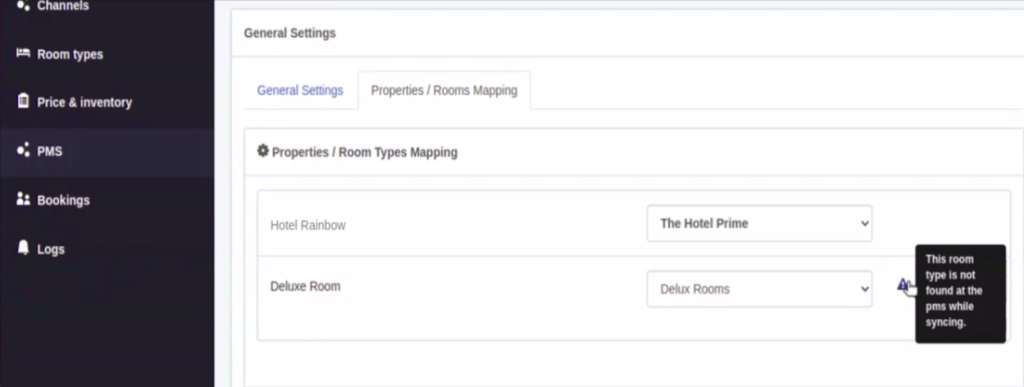
If we delete any room type in the QloApps backend and synchronize the property again.
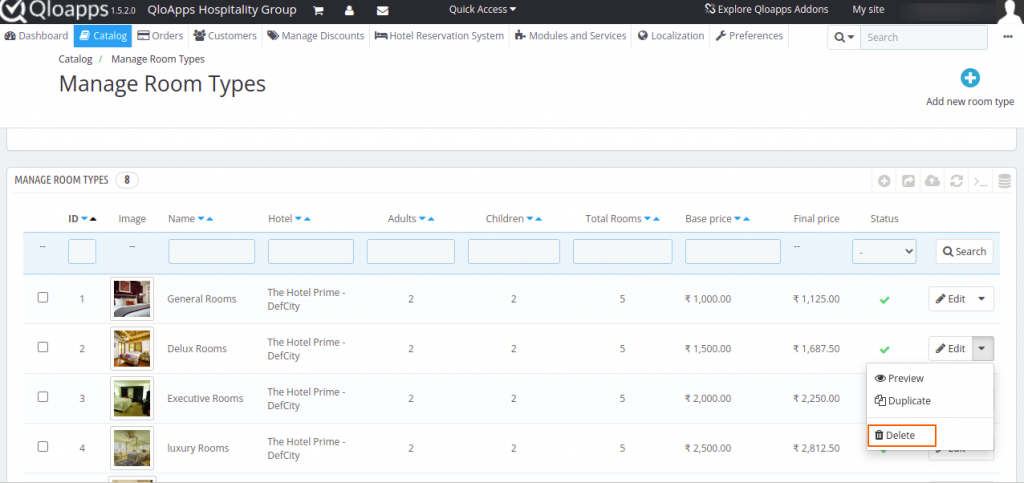
After this we try to map that room type with the QloApps channel manager then it will show the alert as “This room type is not found at the PMS while Syncing”.
For more see the given image below.
Here, when the booking is created on any connected distribution channel, that booking will automatically be synced with the QloApps channel manager.
As well as a booking is created on the QloApps backend.
Also, when any booking is made on the QloApps website, inventory will automatically get synced with all the connected channels in the QloApps online channel manager.
You can see these bookings under the “Bookings” as discussed further.
Properties and Bookings Synchronization with PMS
Synchronize Properties: By clicking this button, All the property information from PMS will be updated in the channel manager for Properties / Room types mapping.
Synchronize Bookings: By clicking this button, PMS bookings will be synced to the channel manager and channel manager bookings will be synced to PMS.
Note: Map properties and room types before syncing.
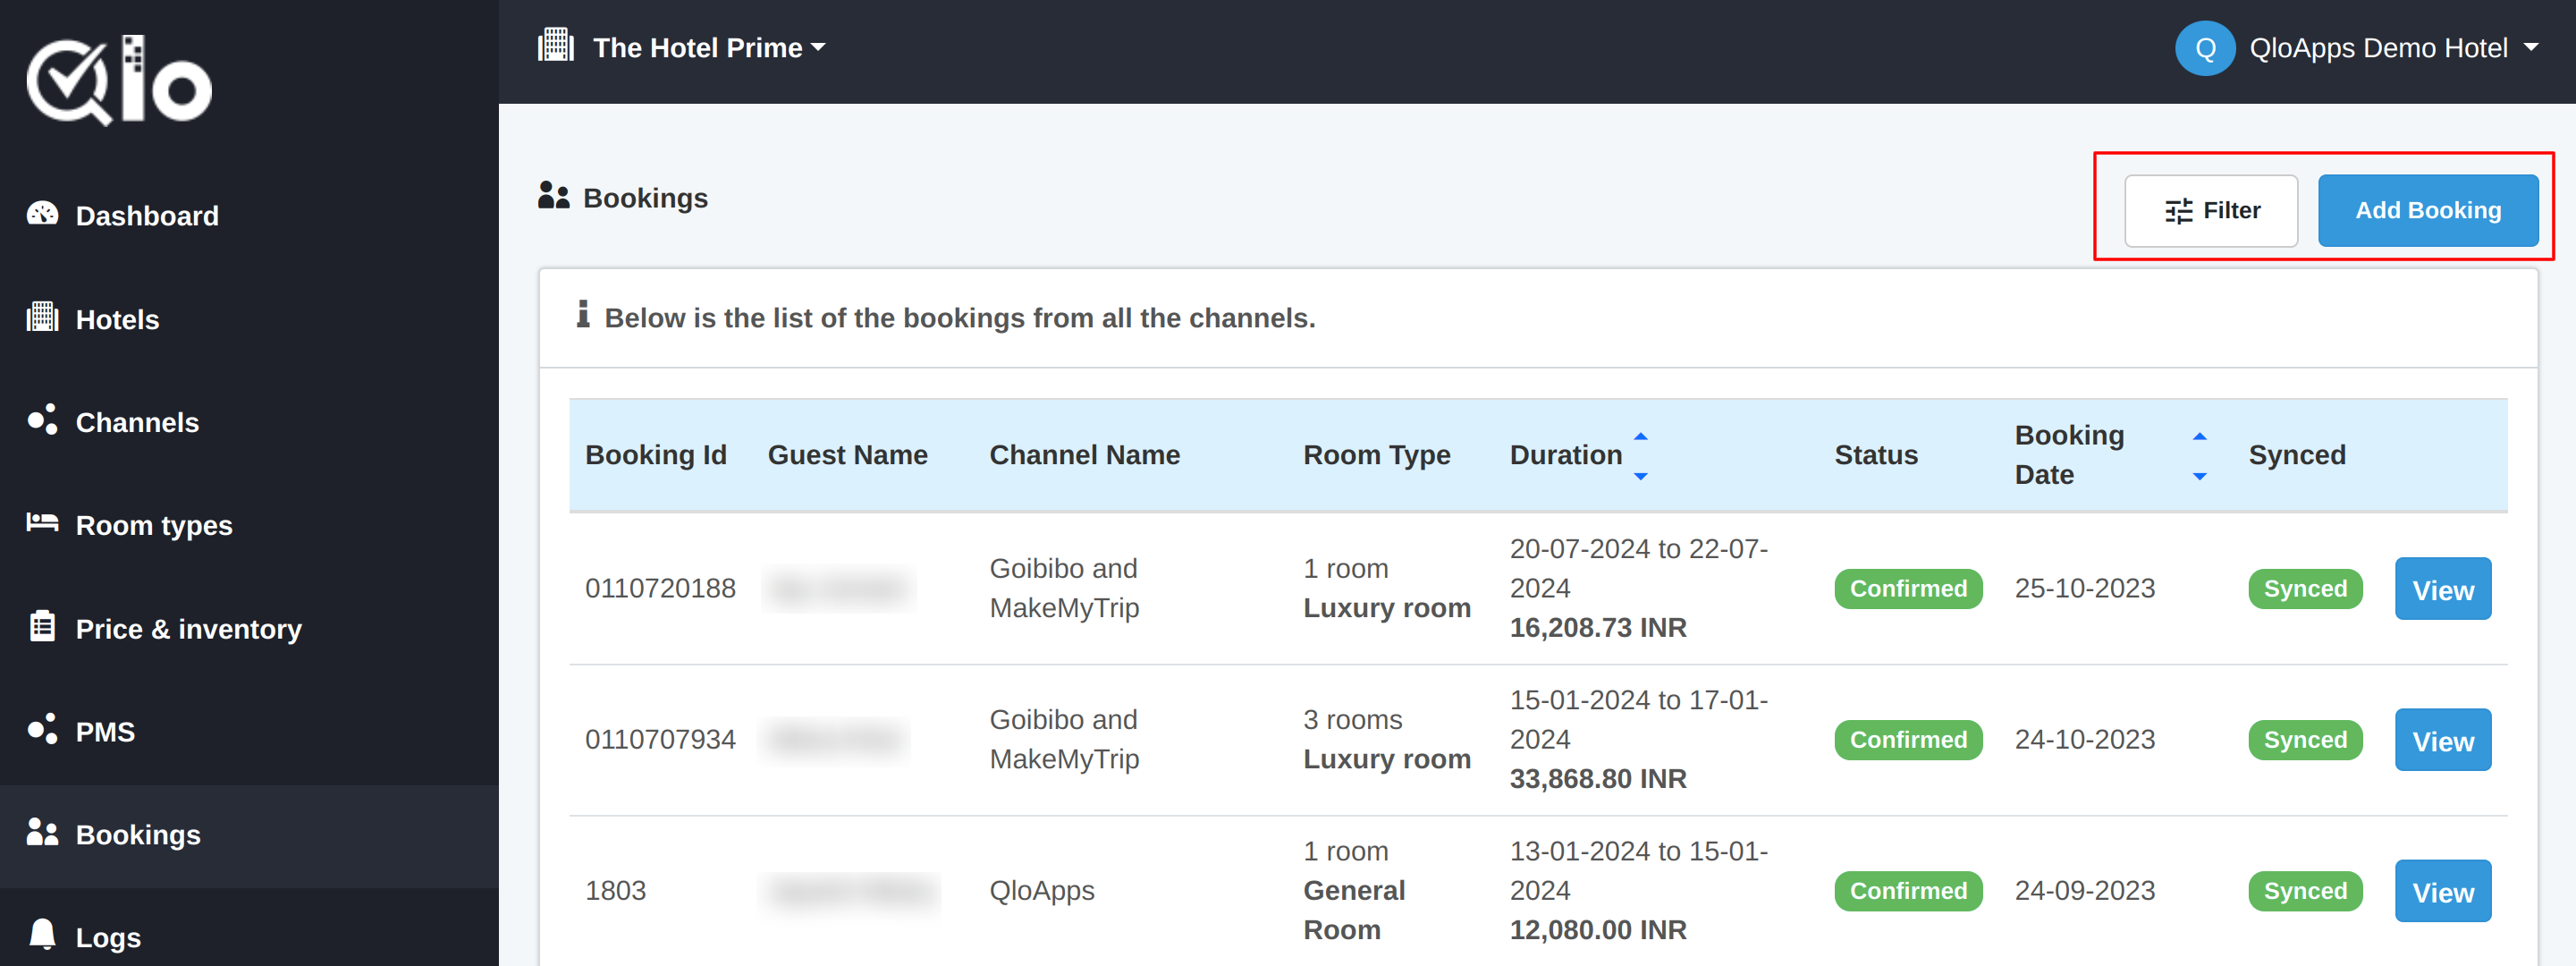
Bookings
In the bookings section, you can see the list of all the bookings you have received for your property from the various channels on which you have listed your hotel.
You can also filter the bookings and search for a particular booking using the various search filters available in QloApps Channel Manager.
To filter the bookings, click on the filter button and add the data in the parameters on which you have to filter the list of bookings.
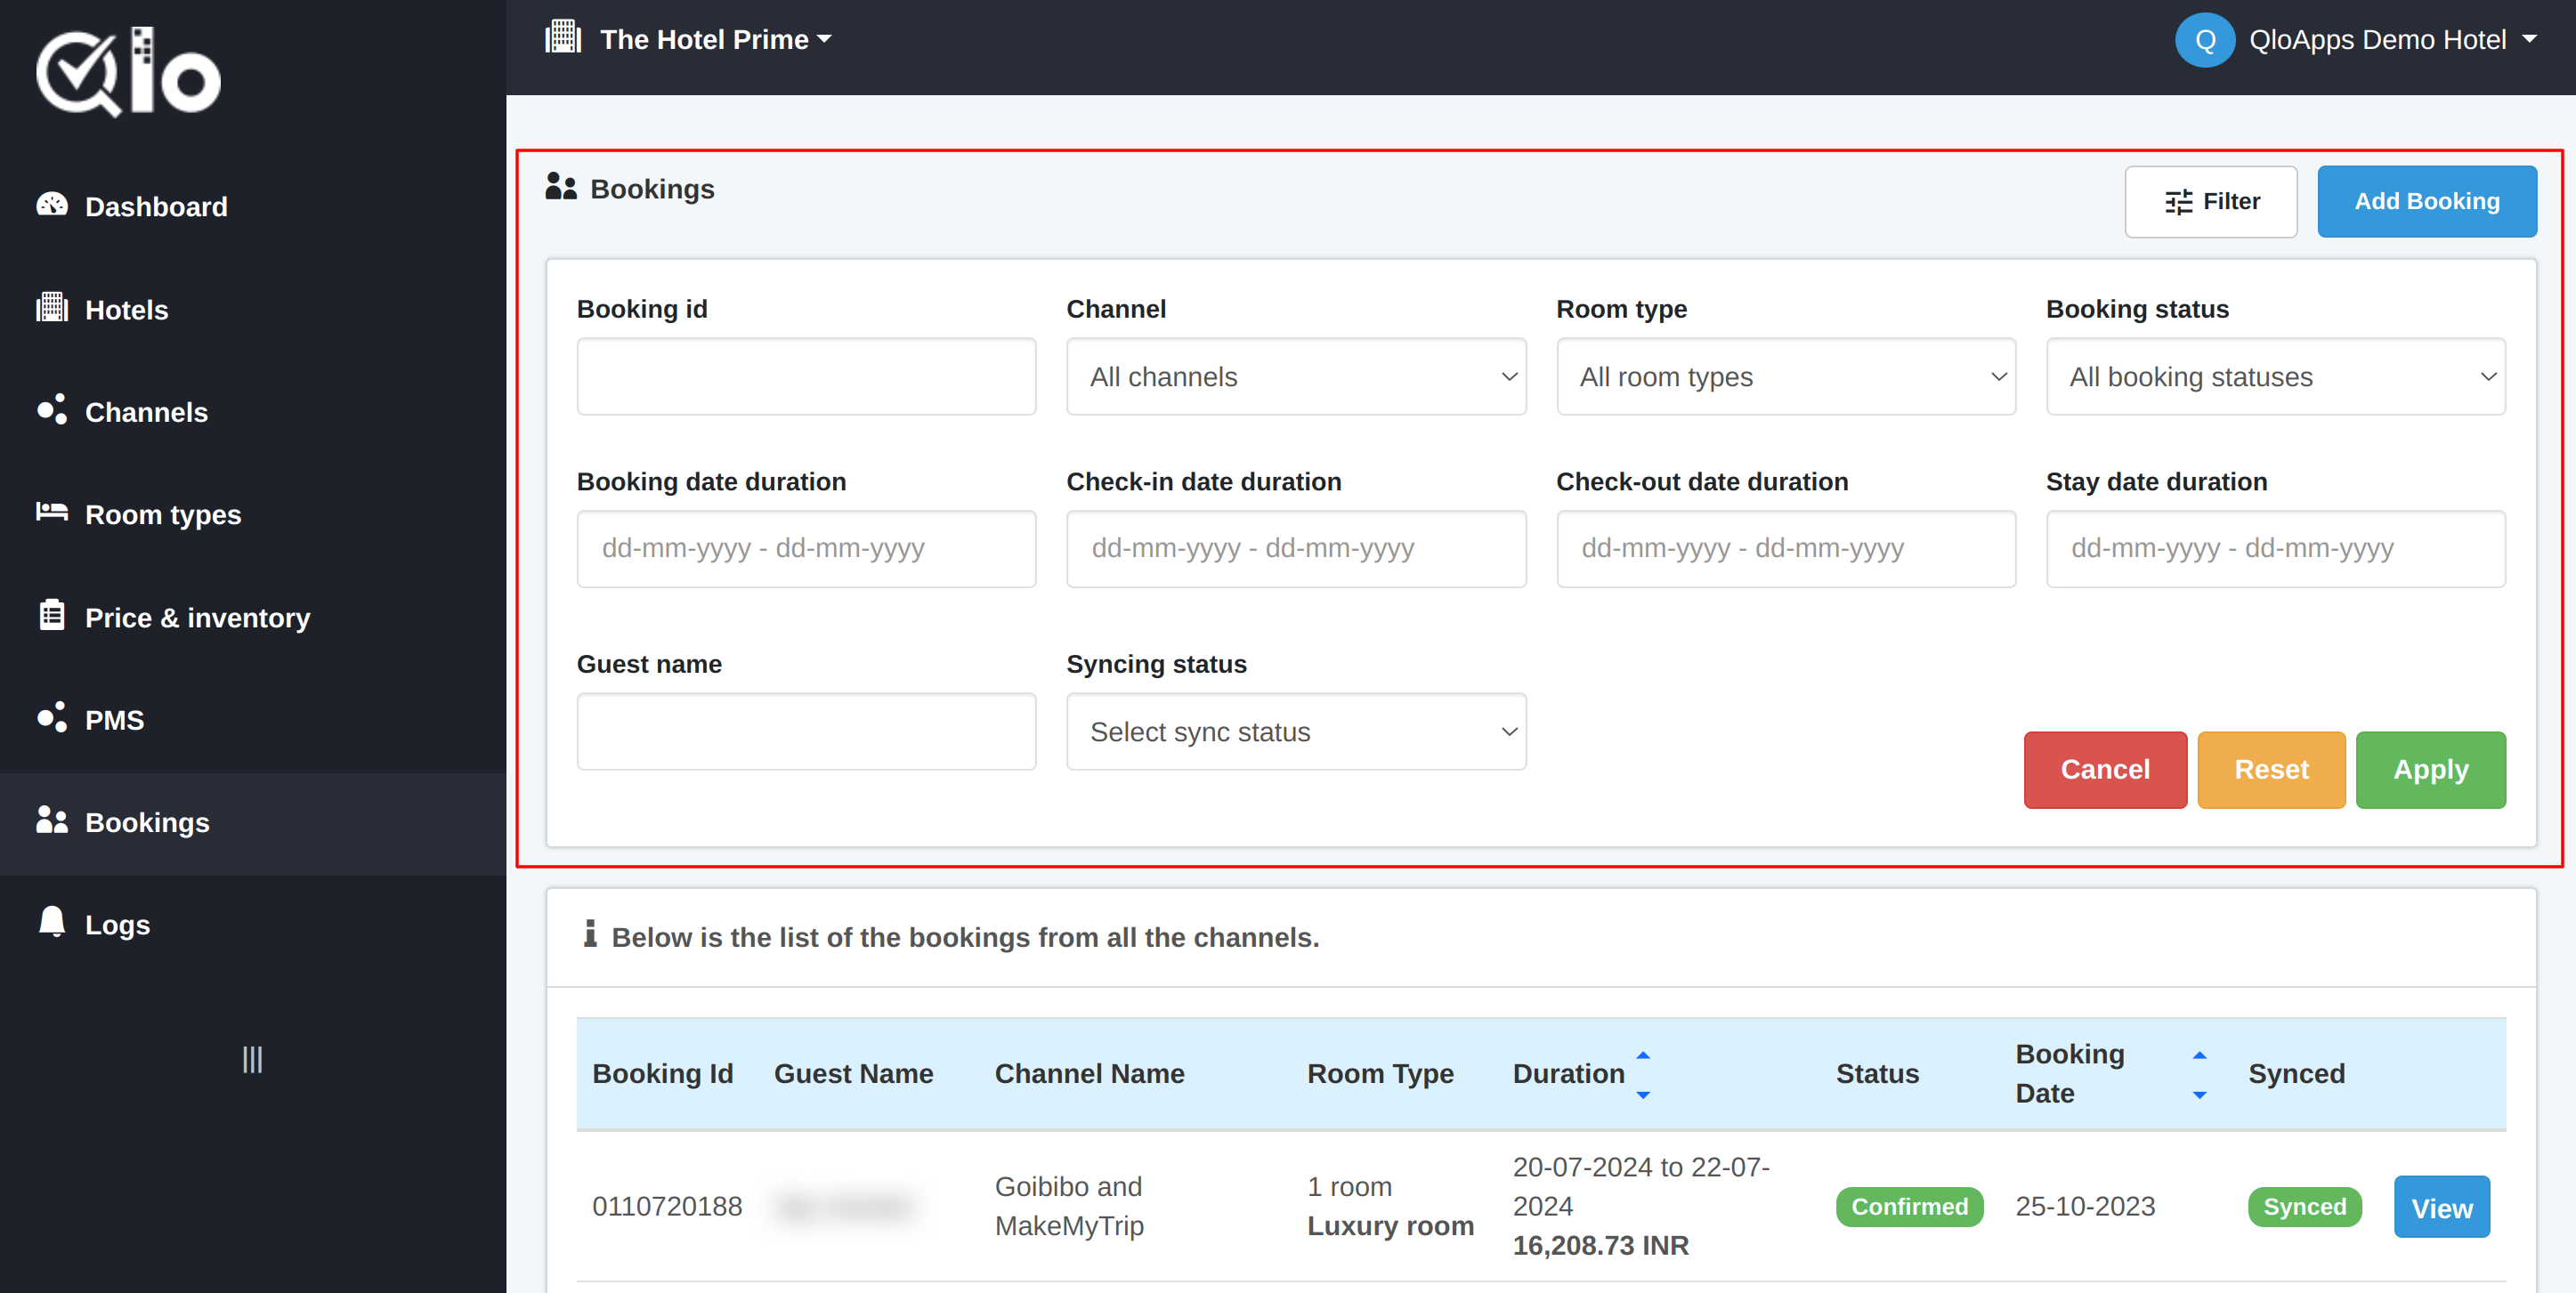
Once you have entered all the details in the filter section, click on apply and the list will be filtered accordingly.
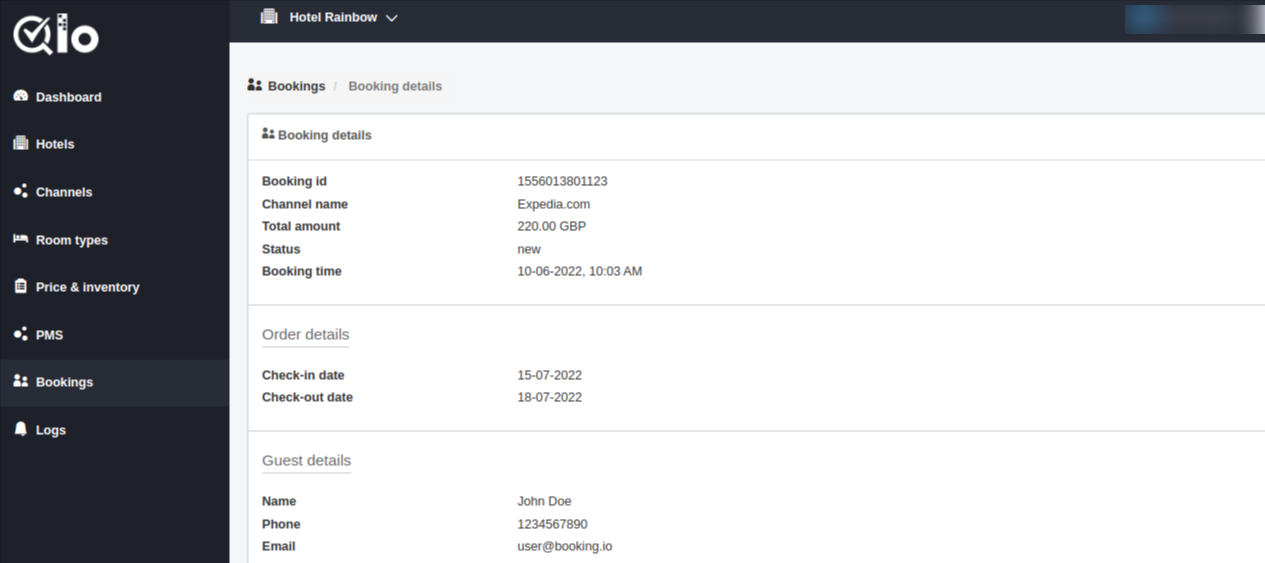
To view the details of a particular booking, you can click on the ” View” button.
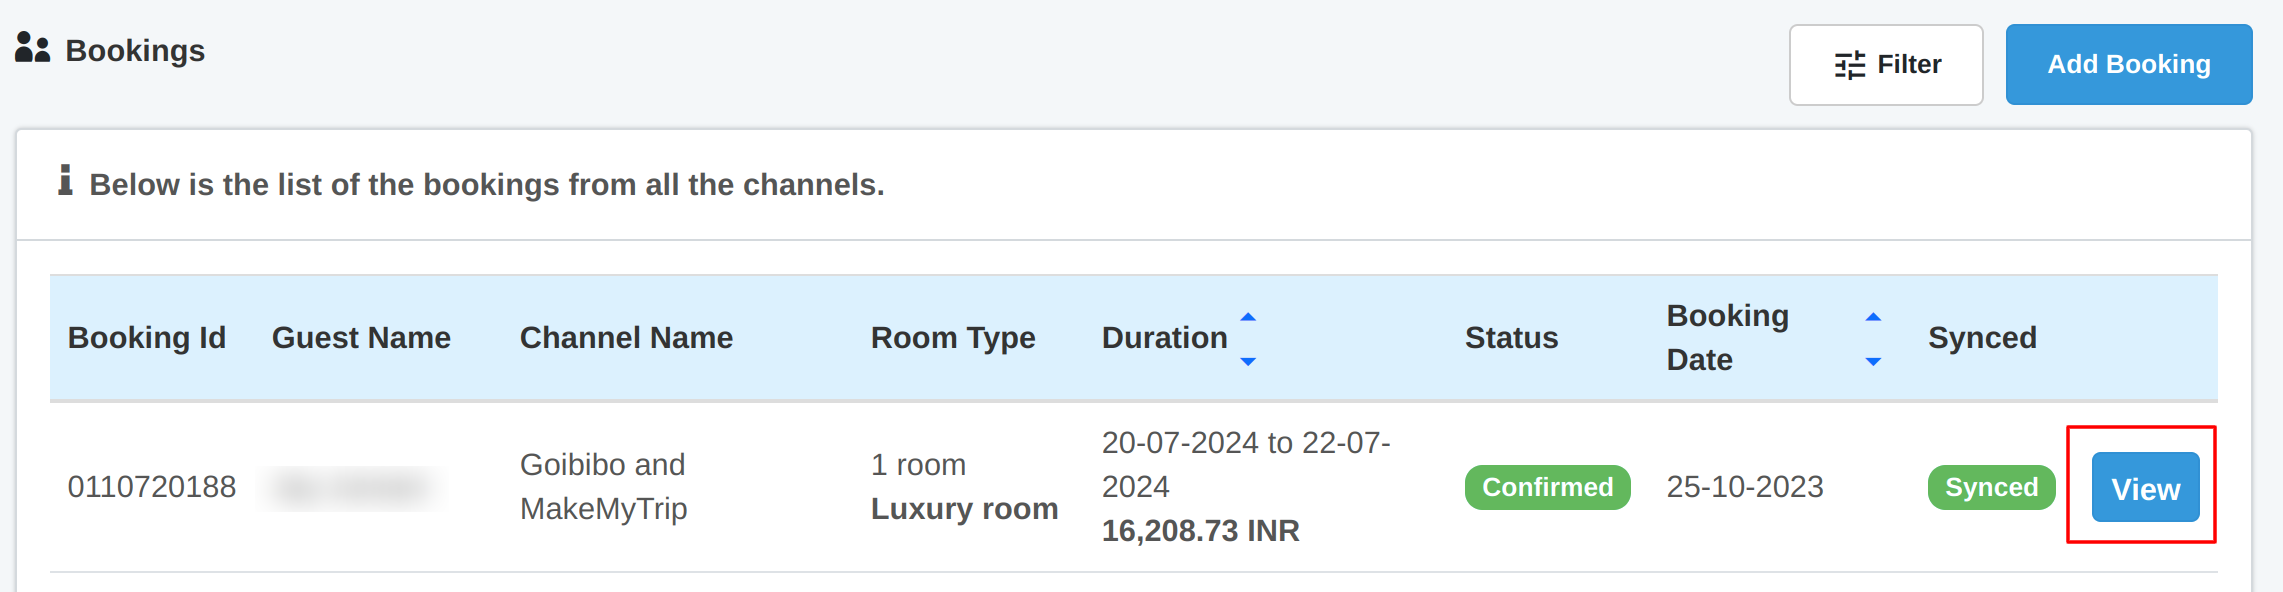
Once you click on the view button, all the details will be displayed to you.
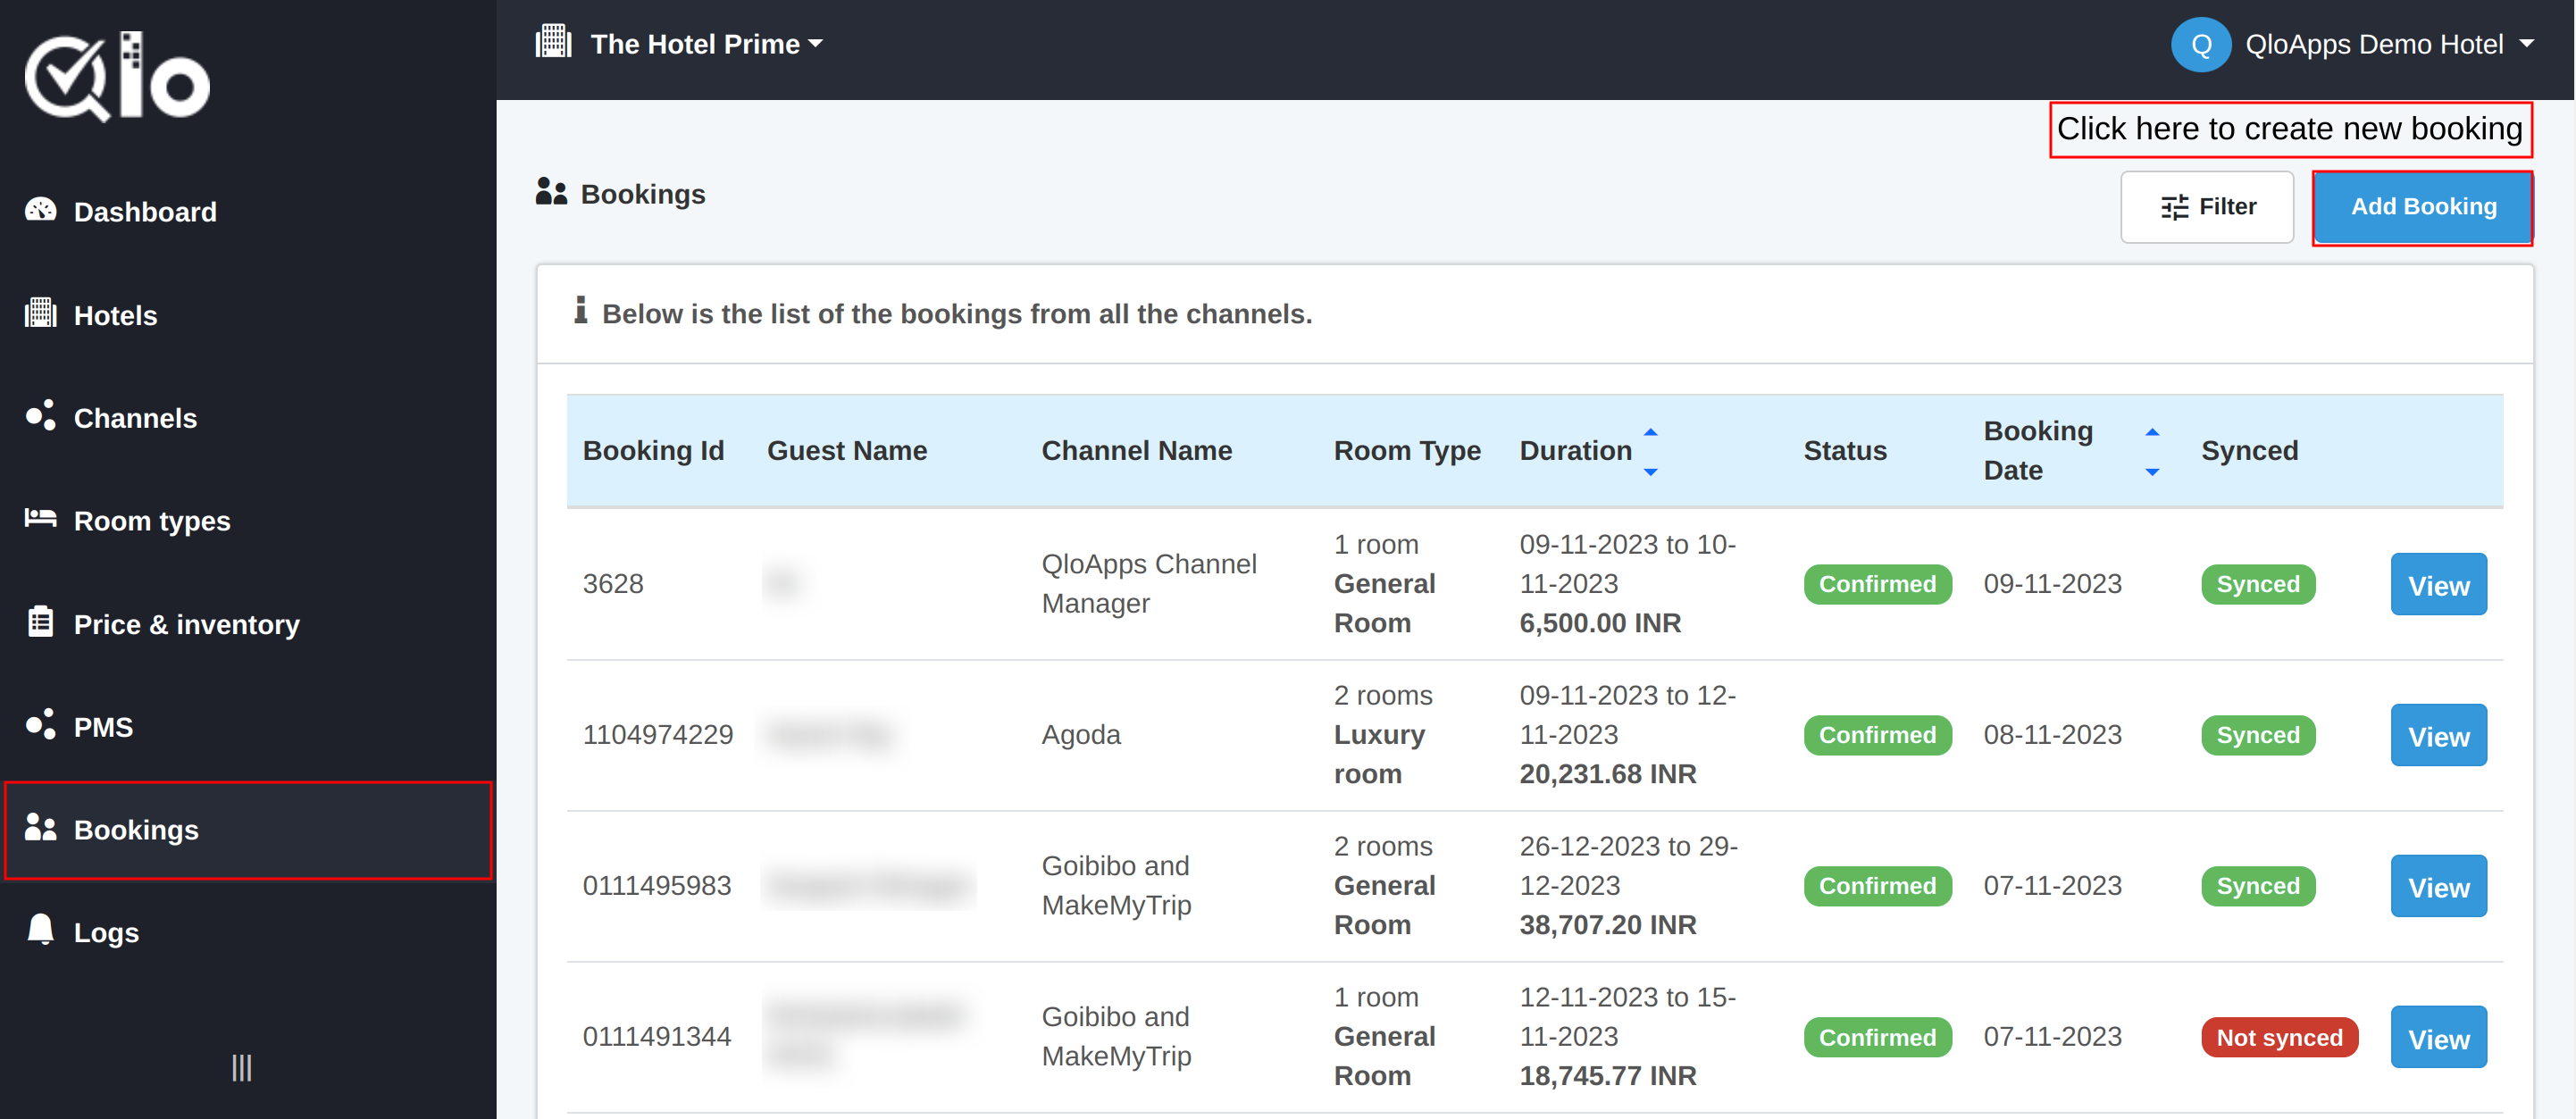
How to create a booking in the QloApps Channel Manager?
QloApps channel manager enables you to create bookings directly using the QloApps Channel Manager.
The created booking will not only get synced with all listed Online Travel Agents but will also be added to the PMS as well. , if your PMS is connected with the channel manager.
To create a new booking, go to the ” Booking” Tab and click on the ” Add Booking” Button to start the process of creating new bookings.
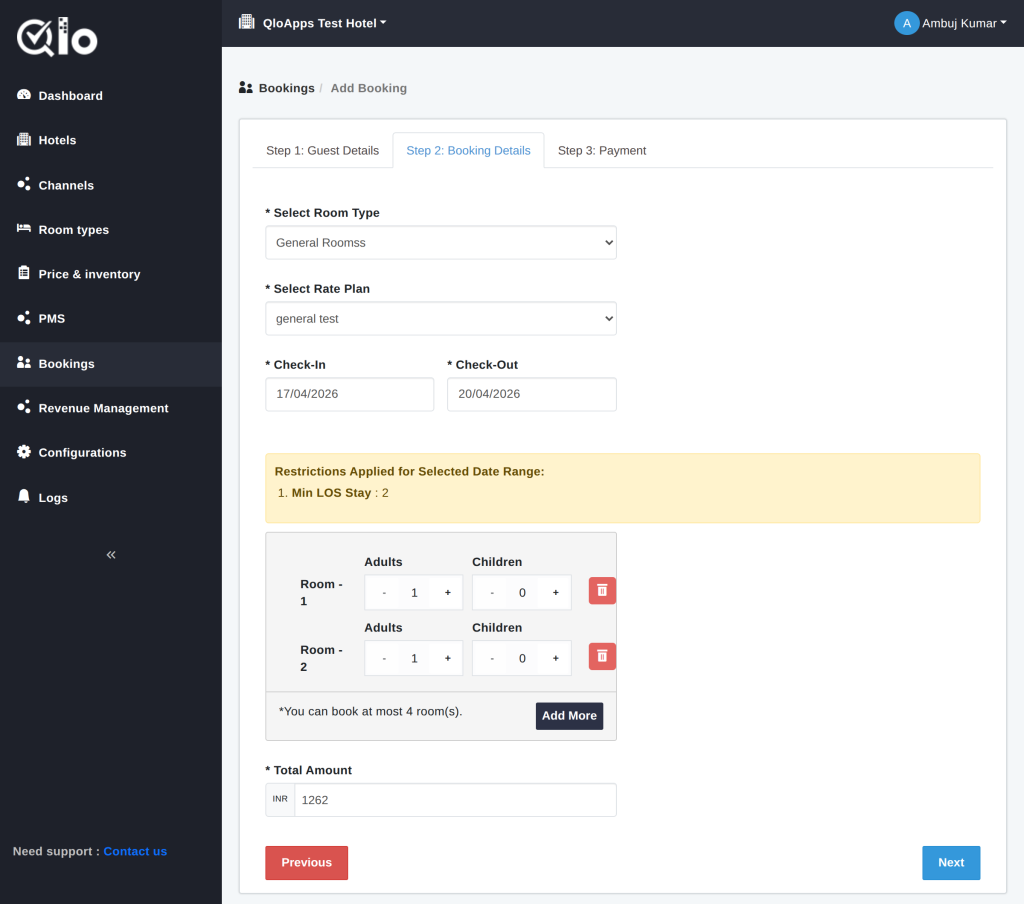
Now, fill in the details of the customer and book in three steps.
- Guest Details: Enter the name, phone number, and email address of the guest.
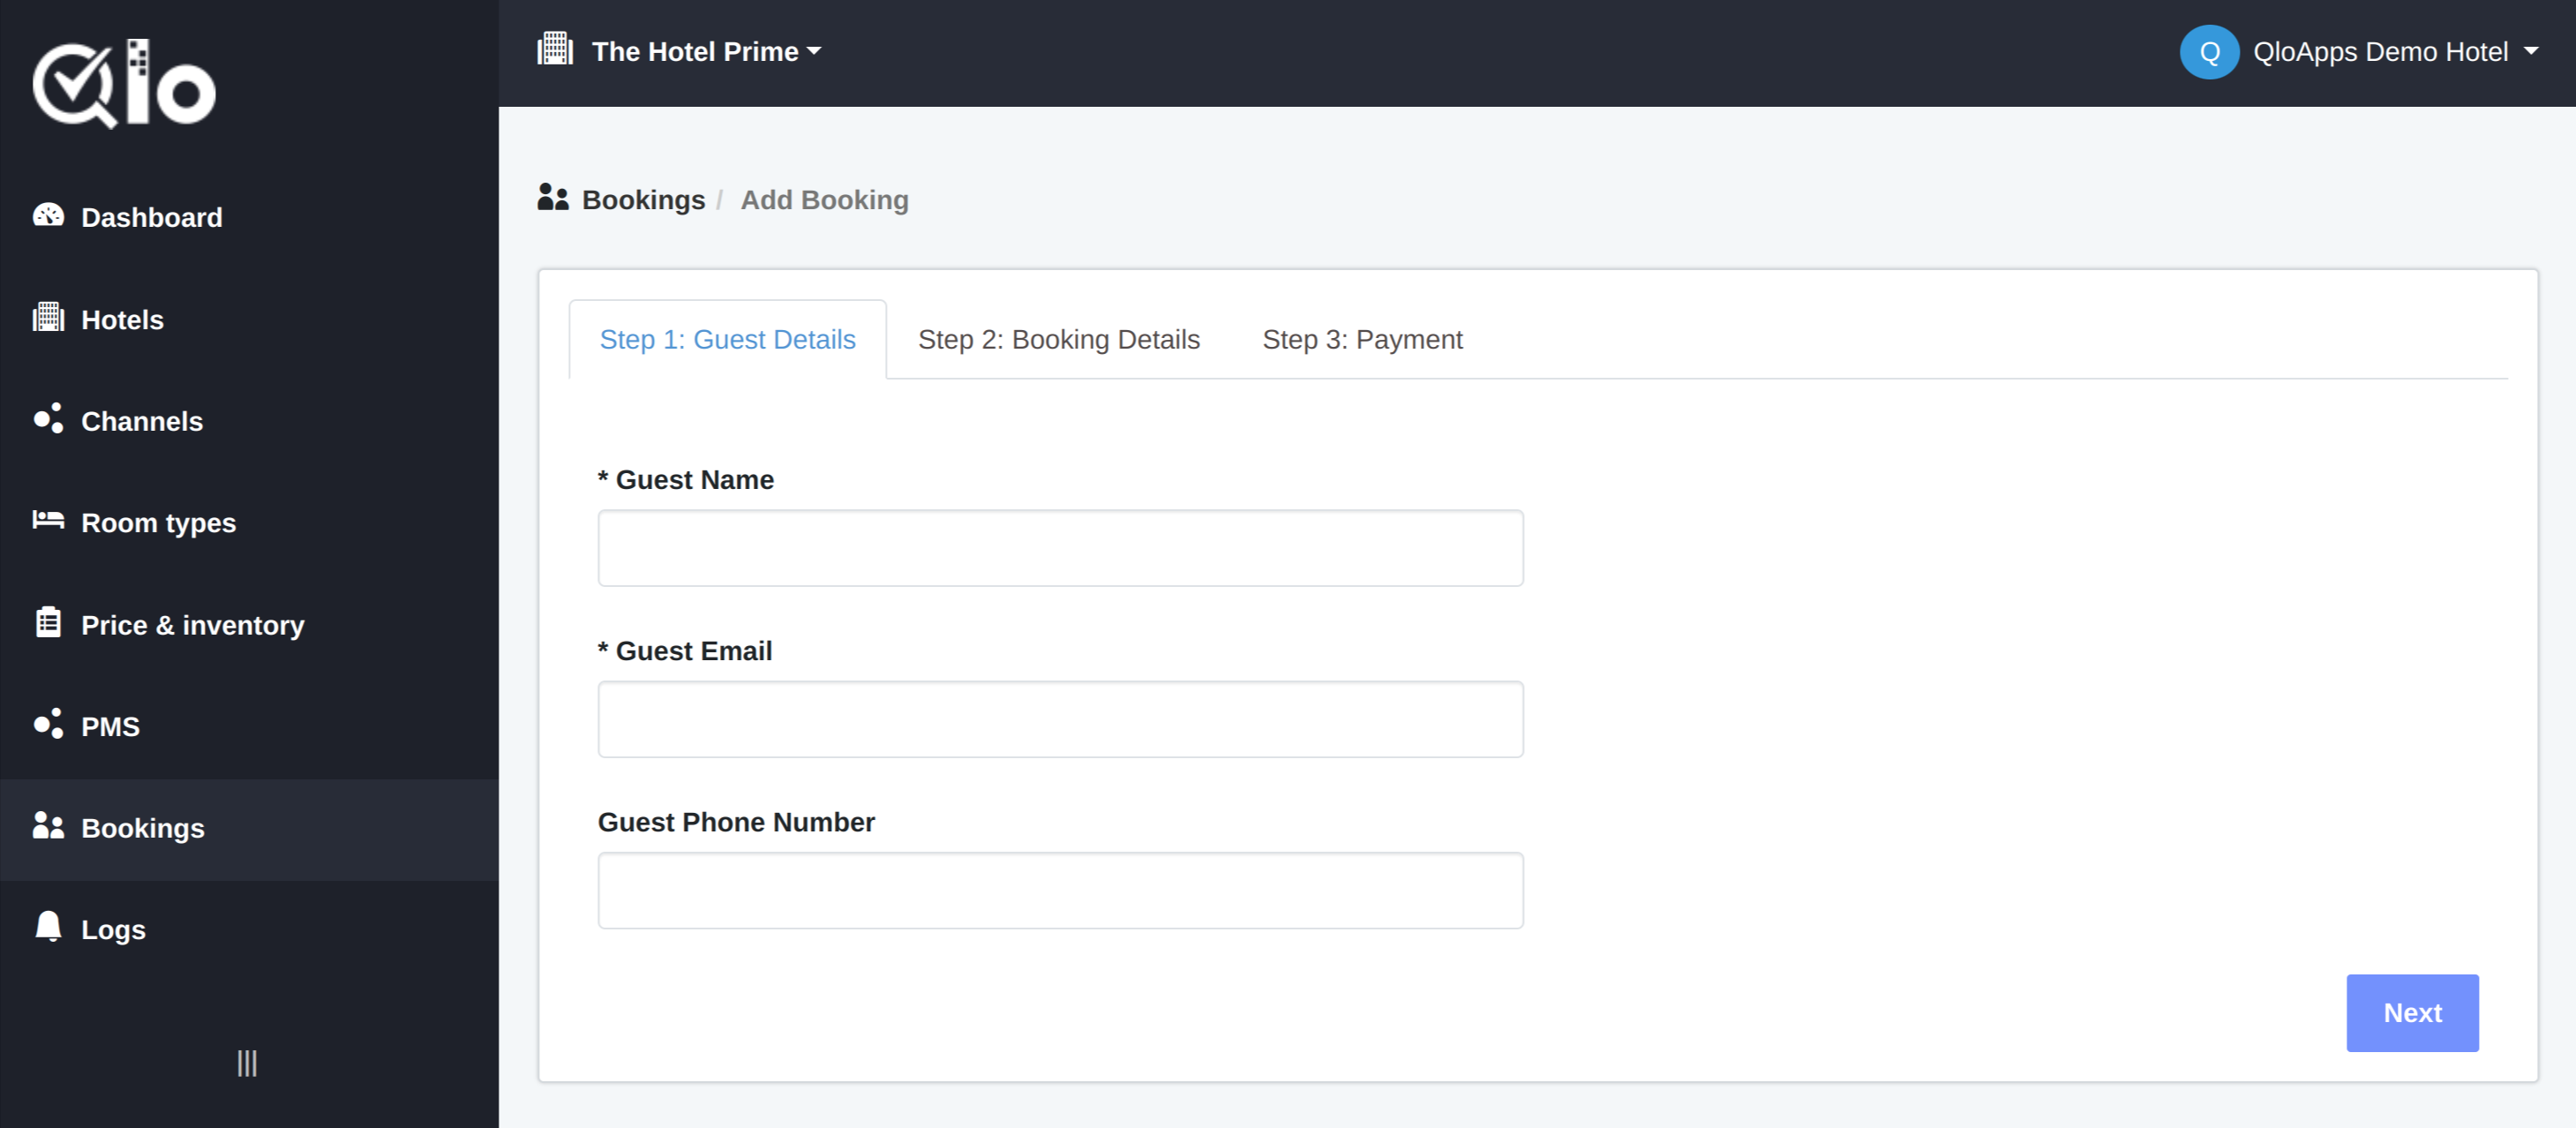
- Booking Details: Select the room plan, rate plan, no of rooms, occupancy of each room, check-in and check-out dates.
Based on your entered booking details, the total amount will be calculated automatically.
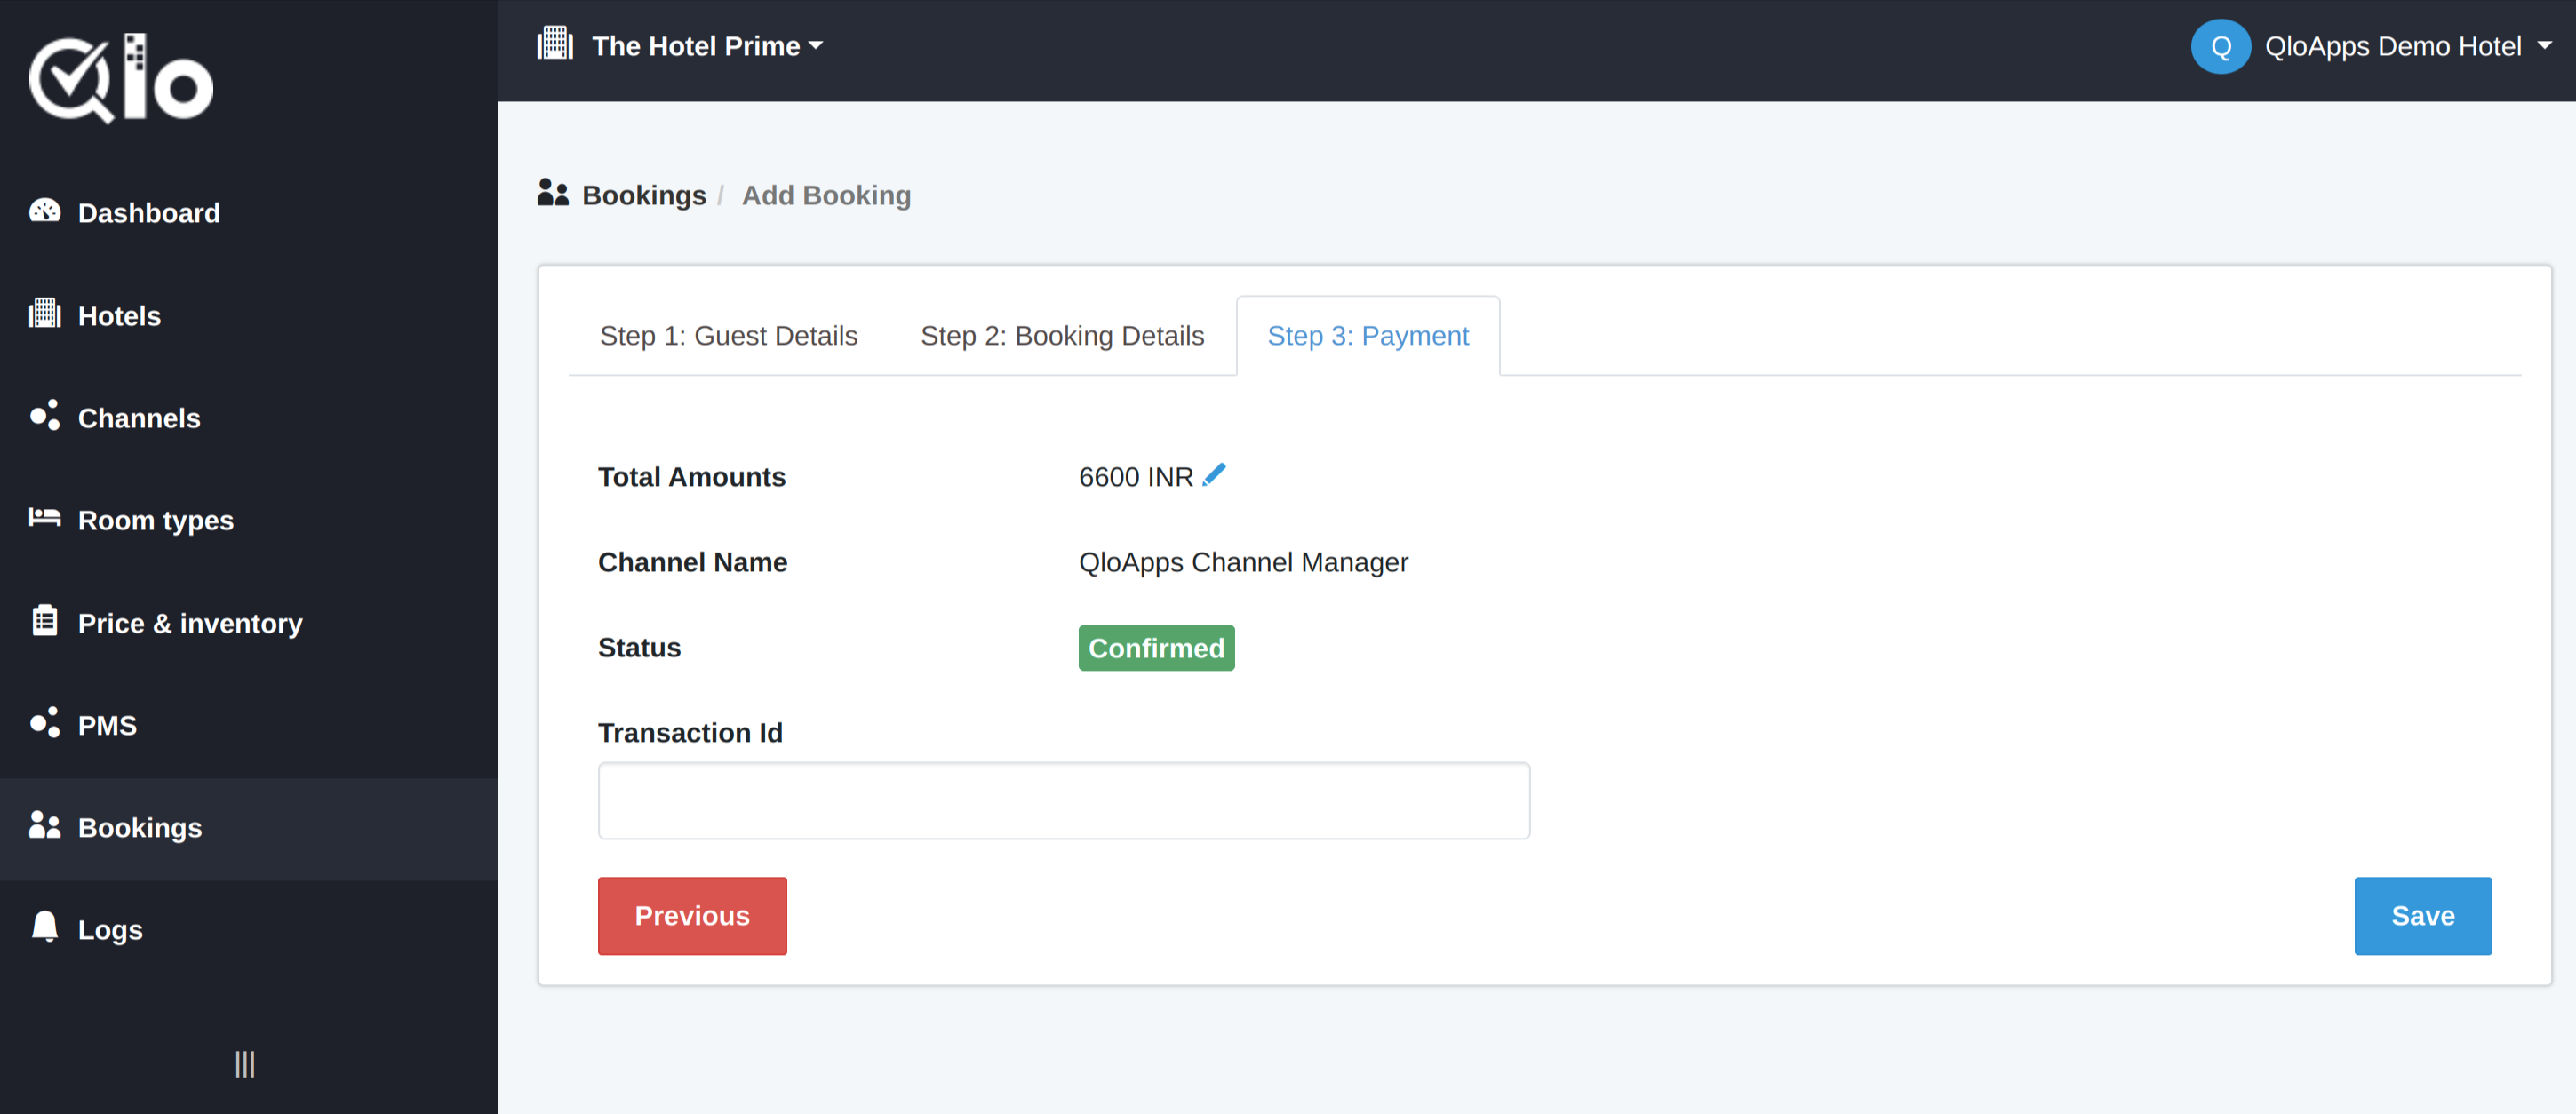
- Payment: Enter the transaction ID and click on save to complete the booking process.
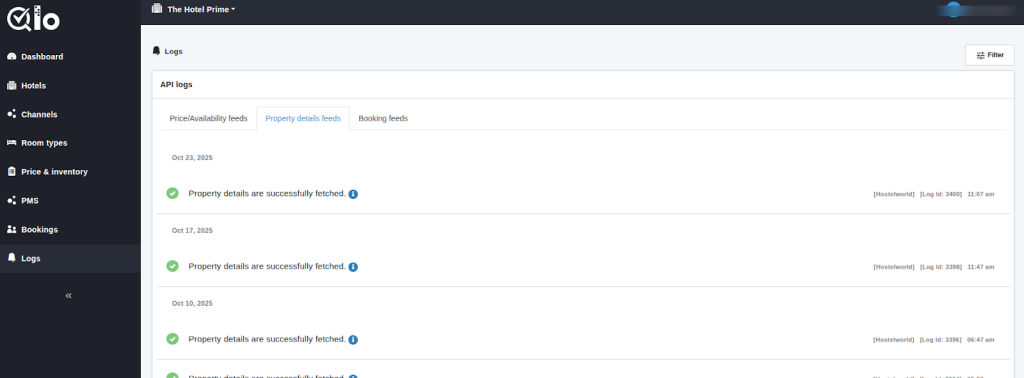
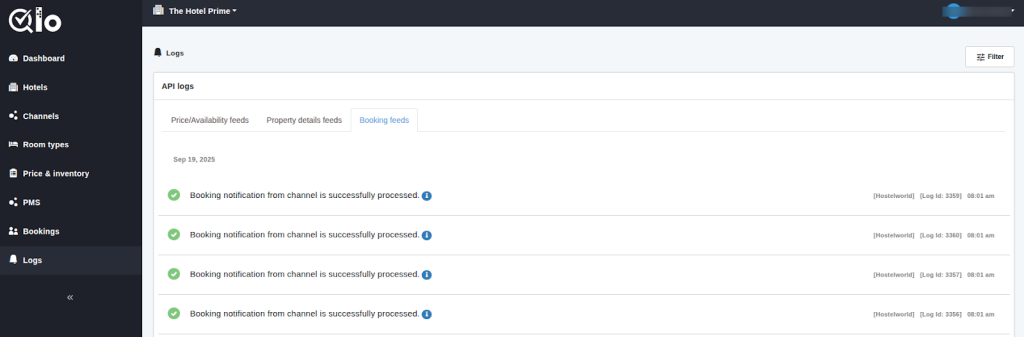
Logs
All the vital activity and changes are in the log if done in the QloApps Channel manager
From the menu go to Logs.
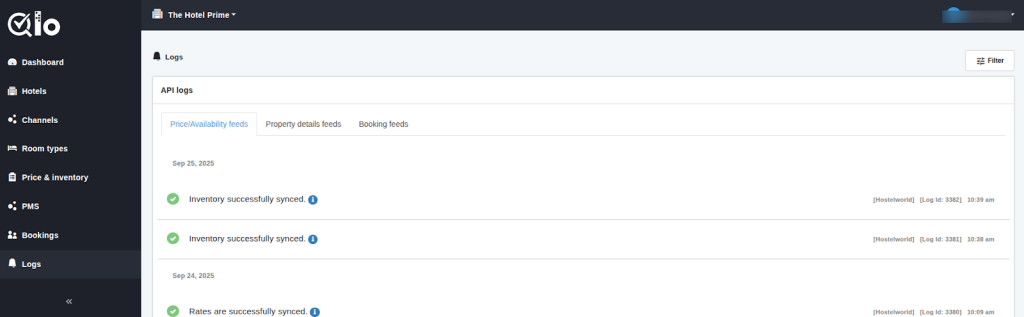
In API logs three types of logs are there:
- Price/Availability feeds: When any rates and inventory get update they will log in price and availability feeds.
- Property details feed: When any property details get fetch they will log in to the property details feeds.
- Booking feeds. Any booking details if fetch will get log into the booking feed.
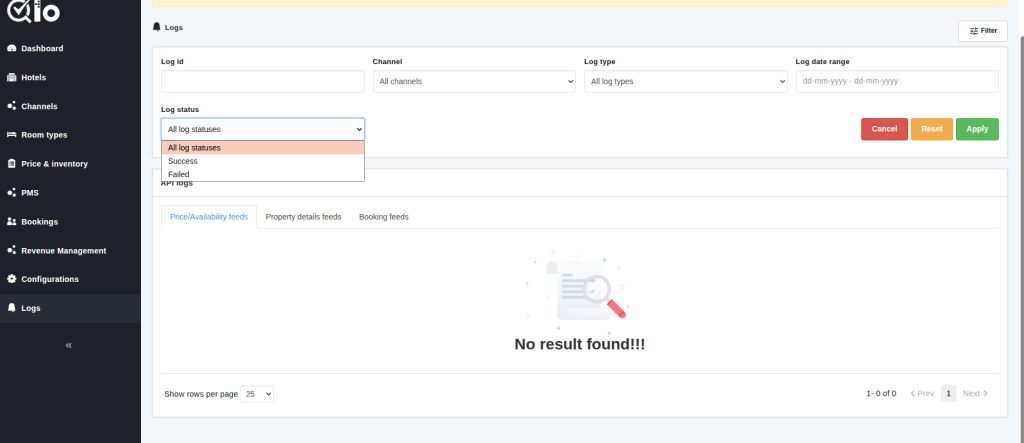
Click on the Filter button to filter the logs.
Enter the Log ID, Channel, Log type, Log Date Range, and Log Status
How To Upgrade the Plan of QloApps Channel Manager?
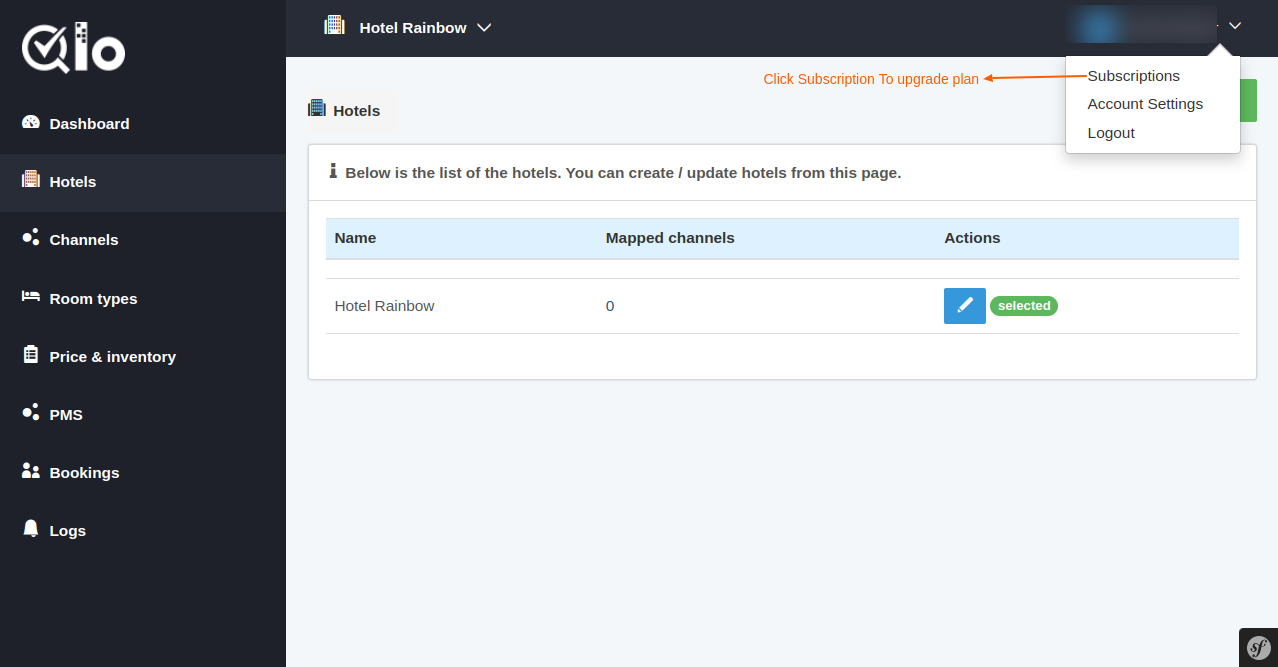
To upgrade the trial plan of QloApps Channel Manager:
- Go to your profile logo
- Click on the drop-down
- Click on Subscriptions
- Now you will get the list of subscriptions purchased or you will purchase for the first time.
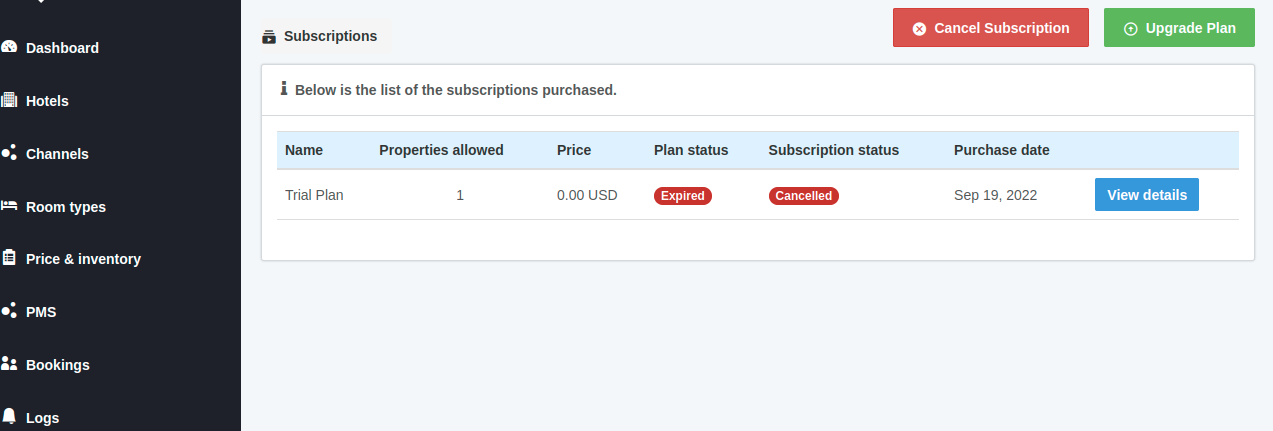
- Click on the Upgrade Plan.
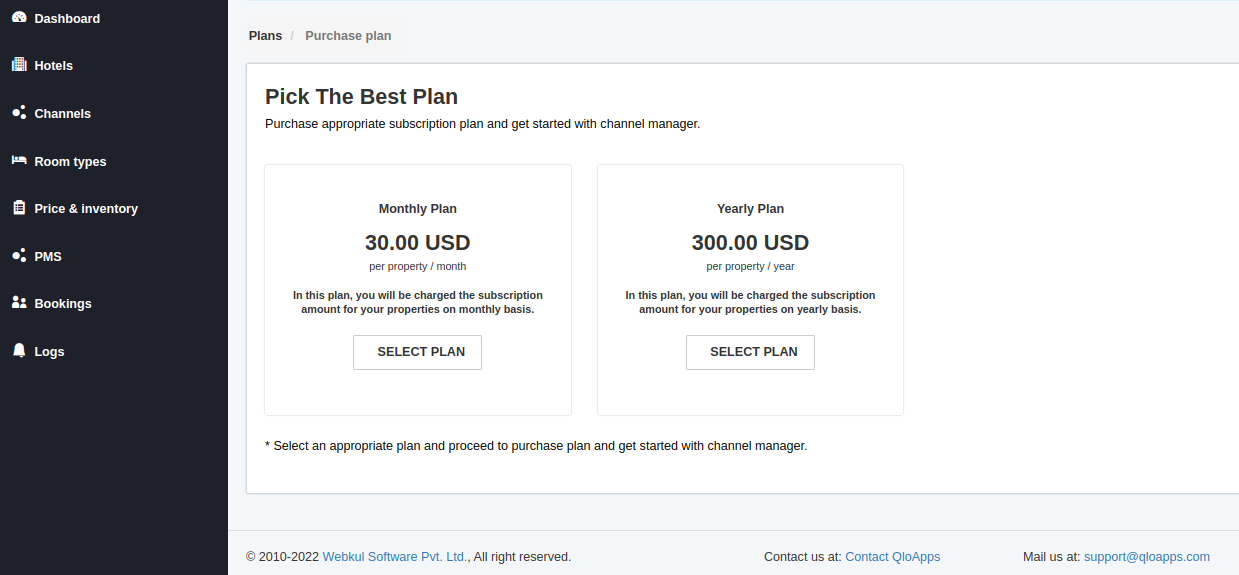
- Now select any one of the two available plans: monthly or yearly and then click on the Select Plan.
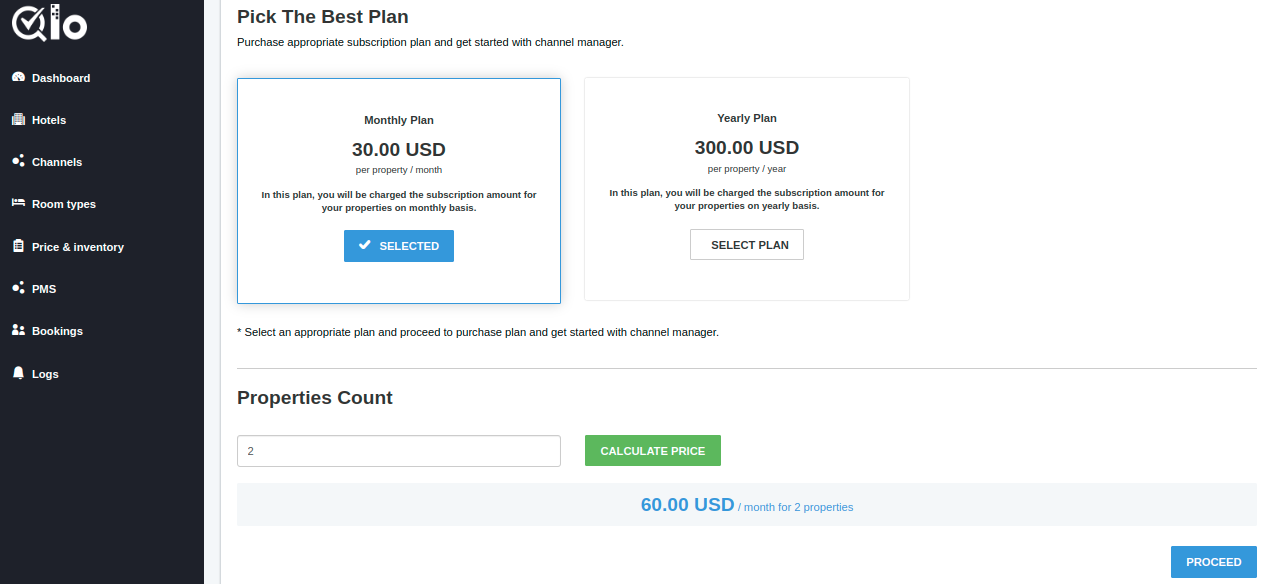
- Enter the number of Properties Count (Number of properties that you want to manage through the QloApps channel manager)
- Then click on CALCULATE PRICE to calculate the final plan pricing for entered properties.
- After this final price will be displayed on a per month or yearly basis for any number of properties.
- Then click on Proceed.
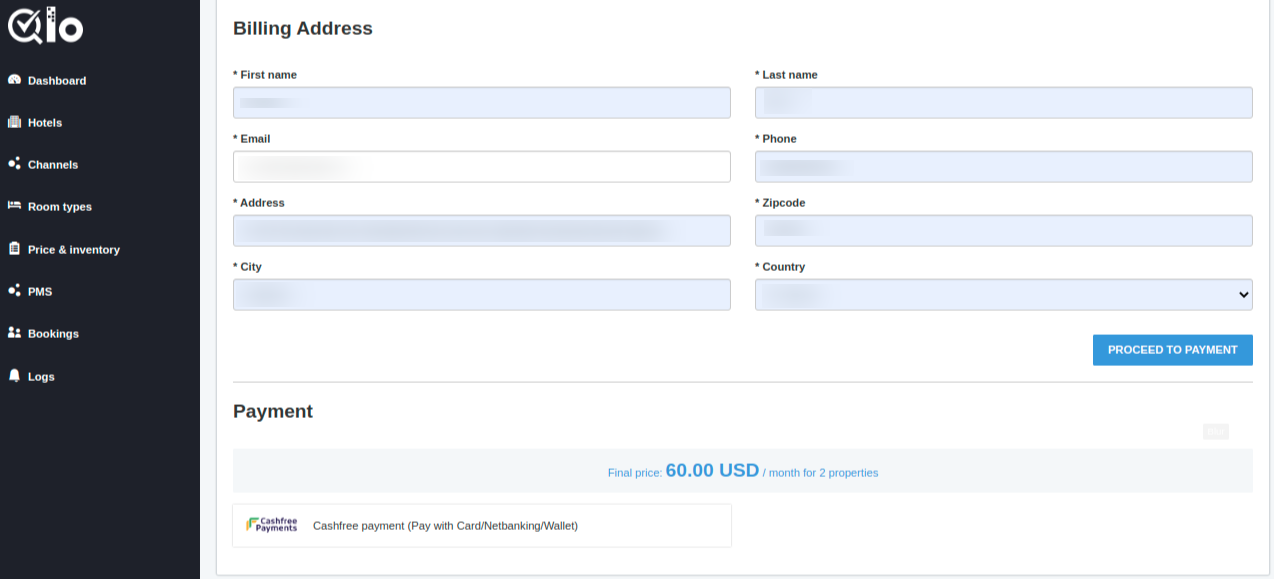
- Fill in the billing address and click on Proceed To Payment.
Payment Process For Indian Users
When Indian users proceed with the payment the payment method will be a “Cash-Free Payment Method“.
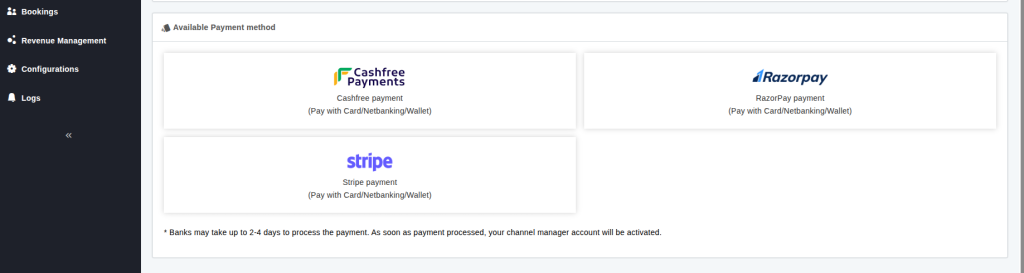
Payment Process For Non-Indian Users
The users from the other country will get the payment methods PayPal, Stripe, or Razorpay to complete the payment.
Once you purchase the plan, the subscription page will get updated and will display the purchased plan.
Note: Users can synchronize price and inventory after upgrading the plan.
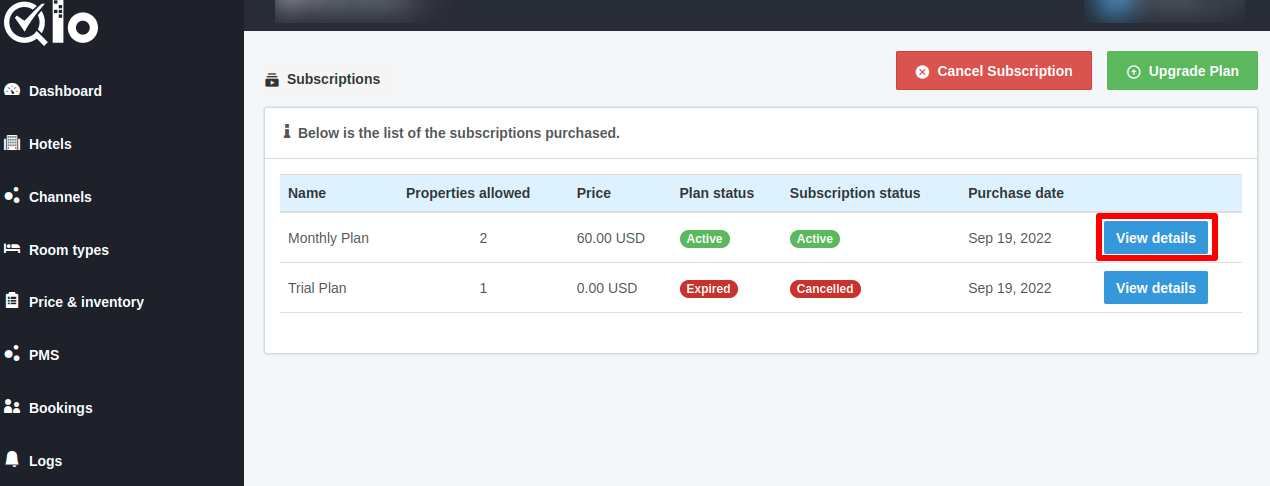
You can view the details of your purchased subscription, by clicking on View details on the subscription page.
Once you click on view, a new page will open, that will display the following information:
- Subscription Details: All the details of the subscription you have purchased will be displayed here.
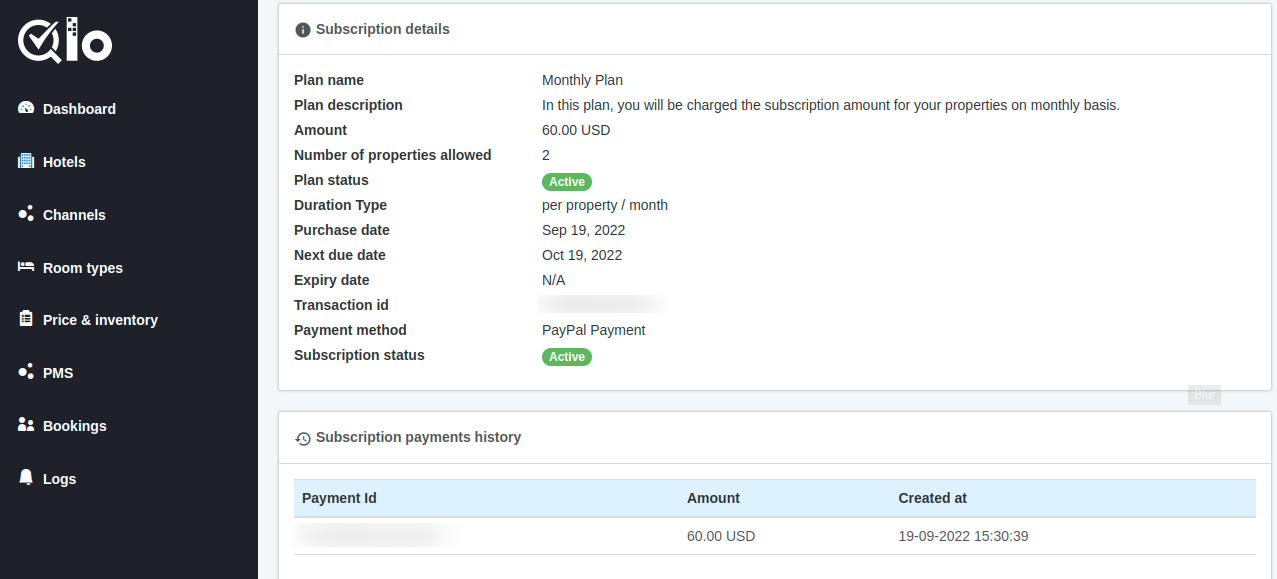
- Subscription Payment History: Here user can get the details of the payment history of the subscription he purchased.
Property Size Limits
Limits for Vacation Rental
-
Room Types: Max 20
-
Rate Plans: Max 10 Per Room Type
-
Per Person Rate: 18 Occupancy
Limits for Hotel
-
Room Types: Max 20
-
Rate Plans: Max 200 per property
-
Per Person Rate: 18 Occupancy
Conclusion
If you want to learn about the functionality of QloApps then you can visit this link: QLO Reservation System.
In case of any query, issue, or requirement please feel free to raise it on QloApps Forum.
Moreover, you can raise a ticket to connect with our experts for any assistance.