QloApps Amazon Pay Payment Gateway
Give your guests a trusted, fast, and familiar way to pay for their bookings with Amazon Pay—a globally recognized digital wallet trusted by millions.
Integrate Amazon Pay into your hotel site with QloApps, letting guests securely pay using saved Amazon details—boosting trust and streamlining checkout.
Whether your guests are booking from a desktop or mobile device, Amazon Pay delivers a seamless and secure payment experience they already know and trust.
Need to handle a refund? No problem—process full or partial refunds easily from the QloApps admin panel.
Features of QloApps Amazon Pay Payment Gateway
Seamless Amazon Pay Integration
Allow customers to pay using their Amazon credentials without leaving your booking site, improving trust and conversion rates.
Secure Checkout Experience
Ensure encrypted, secure communication with Amazon Pay servers using your verified merchant credentials.
Full and Partial Refund Support
Easily process full or partial refunds from your QloApps back office for better guest support.
Transaction Management Interface
Manage and track Amazon Pay transactions from a dedicated section within the admin panel.
Test and Live Mode
Switch between sandbox (test) and production (live) environments to test the integration before going live.
Multi-Currency Capability
Payment will be accepted only in the country and currency for which the credentials are generated..
Debug Logging for Troubleshooting
Enable debug logs to capture transaction details and troubleshoot issues efficiently during integration or live use.
How to install QloApps Amazon Pay Payment Gateway

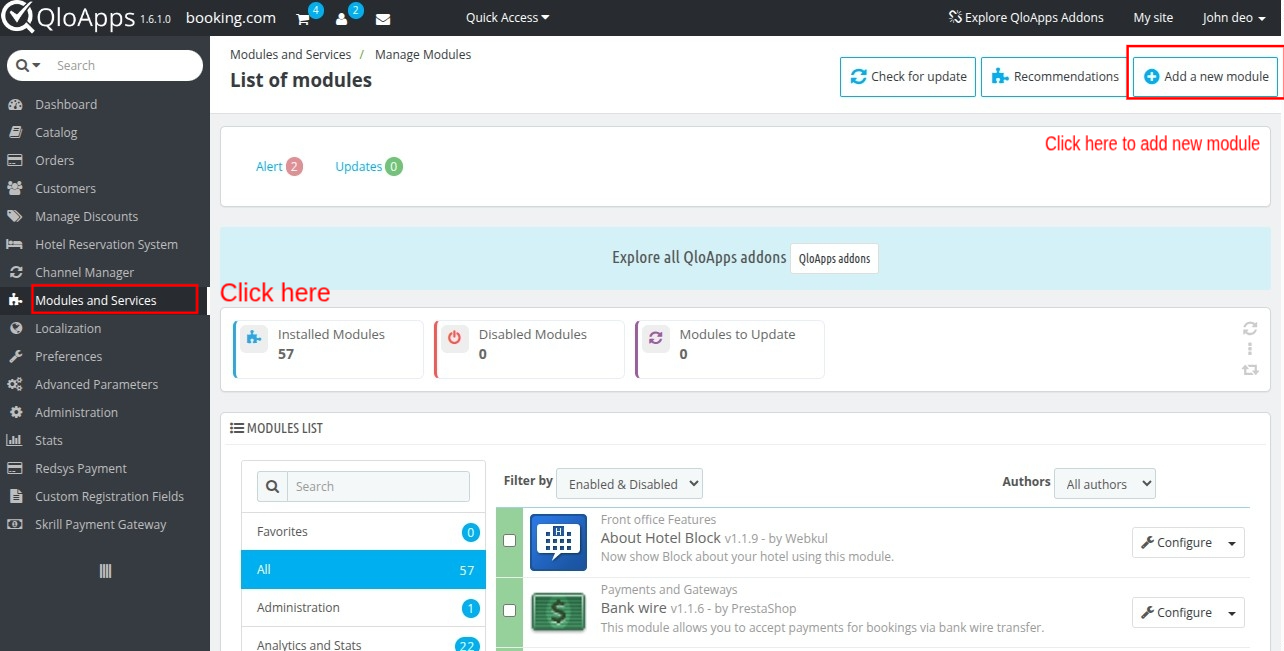
Click on Choose a file and upload the zip file of the module.

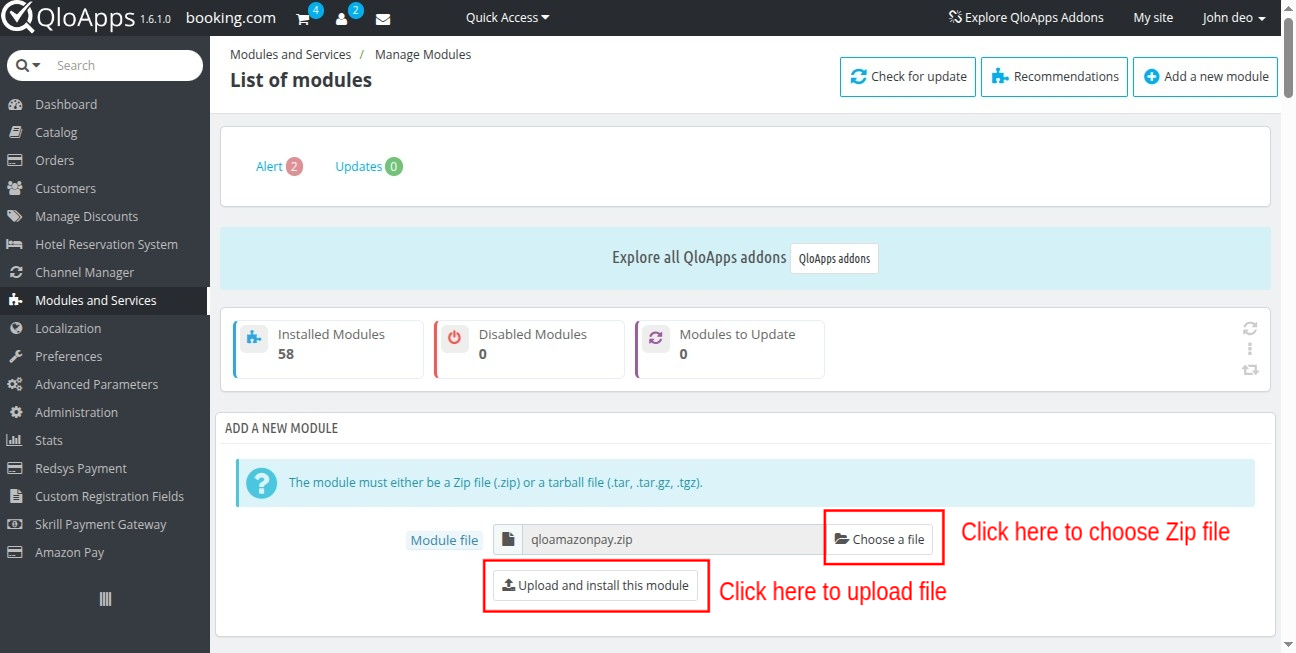
After uploading the ZIP file the module will start installing automatically.
How to configure QloApps Amazon Pay Payment Gateway
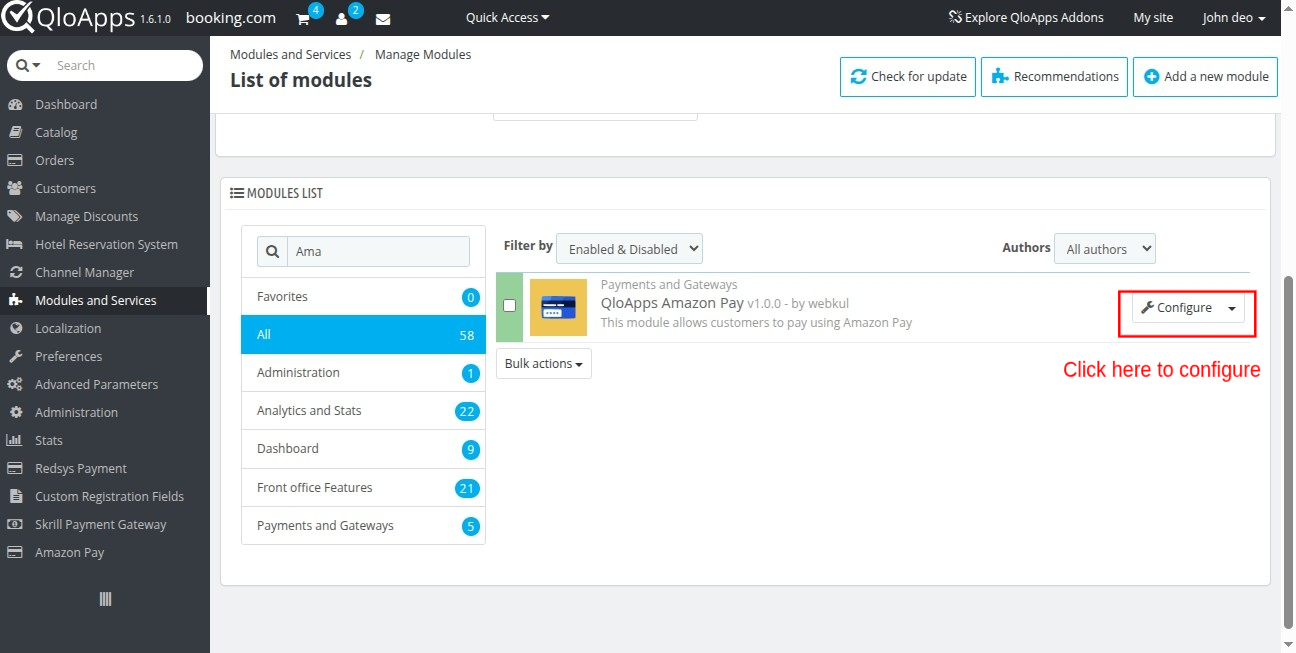
Here, in the Amazon Pay payment configuration block, the admin needs to enter the following information:

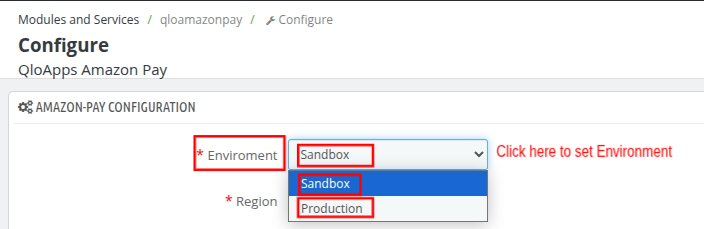
step 1: Select the Environment
The Admin needs to first select the appropriate environment for the Amazon Pay Payment Gateway configuration.
Environment Dropdown
This dropdown allows you to choose between two modes:
- Sandbox (Testing Mode):
This is a testing environment used to simulate transactions without using real money. It is ideal for development, debugging, and integration testing. - Production (Live Mode):
This is the live environment used for processing real customer payments. Once your setup is tested and verified in Sandbox, switch to Production for actual transactions.
These environment options help you ensure a smooth and secure integration of the Amazon pay Payment Gateway in QloApps.
Step 2: Enter the details

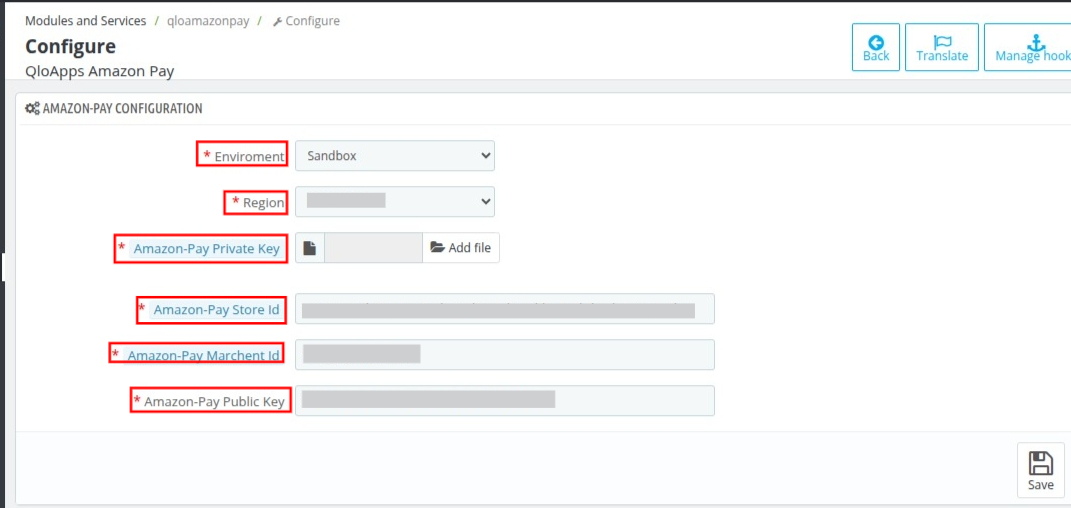
These are the required fields for configuring the Amazon Pay Gateway:
Region
👉 Choose the region where your Amazon Pay merchant account is registered. This ensures proper connectivity to Amazon’s regional services.
Amazon-Pay Private Key
👉 Upload your Amazon Pay Private Key file (.pem format). This key is used to securely sign the API requests sent to Amazon Pay.
Amazon-Pay Store ID
👉 Enter your Amazon Store ID. This unique ID identifies your specific store in Amazon’s payment system.
Amazon-Pay Merchant ID
👉 Provide your Amazon Merchant ID. This is the unique identifier linked to your Amazon Pay business account.
Amazon-Pay Public Key
👉 Paste your Amazon Public Key here. This key is used by Amazon to verify the signed API requests from your server.
Steps to get the Credentials from Amazon pay
In order to configure the module,credential.
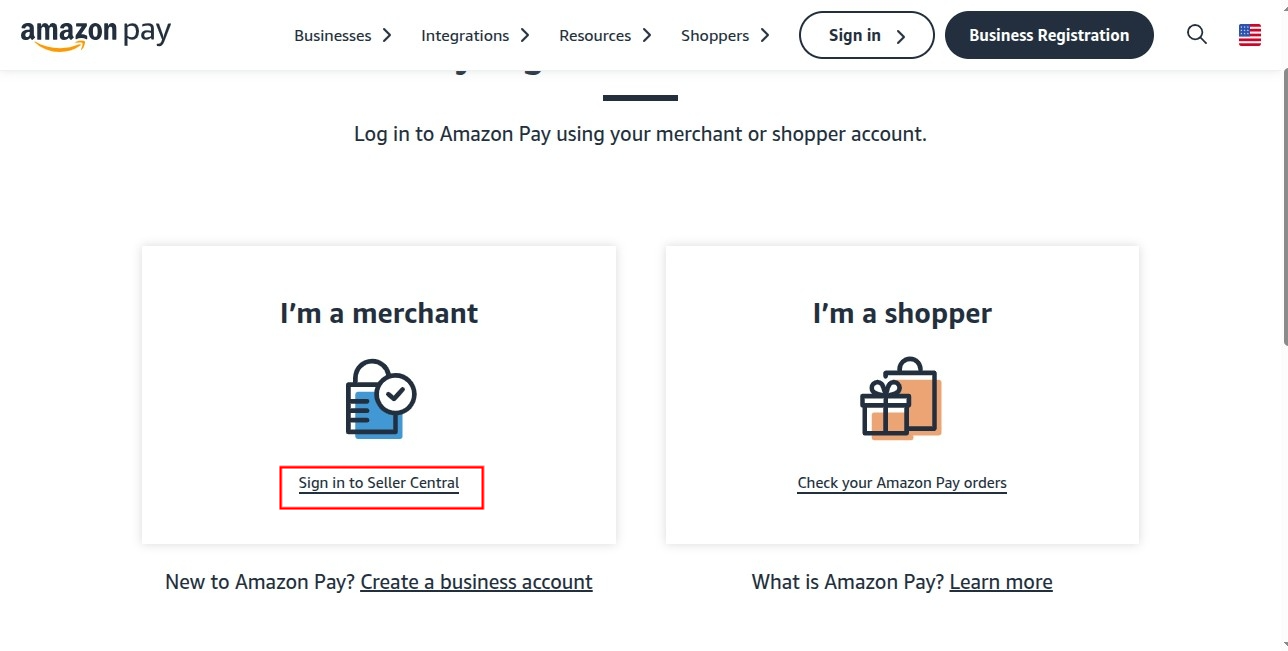
Firstly, visit the Amazon pay website. After that, proceed to login into your Amazon pay account.
QloApps
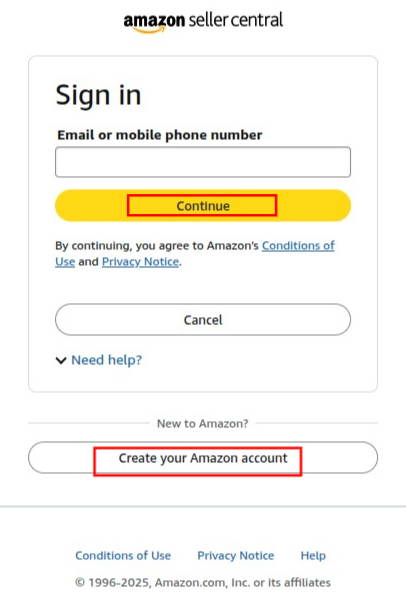
Then click to sign in as seller

Enter your login credentials to proceed.

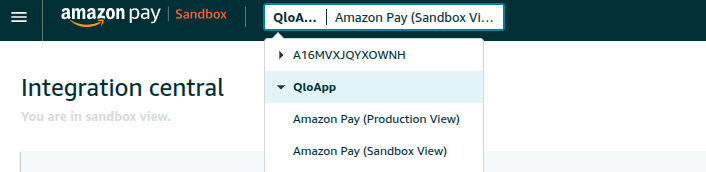
After successfully logging in to the account you will see this type of interface.

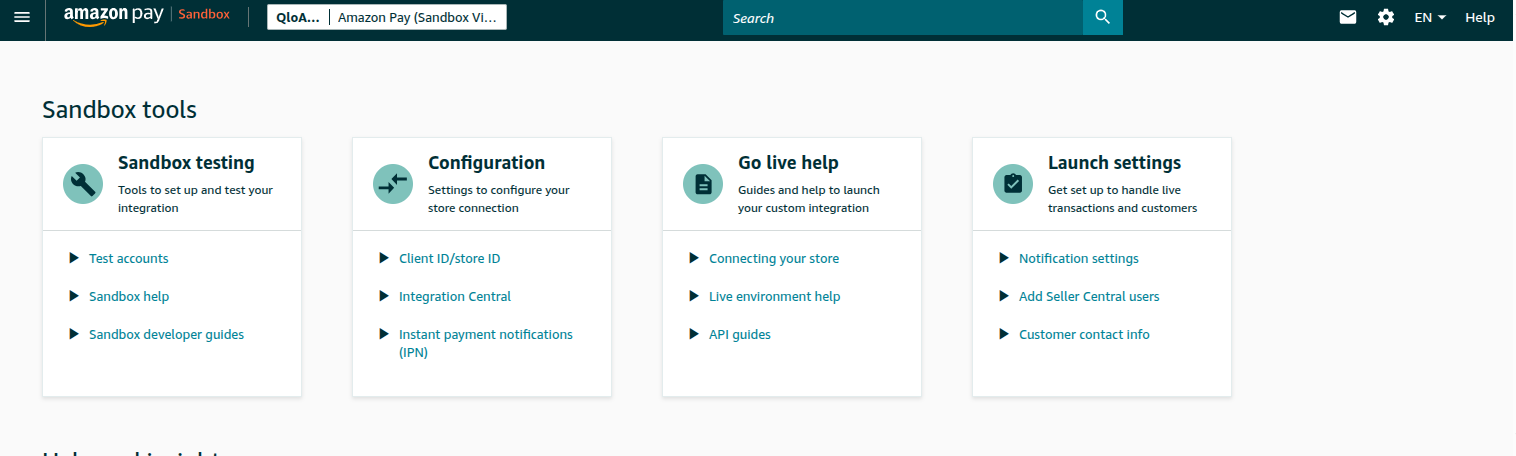
First, set the environment.

After setting the environment, click on the “integration section under configuration ” section.

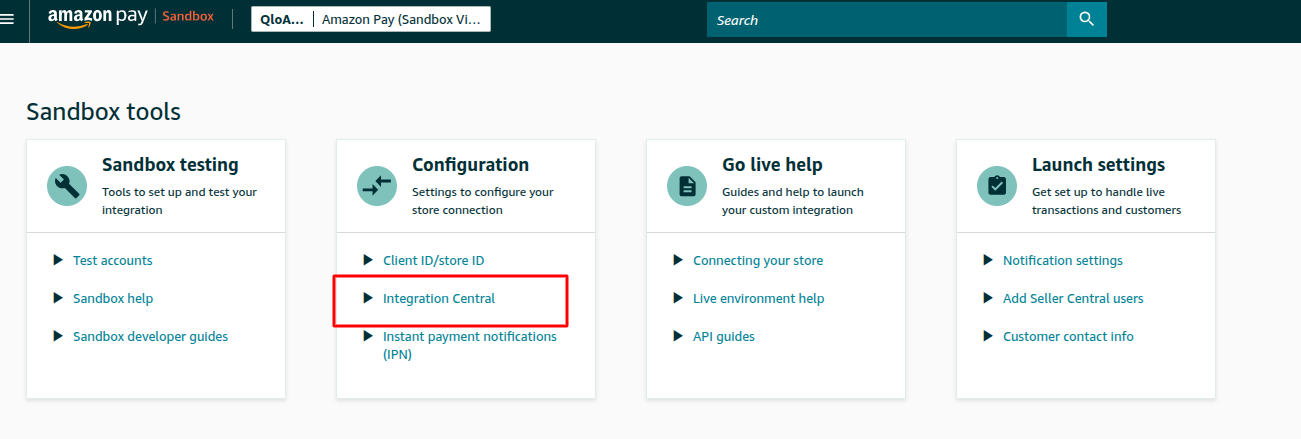
Under the integration central.


Here we get the Store id , Merchant id, public key.
And we can create a private key from here.
NOTE: At the time of key creation, you will receive a private key file with a .pem extension.
Make sure to store this file in a safe place, as the key is generated only once at the time of creation and cannot be retrieved later.
And after Go to the Instant payment notification (IPN).

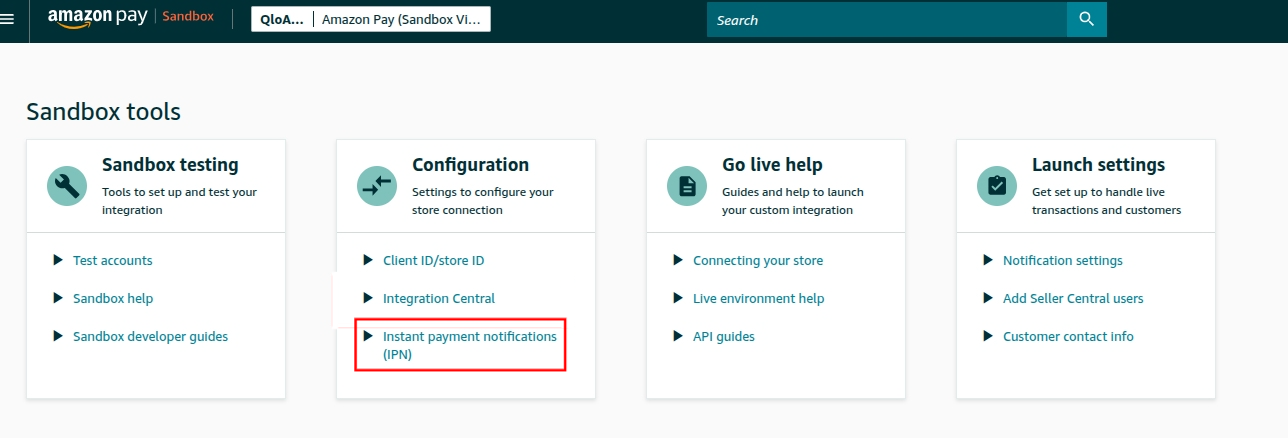
Under Instant payment notification (IPN) you will get

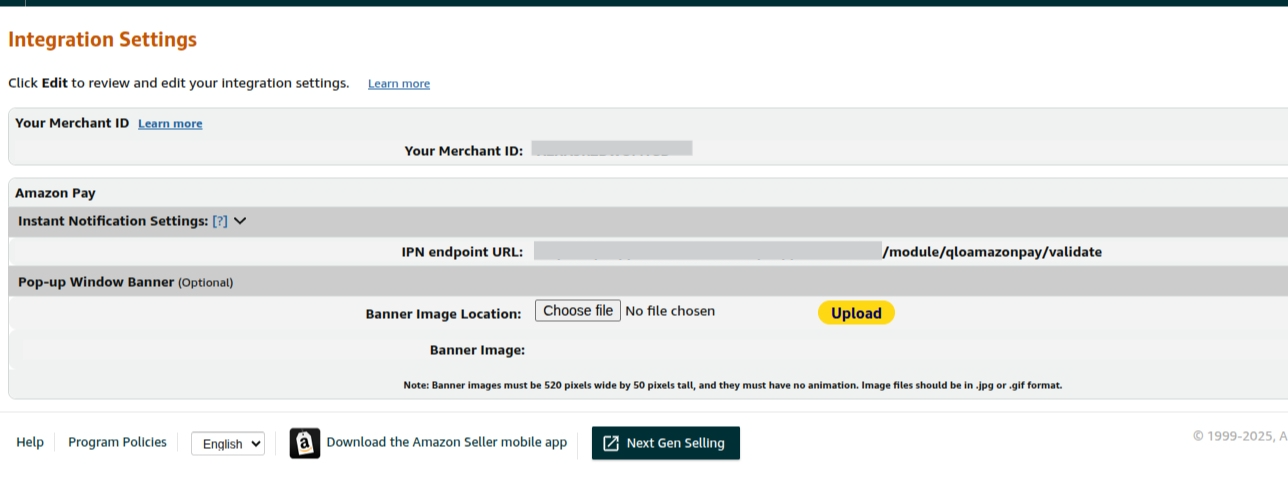
Here it you can edit it.

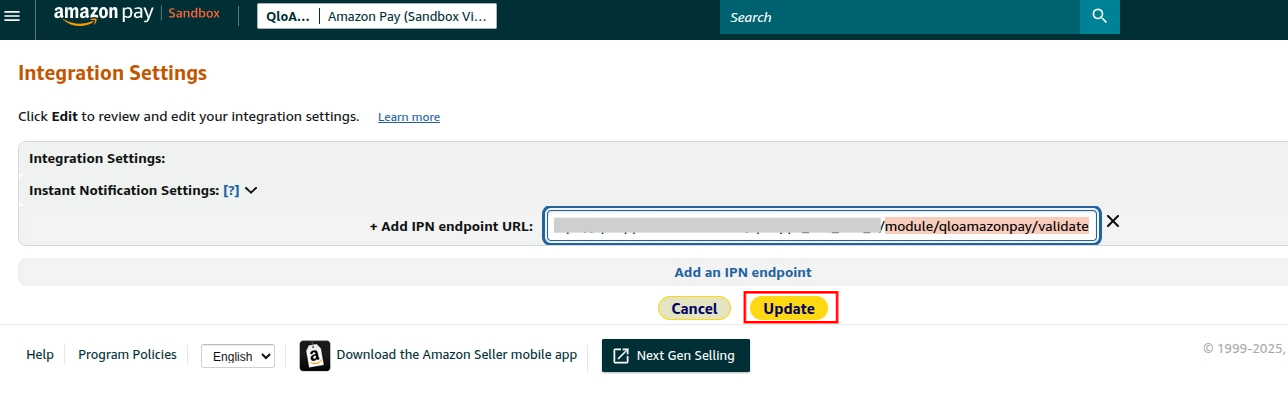
You have to set an IPN URL here with your site name, like: https://abc.com (example)
after the website URL you have to add /module/qloamazonpay/validate
It is important to add end point after your domain to validate.
What is the need to validate Instant payment notification (IPN)?
The IPN endpoint in Amazon Pay sends real-time updates on transactions like payment confirmations, refunds, and chargebacks to keep your system synced.
It ensures your system stays synchronized with Amazon Pay for accurate order and payment status.
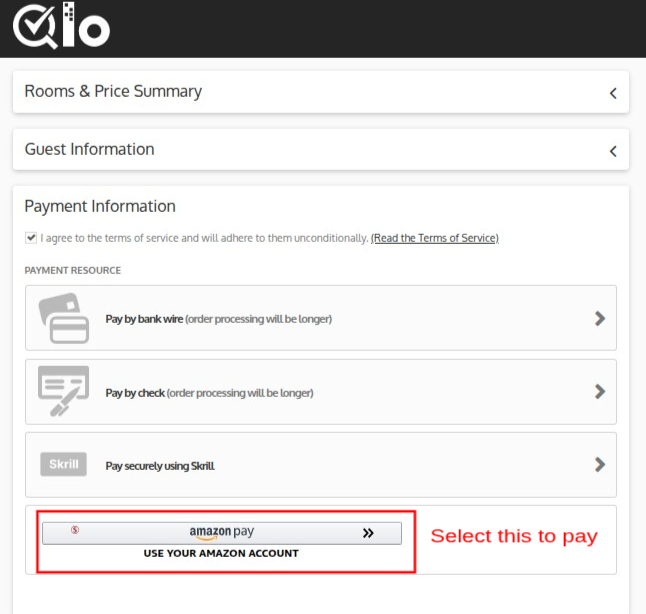
How the QloApps Amazon pay Payment Gateway Works on the Frontend
When a guest/customer books a room and reaches the checkout page, they will see the Amazon pay payment gateway option available to them.
They can choose the Use your Amazon account option for their payments.

After choosing Amazon Pay, you’ll be taken to the official Amazon Pay payment page.

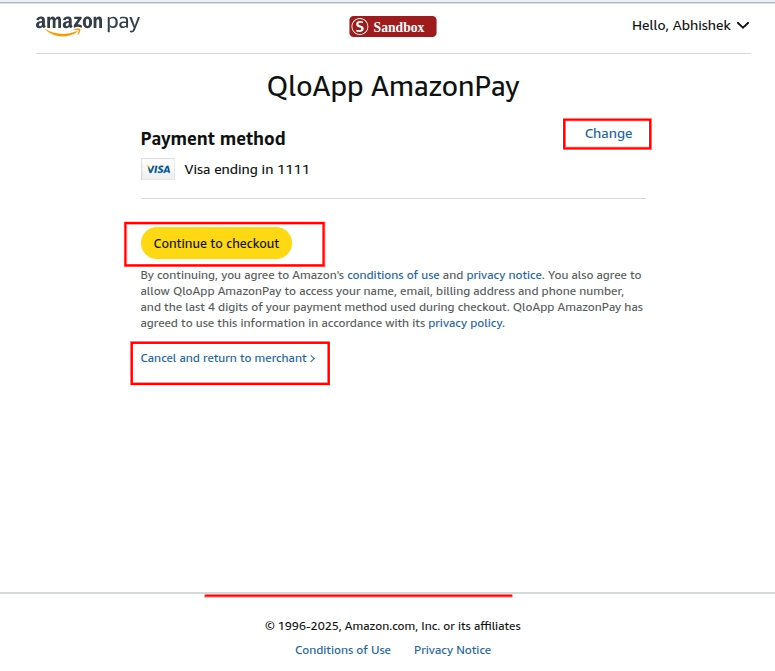
When your customers choose Amazon Pay during checkout on your QloApps website, they are redirected to a secure payment page. Here’s what each key section means:
Change
👉 This option allows customers to switch or update their saved payment method, such as selecting a different credit or debit card from their Amazon account.
Continue to Checkout
👉 By clicking this button, the customer confirms their selected payment method and proceeds to complete the booking or purchase. It’s the final step to authorize the payment.
Cancel and Return to Merchant
👉 This link lets the customer cancel the Amazon Pay process and return to your website without completing the payment.
It ensures a smooth exit if they change their mind or wish to select another payment option.
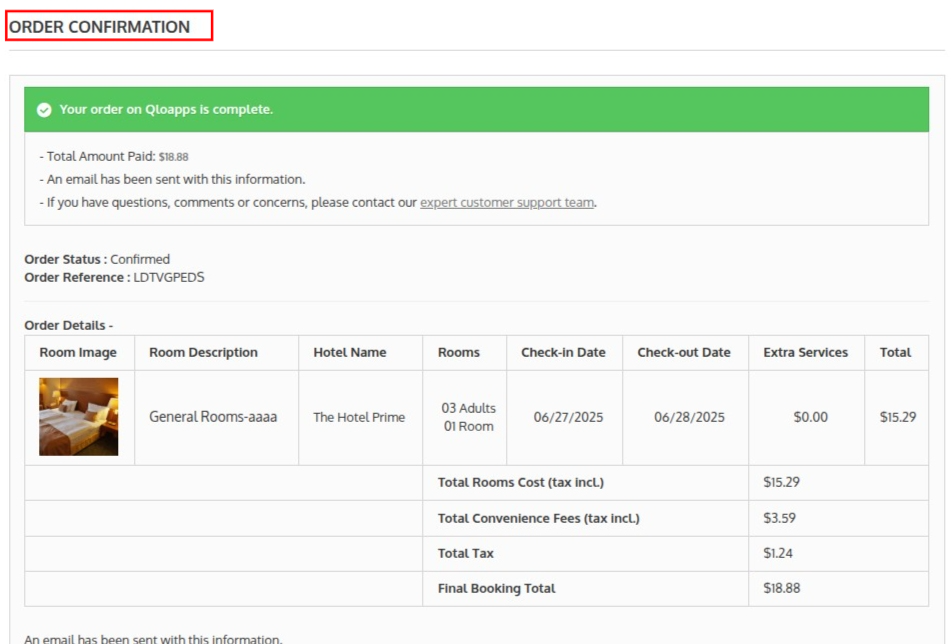
Redirect to Order Confirmation
👉 Once your details are verified and you click on the Continue to Checkout button, you will be automatically redirected to the QloApps order confirmation page.
This indicates that your payment through Amazon Pay was successful and your booking has been confirmed.

How the QloApps Amazon Pay Payment Gateway Works on the Backend
Viewing Amazon Pay Payment Transactions in QloApps
- Log in to the QloApps Admin Panel
- Click on ‘Amazon Pay payment gateway‘
- A table with all Amazon Pay transactions. Each column provides detailed information and comes with filter options to help you quickly find specific records:

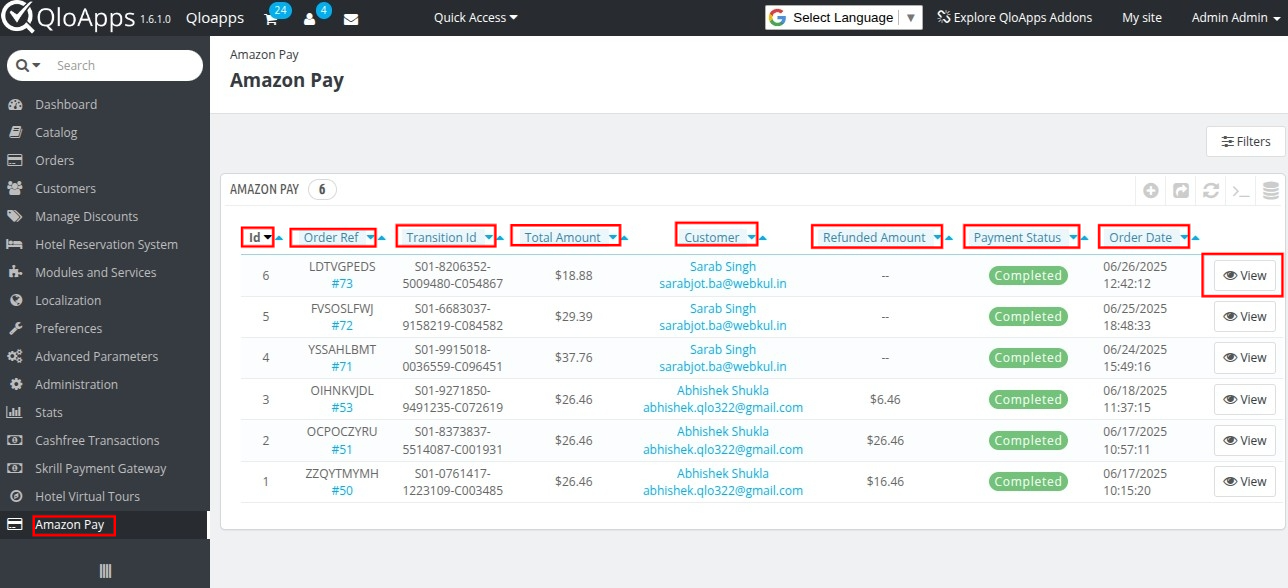
This section provides a detailed overview of all payment transactions processed through Amazon pay on your hotel booking platform.
The system lists each transaction with the following key details (highlighted in red):
- ID: Unique identifier for each transaction record.
- Customer: Name and email of the guest who made the booking.
- Order Ref: Reference number for the corresponding hotel booking.
- Transaction ID: ID generated by Amazon Pay for the specific payment transaction.
- Amount: Total payment amount received from the customer.
- Refunded Amount: Amount refunded to the customer, if applicable.
- Status: Current status of the transaction (e.g., Completed, Pending).
- Order Date: The system records the date and time when you make the booking.
- View Button: Allows the admin to view detailed information about the specific transaction.
This intuitive interface allows hotel administrators to track, monitor, and manage all payment activities seamlessly, improving both transparency and financial control.
After clicking on View on the Payment transaction page, you will be redirected to the Transaction details page

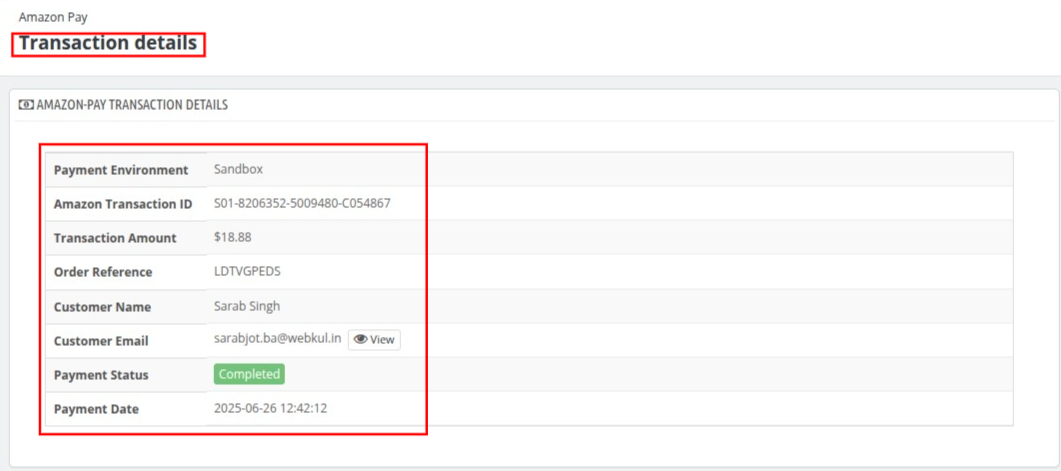
Here are all the details related to the transaction.
How to Refund Transactions Made via the Amazon Pay Payment Gateway in QloApps

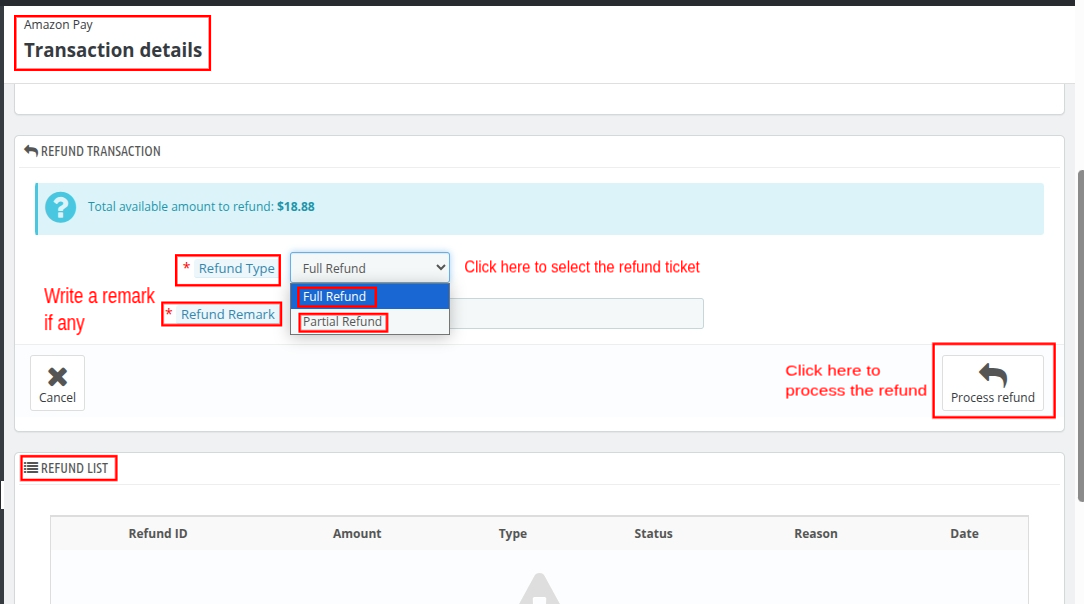
On the transaction details page, you can find an option to refund the transaction.
Check Refund Transaction Section
At the top, you’ll see the total refundable amount displayed.
Select Refund Type
Use the Refund Type dropdown to choose between:
- Full Refund – Refunds the entire transaction amount.
- Partial Refund – Refunds only a part of the total amount.
Enter Refund Remark (Optional)
You can write a remark or reason for the refund in the Refund Remark field.
Click “Process Refund”
Once you fill in everything, click on the “Process Refund” button to execute the refund.
Track Refund in the Refund List
After processing, the refund will appear in the Refund List below with:

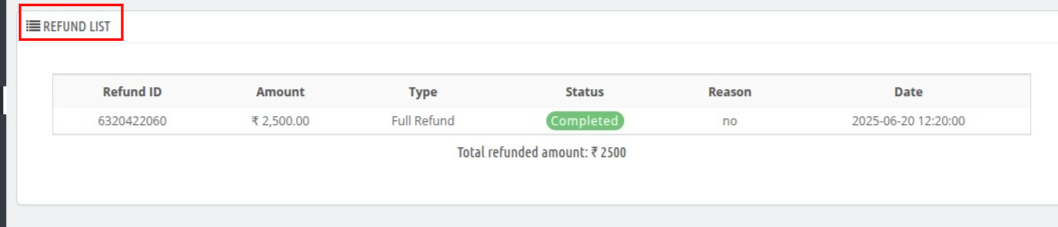
- Refund ID
- Refunded Amount
- Refund Type
- Status
- Reason
- Date
Conclusion
That was all about “QloApps Amazon pay payment gateway”.
Above all, if you want to learn about the functionality of QloApps, then you can visit this link: QloApps Reservation System.
If you have any questions or face issues, don’t hesitate to post them on the QloApps Forum.
Current product version: v4.0.0
Supported framework version: 1.7.x & 1.6.x