QloApps Viva Wallet Payment Gateway
QloApps Viva Wallet Payment Gateway enables hoteliers to accept secure online payments directly through the QloApps booking engine.
Additionally, this module enables hotel owners to process guest transactions seamlessly and provides a professional, trustworthy checkout experience.
Furthermore, this payment gateway provides multiple payment methods (Visa, Mastercard, Amex, Apple Pay, Google Pay, PayPal, etc).
Moreover, Viva Wallet mainly operates across most of the European Economic Area (EEA).
By using the QloApps Viva Payment Gateway, hotel owners can offer their guests a convenient, real-time, and secure payment process while managing all transactions directly from the QloApps backend.
As a result, this eliminates the need for third-party tools or manual follow-ups.
Features of QloApps Viva Wallet Payment Gateway
- Full integration of Viva Payment Gateway with the QloApps booking engine
- Additionally, it enables secure online payments during the booking process.
- Easy backend configuration of Viva Wallet merchant credentials
- Real-time payment authorization and confirmation
- It supports the European Economic Area (EEA).
- Additionally, the admin can enable or disable the payment gateway with a single click.
- Compatible with both desktop and mobile devices
- Consequently, it reduces manual processing with automated payment handling.
- Additionally, the module includes built-in compliance with secure transaction standards.
How to install QloApps Viva Wallet Payment Gateway
You can install the QloApps Viva Wallet Payment Gateway easily by performing the following steps:
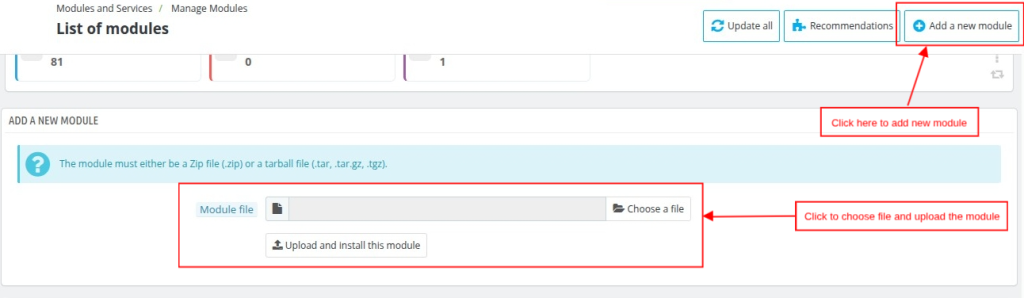
- At the admin back office panel, go to the Modules and Services tab present in the menu.
- Next, click on Add a new module.
- Then, upload the ZIP file of the module.
- After that, upload the ZIP file of the module and click on install.

Once the installation is completed, the system will successfully install your module and display a new Viva Wallet menu in your system.
Before discussing how you can use this Addon, let’s first discuss how you can configure this Addon.
Configuration of QloApps Viva Wallet
To configure this module, search for the Viva Wallet module in the module list on the manage module tab. Now, click on the configure button.

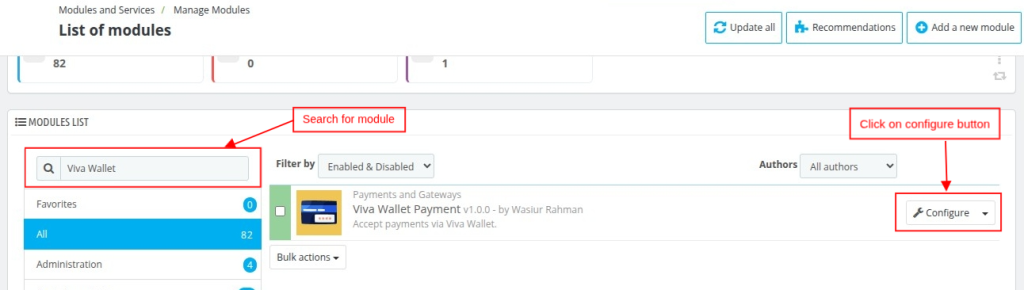
Alternatively, you can open the configuration page directly from the Viva Wallet tab.
Once you click on the Configure button, the Configuration page will open. Here, two types of configuration are provided:
- Configuration
- End Point URLs
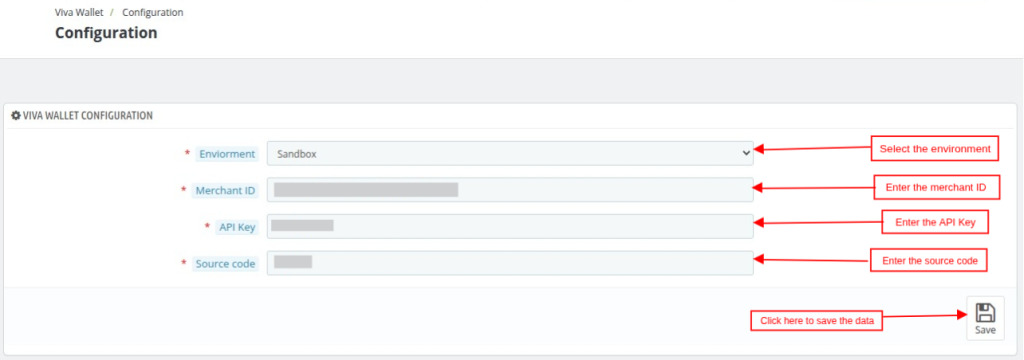
Configuration
Environment: You can select the appropriate environment based on your requirements — Sandbox or Production.
- Sandbox: This is a testing environment that allows you to simulate and verify payments without processing real transactions.
- Production: This is the live environment where actual customer payments are processed and received.
Merchant ID: Simply, enter the Merchant ID provided in your account.
API Key: Enter the API Key obtained from your account.
Source Code: Enter the payment source code available in your account.

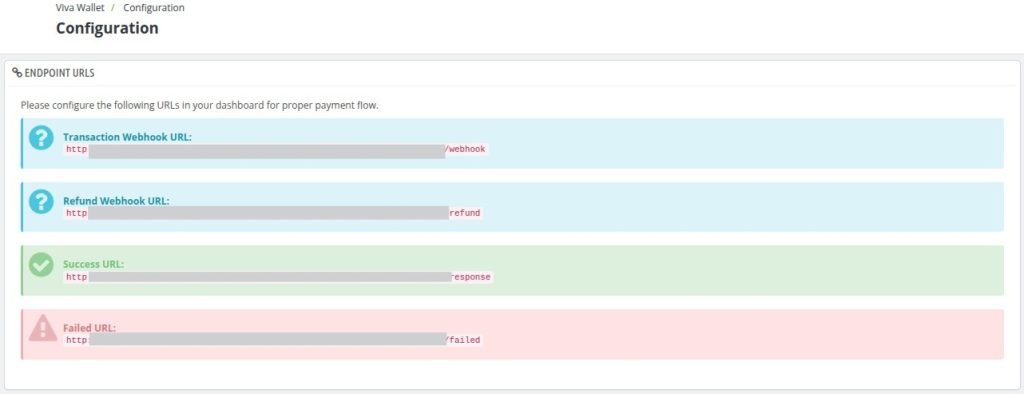
EndPoint URLs
Configure the following URLs in your dashboard to ensure a smooth payment flow.
Transaction Webhook URL: Enter the Transaction Webhook URL in Viva Wallet to receive real-time notifications when a payment is successful, failed, or pending.
Refund Webhook URL: Enter the Refund Transaction Webhook URL in Viva Wallet to receive the real-time notification when the refund is made.
Success URL: Enter the Success URL in Viva Wallet to redirect customers after a successful payment.
Failed URL: Enter the Failed URL in Viva Wallet to redirect customers if the payment fails or is cancelled.

How to Set Up Viva Wallet Configuration and Endpoint URLs
To get the Merchant ID, API Key, Source Code, and Verification Key, you must have an account in the Viva Wallet Payment System.
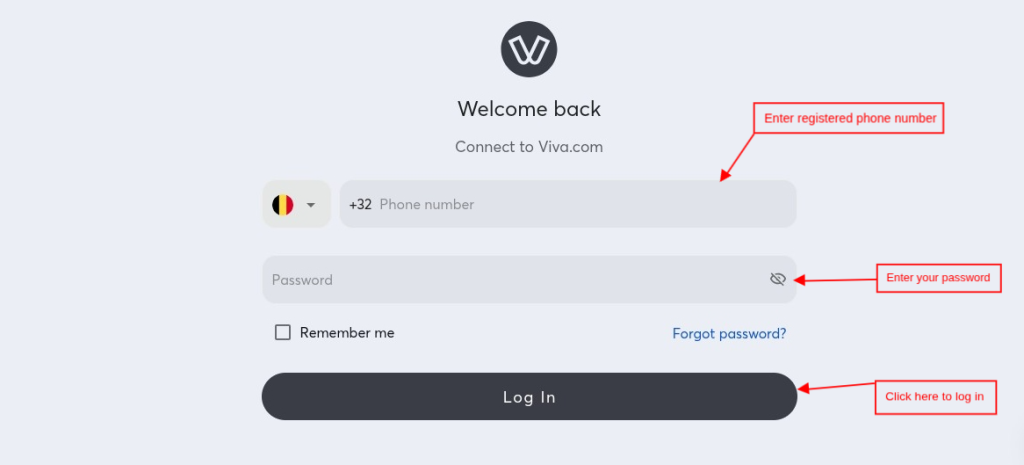
If you already have an account, enter the details and log in to the application.

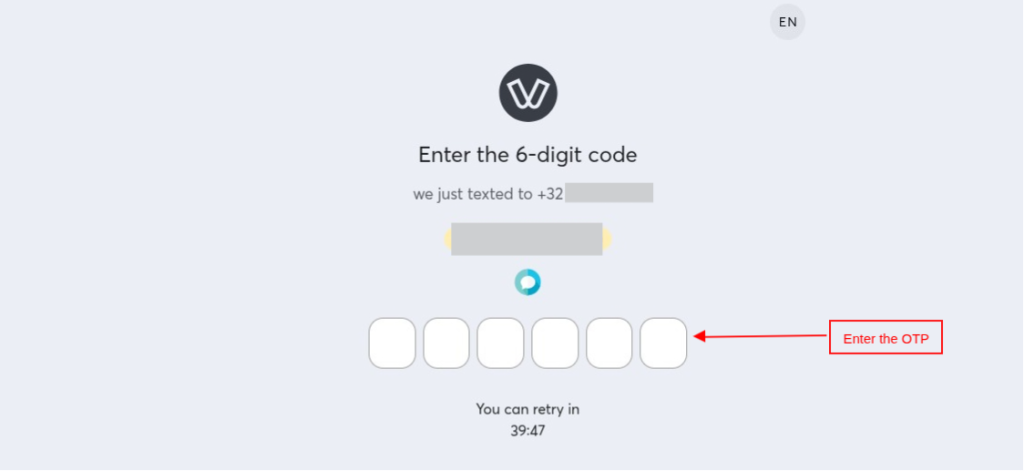
Afterward, the OTP verification page will appear once you click on the login button. Enter the OTP that you have received on your registered mobile number.

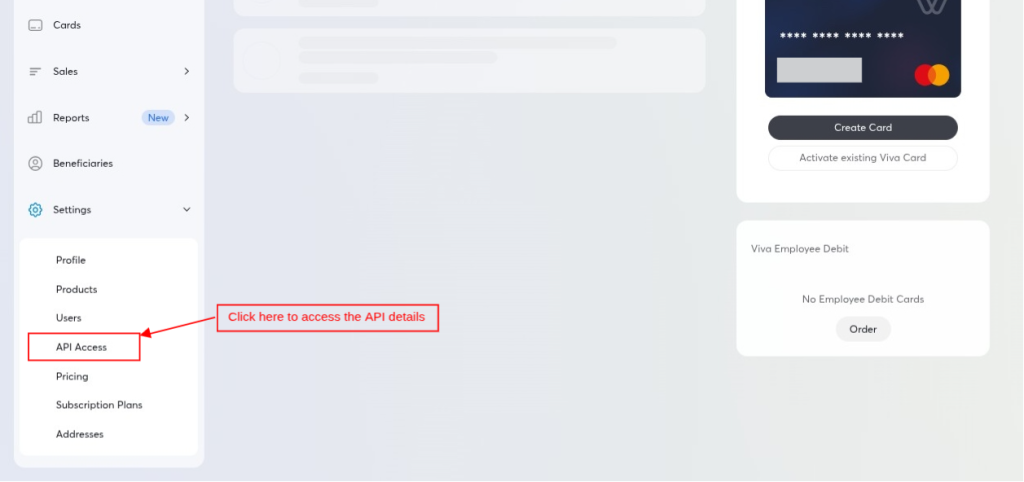
After logging in to your account, you will be redirected to the Dashboard screen. Next, look for the API Access option under the Settings tab.

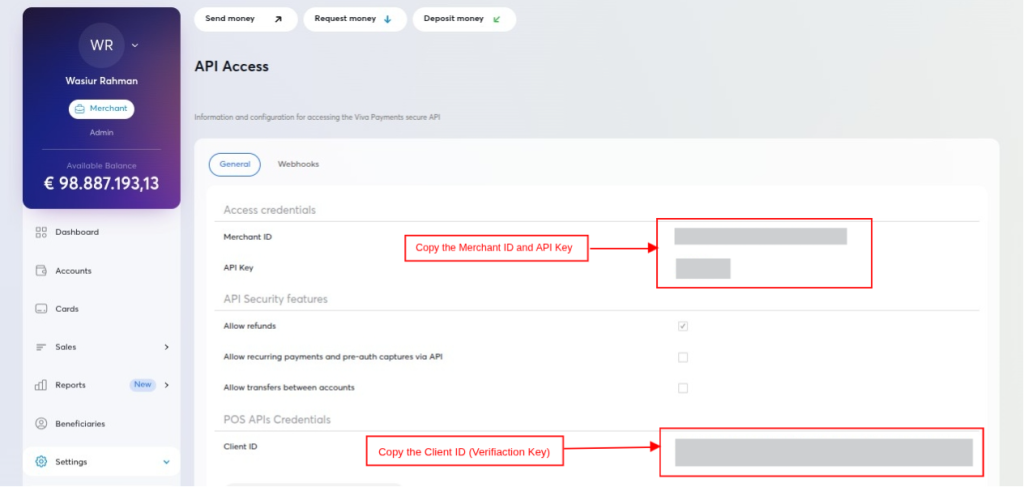
On the API access screen, you will have the Merchant ID, API Key, and Client ID (Verification Key) which you can place under the configuration section, shown above:

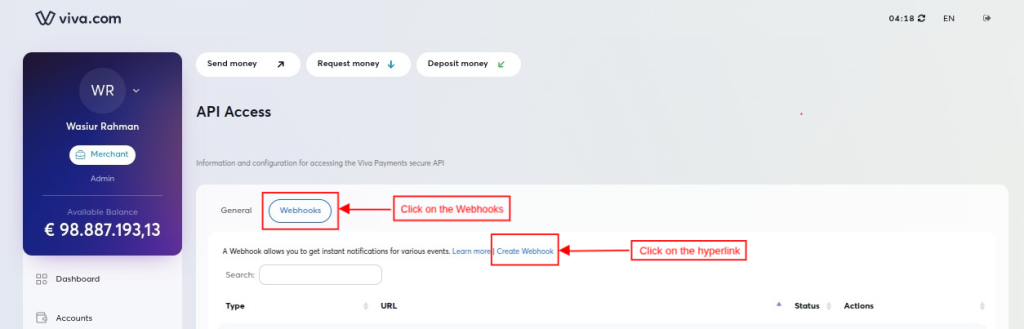
Webhook Setup (Real-Time Notifications)
Create the webhook to receive real-time notifications when a payment or refund is successful, failed, or pending.
Click on the Webhook option and click on the Create Webhook hyperlink to create a new webhook as shown below:

Then, a pop-up window will open where you need to enter the URL and select the event type.

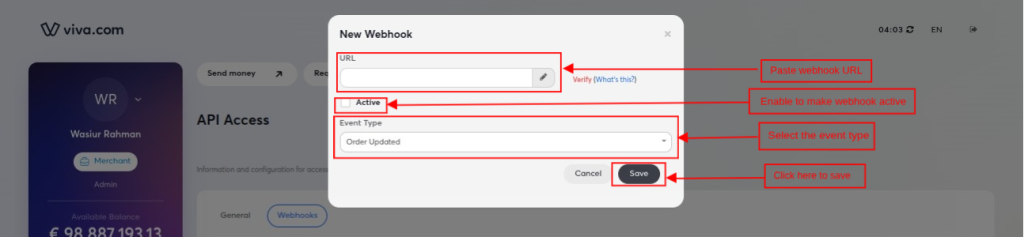
- URL: Paste the Transaction and Refund Webhook URL separately, which is provided in the EndPoint URL section of the configuration.
- Is Active: To make the webhook active, check the is active flag.
- Event Type: Select the event from the drop-down.
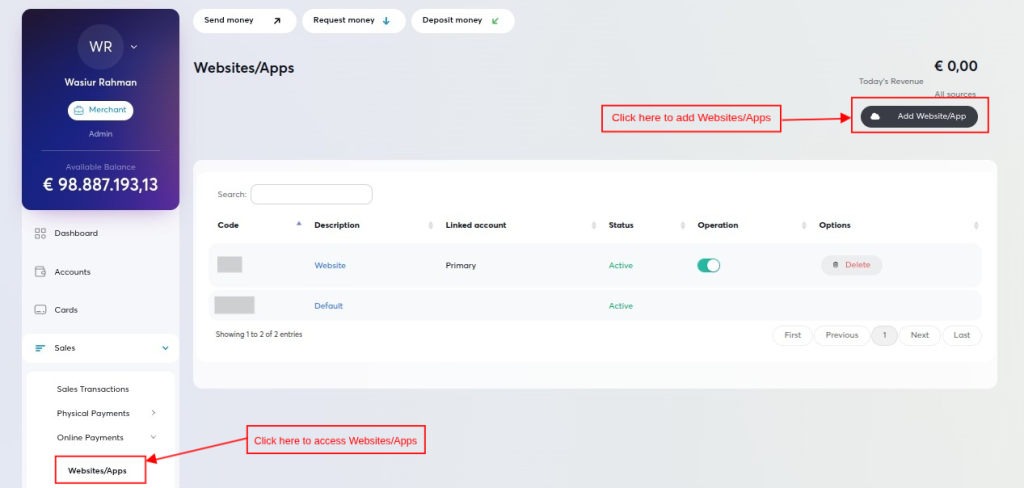
Payment Source Creation: Website/Mobile App
Next, for the Source Code, you can create the Website/App under the Sales section, as shown below:

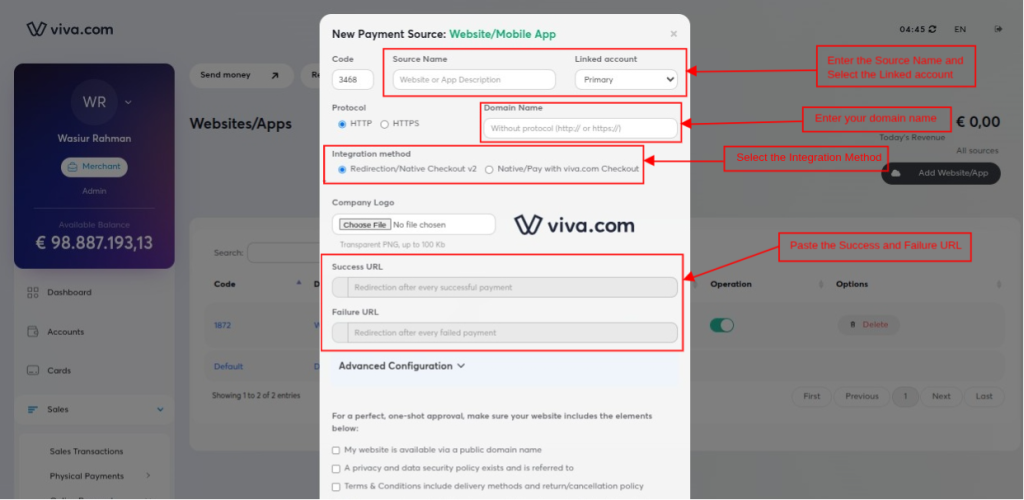
Subsequently, a new page will open after clicking on the Add Website/App button, as shown below:
- Source Name: Enter the Source Name.
- Linked Account: Select the linked account from the drop-down.
- Domain Name: Enter the domain name of your server.
- Integration Method: Select the integration method.
- Success URL: Copy and paste the Success URL from the EndPoint URL (Viva Wallet Configuration page).
- Failure URL: Copy and paste the Failure URL from the EndPoint URL (Viva Wallet Configuration page).

Transaction Detail
In the transaction detail screen, the admin user can view the list of all the transactions made by Viva Wallet, as shown below:
- Order ID: Booking order ID for which the transaction has been made through Viva Wallet.
- Customer: Name of the customer and their registered email ID.
- Transaction ID: Transaction ID of the payment.
- Viva Wallet Order ID: Unique Viva Wallet Order ID.
- Amount: Transaction Amount made by Viva Wallet.
- Status: Status of the payment.
- Date: Transaction date and time.

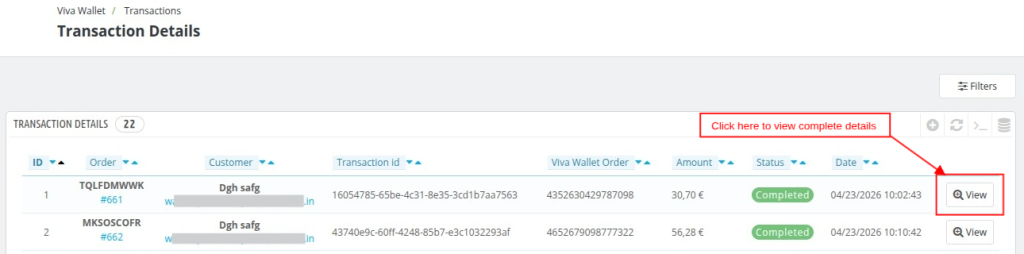
To view the complete details of the transaction, click on the view button in the transaction detail screen, as shown above.
This screen is divided into three section:
- Transaction Details
- Refund Transaction
- Refund History
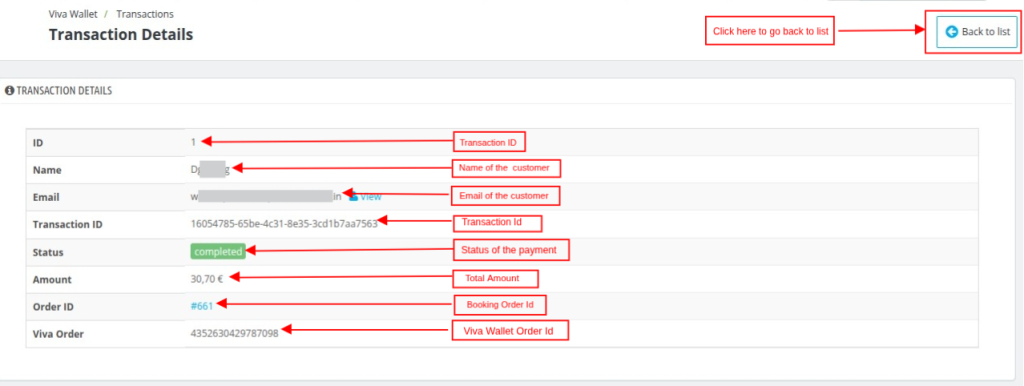
Transaction Detail:
In this section the user can view the complete transaction details that have been made, as shown below:

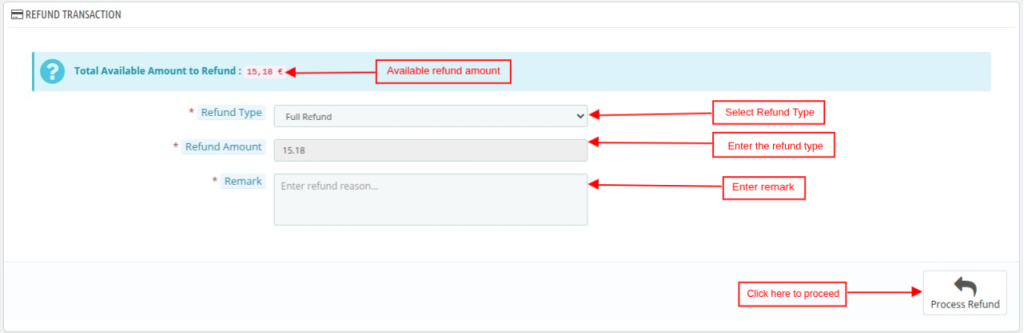
Refund Transaction
If the payment is made through the Viva Wallet payment section, the admin user can initiate the refund of the payment via the refund transaction section, as shown below.
Refund Type: There are two types of transactions that the admin can make.
- Full Refund: After selecting this, the admin user can refund the complete amount to the customer in their Viva wallet account.
- Partial Refund: After selecting this option the admin user can refund the partial amount to the customer in their Viva Wallet account.
Refund Amount: In case of a full refund, no need to enter the refund amount. But in case of a partial refund, you need to enter the amount.
Remark: Add the remark before the refund process.

Refund History
Finally, all the refund records will be shown in the refund history section of the detailed transaction history, as shown below:
- ID: Refund transaction ID
- Type: Type of refund.
- Amount: Total Amount which is refunded.
- Status: Status of the refund.
- Date: Date and Time of the refund transaction.


Conclusion
The QloApps Viva Wallet Payment Gateway helps hotels accept secure online payments directly from the booking website with ease.
It supports multiple payment methods and provides real-time payment confirmation for a smooth guest booking experience.
The module also offers simple configuration, automated transaction handling, and easy refund management from the admin panel.
With this integration, hoteliers can streamline payment operations while offering trusted and secure checkout services.
Additionally, to learn more about the functionality of QloApps, you can visit this link: All-in-One Property Management System.
In case of any query, issue, or requirement, please feel free to raise it on the QloApps Forum.
Current Product Version: 1.0.0
Supported Framework: QloApps 1.6.1 and 1.7.X