QloApps Tours and Packages
QloApps Tours and Packages is an addon that will unlock a whole new dimension of the hotel business for the admin.
Using this addon, the admin will be able to sell tours and packages from his website and not just hotels.
The tours and Packages option on a hotel booking website is always one of the USPs for that website.
People prefer booking tours instead of making all the bookings separately due to many reasons. It saves them time and money and is very convenient.
And that is why they are more attracted to the websites that offer tours and packages.
The decision to offer tours and packages on the hotel websites is very fruitful.
It helps the admin to fillout the inventory quickly, and also earn some extra revenue on the services offered in the package.
So let’s explore the features and workings of this addon.
Note: We are updating all QloApps modules for compatibility with version 1.7.0. Purchased modules will be updated on priority under support.
Features of QloApps Tours and Packages
Frontend Features
- A totally separate interface for the tours and package
- Attractive and elegant design to display packages
- Responsive to different screen size
- Customers make the search for location and date
- Users can filter the search results on the basis of package duration
- The customer can filter search results on the basis of the package price
- Users can filter search results on the basis of package theme
- Customers can filter search results on the basis of package activity
- Users can filter the search results for the location
- Search results show the offer tags for the packages that have a discount in them
- Customers can check the full itinerary of the tour
- Customer can add the room types to the packages as per their choice
- Book or Enquire about the package
- Book the whole package from a single cart
Backend Features
- Admin can create packages of any duration
- Admin can create as many packages as wants
- Admin can create as many as different availability dates for same package.
- Decide if a user can book the packages or he can only enquire about it
- Three kinds of package pricing
- Fixed package price
- Price per person
- Price per room
- Decide the child’s age for no charges
- If u want u can add the child pricing also if you don’t want go for no charges
- Offer a discount on the minimum number of persons or rooms
- Admin can define his Terms and Policies
- Admin can decide which room type will be offered in the package of a particular hotel
- The Admin can create the whole itinerary
- Admin can add activities in the package
- Add transport facility to the package
- Admin can Add special events to the package
- Admin can Add nearby attractions to the package
- Select the theme for the package
- Manage all the inquiries from the customer
- Decide the limit of rooms a user can purchase in a package
- Decide the max occupancy that can be added to a package
- Limit the number of adults and children per room
Prerequisite of Installation of Tours and Packages Addon in QloApps
Note: You have to make the below-mentioned changes in QloApps only if you are using QloApps version 1.5.0 or less.
Before you install the QloApps Tours and Packages addon you must make a few changes in the core for the proper functioning of the module.
The step is very simple, you just have to locate the following paths and replace the mentioned codes.
Path1:
Open the hotel commerce folder –> modules–> hotelreservationsystem then open the hotelreservationsystem.php file.
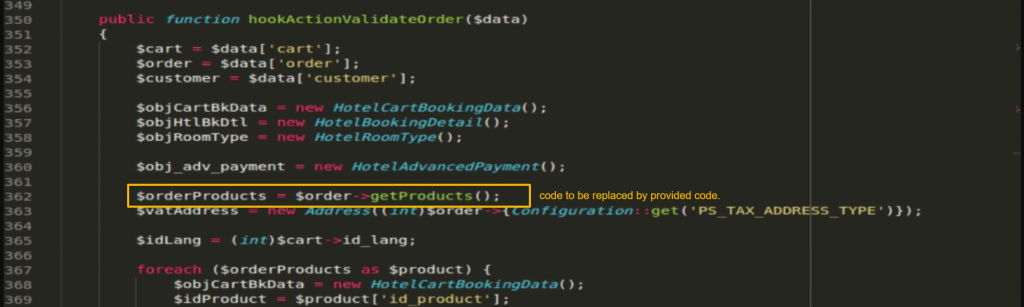
Now go to the line number 362 and replace the following code:
$orderProducts = $order->getProducts();
replace this code with the following code.
$orderProducts = $order->product_list;

Path 2:
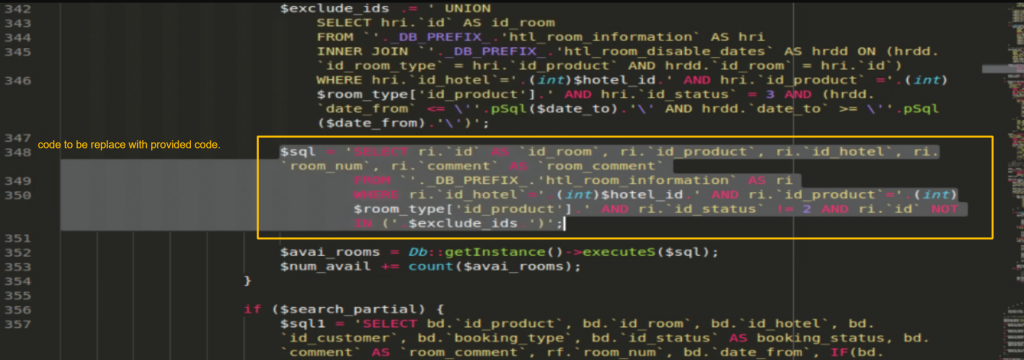
Open hotel commerce folder –> modules–> hotelreservationsystem–> classes then open the HotelBookingDetail.php file.
The change the code from line no 348 to 350
$sql = 'SELECT ri.`id` AS `id_room`, ri.`id_product`, ri.`id_hotel`, ri.`room_num`, ri.`comment` AS `room_comment`
        FROM `'._DB_PREFIX_.'htl_room_information` AS ri
        WHERE ri.`id_hotel`='.(int)$hotel_id.' AND ri.`id_product`='.(int)$room_type['id_product'].' AND ri.`id_status` != 2 AND ri.`id` NOT IN ('.$exclude_ids.')';
will be replaced by:
$selectAvailRoomSearch = 'SELECT ri.`id` AS `id_room`, ri.`id_product`, ri.`id_hotel`, ri.`room_num`, ri.`comment` AS `room_comment`';

$joinAvailRoomSearch = '';

$whereAvailRoomSearch = 'WHERE ri.`id_hotel`='.(int)$hotel_id.' AND ri.`id_product`='.(int)$room_type['id_product'].' AND ri.`id_status` != 2 AND ri.`id` NOT IN ('.$exclude_ids.')';

$groupByAvailRoomSearch = '';
$orderByAvailRoomSearch = '';
$orderWayAvailRoomSearch = '';

Hook::exec('actionAvailRoomSearchSqlModifier',
    array(
        'select' => &$selectAvailRoomSearch,
        'join' => &$joinAvailRoomSearch,
        'where' => &$whereAvailRoomSearch,
        'group_by' => &$groupByAvailRoomSearch,
        'order_by' => &$orderByAvailRoomSearch,
        'order_way' => &$orderWayAvailRoomSearch,
        'params' => array(
            'id_hotel' => $hotel_id,
            'id_product' => $room_type['id_product'],
            'date_from' => $date_from,
            'date_to' => $date_to
        )
    )
);

$sql = $selectAvailRoomSearch;
$sql .= ' FROM `'._DB_PREFIX_.'htl_room_information` AS ri';
$sql .= ' '.$joinAvailRoomSearch;
$sql .= ' '.$whereAvailRoomSearch;
$sql .= ' '.$groupByAvailRoomSearch;
$sql .= ' '.$orderByAvailRoomSearch;
$sql .= ' '.$orderWayAvailRoomSearch;

Path 3:
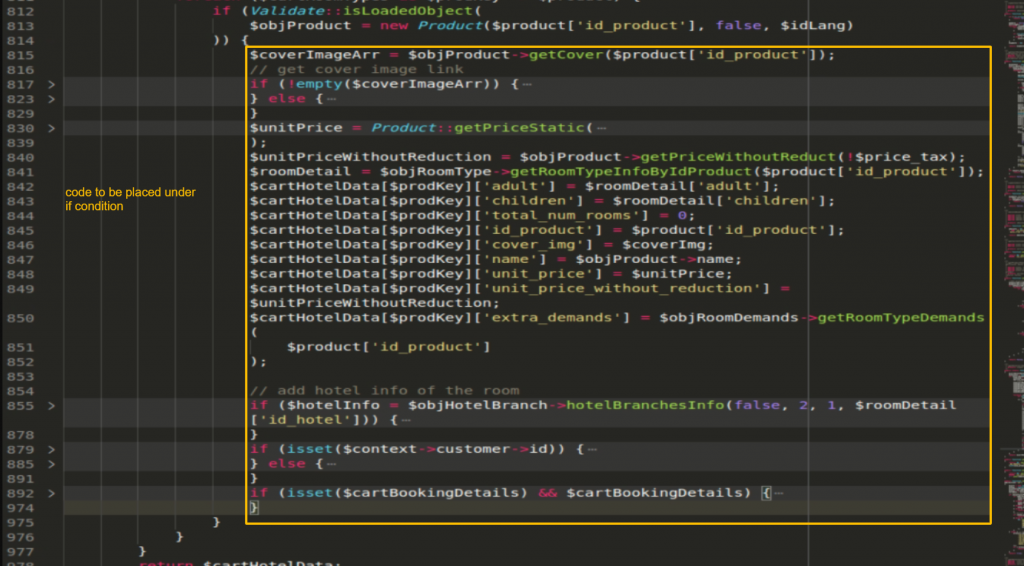
Open hotelcommerce folder –> modules–> hotelreservationsystem–> classes then open the HotelCartBookingData.php file.
Paste the following code under the “if condition” of line number 815 to 974.
if ($roomDetail = $objRoomType->;getRoomTypeInfoByIdProduct($product['id_product'])) {
	//place code from line no. 815 to 974 under this condition
}

Path 4:
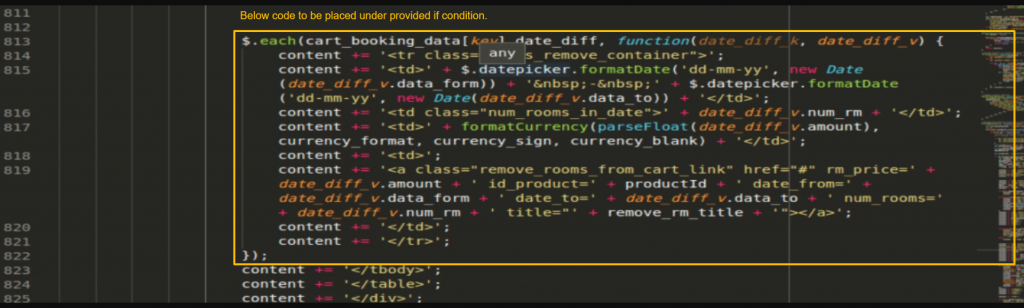
Open hotelcommerce folder –> themes–> hotel-reservation-theme–> js–> modules –> blockcart then open the ajax_cart.js file.
Paste the following code under the “if condition” of line numbers 813 to 822:
if (cart_booking_data[key].date_diff !== 'undefined') {
	// Place code from line no. 815 to 974 under the below if condition
}

Place code from line no. 849 to 858 under the below if condition https://prnt.sc/w5dyzq

if (cart_booking_data[key].date_diff !== 'undefined') {
	// Place code from line no. 815 to 974 under the below if condition
}

Installation Of QloApps Tours and Packages
The installation of any module is very simple in QloApps.
- Go to the Module and Services tab
- Click on Add New Module


- Now upload the Zip file of the Module and click on Install


Now that you have installed the module. So, let us check the module configuration.
Configuration of QloApps Tours and Packages
The configuration of this addon is very simple. As the module is installed we will have a tab in our menu bar by the name of manage packages.


Now, first let us check how we create activities, transport facilities, special events, nearby attractions, themes, and inclusions for the packages.
Then we will check how to create a package and use the above-mentioned features in the package.
Package Activities
This section will help you add the activities that you can offer in a package.
Just go to the Manage Package tab and select Package Activities.
Now you can add or edit Package Activities.


Now, when you click on Add New Activite, the following page will appear which has three tabs for configuration.
Activity Information
Here you have to enter the basic information about the Activity.


Activity Inclusions and Exclusions
Here you have to select what is included in the activity and what is not.


Activity Images
In this tab, you will be able to Add Activity images


Package Transport Facility
This option will allow you to create all the transportation facilities you offer in your packages so that you can choose which transport facility you want to offer in which package.
Just go to the Manage Package tab and select Package Transport Facility.

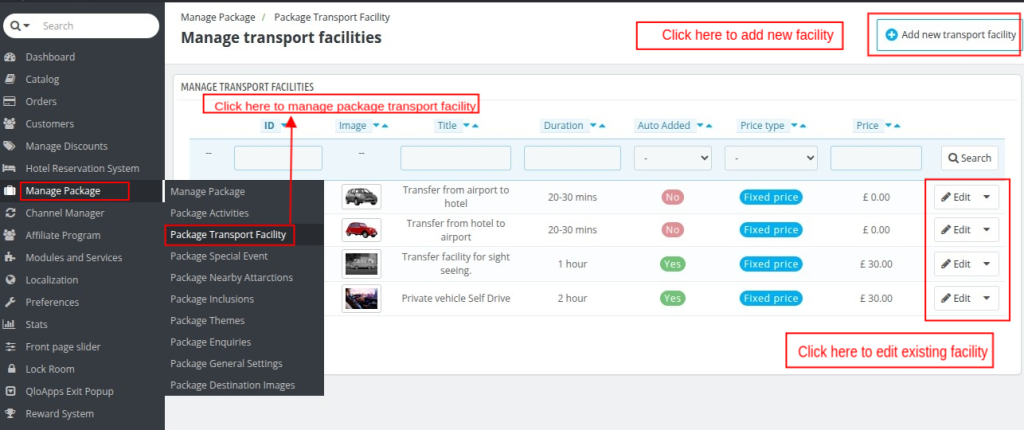
When you click on the Add New transport facility, you will have the following page with two tabs.
Transport Facility Information
Enter the basic information about the Transport Facility that you provide.

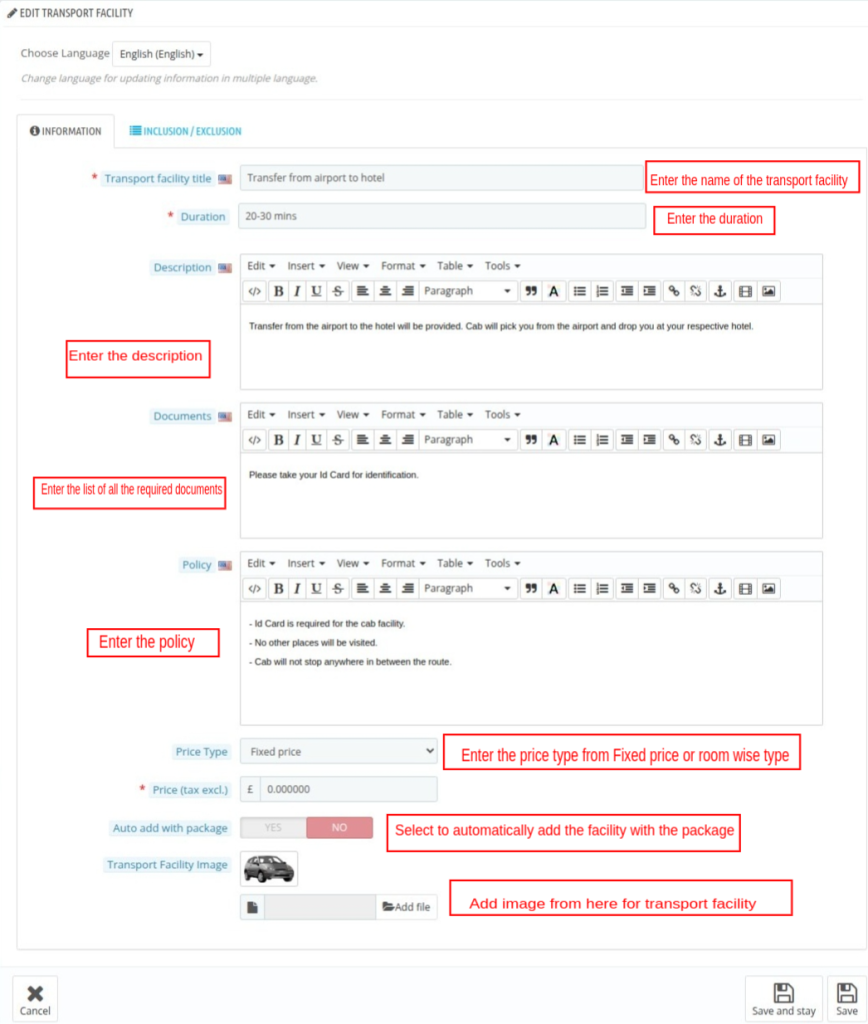
Inclusion/exclusion
Here you have to select what is included in the Transport Facility and what is not.


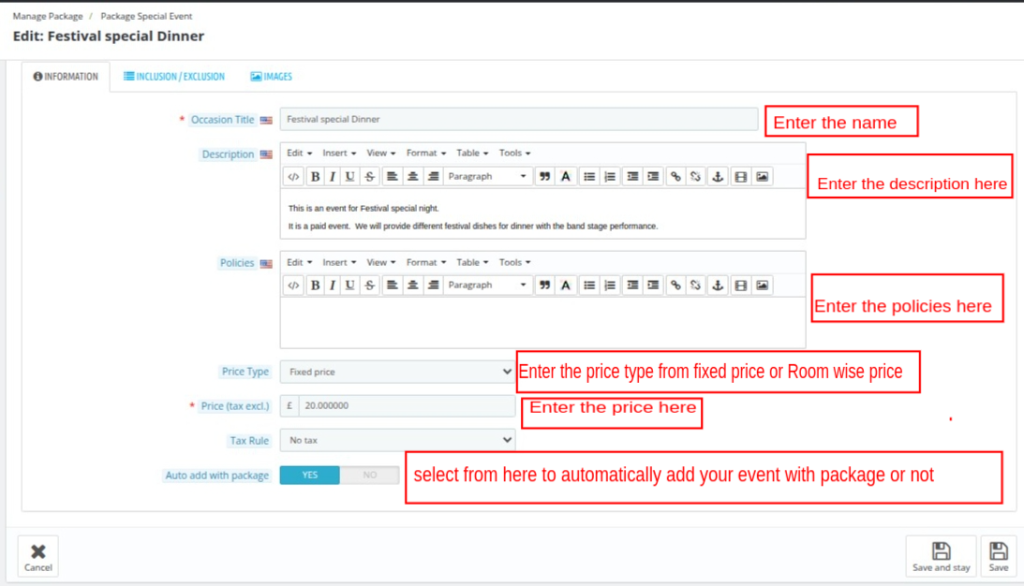
Package Special Events
Here you can create and manage special events that can be included in a package.


When you click on the Add New, the following page will appear.
Special Events Information
Enter the basic info of Special Events.

Inclusion/Exclusion
Here you have to select what is included in the Special Events and what is not.


Special Events Images
Upload the images of the special events here:

Package Nearby Attractions
With the help of this option, you will be able to add nearby attractions that can be added to a package.


Here to create a nearby attraction, you just have to enter some basic information and upload the images.


Then add an image.


Package Inclusions
Here you can create the Inclusions that can be added to a package.
Just go to Manage Package and select Package Inclusion.
These inclusions are for virtual presentation only. There is one more inclusion tab that u see in manage packages, which tells about the details of the inclusions we create here.


Click on Add new Inclusion to create one.


Package Themes
Themes define a package. They tell us what kind of package it is. So here we can create themes and then select a theme in a package.


Just click on Add a new theme to create one, then you will have the following page.


Package General Settings
Here you can upload the header image of the Tours and Packages landing page.
You can choose whether the landing page destination slider should display available packages based on City and Country.


Package Destination Images
Here you can upload the image of the package destination.
You can upload images for package destination based on the destination type and destination. You can select different images for each package destination.


How to Create a Package?
Once you click on the Manage Packages option, you will see a list of all created packages.


After creating all the required options for a package, you can start creating a package in QloApps.
To create a new package, click on “Add New Package”.


Now, you have to enter details in various tabs. Let us understand each tab in detail.
Information Tab
In this tab, you will have to fill out the basic details of the package.


Fill in the following details in the information section:
- Title: Enter the title of the package.
- Active: Enable this option to allow booking of this package by guests.
- Overview: Add a brief overview of the package.
- Countries: Select the countries that are included in the package.
- Tour Days: Enter tour duration in days.
- Availability: Enter the date range in which guests can book this tour.
- Add more dates: You can add more than one date range in which guests can book this tour.
- Contact Number For Package Query: Enter the contact number through which your guests can connect with you regarding their queries.
- CMS for “Know More” Link: Select the page on which you want to redirect your guest once he clicks on the “Know More” option of the package query submission form.
- Include Stay: Enable this option if the package you are creating includes the stay of the guest.
- Not Available for Booking: Enable this option if the package you are creating can not be booked directly by the guest. To book the package, they have to first inquire about the same.
Locations Tab
In this tab, you will be able to add all the locations available in the packages along with the hotels and room types included in this package.


Inclusion/ Exclusion Tab
In this tab, you can list down all the services that are included and excluded from the package.
This tab tell about the details regarding the inclusion/Exclusion , that is why this tab is different from other inclusion tab which tells about the other visualization of these details.


Itineraries Tab
In this tab, you can define the itinerary of the whole tour. You will have to define each day’s curriculum.
Once you land on this page you will see the list of the day-wise itinerary.


Now to create a day’s itinerary just click on Add New and fill out the following details:
- Information: Here you will have to fill out the basic info of the day and select the location of the tour.


- Activities: Select the activity on that day.


- Events: Select the events scheduled on that day.


- Transport Facility: Select the transport facility offered on that day.


- Nearby Attractions: Here you can add the nearby attractions for better visualization.


- Images: Upload up to 4 images per day’s itinerary.


Inclusions Tab
Here you can add all the inclusions that you provide with the package.
This is basically to give the better visual experience about the inclusions.


Price Tab
This tab will allow you to manage the pricing of the package.
Using the commissions option, you can also set and record the commission you are receiving from your partner hotel.
The commission you have earned from the hotel will be calculated on the room type price.
The room type booking amount will be sent to the hotelier after the deduction of your commission amount and the rest amount of the package will be transferred to you.
You can price the package on three basis:
- Fixed Price: Select a fixed price of the package and sell it at that price.


- Price per person: Enter per adult price and age of child below which the child will not be charged. The cost of the package will be calculated as per the number of people added to the package by the user.


- Room-wise price: The cost of the package will be calculated as per the number of rooms added to the package by the user.


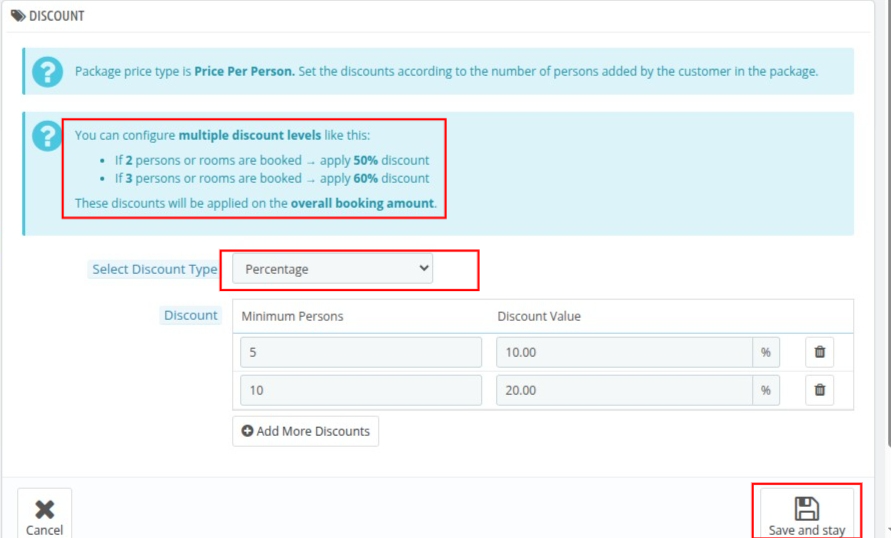
Discount Tab
In this tab, you can offer a discount on dynamic prices. So if you are using per-person pricing then you can offer a discount on the basis of the number of people.
For example you can refer to image.
The same can be done for room-wise pricing.
Note: No discounts can be applied in case of fixed pricing.

Theme Tab
In this tab, you can add the theme of the tour.


Image Tab
Here you will have to upload all the images that you want to show in the package.


Quantity Setting Tab
You can enter the available quantity of this package.


Terms And Policies Tab
In this tab, you can define all the terms and policies of the package. You can define the Payment Policy, Cancellation Policy, Documents, and Terms and Conditions.


Occupancy Setting Tab
In this tab, you have the option to decide the maximum occupancy that this package can accommodate.
- You can limit the number of rooms that can be added to this package.
- Limit the number of adults and children in this package
- Limit the number of adults and children allowed per room in this package.


How Guest can Book a Package from the QloApps Website?
To book the tours the user will have to click on the Tour and Packages button on your website homepage.


Once the user clicks on the Tours and Packages button, after which he will land on the Tours and Packages landing page.
screenshot_1744281532071
Now once the user searches for a package on the basis of location and date then he is directed to the package search result page.


The user now clicks on View Details in order to proceed to book a process.

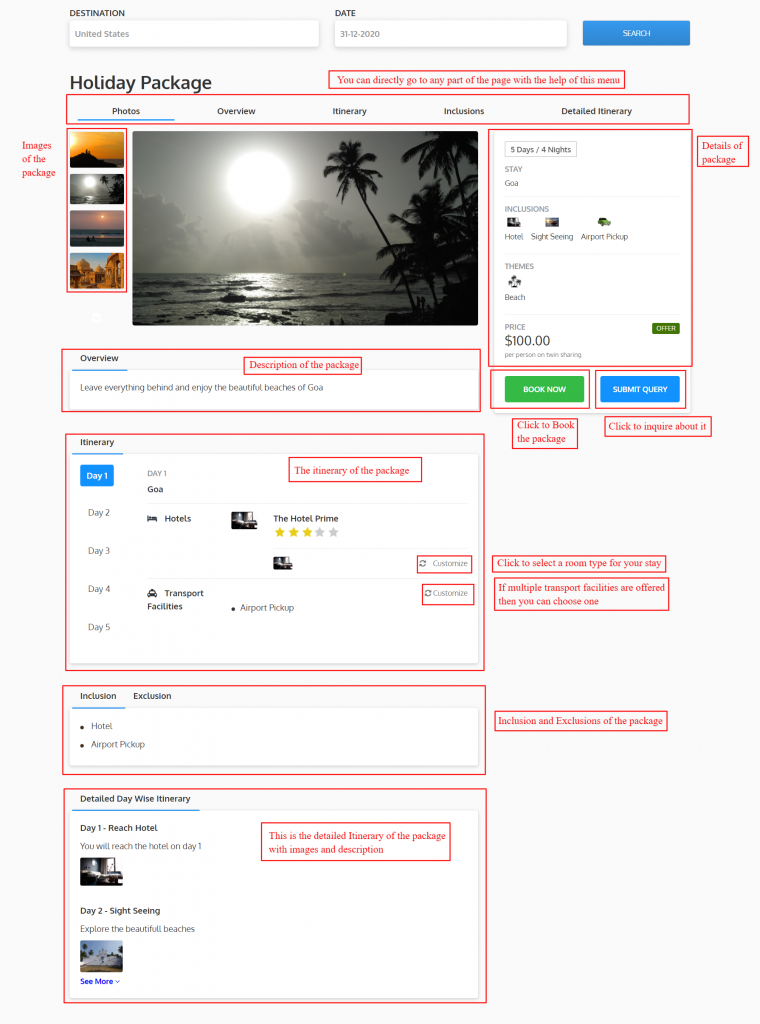
In the itinerary section, the user has the option to customize the room types he wants to book in the package.


The user can also customize the transport facility offered in the package.


Now the user can either Book the package or Enquire about the package.
Package Booking
To book a package the user will have to click on Book Now as shown in the above https://prnt.sc/5SCsJ2umKPt-
.
Once the user clicks on Book Now the system will ask him to add rooms in the package select occupancy in each room.
The user cannot add more rooms than the limit selected by the admin. And he cannot add more occupancy than the limit set by the admin.


Once you click on submit you will have the details of your booking and then you will have to click on Proceed to Checkout.


Once you click on Proceed to Checkout, you will be directed to QloApps default checkout page where you can make the payment and book the package.
Submit Query
When a user clicks on Submit Query a form opens up where the user to enter his details and queries and submit them for the admin to take action.

Once the user submits a query, it will be raised at the backend for the admin to take action.
Managing Package Order
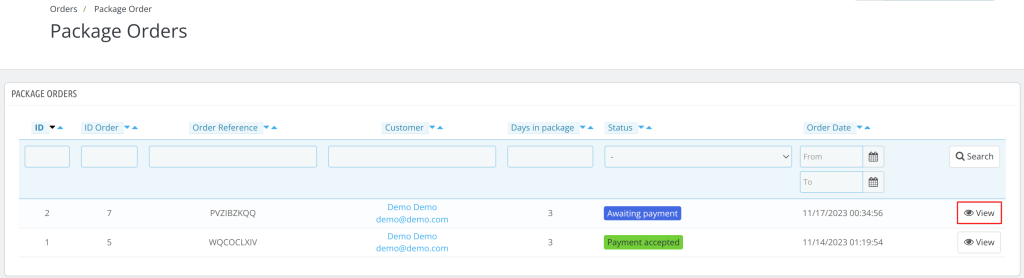
All the orders placed by the guest of the packages are visible on the “Package Orders” Page.
To view all package orders, click on the orders menu from the menu bar and then select the “Package order” option from the drop-down.


The package order page displays the list of all the booked packages. You can view all the details of the package order, by clicking on the “view” button.

On the package order details page of each order, all details are shown.


NOTE: For each hotel that will provide a stay for a particular package order, a different order will be created for that particular hotel.
Hoteliers can view and edit the booking order of their room type on the hotel orders page.
Managing Package Enquiries
The admin can check Package Enquiries in the Manage Package tab –> Package Enquiries.
Then he will see the list of inquiries submitted by the users. He can click on it to check the details.


Once the admin clicks on View, he can view the details submitted by the user and then change the status of the query.


Conclusion
So, this was all from QloApps Tours and Packages. Hope I was able to explain the module to you.
If you want to learn about the functionality of QloApps then you can visit this link: QLO Reservation System – Free Open-Source Hotel Booking & Reservation System
In case of any query, issue, or requirement please feel free to raise it on QloApps Forum.
Current Product Version – V1.2.0
Supported Framework Version – QloApps 1.6.1