QloApps Room Guest Details
QloApps Room Guest Details lets you collect a name, email, and phone number for every traveller in a booking, not just the person who paid for it.
It covers the Back Office order screens, the front-office checkout form, the order confirmation recap, and a My Account view where a guest can update their own details before check-in.
Features of QloApps Room Guest Details
- Capture First name, Last name, Email, and Phone for every adult and child, per booked room, separately for the Back Office and the front office
- Show or require each field independently, and switch the guest details section off on the booking website
- Block Back Office order creation when a room is missing one of its required guest detail fields
- Add a Guest Details tab to the Edit Room modal on an existing order, and open a read-only summary from the icon in the Occupancy column
- Capture guest details on the front-office checkout page, with one form per adult and child in every room and the child’s age shown
- Recap the captured details on the order confirmation page, and let a customer edit them from My Account until check-in when the site enables it
- Offer the selected customer’s own name, email, and phone as a one-click fill for the first occupant
- Reject invalid values, duplicate adult emails or phone numbers, and guest counts above the room type limits
- Lock a room’s guest details in the Back Office and the front office once the room reaches check-in
How to Install QloApps Room Guest Details
- In the Back Office go to Modules and Services › Modules and Services and click Add a new module.
- Choose the module ZIP under Module file, then click Upload and install this module.
- QloApps installs it immediately. Look for QloApps Room Guest Details in the modules list, marked Front office Features with a Disable control — the module has no separate configure screen, so there is nothing further to open here.


The module shows its screens through seven QloApps template and controller files. On install it adds eight hook lines to them, in the Back Office order screens, the front-office checkout, the order detail and confirmation pages, and AdminOrdersController.php. Uninstalling removes the lines again.
If a file is not writable, QloApps skips it without an error and that screen shows no guest details. In that case open the module’s Readme.md. It lists each file and the exact line where each hook goes, so you can add them by hand.
Configuration of QloApps Room Guest Details
This module has no entry of its own in Modules and Services it does not appear in the Back Office menu, and it has no Configure button.
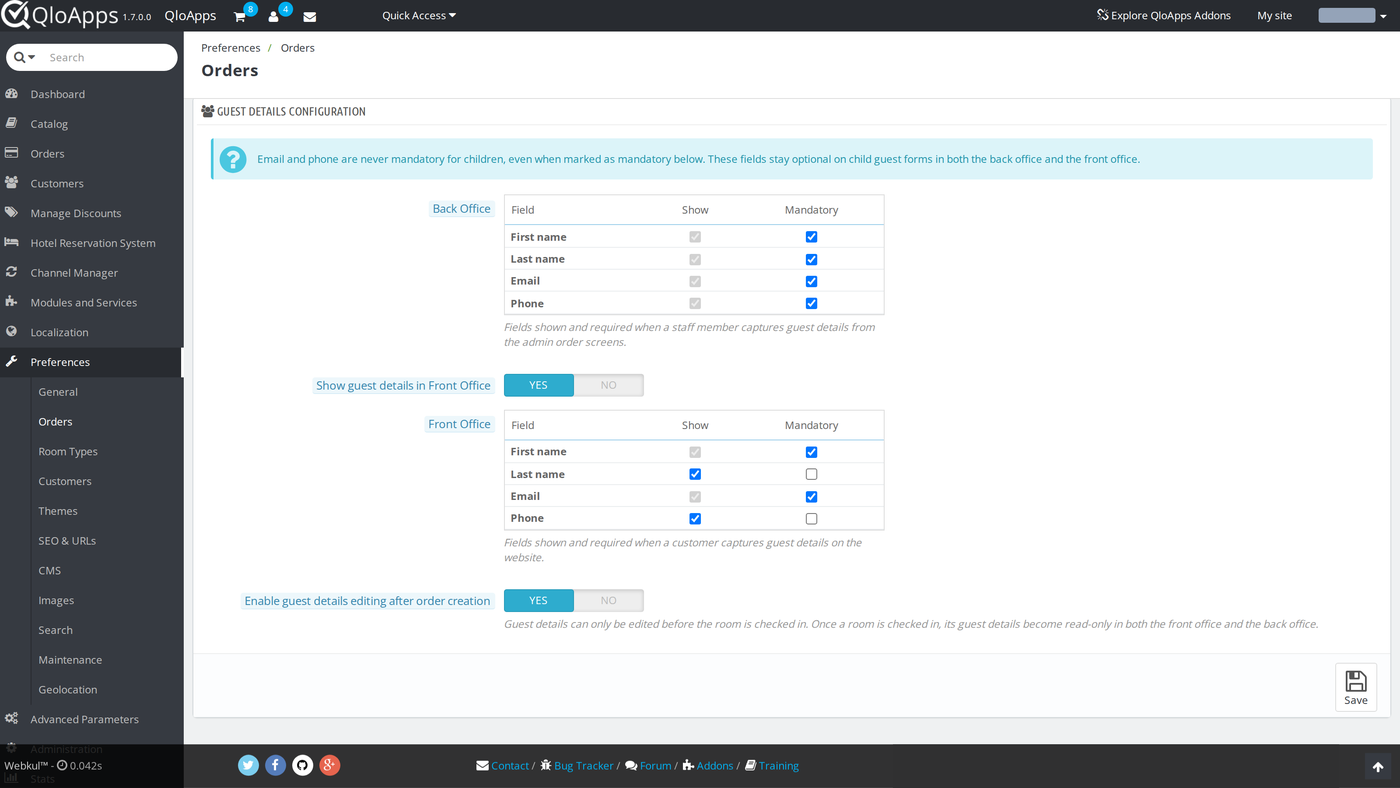
The module adds its settings directly to the order preferences screen. Go to Preferences › Orders and scroll to the Guest Details Configuration panel.
General Configuration
The panel has two tables, one for the Back Office (the fields a staff member fills in from the admin order screens)
One for the Front Office (the fields a customer fills in on the website).
Each table lists the same four fields — First name, Last name, Email, Phone — with a Show checkbox and a Mandatory checkbox for each.
Checking Mandatory automatically checks and locks Show, since a required field must also be visible.
Each table must keep at least one field shown. If you clear them all, QloApps refuses to save and names the office.
On a fresh install, all four Back Office fields are mandatory. In the Front Office, First name and Email are mandatory, and Last name and Phone appear but stay optional.
Below the two tables, Enable guest details editing after order creation controls whether a customer can come back and change guest details from My Account once the booking exists. On a fresh install it starts as Yes.
Click Save at the bottom of the panel to apply changes; the panel saves over AJAX without leaving the Orders preferences page.

Front Office Switch and Child Rules
The panel carries two more controls that sit around the field tables.
Show guest details in Front Office sits above the Front Office table and defaults to Yes. Set it to No to hide the guest details section from the booking website completely: the checkout form, the confirmation icon, and the My Account form. Staff can still capture and edit guest details in the Back Office.
A notice at the top of the panel states that Email and Phone are never mandatory for children, even when you tick Mandatory in either table. They stay optional on every child form. First name and Last name still follow your settings for children.
Adding Guest Details to a New Order (Back Office)
When a staff member builds a booking from Orders › Add new, every room added to the cart gets an Add Guest Details button next to its occupancy.

Clicking it opens a modal with one block per occupant — Adult 1, Adult 2, and so on, matching the room’s occupancy.
Fill in the fields configured as visible for the Back Office and click Save.
If any mandatory field is left blank, QloApps refuses to create the order and names the room that still needs guest details.

If you lower the number of adults or children on a room after entering details, QloApps deletes the details saved for the occupants who are no longer in the room.
Viewing and Editing Guest Details on an Existing Order (Back Office)
Open any order and click Edit on a room row to open the Edit Room modal.
Alongside the existing Rooms, Facilities, and Services tabs, this module adds a Guest Details tab with the same per-occupant fields.
Edit them and click Update Guest Details to save — the change applies to that room’s booking without closing the order.

Once a room has saved guest details, its Occupancy column shows a small info icon next to the adult/child count.

Click the icon to open a read-only table of everyone booked into that room, without opening the full Edit Room modal.

Capturing Guest Details at Checkout (Front Office)
On the front-office checkout page, after a customer fills in their own contact details
A Guest Details section lists every room in the cart and asks for the fields configured as visible for the front office — again, one block per adult and child in each room. Each child block shows the age you chose in the room search, for example Child 1 (Age: 8 years).
A customer can use the Booking for someone else? option, and if they are logged in, QloApps offers their own name, email, and phone as a one-click fill for the first occupant.


QloApps validates the same mandatory fields on the server before the booking can proceed, so a customer cannot skip a required field by disabling JavaScript.
Reviewing Guest Details After Booking (Front Office)
Once the customer places the booking, the order confirmation page shows the same info icon next to each room’s guest count.
Clicking it opens a summary of everyone booked into that room — the details the customer just entered.


If Enable guest details editing after order creation is set to Yes on Preferences › Orders
The same icon on the My Account › Bookings › Booking details page opens an editable form instead of a read-only one, for any room whose booking has not yet reached check-in.
A customer can correct a misspelled name or a wrong phone number without contacting the hotel.


A visitor who looks up a booking as a guest on the Guest tracking page sees the same icon. It opens a read-only summary, because a guest who is not signed in cannot edit.
Checks QloApps Runs Before Saving Guest Details
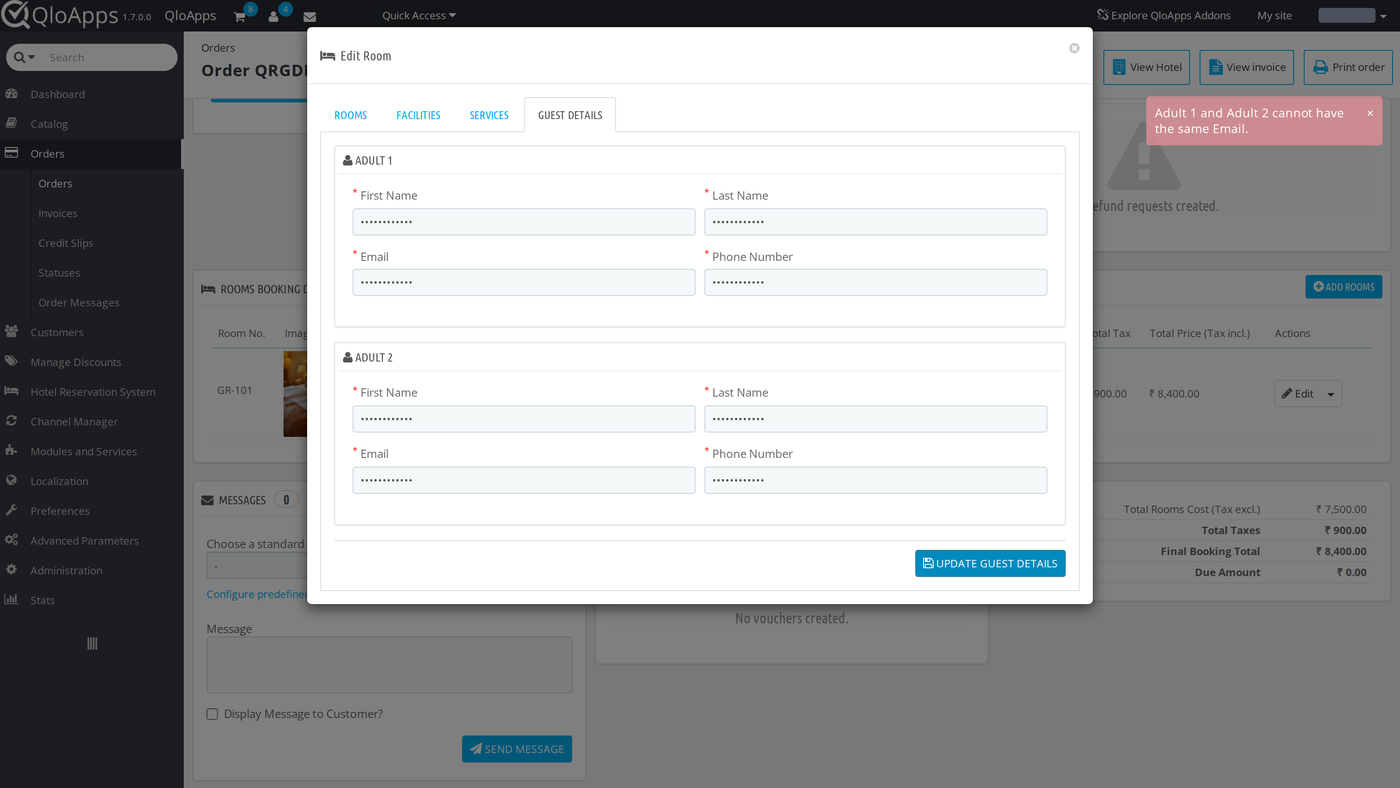
The Back Office and the front office run the same checks when someone saves guest details. Each error names the occupant, for example “Adult 1: Email is invalid.” At checkout QloApps lists the errors above the form, with the room name in front of each one. In the Back Office they appear as a message at the top right of the page.
- Required fields. A blank mandatory field stops the save and names the occupant and the field.
- Formats. First name and Last name must be valid names of up to 32 characters. Email must be a valid address of up to 128 characters. Phone must be a valid phone number of up to 32 characters.
- Children. Email and Phone are optional on child blocks, and the form shows “Optional for children.” under them.
- Duplicate contacts. Two adults in the same booking cannot share an email address or a phone number. QloApps compares across every room in the booking, including rooms you saved earlier, and ignores capital letters in emails and spaces or dashes in phone numbers. It reports the pair, for example “Adult 1 and Adult 2 cannot have the same Email.” QloApps does not compare children and skips blank values.
- Room type limits. The adults, children, and total guests in a room cannot be more than the maximums set on its room type. The message gives the limit and the number provided.
Locking Guest Details After Check-in
You can change guest details only until the room reaches check-in. The lock works for each room on its own, so in a booking with two rooms you can still edit one room after the other has reached check-in.
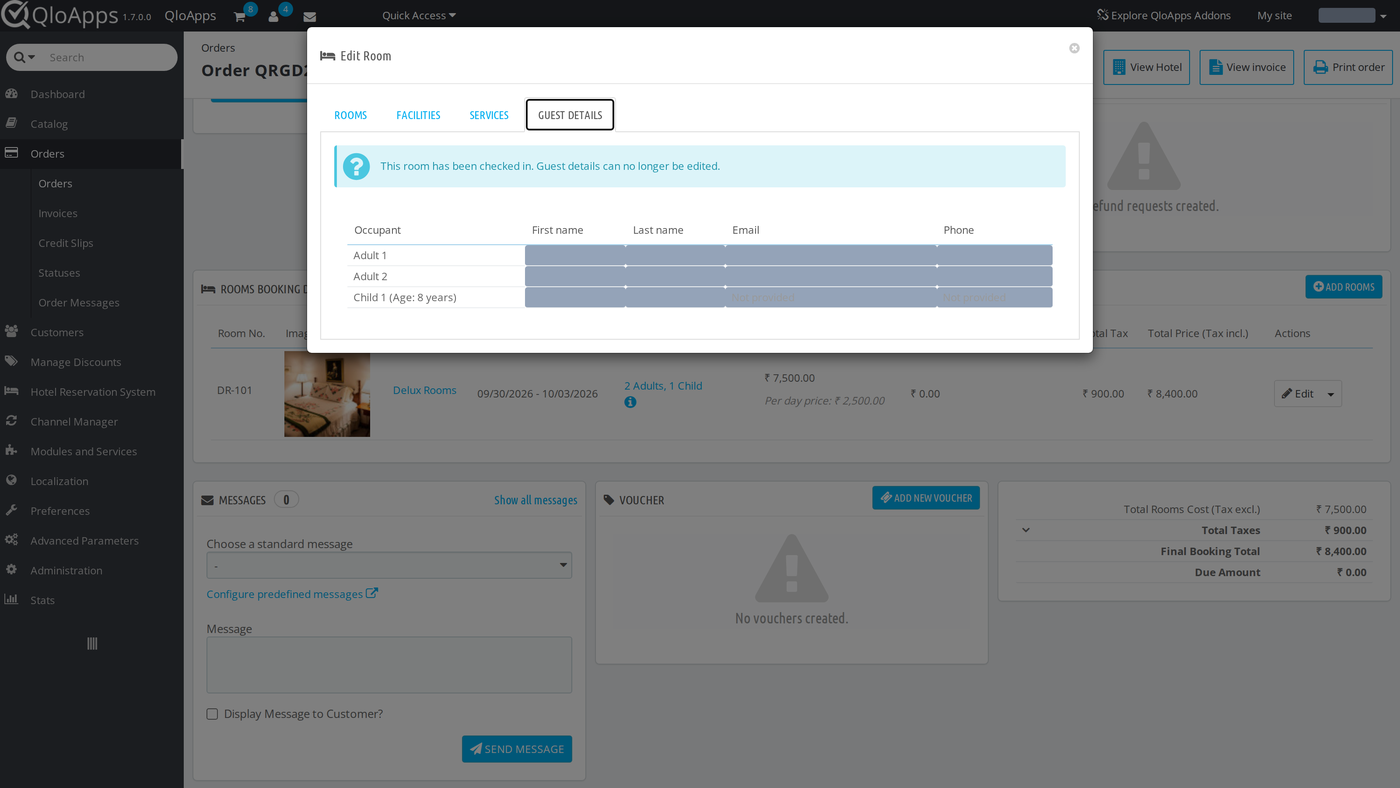
In the Back Office, the Guest Details tab of a checked-in room shows “This room has been checked in. Guest details can no longer be edited.” above a read-only table. The table lists each occupant, with the child’s age beside the child, for example Child 1 (Age: 8 years). Empty Email and Phone values read Not provided.
On the booking website, when editing after order creation is on, the icon for a checked-in room opens the same details as read-only with the note “This room has been checked in, so guest details can no longer be edited.” If someone tries to save changes to a checked-in room anyway, QloApps refuses with “Guest details cannot be edited once the room has been checked in.”
Guest Customer Profiles and Data Privacy
Every time someone saves guest details, QloApps looks at each adult. When an adult has a valid First name, Last name, and Email, and no customer with that email exists yet, it creates a guest customer record with those details. QloApps saves a valid phone number too, and it never changes an existing customer. Children do not get a record.
The QloApps data privacy tools also cover guest details:
- A customer’s GDPR data export includes the guest details saved for their bookings.
- A GDPR deletion request erases them.
- Deleting a customer account removes the guest details linked to that customer.
- Cleaning sales data from the Back Office clears the guest details table.
Conclusion
QloApps Room Guest Details adds a consistent way to record who is actually staying in each room, on both sides of the booking
The Back Office order screens and the front-office checkout — and lets a hotel decide field by field what to ask for and what to require. It also checks each entry and locks the details once the room reaches check-in.
This guide covered installing the module, configuring which fields appear in each office, and the four places a hotelier or a guest will meet it:
Adding a new order, editing an existing one, checkout, and the post-booking summary. It also covered the checks that run before saving, the check-in lock, and how QloApps handles guest profiles and privacy requests.
Webkul develops this module; browse its other QloApps modules at the Webkul Store. Finally, we hope this guide has helped you configure and use QloApps Room Guest Details with confidence.
Additionally, to learn more about the functionality of QloApps, you can visit this link: All-in-One Property Management System.
For technical assistance, raise a ticket at QloApps Support. In case of any query, issue, or requirement, please feel free to raise it on the QloApps Forum.
Current Module Version: 4.0.0