QloApps Reward System
QloApps Reward System is a powerful QloApps add-on that helps business owners (hoteliers) to drive more traffic on their hotel booking websites.
Using this add-on, business owners can boost sales and increase customer retention.
A powerful tool to turn your website visitors’ into potential customers.
- Encourage website visitors to become customers by rewarding them for signup.
- Provide customers booking reward, room reward, and location / hotel reward under Catalog reward configuration tab.
- Give rewards to customers for friends’ referrals.
- Sponsor will get rewards on his/her referral’s registration (signup).
- Reward to sponsor on referral’s orders.
- Referral will get reward points on his/her registration (signup).
- Reward points for sharing orders on Facebook.
- Let users track the reward points history from their accounts.
- Manage email notifications configuration (settings) for both customer & admin actions.
- Analyze performance of reward programs with advanced reports.
Features of QloApps Reward System
- Admin can enable or disable the approval of customer reward points and customer memberships.
- Priorities can be set by Admin to allocate reward points based on a specific customer, customer groups, and customer memberships.
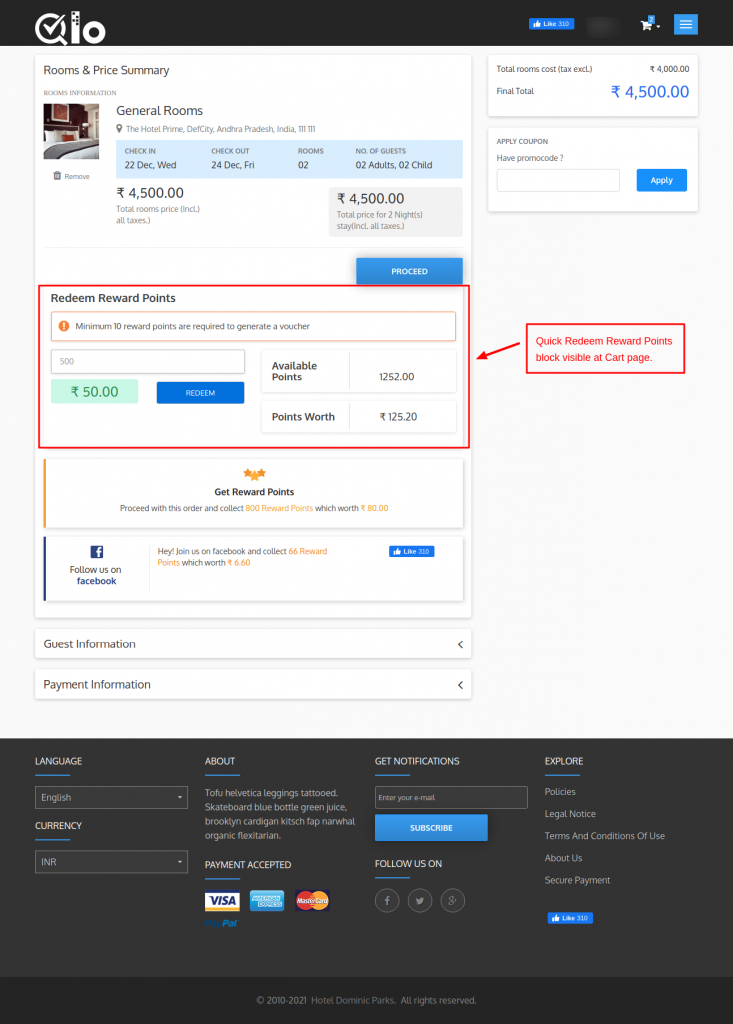
- Admin can display or hide quick redeem reward point block at cart and checkout page.
- The Admin can manage booking statuses for assigning/canceling reward points.
- Admin also can activate or deactivate Catalog reward points and set them.
- Admin can manage the behavior of Catalog reward points: All Reward Points, Minimum Reward Points, Maximum Reward Points, and Set Reward Type Priority.
- The Admin can do enable or disable Booking rewards, Room Rewards, Location / Hotel Rewards under the Catalog reward option.
- Advanced reward rules created by the admin for Booking Reward, Room Reward, and Location / Hotel Rewards based on customer types: Specific Customer, Customer Group, or Customer Membership type.
- The Admin can enable or disable registration rewards & Sponsorship rewards for new customers, set validity for these reward points.
- The admin can manage the registration reward pop-up content.
- The Admin can set a minimum order total and a minimum number of orders for a customer to be eligible to get sponsorship reward points.
- Admin can enable or disable reward points of sponsor on his/her referral’s registration (signup).
- The Admin can enable or disable reward range rules in reward to sponsor on his/her referral’s registration.
- Admin can enable or disable reward points of sponsor on his/her referral’s order.
- Admin can enable or disable reward points of referral on his/her registration.
- The admin can set reward points validity for Reward to Sponsor on Referral’s Registration, Reward to Sponsor on Referral’s Orders, and Reward to Referral on Registration under Sponsorship Reward option.
Highlighted Features of QloApps Reward System
- Admin can enable or disable customer registration reward pop-up.
- Therefore, Admin can also set time validity in days for the Pop-up display cycle.
- Hotel owners can activate or deactivate digital marketing rewards.
- Admin can show order sharing option at Order confirmation page, or Order History page.
- The Admin can enable or disable Reward expiry notification by pop-up, Reward expiry notification by email, Reward balance notification respectively.
- Admin can configure customers’ & Admin e-mail notifications.
- Admin can view reward point statistics, total reward status, reward type-wise status, and customer-wise status graphically.
- The Admin can set Membership criteria for customers to enter reward memberships.
- Admin can assign or reassign Reward memberships to customers.
- The Admin can enable or disable partial use of the voucher.
- The Admin can manage Reward Voucher History.
- Admin can view the total number of sponsors and their combined sponsorship stats.
- The Admin can view total impressions of the website by sponsored users.
- A customer can earn the reward points by referring the website to his friends.
- Admin can create Advertisement Campaigns to increase the traffic of his hotel booking website.
- The Admin can customize the email content to send to targeted users in the Reward Advertisement Campaign.
- Admin can create Advertisement Campaign for Room types, Location / Hotel, Orders, and others.
- When any user placed an order after that the sponsor customer will get order reward points.
- A customer can view a list of his friends who have registered on the website and through which channel at the front end.
- A sponsor friend can view total referrals, assigned registration points, available registration points, order assigned points, and order available points for a particular channel.
Types of Rewards in QloApps Reward System
In QloApps Reward System, there are four types of rewards:
- Catalog Reward: Catalog Rewards has three types i.e, Booking Reward, Order Reward, and Location / Hotel Reward.
- Registration Reward: The Registration Reward feature is designed to encourage new users to sign up on your hotel website. When a new guest registers an account on your QloApps website, you can automatically reward them with Reward Points
- Sponsorship Reward: Sponsorship rewards has three types: Reward to Sponsor on Referral’s Registration (signup), Reward to Sponsor on Referral’s Orders, and Reward to Referral on Registration (signup).
- Digital Marketing Reward: Digital Marketing rewards has Order Share Reward.
Installation of QloApps Reward System Addon
The installation of any module is very simple in QloApps.
Go to the “Module and Services” tab.
Click on “Add New Module”.

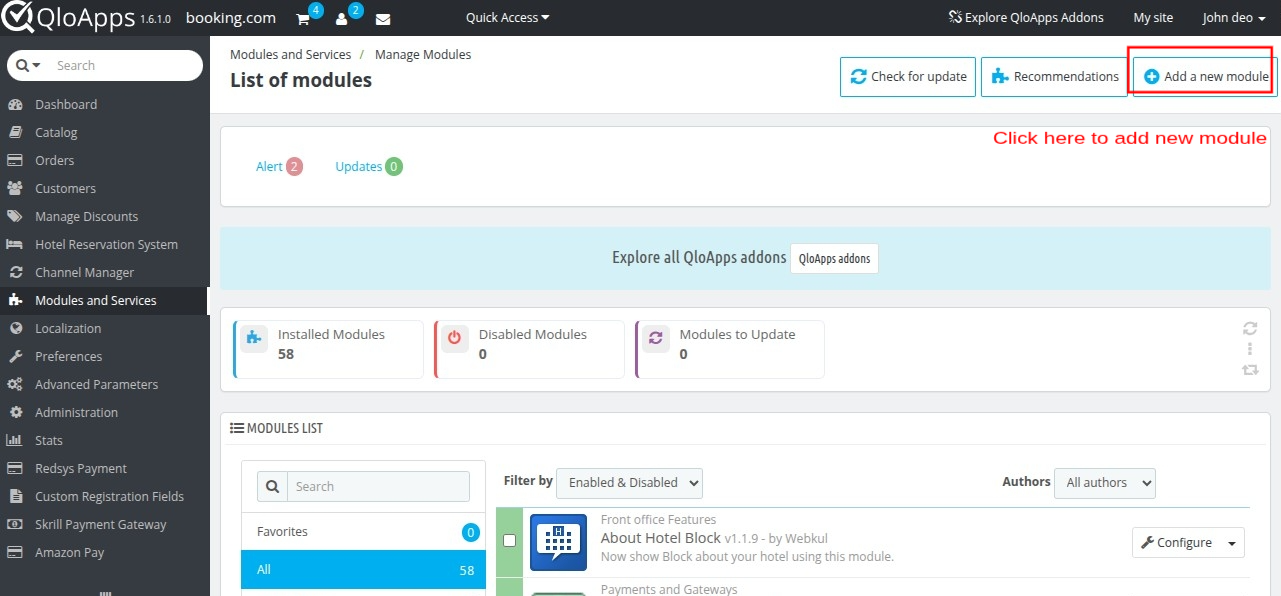
Now upload the Zip file of the module and click on install.

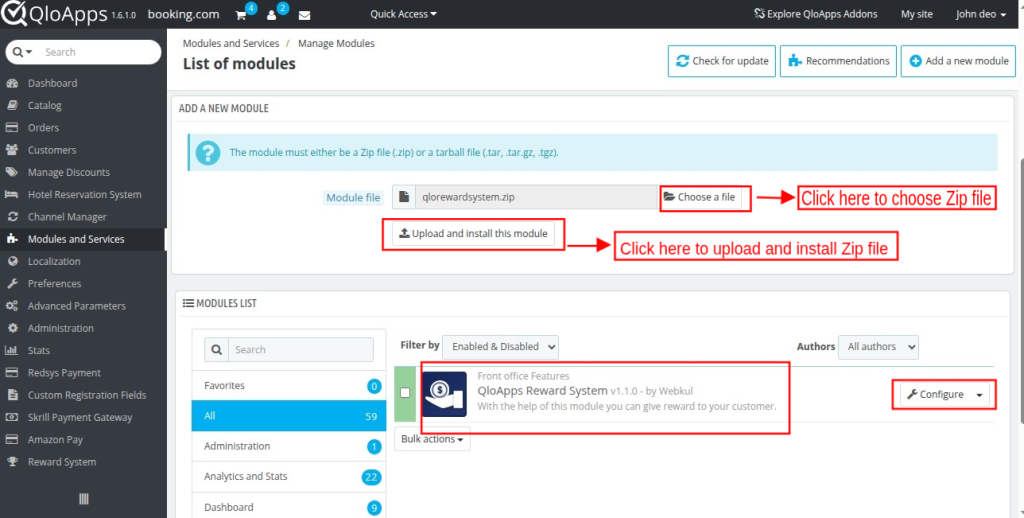
Now you have installed the module. So, let’s check how to configure it.
Configuration of QloApps Reward System
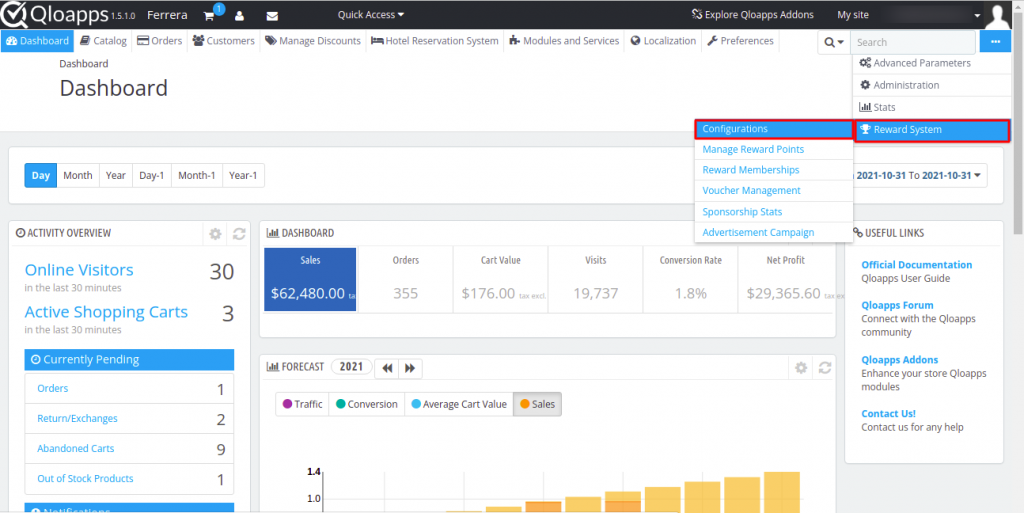
The configuration of this addon is very simple. During the module installation process, we will have a new tab in our menu bar of QloApps back-office with the name of “Reward System”.
Sub-tabs of QloApps Reward System
This addon will provide you 6 different sub-tabs named as:
- Configurations
- Manage Reward Points
- Reward Memberships
- Voucher Management
- Sponsorship Stats
- Advertisement Campaign
These sub-tabs will help a business owner (hotelier) to increase traffic on his hotel booking website, boost sales, and increase retention by giving various types of rewards to target customers.
Configurations Tab
The first sub-tab is Configurations
let’s check out how it will work and can be beneficial for business owners to set General, various Rewards, and Notification settings to attract more users by providing them reward points.

Now, click on configurations to set General Settings.
Configurations -> General Settings

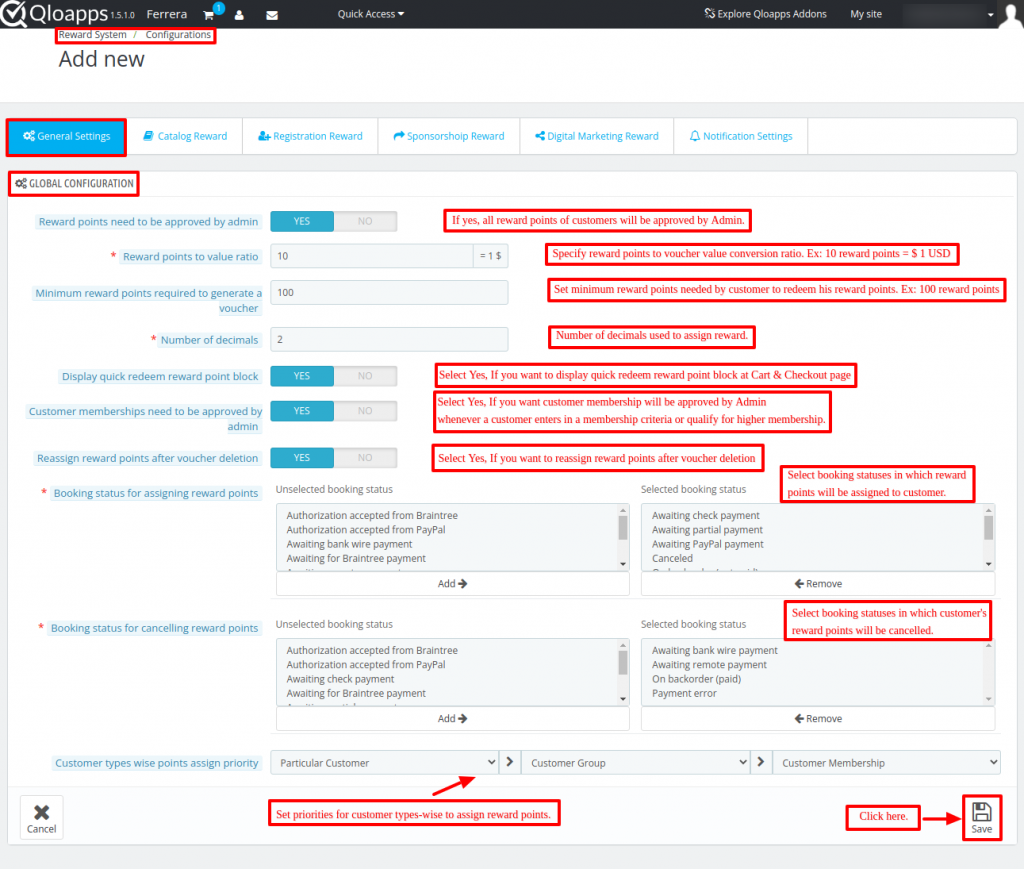
Global Configuration
Reward points approved by admin: Select Yes, then the admin will approve reward points before allocating them to the customer.
Reward points to value ratio: In this field, the admin has to set the value of reward points in terms of money.
For example, if the admin has set 10 reward points equivalent to $ 1, then at the time of checkout if a customer wants to use his 100 reward points
then it will be visible as $ 10 which he can use to get a discount.
Minimum reward points required to generate a voucher: In this field, the admin has to set minimum reward points required by a customer in his account to generate a voucher.
Number of decimals for reward points: Admin has to set the number of decimals used to assign rewards to a customer.
For example, if the reward points have allocated to the customer are 15.1201, then only the last two decimals will consider, then 15.12 reward points will assign to a customer.
Display quick redeem reward point block: Select Yes, If you want to display quick redeem reward points block on the cart and checkout page.

Customer Memberships need to be approved by admin:
Whenever any customer comes under any customer membership plan, then the admin will approve that customer for the membership plan.
Reassign reward points after voucher deletion:
If a voucher is deleted from “Reward Voucher History”, then, a customer can create a voucher for the reward points which was available in a deleted voucher.
Booking status for assigning reward points:
Admin has to select the booking statuses of bookings for which he wants to assign reward points to the customer.
Booking status for canceling reward points:
In this field, the admin has to set the booking statuses of bookings for which reward points will cancel.
Customer types wise points assign priority:
In this field, the admin has to set the priorities according to which reward points will allocate to the customers.
For example, if the admin has set the priority as Particular Customer>Customer Group>Customer Membership.
Now if a customer lies in all three, then reward points applicable for the particular customer will assign based on a priority.
Configurations -> Catalog Reward
Catalog rewards are the reward points that assign to customers when they perform any booking on the website.

Catalog Reward Configuration
Enable Catalog Reward: Admin can enable or disable catalog reward system.
Minimum Booking Total: In this field, the admin has to set a minimum Bookings value for a customer to get the reward points.
Minimum number of bookings: Admin has to set the minimum number of bookings a customer needs to place for getting the reward points.
Points Assign Behaviour: The admin will set the criteria according to which reward points will assign to a customer if he falls into multiple reward types.
Set Priority for Catalog Reward types: Admin can set reward types priority based on points assign behavior (criteria).
If you want to give Catalog reward points based on Bookings, Room Types, or Location / Hotels, then you have to set their priority order in the below sequence:
Reward Types Priority: Booking Reward -> Room Type Reward -> Location / Hotel Reward
Catalog Reward Types:
In QloApps Reward System, there are three types of Catalog Rewards:
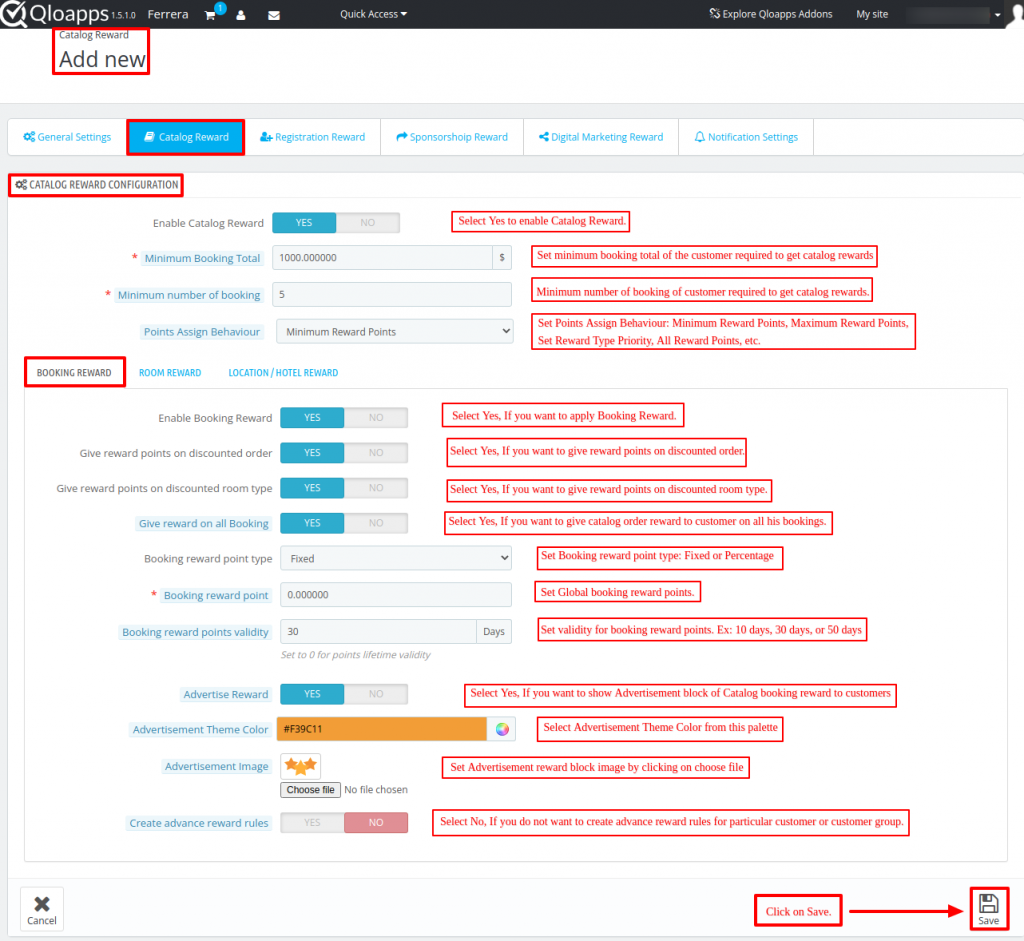
1. Booking Reward:
This is a reward type in which reward points assign to a customer on the basis of bookings made by him.
Enable Booking Reward: Admin can enable or disable booking reward.
Give reward points on discounted orders: In this field, the admin can select whether he wants to give reward points on a discounted order or not.
Assign reward points on the discounted room type: Admin selects whether he wants to give reward points for a discounted room type or not.
Give reward on all bookings: Select Yes, then reward points will assign to a customer for all the bookings made by him.
If disabled, then a customer has to place “minimum number of bookings” set by admin for getting reward points.
Booking reward point type: Admin can set booking reward point type as fixed or percentage.
If set as “Fixed”, then a specific number of reward points will assign to the customer by making the booking.
If set as “Percentage”, then reward points will calculate as per the percentage set by admin on booking total.
Booking reward point: Admin can set reward points that will be given to a customer on successful bookings.
Booking reward points validity: In this field, the admin has to set the number of days for which the reward points will be valid.
Advertise Reward: If enabled, then the advertisement block of catalog booking reward will be visible to a customer on the cart page.


Advertisement Theme Color: Admin can set advertisement theme color from the given palette.
Advertisement Image: Admin can select the image which will be visible in an advertisement block.


Create advance reward rules:
Admin can create advance reward rules for giving reward points to a particular customer, specific customer group, or customer who lies in the membership plan.


2. Room Reward:
This is a reward type in which reward points are applied to a room type by the admin.
Enable Room Reward: Admin can enable or disable room type reward.
Room reward point type: Admin can set room reward point type as fixed or percentage.
If set as “Fixed”, then a specific number of reward points can be applied to a room type.
If set as “Percentage”, then reward points will be calculated as percentage set by admin on room type price.
Room reward points: In this field, the admin has to set reward points for the room types.
Room reward points validity: In this field, the admin has to set the number of days for which the reward points will be valid for a room type.
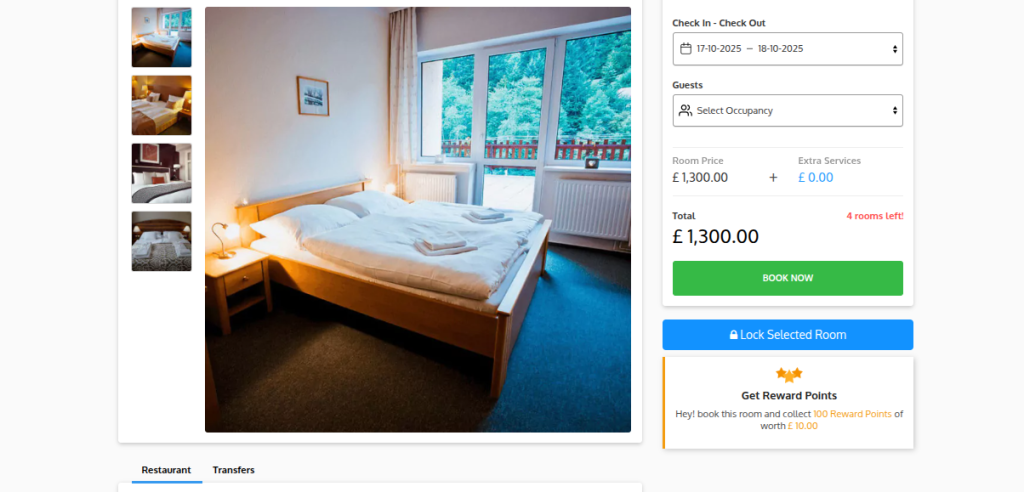
Advertise Reward: If enabled, then the advertisement block of catalog room reward will be visible to a customer on the room type detailed page.
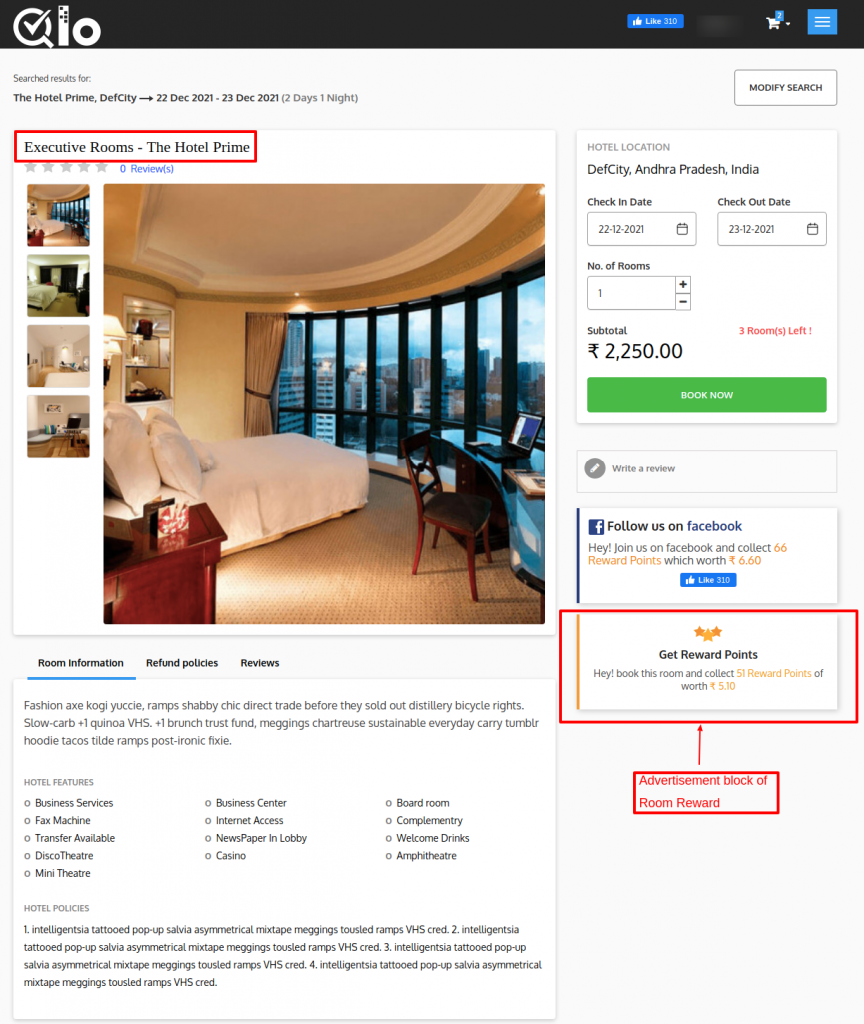
Advertisement Theme Color: Admin can set advertisement theme color from the given palette.
Advertisement Image: Admin can select the image which will be visible in an advertisement block.
Front-end Image of Advertisement block of Catalog Room Reward on Room type page.

Create rooms advance reward rules: Admin can create advance reward rules for giving reward points on a room type to a specific customer group, particular customer, etc.

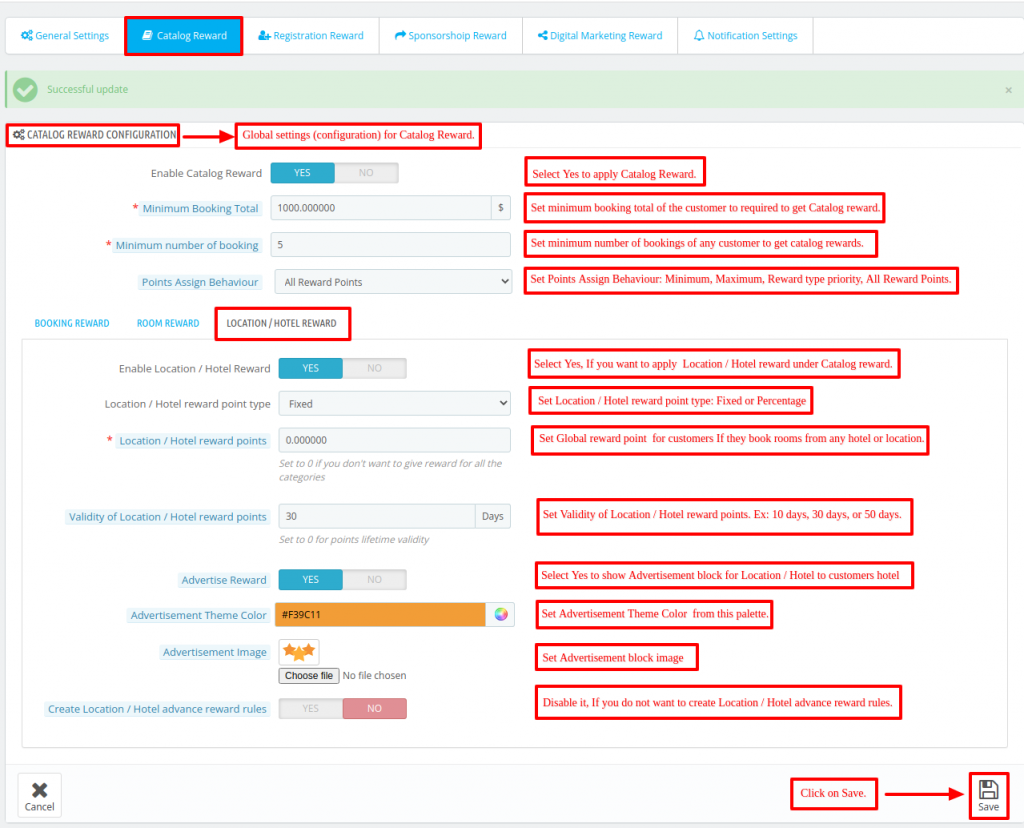
3. Location / Hotel Reward:
This is a reward type in which reward points are applied to a hotel or location by the admin.
Enable Location / Hotel Reward: Admin can enable or disable Location / Hotel reward.
Location / Hotel reward point type: Admin can set Location / Hotel reward point type as fixed or percentage.
If set as “Fixed”, then a specific number of reward points can be applied to a Location / Hotel.
If set as “Percentage”, then reward points will be calculated as percentage set by admin on Location / Hotel price.
Location / Hotel reward points: In this field, the admin has to set reward points for the Location / Hotel.
Validity of Location / Hotel reward points:In this field, the admin has to set the number of days for which the reward points will be valid for the Location / Hotel.
Advertise Reward: If enabled, then the advertisement block of catalog Location / Hotel reward will be visible to the customers.
Advertisement Theme Color:Admin can set advertisement theme color from the given palette.
Advertisement Image: Admin can select the image which will be visible in an advertisement block.
Create Location / Hotel advance reward rules: Admin can create advance reward rules for giving reward points for Location / Hotel to a specific customer group, particular customer, etc.
Catalog Reward at Front-end
A customer can view all the catalog rewards at the front end by clicking on the REWARDS tab under My Account as shown below:

Registration Reward
These are the reward points that are given to the customers when they successfully register themselves on the site.

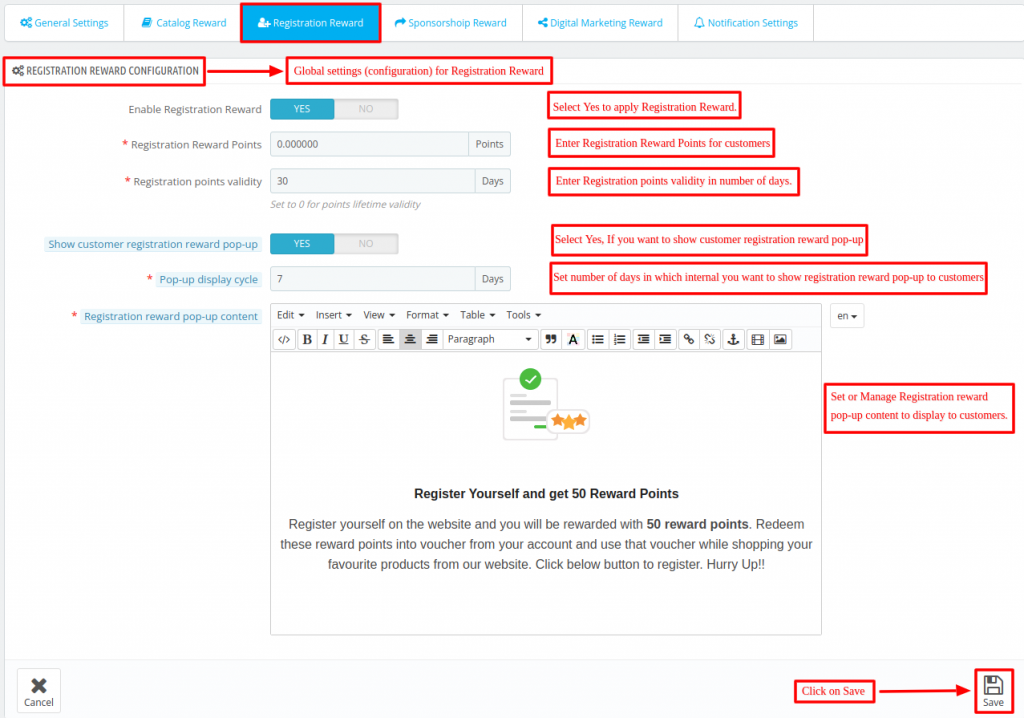
Registration Reward Configuration
Enable Registration Reward: Admin can enable or disable registration reward.
Registration reward points: In this field, admin has to set reward points which will be allocated to the customer when he successfully registers on the site.
Registration points validity: In this field, admin has to set the number of days for which the registration reward points will be valid.
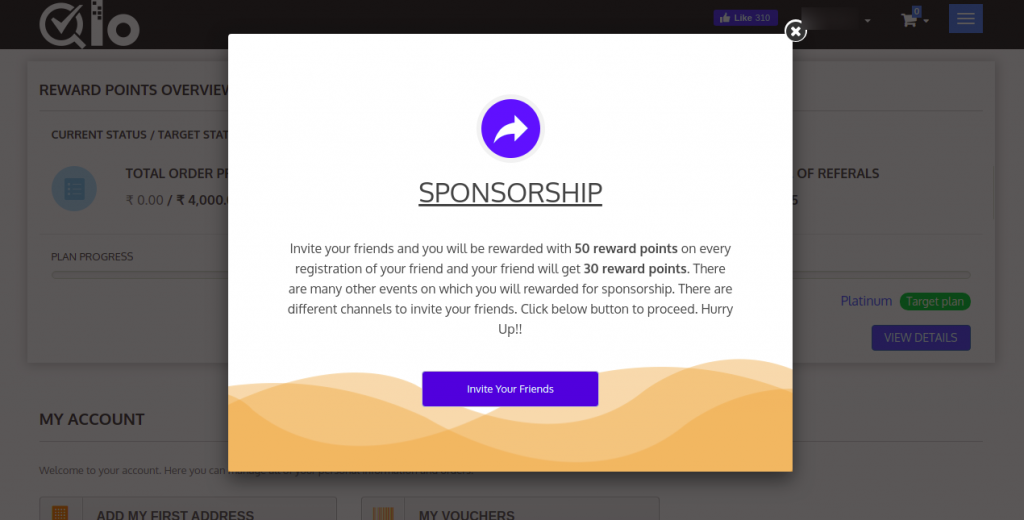
Show customer registration reward pop-up: If enabled, then a pop-up showing registration reward points will be displayed on the screen when the customer visits the site.
Pop-up display cycle: In this field, admin has to set the number of days after which a registration reward pop-up will be displayed to the customer again.
For example, admin has set 10 days in “Pop-up display cycle” field, now if a customer has seen the first pop-up on 15/12/2021
then a registration reward pop-up will be displayed to the customer again on 25/12/2021.
Registration reward pop-up content:
In this field, admin has to enter the content which will be visible to the customers in a registration reward pop-up when it gets displayed on the site.

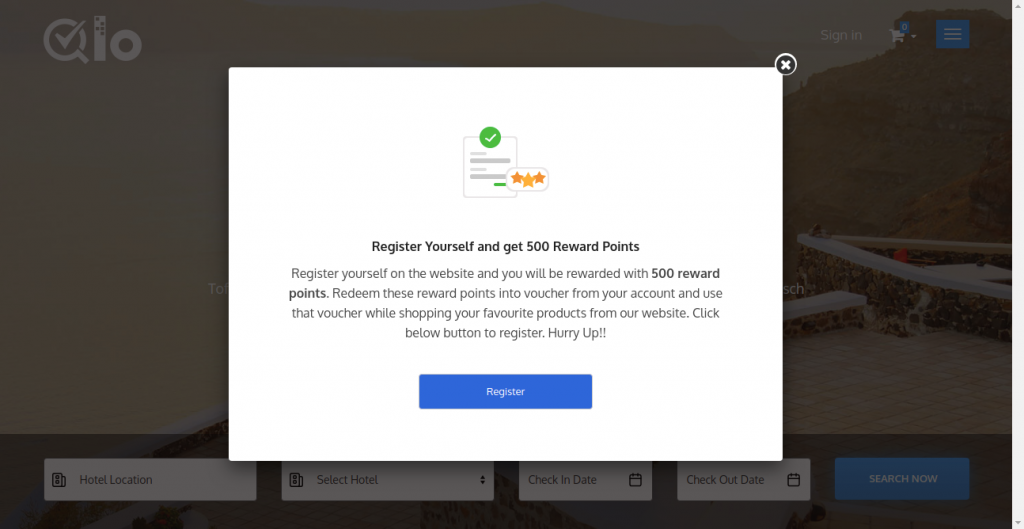
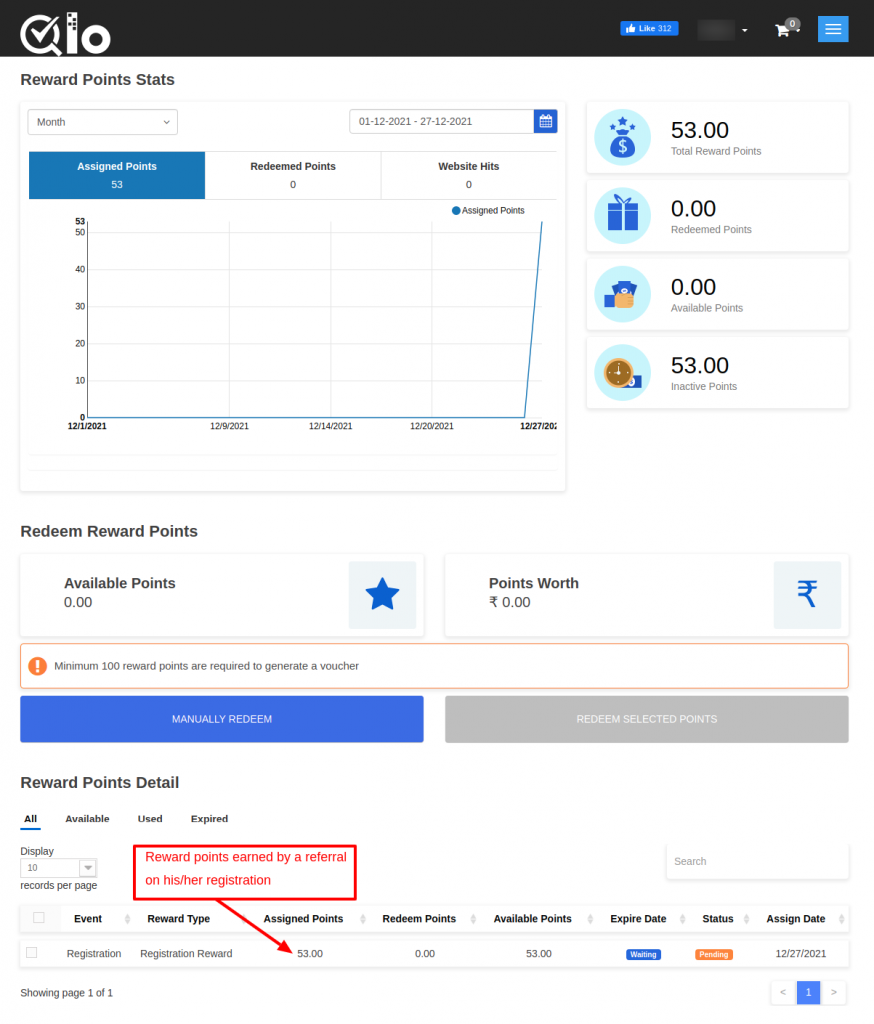
When a new customer registers on the website, he can view rewards points he has received by completing the registration process
by clicking on “REWARDS” tab under “Your account” section as shown below:

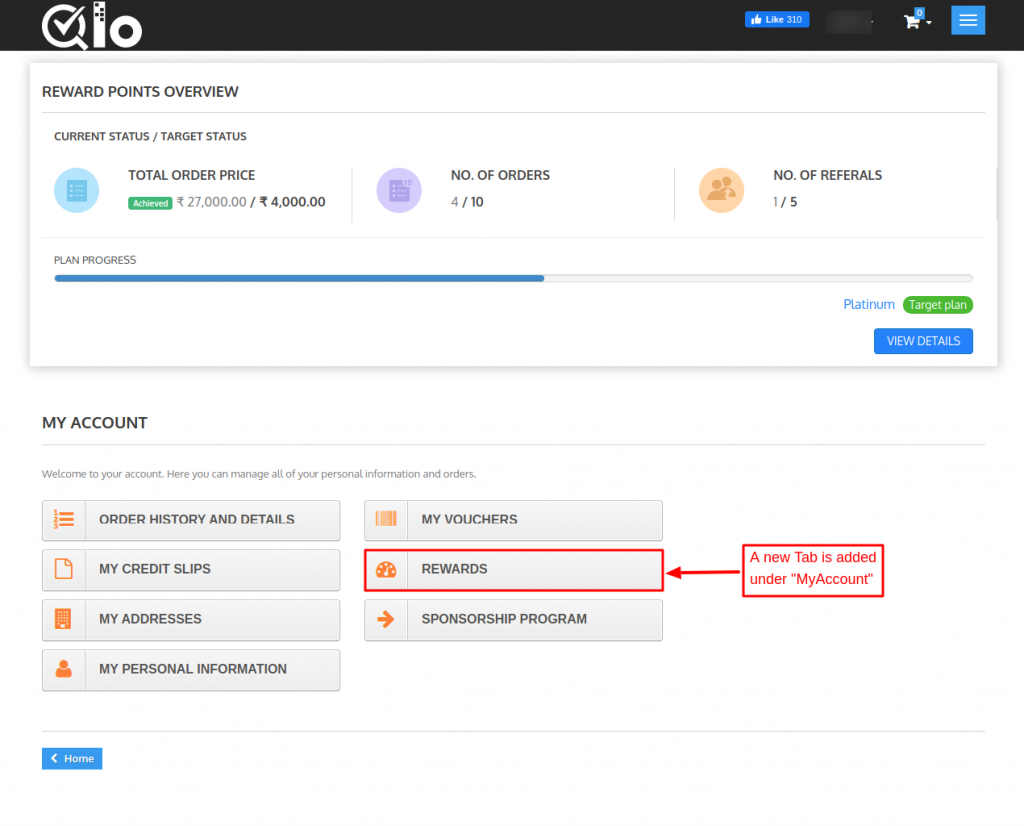
After clicking on “REWARDS” tab, a customer can view registration reward under Reward Points Detail as shown below:

Sponsorship Reward
A customer receives sponsorship reward points when he/she refers his/her friends to the QloApps hotel booking website.
Sponsorship reward points are an excellent way for promoting your site.

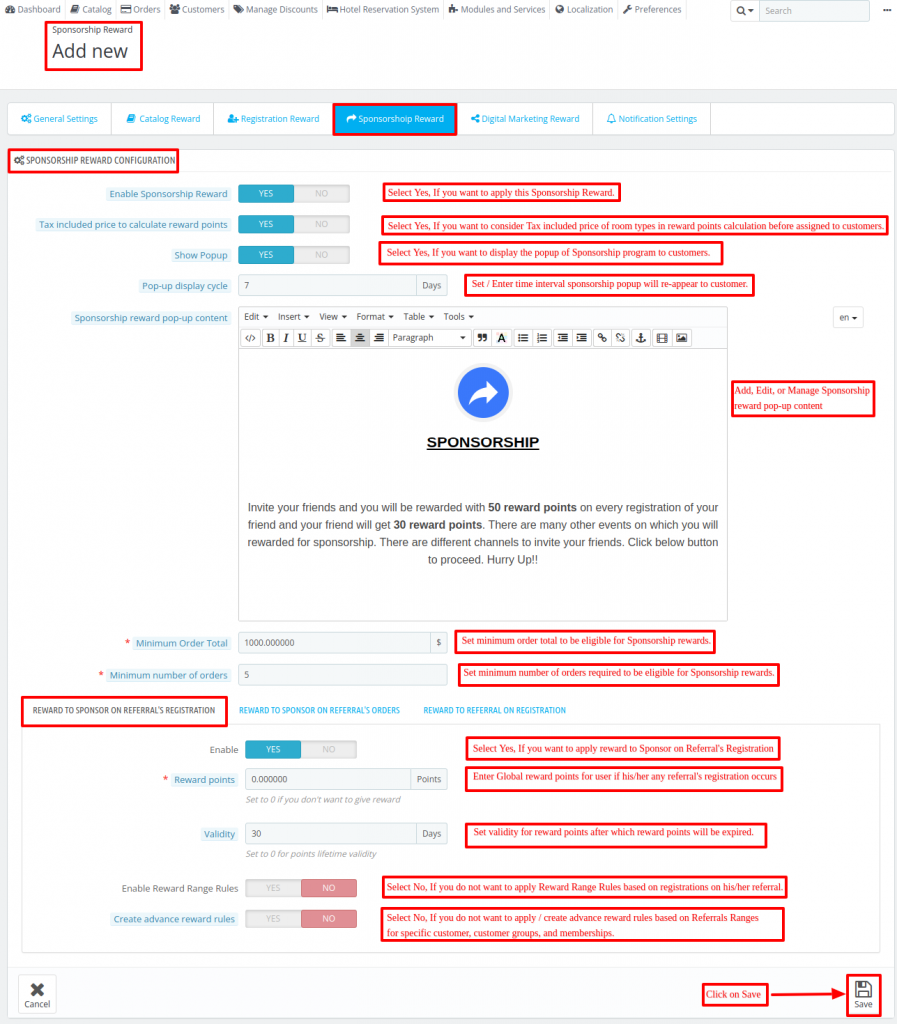
Enable Sponsorship Reward: Admin can also enable or disable the Sponsorship reward program.
Tax included price to calculate reward points:
If enabled, tax-included price of room type will be used while calculating reward points to be assigned to the customer. Else tax excluded price will be used.
Show Pop-Up: If enabled, then a pop-up showing sponsorship reward points will be displayed on the screen when the customer visits the site.

Pop-up display cycle: In this field, the admin has to set a number of days after which a sponsorship reward pop-up will be displayed to the customer again.
For example, the admin has set 10 days in “Pop-up display cycle” field,
now if a customer has seen the first pop-up on 15/12/2021 then a sponsorship reward pop-up will be displayed to the customer again on 25/12/2021.
Sponsorship reward pop-up content: In this field, the admin has to enter the content which will be visible to the customers in a sponsorship reward pop-up when it gets displayed on the site.
Minimum Order Total: In this field, the admin has to set a minimum order total value for a customer to be eligible for getting sponsorship reward points.
Minimum number of orders: Admin has to set the minimum number of orders a customer needs to be eligible for getting sponsorship reward points.
1. Reward to Sponsor on Referral’s Registration

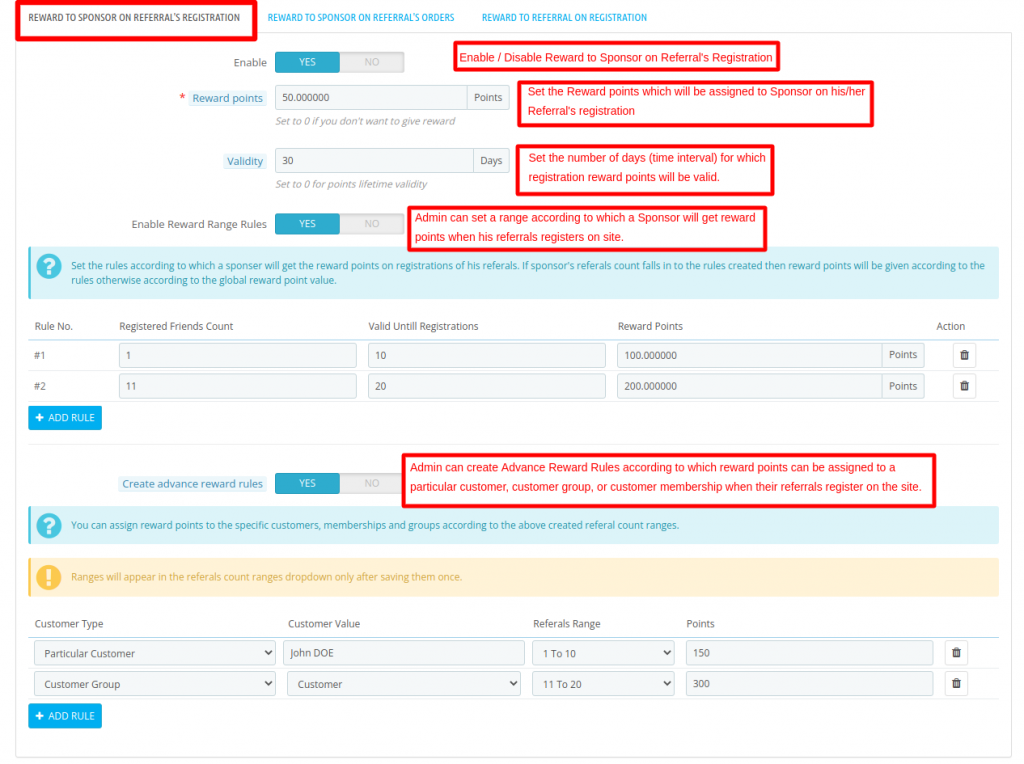
These are the reward points which a sponsor receives when its referrals register on the site.
Enable: Admin can enable or disable sponsor’s reward for referral registration.
Reward Points: In this field, the admin has to set the reward points which will be allocated to a sponsor when a referral successfully registers on the site.
Validity: In this field admin has to set the number of days for which the sponsor’s registration reward points will be valid.
Enable Reward Range Rules: Admin can set a range of referrals and reward points for that range.
Now if the number of referrals registering on the site comes under the range set by admin then a sponsor will get reward points accordingly.
For example, the admin has set a referral range of 1-10 and reward points like 150,
now if 4 referrals register on the site then a friend will get 600 reward points i.e 100 reward points per referral registration.
Create advance reward rules:
Admin can create advance reward rules to give different reward points to a specific customer, customer groups, or customer memberships when their referrals register on the site.

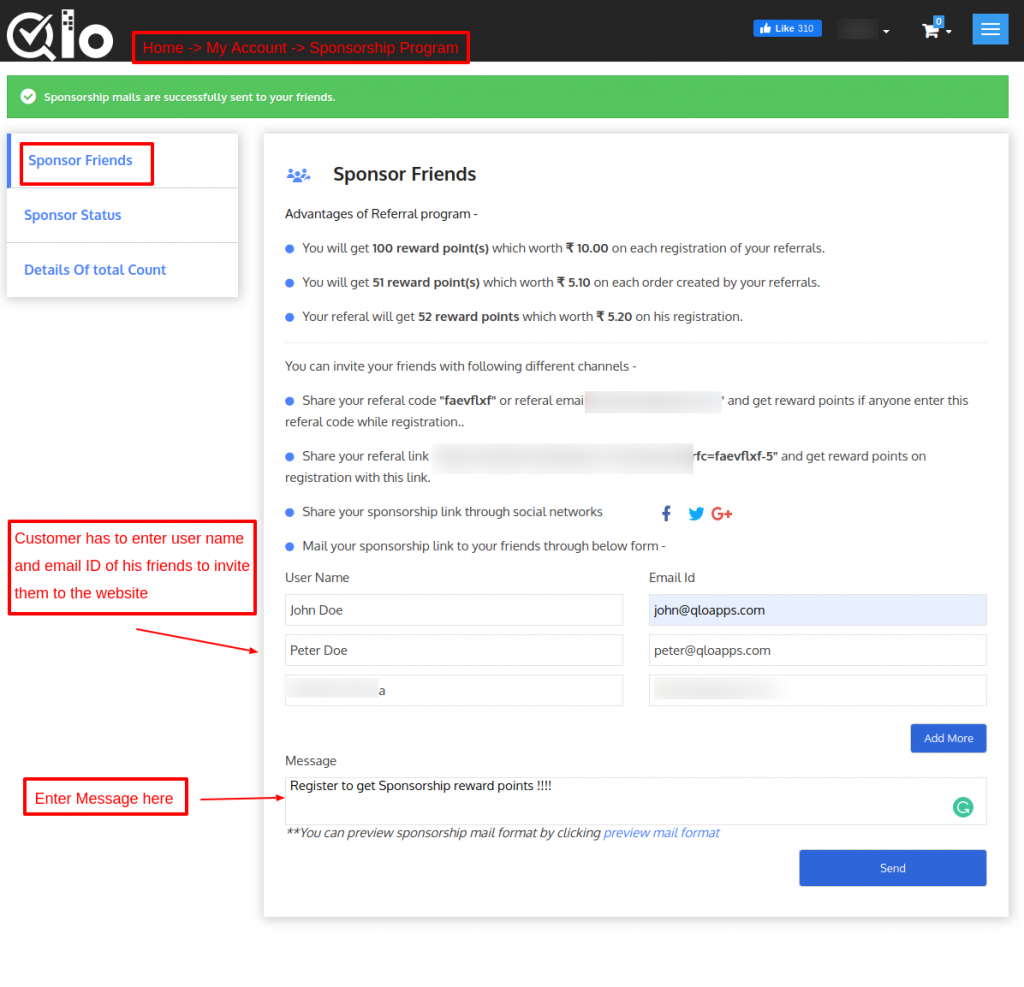


Front-end Workflow of Reward to Sponsor on Referral’s Registration
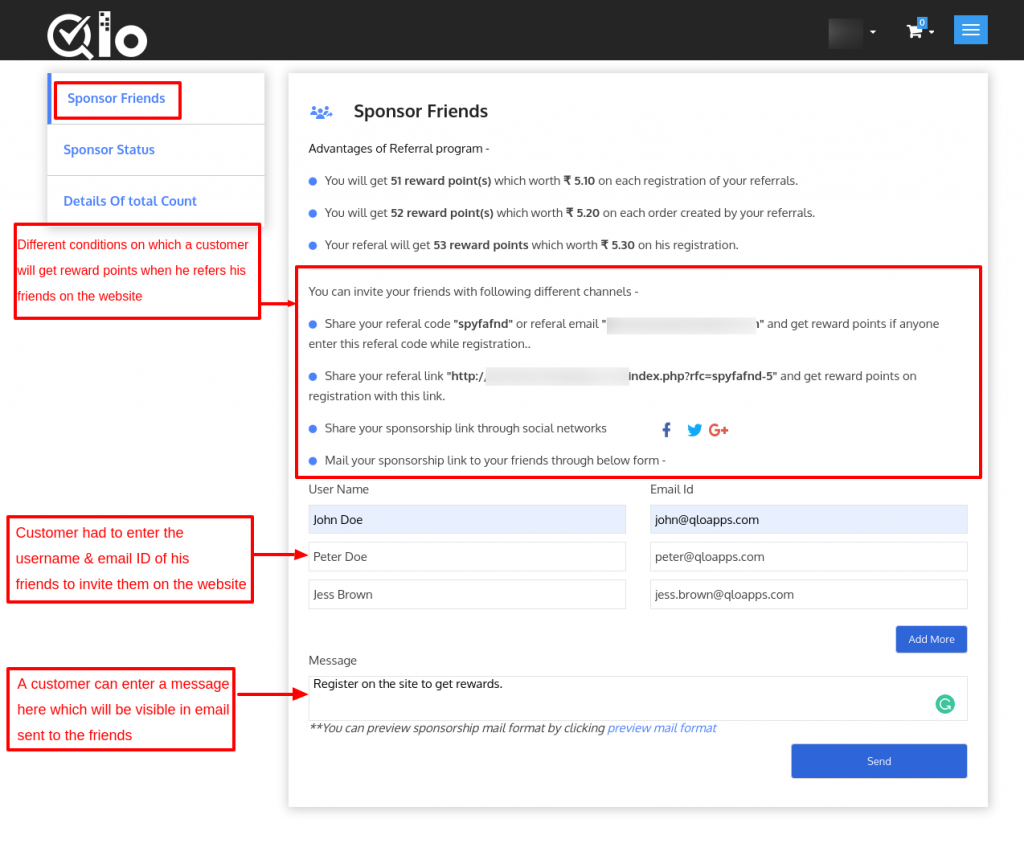
When a sponsorship pop-up gets displayed on the screen and a customer clicks on “Invite Your Freinds” button, he gets redirected to the sponsorship program page as shown below:
Now under the “Sponsor Friends” tab, a customer has to enter the user name and email id of his friends.
Click on the send button.
An email will be sent to all the referrals whose details have been entered by a customer.
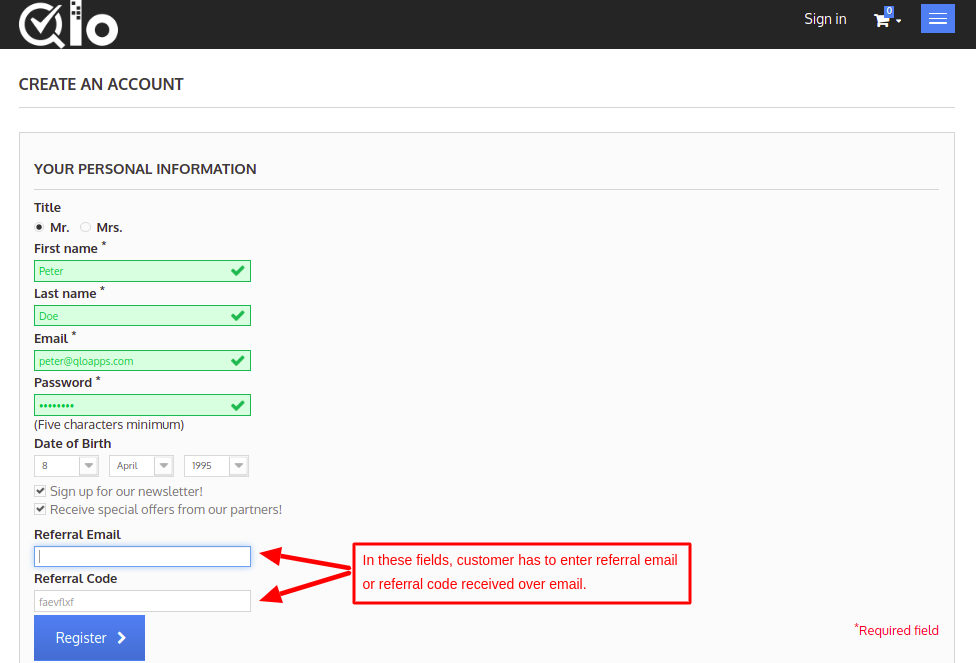
Now, when a referral clicks on the link which he has received in the email.
He will be redirected to the registration page of the website as shown below:
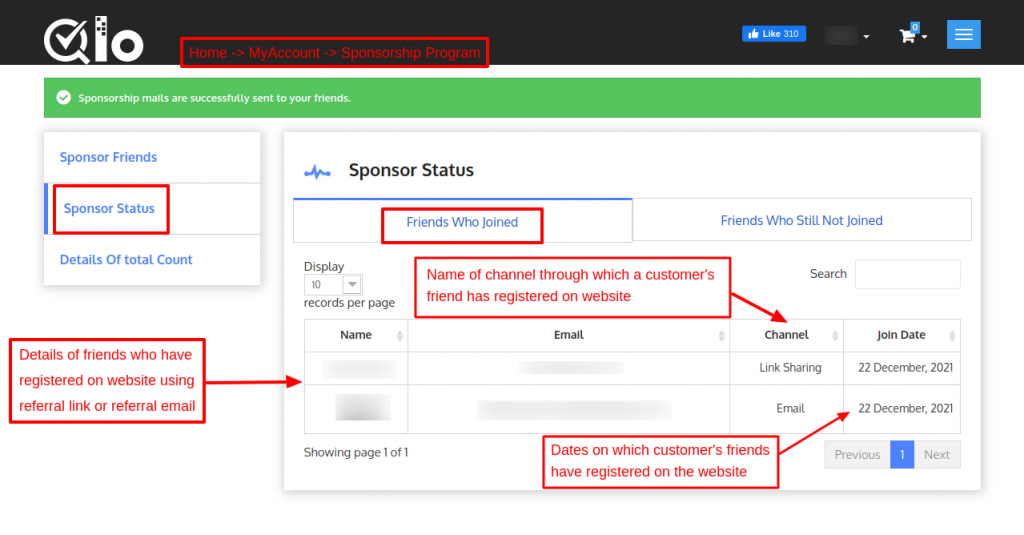
Now, under “Sponsor Status” tab, A sponsor can view the list of friends who have registered on the website using the referral link received in an email.
A sponsor can also view a list of friends who have not registered on the website even after sending the referral link.
A sponsor can also view the total number of referrals and through which channel they have registered under “Details of total Count” tab.
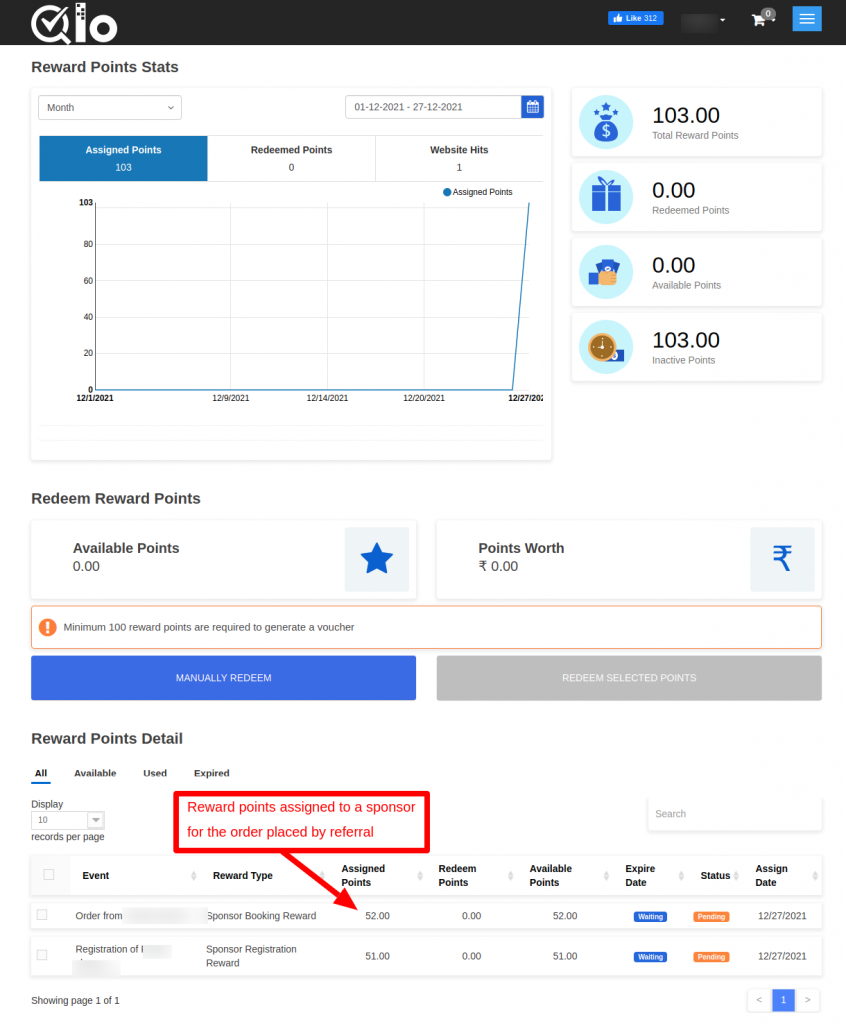
Once a referral has successfully registered on the website, a sponsor will get the reward points for the referral registration.
He can view it by clicking on “REWARDS” tab under “Your Account” as shown below:

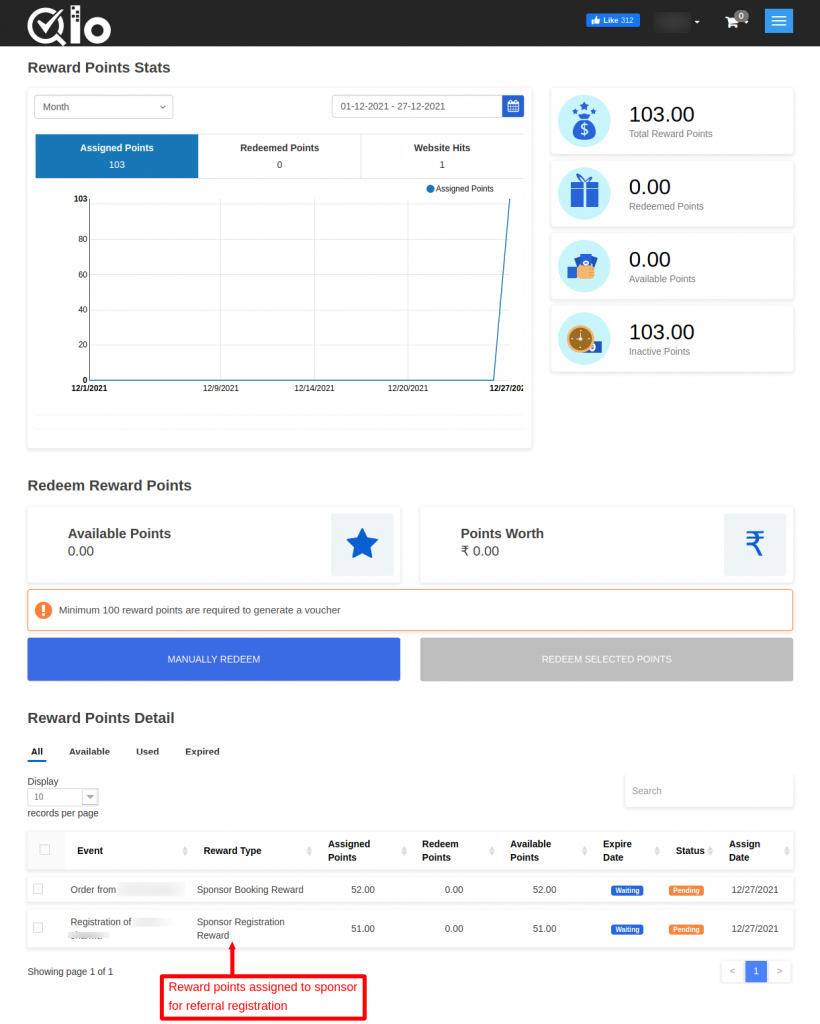
Note: Admin can assign reward points to the particular customer, customer groups, or customer memberships according to the referral count ranges set by him in Reward Range Rules.
2. Reward to Sponsor on Referral’s Orders

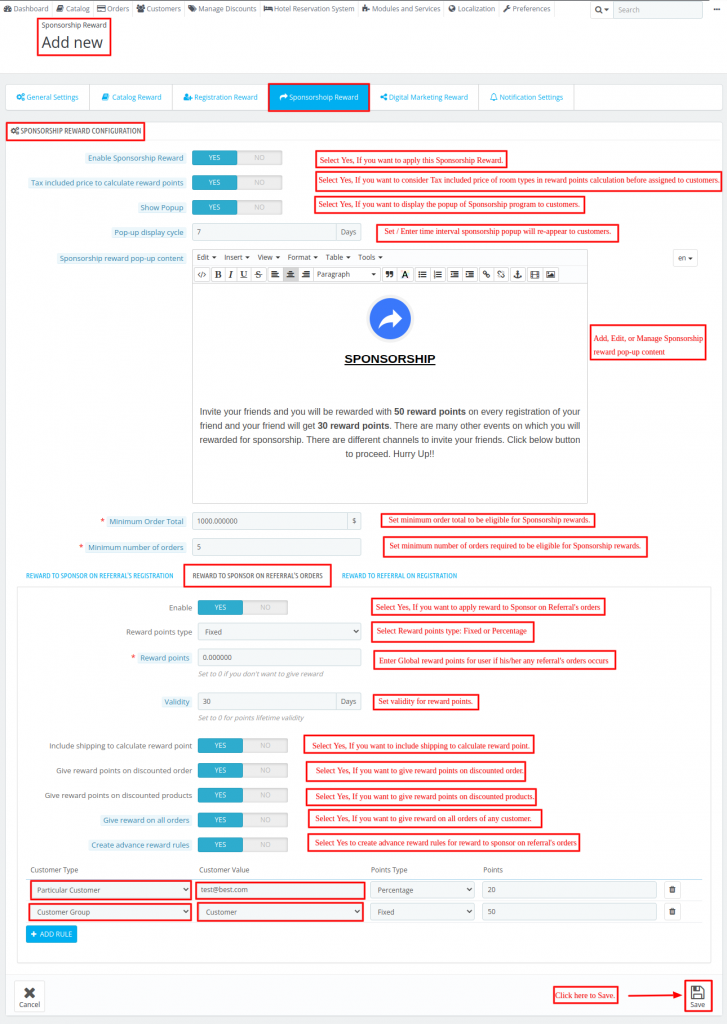
These are the reward points which a sponsor receives when a referral places an order on the site.
Enable: Admin can enable or disable reward for a sponsor for referral’s orders.
Reward points type: Admin can set reward point type as fixed or percentage.
If set as “Fixed”, then a specific number of reward points will be given to a sponsor when a referral places an order.
If set as “Percentage”, then reward points will be calculated as percentage set by admin on order total.
Reward Points: In this field, the admin has to set the reward points which will be allocated to a sponsor when a referral who has registered on a site places an order.

Validity: In this field admin has to set the number of days for which the sponsor’s reward points will be valid.
Include shipping to calculate reward point: If selected “YES”, then shipping will be included in the product total for calculating the reward points.
Give reward points on discounted order:- The admin can select whether to give reward points to a sponsor on a discounted order or not.
Assign reward points on discounted product: Admin has the choice to select whether to give reward points to a sponsor for a discounted product or not.
Give reward on all orders: Select Yes, then the reward points will assign to a sponsor for all the friends’ referral orders.
Select No, then Admin will assign reward points for the number of orders.

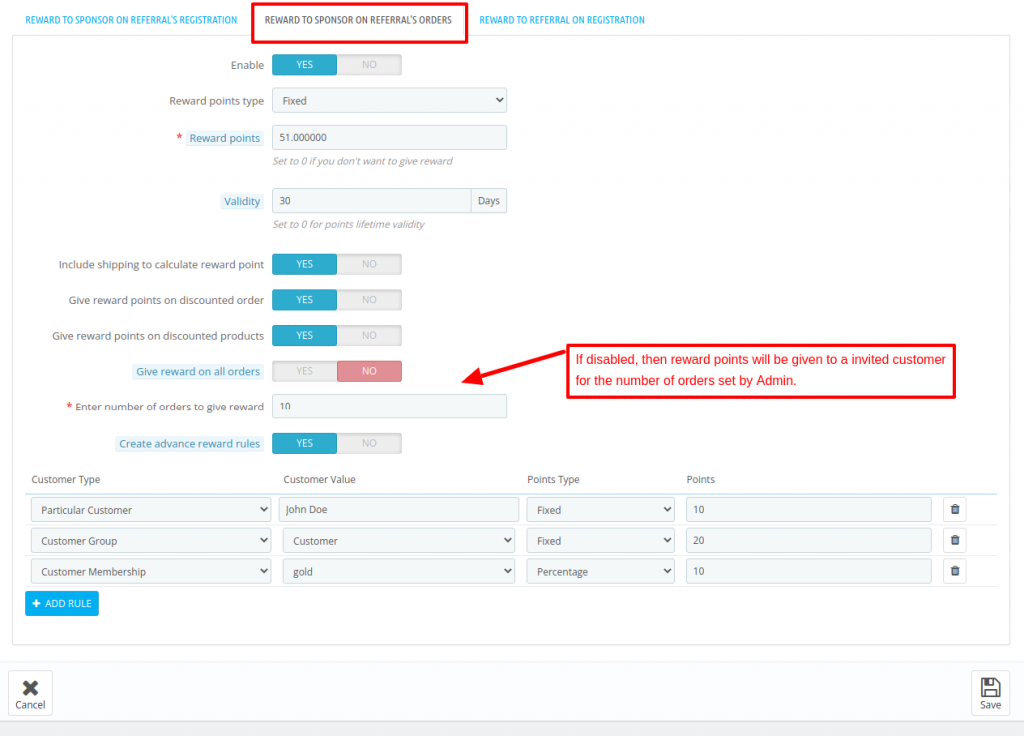
Create advance reward rules: Admin can create advance reward rules to give different reward points to a specific customer, customer groups, or customer memberships when their referrals place an order.
3. Reward to Referral on Registration

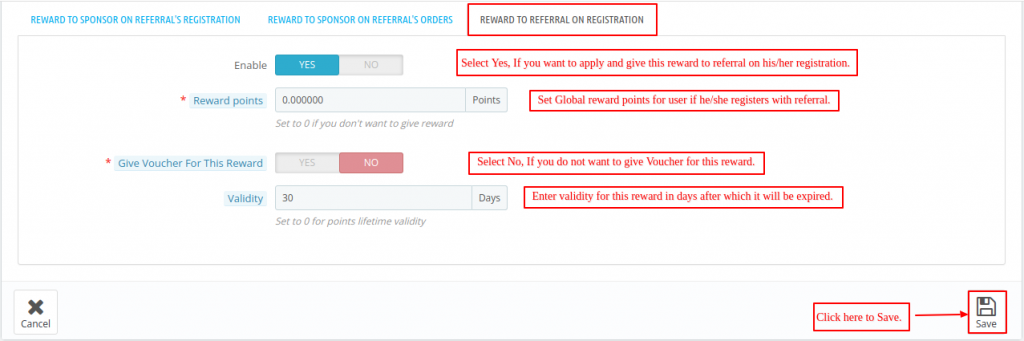
These are the reward points that are given to a referral on his/her registration.
Enable: Admin can enable/disable referral registration rewards.
Reward Points: In this field, the admin has to set reward points that will be allocated to a referral when he completes the registration process.
Give Voucher for this Reward- If disabled, a voucher will not be created as a welcome registration voucher for a sponsored friend (referral).
Validity: In this field admin has to set the number of days for which the referral’s registration reward points will be valid.

Digital Marketing Reward
As the name suggests, these are the reward points that are given by the admin to the customers when they share Orders on Facebook.

Digital Marketing Reward Configuration:
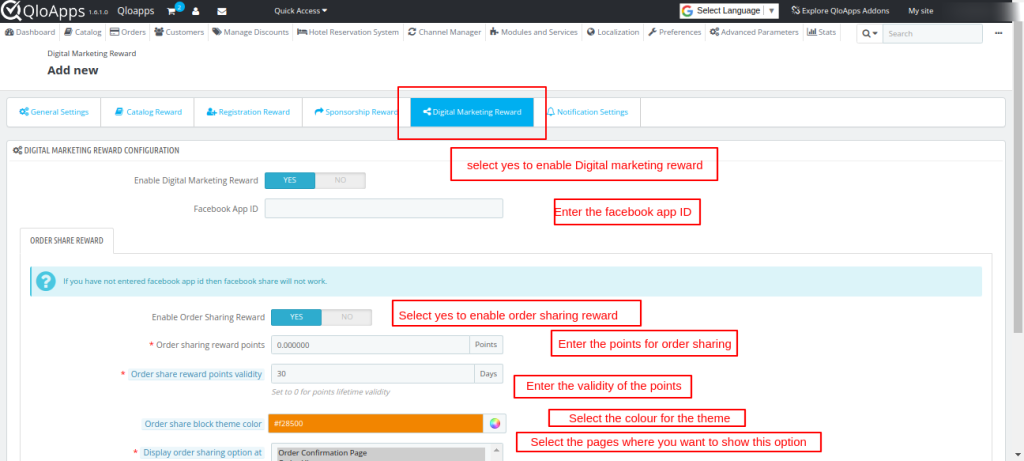
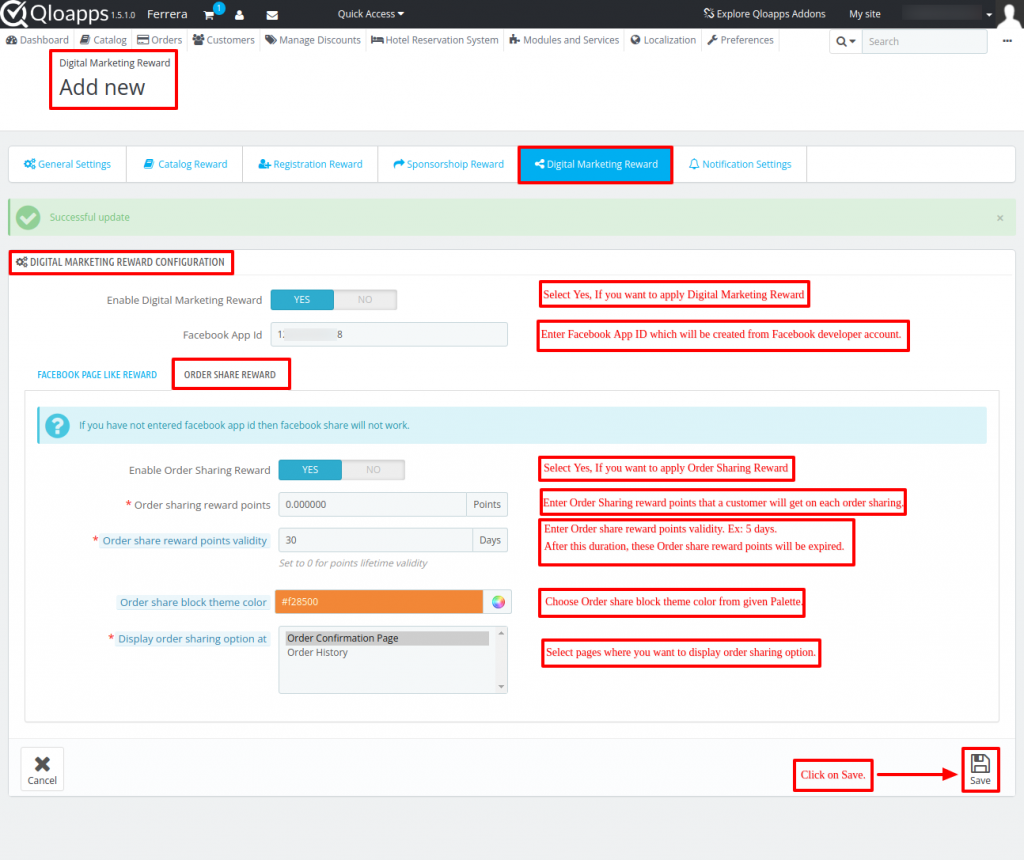
Enable Digital Marketing Reward: Select Yes, If you want to apply Digital Marketing Reward for order sharing on Facebook.
Facebook App Id: Create a Facebook App and enter the Facebook app id which will be created from the Facebook developer account.
Note: To create a Facebook app and gets its ID, follow these steps
Enter Facebook App ID and click on Save.
Facebook page URL: Enter your Facebook page URL. For instance: https://www.facebook.com/qloapps
Advertisement Theme Color: In this field, select the color you want to set as the theme color for the Advertise theme block of this reward.
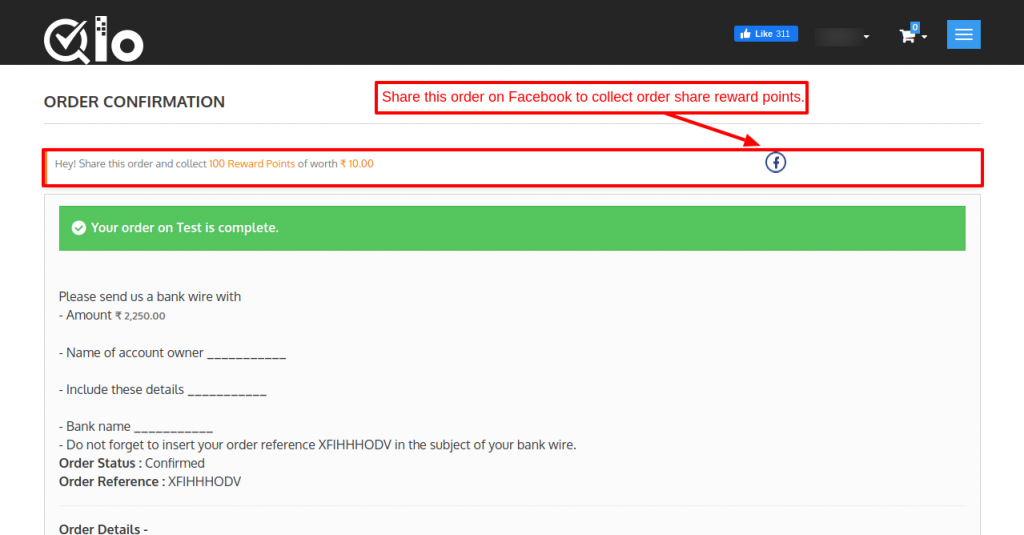
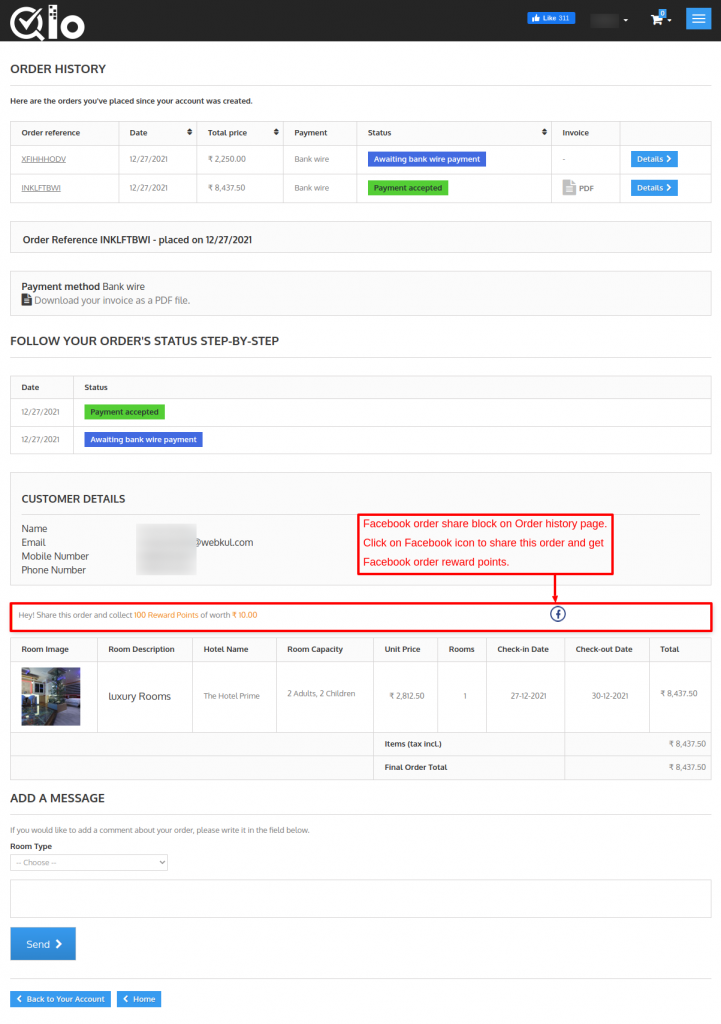
Order Share Reward

These reward points are assigned by admin to customers when they will share any Orders on the Facebook page.
Enable Order Sharing Reward: Admin can enable or disable the order sharing rewards.
Order sharing reward points: In this field, the admin has to set the reward points which will be given to a customer on sharing order on the Facebook page.
The Order share reward points validity: In this field, the admin has to set the number of days for which the order share reward points will be valid.
Order share block theme color: In this field, Set the color of the Order share block theme from the given palette.
Display order sharing at:
In this field, the admin has to select a section of the front-end where he wants to display the order sharing option. Pages to be selected: Order Confirmation or Order History page.

Notification Settings
Under “Notification Settings“, the admin has to configure that on what activities or events email notifications will receive by him and the customers.

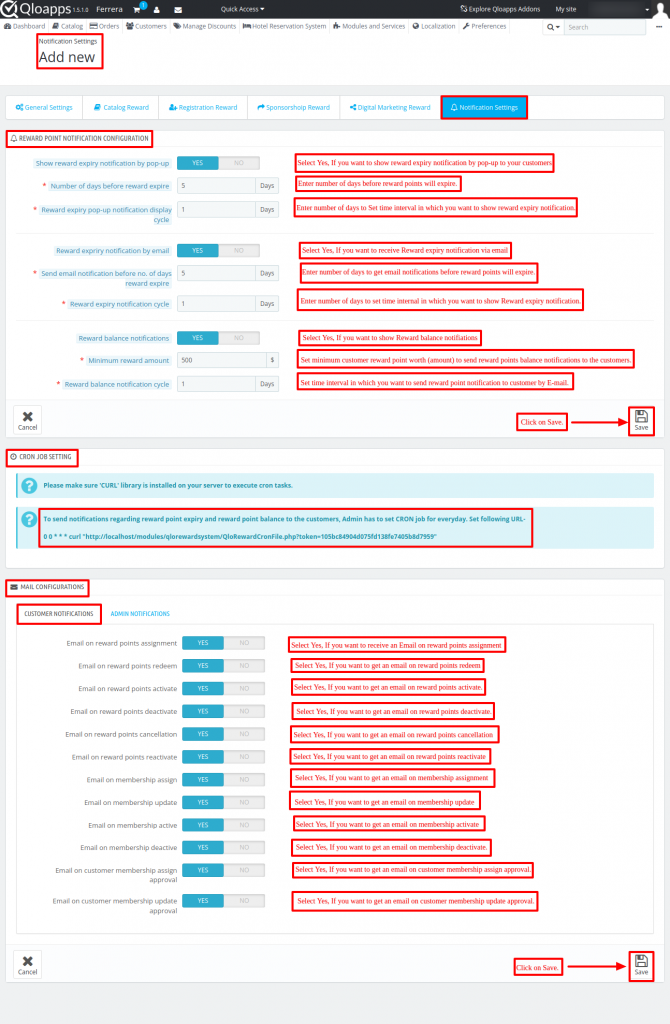
Notification Settings has two parts:
- Reward Point Notification Configuration
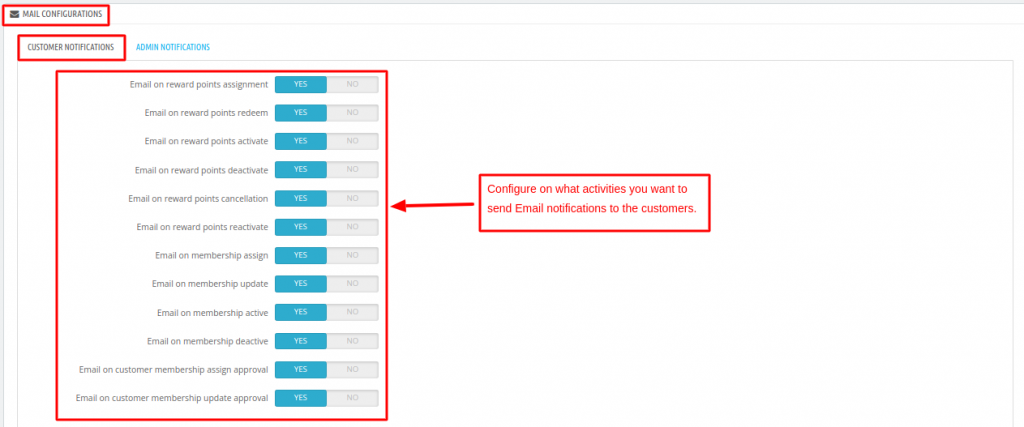
- Mail Configurations
1. Reward Point Notification Configuration
In this section, the admin can configure reward points notification like if he wants to show a pop-up regarding the expiration of reward points to the customers or not.
One can set the number of days after which the reward points expiry pop-up will be shown to the customers again.
Hoteliers can also enable reward points expiry notification according to which an email notification will send to the customers regarding the expiration of their reward points.
He can also set the number of days after which the reward points expiry notification will be sent to the customers again.
NOTE: Admin has to set cron for every day for sending reward points expiry/balance notifications to the customers.
Customer Notifications
Under “Customer Notifications”, the admin has to configure the events on which email notifications will be sent to the customers.

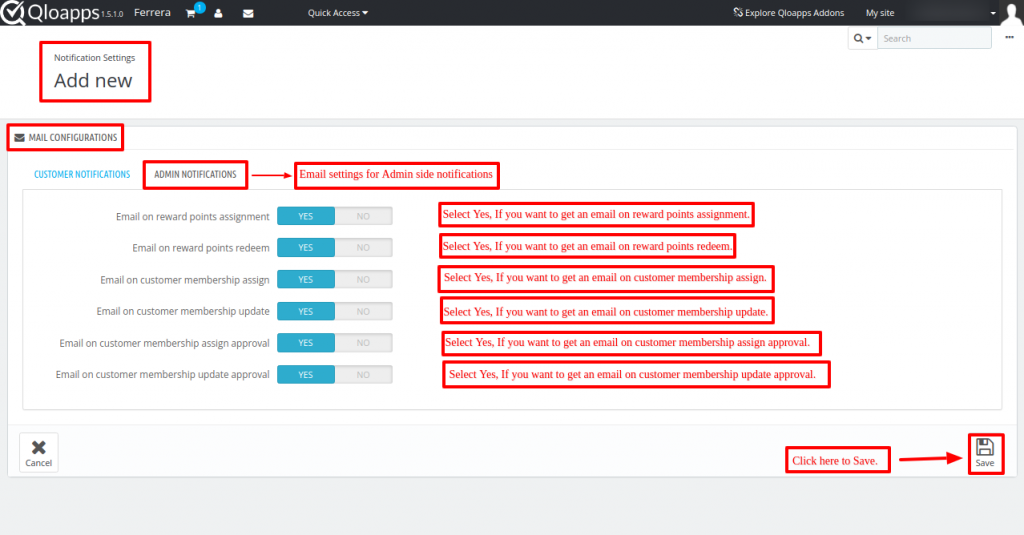
Admin Notifications
Under “Admin Notifications”, the admin has to select the customer’s activities for which he wants to receive email notifications.
Manage Reward Points

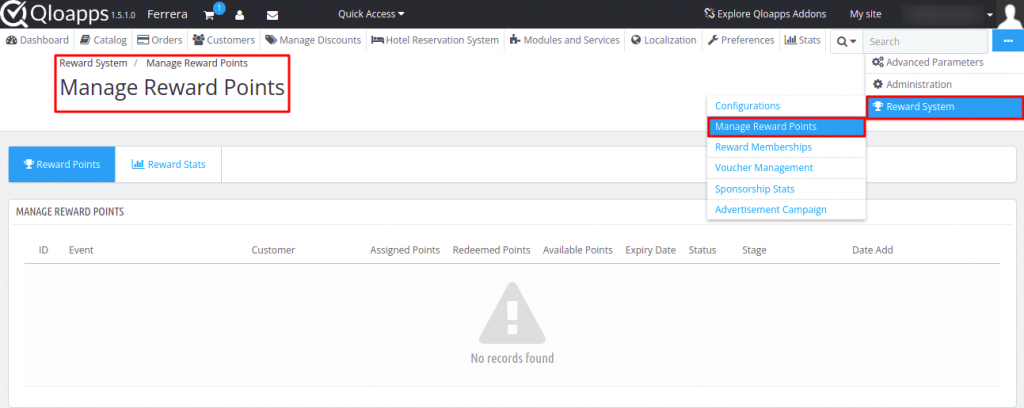
Admin can manage reward points by navigating through Reward System
Reward System -> Manage Reward Points.
Reward Points
Under “Reward Points”, admin can view:
Event: For which event(order reward, category reward, product reward, manufacturer reward) a customer has got the reward points.
Customer’s name and email Id
Assigned points: reward points assigned to a customer.
Redeemed Points: Reward points that had redeemed by a customer.
Available Points: Reward points which a customer has.
Expiry Date: Date on which reward points will expire.
Status: Check whether the reward points are enable or disable. Admin can also change the status of reward points.
Stage: Admin can check the stage of reward points, whether it’s in inactive, active, used, canceled, or expired stage.
Date: On which date reward points were allocated to a customer from Admin.

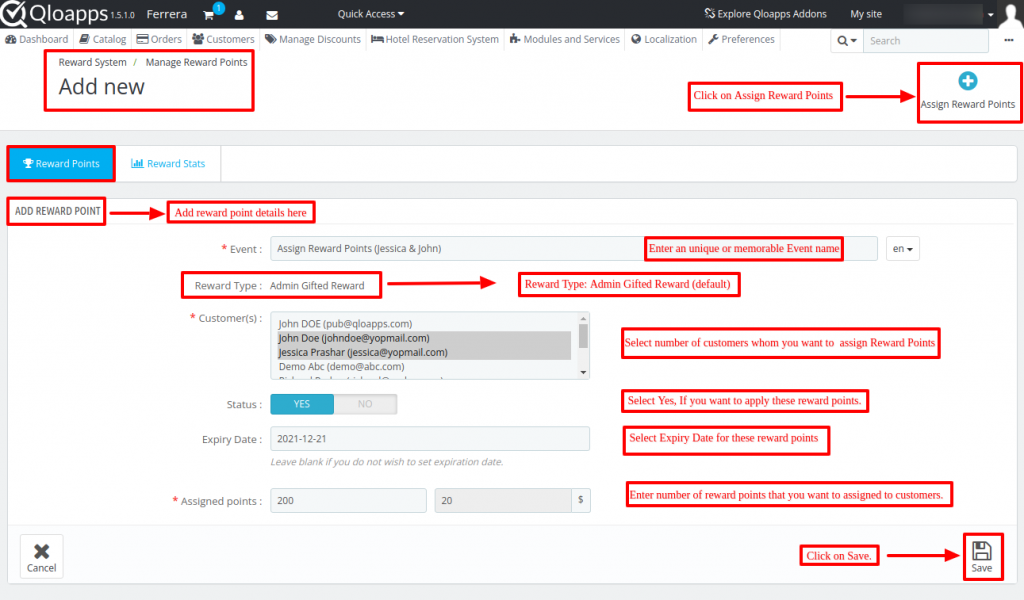
Assign Reward Points
Admin can assign the reward points to a customer by clicking on “Assign Reward Points”. For assigning reward points to a customer, the admin has to:
Enter the event’s name.
Select a customer to which he wants to assign reward points.
Set the status(Enable/Disable) of reward points.
Enter the expiry date of the reward points.
Enter the number of reward points which he wants to assign to a customer.
Manage Reward Points
Admin can manage reward points listing based on Event’s name, and Customer details.
Admin can enable/disable reward points by modifying their status.

Reward Stats

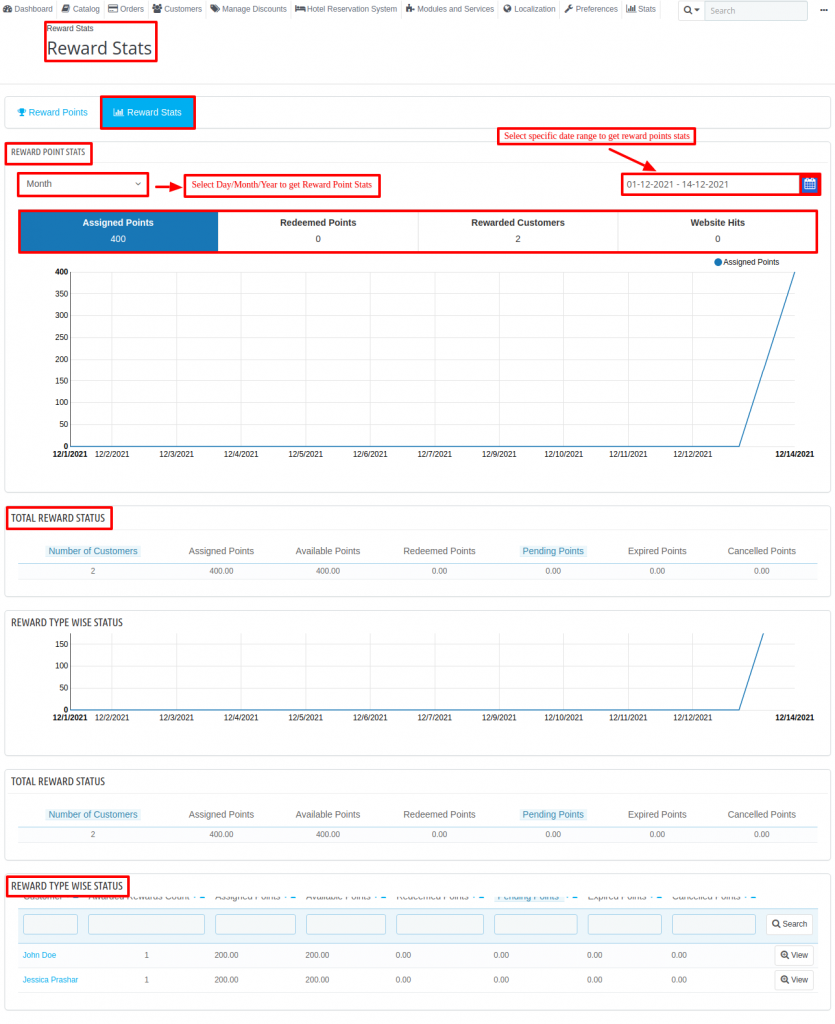
Under “Reward Stats”, the admin can view Reward Point Statistics, Total Reward Status, Reward Type Wise Status, and Customer Wise Status.
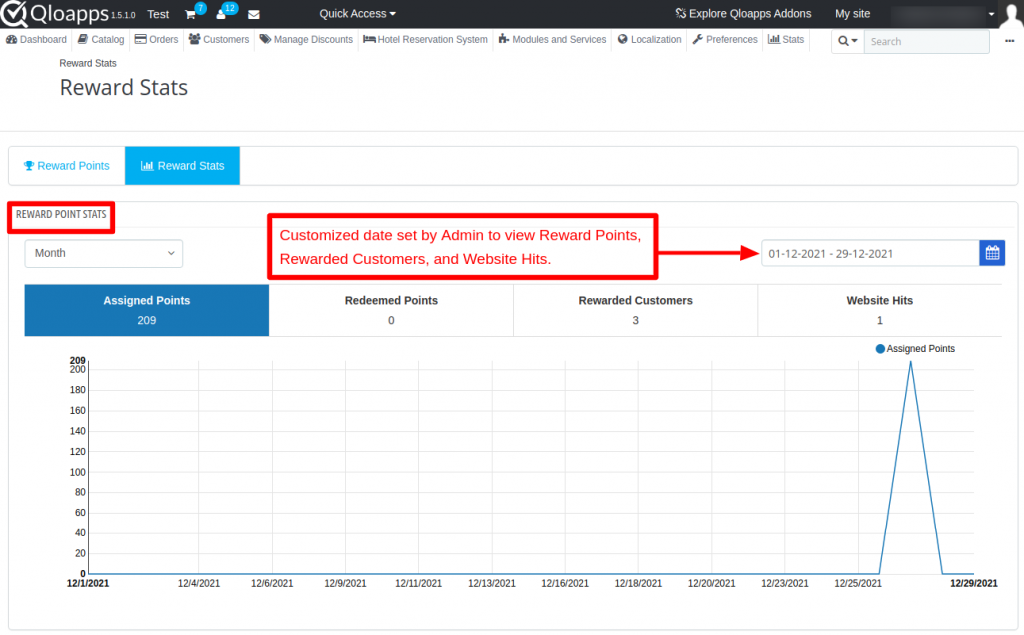
Reward Point Stats
Under “Reward Point Stats”, the admin can view assigned reward points, redeemed reward points, rewarded customers and total website hits on a daily, monthly or yearly basis graphically.

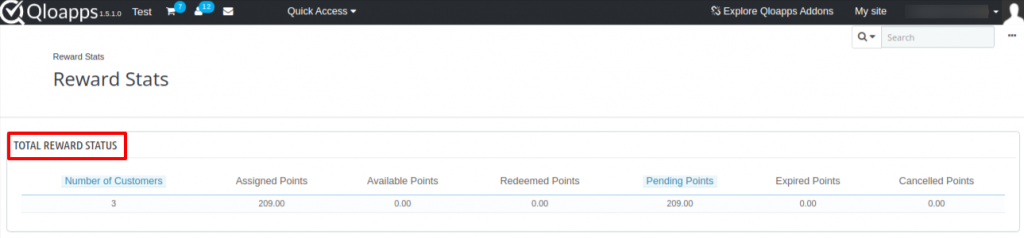
Total Reward Status
Under “Total Reward Status“, admin can view:
- Total number of customers who have received reward points.
- The Total reward points assigned to the customers.
- Total reward customers have.
- The Total reward points redeemed by the customers.
- Total pending reward points.
- The Total reward points which had expired.
- Total reward points which was cancel.

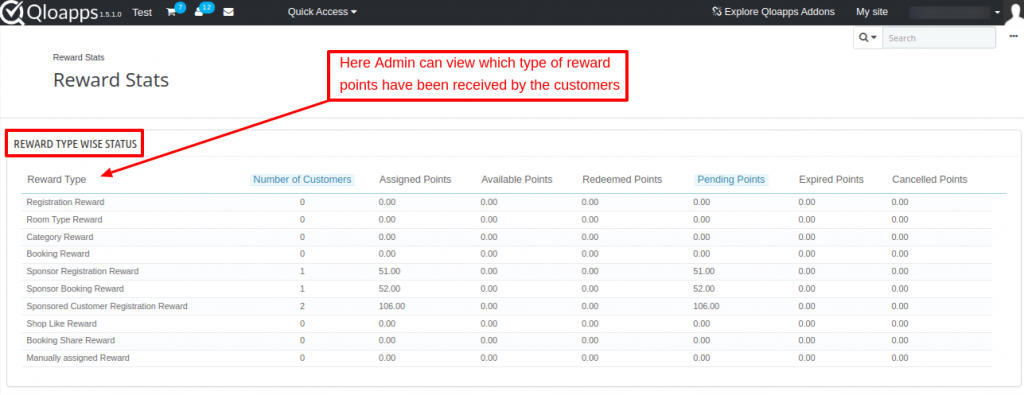
Reward Type Wise Status
Under “Reward Type Wise Status”,
the admin can view the number of customers, assigned points, available points, redeemed points, pending points, expired points, and canceled points according to a particular reward type.

Customer Wise Status
Under “Customer Wise Status”
the admin can view awarded rewards count, assigned points, available points, redeemed points, pending points, expired points, and canceled points for a particular customer.


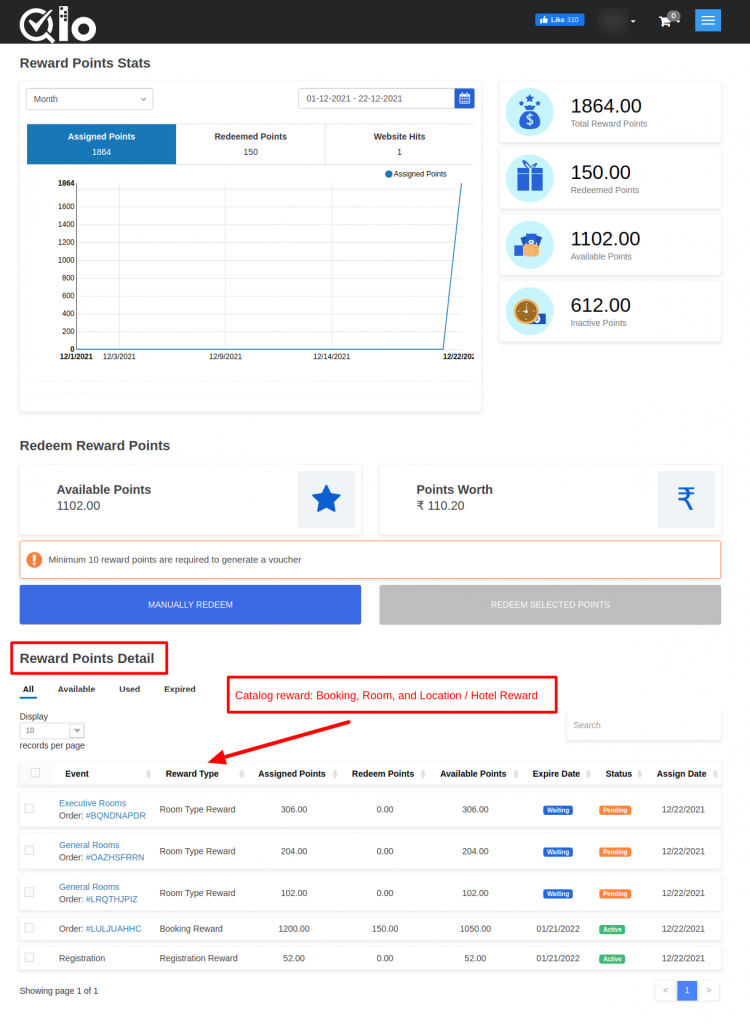
Front End View of Reward Points Stats

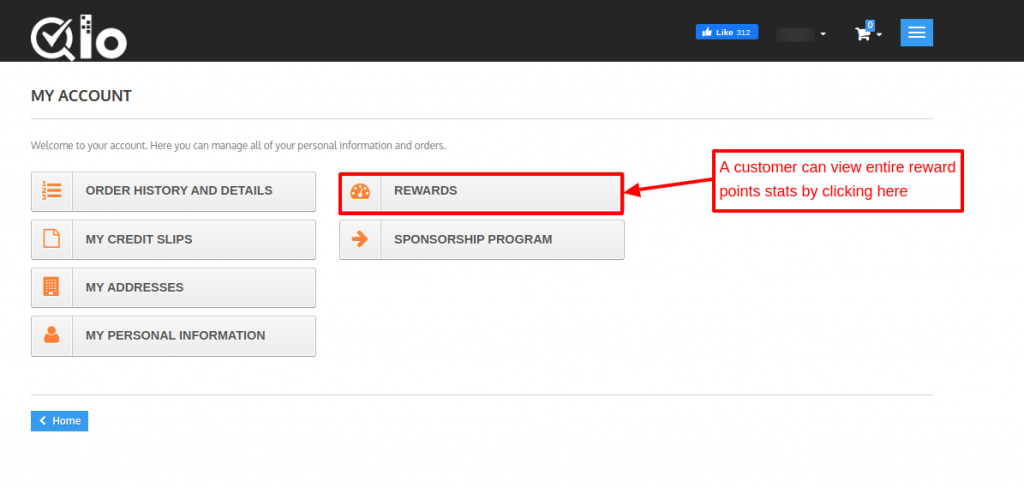
A customer can view the complete reward points statistics by clicking on “REWARDS” tab under “Your Account”.

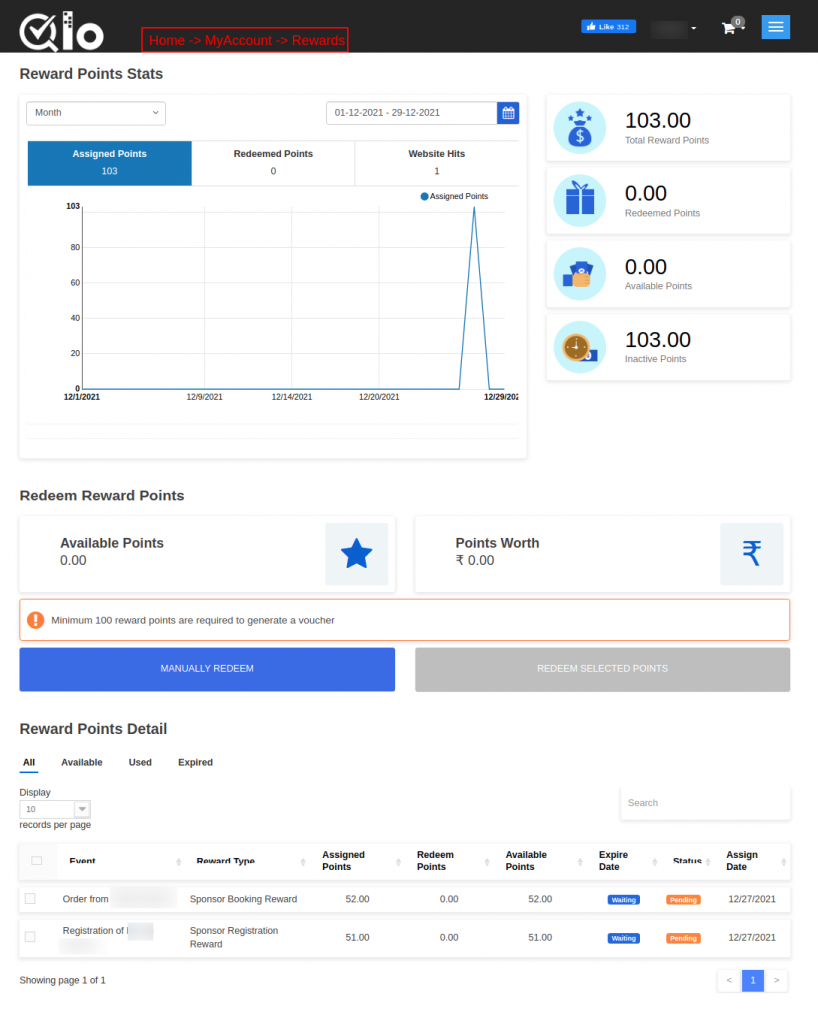
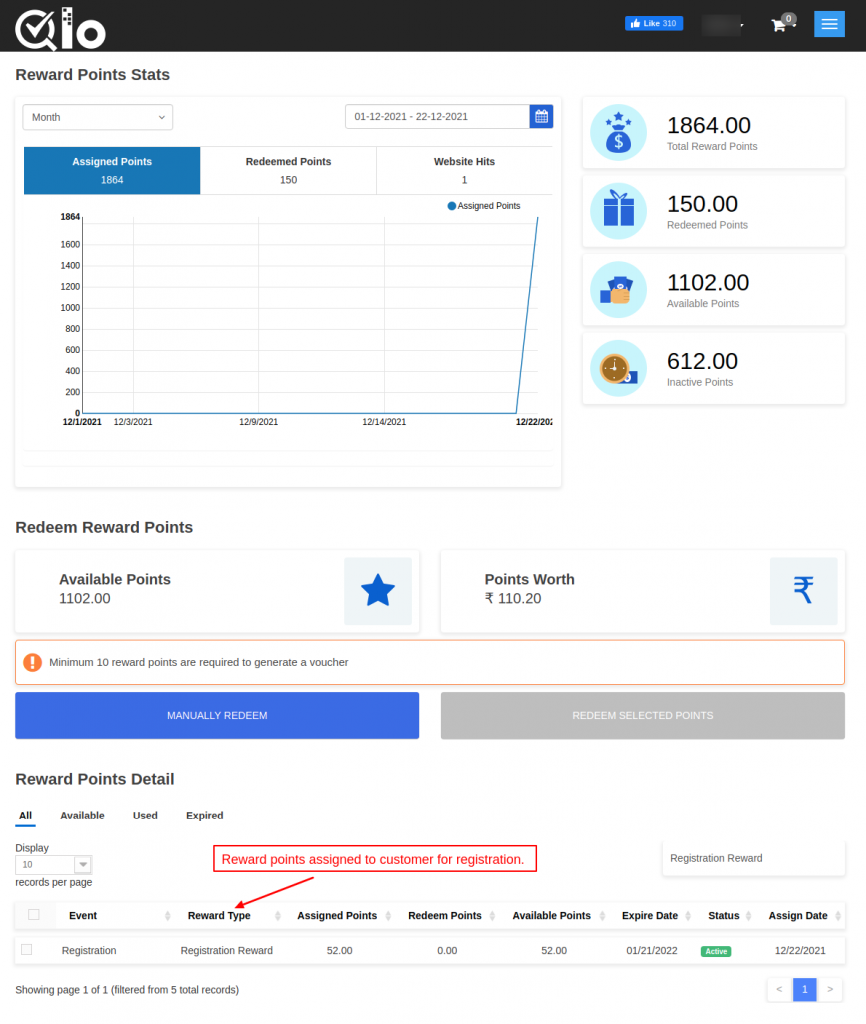
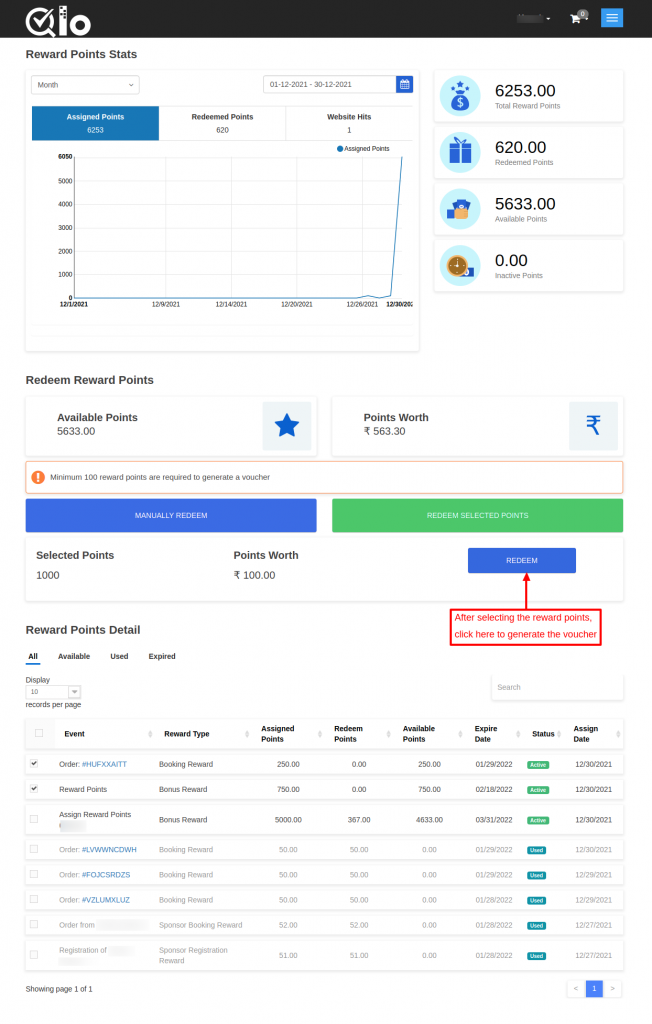
Reward Points Stats (Front-end View)
Under “Reward Points Stats”, a customer can view complete statistics of reward points on a daily, weekly, yearly basis graphically. Under reward points stats, a customer can view:
- Total Reward Points assigned to him
- The Total Reward Points redeemed by him
- Total Reward Points he has
- The Total Inactive Points

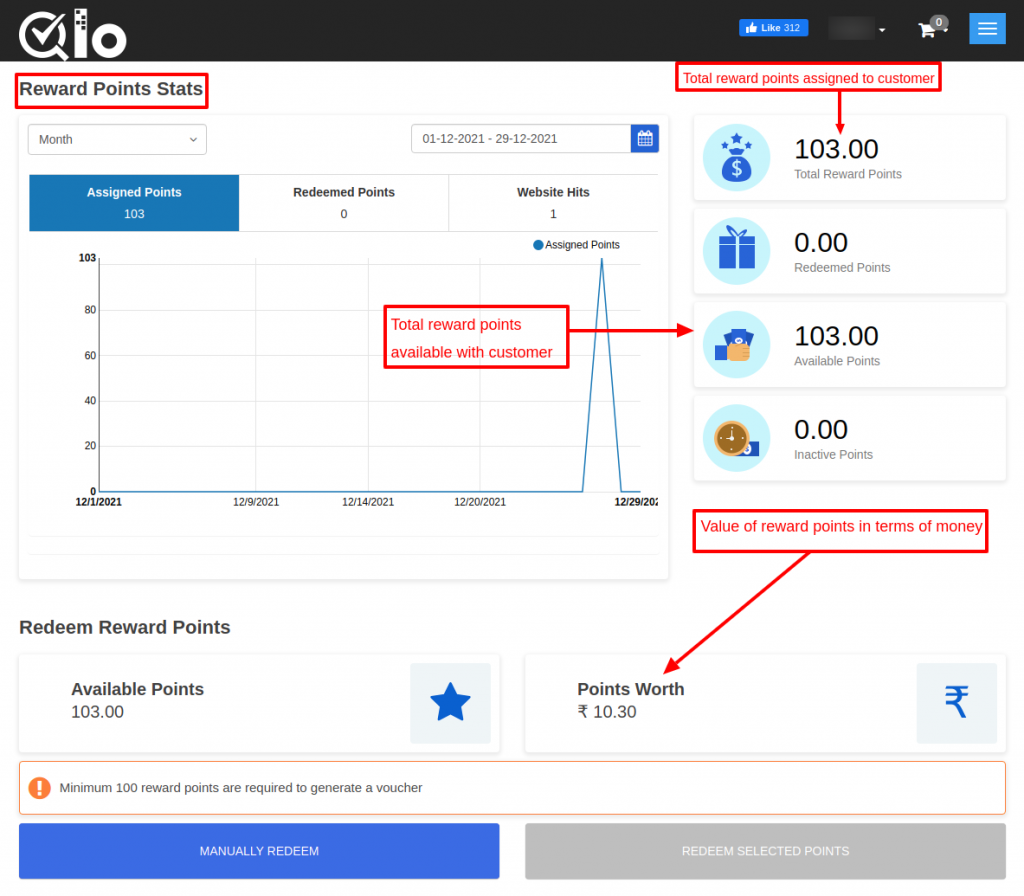

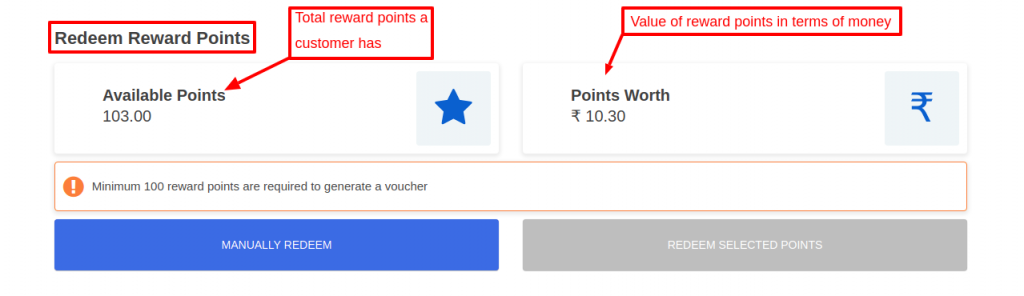
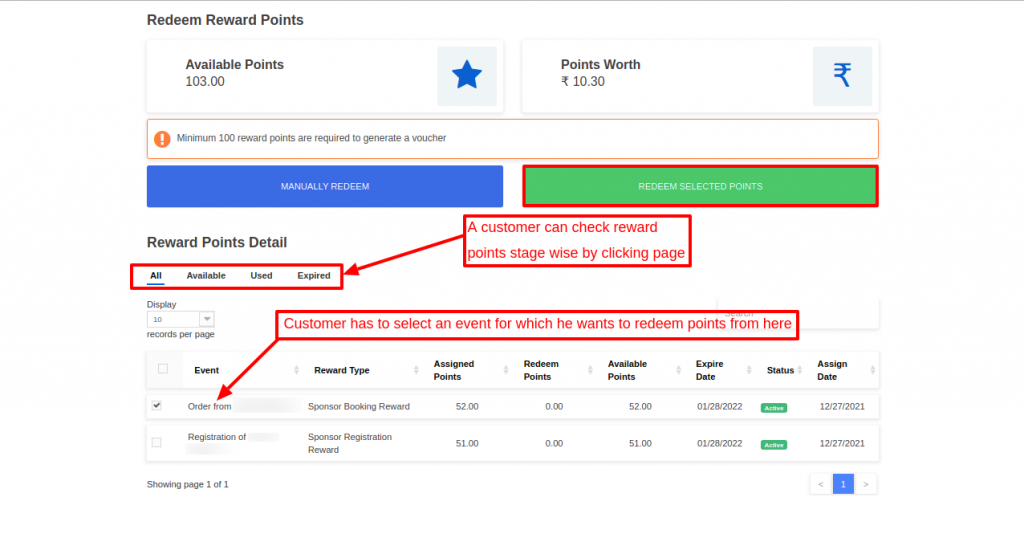
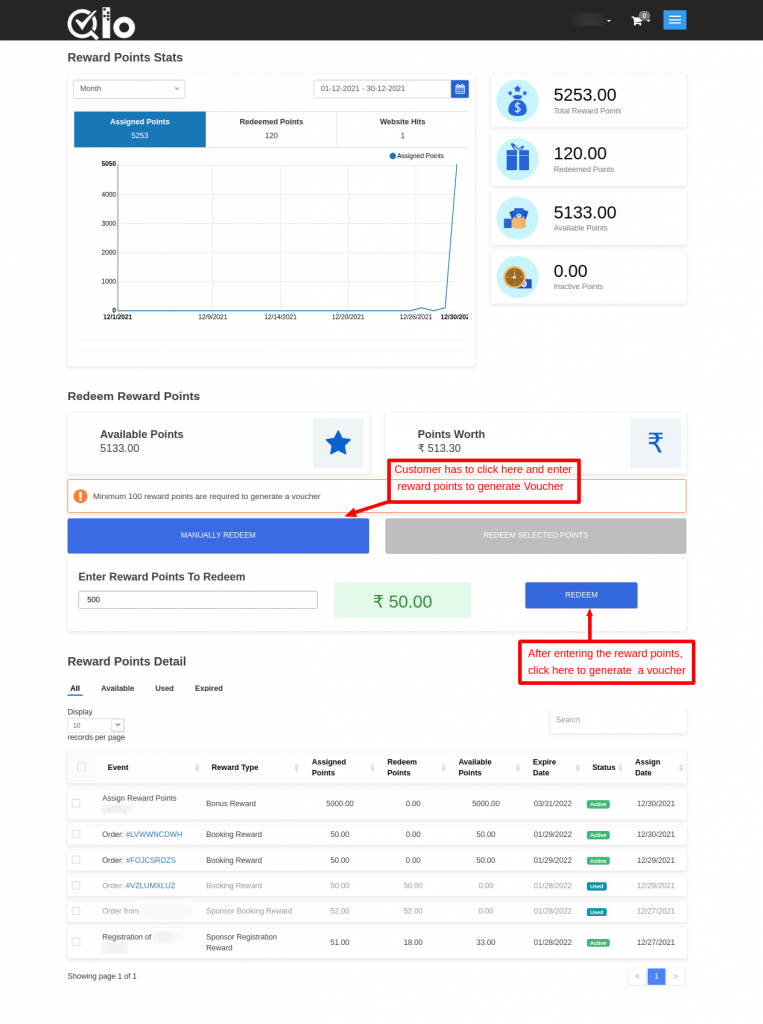
Redeem Reward Points
Under “Redeem Reward Points”, a customer can view the total reward points he has and the value of those reward points in terms of money. A customer can redeem his reward points in two ways:
- Manually Redeem
- Redeem Selected Points
Redeeming Reward Points Manually

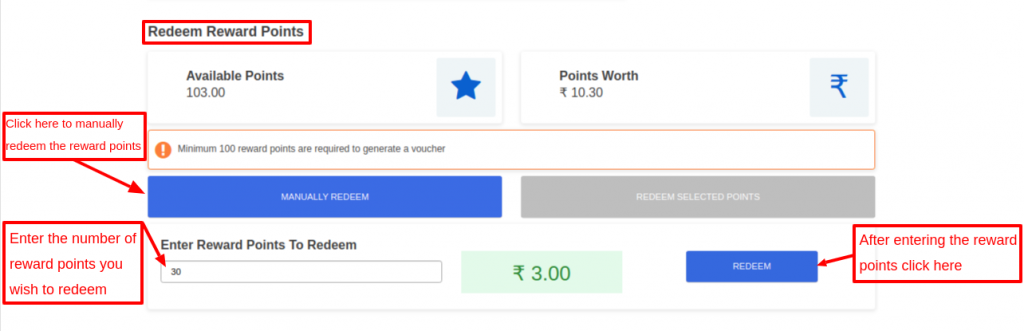
For redeeming reward points manually, a customer has to click on “MANUALLY REDEEM” button and then enter the reward points he wishes to redeem.
After entering the reward points a customer has to click on “REDEEM POINTS“ button as shown below:
Redeeming Selected Points
To redeem specific reward points, firstly a customer has to select an event for which he wants to redeem the reward points and then click on “REDEEM SELECTED POINTS” button as shown below:

Reward Memberships

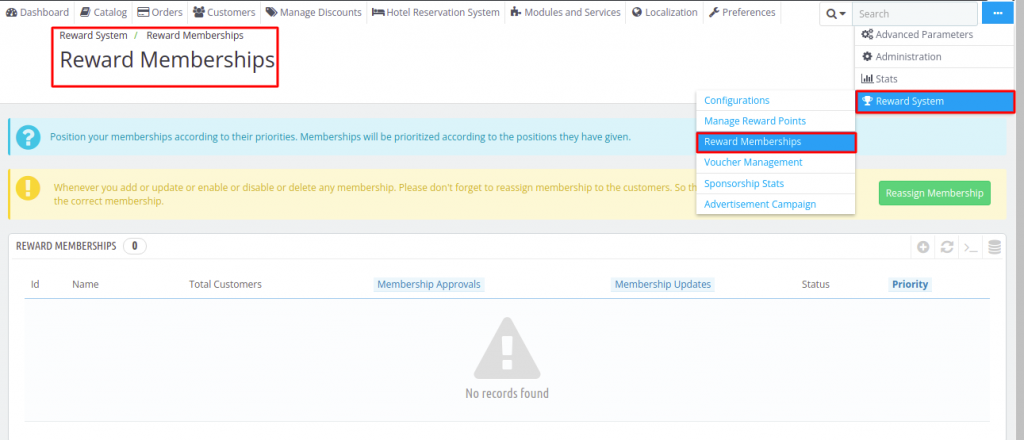
Admin can configure Reward Memberships by navigating through Reward System ->Reward Memberships.
Here admin can view the membership’s name, total customers in the membership, membership approval, membership updates, and status of membership.
Create a new Membership Plan
Admin can add a new Reward Membership by clicking on “Add New Reward Membership”.
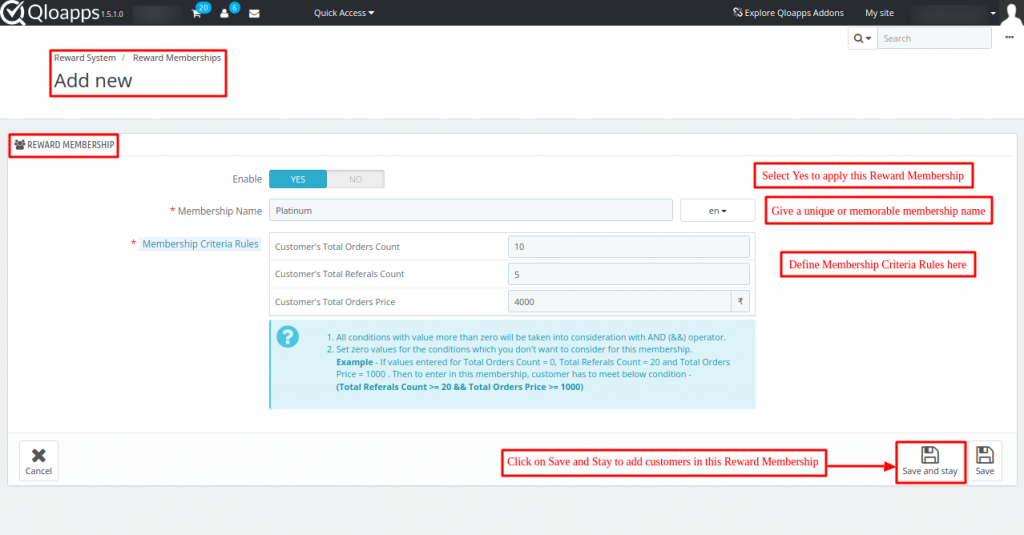
Enable: Admin can enable or disable the reward membership.
Membership Name: In this field, the admin has to enter the name of the reward membership.
Membership Criteria Rules: Admin has to set the criteria which a customer has to meet to enter in the membership plan.
In Membership criteria rules, the admin has to set the customer’s Total Orders Count, Customer’s Total Referrals Count and Customer’s Total Order Price.


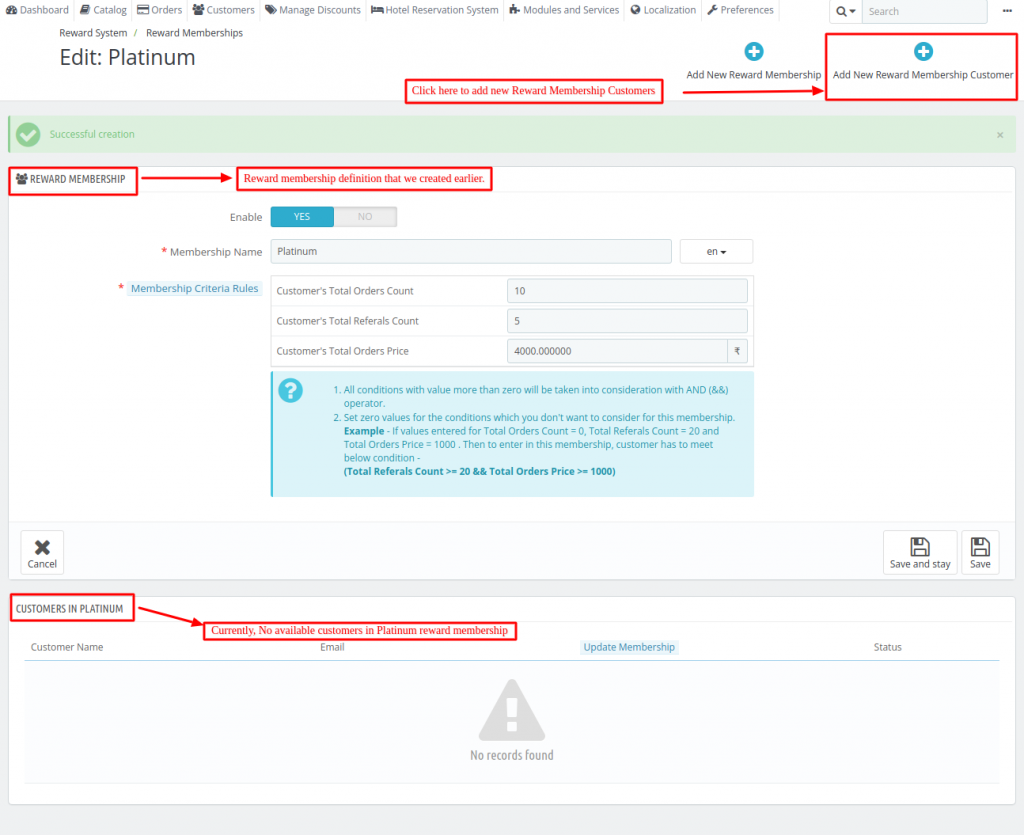
Currently, there is no available customer in the created “Platinum” reward membership.
Add Customers in a Membership Plan
To add customers to this Platinum reward membership, click on “Add New Reward Membership Customer” button given in the upper-right corner.

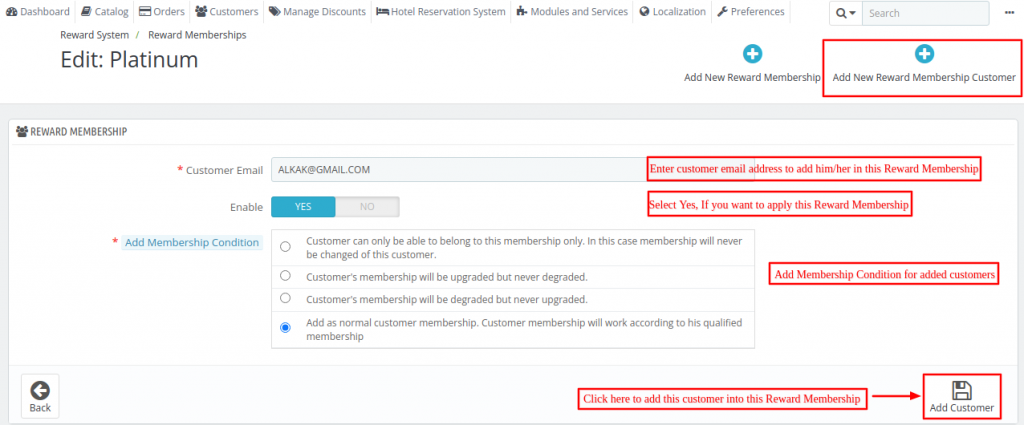
After adding the customers to the Platinum reward membership, Now click on Save.
Therefore, you can check the Reward Membership definition, alongwith the added customers in this reward membership.

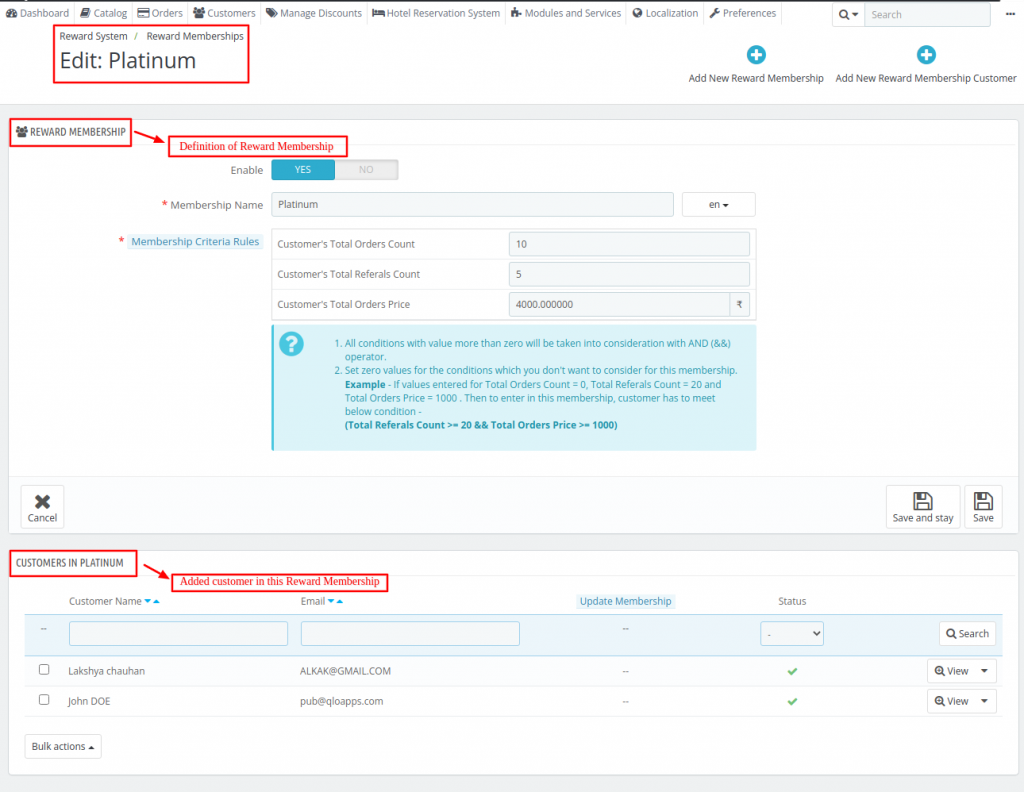
Thus, you can manage reward memberships and assign customer Membership Criteria Rules.
You can also change the Statuses of reward memberships as per your requirement.
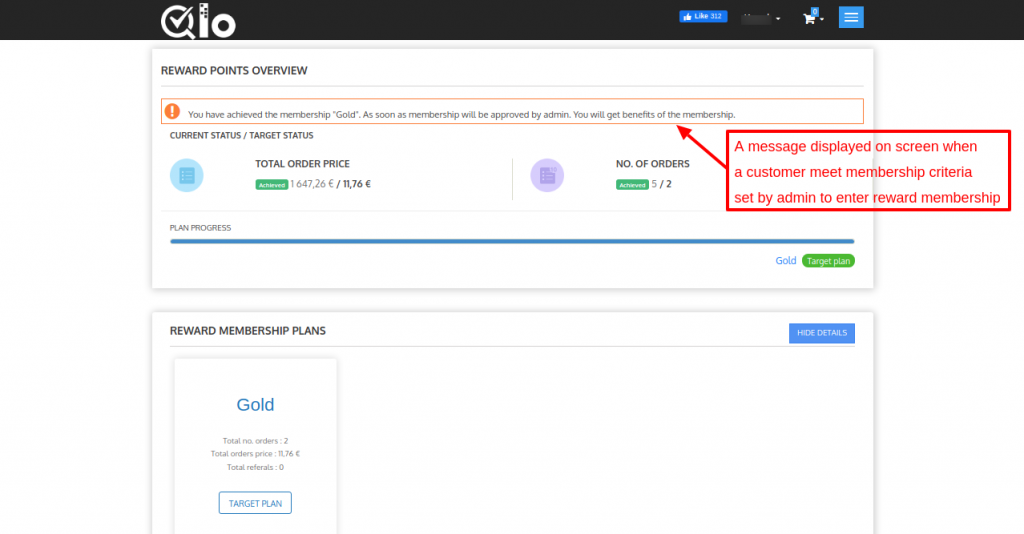
Customer meets qualification of a membership plan
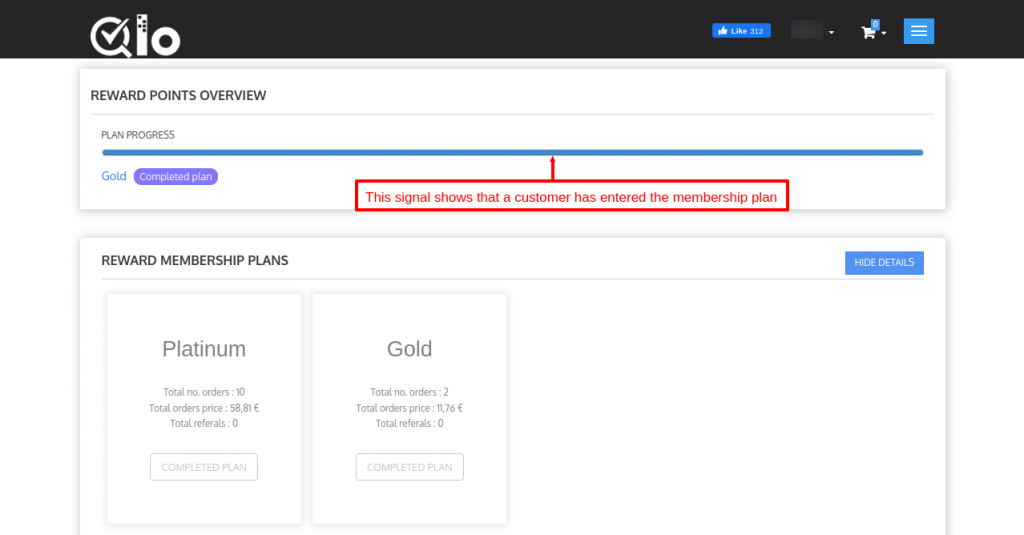
When a customer meets the criteria set by admin to enter the reward membership, a message gets displayed at the front end as shown below:
Admin can add a new customer to the reward membership by clicking on “Add New Reward Membership Customer”.
Once the customer’s membership approves by admin, a customer on the front end can view that he has entered the membership plan as shown above:

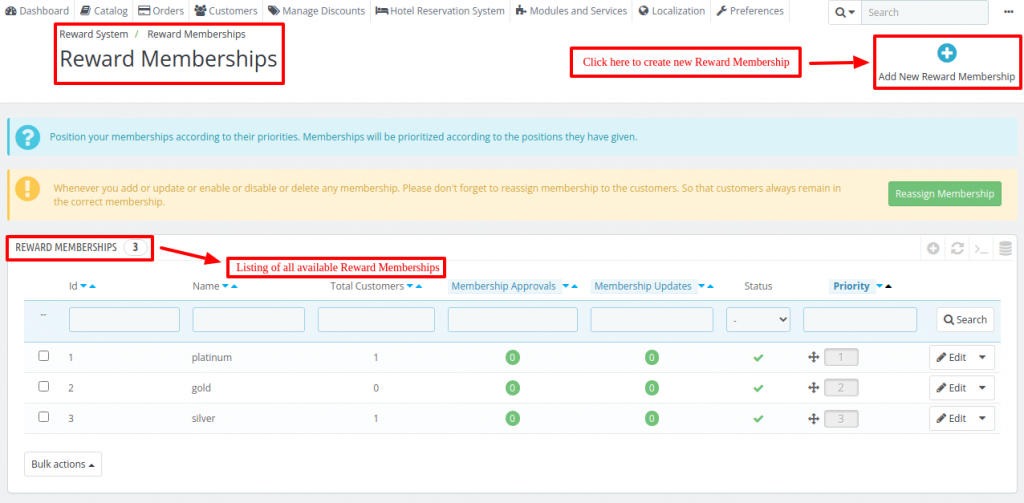
Here, you can check and manage all the listings available of Reward Membership types.
One can set the Status of Reward membership by enabling/disabling it.
Above all, was about Reward Memberships in the QloApps reward system.
Voucher Management
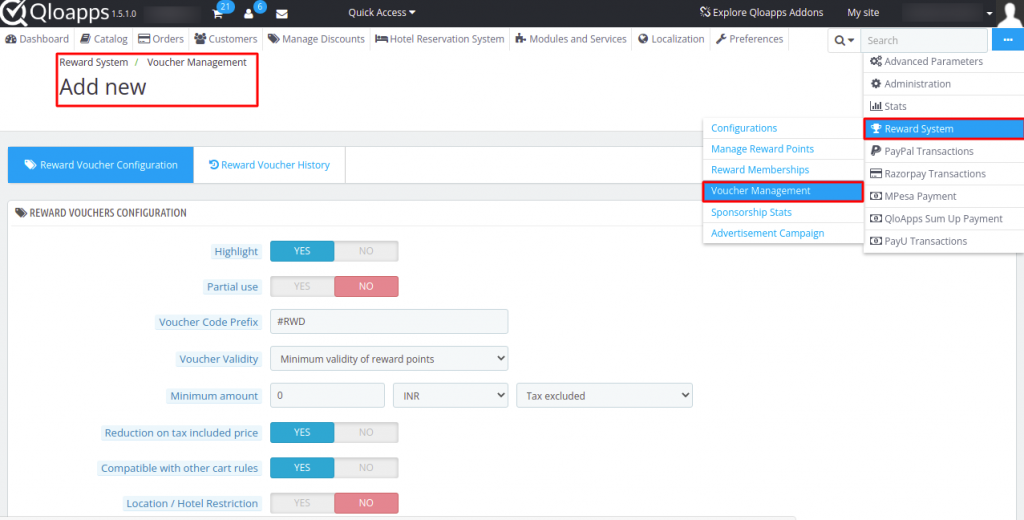
Admin can configure Reward Voucher by navigating through Reward System ->Voucher Management.
Reward Voucher Configuration
Under “Reward Voucher Configuration”, admin has to:

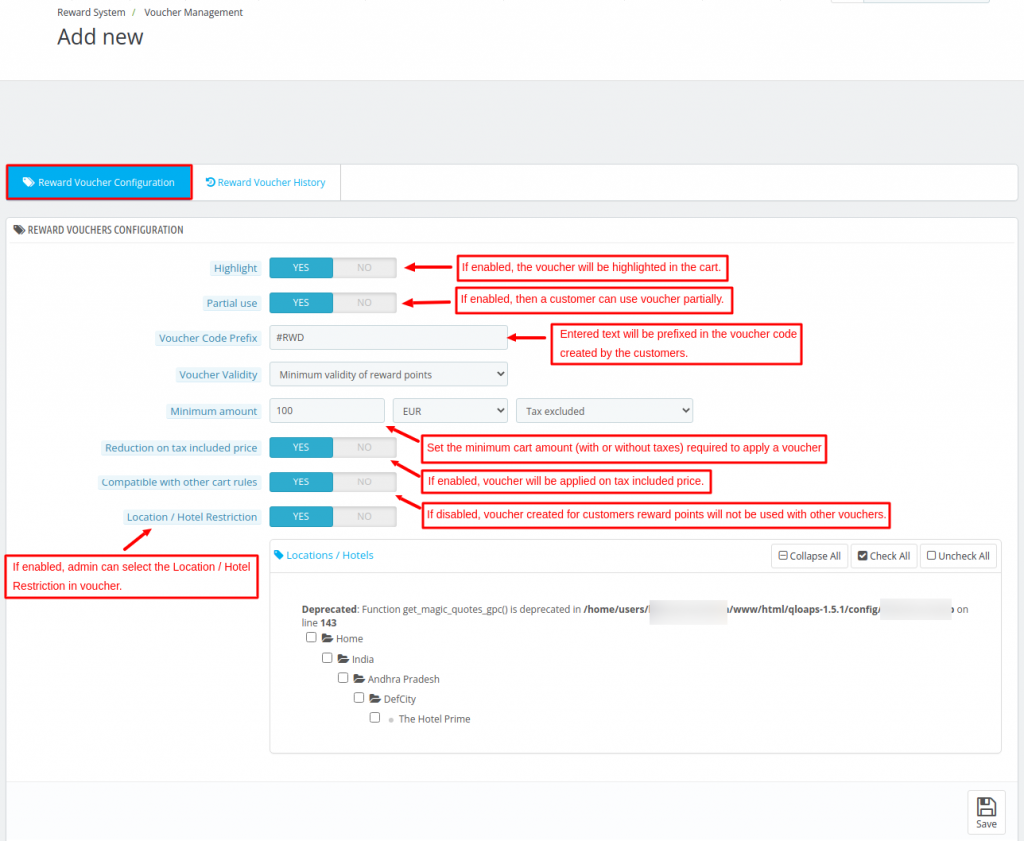
- Enable/disable the partial use of voucher
- Set voucher code prefix
- Admin can set validity of a voucher
- Set minimum cart amount required to apply a voucher.
- Enable/disable category restriction.

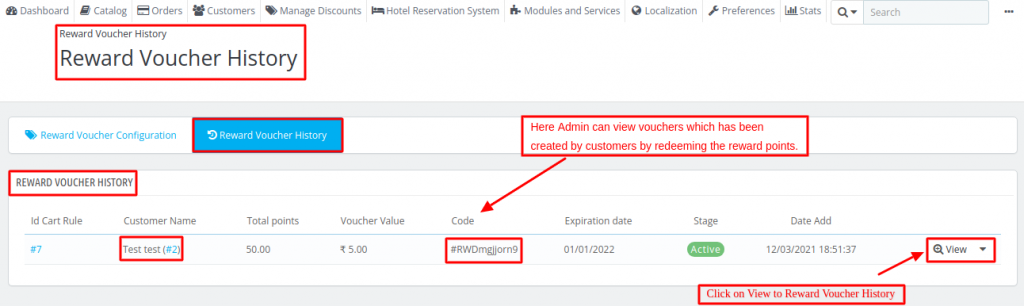
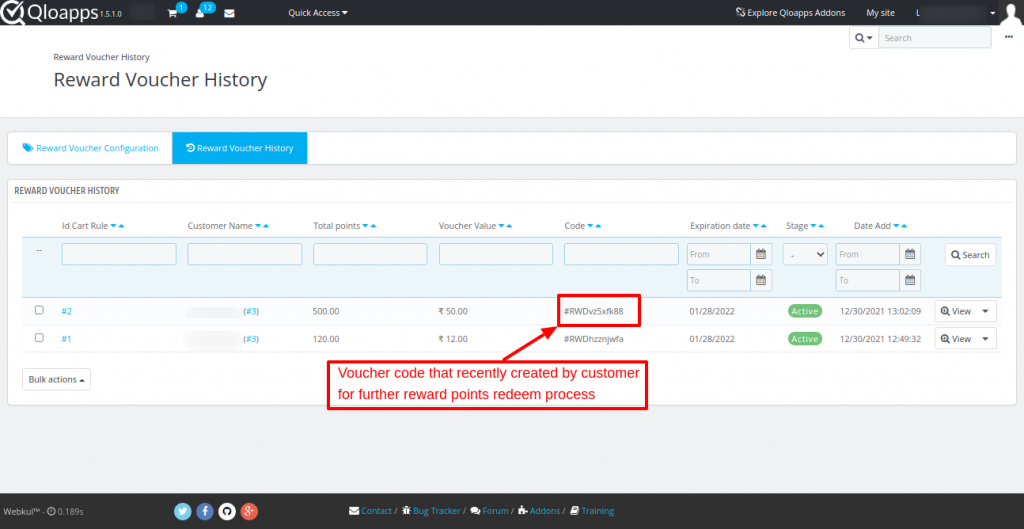
Reward Voucher History
Under “Reward Voucher History”, admin can view:
- Customer’s Name
- Total Reward Points used for the voucher
- Voucher Code
- The expiration date of a voucher
- Stage of a voucher whether its active or canceled
- Date on which voucher got added


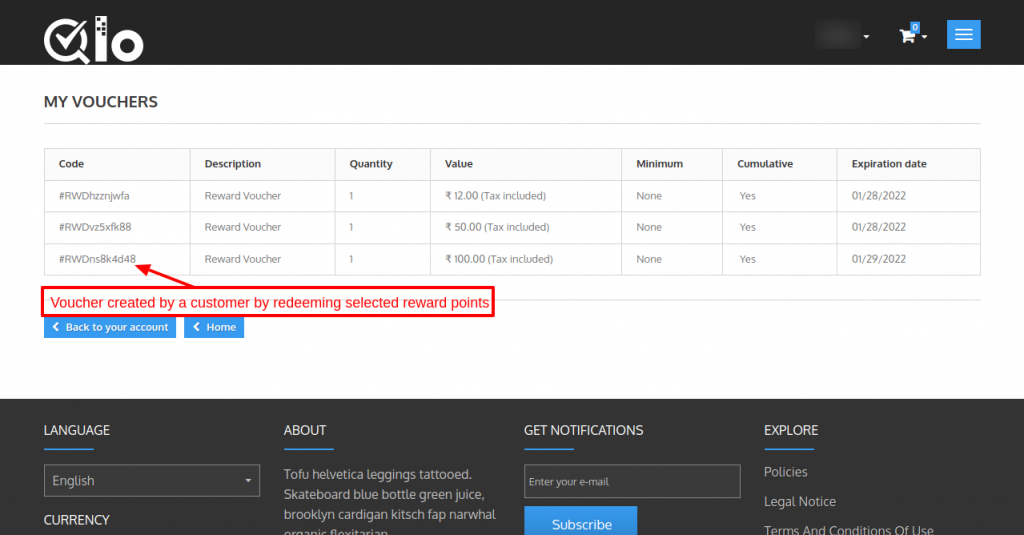
How a Customer can Create Reward Voucher
A customer can create a voucher either by redeeming the reward points manually or redeeming the selected reward points.
Manually redeeming the reward points to generate a voucher


After entering the reward points a customer has to click on “REDEEM POINTS” button to generate a voucher.
- Redeeming selected points to generate a voucher

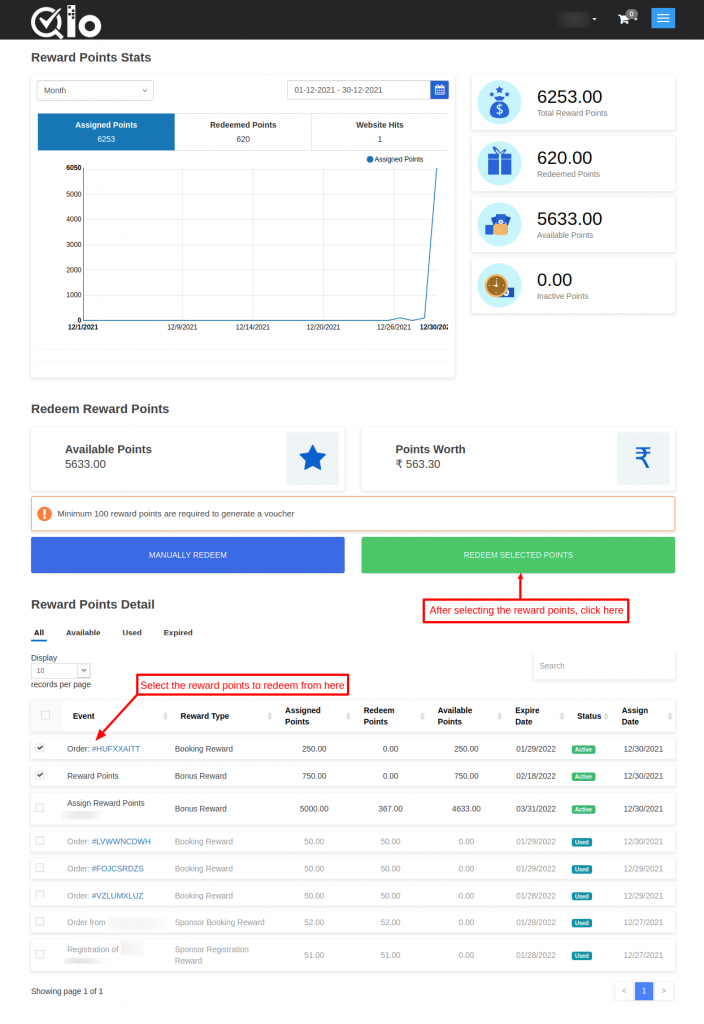

After selecting the reward points, click on Redeem button to generate a voucher.


Redeem Selected Points
For redeeming the selected reward points first, a customer has to select the reward points of different events and then click on the “REDEEM POINTS” button as shown below:
After clicking on REDEEM POINTS button, a voucher will generate.
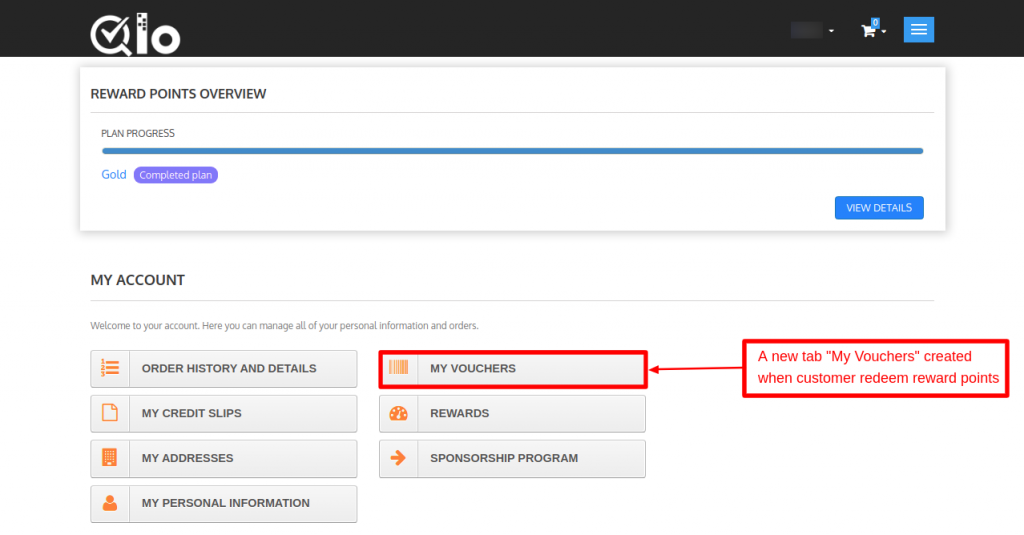
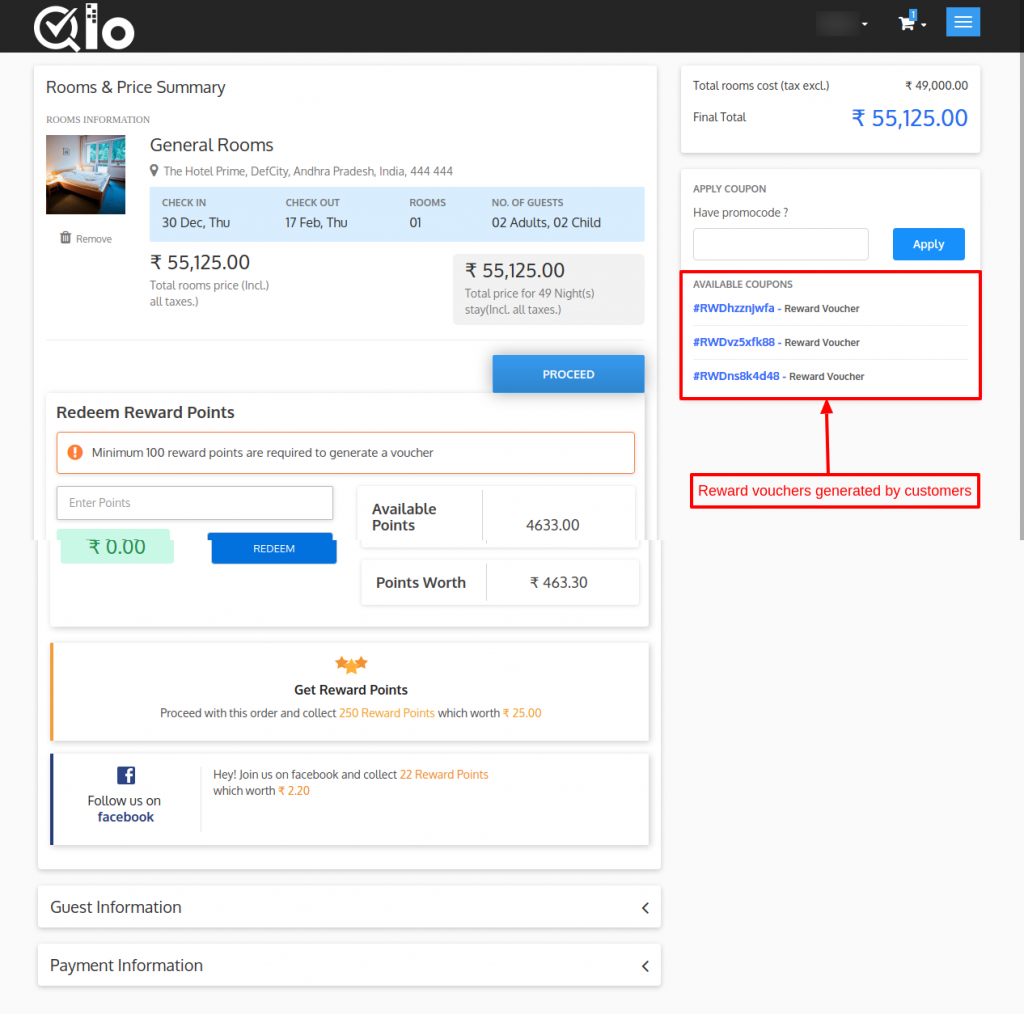
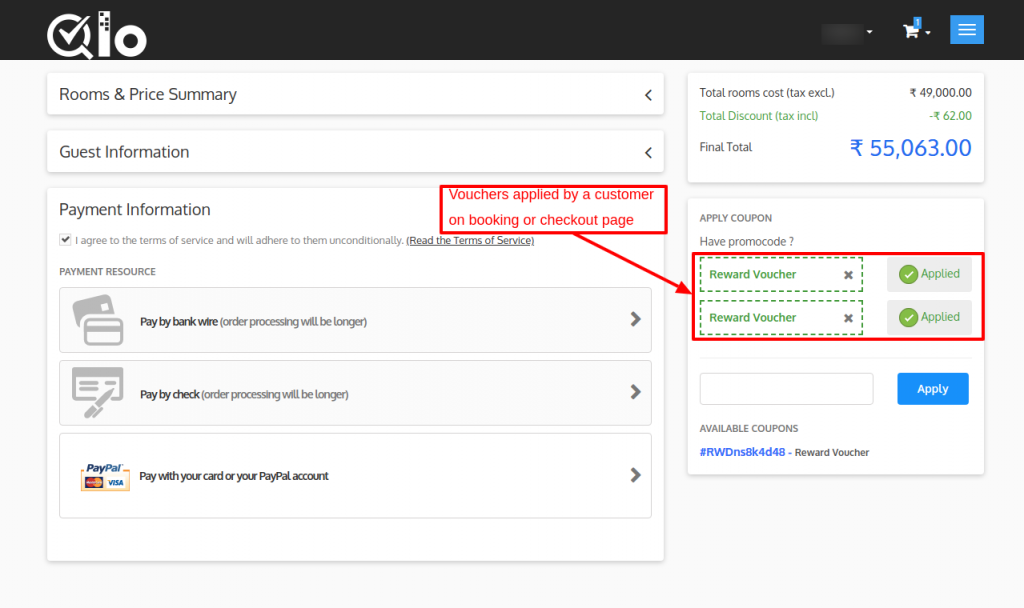
A customer can view the reward vouchers generated by him at the cart page as shown below: A customer can apply the voucher to order.
Sponsorship Stats

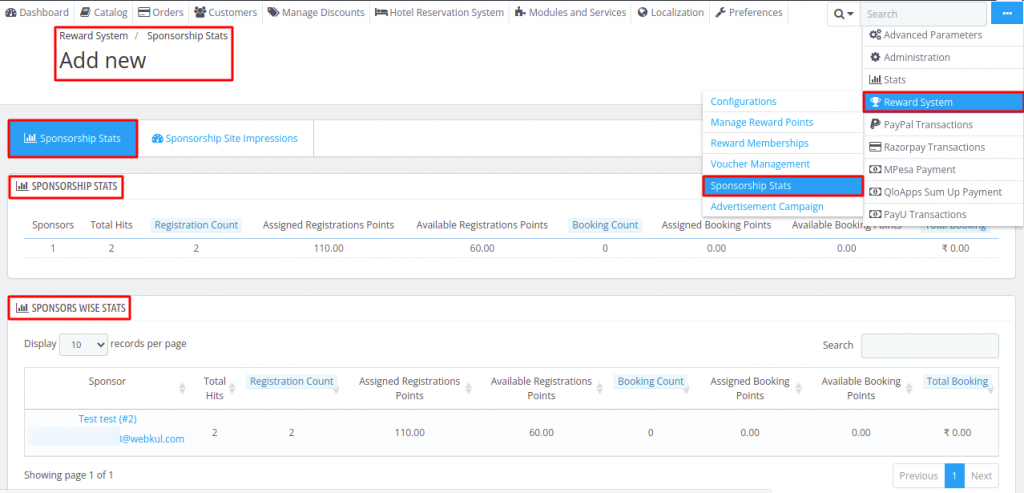
Admin can view the sponsorship statistics by navigating through Reward System ->Sponsorship Stats.

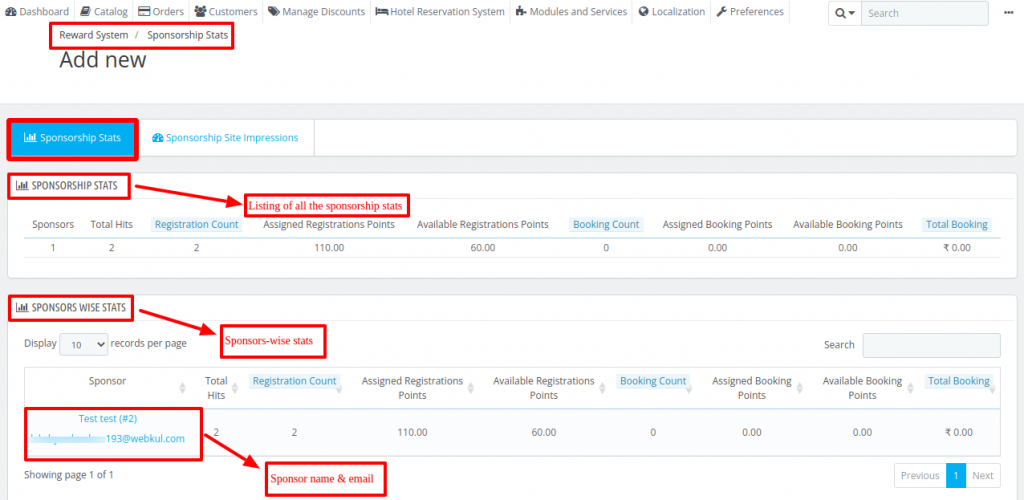
Sponsorship Stats
Under Sponsorship stats, admin can view:
- Total number of sponsors
- The Total Hits
- Total number of registration done by the friends referred by the sponsors
- Reward Points assigned to sponsors on the registration of their referred friends.
- Available registration points of the sponsors
- Total number of orders placed by sponsor’s friends who have registered on the site.
- Total assigned order points which sponsors gets when their friend place orders on the site.
- Available order points of the sponsors.
- Total order value of sponsor’s friends.
Sponsors Wise Stats
Under Sponsors Wise stats, the admin can view the sponsorship statistics of an individual sponsor.
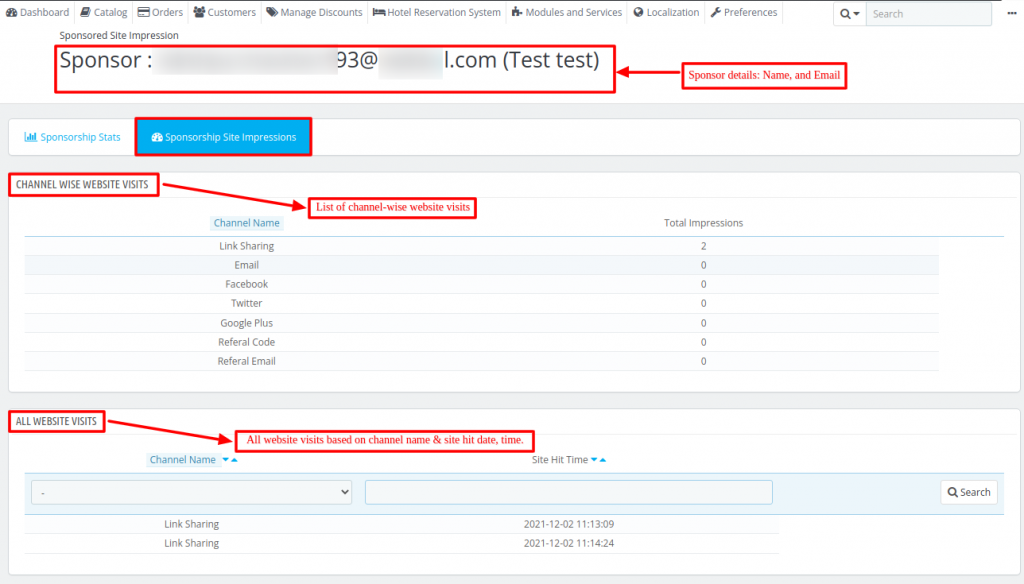
Sponsored Site Impressions
Under “Sponsored Site Impression”, admin can view:
- Customer Id of a sponsor
- Name of a sponsor
- Email Id of a sponsor
- Total impressions to the website by sponsored users

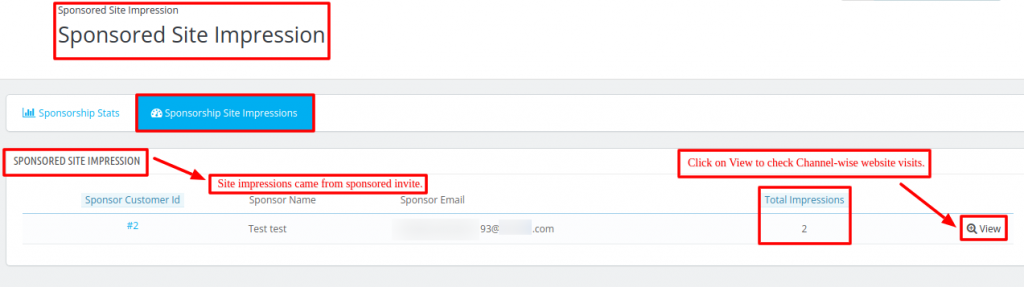
Admin can view channel-wise website visits and all website visits by clicking on the “view” button.

Workflow of Sponsorship Program at Front End
To start a sponsorship program, a customer has to click on Sponsorship Program under “Your Account” as shown below:

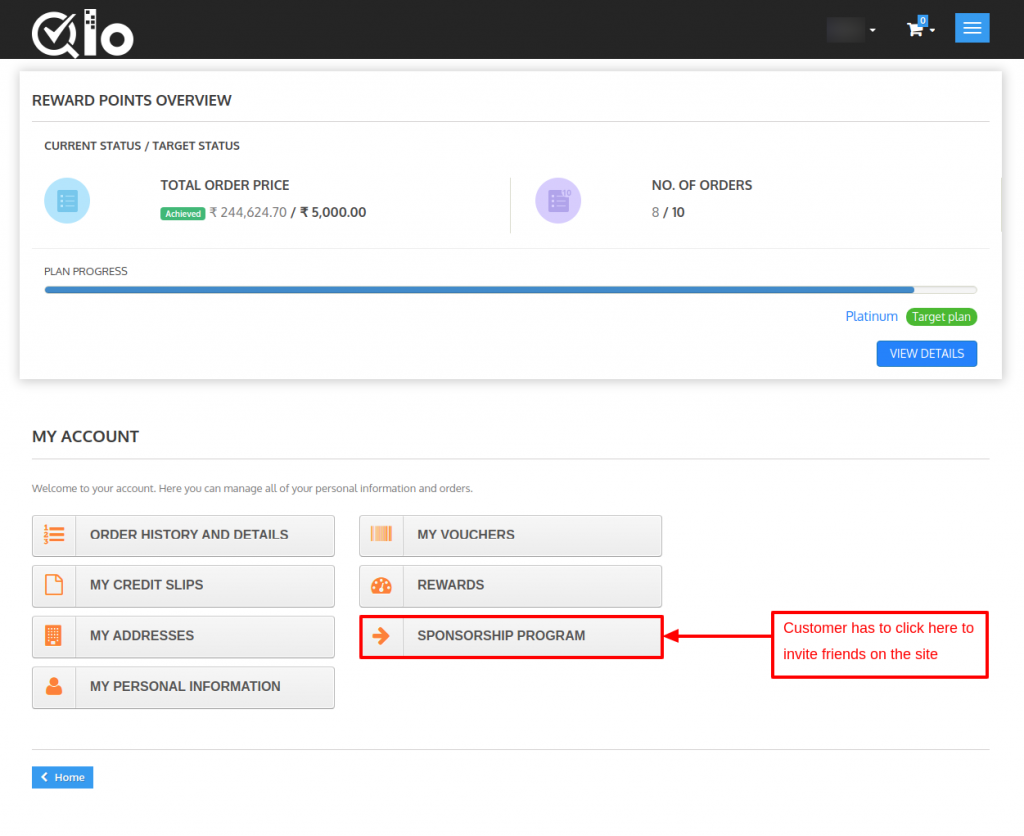
Sponsor Friends

Under this tab, a customer can also refer his friends to the website by entering their username and email id.
If the friends to whom a customer has sent an invite register on the website then a customer gets reward points as set by the admin from the backend.
A customer can also enter the message which will be visible in an email sent to friends.
Sponsor Status
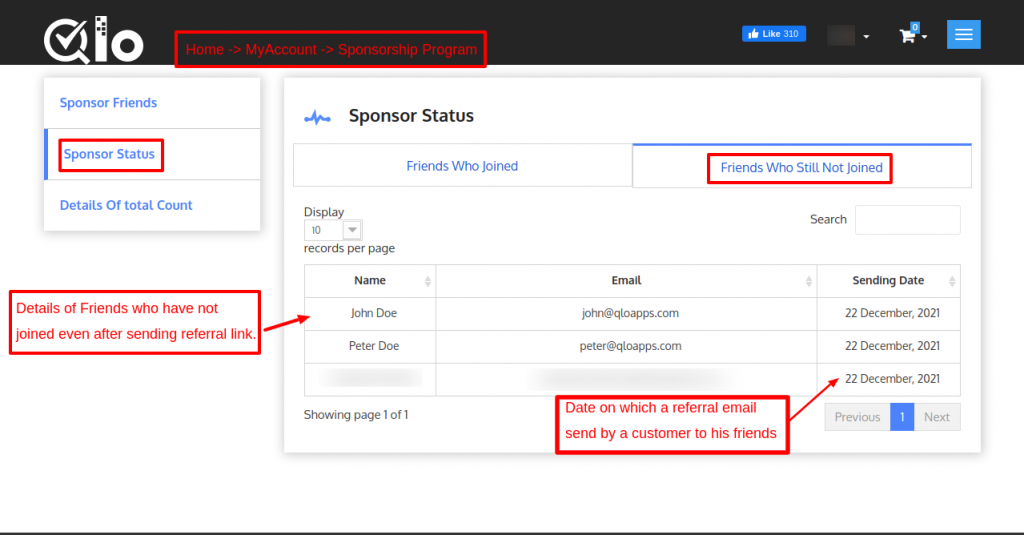
Under Sponsor Status, a customer can also view a list of his friends who have registered on the website and through which channel.
A customer can also view a list of friends whom he has sent the referral email but they have not registered on the website yet.
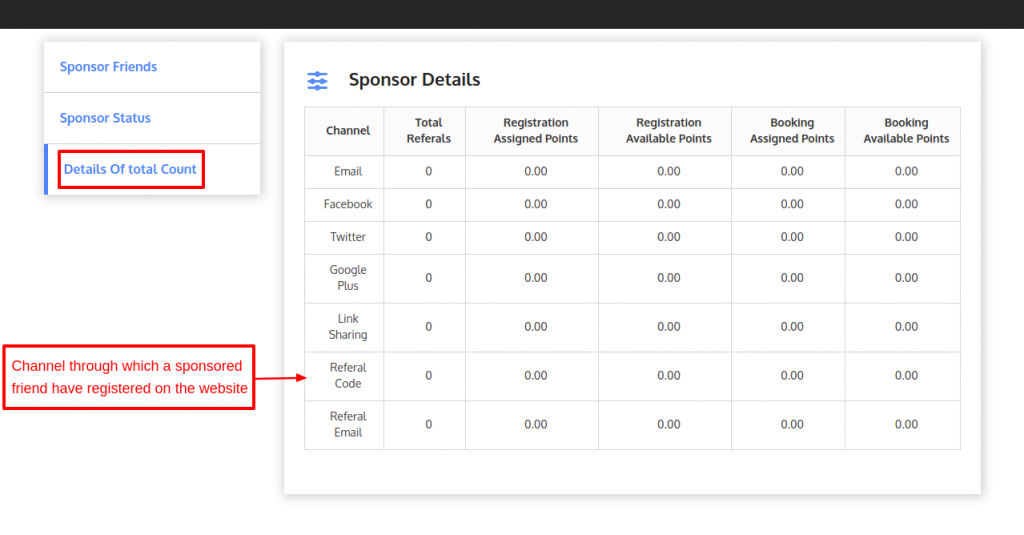
Details of Total Count

Under Details of Total Count, a sponsor friend can view:
- The channel through which a sponsored friend has registered on the website.
- Total number of friends to whom a customer has sent the email have registered on the website through a particular channel.
- Afterthat, Total registration points assigned to a sponsor friend when their referrals register on the website through a particular channel.
- Registration Available Points for a sponsor.
- Total Reward points assigned to a sponsor, if his friends who have registered on the website place orders.
- Order Available Points of a sponsor.
Advertisement Campaign

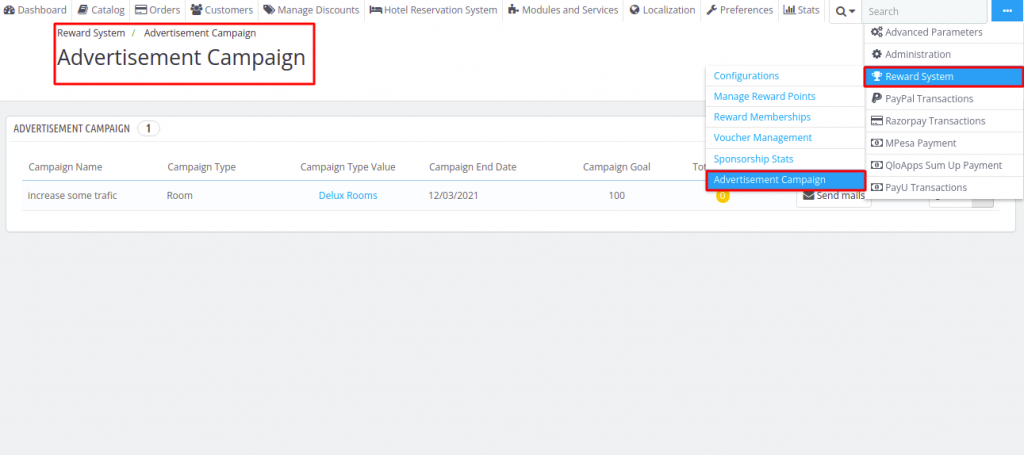
With the help Advertisement Campaign, the admin can promote his reward points-based system and track the website’s progress.
Admin can configure the advertisement campaign by navigating through Reward System Management->Advertisement Campaign.
Admin can add a new advertisement campaign by clicking on “Add New Advertisement Campaign”.

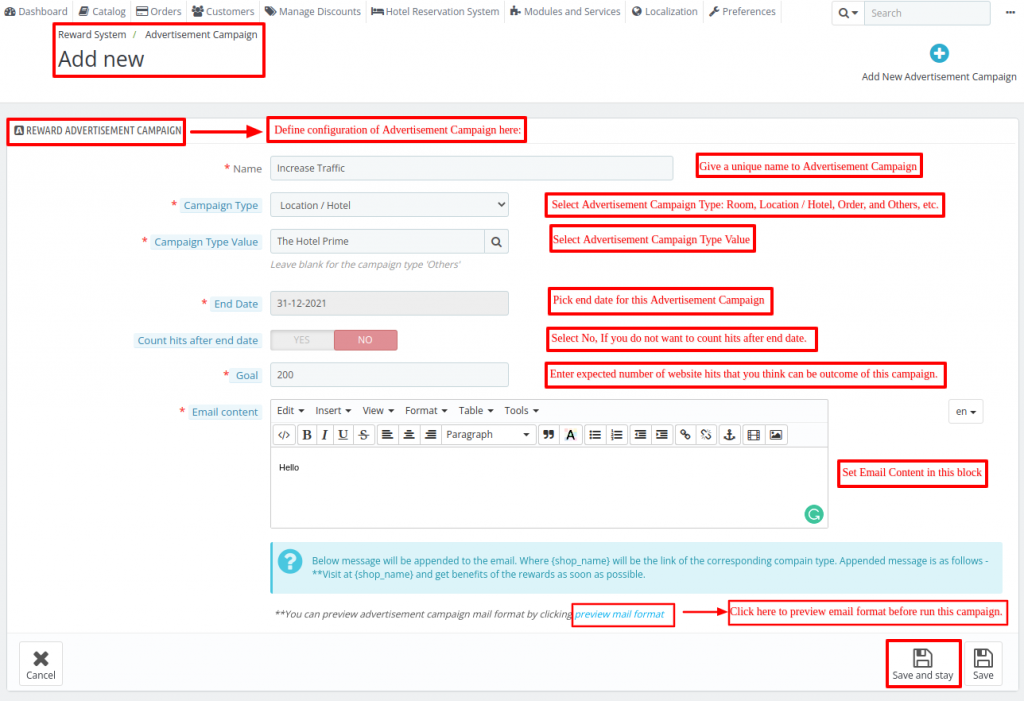
Reward Advertisement Campaign Configuration
Name: Enter the name of the campaign.
Campaign Type: In this field, the admin has to select the type of campaign which he wants to start.
Link to share with customers will generate according to the type of campaign selected by the admin.
For instance, if the admin wants to make a campaign for the product after that product link will send to the customers.
Campaign Type value: In this field, the admin has to enter the value for the selected campaign type.
For example, If the admin selects a product in “Campaign Type” after that doing search by entering the product name to select a product on which the campaign will run.
End Date: Admin has to set the end date for the campaign.
Count hits after end date: Select Yes, If you want to count every website visit from this campaign on the Admin panel.
Goal: In this admin has to set the number of website hits he is expecting from this campaign. This is for tracking purposes.
Email Content: Admin has to enter the content of the email he wants to send to the customers.
The link of the website generates dynamically according to the selected campaign type and this link will append at the end of the email content.
Conclusion
To conclude, this was all from the QloApps Reward System addon. I hope I was able to clarify the functioning of the entire module to you in the best possible way.
If you want to learn more about the functionality of QloApps then you can visit this link: QLO Reservation System – Free Open-Source Hotel Booking & Reservation System.
In case of any query, issue, or requirement, please feel free to raise it on QloApps Forum.
Current product version: V 4.0.0
Supported framework version: 1.7.x