QloApps Marketplace On Desk Booking
QloApps Marketplace On Desk Booking lets a Marketplace seller create a booking for a guest directly from their own seller account.
It also covers the seller’s room search and cart, attaching or creating the guest, taking payment, and the optional “Add Booking” button it adds to the QloApps Marketplace Front Desk screen.
NOTE: This module needs the Marketplace module installed, and it only works for a customer account that Marketplace has approved as an active seller.
Features of QloApps Marketplace On Desk Booking
- Search room availability by hotel, room type, and date range from the seller’s own Marketplace account
- Add available and partially available rooms to an on-desk cart, with occupancy set per room
- Attach an existing guest to the booking or create a new one without leaving the page
- Save a new address for the guest
- Add paid extra services to a room before the booking is created
- Take full or partial payment and record the payment source, method, and transaction ID
- Reallocate or swap an already-booked room for another available room of the same type
- Settle the full booking amount to the seller, with zero admin commission taken on on-desk bookings
- Add a booking straight from the QloApps Marketplace Front Desk screen, when that add-on is also installed
How to Install QloApps Marketplace On Desk Booking
- In the Back Office go to Modules and Services › Manage Modules and click Add a new module.
- Choose the module ZIP under Module file, then click Upload and install this module.
- QloApps installs it immediately, so a checklist confirms all three steps: upload, verification, and install.

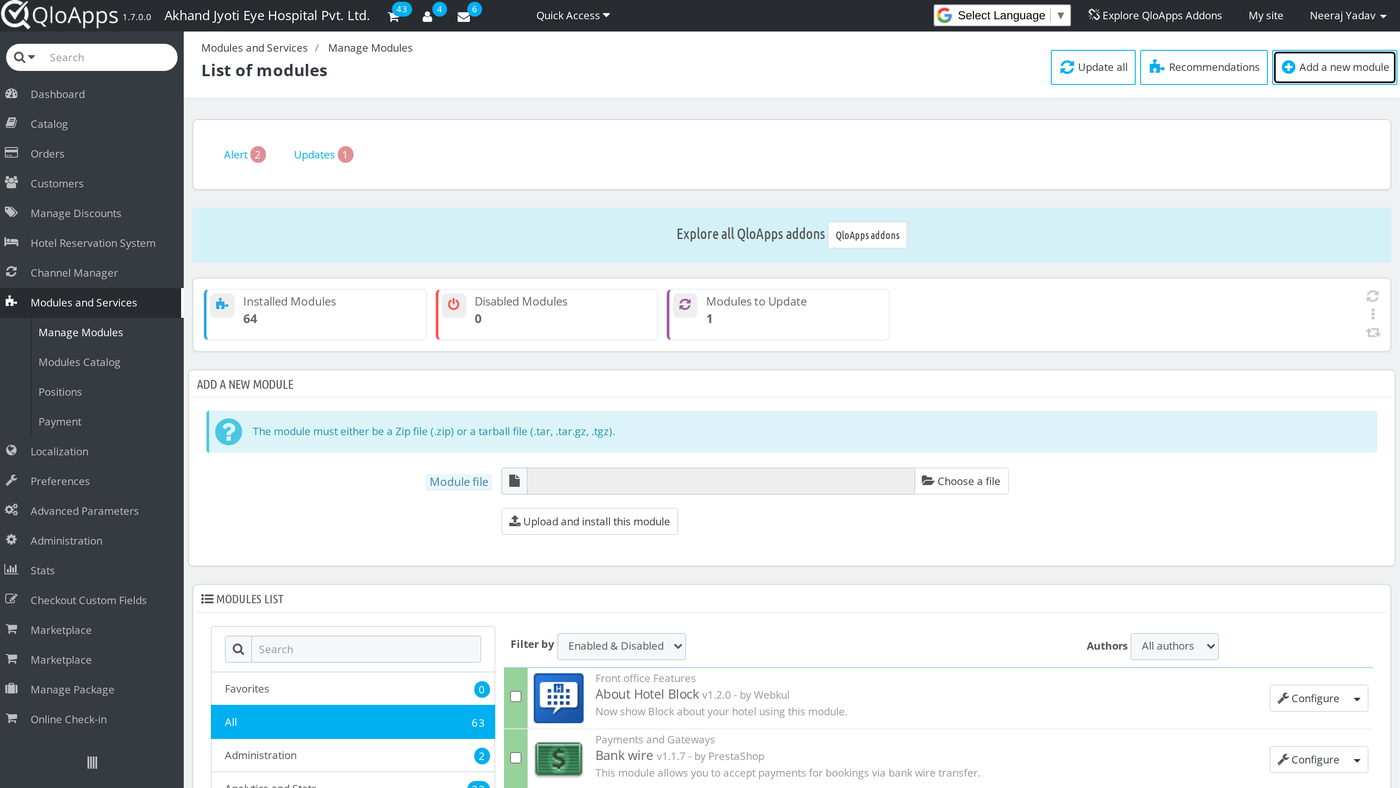
Because the Marketplace module is a dependency, First you make sure to have installed marketplace module.
Configuration of QloApps Marketplace On Desk Booking
QloApps Marketplace On Desk Booking has no settings page — it does not add a Configure link in Modules and Services, only Disable, so there is nothing to fill in on the Back Office side.
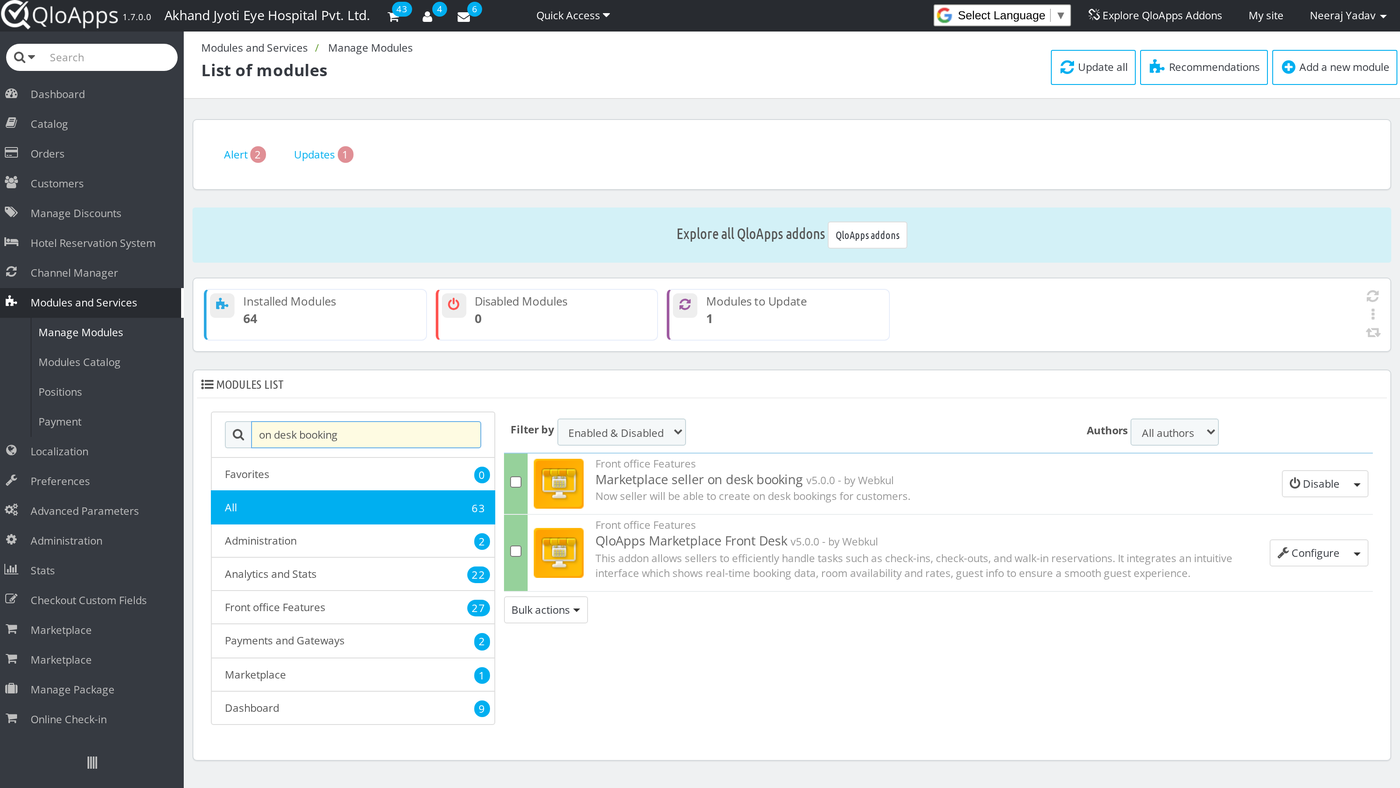
Prerequisites
Two things make the module usable for a given seller:
- The Marketplace module is installed.
- The customer account is an active seller (approved through Marketplace’s own seller request flow).
Once both are true, an On Desk Booking link appears automatically at the bottom of that seller’s Marketplace account menu — no further setup is needed.
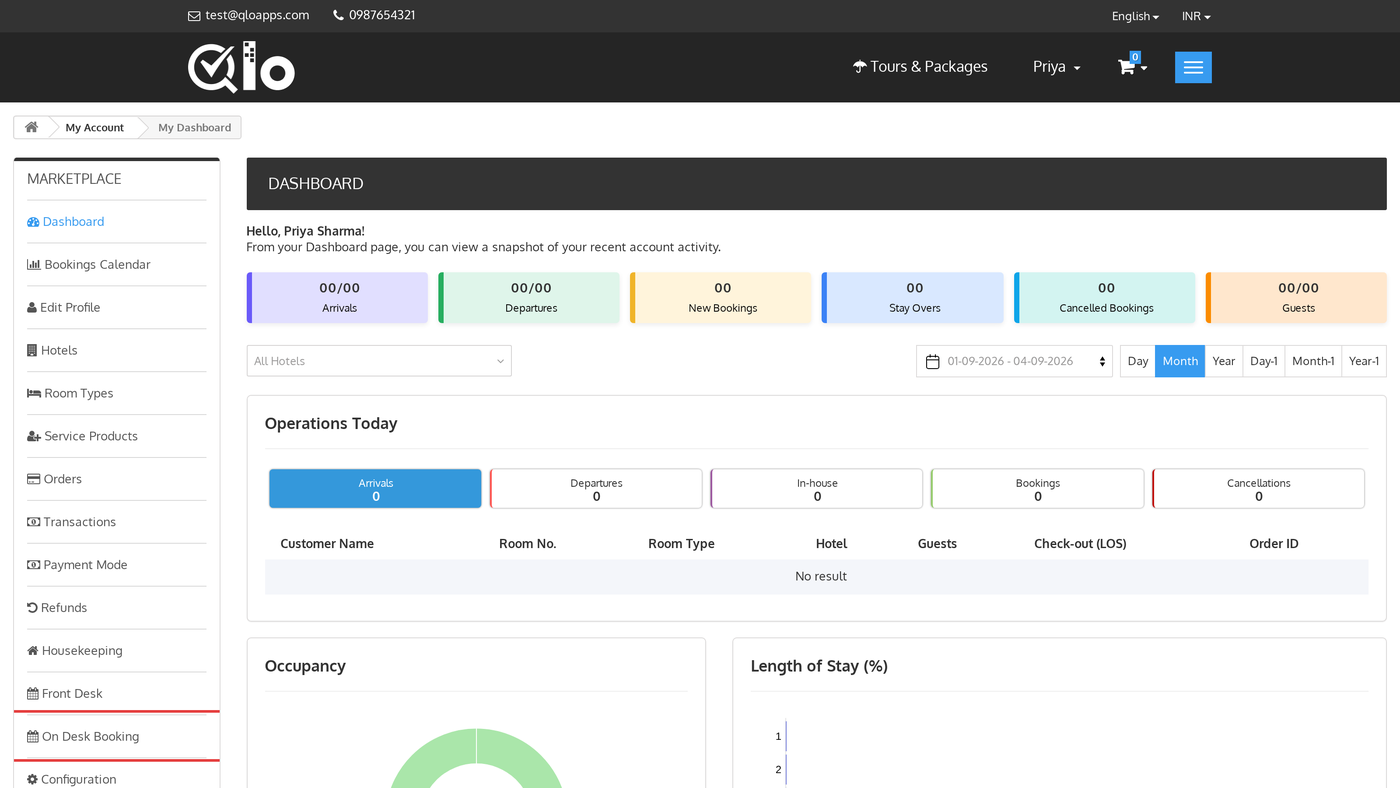
Search for Available Rooms
Open On Desk Booking from the Marketplace menu. The page loads with Check In – Check Out defaulted to today and tomorrow, but seller can search a different date range, hotel, or room type.
QloApps groups the results by room type, then by Available Rooms, Partially Available, Booked Rooms, and Unavailable Rooms tabs.
On a hotel using occupancy-based pricing, first click the Guests dropdown on a room row to confirm adults and children.

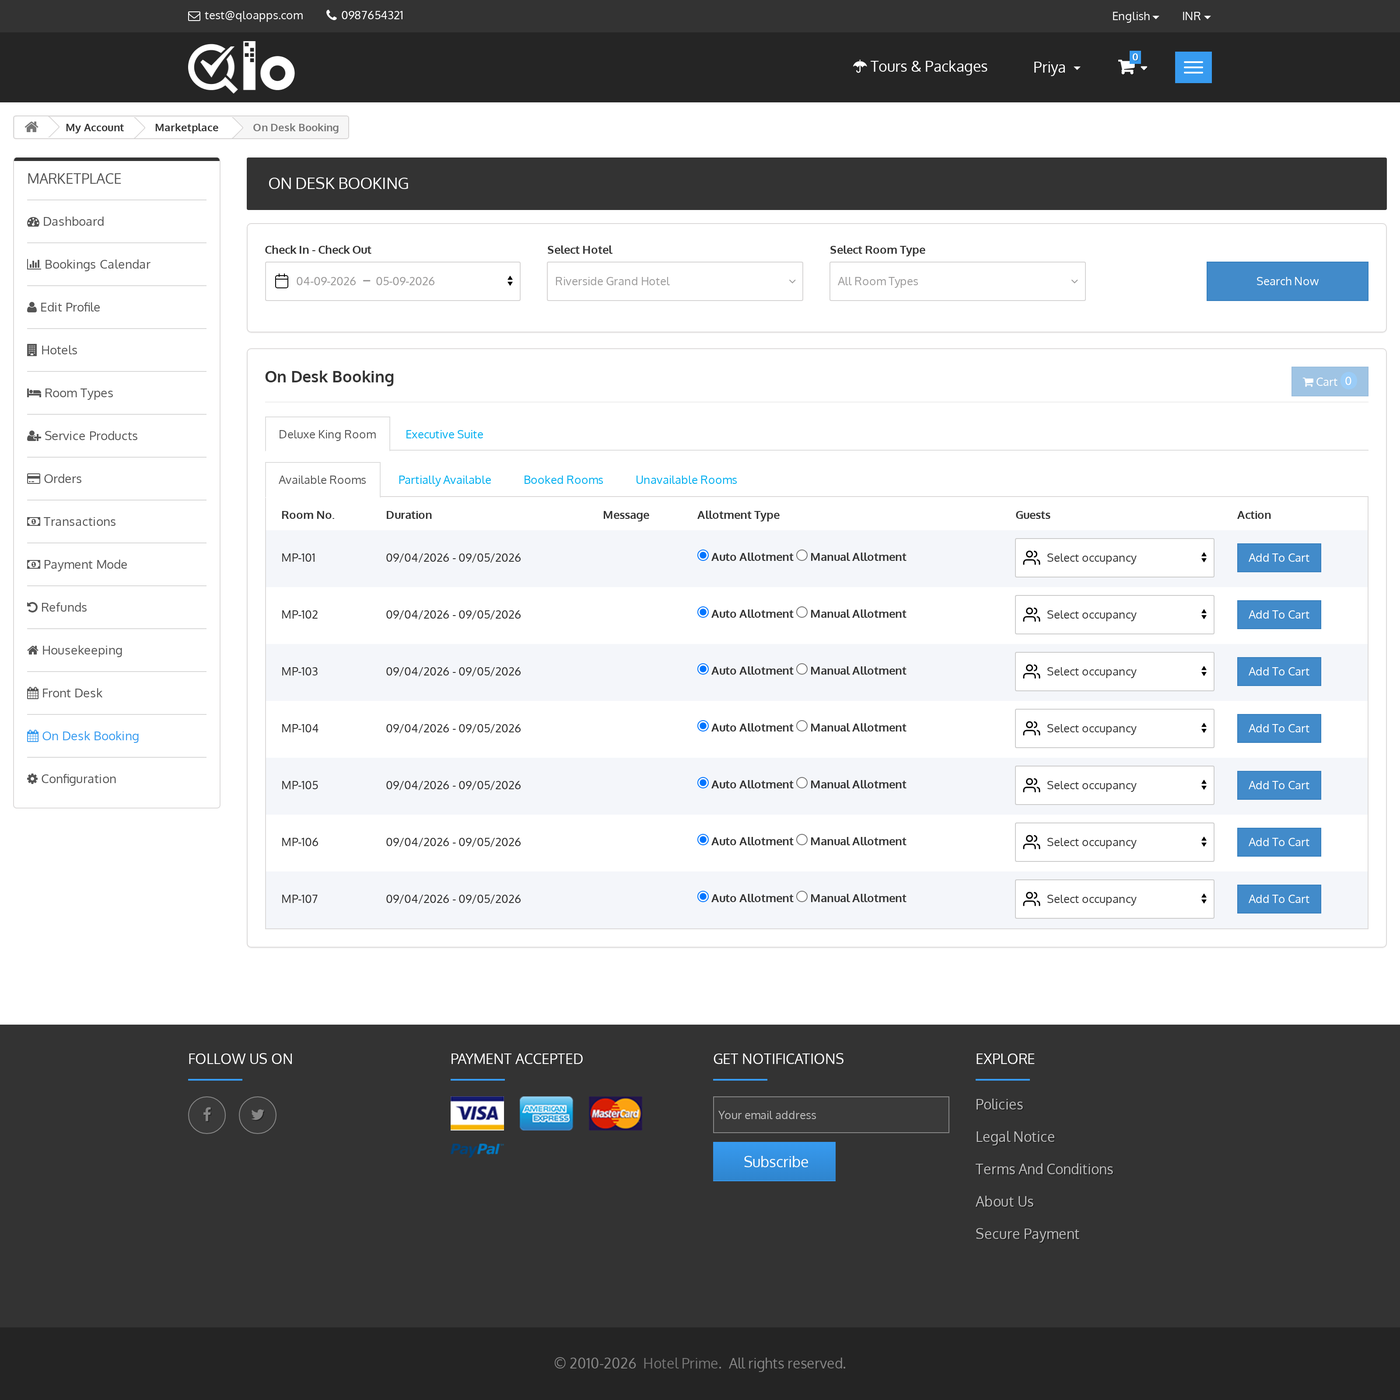
Add Rooms to the On-Desk Cart
Click Add To Cart on any available or partially available room. The room then moves into the seller’s on-desk cart, which persists across searches until you create the booking or abandon the cart.
Click Cart in the top-right of the room list to open Cart Information — it lists every added room, the rooms amount, the convenience fee, and the total (tax excl.), plus a delete icon.
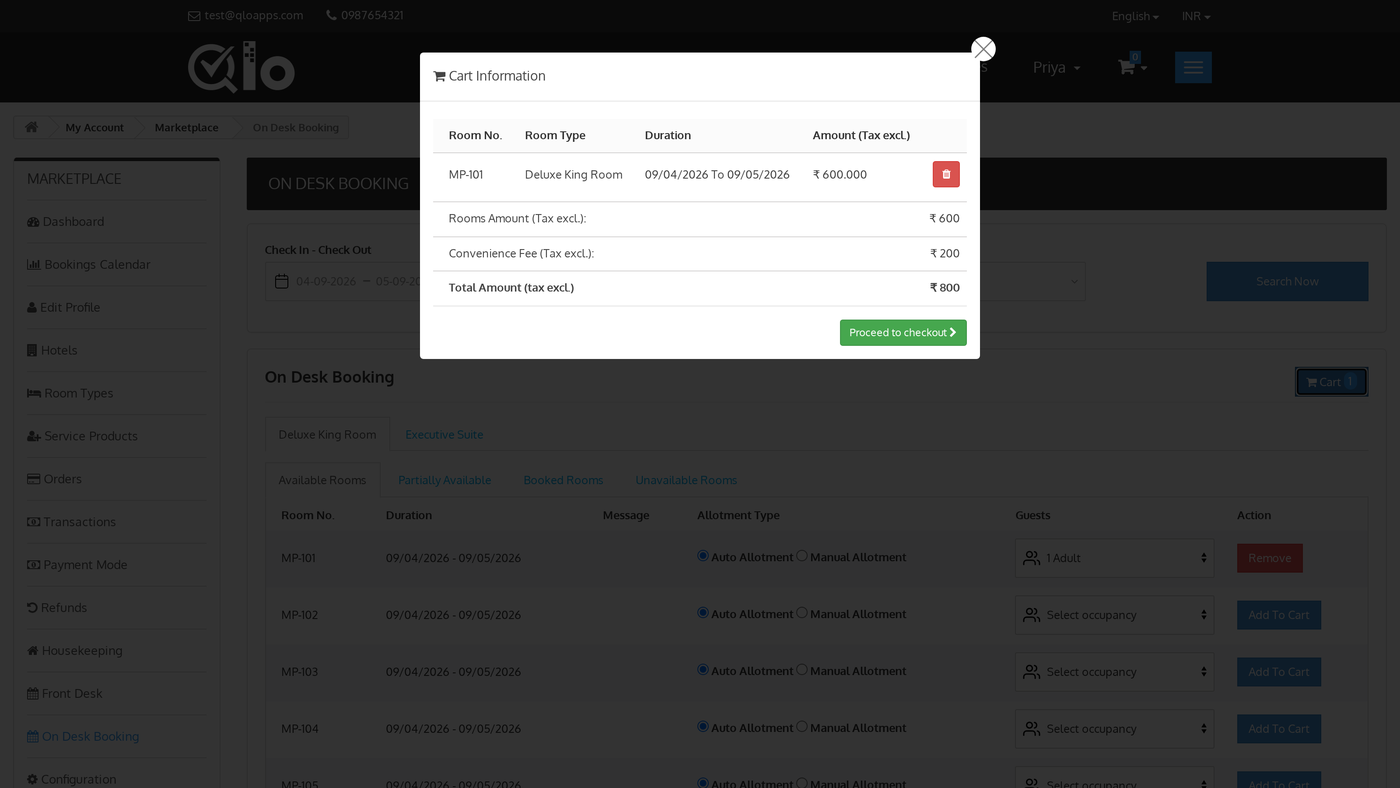
Click Proceed to checkout to move to the booking page.
Reallocate or Swap a Booked Room
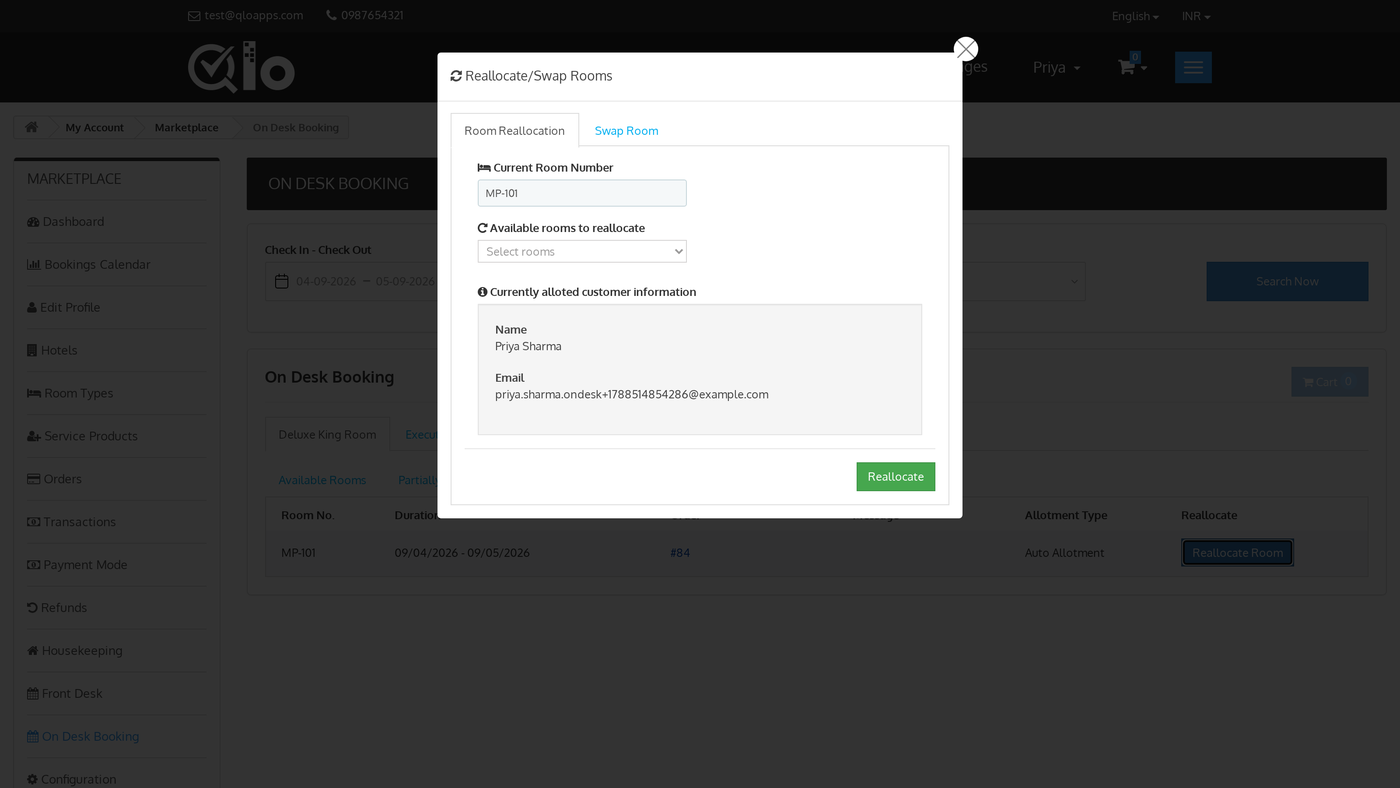
From the Booked Rooms tab of the search results, a room booked with Auto Allotment shows a Reallocate Room button.
Click it to open Reallocate/Swap Rooms, which shows the current room number and the guest currently allotted to it.
Then pick a room from Available rooms to reallocate and click Reallocate, or instead switch to the Swap Room tab to exchange it with another currently-booked room of the same type.
Attach a Customer to the Booking
On the Create On Desk Booking page, Cart Details lists every room in the cart with its occupancy and price.
It also carries a Services button per room, so you can add paid extra services before you create the booking.

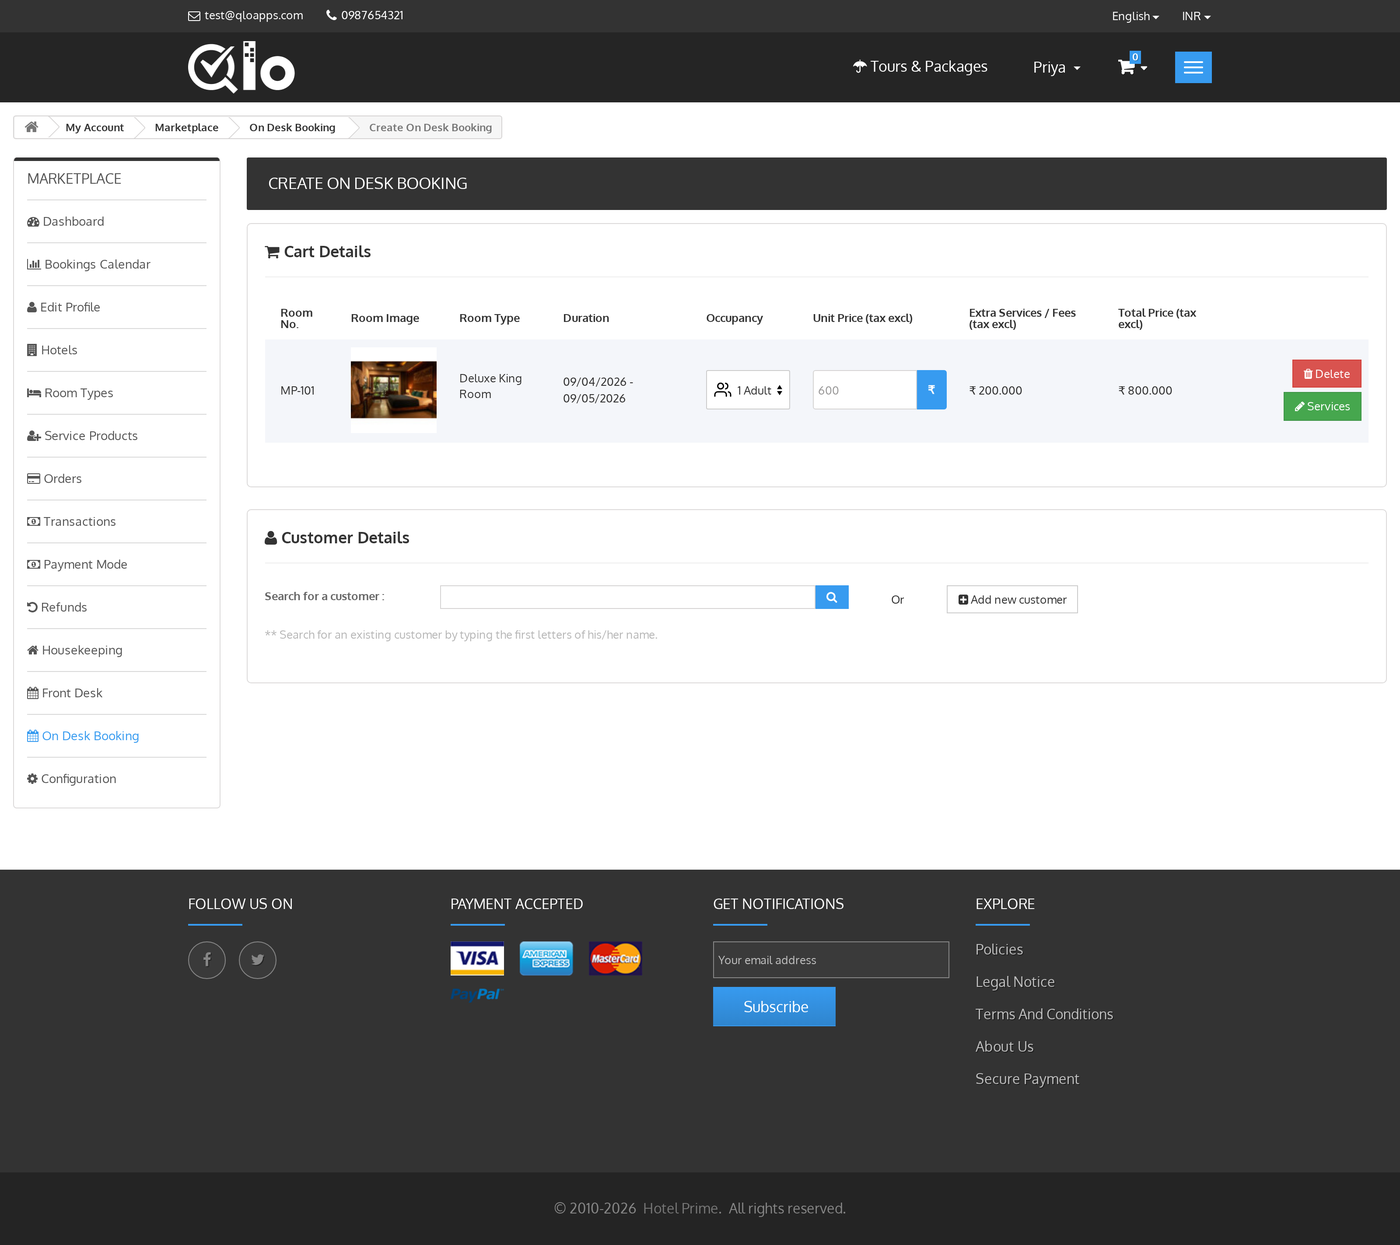
Under Customer Details, type in Search for a customer to find an existing guest by name, or click Add new customer to create one on the spot.
QloApps then requires Social title, First name, Last name, Email, and Password, while Phone and DOB stay optional.
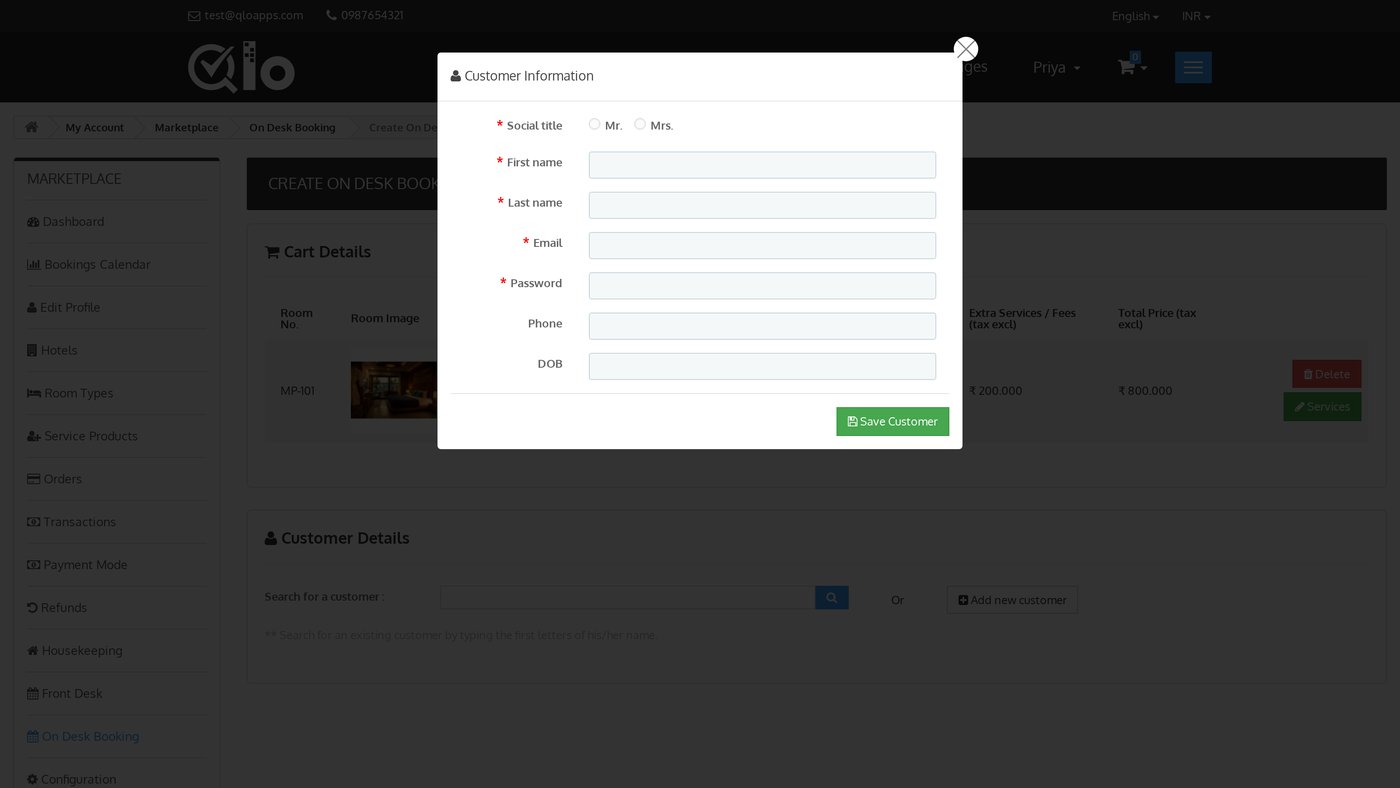
Click Save Customer, then Choose on the matching result card to attach that guest to the booking.
Choosing a guest reveals the Cart (Language/Currency), Addresses, and Summary / Payment sections below.

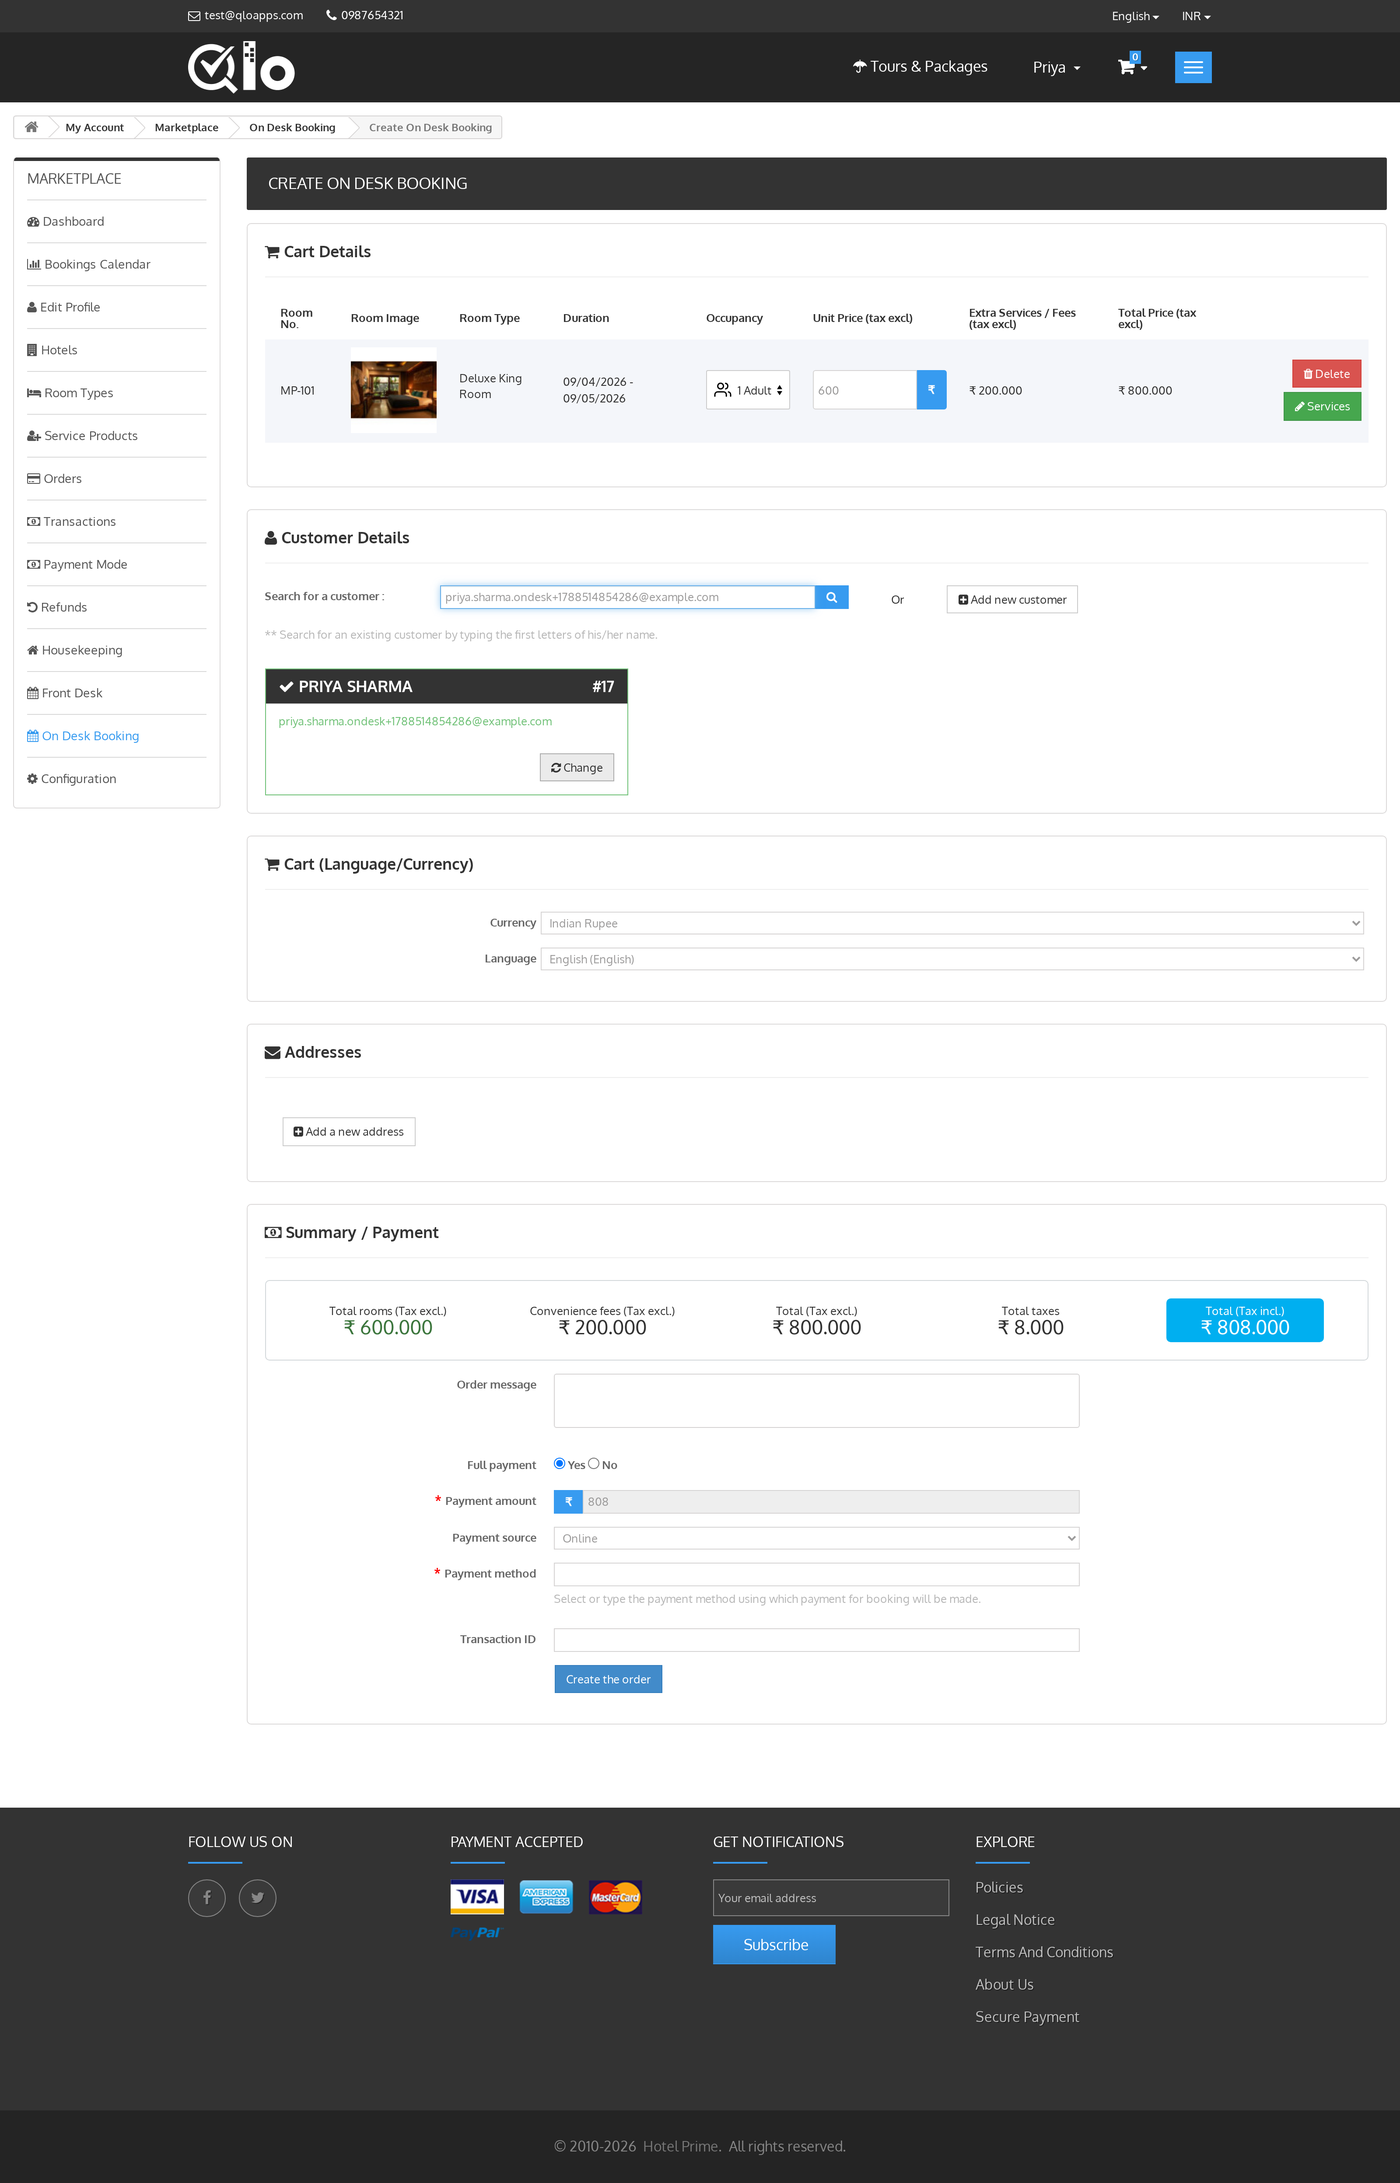
Add the Customer’s Address
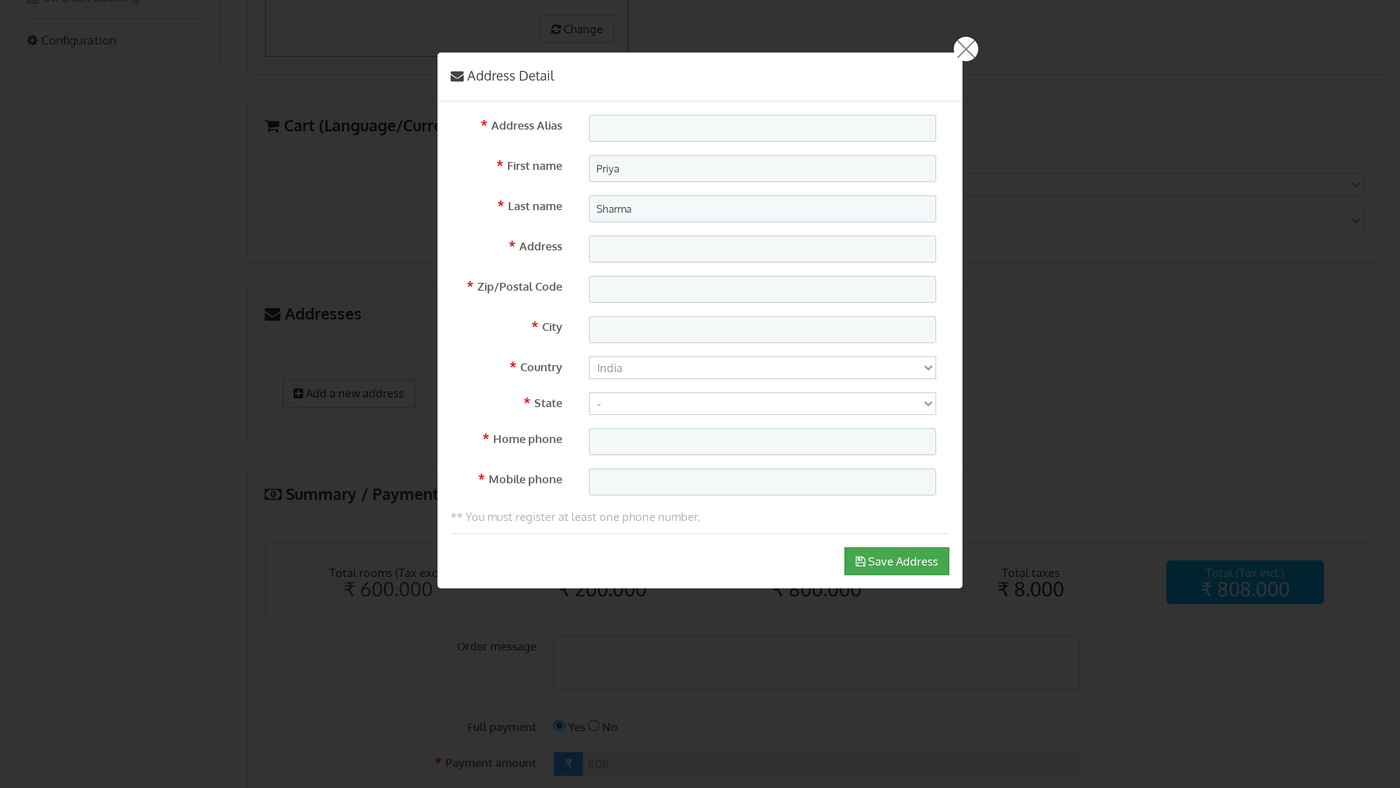
Under Addresses, click Add a new address. QloApps requires Address Alias, First name, Last name, Address, Zip/Postal Code, City, Country, and State, Home phone or Mobile phone.
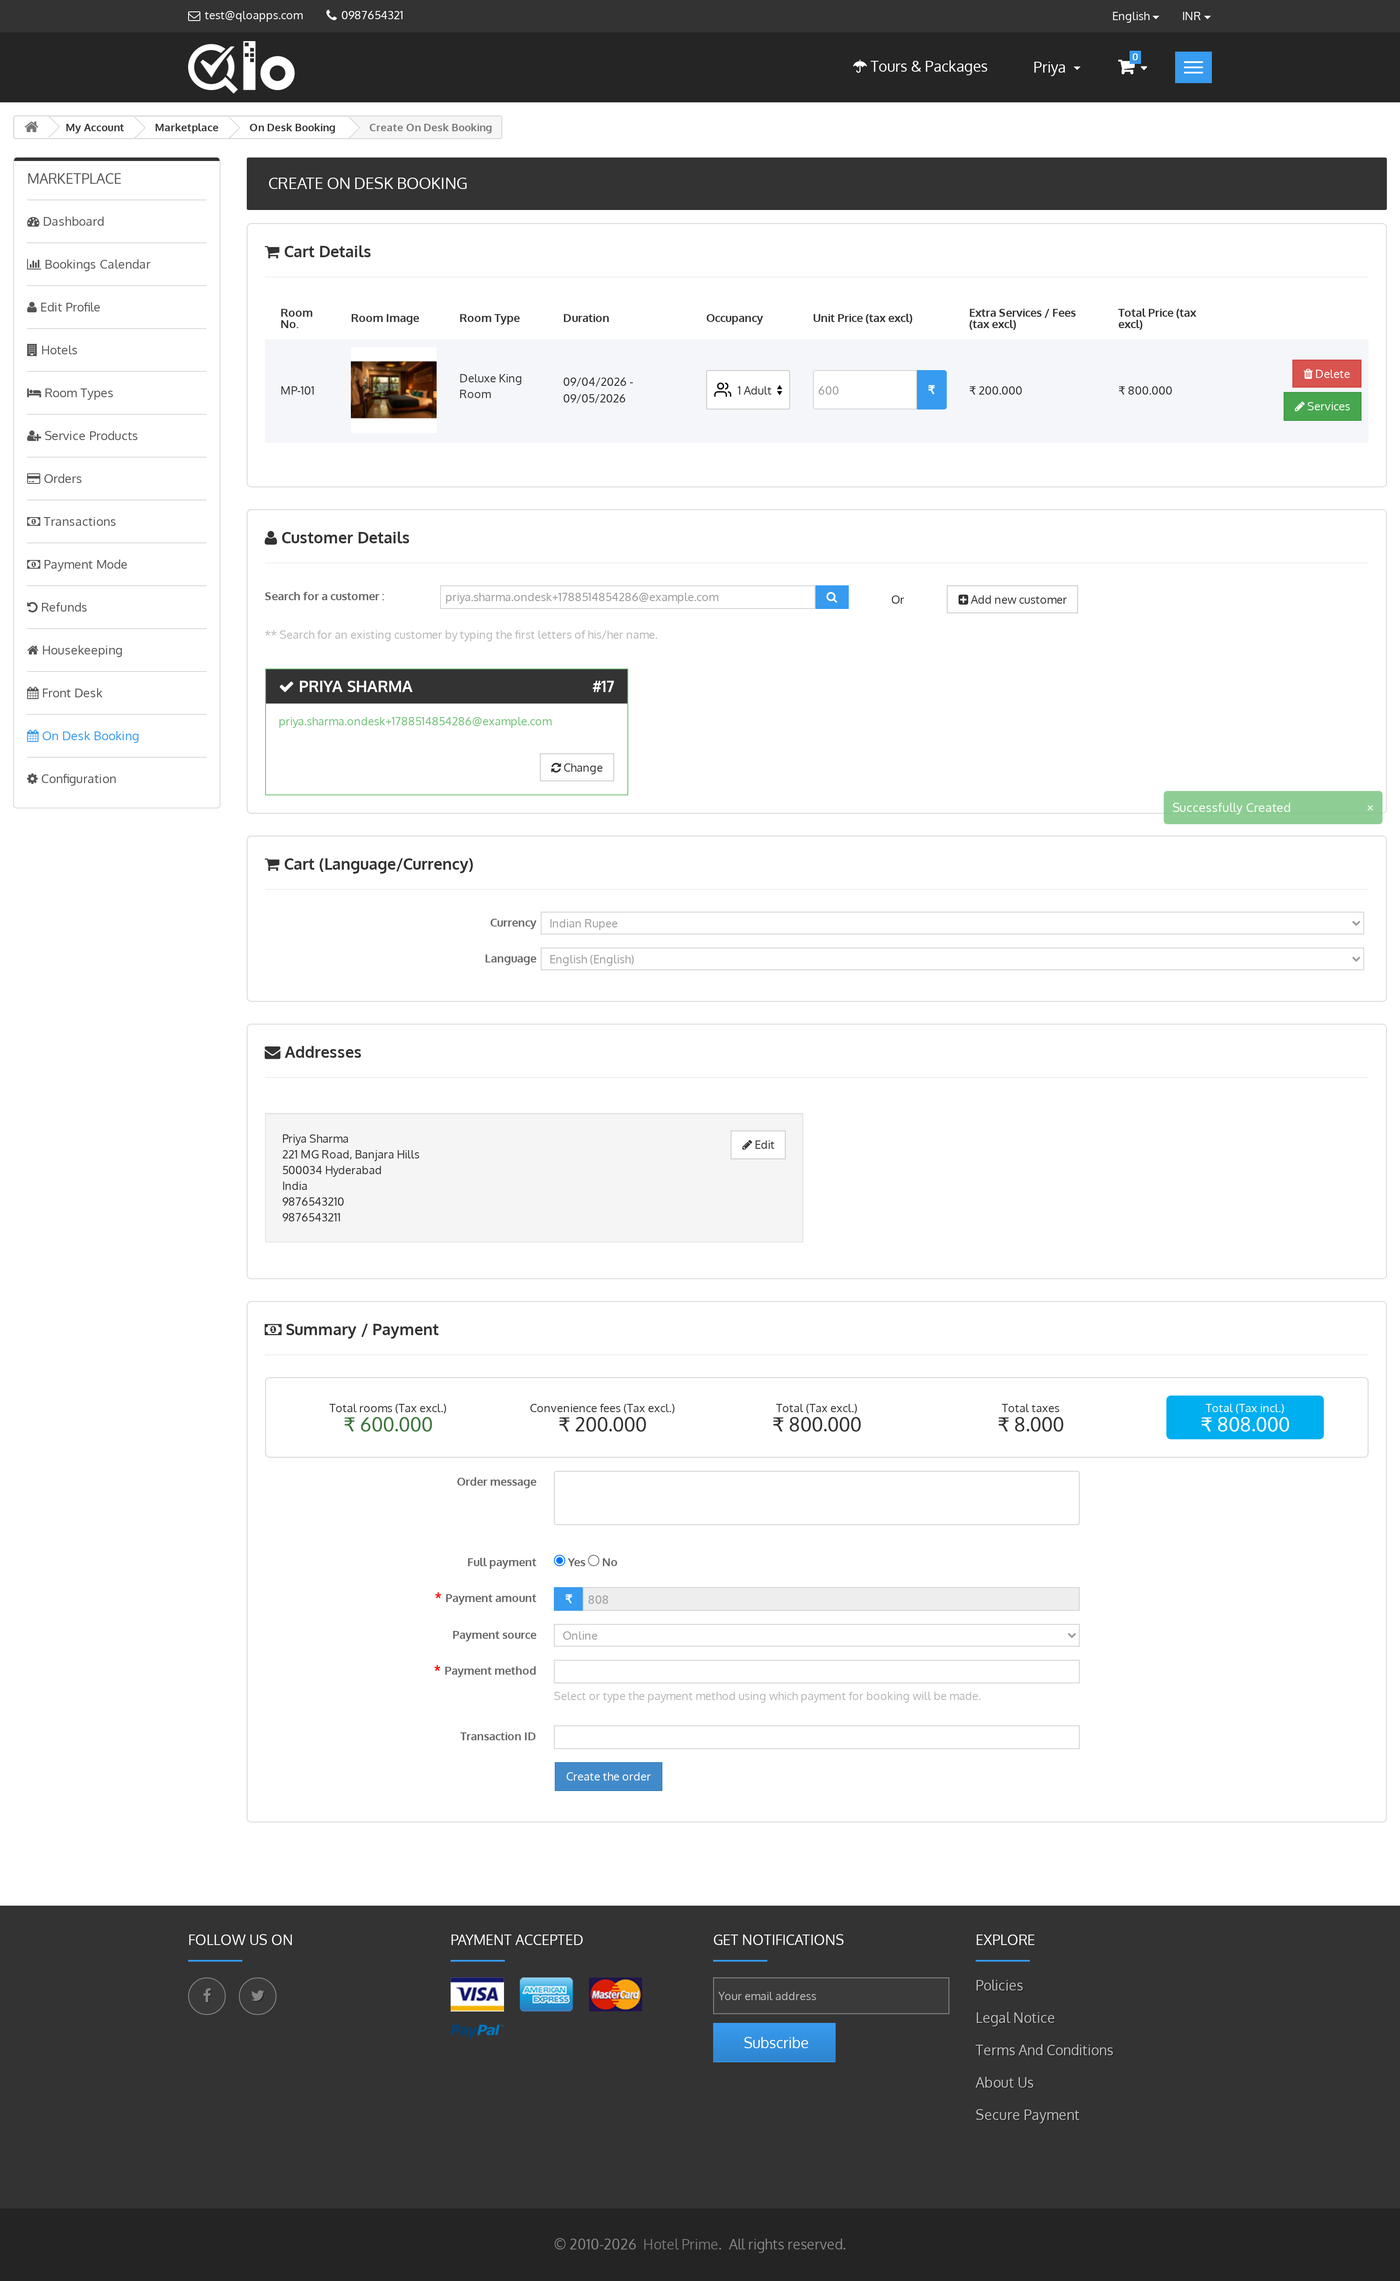
Click Save Address. The saved address shows on the booking, with an Edit link to change it.

Review the Summary and Take Payment
Summary / Payment totals the booking: total rooms, convenience fees, total tax excl., total taxes, and total tax incl.
Set Full payment to Yes to charge the full total, or No to enter a partial Payment amount.
Choose a Payment source (Online, Pay at hotel, or Remote payment), type or pick a Payment method from the installed payment modules, and add a Transaction ID if the guest already paid outside QloApps.
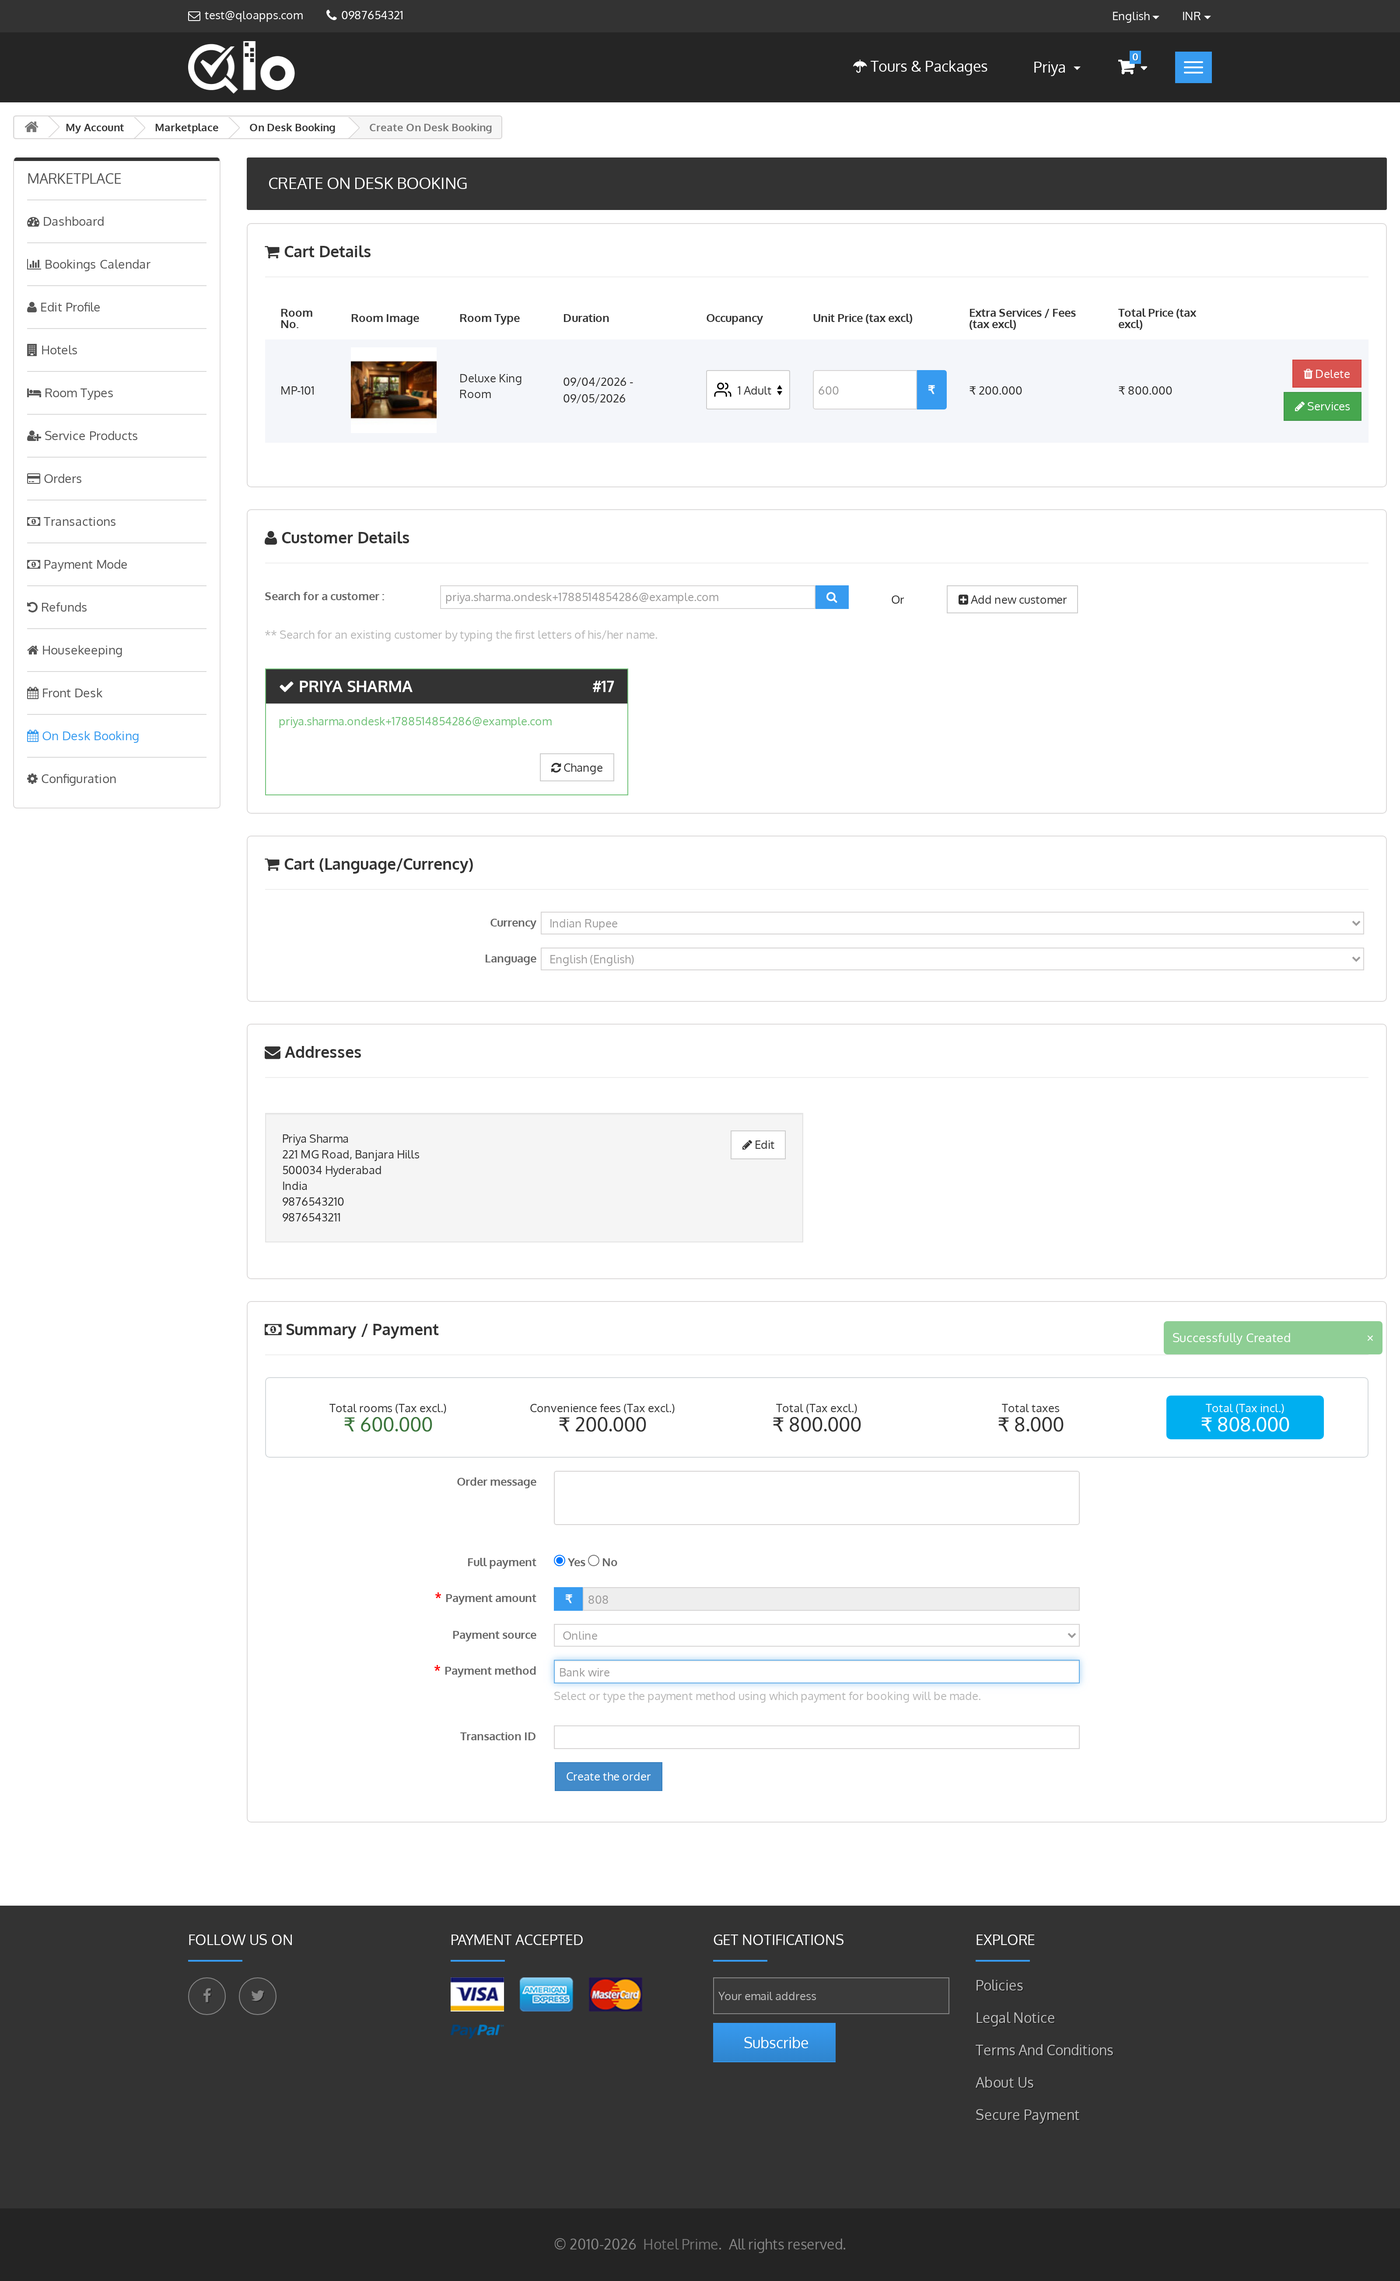
Click Create the order to finish.
View the Confirmed Booking
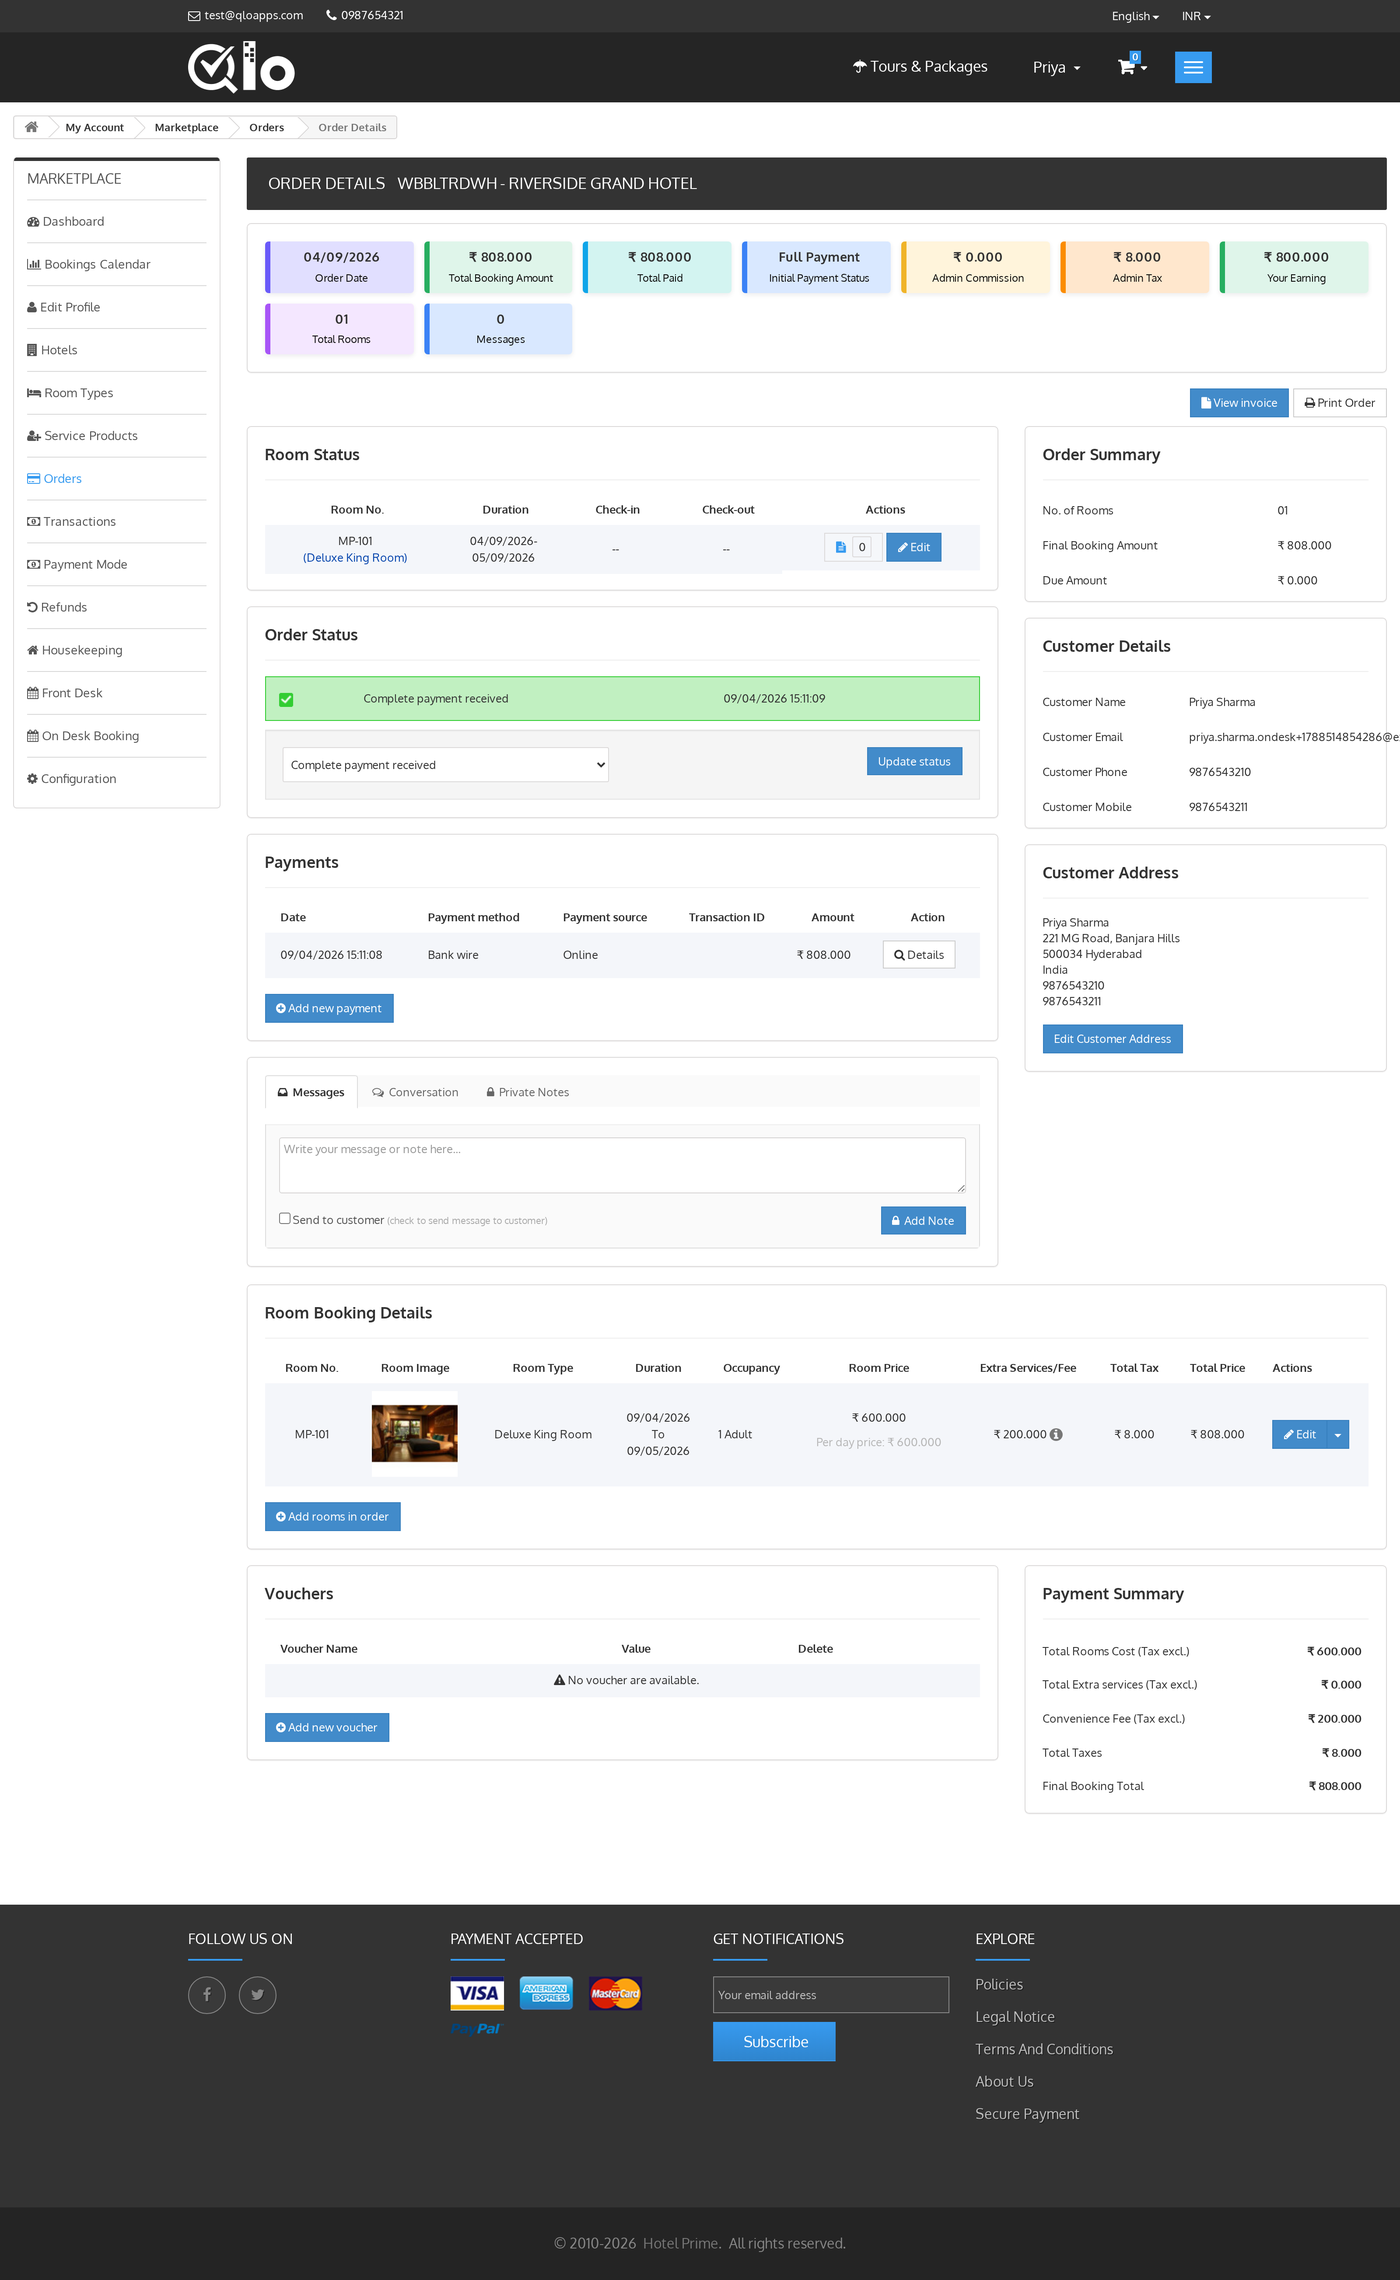
QloApps redirects to the booking’s Order Details page in the Marketplace account, showing the order status, the room booking details, the recorded payments, and the payment summary.
Admin Commission on an on-desk booking is always 0, so the full booking amount settles to the seller as Your Earning.

Add a Booking from the Front Desk
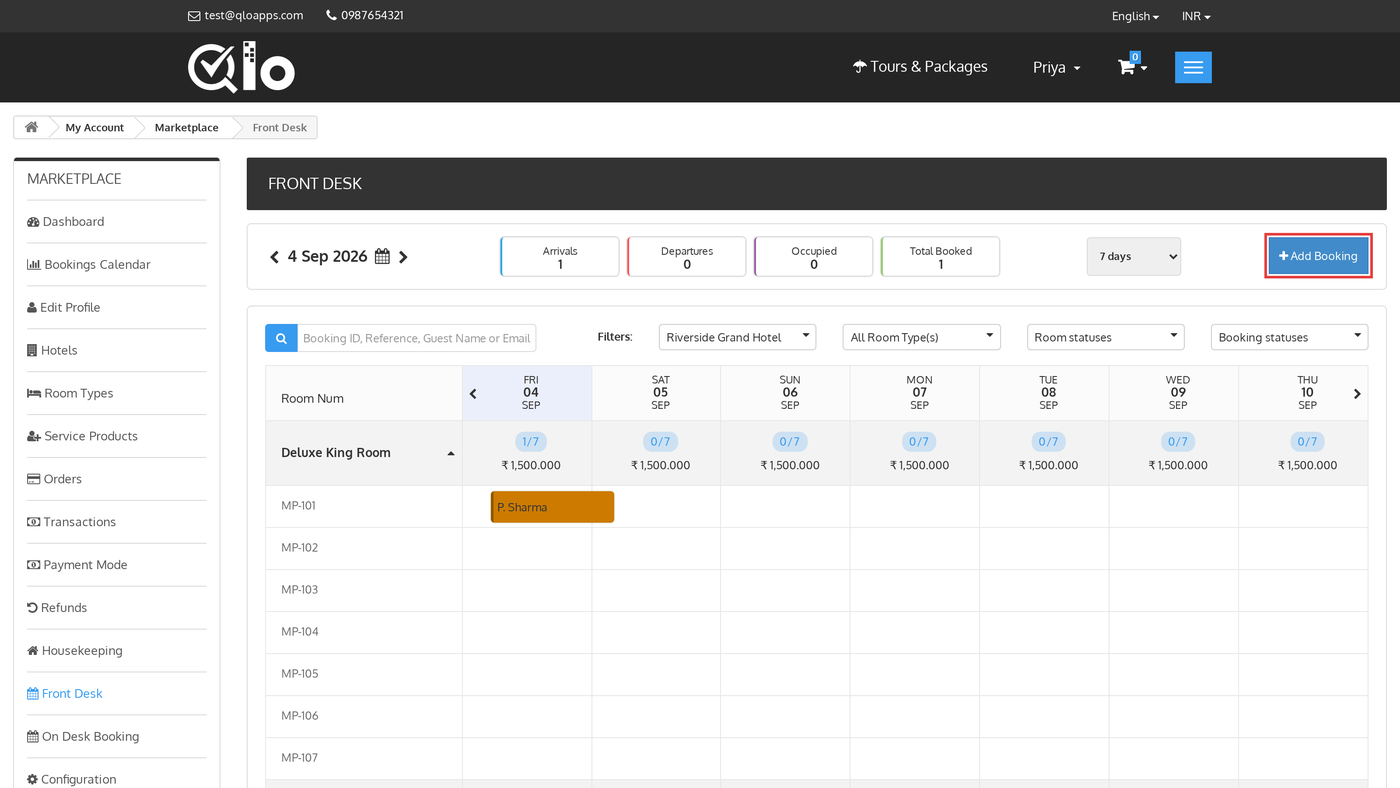
When you also install QloApps Marketplace Front Desk, this module adds an Add Booking button to its Front Desk header, plus a Room Booking option to that screen’s own booking action list.
Both start the same add-to-cart flow described above, so a seller working from the Front Desk board never has to switch screens to start a walk-in booking.
Conclusion
QloApps Marketplace On Desk Booking gives a Marketplace seller — searching rooms, attaching or creating a guest, saving an address, and recording payment, with the full amount settling to the seller.
This guide walked through installing the module, where it appears once a seller is active, and every screen of the on-desk booking workflows. Find the module’s store listing for pricing and updates.
Additionally, to learn more about the functionality of QloApps, you can visit this link: All-in-One Property Management System.
For technical assistance, raise a ticket at QloApps Support. In case of any query, issue, or requirement, please feel free to raise it on the QloApps Forum.
Current Module Version: 5.0.0
Supported QloApps Versions: 1.7.x