QloApps Social Login is an add-on that allows users to effortlessly log in to your website.
Using their existing accounts from major platforms such as Google, Facebook, X (Twitter), Apple, LinkedIn, and Amazon.
In today’s fast-paced digital world, the impact of social media is undeniable.
Nearly every internet user has an account on one or more of these platforms, so enabling social logins on your hotel booking website can significantly enhance user experience.
By allowing users to log in using their favorite social media accounts, you make the booking process quicker and more convenient.
From a user’s perspective, managing multiple passwords for different websites can be frustrating.
With QloApps Social Login, users can skip the hassle of remembering additional credentials and log in securely with just a few clicks.
This not only makes the process smoother but also boosts website engagement and conversion rates for your hotel.
Let’s dive into the functionality and features of this essential add-on and explore how it can benefit your hotel website!
Features
- The add-on supports login via popular platforms like Google, Facebook, X (Twitter), Apple, LinkedIn, and Amazon, allowing users to choose their preferred method for a smooth login experience.
- Users no longer need to remember multiple passwords or create new accounts for your website.
- The admin can choose to display the social login button in a clean and minimal design by showing only the logo of the respective social platform.
- For users seeking a more informative approach, the admin can display both the logo and the name of the social platform, offering clear recognition and additional clarity.
- Admin can show & change the social login button design on both the signup and checkout pages.
- Additionally, the admin can preview the template before finalizing the selection.
Installation Of QloApps Social Login
The installation of any module is very simple in QloApps.
- Go to the Module and Services tab
- Click on Add New Module
- Now upload the Zip file of the Module and click on Install
Note:
For QloApps version 1.6.1
To display social login buttons on the Guest checkout page, you have to add a hook in the below tpl file:
tpl file path:
hotelcommerce/themes/hotel-reservation-theme/order-opc-new-account.tplAdd hook code at line number 547 (may vary)
{hook h="displayAddAcccountFormBottom"}
Refer to the screenshot given below.

For QloApps versions below 1.6.1
Guest checkout page
To display social login buttons on the Guest checkout page, you have to add below hooks in below tpl file:
tpl file path:
hotelcommerce/themes/hotel-reservation-theme/order-opc-new-account.tplAdd hook-1 code at line number 547 (may vary)
{hook h="displayAddAcccountFormBottom"}
Refer to the screenshot given below.

Add hook-2 code at line number 45 (may vary)
{hook h="displayLoginFormBottom"}
Refer to the screenshot given below.

Authentication page
To display social login buttons on the Authentication page, you have to add a hook in the below tpl file:
tpl file path:
hotelcommerce/themes/hotel-reservation-theme/footer.tpl {hook h="displayColumnsBottom"}
Add at line number 31 (may vary)
Refer to the screenshot given below.

Configuring the QloApps Social Login
Click on the configure button.
Display Settings
login button design: The admin can choose from two display options:
- Social Platform Logo Only: Display a clean and minimal interface by showing only the logo of the social platform.
- Social Platform Logo with Name: For a more informative approach, display both the logo and the name of the social platform, providing clear recognition for users who may prefer additional clarity.
The admin can preview the button design before finalizing the selection.

Social Login Platform settings
- Social login with Google: Enable or disable Google login from here.
- Google App Client Id: Enter Google app client ID here.
- Social login with Facebook: Enable or disable Facebook login from here.
- Facebook App Id: Enter Facebook app ID.
- Facebook App version: Enter the Facebook app version.
- Social login with X: Enable or disable x login from here

- X client ID: enter x client ID
- X client secret: enter x client secret
- Social login with Apple: Enable or disable Apple login from here.
- Apple client ID: enter Apple client ID
- Social login with LinkedIn: Enable or disable LinkedIn login from here.
- LinkedIn client ID: Enter the LinkedIn client ID
- LinkedIn Client secret: Enter LinkedIn client secret.
- Social login with Amazon: Enable or disable Amazon login from here.
- Amazon client ID: Enter Amazon client ID
- Amazon Client Secret: Enter Amazon client Secret
Note: To ensure the redirect URLs option works correctly for X (Twitter), Apple, LinkedIn, and Amazon, the admin must copy and paste the redirect URLs directly from the module’s configuration page.
How to get API Keys
To enable any social platform, you need to provide the app ID and secret ID.
How To Obtain Google API Credentials?
To get the Google app ID, the admin will have to first create an account on the Google Developers console.
- Next, he will create a project by clicking on Project -> New Project.
- Add the name of your project.
Note: Please note that you should not include any Google Word for your project name.
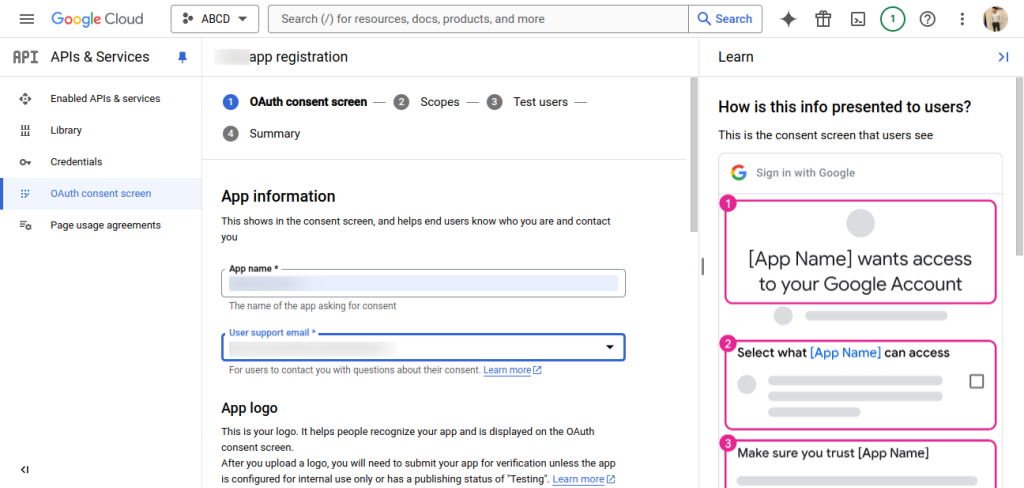
Now, go to Google API keys-> credentials-> OAuth Consent screen. Here admin has to provide an email ID and product name.
2. Now, Go on the Credentials menu option and select the Create Credentials option.
3. Select the OAuth client ID option from the drop-down.
4. Now, Select the Application type and add the Authorized JavaScript origins and the Authorized redirect URLs. After adding the details, click on the Create button.

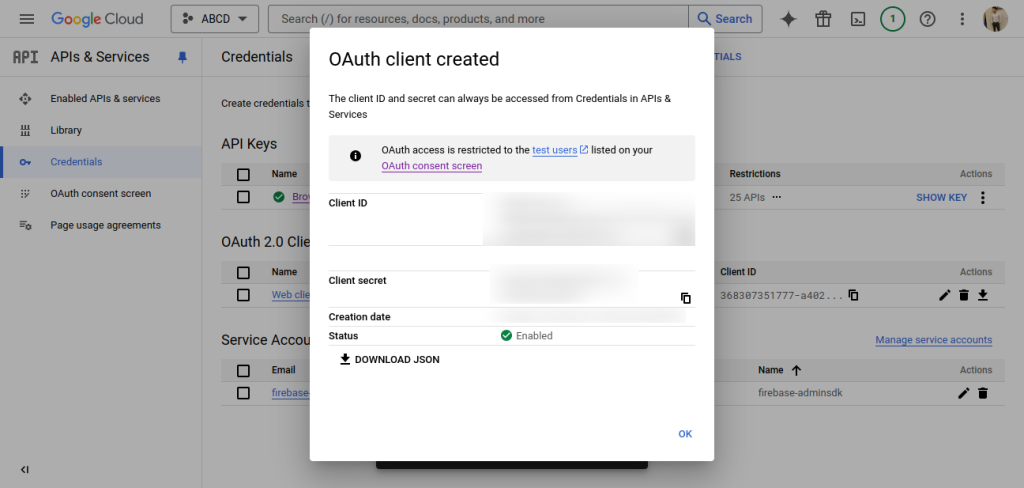
5. The last step is to click on the Create button and then the Client ID and Client Secret will be provided to you.
How To Get Facebook API Credentials?
To obtain a Facebook App ID, you have to create a developer account on Facebook. Admin can create a developer account using this link: https://developers.facebook.com/
- Facebook will ask you to create an external application linking your website to their API.
- App ID and App Secret can be also referred to as Consumer Key and Secret or Client ID and Secret)
You have to follow the below-mentioned steps to obtain the Facebook App ID:
- Sign in or create a new account on the Facebook developer platform.
2. After completing the login process, click on My Apps.
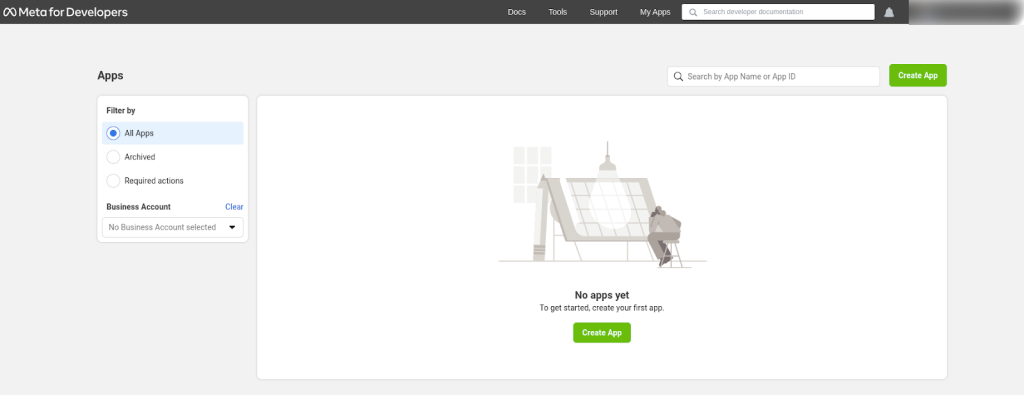
3. After the My App page opens up, click on the “Create App” option to proceed further.
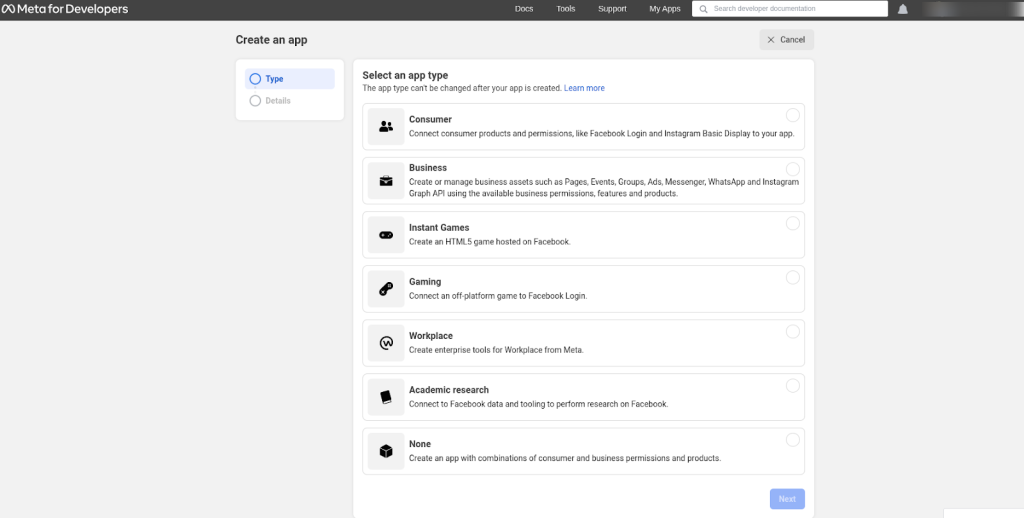
4. Select the “other” option in the dialogue box.
5. Next, Select the none option in the dialogue box and then click on the next button.
6. Now add the details in two fields:
- Add an App Name: Add the name of your app in this section.
- App Contact Email: Add your email ID for contact in this section.
After adding details in above mentioned fields, click on the “Create App” button.

7. Click and open the “Set Up” button of “Facebook Login”.
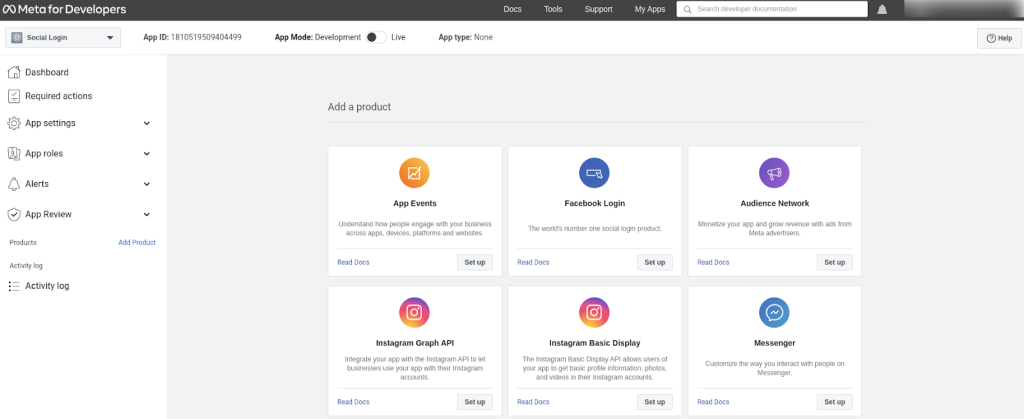
8. Now open the left side menu and select www from the same.

9. Enable the following Client OAuth Settings:
- Client OAuth Login
- Web OAuth login
- Enforce HTTPS
- Deauthorize callback URL: Add the URL of your page in this section
- Data Deletion Request URL: Add the URL of your webpage
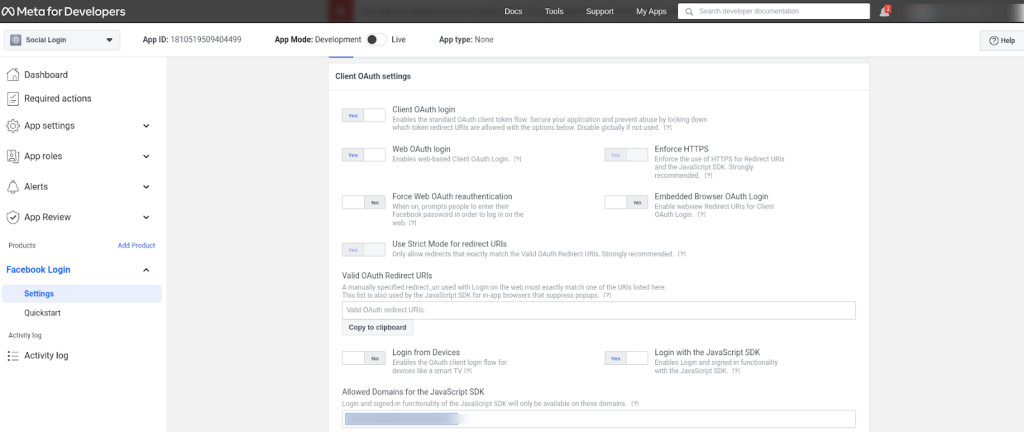
Once you have filled in all the required details, click on Save Button to proceed further.
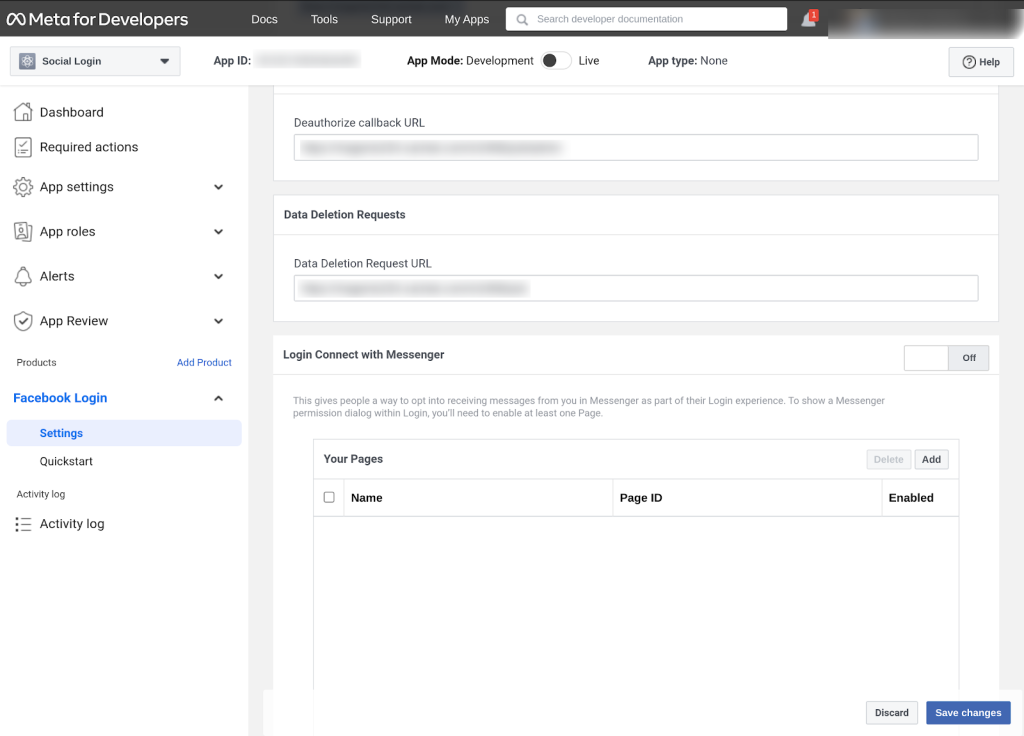
10. Now, you have to obtain the app ID and app version by clicking on “App Setting” and then selecting Advanced.
How to get X API Credentials?
Admin has to create a developer account on Twitter. Admin can create a developer account at https://developer.x.com/en
After signing up as a developer from Twitter the admin needs to provide the information to create the project.

After successfully submitting the information, a project will be created on the admin’s Twitter (X) developer account.
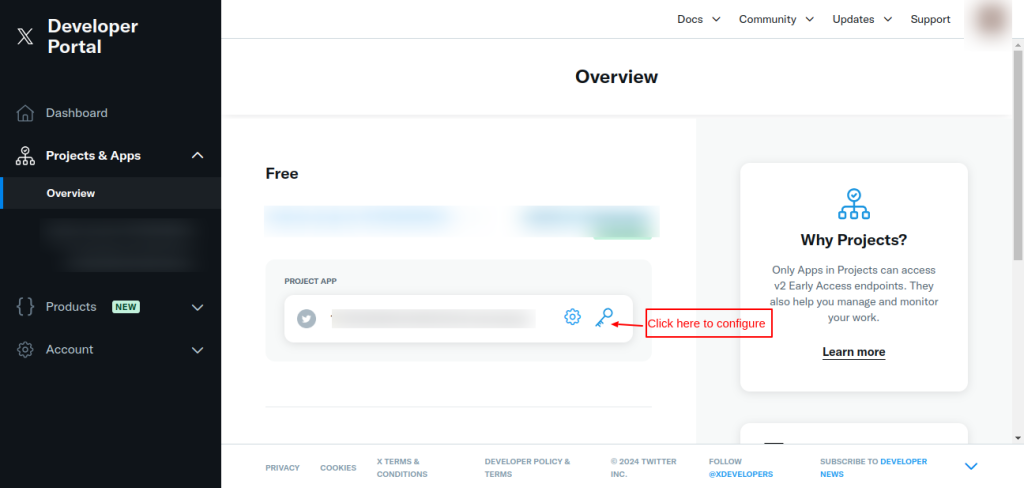
Once you click to configure the project app button, the admin will redirect to the below-mentioned page to set up the app.
After clicking on the setup button the admin needs to enter the required details to set up the app.
Note: Make sure to paste the redirect URL provided in the module configuration page for X.
Just after saving these details, a new tab/section will be added to the Twitter developer account.
By clicking on the regenerate button, new credentials will be generated.
Admin can copy & paste the client ID and Client secret from here.
How to get Apple API credentials?
Admin has to create a developer account on Apple. Admin can create a developer account at https://developer.apple.com/
Once the admin creates the account on the Apple developer account he will have to head to the “Certificates, IDs, & Profiles” section, and choose the “Identifiers” subsection on the left menu.
Now, click on the “Register an App ID button”, choose App IDs as the identifier type, and hit “Continue”.
After doing so, you will have to provide a description for your new App ID and a Bundle ID.
Then, scroll down a bit check the “Sign In with Apple” feature and click on continue.
After that, Apple will redirect you to the “Certificates, Identifiers & Profiles” subsection again, this time listing your new App ID. What you will need next is to create a Service ID.
So, click on the round, the blue icon next to the “Identifiers” header; then choose “Services IDs” and click on “Continue”.
On the next screen, you will have to fill in the same fields as before (i.e., description and identifier), and you will have to enable the “Sign In with Apple” feature.
click on the “Configure” button right next to it.
When you click on this button, Apple will show a dialog where you will have to define what “Web Domain” you will be using.
Add a “Return URL”.(you have to paste the redirect URL from the module configuration page)
After providing this information, you can click on the “Save” button and click on Continue.
Now you can use The identifier as your client ID.
How to get LinkedIn API credentials?
Admin has to create a developer account on LinkedIn. Admin can create a developer account at https://www.linkedin.com/secure/developer
Once the admin creates the developer account he will redirect to the “My Application” page. Here, the admin will click on the “Create Application” button.
Now, fill out the form to register a New Application.
Note:
Set the OAuth Redirect URL given on the configuration page of the module.
In the product section scroll down and select Sign In with LinkedIn using OpenID Connect.
Here, click on the request access tab and it will show a popup to approve the access.
Once the access is granted you can check the endpoints.
After that, you can receive Application details with your “Client ID” and “Consumer Secret”.
How to get Amazon API Credentials?
Admin has to create a developer account on Amazon. Admin can create a developer account at https://developer.amazon.com/dashboard
Once the admin creates the account on the Amazon developer account he will redirect to the below-mentioned page.
After clicking on the settings button, the admin will be redirected to the below-mentioned page.
Once the admin clicks on the Security Profile button, the admin needs to create a new security profile.
Enter your profile name and profile description.
After creating the profile, the admin needs to go to the web settings.
Front-End
Once the module is successfully configured the guest will see the Social login design according to the configurations selected.
Below is the front-end view of every available design for QloApps social login.
Signup page
The screenshot below shows a more informative approach, displaying both the logo and the name of the social platform.
This design provides clear recognition for users who may prefer additional clarity.
The screenshot below illustrates the clean and minimal interface where only the logos of the social platforms are displayed.
This design choice ensures a sleek and unobtrusive user experience, maintaining a streamlined look on the login page while offering clear and easy-to-recognize social login options.
Checkout Page
Users can check out directly using their social accounts, allowing for a faster and more convenient purchasing experience.
Conclusion
The QloApps Social Login Add-on offers a convenient and streamlined way for users to sign in to hotel websites using their preferred social media accounts.
By simplifying the login process, it enhances the user experience, reduces friction, and can lead to higher conversion rates.
If you want to learn about the functionality of QloApps then you can visit this link: QLO Reservation System – Free Open-Source Hotel Booking & Reservation System
In case of any query, issue, or requirement please feel free to raise it on QloApps Forum
Lastly, do not forget to drop your thoughts in the comments.
Current Product Version – V 1.2.1
Supported Framework Version – QloApps 1.6.x & 1.7.x

Be the first to comment.