
QloApps WhatsApp Business Order Notifications allows you to send time-sensitive updates to your customers via WhatsApp.
These include booking confirmations, check-in reminders, OTP verification, check-out reminders, and more.
Additionally, the module enables you to create and send marketing campaigns directly to your customers on WhatsApp.
Features of the QloApps WhatsApp Business Order Notifications
- Notify customers about their Booking Confirmation, Check-In reminder, OTP verification, Check-Out reminder, and many more.
- Additionally, select the booking status to which the notification will be sent to the customer.
- Moreover, create a message template for each event (booking confirmation, check-in reminder, OTP verification, etc.) separately.
- Allow customers to add a WhatsApp number during registration to receive notifications.
- Furthermore, verify the WhatsApp number during customer registration.
- Moreover, create campaigns for marketing purposes and send them to your customers on WhatsApp.
- Add category link to campaign
- Delete the campaign from Meta on the module’s end.
- View the list of customers who registered to receive the WhatsApp notification.
- Add interactive and more appealing buttons to your campaign messages.
- Automate responses to customer queries.
How to install the QloApps WhatsApp Business Order Notifications
You can install the QloApps Business Order Notification easily by performing the following steps:
- Firstly, at the admin back office panel, go to the Modules and Services tab present in the menu.
- Next, click on Add a new module
- Then, upload the ZIP file of the module.
- After that, click on install.
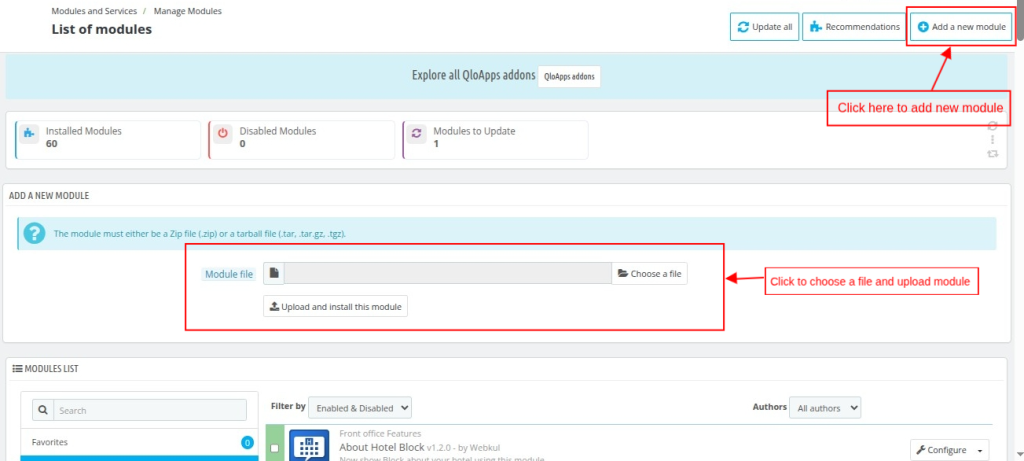
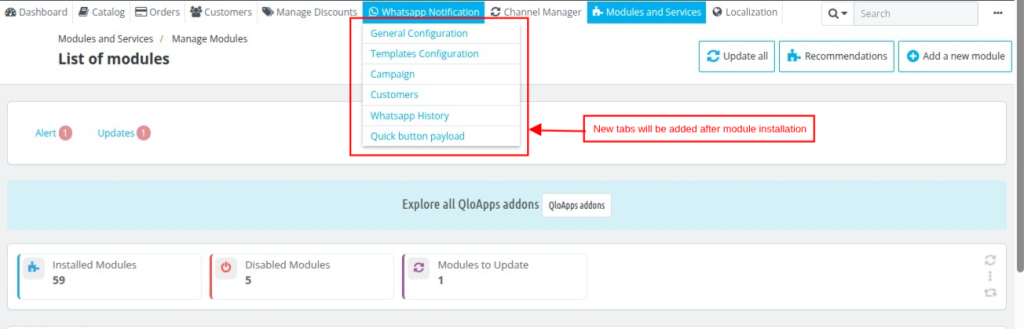
Once this process is completed, your module will be successfully installed. A new menu of WhatsApp notifications will be available through which you can manage WhatsApp notifications.
Before discussing how you can use this Addon, let’s first discuss how you can configure this Addon.
Configuration of QloApps WhatsApp Business Order Notifications
Firstly, to configure this module, search for the WhatsApp business module in the Manage module tab. Now, click on the configure button.
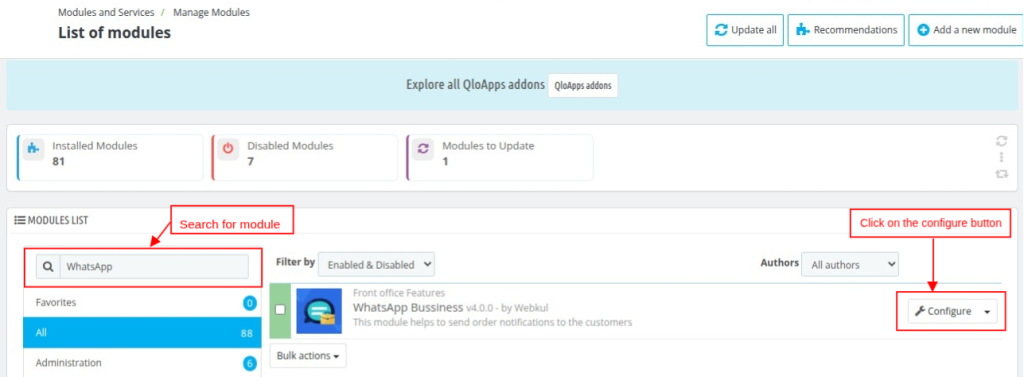
Alternatively, the other way to open the configuration page is to click directly on the General configuration button under the WhatsApp Notification tab.
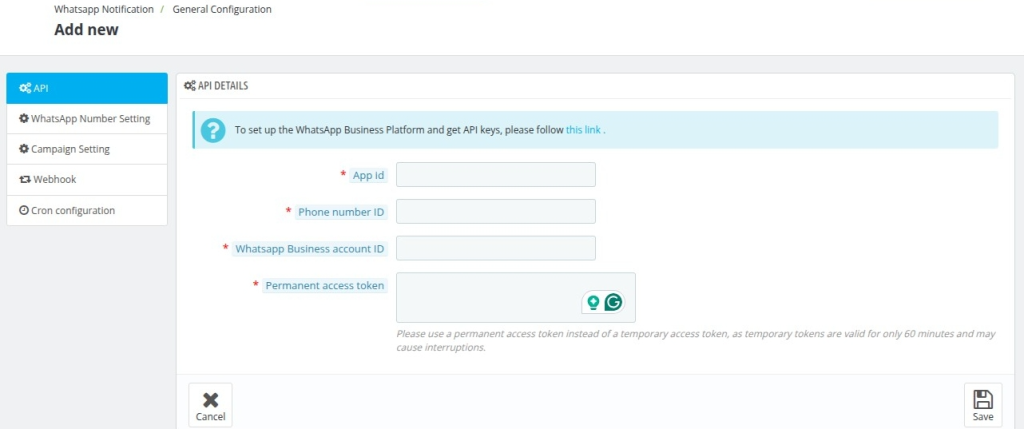
Afterward, once you click on the General Configure button, the configuration page will open. On this page, five types of configuration are provided:
- API Configuration
- WhatsApp Number Setting
- Campaign Setting
- Webhook
- Cron Configuration
How to get the required API Details?
Firstly, to get the API keys & add new apps to the account, you need to create a developer account on Facebook.
App ID:
To begin with, let’s start by creating an app to generate the App ID. Login into your Meta Developer account by clicking on the Login and entering your login details.
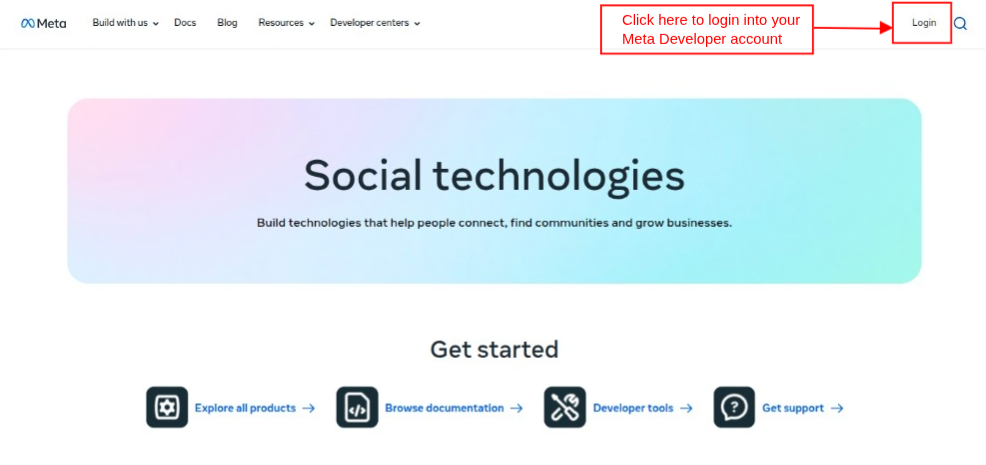
After logging in to the account, then go to the “My Apps” section.
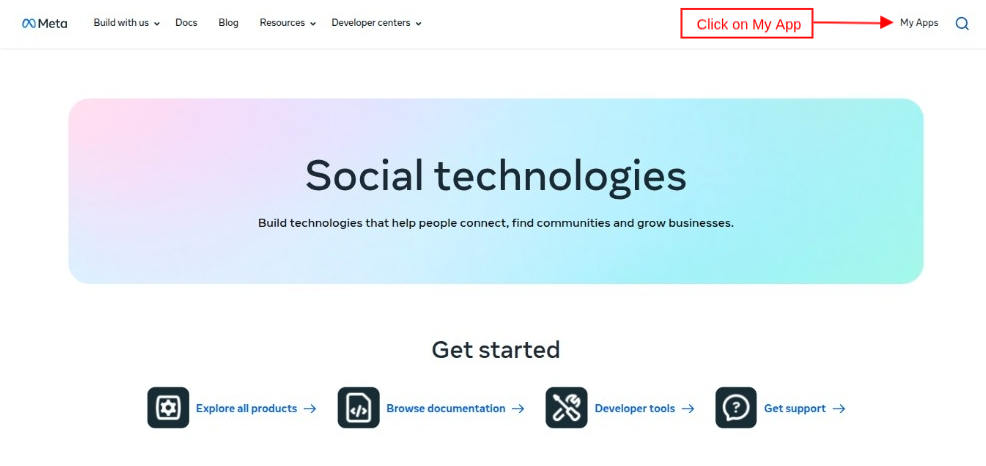
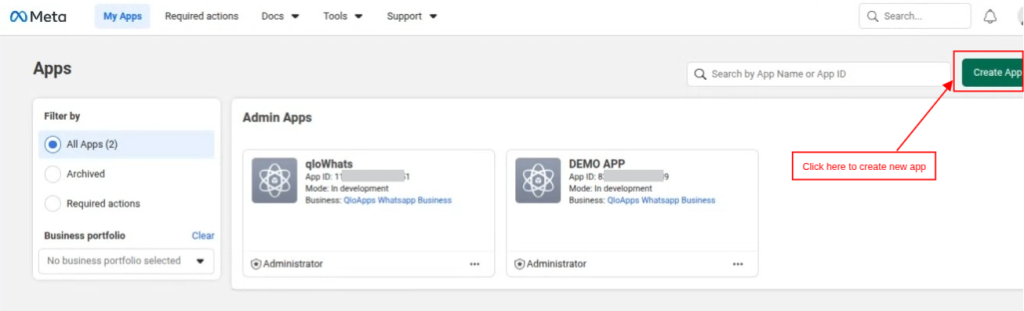
Next, click on the Create App button to create a new app.
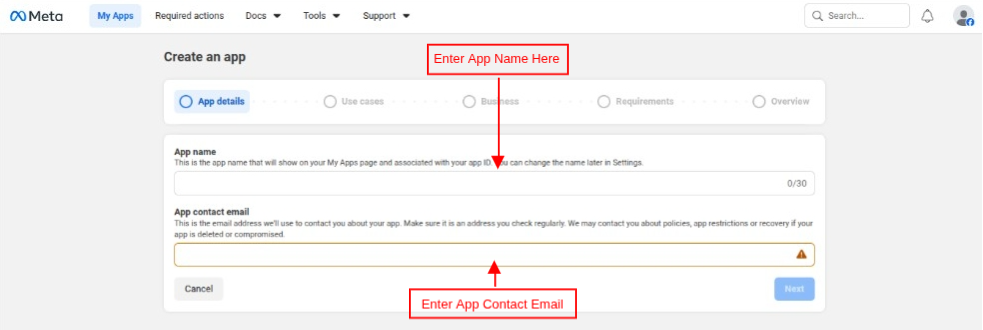
Next, enter the App Name and App Contact Email to create an app.
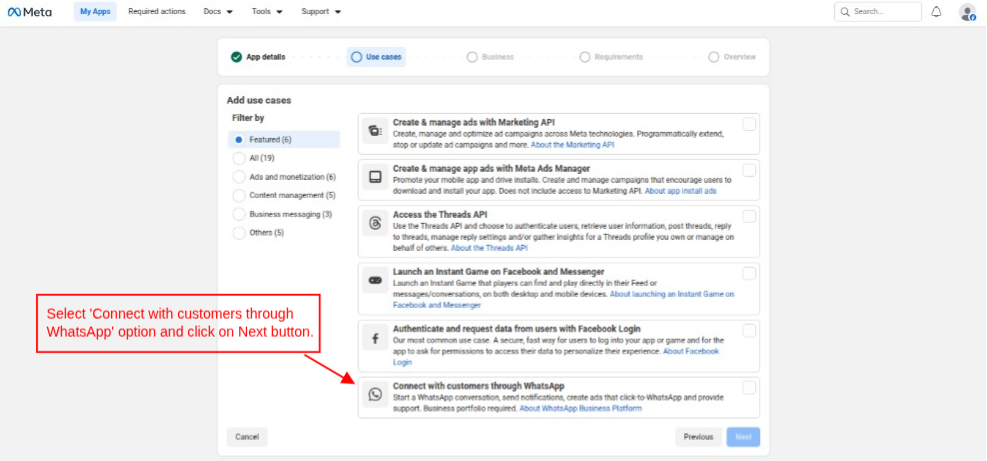
Once you enter the app name and contact email to create the App, you need to select the user case of the app.
Afterward, you have to select Contact with customer through WhatsApp and proceed to the next step.
Subsequently, in the next step, you need to select the business portfolio for which you’re creating the app, or you can create a new business profile for creating the app.
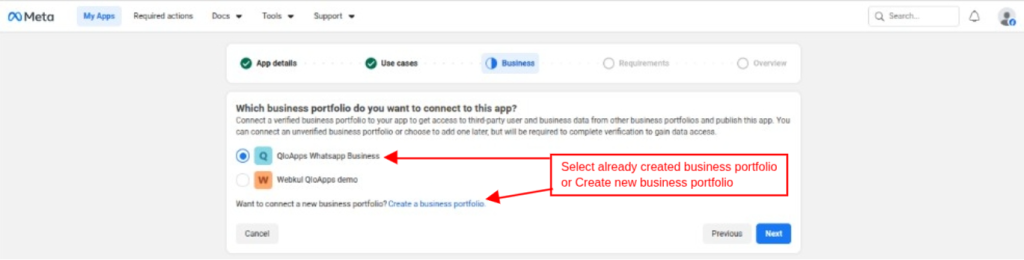
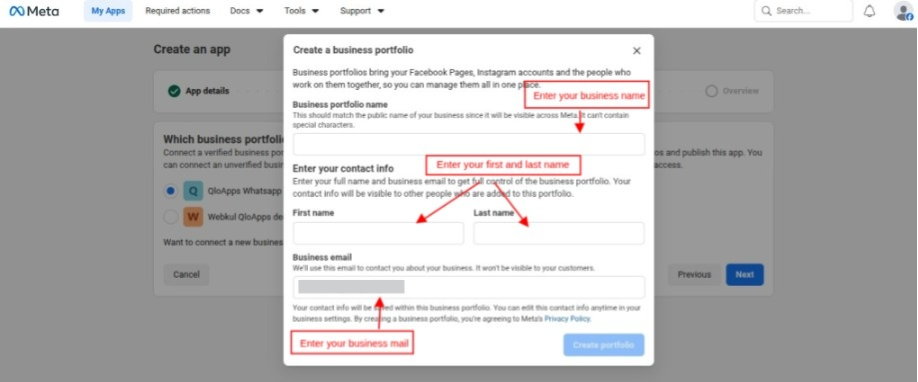
Create a business portfolio:
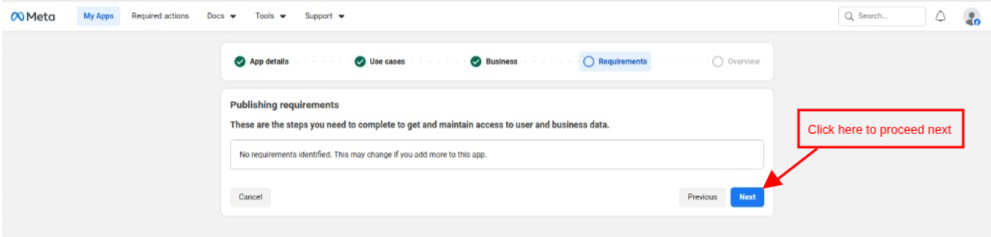
Once you select or create a business portfolio, you can proceed to the next step, “Requirements”.
Now, you can overview the details of the app that you are going to create.
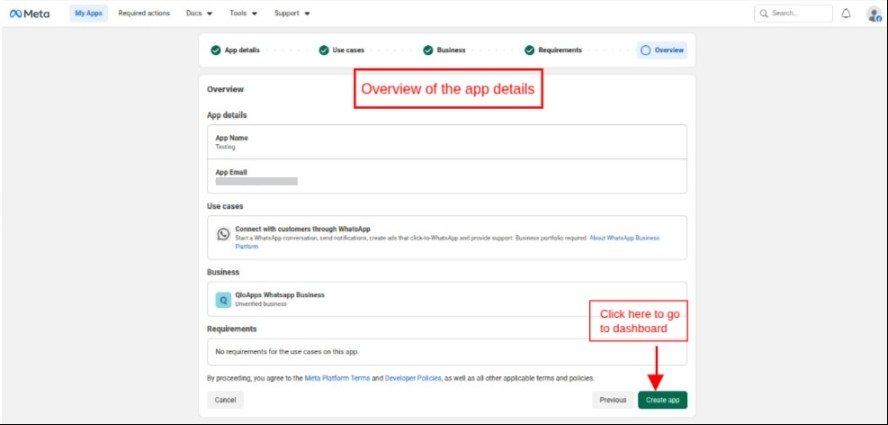
Finally, after verifying all the details and clicking the Create App button, you’ll be redirected to the dashboard screen.
Click on the My Apps tab, and you will be redirected to the App screen, where you will be able to see the app, as shown below.
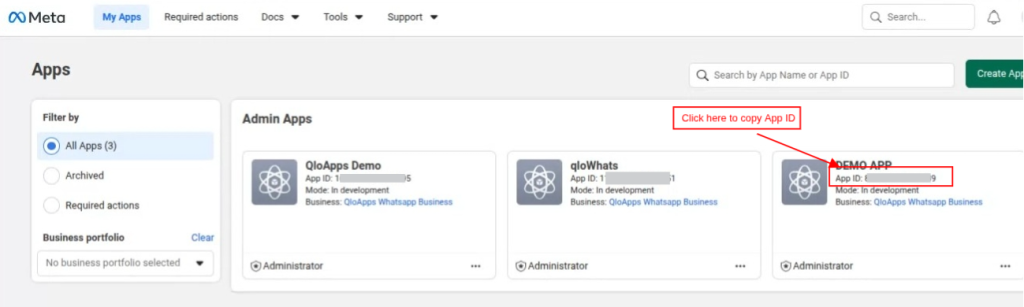
Copy the provided App ID and paste it in the APP ID section of the API configuration setup of QloApps WhatsApp Business Order Notification module, as shown below.
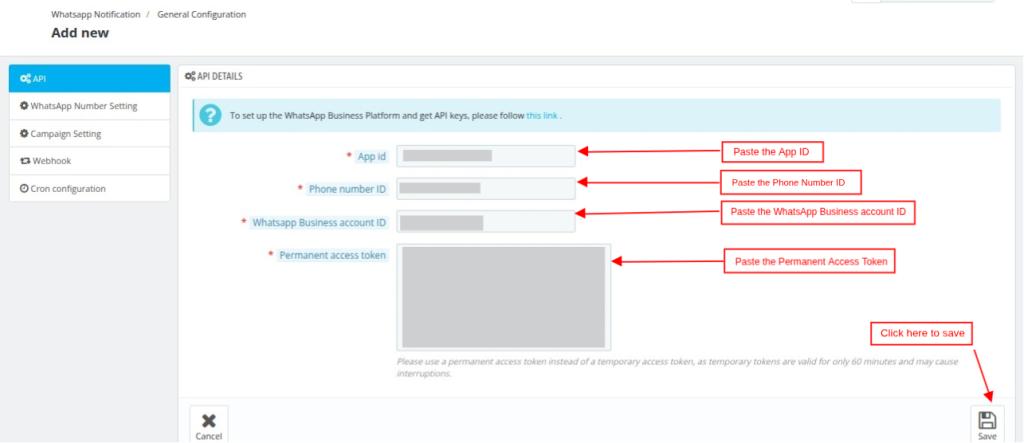
Phone Number ID, WhatsApp Business Account ID, and Permanent Access Token
To generate the Phone Number ID, click on the App in the My Apps section of the meta account, as shown below:
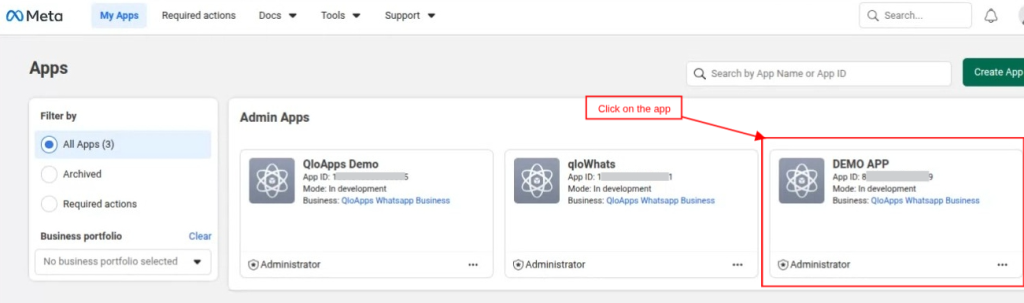
After clicking on the App, you will be redirected to the Dashboard screen of your app.
Check for the Publish option, and click on it. After clicking on the Publish option, click on the Connect with customers through WhatsApp option, as shown below:
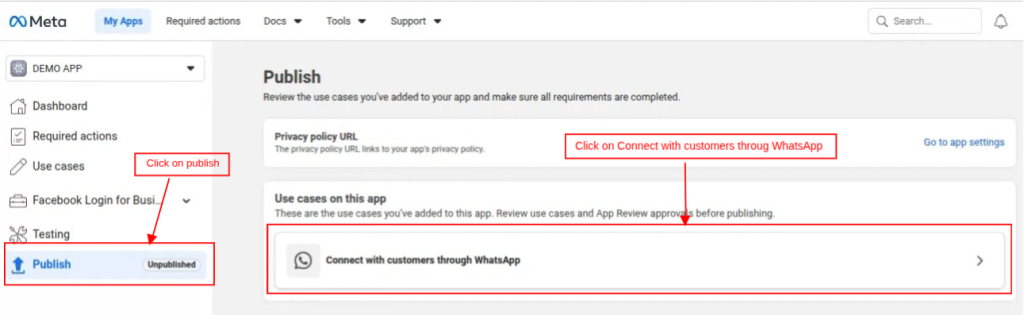
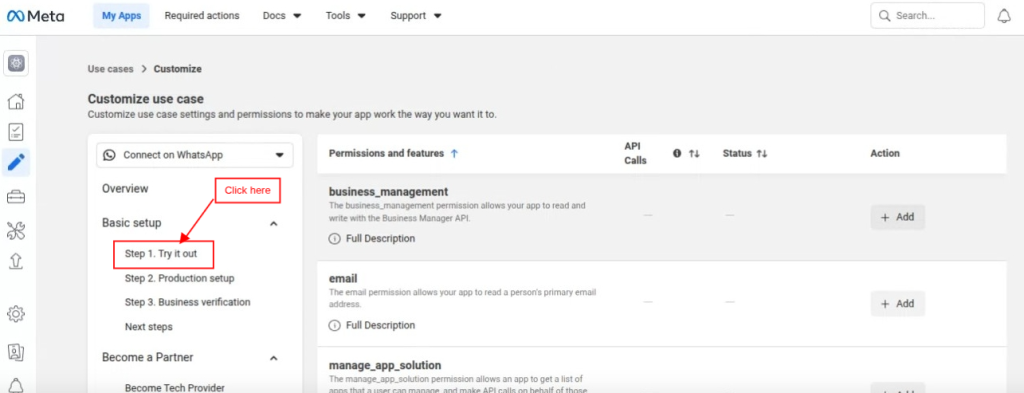
After clicking on the Connect with customers through WhatsApp option, the customization use case screen will appear. Click on the Try it out option under the basic setup, as shown below:
Copy the Phone Number ID and WhatsApp Business Account ID, then paste them into the API configuration section of the QloApps WhatsApp Business Order Notifications module.
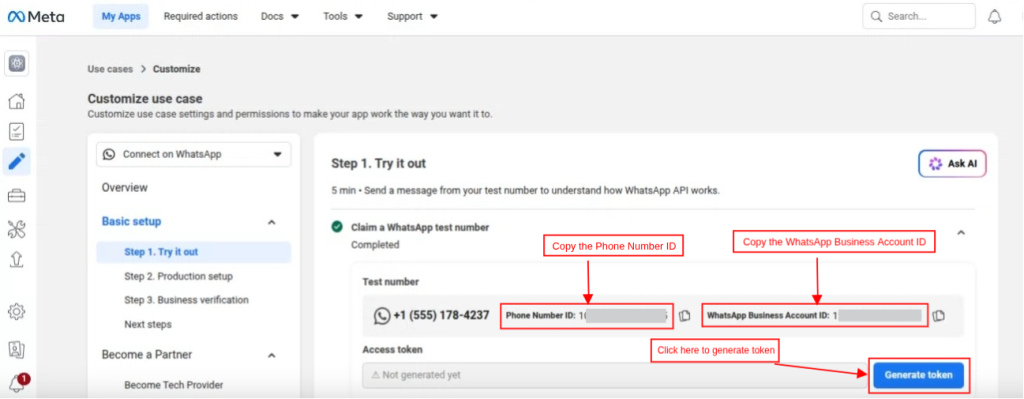
Click on the “Generate Token” button to create an access token, then paste it into the Permanent Access Token field of the QloApps WhatsApp Business Order Notifications module.
How to configure Webhook
Now, let’s set up the webhook to enable real-time communication with WhatsApp.
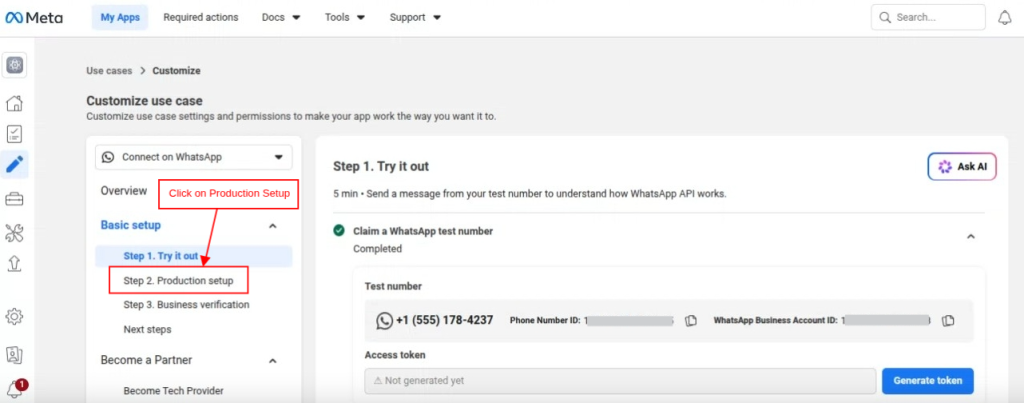
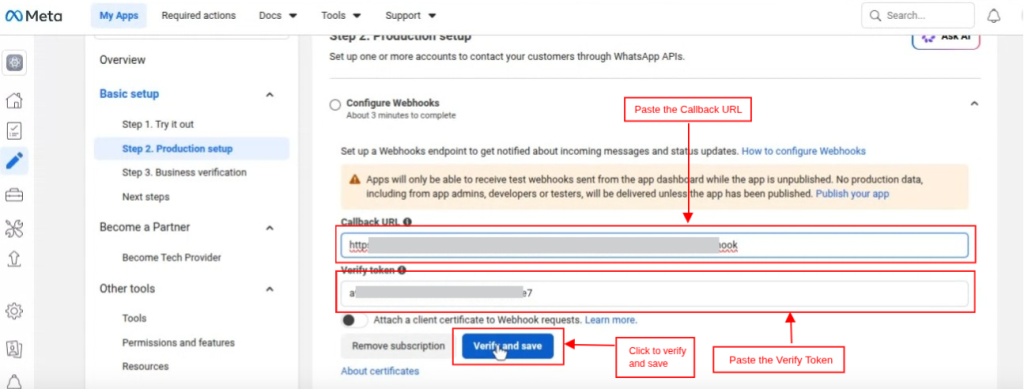
On the Customize Use Case screen, click on the Production Setup section under Basic Setup to setup webhook.
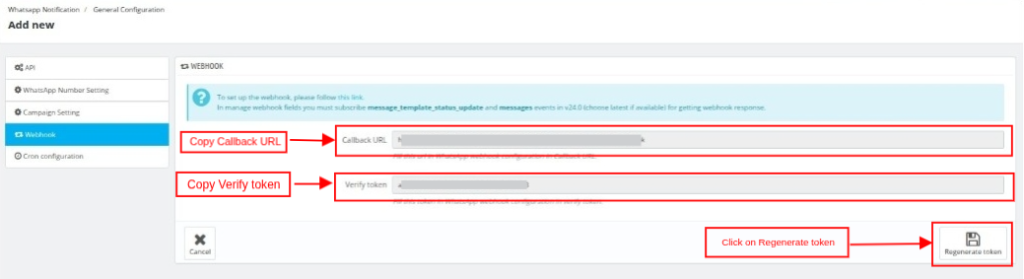
Then, paste the callback URL and verify token in the configure webhook section, and click on the verify and save button.
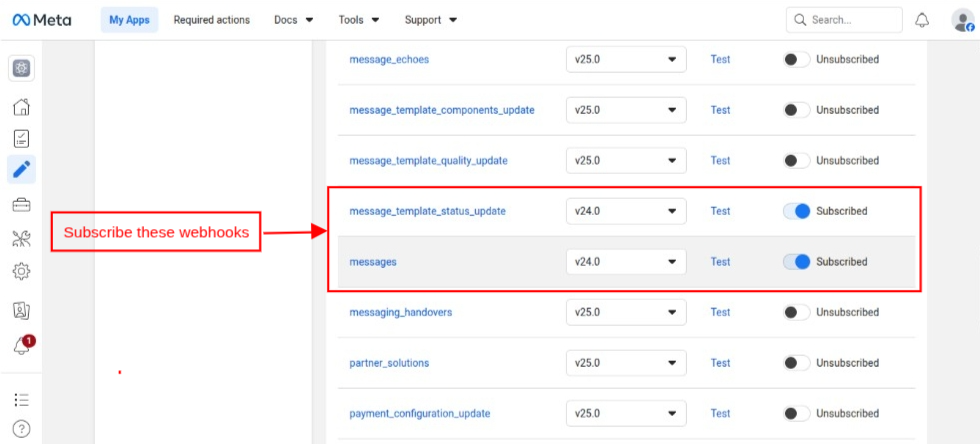
After that, select “WhatsApp Business Account” as the product and subscribe to Message_template_status_update and messages events.
Note: API version gets updated from time to time. You can use the latest version.
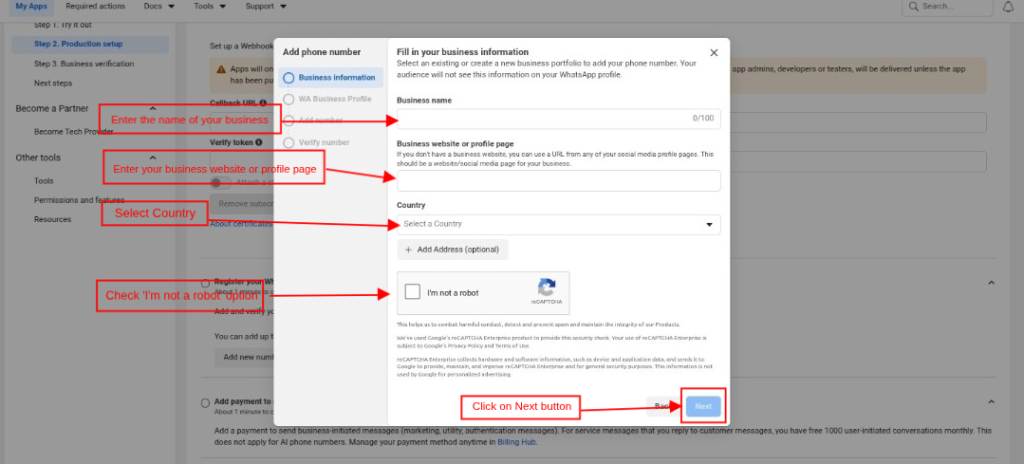
After the callback URL and Token verification, register your WhatsApp number. By clicking on the Register Your WhatsApp phone number, as shown below:

Add Phone Number:
After clicking on the “Add phone number” button, a pop-up will immediately be displayed to the user to enter the business name, business website, and country in the Business Information section.
Note: The phone number you register here must not already be active on any WhatsApp mobile app. If it is currently in use, you must delete the WhatsApp account from your phone before proceeding.
Next, you have entered your WhatsApp business profile
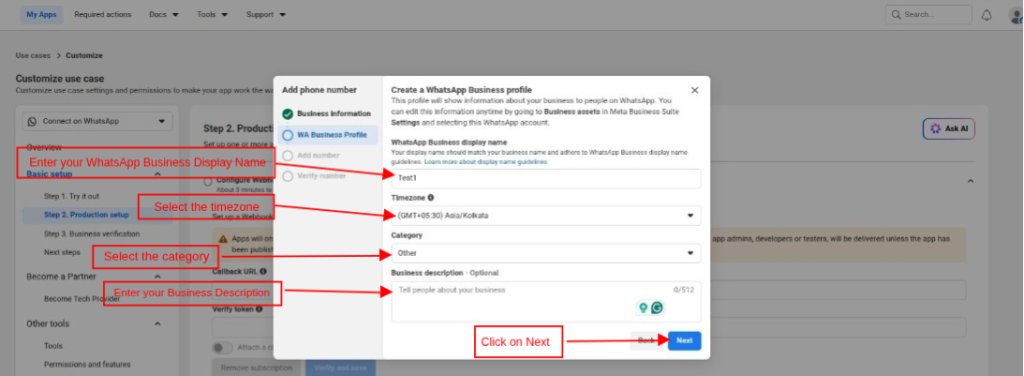
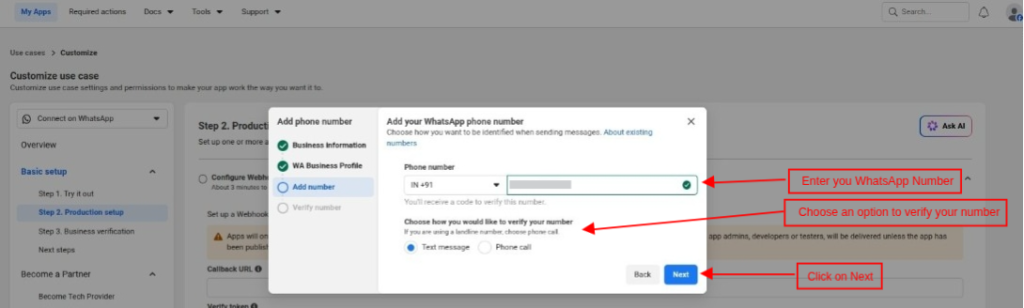
After clicking on the Next button, you need to enter your WhatsApp Number and choose the option to get it verified by Meta.
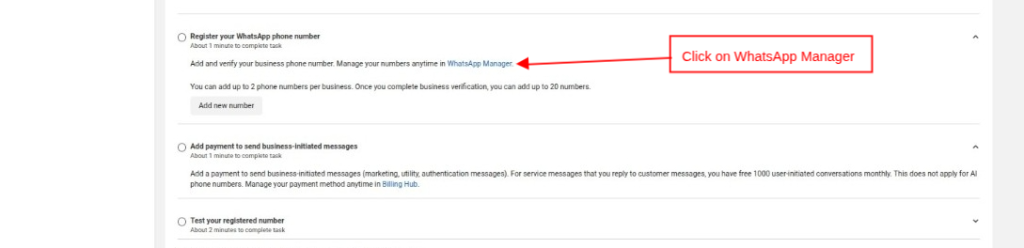
After verifying the mobile number, you have to click on the “WhatsApp Manager” link available in the “Add a phone number” step.
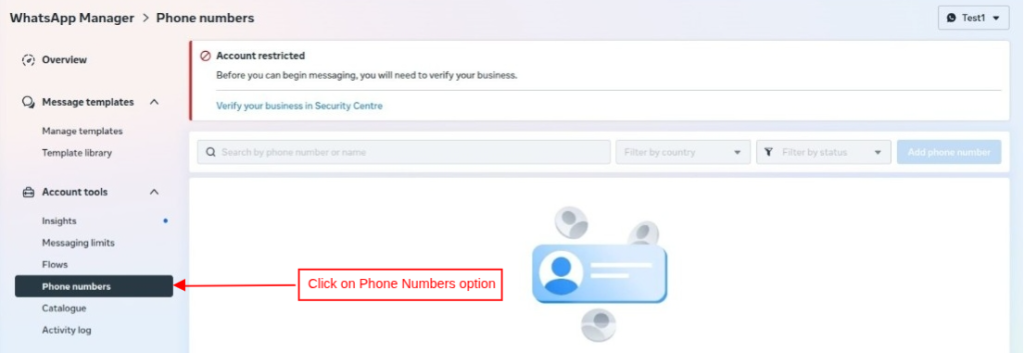
Then you’ll be redirected to the WhatsApp Manager dashboard, and you need to click on the “Phone number” option available in the “Account Tools” tab.
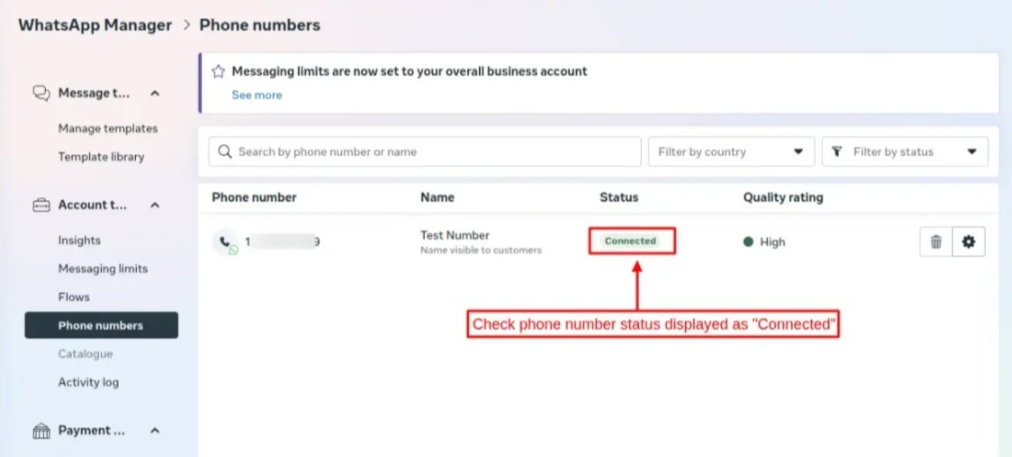
Now, check whether the phone number status is displayed as “Connected“.
Please note: It may take some time to change the phone number status from “Pending” to “Connected
Now, go back to the “App dashboard” for adding the payment method.
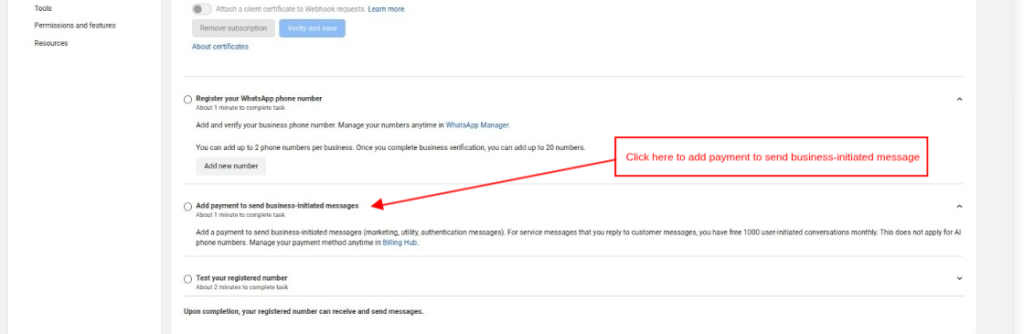
Next, click on the Add payment method button, as shown below:
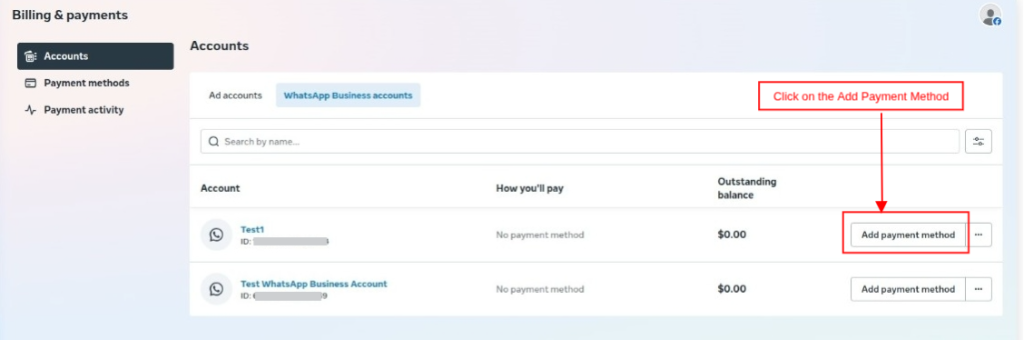
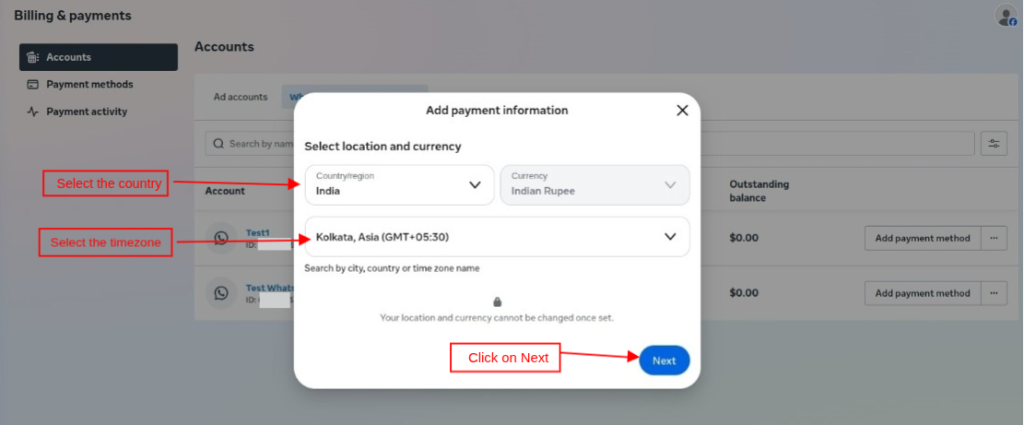
Select the Country/Region and Timezone, click on the Next button to add the payment method.
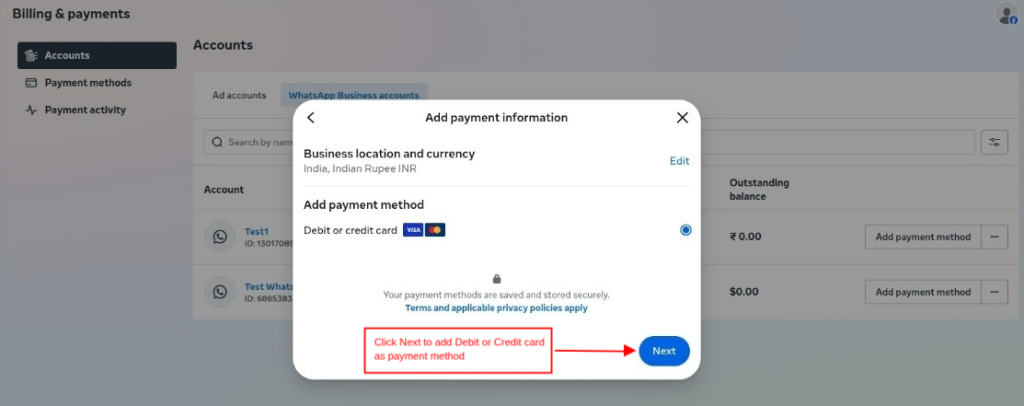
Subsequently, a pop-up will be displayed to add a debit/credit card for the payment method.
Complete Business Verification
Before you can fully utilize the WhatsApp Business API and increase your messaging limits, you must verify your business with Meta.
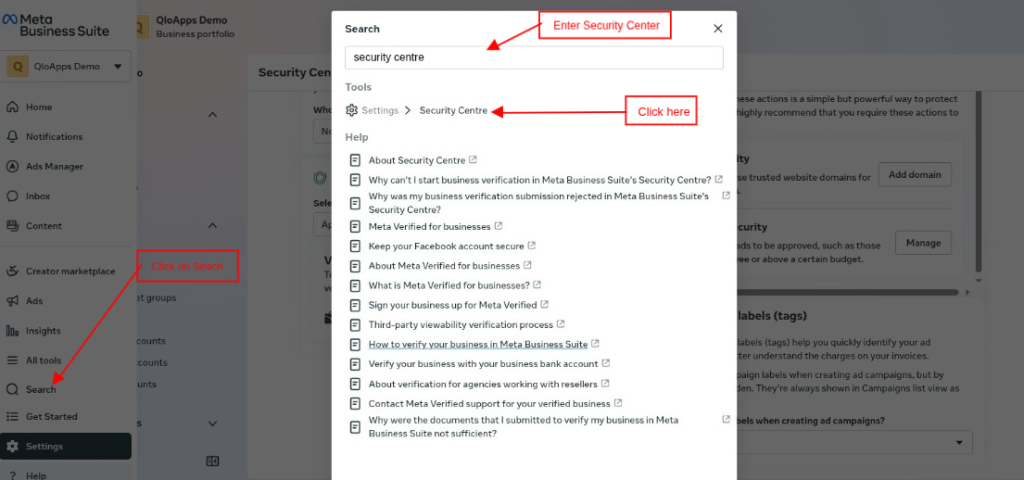
Firstly, open Business Settings and click on Search, and search for Security Center.
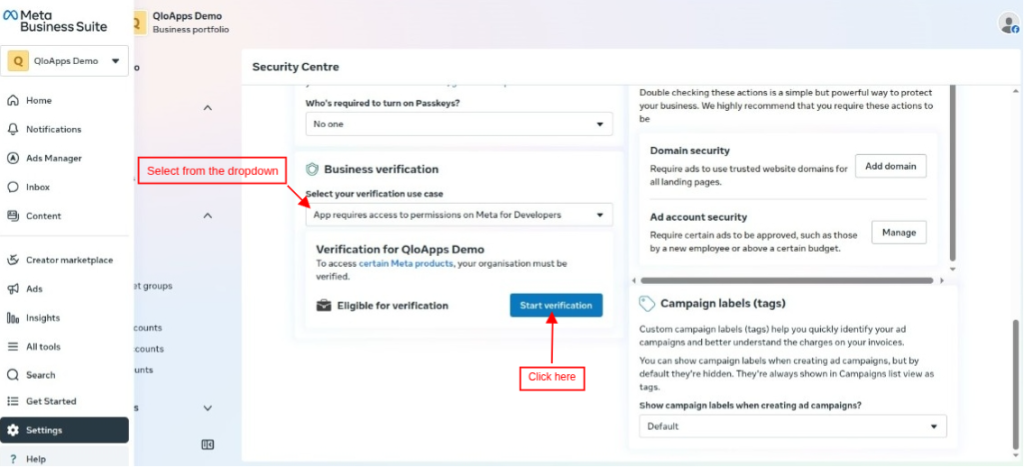
On the Security Center Screen, select the verification use case, and click on the Start Verification for Business Verification.
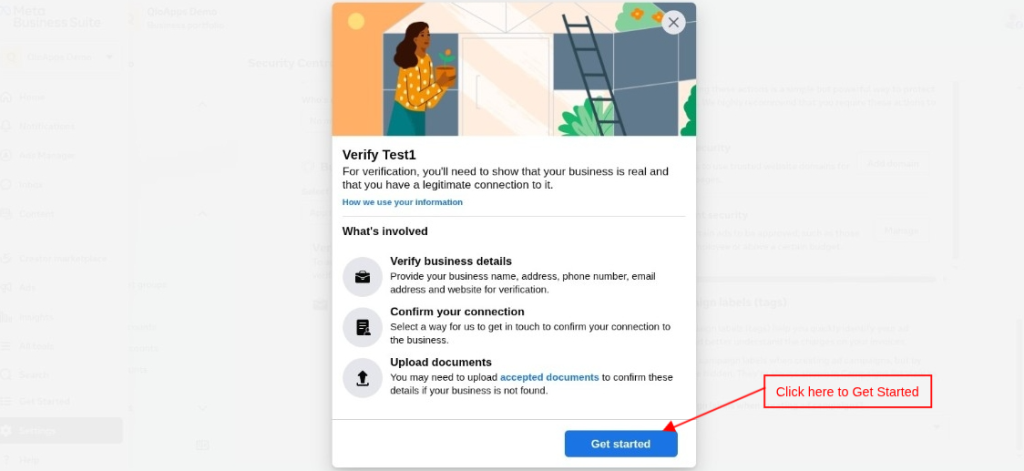
Afterward, a pop-up window will open once you click on Start Verification. Click on the Get Started button:
- To Verify Business Details
- To confirm your connection
- Upload the document for verification
Note: Once all the above steps are completed, your business verification will be completed.
How to Generate a Permanent Token
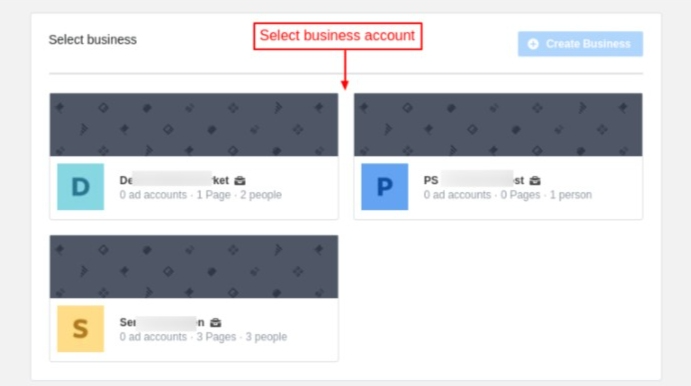
Firstly, go to Business Settings and select the account with which your app is associated.
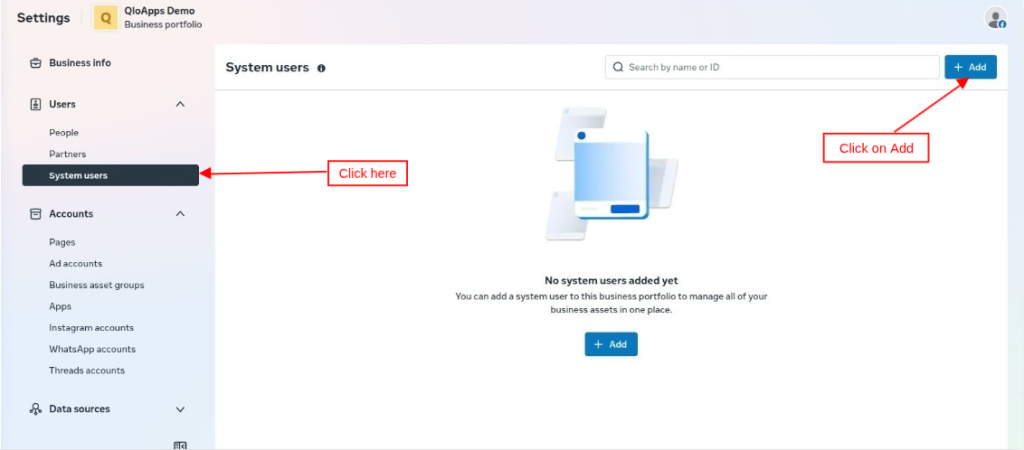
Under Users, click on ‘System users’, and click on the Add button to add a new system user.
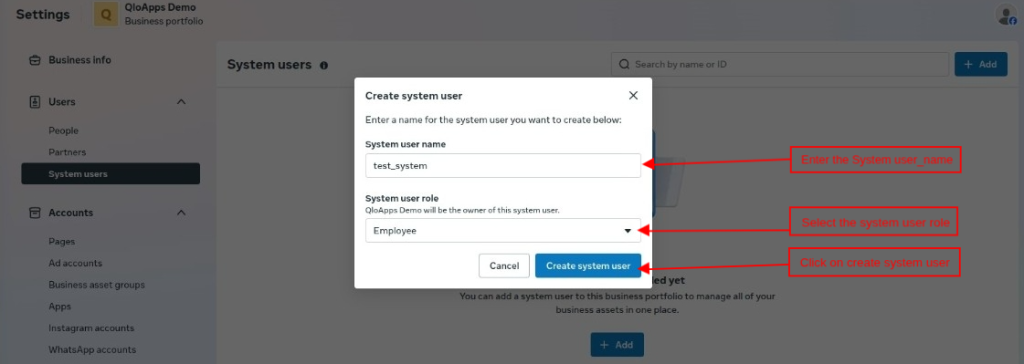
On clicking the ‘Add’ button, a pop-up appears on the page where you need to specify the system user name, select ‘Admin’ as the system user role, and click on the ‘Create system user’ button.
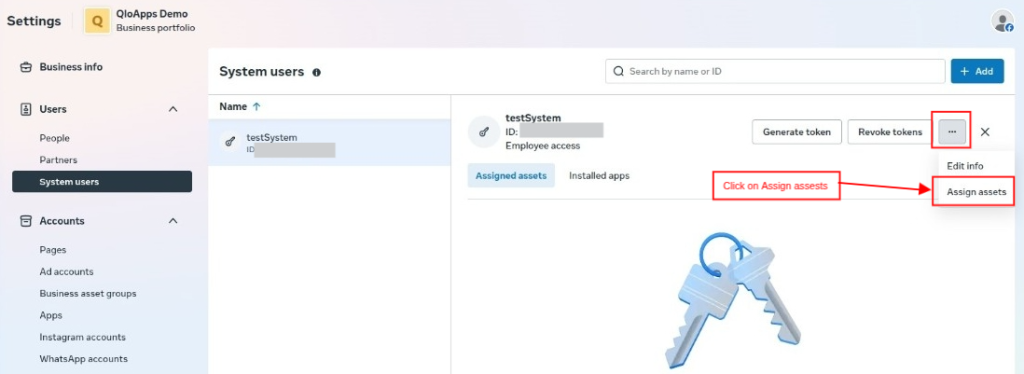
After creating/selecting the system user, you have to click on the “Assign assets” button.
Now, the admin has to search for and select the app that you have created, and give full control to both the app and the WhatsApp Business Account.
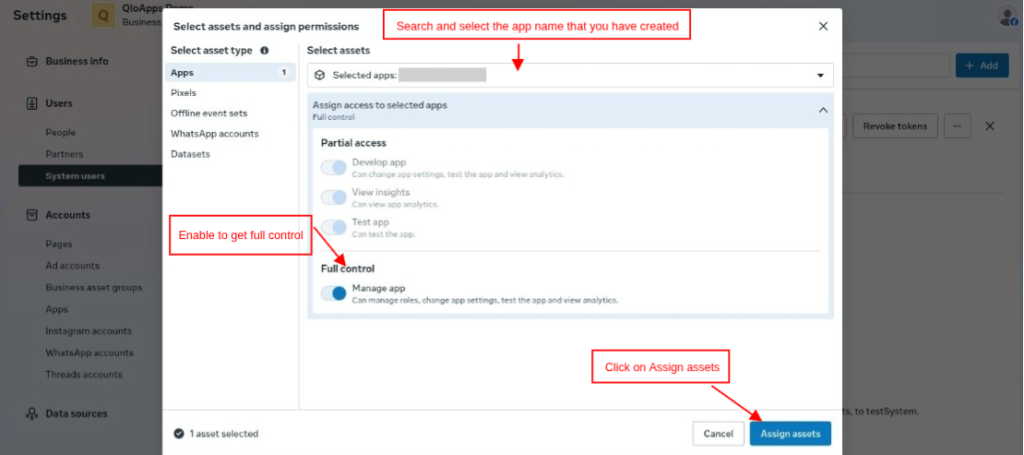
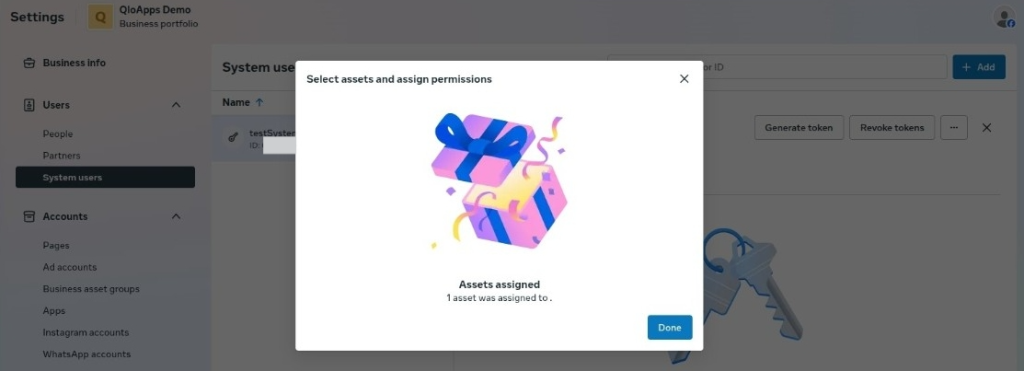
After assigning the assets, the Select assets and assign permission message will be displayed as shown below:
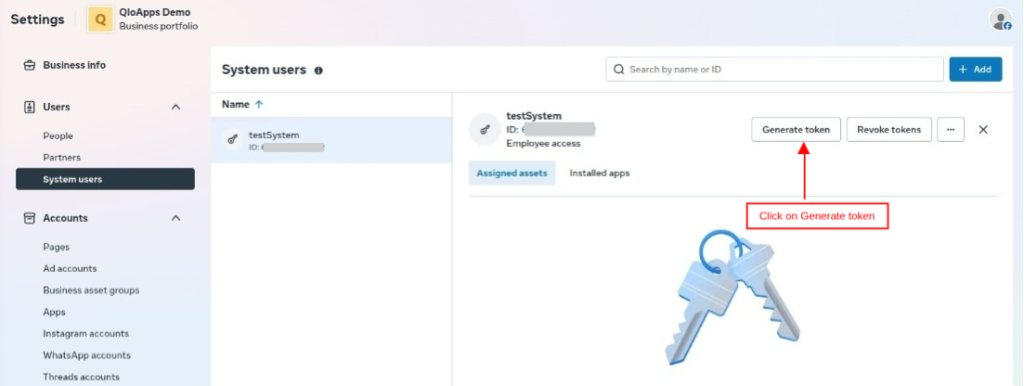
Click on the ‘Generate token‘ button.
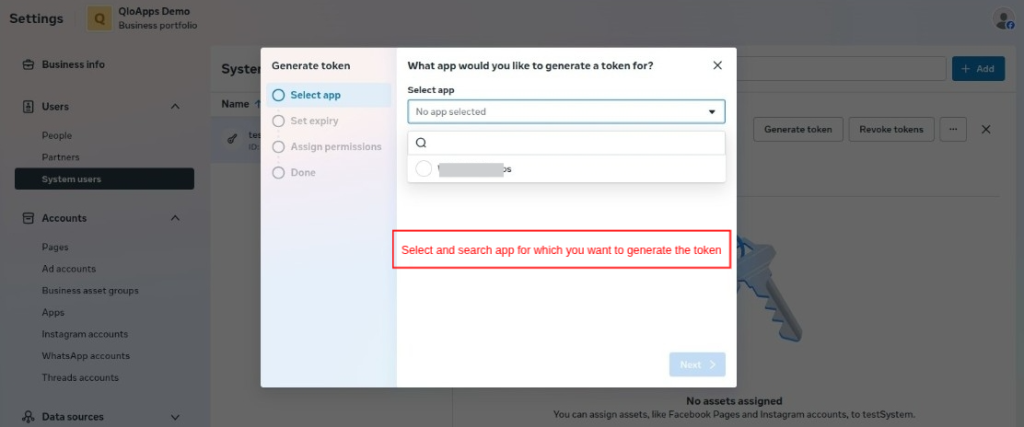
On clicking the button, a pop-up appears on the page where you need to select an app.
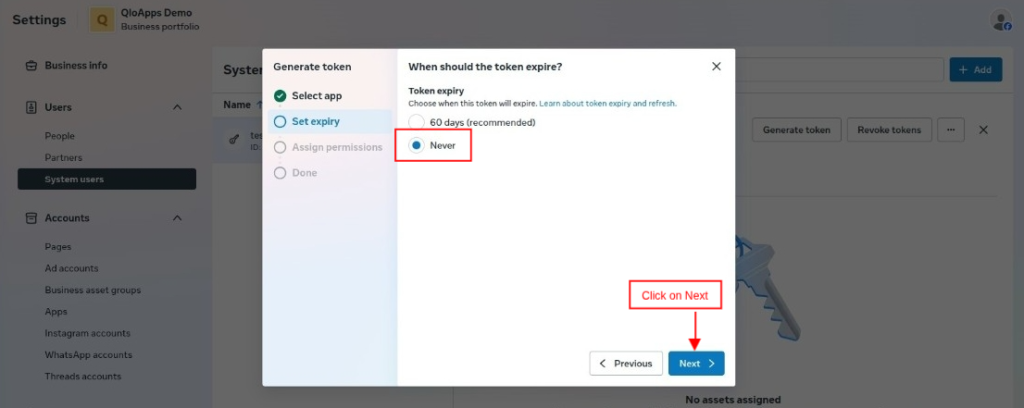
Once you select the app, choose ‘Never’ for token expiration.
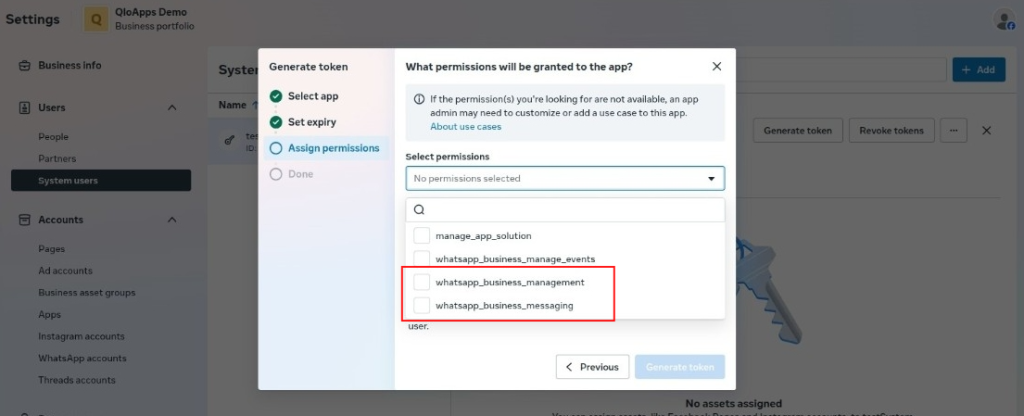
Select whatsapp_business_messaging, whatsapp_business_management permission under the “Select permissions” list.
After selecting the permissions, click on the ‘Generate token’ button.
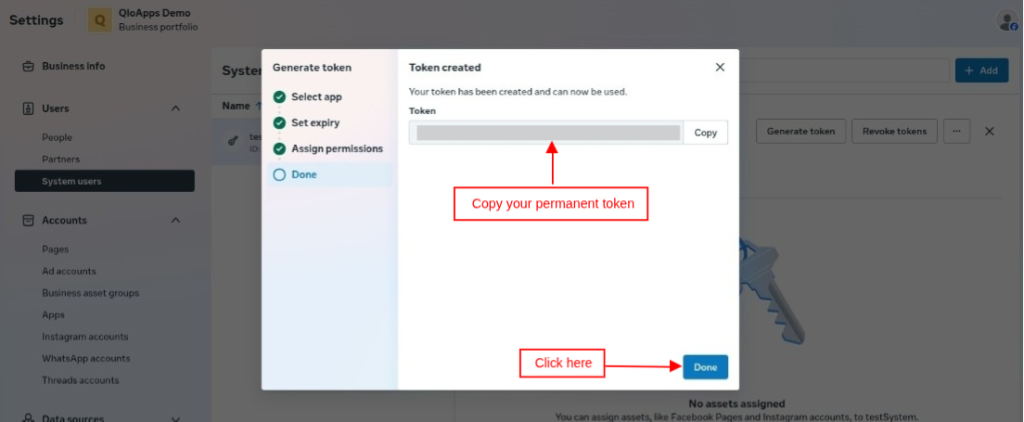
Now, copy your permanent token and configure your module.
QloApps WhatsApp Business Order Notification (Back Office)
The module adds six new tabs in the back office. Those are:
- General Configuration
- Template Configuration
- Campaign
- Customers
- WhatsApp History
- Quick Button Payload
Module Configuration
Let’s understand each of them one by one. Starting with:
General Configuration
API:
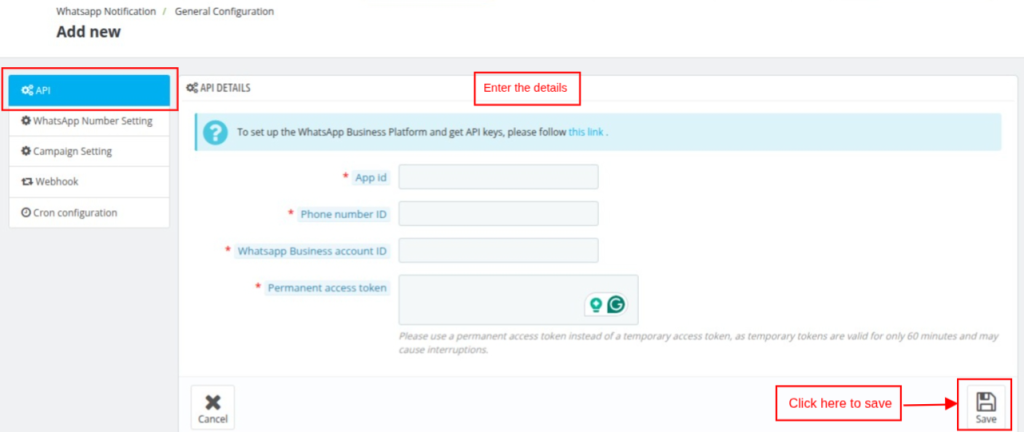
- Firstly, you need to enter the details like your App ID, Phone Number ID, WhatsApp Business Account ID, and Permanent Token to use this module.
- Without these details, you will not be able to proceed further with the module configuration process.
WhatsApp Number Setting
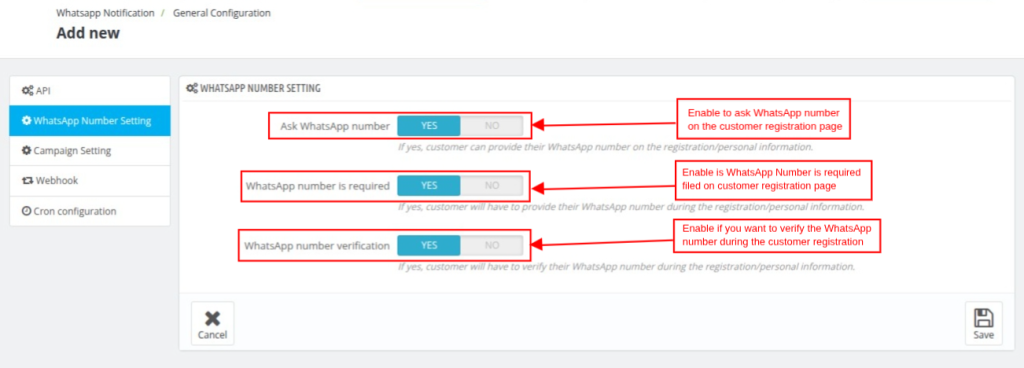
- Ask WhatsApp Number: Enable this option for asking the customer to enter the WhatsApp number while registration.
- WhatsApp Number is required: Enable if you want the WhatsApp number field to be required during registration.
- WhatsApp Number Verification: Enable the WhatsApp number verification must be verified during customer registration.
Campaign Setting:
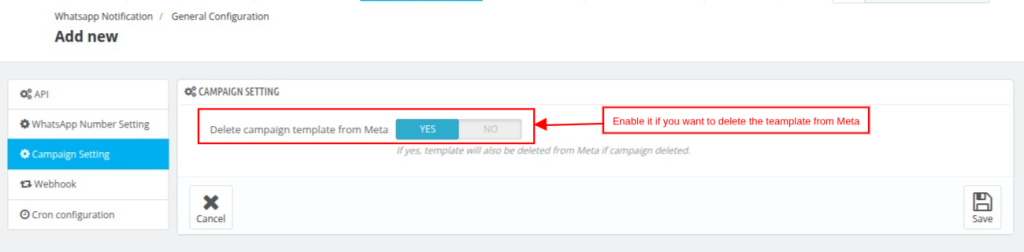
Enable if you want to delete the campaign template from Meta’s end when deleting from the module’s end.
Webhook:
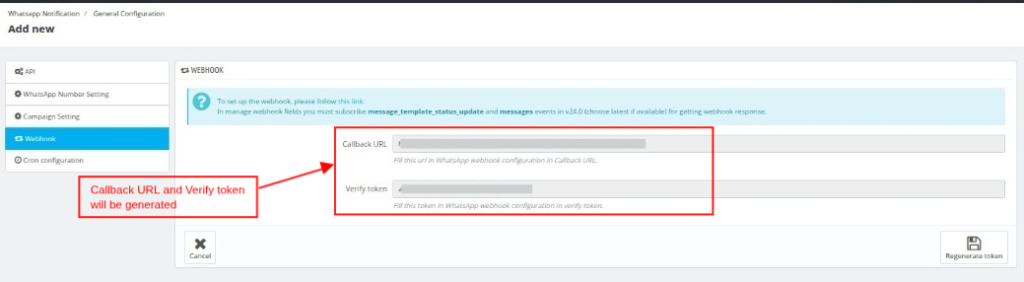
- Here, you need to generate the Webhook callback URL and verification token by clicking on the Regenerate Token button.
- Once the callback URL and verification token are generated, enter them in the meta, as shown in the above section.
Cron Configuration:
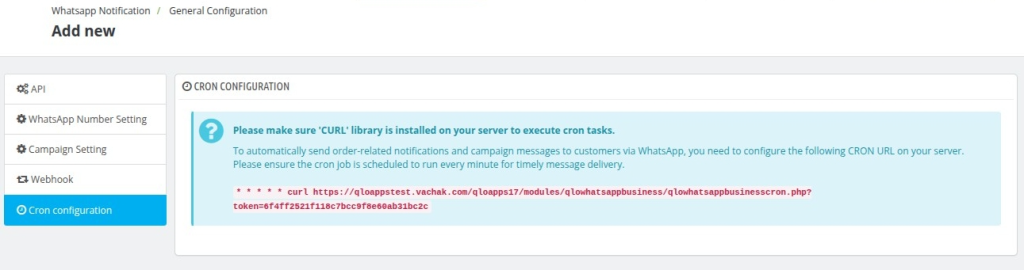
To send the template and campaign automatically to the customer, you need to set the cron configuration in your system.
Template Configuration
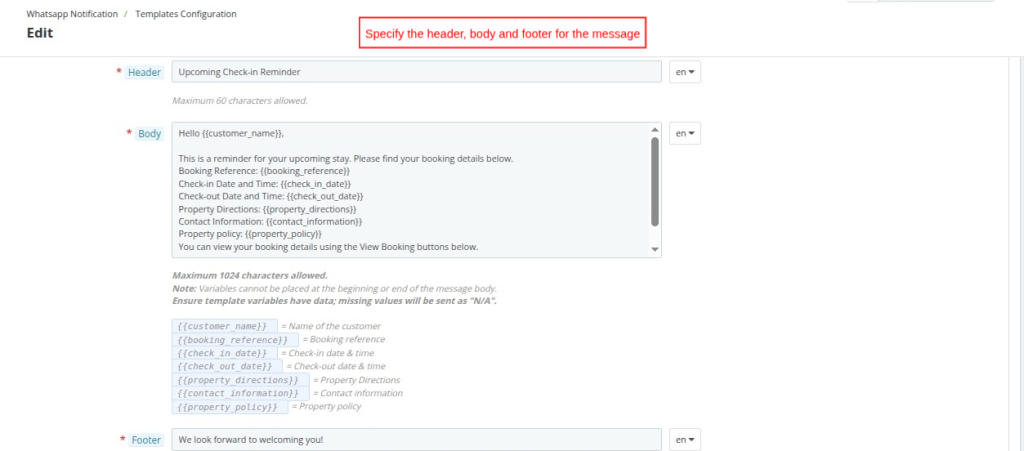
You can send notifications to customers on the following 5 events:
- Booking Confirmation
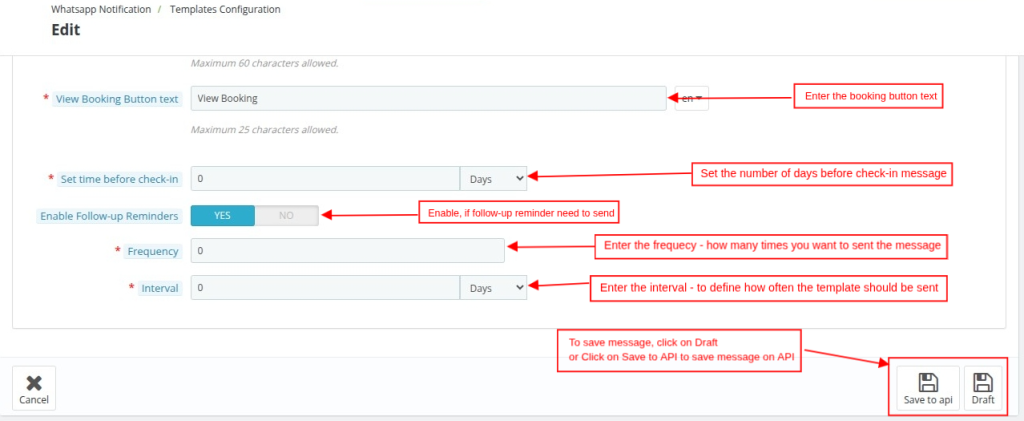
- Check In Reminder
- OTP Verification
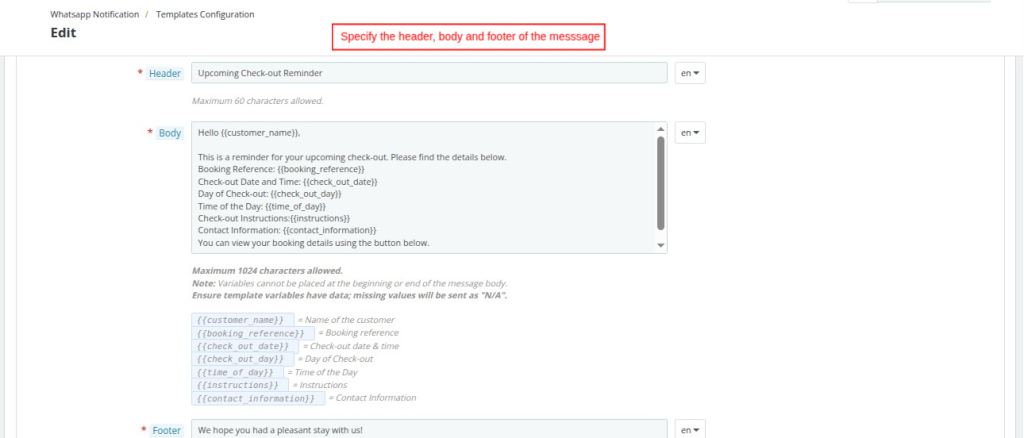
- Check Out Reminder
- Abandoned Cart
- Post Check out
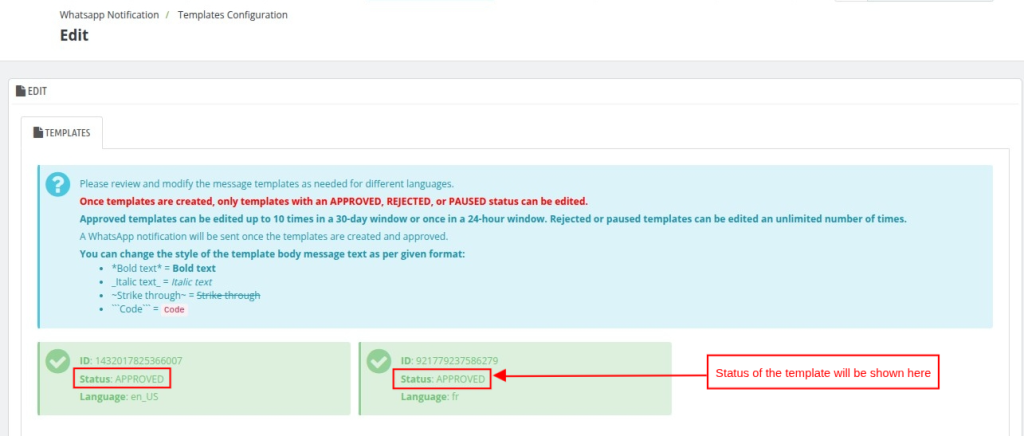
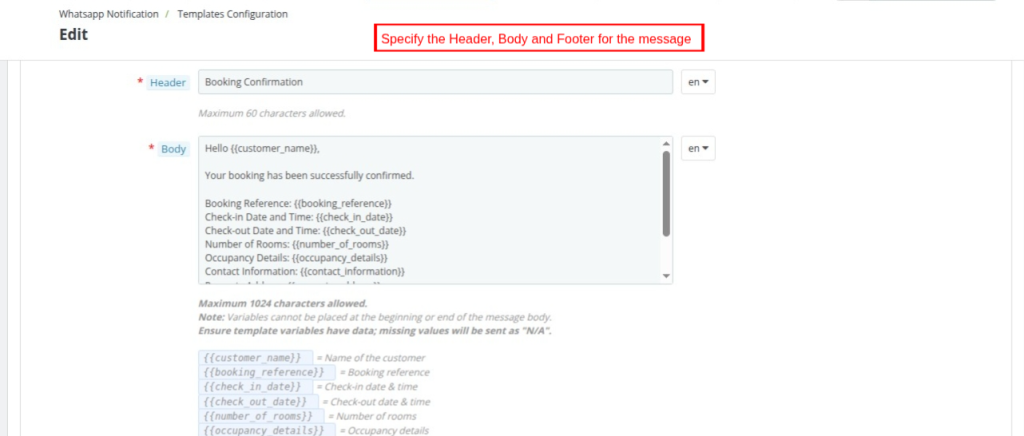
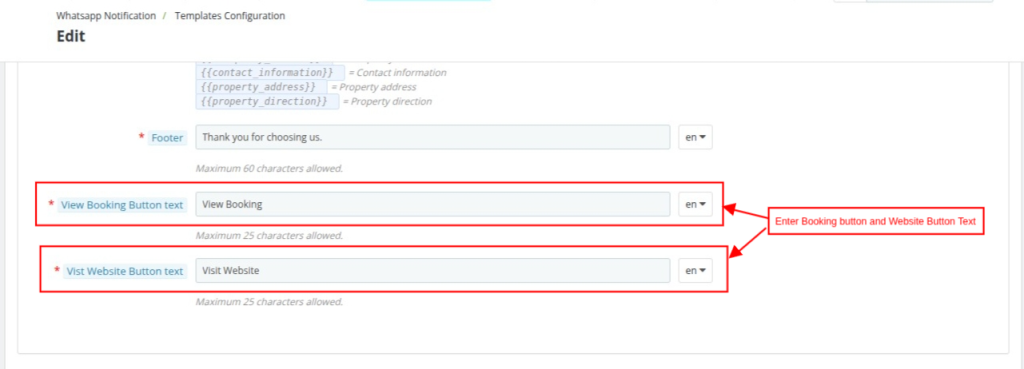
For sending the notifications, you must define their template. So here, you can set a template for each event separately.
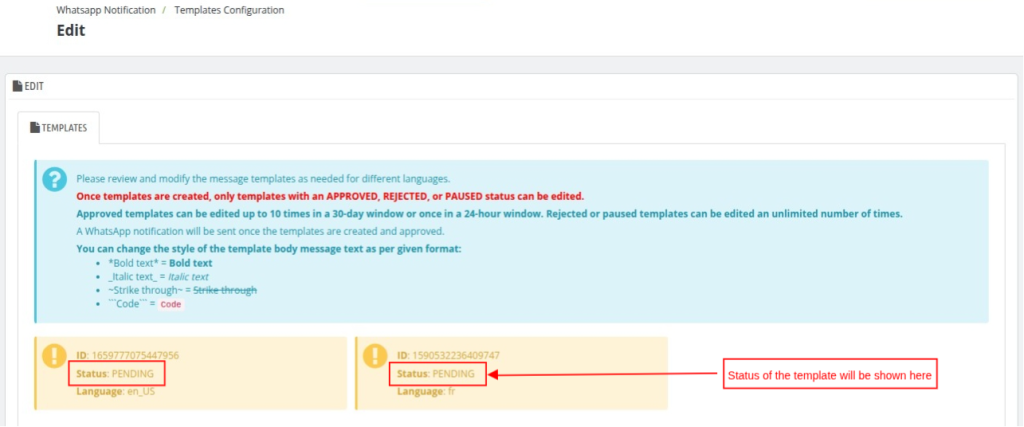
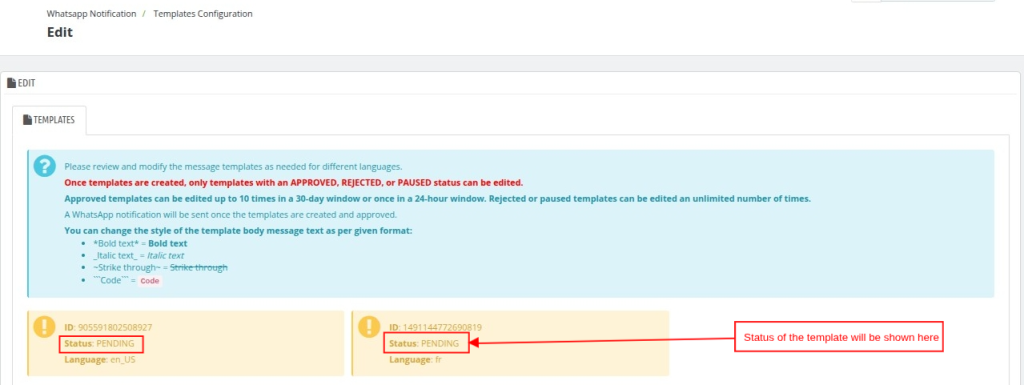
Also, note that message templates will require approval from WhatsApp before being sent out to customers.
Note: The template will be rejected by the Meta team if template content does not comply with the WhatsApp Business Messaging and Commerce policies.
In this case, you can review the rejection reason and send it for review again after updating the template contents.
Booking Confirmation:
Check In Reminder:
Check-Out Reminder:
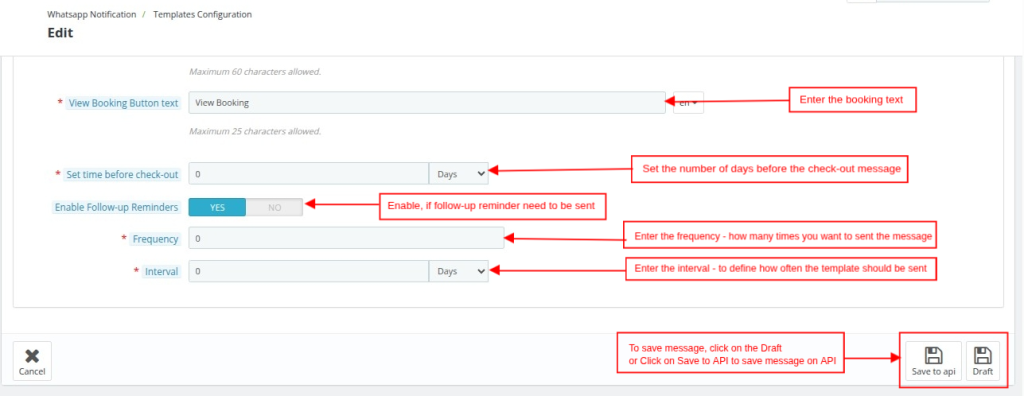
Abandoned Cart:
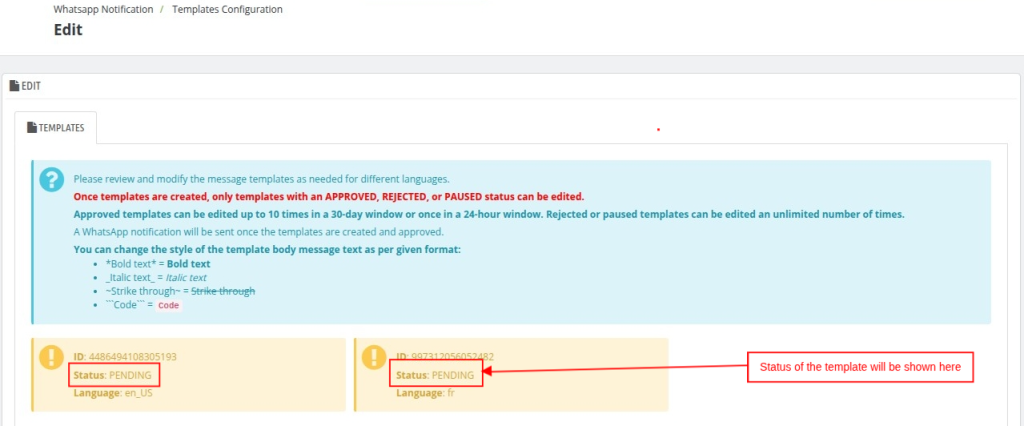
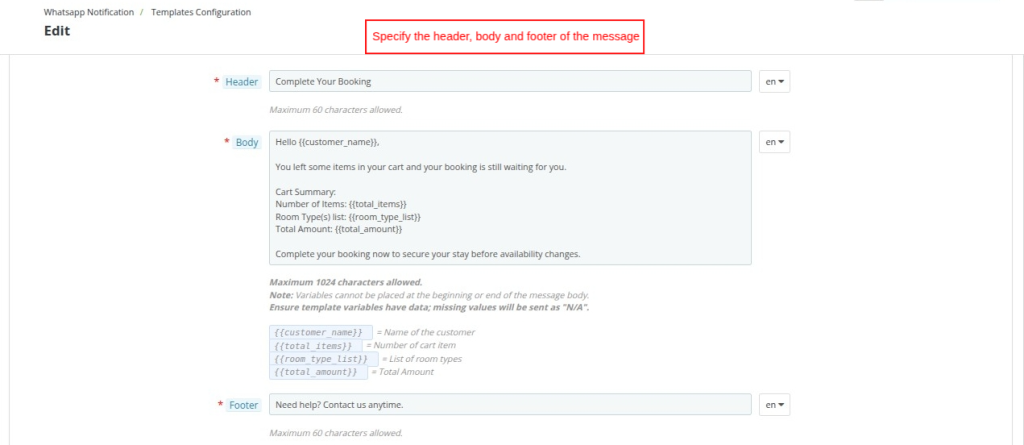
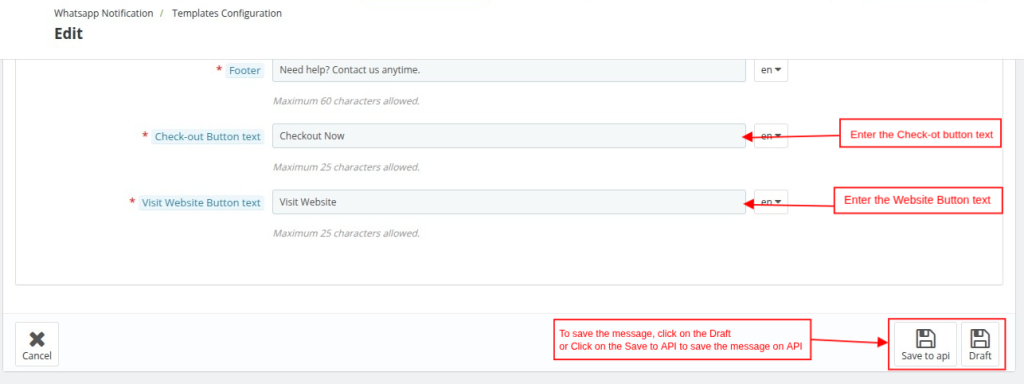
Note: A cart will be considered abandoned when a customer adds products to their cart and doesn’t purchase within 24 hours.
Also, the module will send the WhatsApp notification till 3 days when the customer’s cart is abandoned.
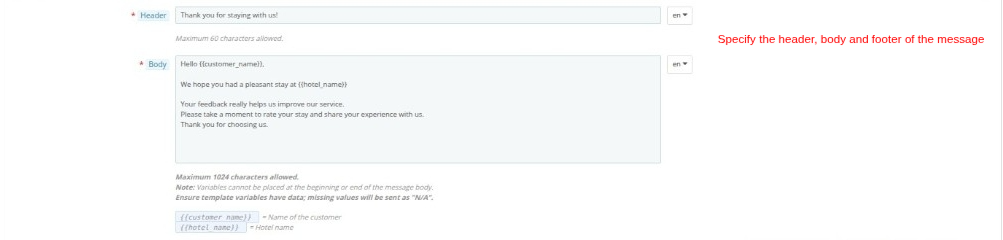
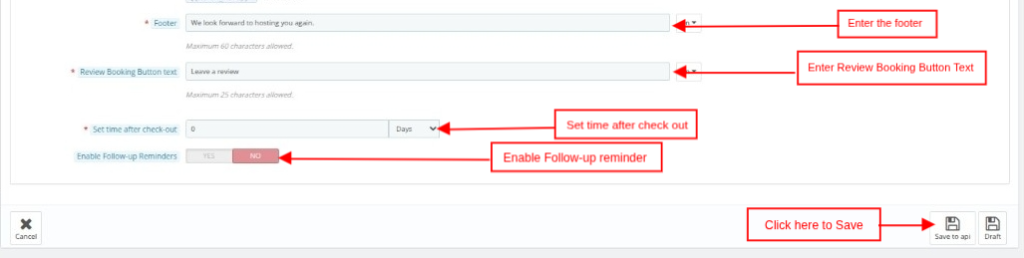
Post Check Out
OTP Verification
Here you will need to set the template of the OTP message which will be sent to the customer for WhatsApp number verification when he/she opts to receive the messages.
Customers
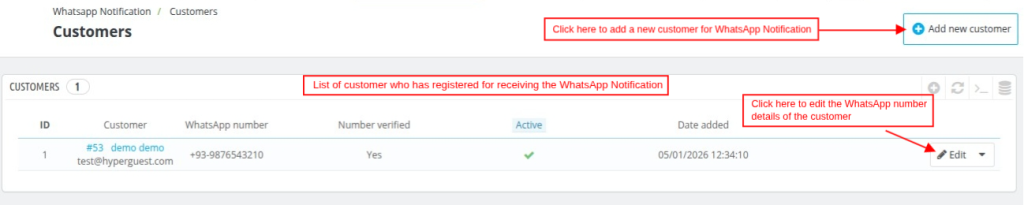
Furthermore, the admin can view the list of customers who have registered to receive the WhatsApp notification.
Also, you can add the new customer by clicking on the Add New Customer, as shown below:
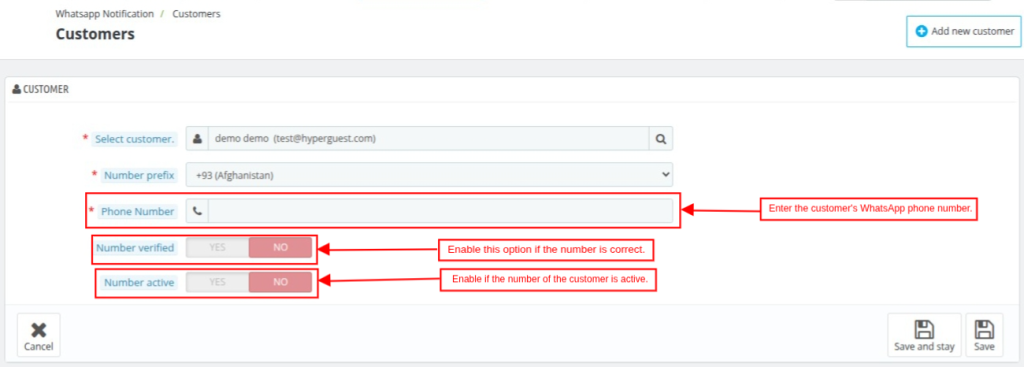
After clicking on the Add new Customer, you can search for the existing customer from the search option, and add the details:
- Phone Number: Enter the customer’s WhatsApp phone number.
- Number Verified: Enable this option if the number is correct.
- Number Active: Enable if the number of the customer is active.
WhatsApp History
All chats related to Booking Confirmation, Check-In Reminder, OTP Verification, Check-Out Reminder, Abandoned Cart, and Post Check-Out are displayed in the WhatsApp History section.

Campaign
Additionally, you can create campaigns for marketing purposes and send them to your customers on WhatsApp.
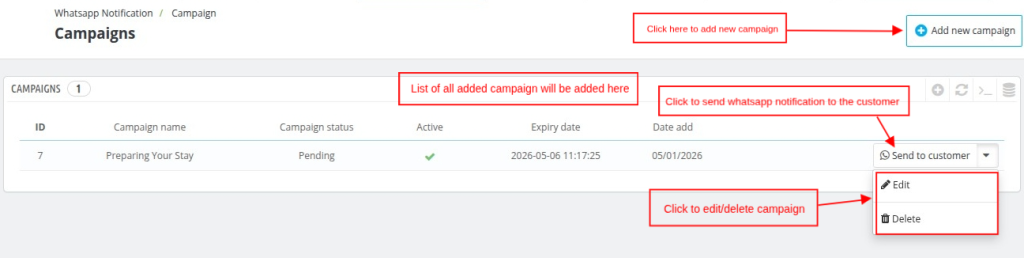
While creating Campaigns, you can set “Header Type” to either:
- Text
- Media
Furthermore, you can include interactive and more appealing buttons in your campaign messages. These buttons can be of 2 types:
CTA (Call To Action):
- Call
- Visit Website
Similarly, you can use the quick reply option to provide quick chat support to the customer.
Note: In case of campaign template rejection, you can review the reason on the Facebook developer account, take appropriate action as suggested by the Facebook team, and send it again for review.
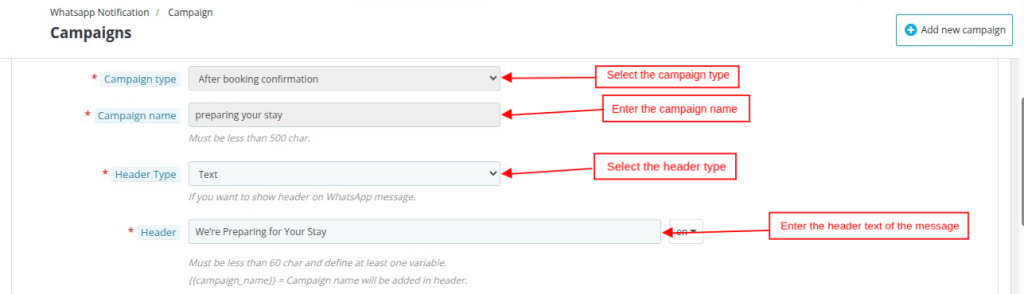
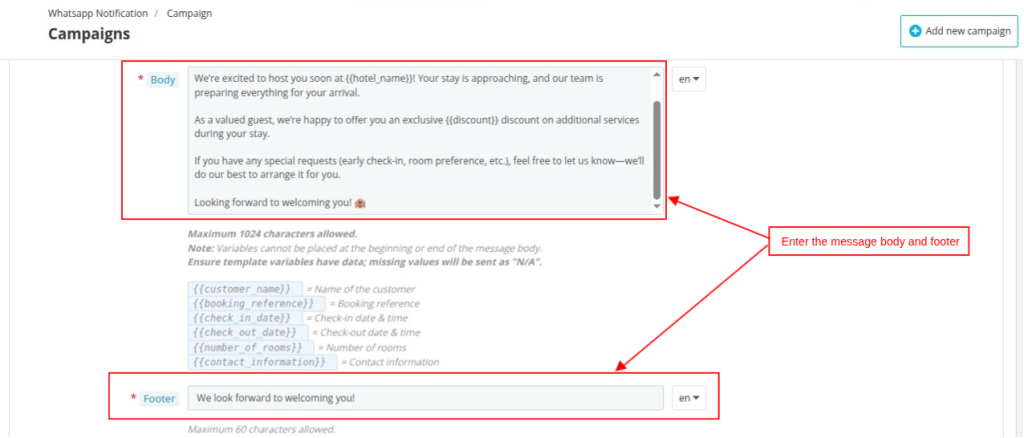
We are going to create a few campaigns and see how they look.
Example:
- Campaign Name: After booking confirmation
- Header Type: Text
- Add Buttons: Enabled
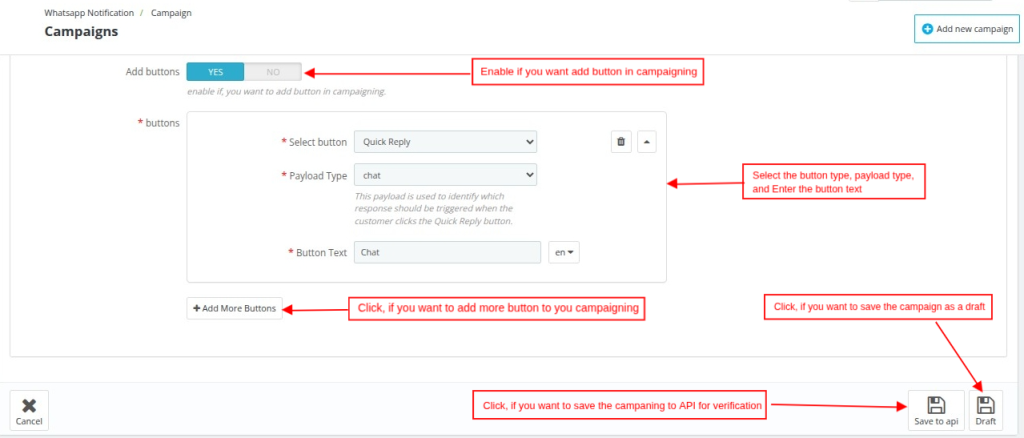
Note: Once the campaigning is approved by the meta, then the status of your campaign will appear as Approved.
Quick Button Payload
For the quick reply over WhatsApp template messages, buttons are provided. When a user clicks a button, Meta sends a webhook event containing the button payload.
Our system captures this payload and responds dynamically based on predefined mappings.
You can add the quick reply payload button by clicking on the Add New button, as shown below:
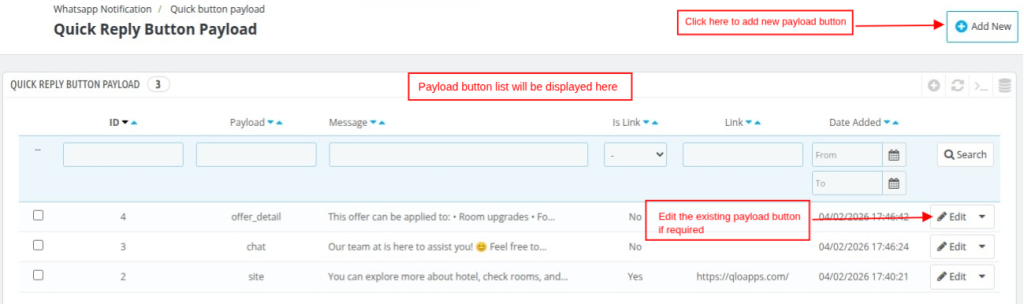
Once you click on the Add new button, the payload detail page will open, as shown below:
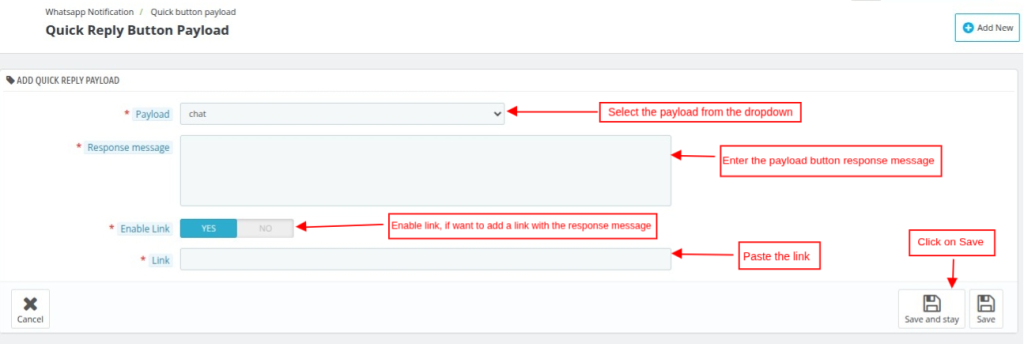
Note: The save payload button will be reflected in the campaign while adding the button.
Conclusion
The QloApps WhatsApp Business Order Notifications module is a powerful tool for enhancing customer communication and engagement throughout the booking lifecycle.
By automating essential notifications such as booking confirmations, reminders, OTP verification, and post check-out messages, the module ensures timely and reliable communication with guests.
In addition to operational notifications, the ability to create and manage WhatsApp marketing campaigns allows businesses to drive customer engagement, promote offers, and increase direct bookings.
Additionally, to learn more about the functionality of QloApps, you can visit this link: All-in-One Property Management System.
In case of any query, issue, or requirement, please feel free to raise it on the QloApps Forum.
Current Product Version: 4.0.0
Supported Framework: QloApps 1.6.1 and 1.7.X

Be the first to comment.