QloApps room type label is an add-on for QloApps.
It easily makes your room type on special offers/discounts noticeable to its customers.
In this competitive environment, it is important to label your room type to promote and increase sales.
Further, you can customize the label with a logo, text font, text color, and background colour.
This way you can impart knowledge of the room type and attract a larger customer base.
Features of QloApps Room Type Label
- Set global settings for the label like label visibility on various pages and dimensions.
- Display labels on various pages like landing page, and room type details page.
- Create as many labels as you want to generate sales.
- Restrict the labels from applying to a particular room type.
- Customize label display (font, text color, background color) on the room-type image.
- Display labels randomly if the same position is set for the multiple labels.
- Set the validity for displaying the labels.
- You can also add a banner on the landing page to give information about room type.
- Choose the customer group to which you want to show the created labels.
- Show content along with the label assigned to the room type.
- Assign the labels individually or use bulk action to assign labels to the particular group of room types.
- Create label rules for assigning labels to all room types falling under that rule.
Prerequisites of Installation
Before you install the QloApps Room Type Label addon you must make a few changes in the core for the proper functioning of the module.
Note– The following changes are required only if you have the QloApps version below or equal to 1.5.0.
The step is very simple, you just have to replace the mention codes in the following paths.
Path 1;
At path hotelcommerce/themes/hotel-reservation-theme/category.tpl
Add below hook code below line number 64 (may vary)
{hook h='displayRoomTypeListImageAfter' product=$room_v}
It will look like this.
<div class="col-sm-4">
  <a href="{$room_v['product_link']}">
    <img src="{$room_v['image']}" class="img-responsive">
    {hook h='displayRoomTypeListImageAfter' product=$room_v}    //inserted code
  </a>
</div>
Path 2;
At path hotelcommerce/themes/hotel-reservation-theme/product.tpl
Add below hook code below line number 400 (may vary)
{if isset($HOOK_EXTRA_RIGHT) && $HOOK_EXTRA_RIGHT}{$HOOK_EXTRA_RIGHT}{/if}
It will look like this.
          {/foreach}
          <div class="room_demands_container_overlay">
          </div>
        </div>
      {/if}
    {/if}
    {if isset($HOOK_EXTRA_RIGHT) && $HOOK_EXTRA_RIGHT}{$HOOK_EXTRA_RIGHT}{/if}  //inserted code
  </div>
</div> <!-- end primary_block -->
Path 3;
At path hotelcommerce/modules/wkhotelroom/views/templates/hook/hotelRoomDisplayBlock.tpl
Add below hook code below line number 40 (may vary)
{hook h='displayHotelRoomsBlockImageAfter' roomType=$roomDisplay}
It will look like this.
<div class="col-sm-12 col-md-6 margin-btm-30">
  <img src="{$roomDisplay.image|escape:'htmlall':'UTF-8'}" .....
  {hook h='displayHotelRoomsBlockImageAfter' roomType=$roomDisplay}   //inserted code
  <div class="hotelRoomDescContainer">
    <div class="row margin-lr-0">
Installation of QloApps Room Type Label
The installation of any module is simple in QloApps.
- Go to the “Module and Services” tab.
- Click on “Add New Module”.
- Now upload the Zip file of module and click on install.
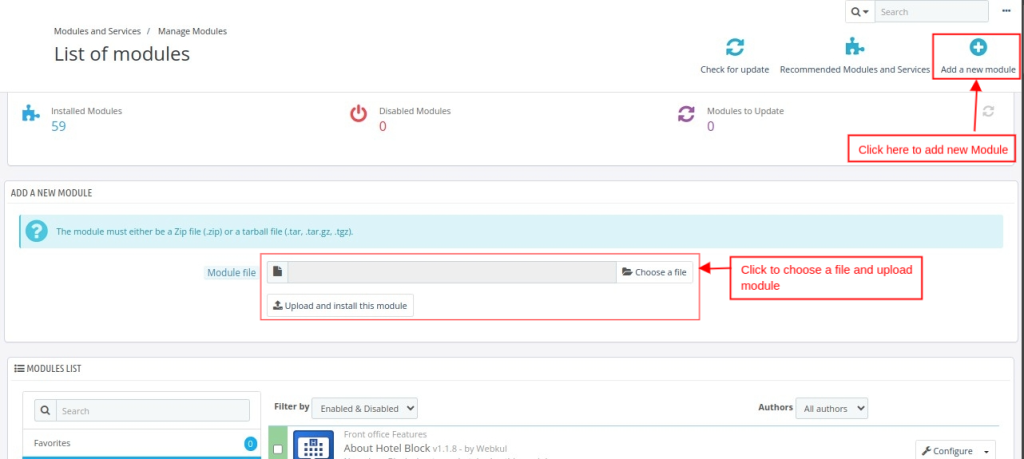
Now you have installed the module. So let’s check how to configure it.

Configuration of QloApps Room Type Label
After clicking on the configure button you will be redirected to the configuration page.
Here, you can view the configuration page as shown below.
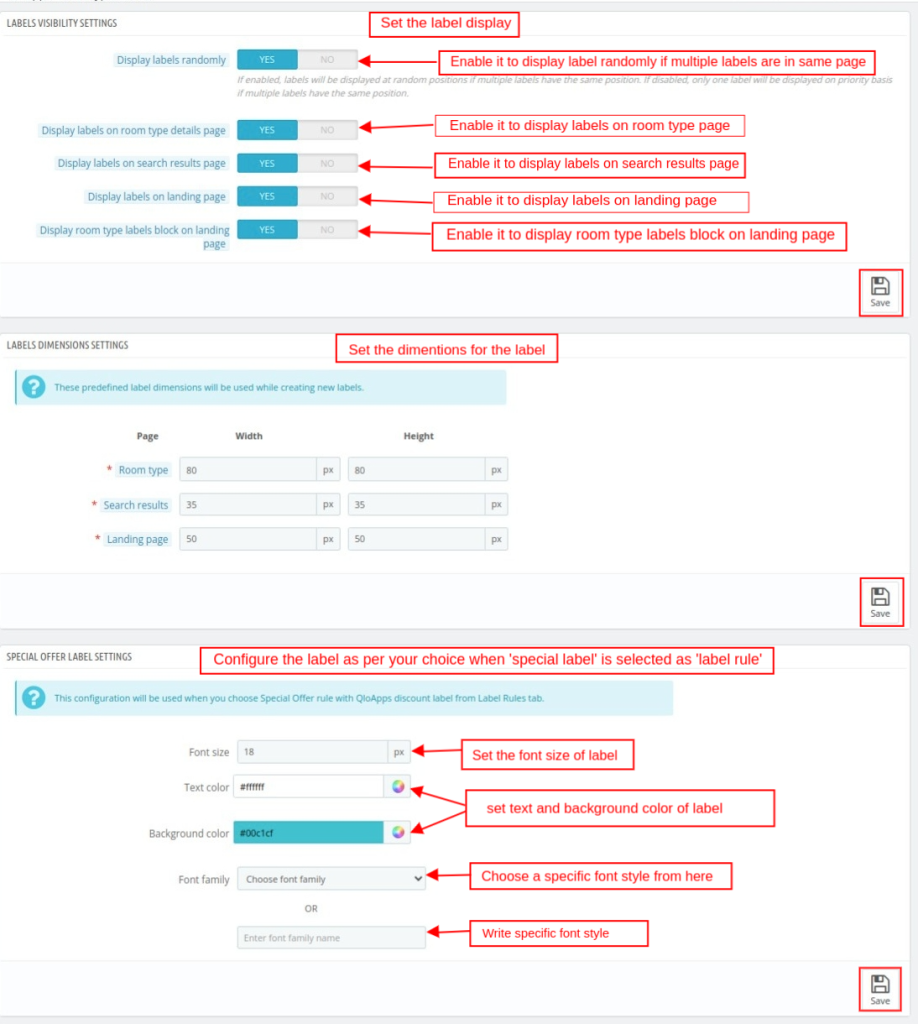
Labels visibility settings
Display labels randomly: If enabled, labels will be displayed at random positions if multiple labels have the same position.
Display label on room type details page: Enable/ disable to display label on room type.
The label on the search result page: Enable to display a label on the search result page.
Display labels on landing page: Enable it if want to show label on landing page.
Display room type labels block on landing page: If enabled room type labels block will be displayed on landing page.
Labels dimensions settings
Set the dimensions of the labels for various pages.
By default, these dimensions will auto-fill while creating a label and it will only display for the image type label.
Special offer label settings
This configuration will be used when you choose the Special Offer rule with the QloApps discount label from the Label rules tab.
Font size: Set the font size of the label.
Text color: Set the text color of the label.
Background color: Set background color of color.
Font family: Choose a specific font style from here.
But you need to go to “Catalog” and select “Room type labels” to configure the module Labels, label bulk actions and label rules.
Labels
From here, you can Add new labels or edit existing labels to all the filtered room types.
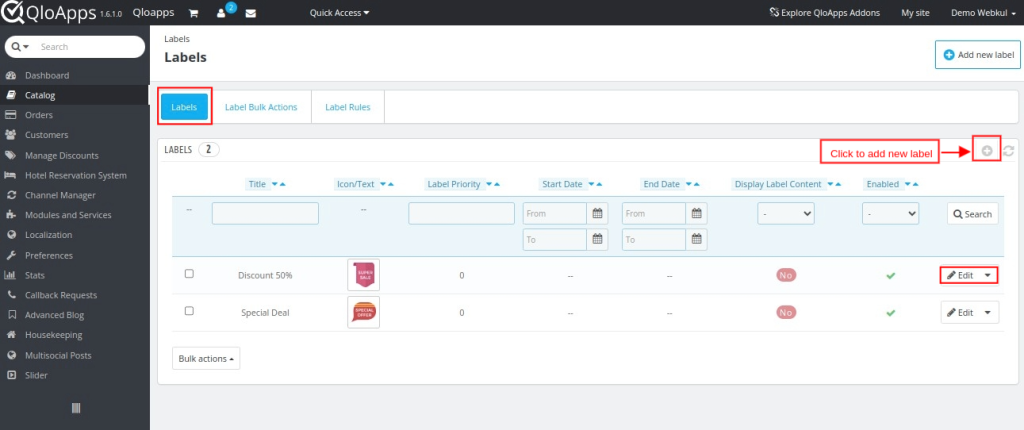
After you click “Add New Label,” this page will appear.
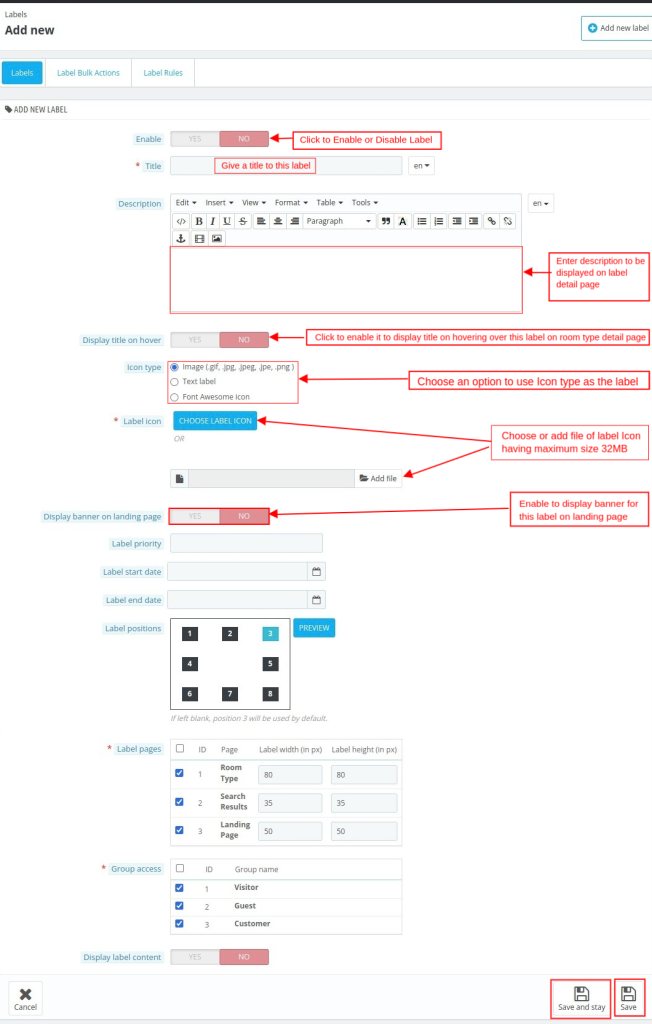
It consists of the following so fill in the required fields:
- Enable: To activate this label, click “Yes.”
- Title: Next, provide a short and descriptive title for your label.
- Description: Finally, add details about the label’s purpose or intended audience.
- Display Title on Hover: First, toggle this option to “Yes.” Next, this ensures the label title appears when users hover over it.
- Icon Type: Choose how your label will be represented:
- Image: Upload a relevant image (.gif, .jpg, .jpeg, .png).
- Text Label: Use descriptive text instead of an icon.
- Font Awesome Icon: Select a predefined icon from the Font Awesome library.
- Label icon: choose or add file of label Icon having maximum size 32MB.
- Display banner on landing page: Enable a banner display on landing pages to ensure prominent visibility.
- Label Banner: First, click to upload an image that will display as the banner for this label on the landing page.
- Label Priority: Next, set the priority to determine which label is displayed if multiple labels are applied.
- Label Start Date: Then, select the start date to ensure the label displays from the specified date.
- Label End Date: After that, choose the end date to display the label until the selected date.
- Label Positions: Assign labels to specific positions (1–8). If left blank, Position 3 is assigned by default.
- Label Pages: Next, select the pages where the labels should appear.
- Group Access: Finally, choose the customer groups who can view the label.
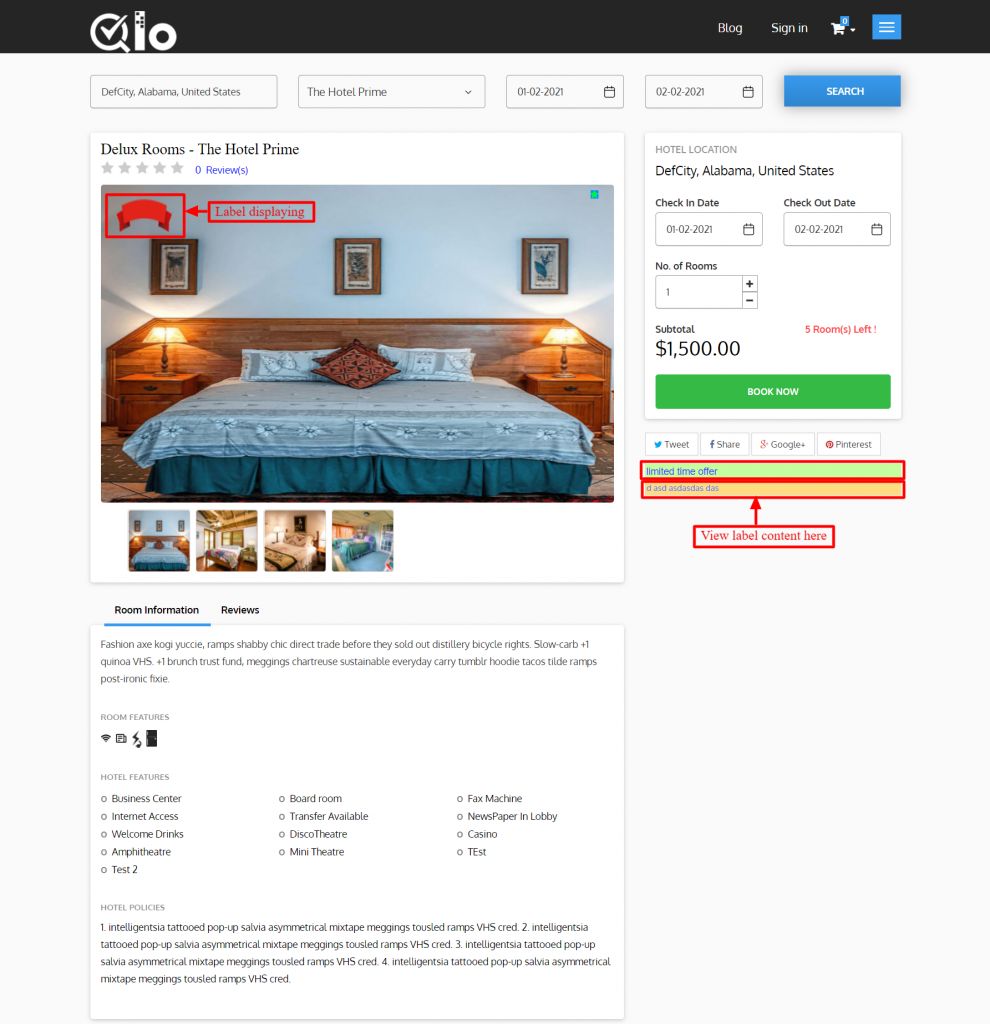
- Display Label Content: Enable the content display for the label on the room type detail page.
- Content: Enter the text that will be shown on the room type details page.
- Text color: Set the color of the label text.
- Background color: Set the background color behind the label text.
- Font size: Specify the font size in pixels (px).
- Font family: Choose a font family from the available options. OR: Use a custom font if desired.

Label Bulk Actions
From this, you can apply labels to all the filtered room types.
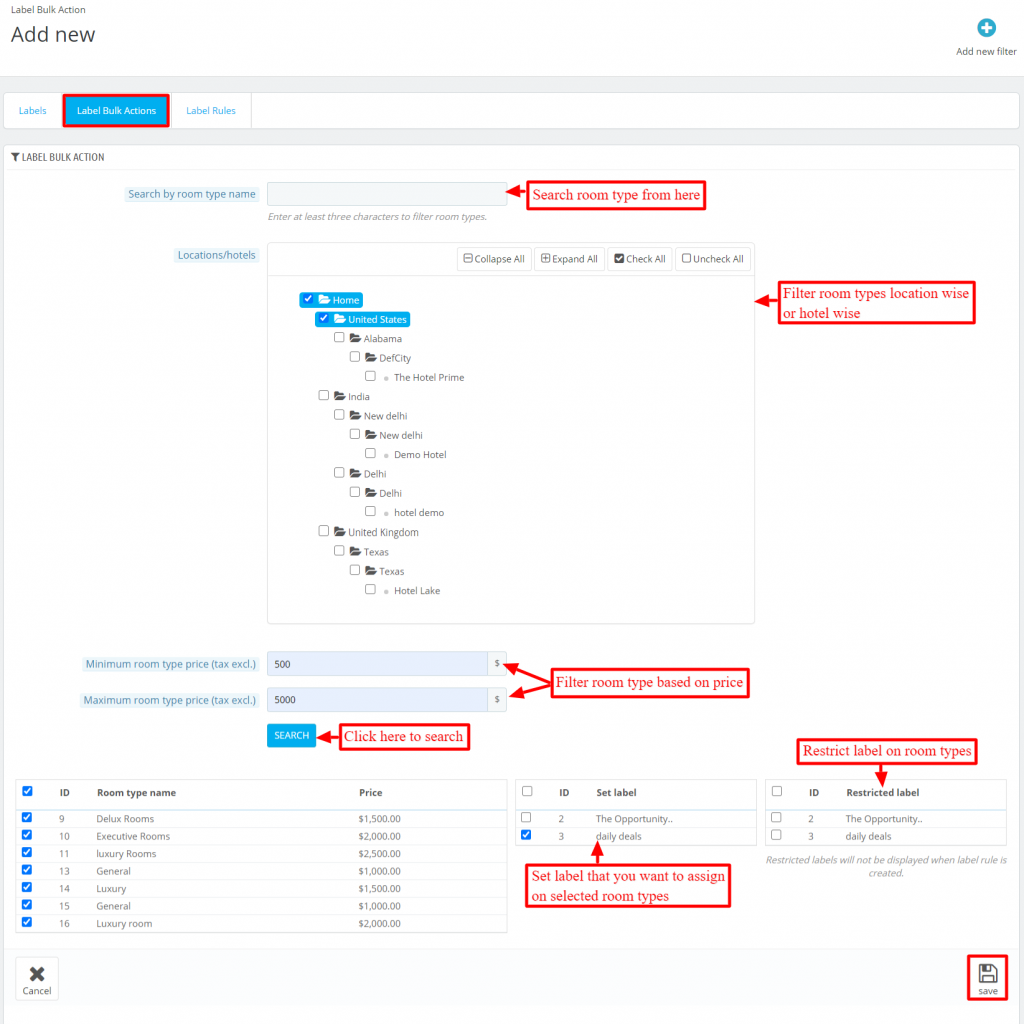
It consists of the following:
Search by room type name: Enter the room type name in which you want to apply the label.
Location/hotels: Filter room types location-wise or hotel-wise
Minimum room type price(tax excl.): Filter room type by entering the minimum price of the room. Tax is excluded.
Maximum room type price(tax excl.): Filter room type based on maximum price. Tax is excluded.
Search: Click on search to search room type based on selected criteria.
Room type name: In the checklist tick out all those room types you want to apply label.
Set label: From here set label you want to assign on filtered room type and location.
Restricted label: In this, you can restrict labels you do not want to assign on filtered room type and location.
Label Rules
Rules allow you to add labels to massive selections. You can add as many rules as you want to apply labels on multiple rooms and room types.
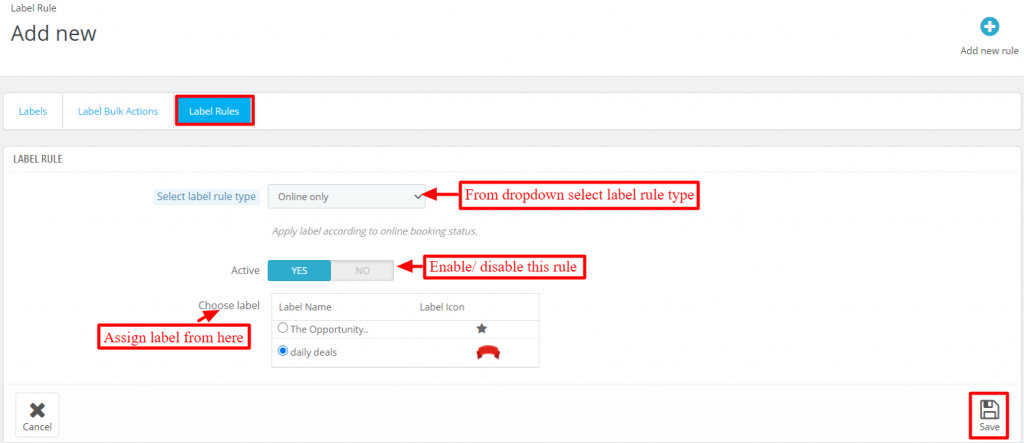
It consists of the following:
Select label rule type: From dropdown, select any one label rule type.
Active: Enable/ disable this rule from here.
Choose label: Check the checkbox against the label name which you want to choose.
Workflow
Back-end
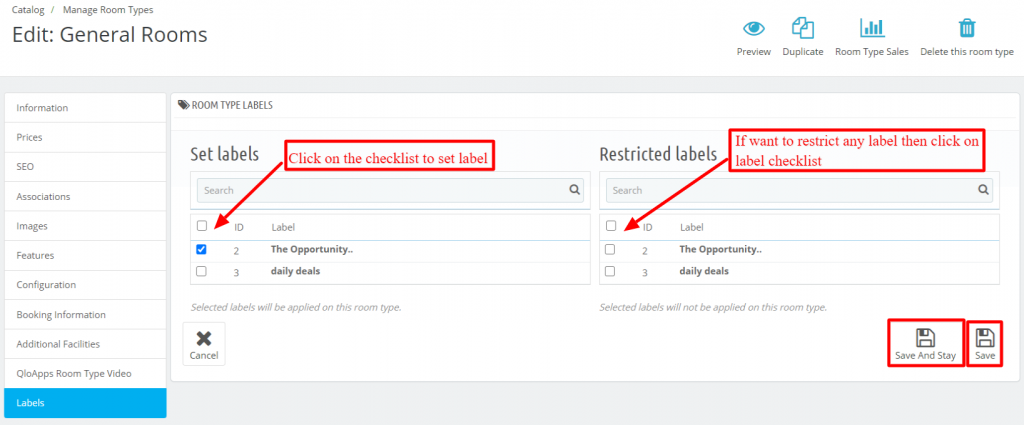
In the backend, the admin can also set a label. Go to Catalog–> Manage Room Type.
Click on edit of any room type you want to view details.
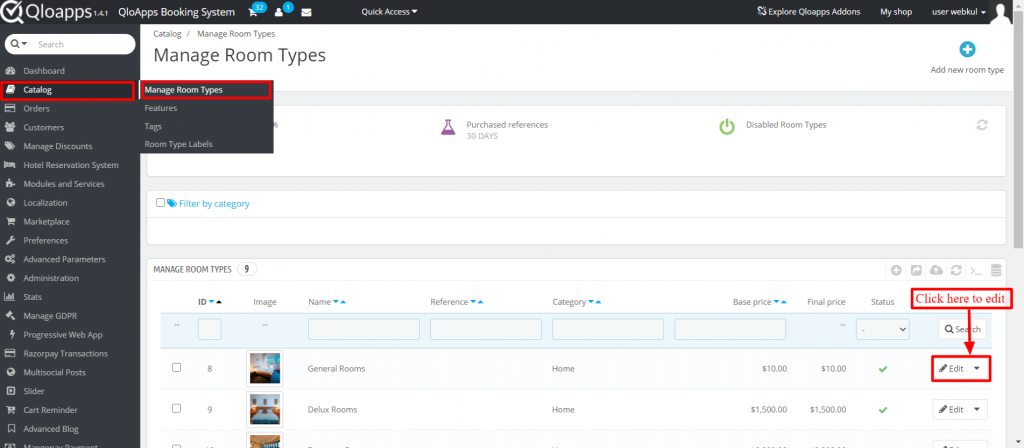
On the left-hand side at the bottom click on label.
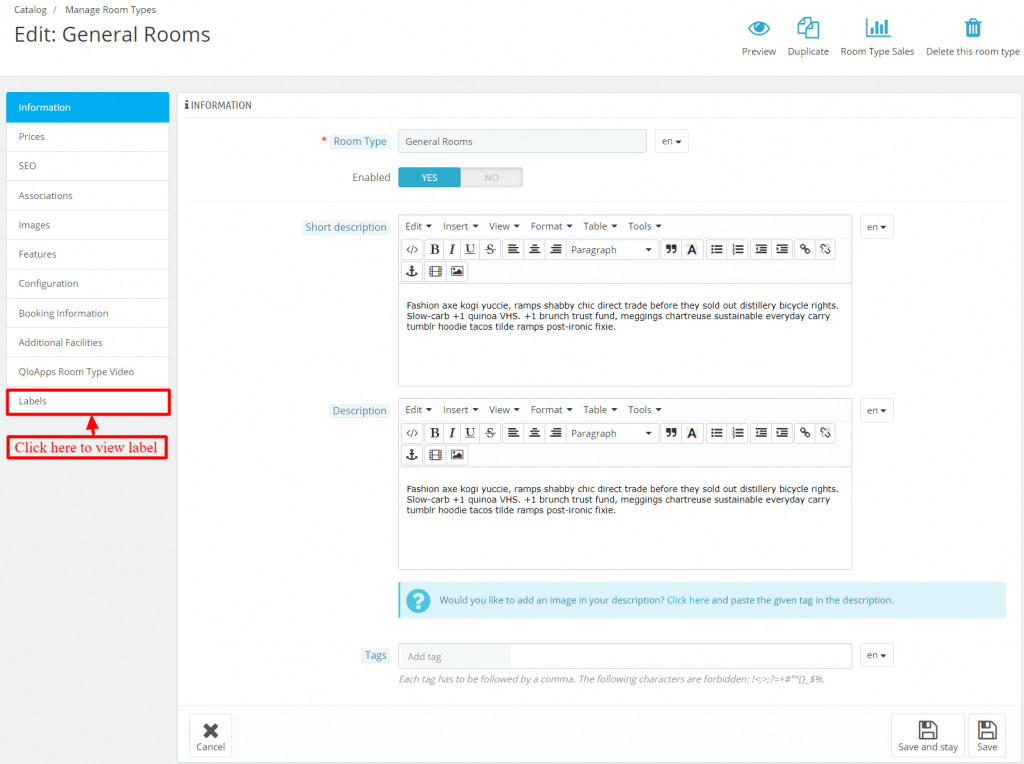
Click on check list to set or restrict label.
Front-end
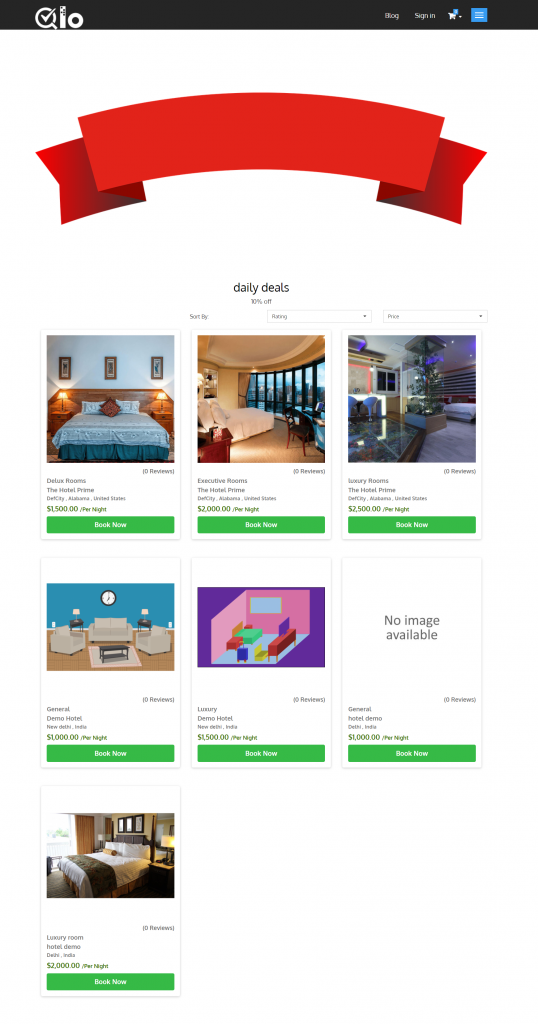
On the landing page view the label and banner.

After clicking on the banner, one can view room types listed on label.
You can view the label on the room type details page.
Conclusion
This was all from the QloApps Room Type Label. I hope I was able to clarify the functioning of the module to you.
If you want to learn about the functionality of QloApps then you can visit this link: QLO Reservation System – Free Open-Source Hotel Booking & Reservation System
In case of any query, issue, or requirement please feel free to raise it on QloApps Forum
Current Product Version – 4.0.0
Supported Framework Version- QloApps 1.7.x

Be the first to comment.