
The QloApps Redsys Payment Gateway module lets a hotelier take booking payments on the secure Redsys payment page. It covers card and Bizum payments, instant charges, pre-authorization holds, a transaction list in the Back Office, and full or partial refunds. You can buy the module on the Webkul store or try it in the live demo.
NOTE: You need a Redsys account from your bank before you start. Your bank gives you the account name, account code, terminal number and secret encryption key that the module asks for. The module shows its payment options only when the booking cart uses the Euro (EUR), so enable EUR in your hotel’s currency settings. To release unused card holds automatically, you also need to add one cron job on your server.
Features of QloApps Redsys Payment Gateway
- Send guests to the secure Redsys payment page to pay for a booking
- Offer card payments, Bizum payments, or both
- Test payments in Sandbox, then switch to Production for real payments
- Charge the full amount at once with instant payment
- Hold the amount on the guest’s card with pre-authorization, then charge it later or cancel it from the order page
- Release unused card holds automatically after 1 to 7 days with a cron job
- Set the payment title that guests see at checkout, in every language
- Review every Redsys payment in one list with its status, guest, order and amounts
- Refund a payment in full or in part, with a remark
How to Install QloApps Redsys Payment Gateway
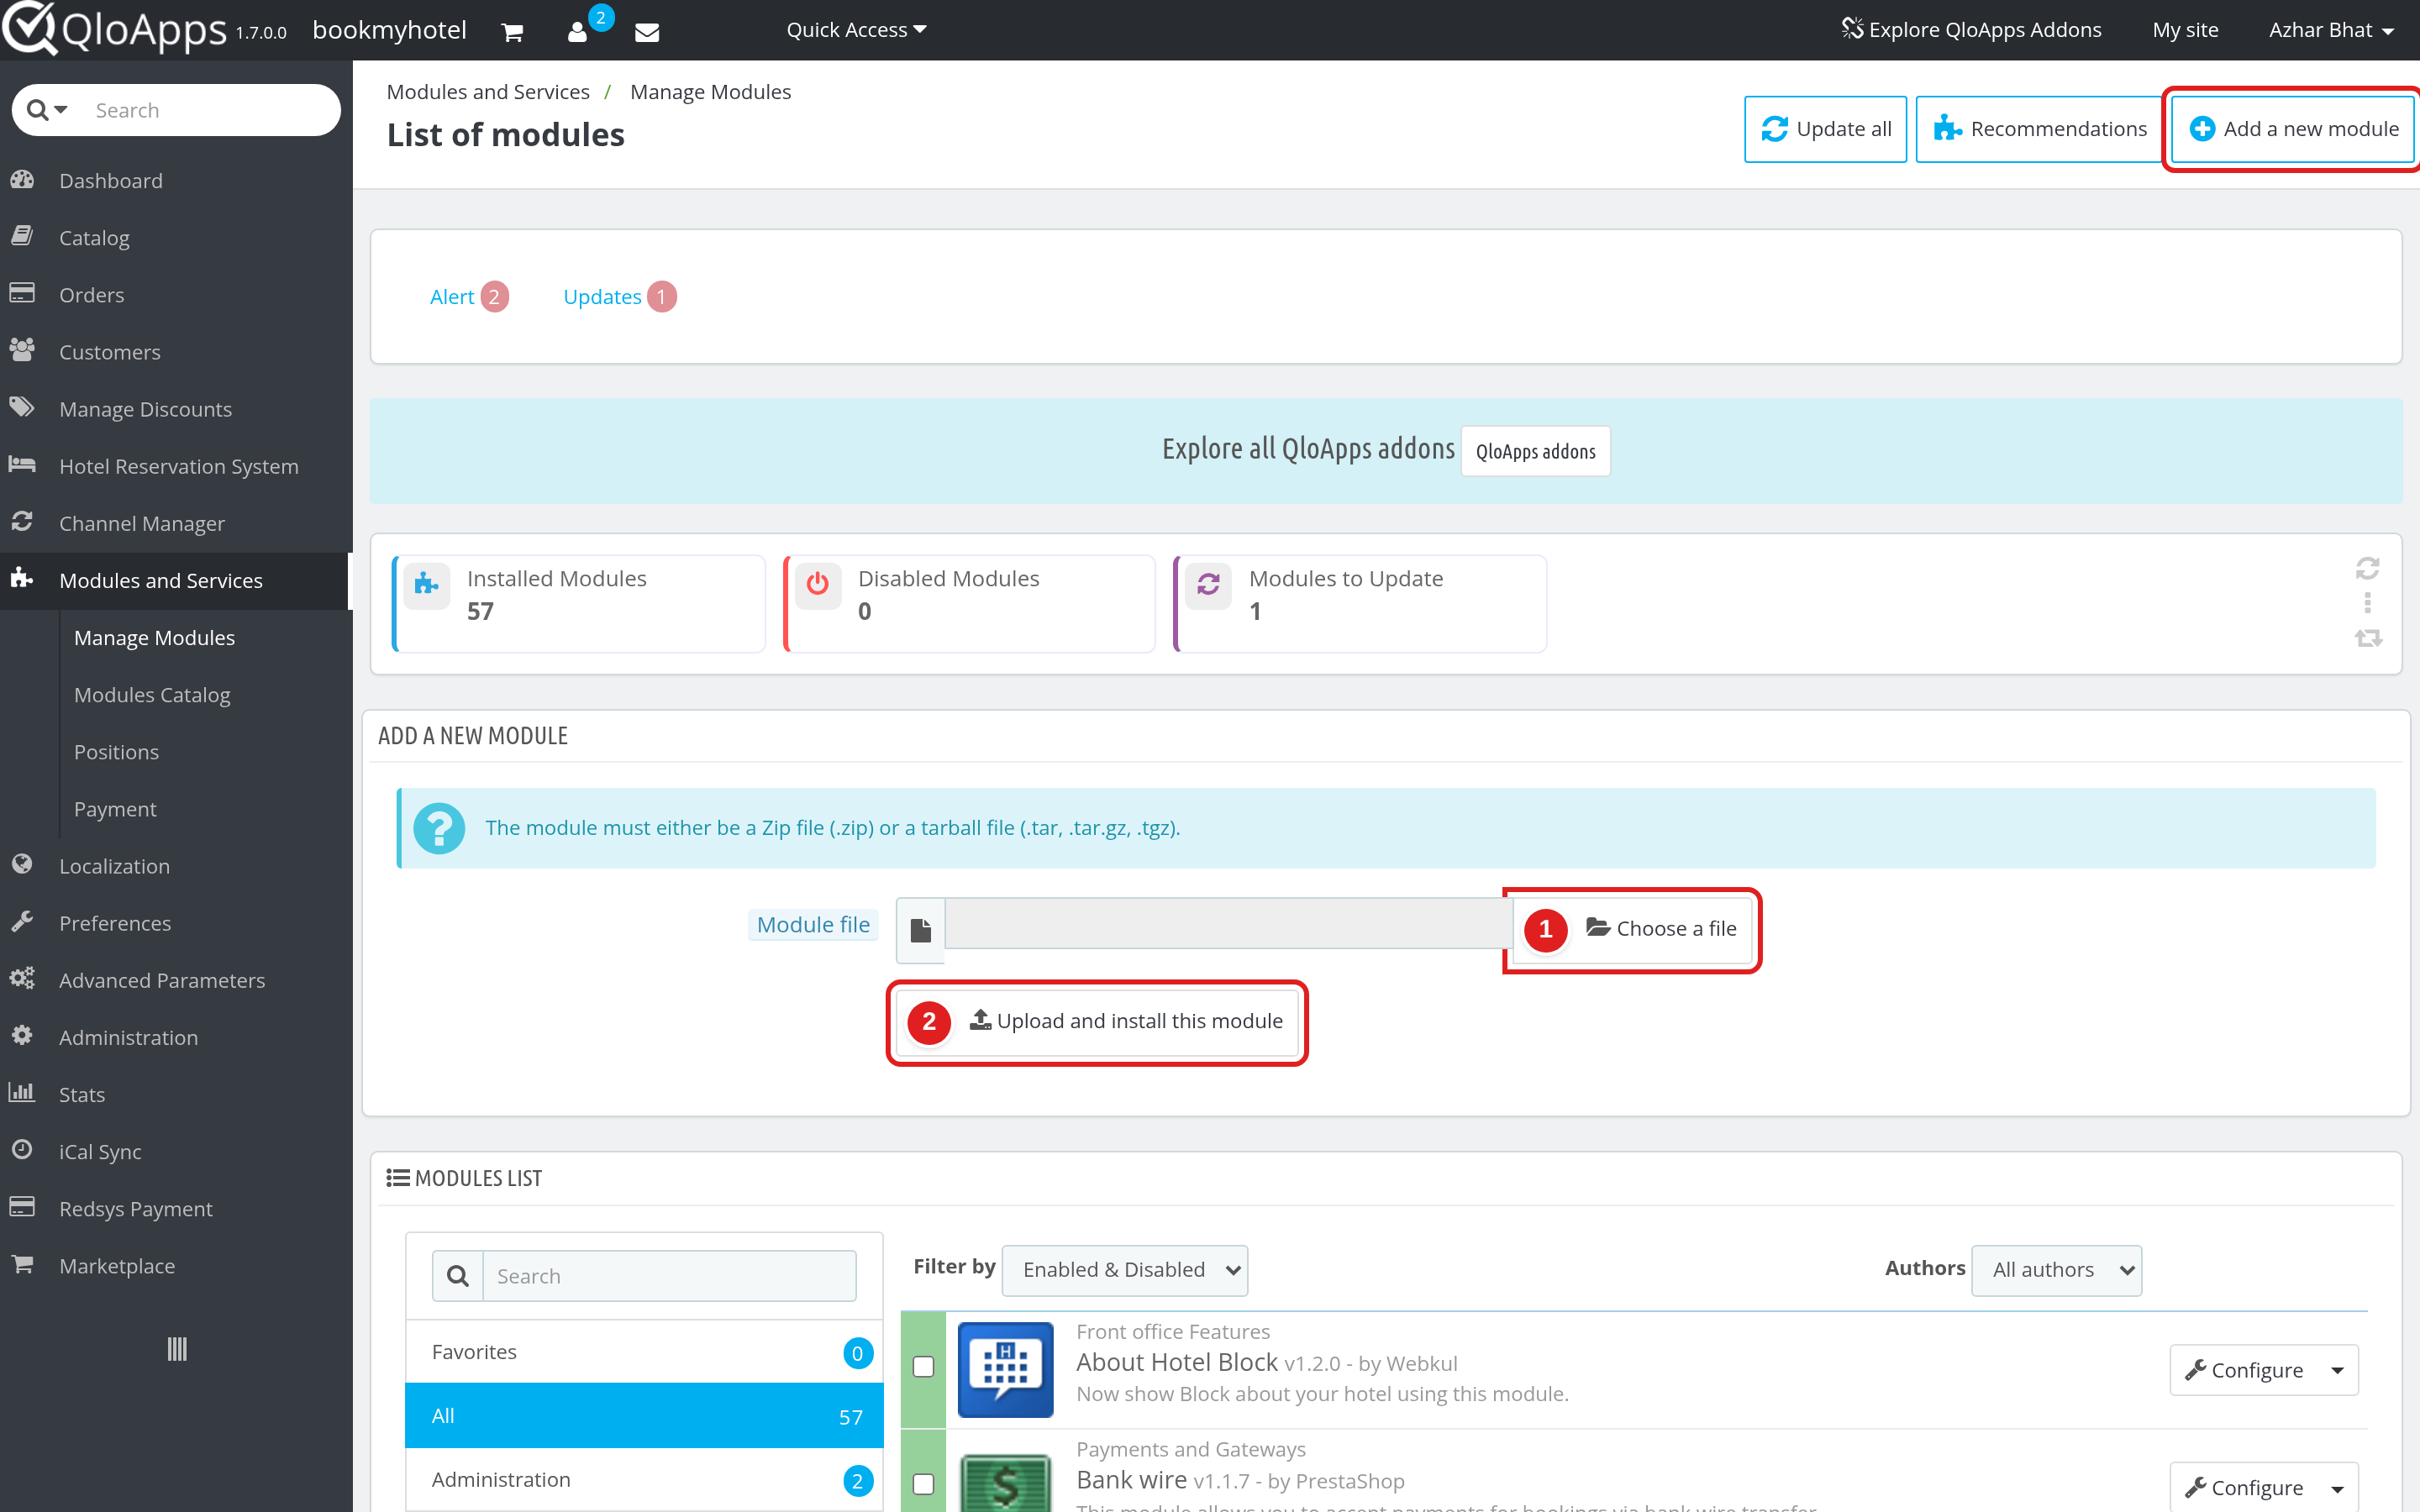
- In the Back Office go to Modules and Services › Manage Modules and click Add a new module.
- Click Choose a file and select the module ZIP file.
- Click Upload and install this module. QloApps uploads the module and installs it.
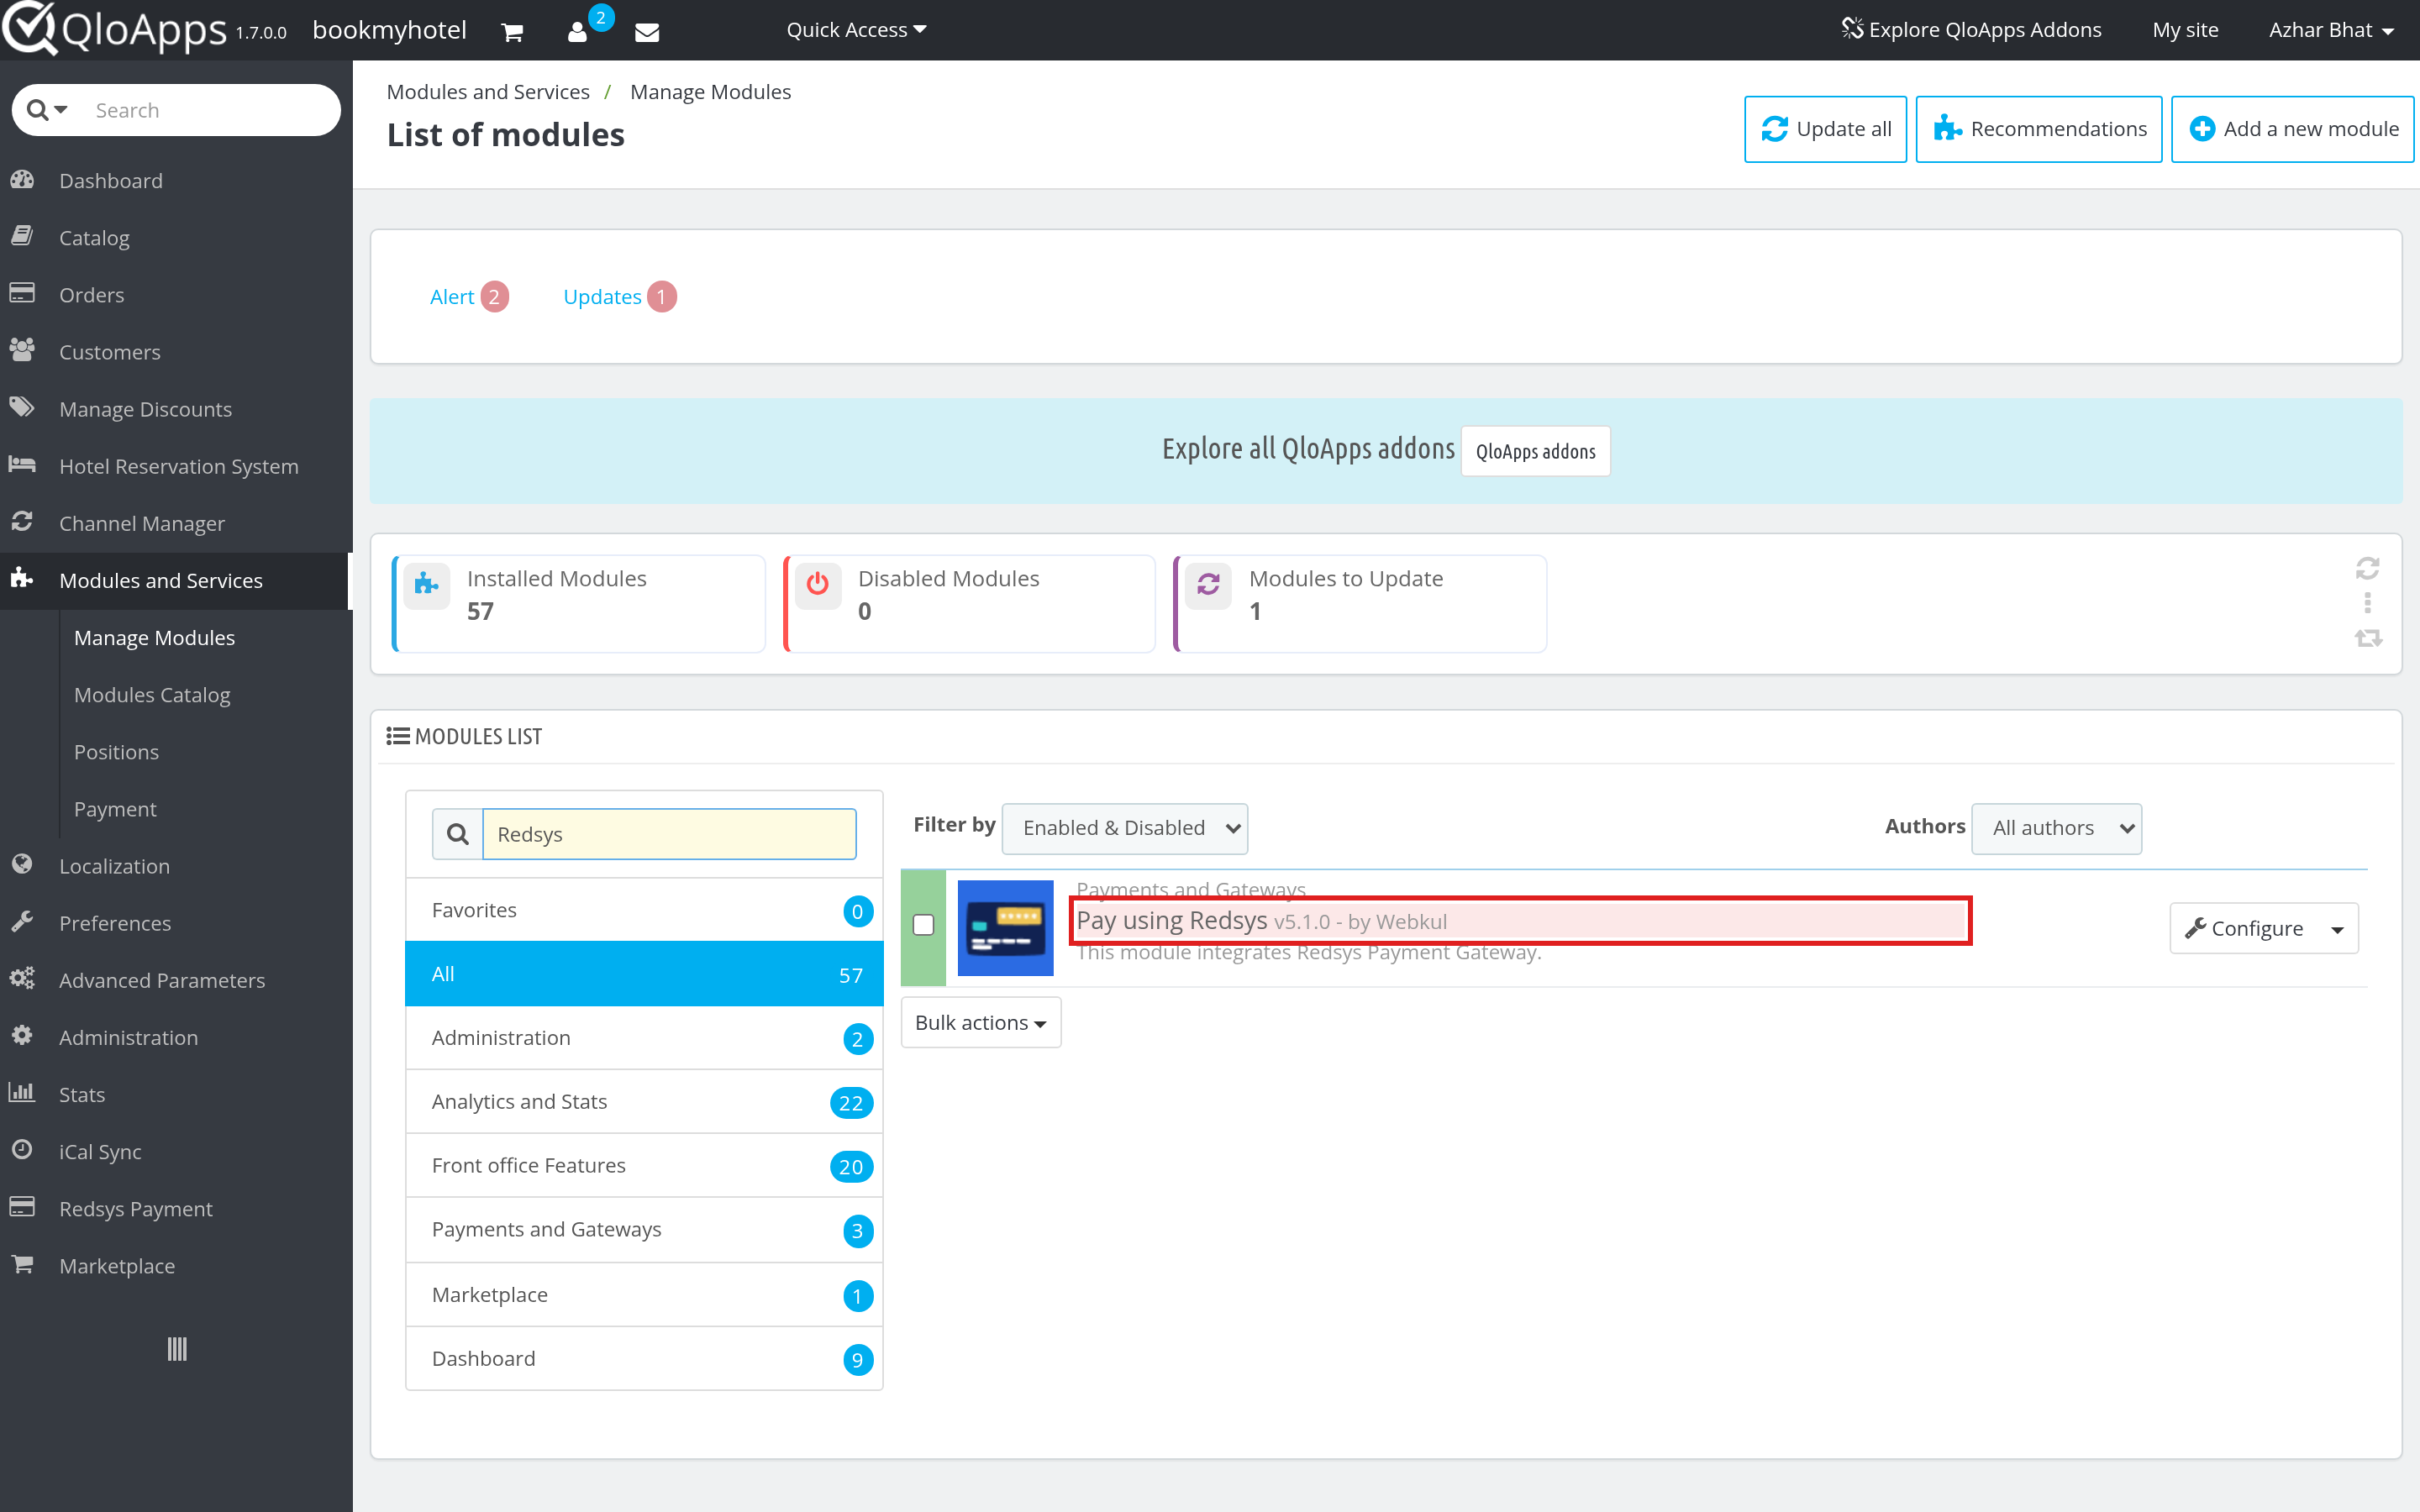
When the install finishes, type Redsys in the module search box. The module appears in the list as Pay using Redsys with a Configure button.
The install also adds a Redsys Payment menu to the Back Office. It holds two pages: Redsys Transactions and Redsys Configuration.
Configuration of QloApps Redsys Payment Gateway
Open Modules and Services › Manage Modules and click Configure next to Pay using Redsys. You can also click Redsys Payment › Redsys Configuration. The page has three panels.
Payment Configuration
This panel connects QloApps to your Redsys account. Every field with a red star is required. Also, the numbers below match the numbers on the screenshot.
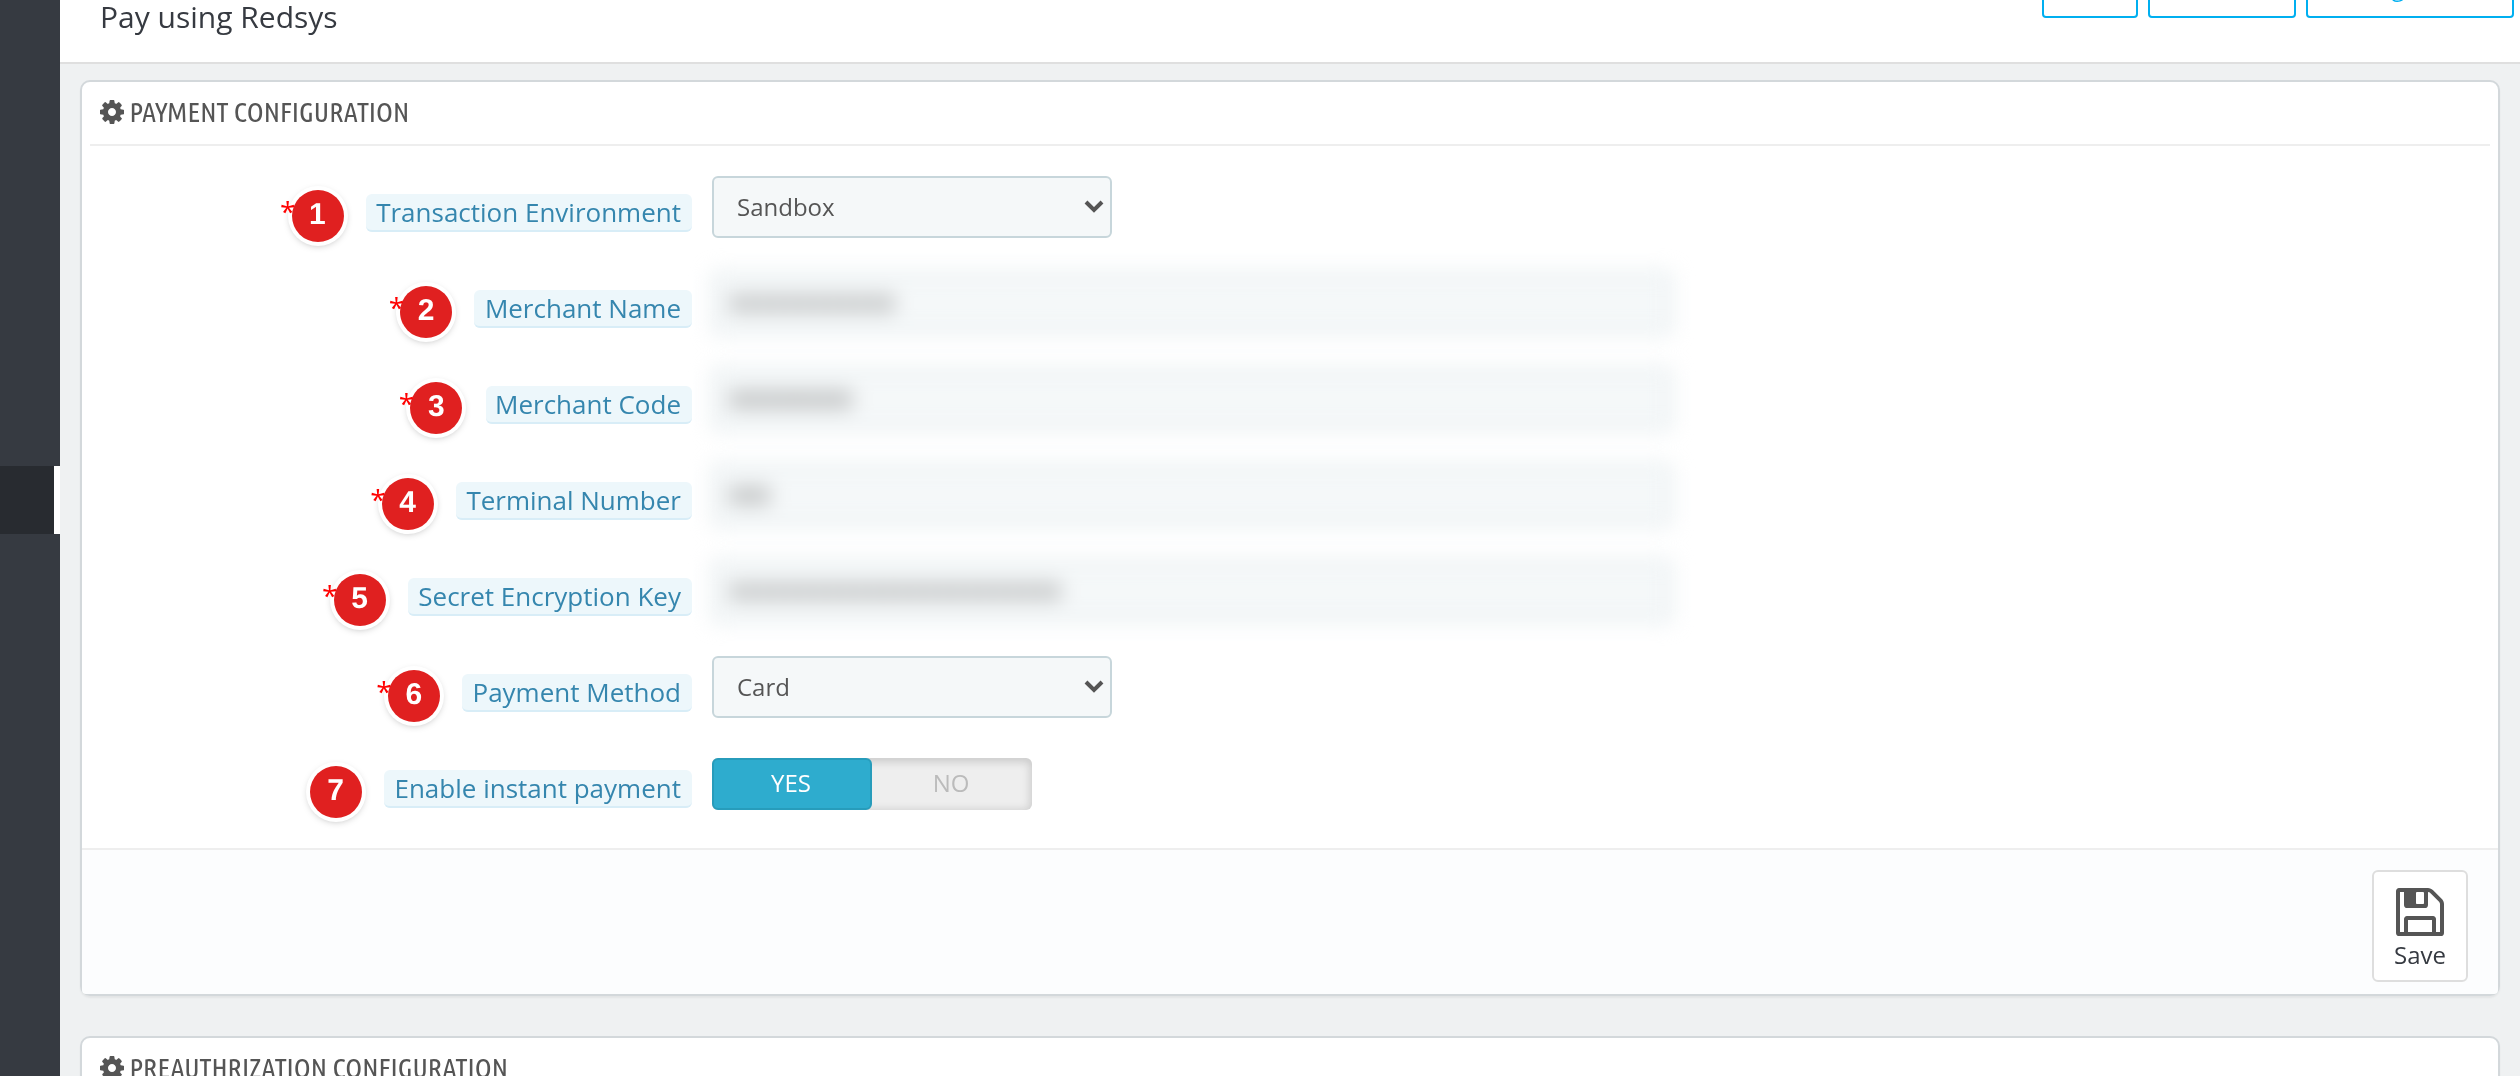
- Transaction Environment – choose Sandbox to test with practice payments or Production to take real payments. Only Production gives you real transactions. The default is Sandbox.
- The account name field – enter the name of your Redsys account.
- The account code field – enter the code of your Redsys account.
- Terminal Number – enter the number your bank gave you. It must be numeric.
- Secret Encryption Key – enter the secret key of your Redsys account. Keep it private.
- Payment Method – choose Card, Bizum, or Both. The default is Card. Ask your bank to activate Bizum on your Redsys account before you offer it.
- Enable instant payment – set to Yes to show a Pay by Redsys option at checkout that charges the guest at once. The default is No.
Click Save. However, if the account code, terminal number or secret key is empty, QloApps shows a warning at the top of the page.
Pre-authorization Configuration
Pre-authorization places a hold on the guest’s card instead of charging it. Therefore, this suits a hotel that wants to collect the money later, for example at check-in.
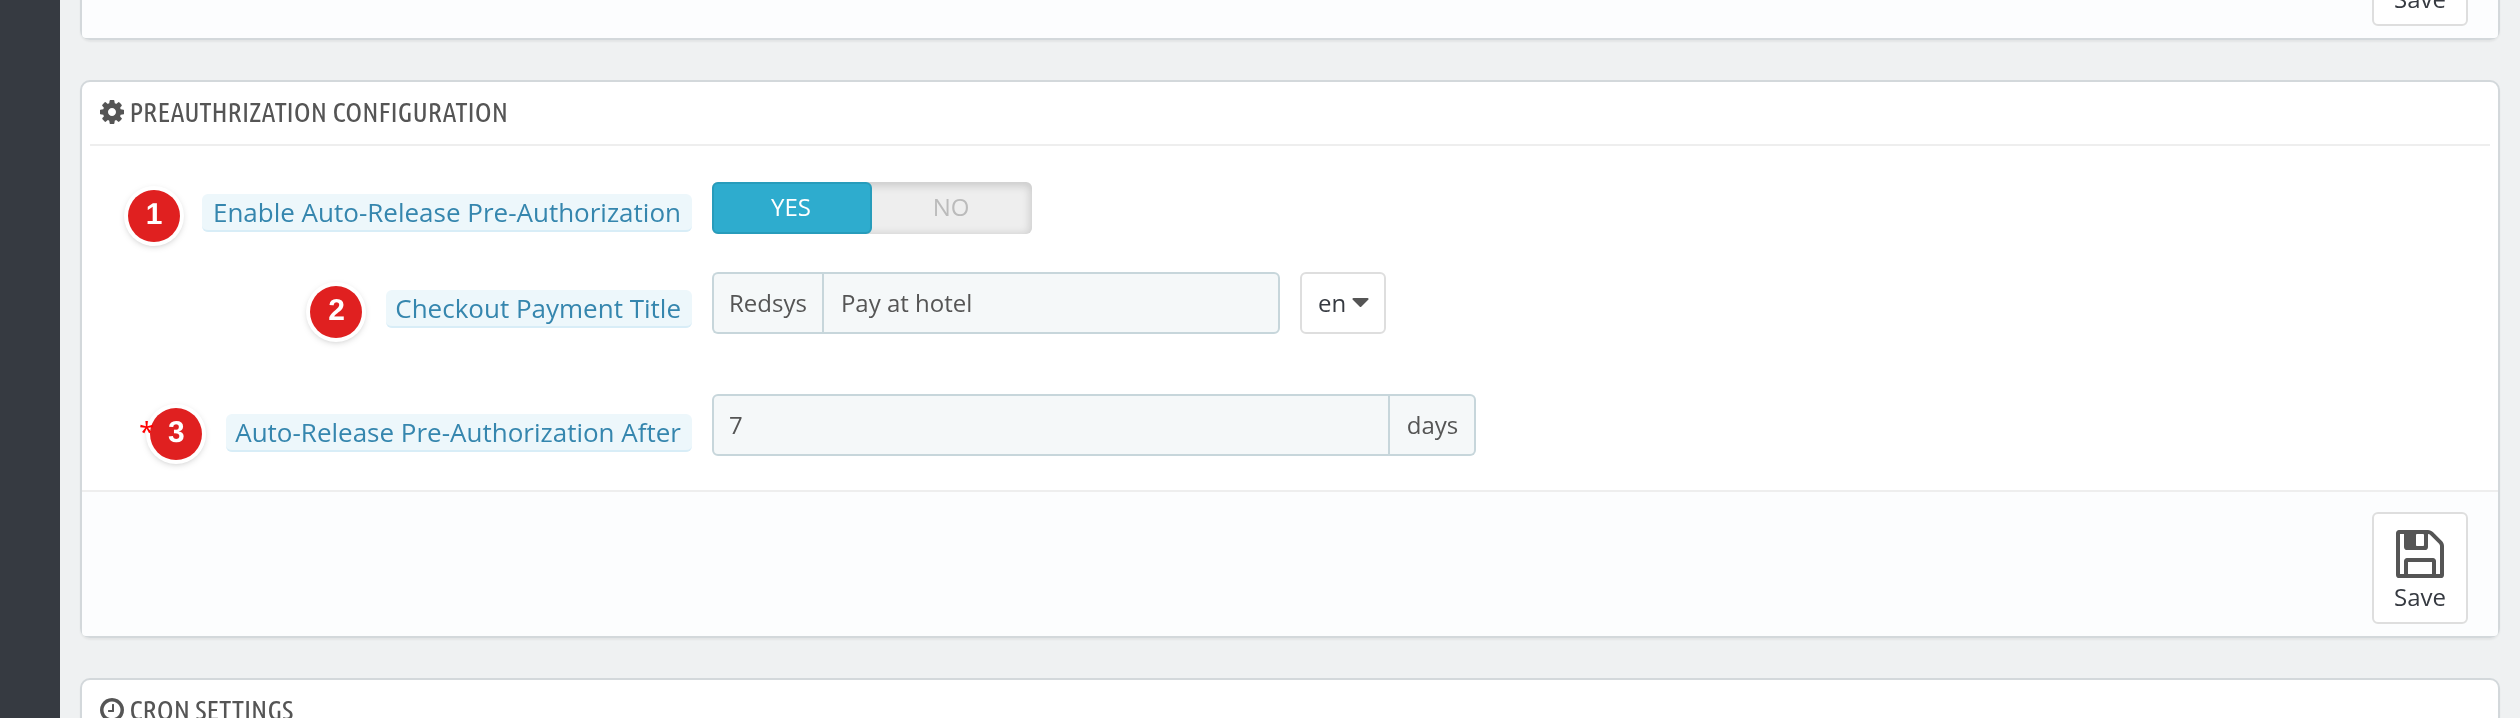
- Enable Auto-Release Pre-Authorization – set to Yes to offer the pre-authorization option at checkout and to release old holds automatically. The default is No.
- Checkout Payment Title – enter the title that guests see next to the Redsys option at checkout. You can enter it in each language. Enter it in at least one language.
- Auto-Release Pre-Authorization After – enter the number of days, from 1 to 7, after which QloApps releases a hold that nobody charged.
Click Save in this panel to keep your changes.
Cron Settings
QloApps releases old holds with a cron job, so the Cron settings panel shows the exact line to add to your server’s cron task manager. The job runs every day at 1:00 AM.

The line ends with a secret token that is unique to your hotel website. So copy the line from your own Back Office and do not share it.
Redsys Setup
You do not create anything on the Redsys website for this module. You need four values from your bank before you configure it: the account name, the account code, the terminal number and the secret encryption key. Use your bank’s test values with Sandbox first. Then, when your payments work, switch Transaction Environment to Production and enter the live values.
Guest Payment at Checkout
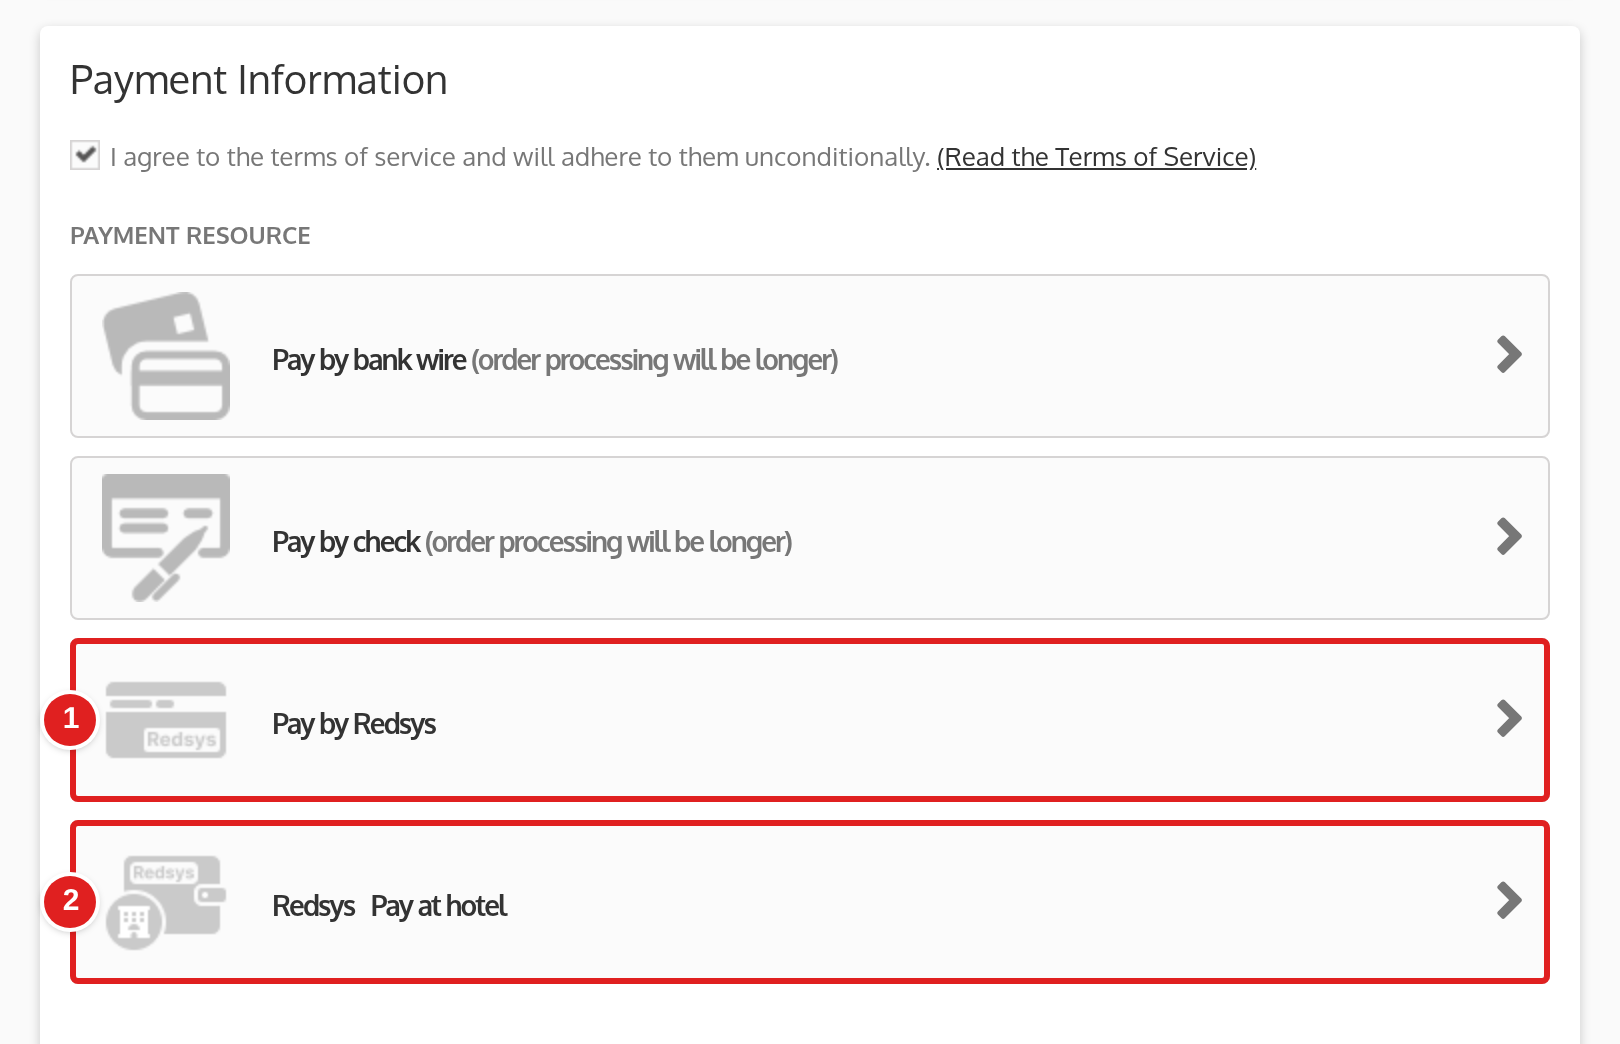
On the payment step of the booking process, the guest ticks the terms of service and sees the payment options. The Redsys options appear below the other payment methods:
- Pay by Redsys appears when Enable instant payment is Yes. The guest pays the full amount at once.
- An option named Redsys followed by your Checkout Payment Title appears when Enable Auto-Release Pre-Authorization is Yes. In this example the title is “Pay at hotel”, and the guest’s card is held instead of charged.
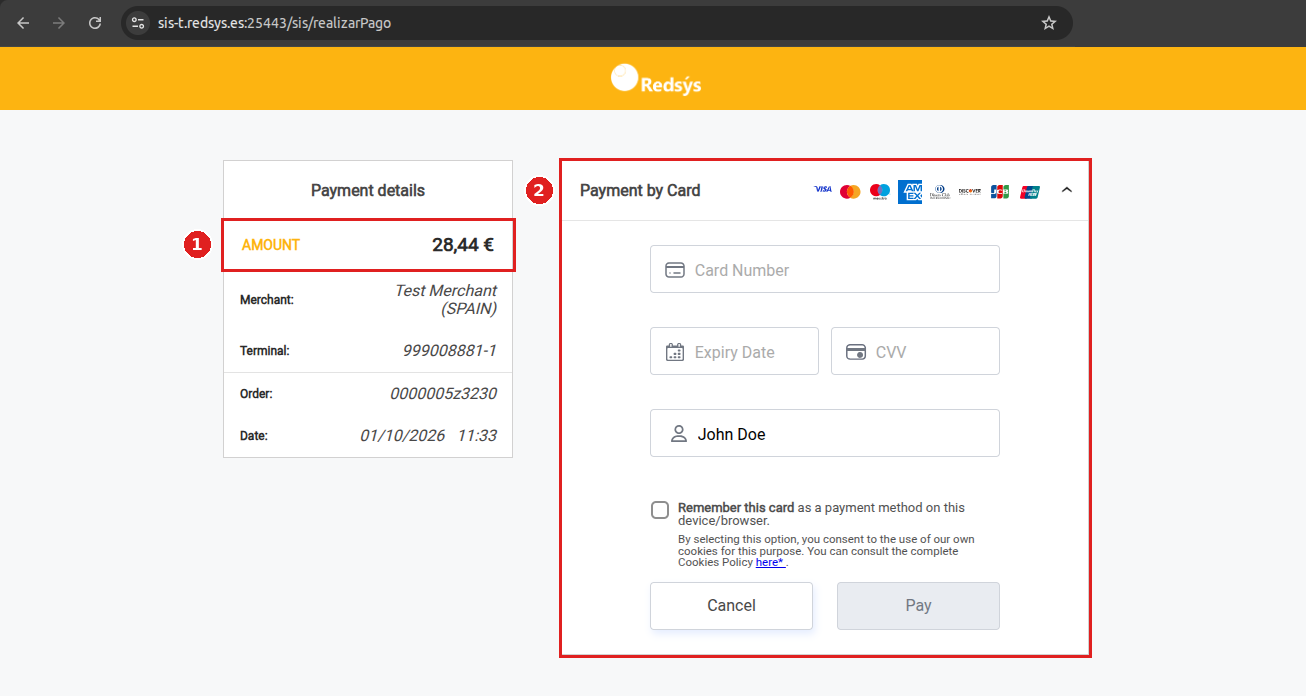
The guest picks one and goes to the secure Redsys payment page to pay by card or Bizum. In Sandbox, the page address starts with sis-t.redsys.es. In Production, it starts with sis.redsys.es. The page shows the payment details (1): the amount, your account name, the terminal number, the order number and the date. Below them, the guest enters the card details (2) and clicks Pay.
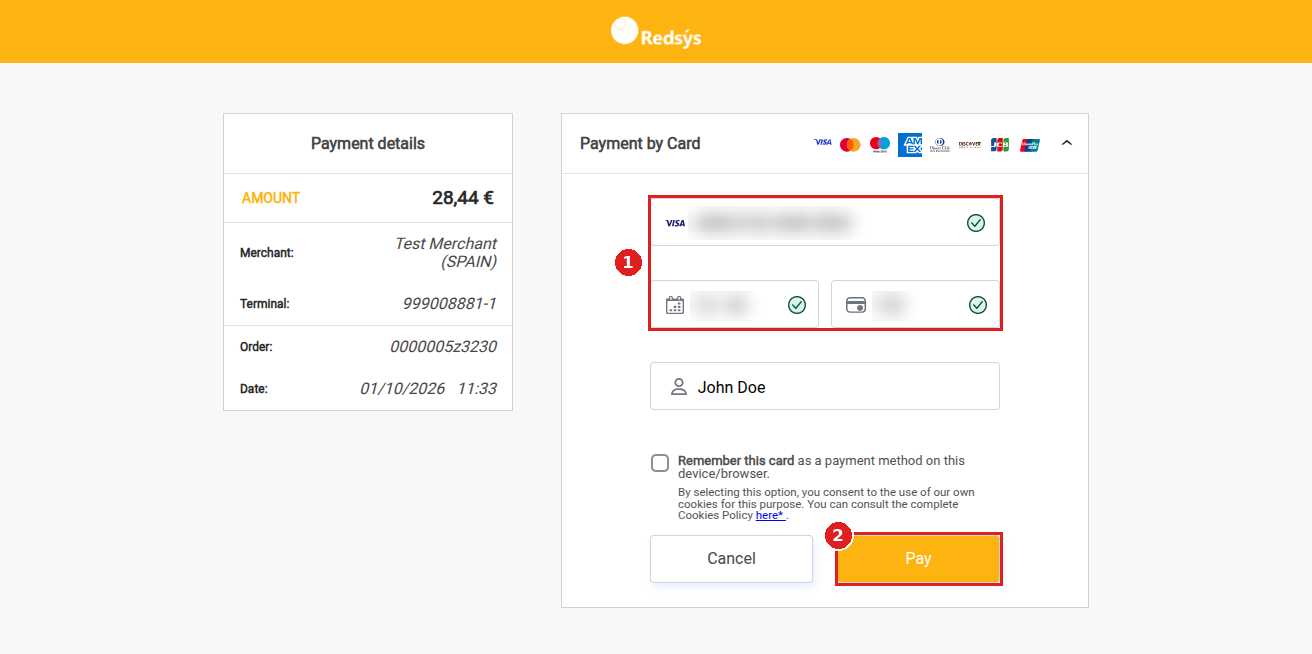
Next, the guest types the card details (1) and clicks Pay (2). Use the test card details from your bank or from Redsys when you test in Sandbox.
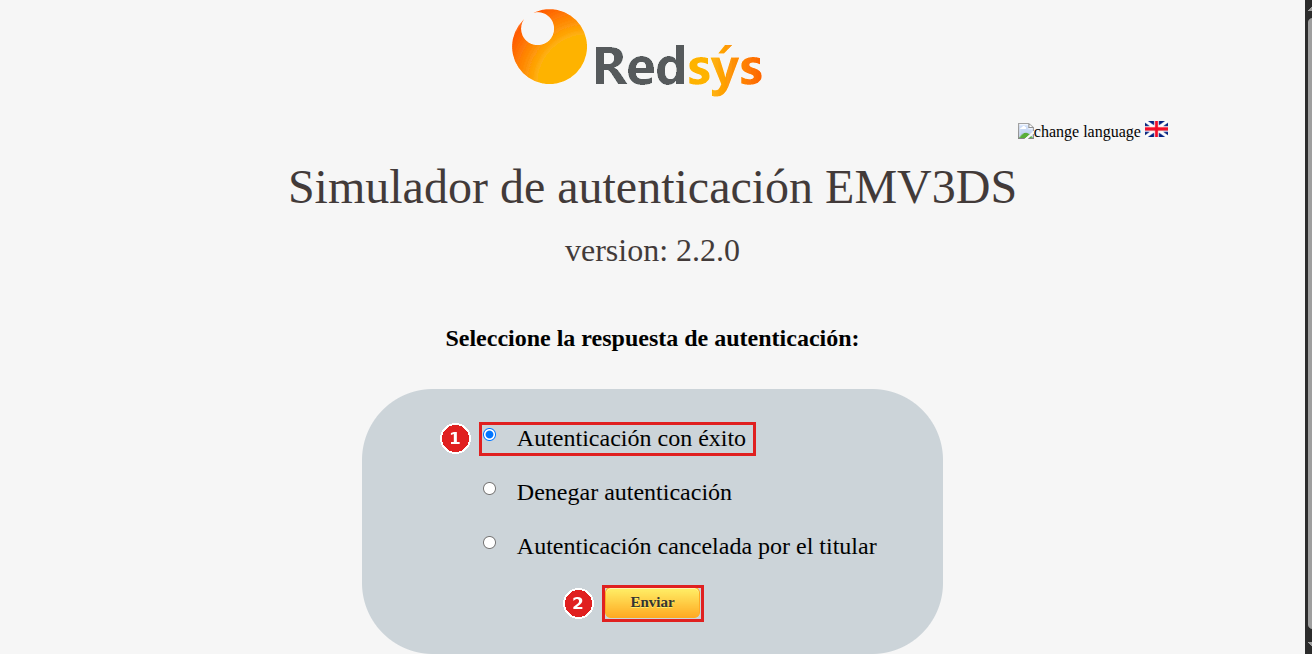
In Sandbox, Redsys then shows an authentication simulator. Choose Autenticación con éxito (authentication successful) (1) to approve the test payment, then click Enviar (submit) (2). The other two options, Denegar autenticación and Autenticación cancelada por el titular, let you test a denied authentication and one that the cardholder cancels.
When the payment goes through, Redsys shows AUTHORIZED OPERATION WITH CODE (1) and the authorization code. Click Continue (2) to return to your booking website.
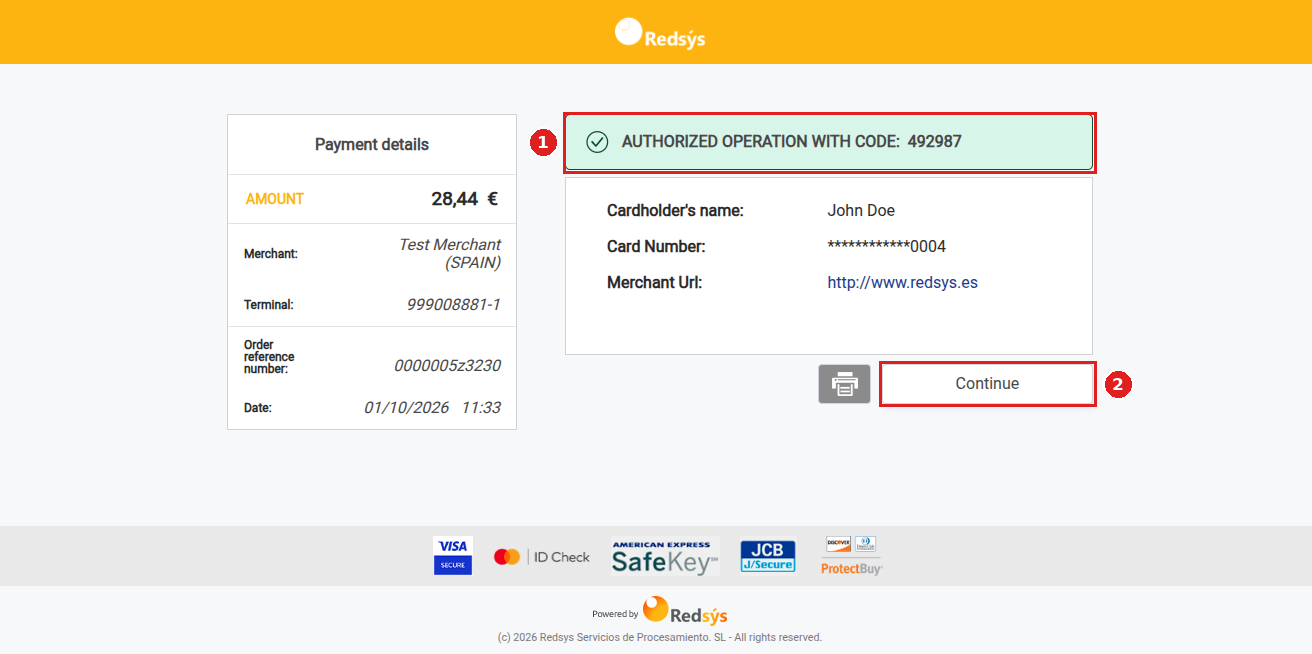
After the payment, the guest returns to your booking website and sees the order confirmation. However, if the payment fails, the guest sees the message “Payment Failed. Please try again or try another payment method.” If Redsys is still working on the payment, the confirmation page asks the guest to check again after about 10 minutes.
QloApps shows the Redsys options only when the booking cart uses the Euro (EUR) and the currency is enabled for this module. Therefore, a cart in any other currency, such as INR, does not show them.
Review Redsys Transactions
Open Redsys Payment › Redsys Transactions to see every Redsys payment in one list. The list below shows two payments. For example, the first guest used pre-authorization. In contrast, the second guest paid with instant payment.
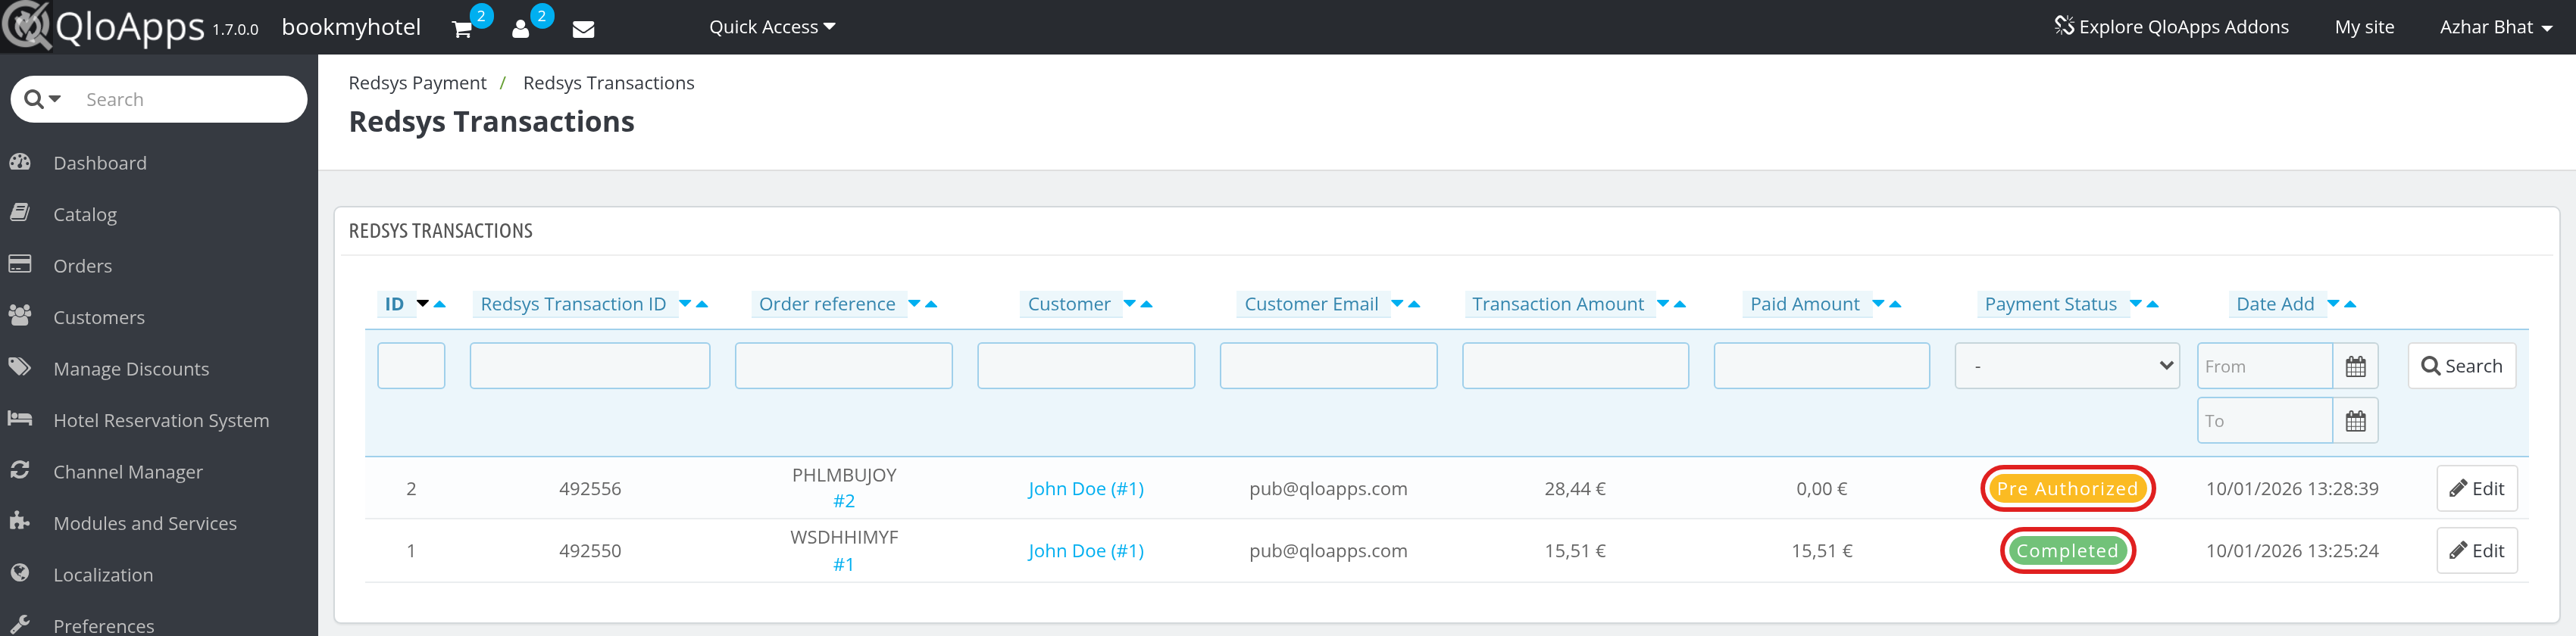
The list has these columns:
- ID – the record number in QloApps
- Redsys Transaction ID – the transaction number from Redsys
- Order reference – the booking order, with a link to open it
- Customer and Customer Email – the guest who paid, with a link to the guest profile
- Transaction Amount – the amount of the payment or hold
- Paid Amount – the amount actually charged. A pre-authorized payment shows 0,00 € until you charge it.
- Payment Status – Completed, Pre Authorized, Payment Failed or Payment Cancelled
- Date Add – the date and time of the payment
Use the filter row under the column titles to find a payment. Then click Edit at the end of a row to open the Transaction details.
Charge or Cancel a Pre-authorization
When a guest paid with pre-authorization, the Redsys Payment panel on the booking order page shows the hold. Open the order from Orders › Orders or from the order link in the transaction list. The panel lists the transaction ID, the PreAuthorized Amount, the Charged Amount and the Payment Status. It also gives you two buttons:
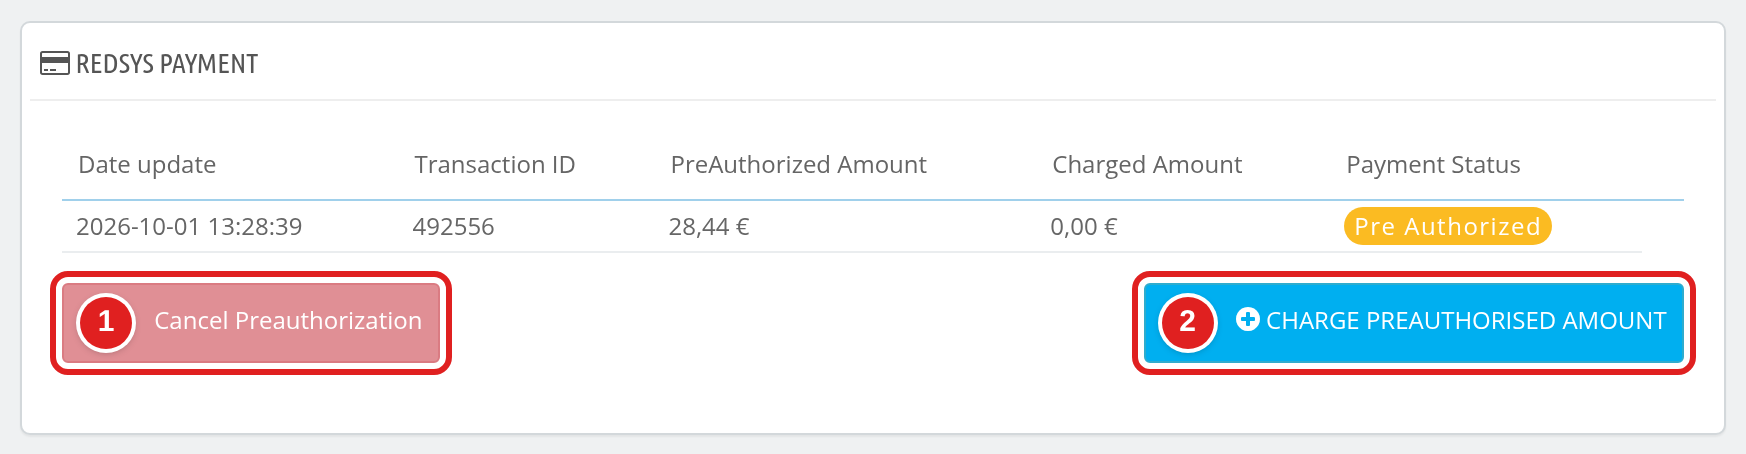
- Cancel Preauthorization – release the hold without charging the guest. QloApps asks you to confirm.
- Charge PreAuthorised amount – take the money from the guest’s card.
When you click Charge PreAuthorised amount, a Charge amount window opens. It shows the pre-authorized amount and an Amount to charge field that already holds the full amount.
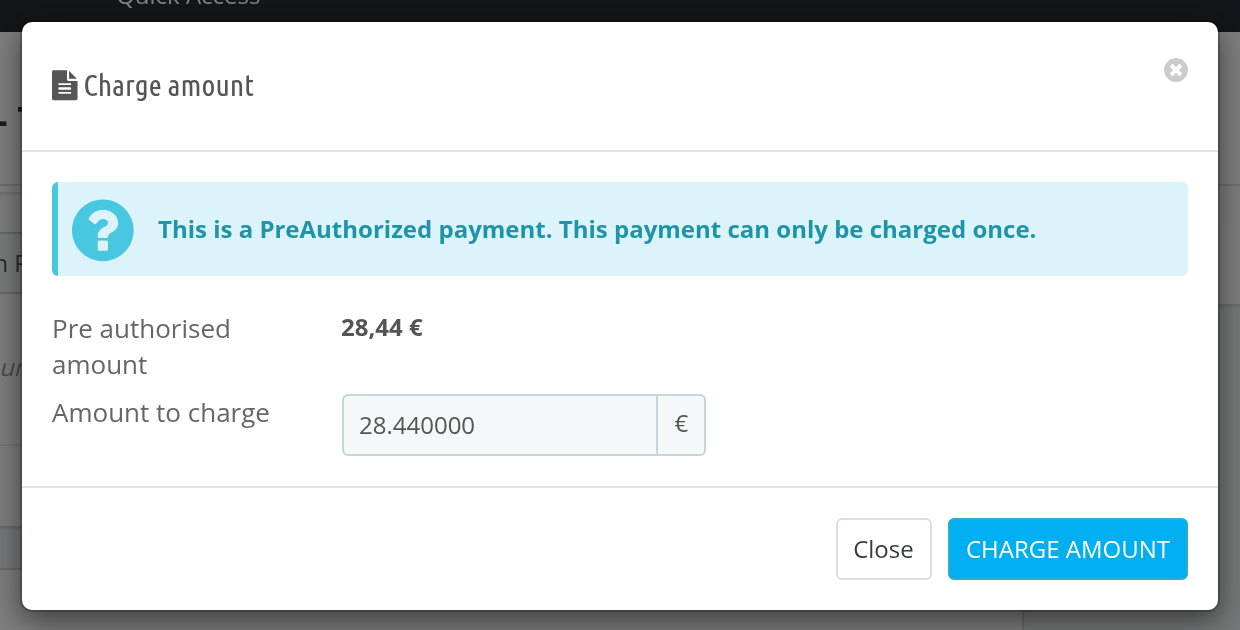
Next, check the amount, click Charge amount, and confirm. You can charge a pre-authorization only once, so enter the final amount. If you do nothing, QloApps releases the hold after the number of days you set in Auto-Release Pre-Authorization After. This needs the cron job from the Cron Settings panel.
Refund a Redsys Payment
Open a completed payment with Edit in Redsys Payment › Redsys Transactions. The Transaction details page shows the transaction ID, the amounts, the guest and the payment status. While part of the payment is still refundable, a Refund Transaction panel appears under these details. It shows the Total refunded amount and the Total available amount to refund.
- Under Choose Refund Type, select Full Refund or Partial Refund.
- For a partial refund, enter the amount under Enter Refund Amount.
- Enter a Refund Remark and click Refund.
Also, a refund can never be more than the amount that is left to refund.
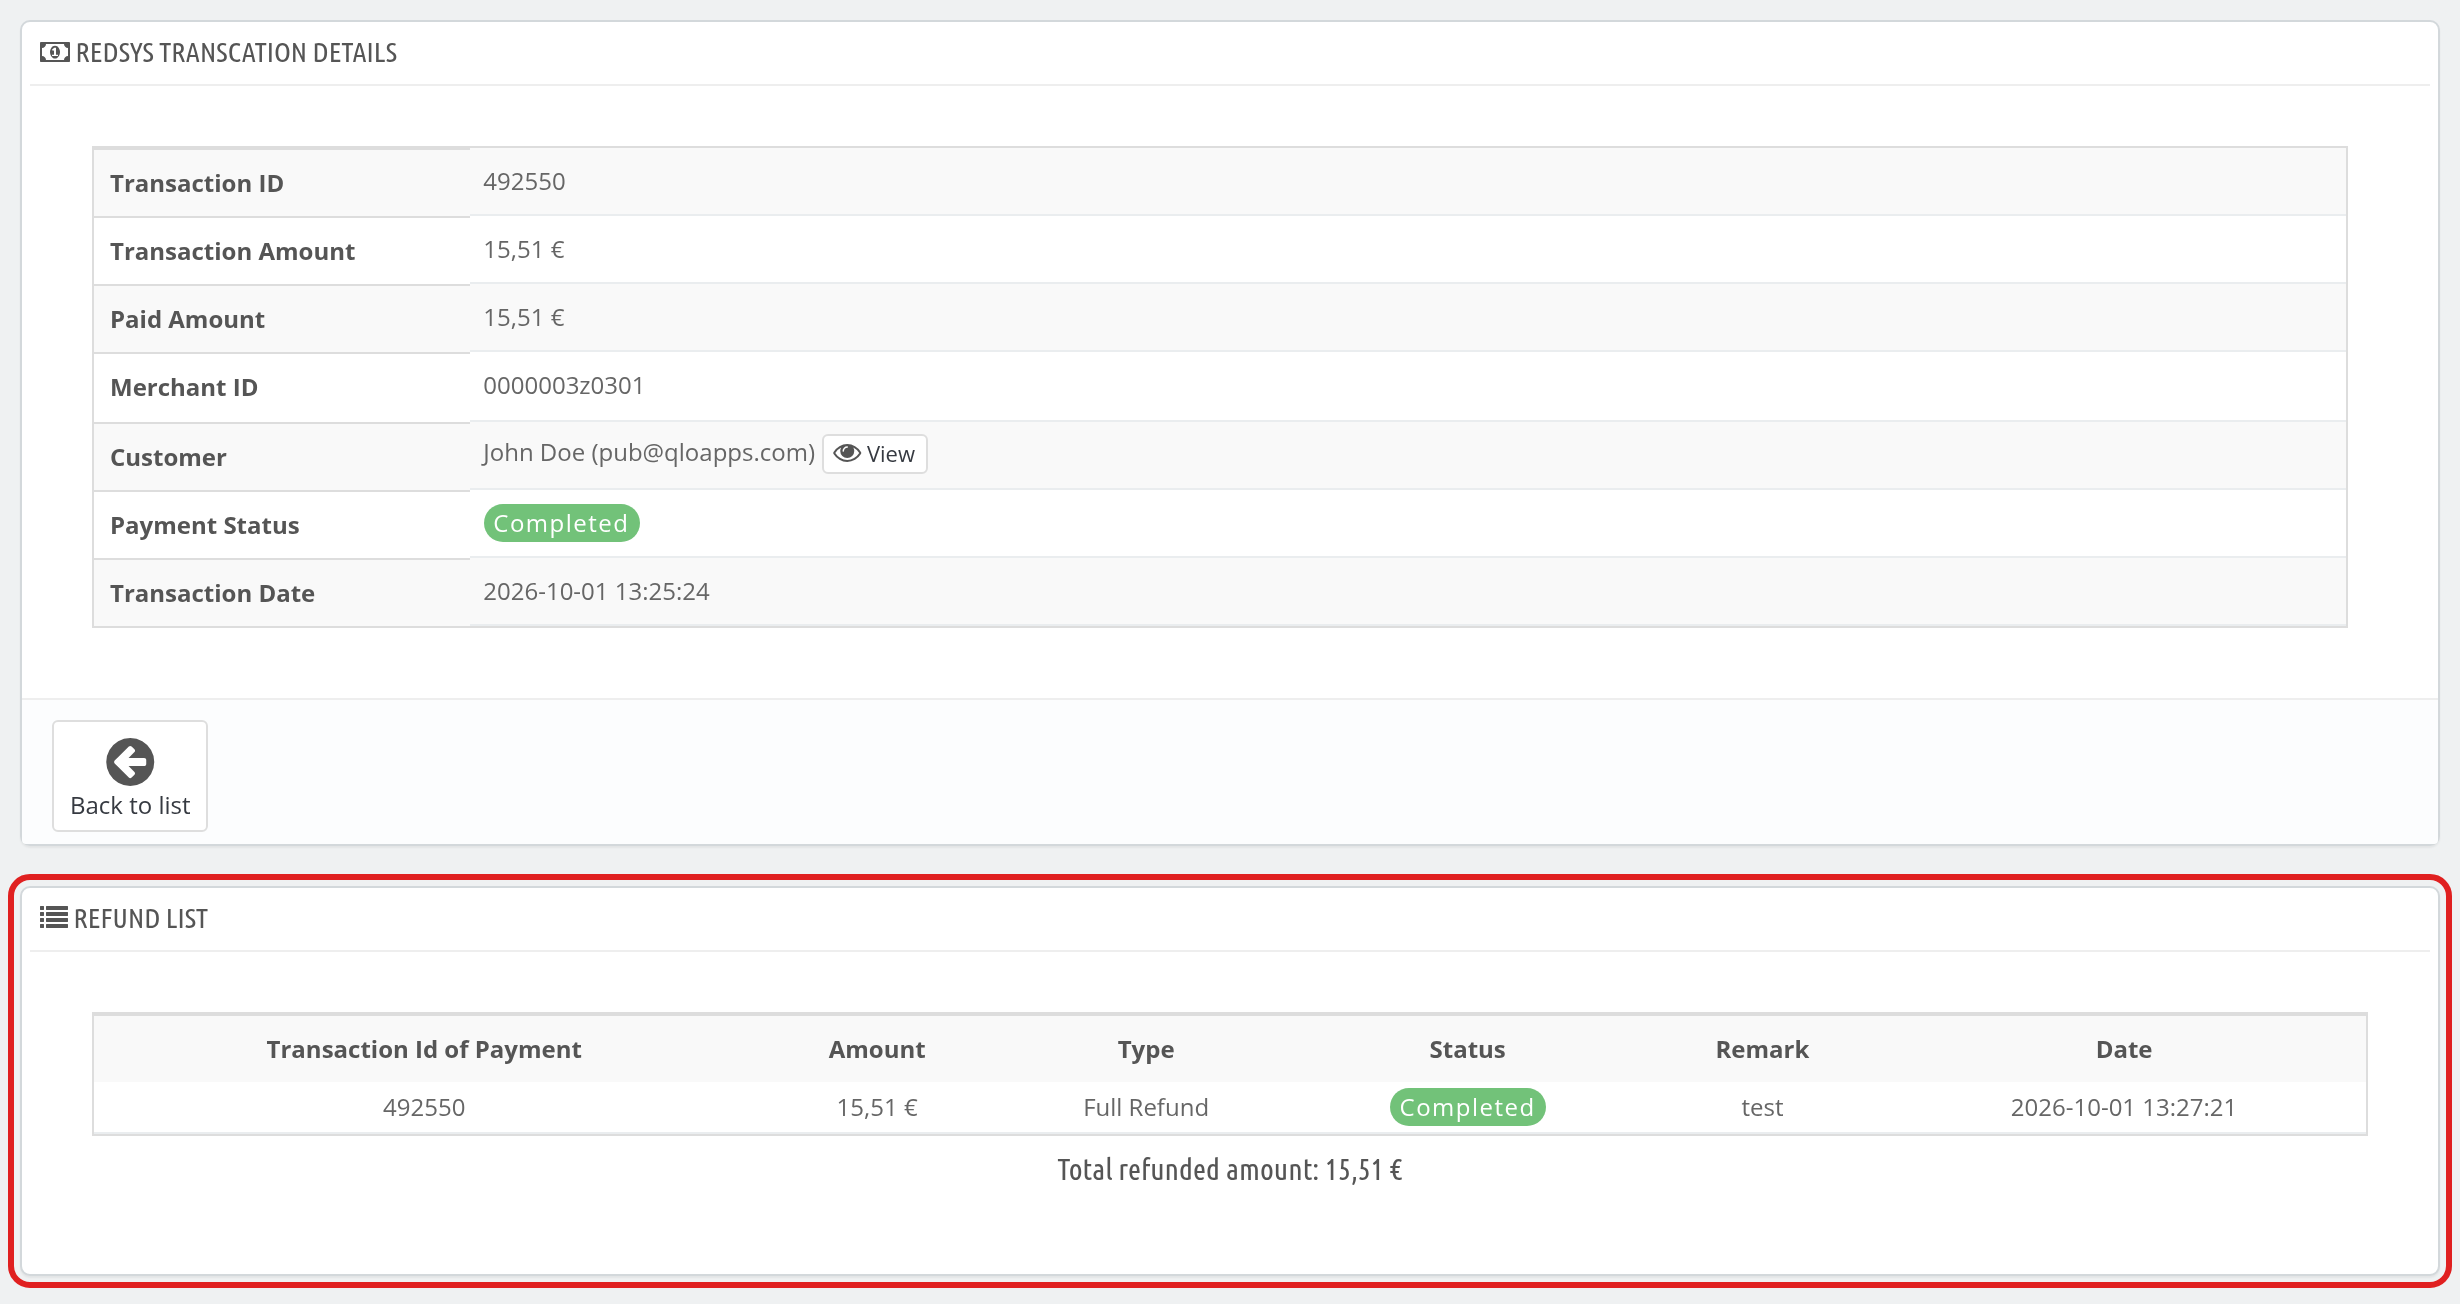
Finally, QloApps records every refund in the Refund List at the bottom of the page. It shows the refund type, its status, your remark, the date and the Total refunded amount. In the example above, the guest got a full refund, so the Refund Transaction panel no longer appears.
Conclusion
The QloApps Redsys Payment Gateway module lets a hotel take card and Bizum payments on the secure Redsys page, charge at once or hold the amount first, and refund guests from the Back Office. This guide covered the install, the three configuration panels, the guest checkout, the transaction list, pre-authorization charges and cancellations, and refunds. Finally, we hope this guide has helped you configure and use QloApps Redsys Payment Gateway with confidence.
Additionally, to learn more about the functionality of QloApps, you can visit this link: All-in-One Property Management System. For technical assistance, raise a ticket at QloApps Support. In case of any query, issue, or requirement, please feel free to raise it on the QloApps Forum.
Current Module Version: 5.1.0
Supported QloApps Versions: 1.6.x and 1.7.x

Be the first to comment.