In today’s hospitality landscape, managing a hotel can be challenging, especially when dealing with multiple online booking channels. That’s where the QloApps PMS & Channel Manager Connector comes in.
However, manually updating this information on different channels can be time-consuming and prone to errors.
In simple terms, this powerful tool acts as a bridge between QloApps PMS (Property Management System) and QloApps Channel Manager
As a result, hotel owners and managers can automate their workflow, reduce overbookings, and maintain consistency across all booking channels without any manual intervention.
Key Features of the QloApps PMS & Channel Manager Connector
- Firstly, admins can easily connect QloApps PMS with QloApps Channel Manager without any complex setup.
- Moreover, when an admin updates room availability, prices, or bookings in QloApps PMS, the system instantly sends updates to QloApps Channel Manager, and it updates all connected OTAs. However, this removes the need to log in to multiple platforms, making hotel management faster and easier.
- In addition, it uses a single API request to sync all required data, minimizing API call load and improving system performance.
- At the same time, when a booking is made on any platform, the API updates room availability in QloApps PMS, preventing overbookings.
- Consequently, this eliminates the risk of pricing mismatches, incorrect availability, and manual booking errors by ensuring accurate API-based data transfer.
Prerequisite for Installation of the QloApps PMS & Channel Manager ConnectorModule
Before you install the QloApps PMS & Channel Manager Module, you must make a few changes to the core code of QloApps.
The process to make changes in the QloApps source code is very simple. You just have to locate the following path and add the mentioned code for the proper functioning of the module.
Note: You only need to make these changes for QloApps version 1.6.1.0.
Code 1:
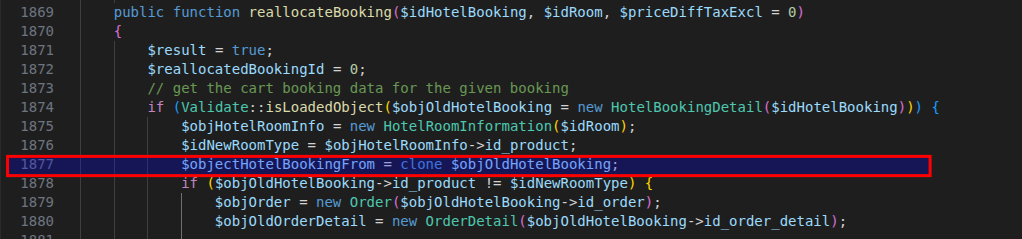
Locate the following path and add the mentioned code at line number 1877 (Line may vary).
Path:
modules/hotelreservationsystem/classes/HotelBookingDetail.phpAdd code:
$objectHotelBookingFrom = clone $objOldHotelBooking;
Kindly refer to this screenshot:
Code 2:
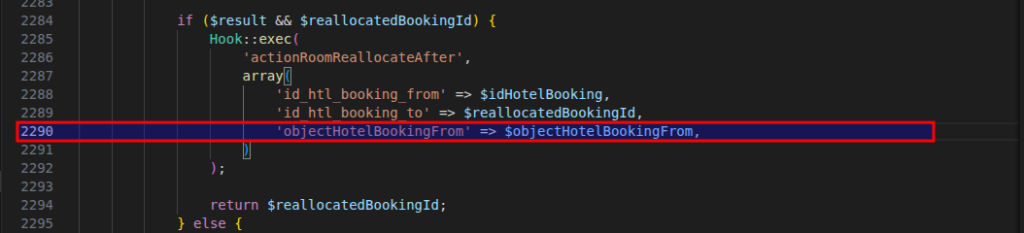
Locate the following path and add the mentioned code at line number 2290 (Line may vary).
Path:
modules/hotelreservationsystem/classes/HotelBookingDetail.phpAdd Code:
'objectHotelBookingFrom' => $objectHotelBookingFrom,
Kindly refer to this screenshot:
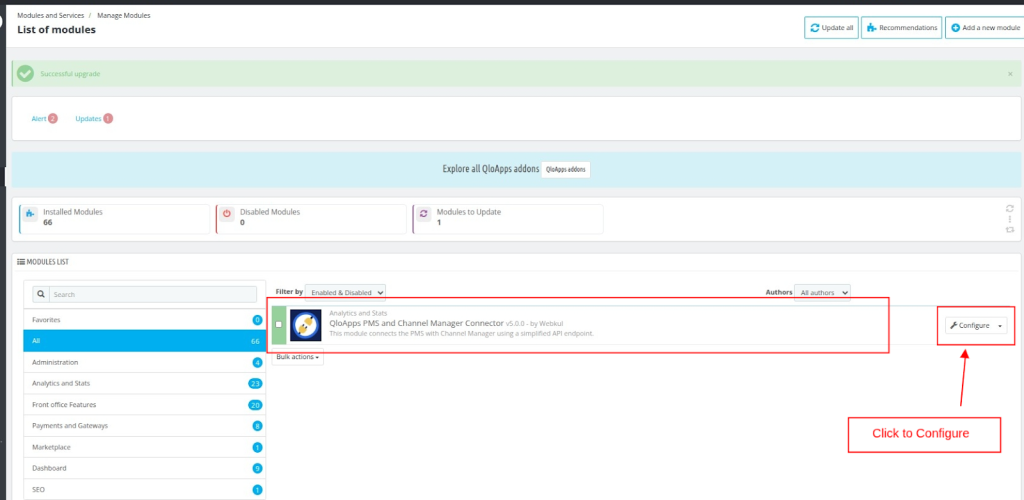
How to Install the QloApps PMS & Channel Manager Connector
To get started, follow the steps below to install
- First, log in to your QloApps Admin Panel.
- Next, navigate to Modules & Services > Manage Module
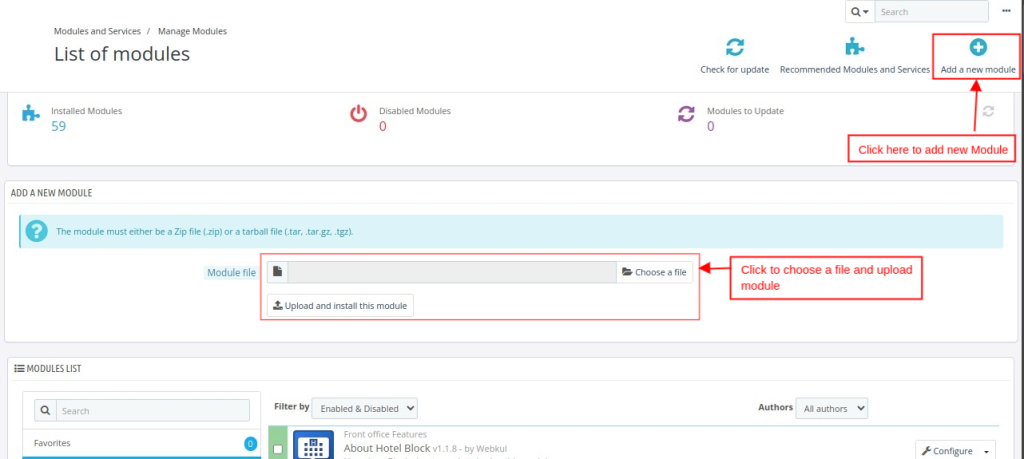
- Then Click Add a New Module
- After that, Choose a File and Upload
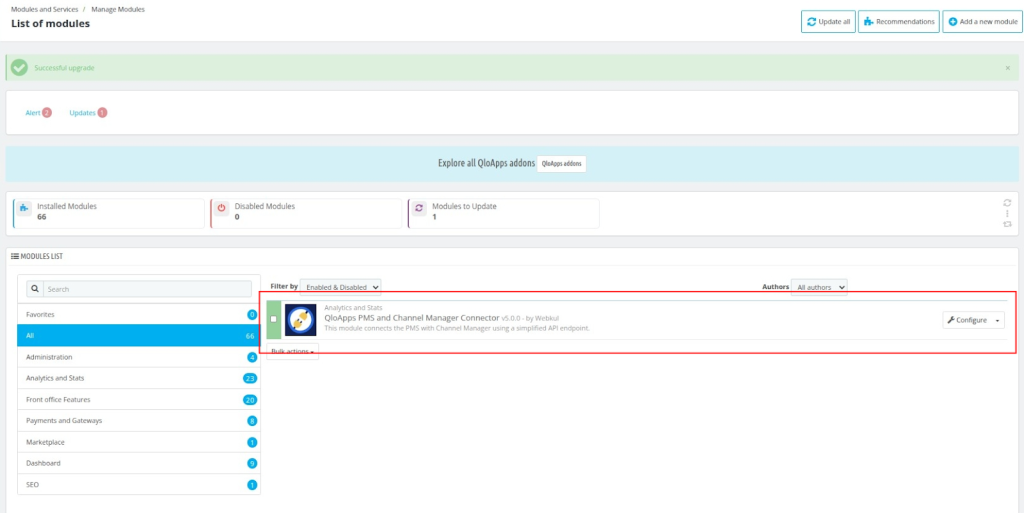
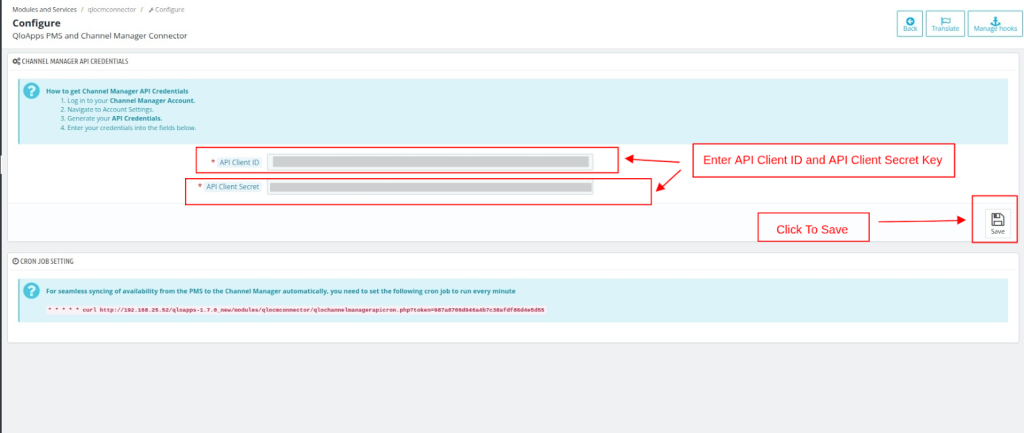
Configuration of QloApps PMS & Channel Manager Connector
At this stage, once the module is installed,
- Click on the Configuration Button
- Enter the API Client ID and API Client Secret
- Finally, Click on the Save Button
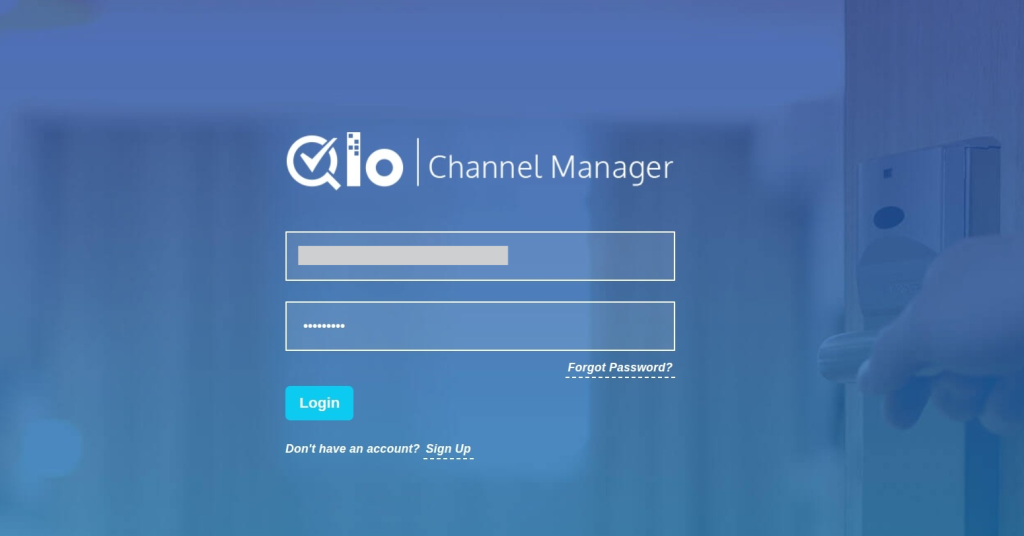
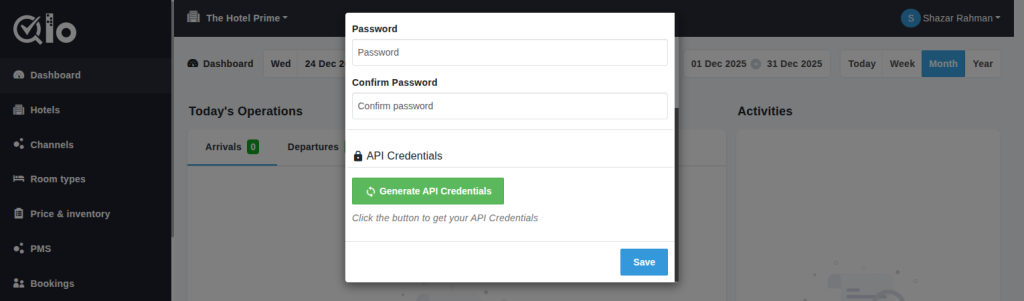
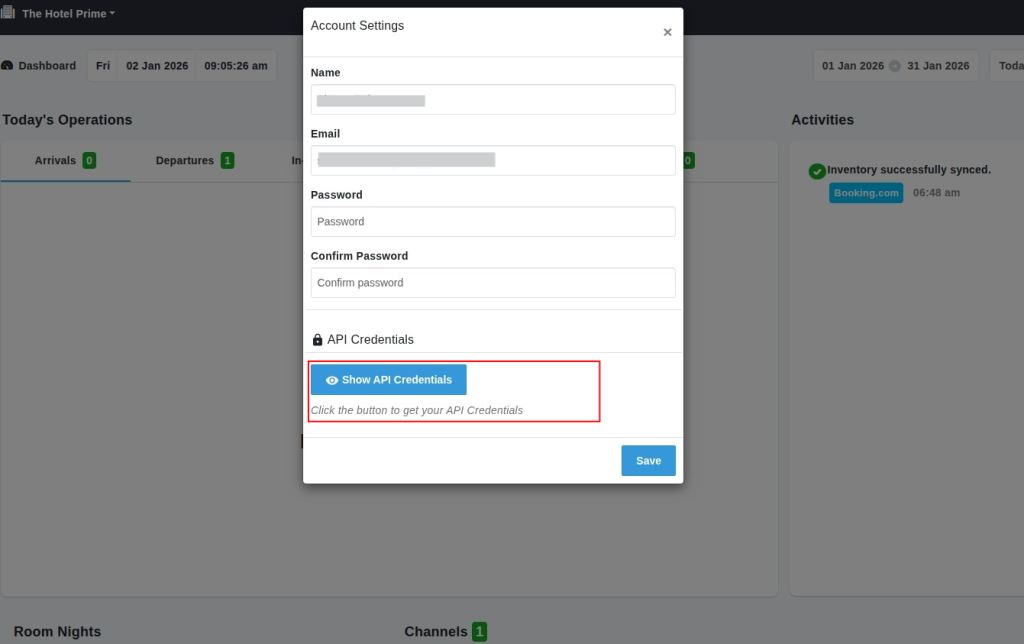
How to Obtain API Client ID and API Client Secret
- Log in to your QloApps Channel Manager Account.
- Navigate to Account Settings.
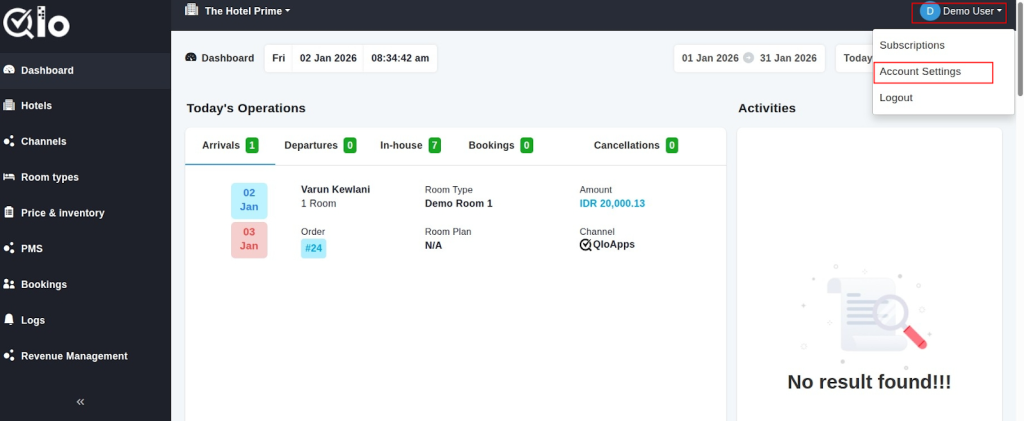
- Click on Generate API Credentials and save.
Note: The “Generate API Credential” field is exclusive to users having a paid plan on Channel Manager. If you are on a trial plan, this field will remain hidden.
- Afterward, once the API Credentials are generated
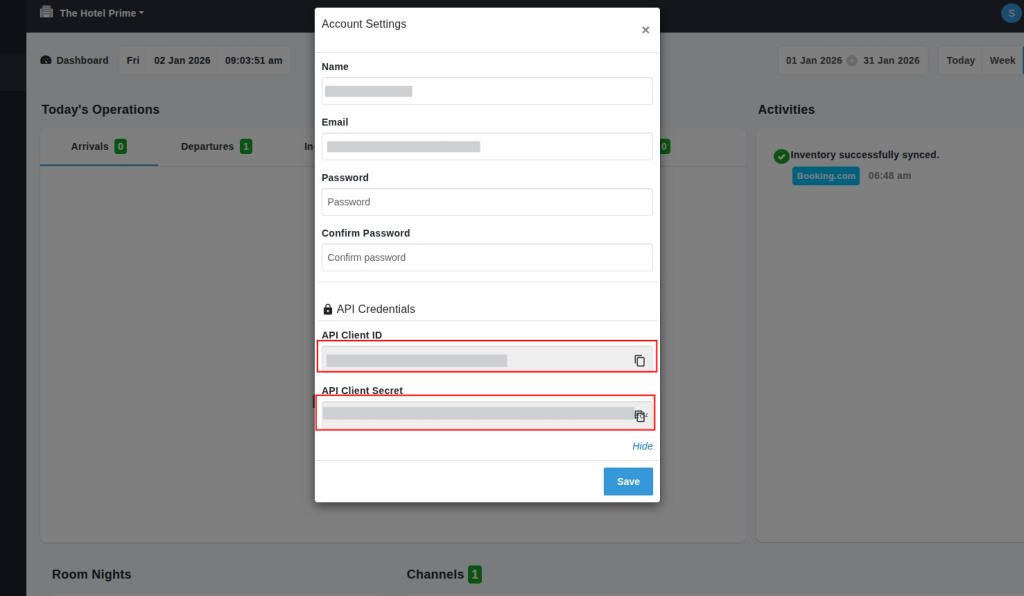
- Enter your credentials into the fields on the Configuration page.
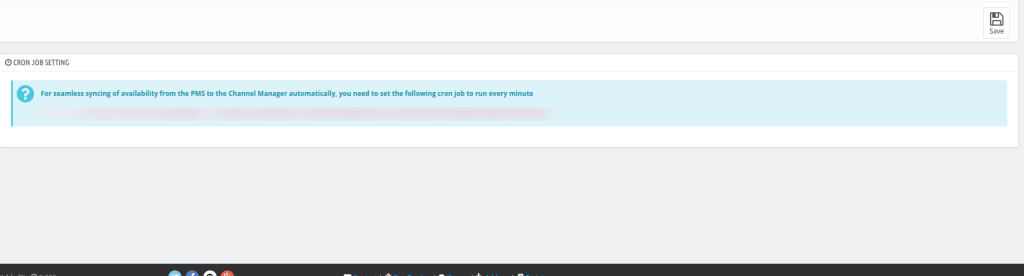
Cron Setting for Seamless Availability Syncing
To ensure continuous, real-time synchronization between the Property Management System (PMS) and the Channel Manager, it is essential to configure a cron job that runs every minute.
This cron process automatically updates room availability across all connected booking channels, minimizing overbooking risks and ensuring inventory accuracy.
Why Cron Settings Are Important
Availability changes can occur at multiple operational touchpoints within the PMS.
The cron job acts as a background service that continuously monitors these changes and syncs them with the Channel Manager.
Below are the key scenarios where cron execution plays a critical role:
1. Room Reallocation within an Existing Reservation
When a reservation is reassigned to a different room:
- Real-time availability for the affected room type is updated immediately.
- Therefore, the cron job syncs the updated availability across all connected channels.
- This prevents the same room from being resold on external OTAs.
2. Temporarily Disabled Rooms
Similarly, when a room is temporarily disabled:
- The room is removed from the available inventory.
- The cron job ensures the reduced availability is synced instantly.
Meanwhile, if the room is later reactivated or permanently deleted:
- The cron job recalculates the total inventory.
- Updated availability is correctly reflected across all connected channels.
3. Room Addition or Deletion within a Room Type
- In Case any addition or removal of rooms triggers an inventory recalculation.
- Then, the updated availability is synchronized with all connected channels.
4. Booking Creation or Modification
When a booking is created or modified (e.g., date change or cancellation):
- Availability is released or blocked accordingly.
- The cron job synchronizes these changes in real time.
However, this ensures consistent availability between the PMS, channel manager, and all connected channels
How to Enable Connector Permissions
For proper functionality, connector permissions must be enabled.
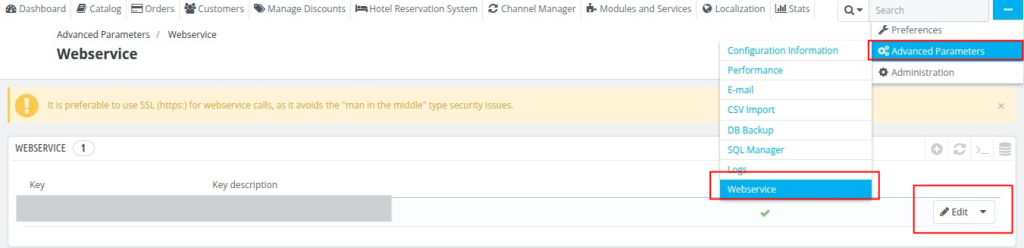
- First, Log in to your QloApps Admin Panel.
- Navigate to Advanced Parameters > Webservices.
- Look through the list of API keys to find the one used for your Channel Manager.
- If you’re unsure which API key is being used, you can verify it:
- Go to Channel Manager > PMS Setting ->General Settings
- Match this key with the ones listed in Webservices
- Once you locate the correct API Key, click on the Edit (pencil icon) next to it.
- Scroll down to the Permissions section.
- Find cm_api in the list.
- Then enable all necessary permissions by checking the boxes:
- ALL- It clicks all permissions in one click
- View (GET) – Retrieve data from Channel Manager
- Modify (PUT) – Update existing data
- Add (POST) – Create new data entries
- Delete (DELETE) – Remove data from the system
- Fast view (HEAD) – Retrieve metadata without the response body
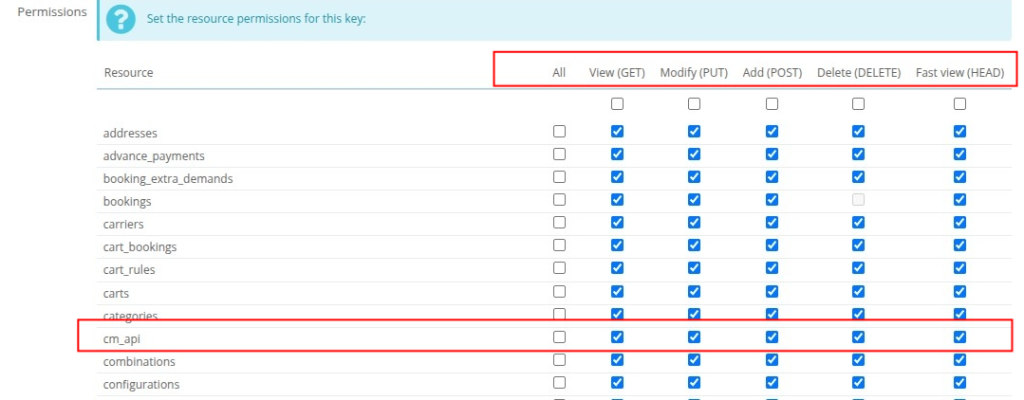
Next, enable all required permissions.
After completing this, in the Configuration panel, enable QloApps’s web service.
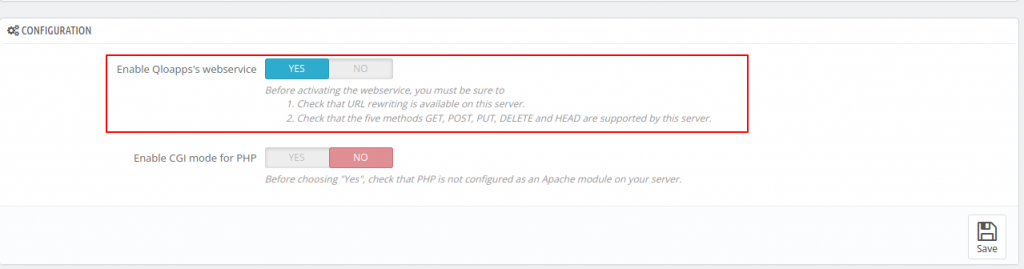
After that, the next step is to establish a connection between QloApps Channel Manager and PMS
Establish the connection by following the Link: PMS Connection in QloApps Channel Manager
Conclusion
In conclusion, the QloApps PMS & Channel Manager Connector ensures a fast and efficient way to sync hotel data.
Moreover, with the improved single API sync, admins can instantly update inventory, pricing, and reservations without excessive API calls.
However, this streamlined process saves time, prevents overbookings, and reduces manual effort, making hotel management smoother and more reliable.
Additionally, to learn more about
- QloApps and its features, visit: QLO Reservation System – Free Open-Source Hotel Booking & Reservation System.
- Channel Manager, visit: QloApps Channel Manager
- Need Help? Raise your queries on the QloApps Forum
Current Product Version – 5.0.1
Supported Framework Version- QloApps 1.7.x

Be the first to comment.