QloApps Marketplace Addon turns your hotel website into a platform where other hotels can list their properties. You earn a commission every time a booking is made through your website.
Admin Features of QloApps Marketplace
- Add or delete sellers on the marketplace.
- Admin has the option to approve or disapprove seller requests manually or set it to be done automatically.
- Allow or disallow sellers to agree to the terms and conditions.
- Admin can manage seller profiles, their hotels, orders, room types, service products, and refund rules.
- Admin can manage the commission rate and tax distribution of the seller.
- Easy to manage and add multiple payment modes for sellers.
- Admin can select ‘Super Admin Email’ where all marketplace emails will be sent.
- Allow Sellers to use multiple languages in the Marketplace.
- Admin can manage various mail configuration settings.
- View total earnings of the hotel marketplace as well as seller-wise earnings in the back-end.
- Manage seller settlements from the back end.
- Admin can allow/disallow the display of Admin commission to sellers.
- Admin can allow/disallow the Advance Payment option to sellers.
- Allow/disallow sellers to create customer-wise specific prices.
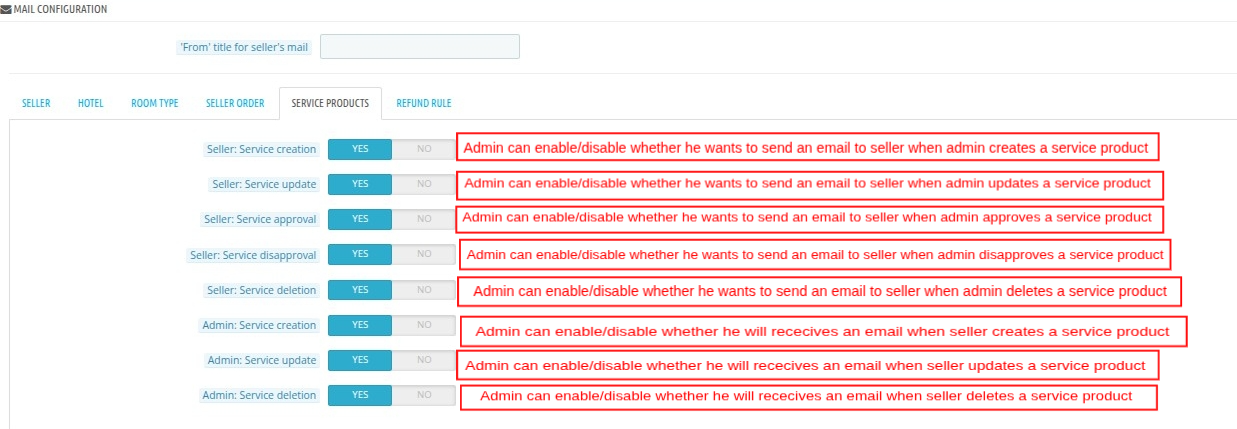
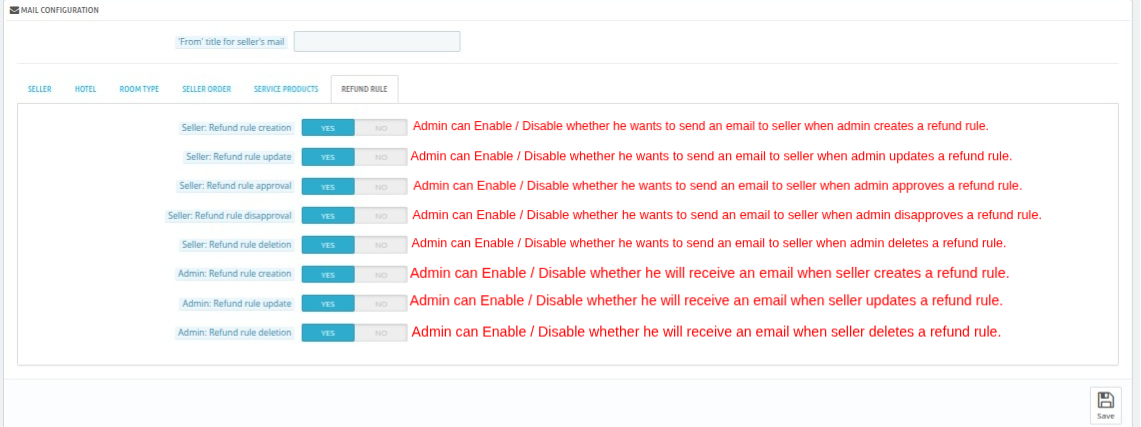
- Admin can enable or disable various mail settings, and accordingly, emails are sent to admin and sellers on the happening of various events.
- Admin can select the order status that will be available to the seller for changing their order status.
Seller Features of QloApps Marketplace
- Sellers receive an email regarding the update on the status of their approval or disapproval of their request to become a seller.
- Sellers can view statistics of bookings and sales of the current year and the previous year.
- View data based on various performance measuring parameters in the form of graphs and charts on the dashboard of the marketplace seller portal.
- Sellers can manage their profile, hotels, room types, service products, refunds, and orders.
- Select the payment mode provided by the admin and send account details to receive payments manually from the admin.
- The seller can edit the bookings created by the guest. For instance, they can change the duration of booking dates, add rooms, and reallocate or swap rooms.
- Sellers can view their marketplace earnings and admin commission from the dashboard.
Compatibility Information of QloApps Marketplace
- QloApps Marketplace v5.0.0 is compatible with QloApps version v1.7.x
- QloApps Marketplace v2.0.0 is compatible with QloApps version v1.6.x
- QloApps Marketplace v4.0.0 is compatible with QloApps version v1.7.x
- QloApps Marketplace v1.3.2 is compatible with QloApps version v1.6.1
- QloApps Marketplace v1.3.1 is compatible with QloApps version v1.6.x
- QloApps Marketplace v1.2.4 is compatible with QloApps version v1.5.1
- QloApps Marketplace v1.2.3 is compatible with QloApps version v1.5.0
- QloApps Marketplace v1.2.2 is compatible with QloApps version v1.4.0
- QloApps Marketplace v1.2.1 is compatible with QloApps version from v1.2.0 to versions below v1.4.0
Installation Of QloApps Marketplace
The process of installation of the marketplace module in QloApps is very simple.
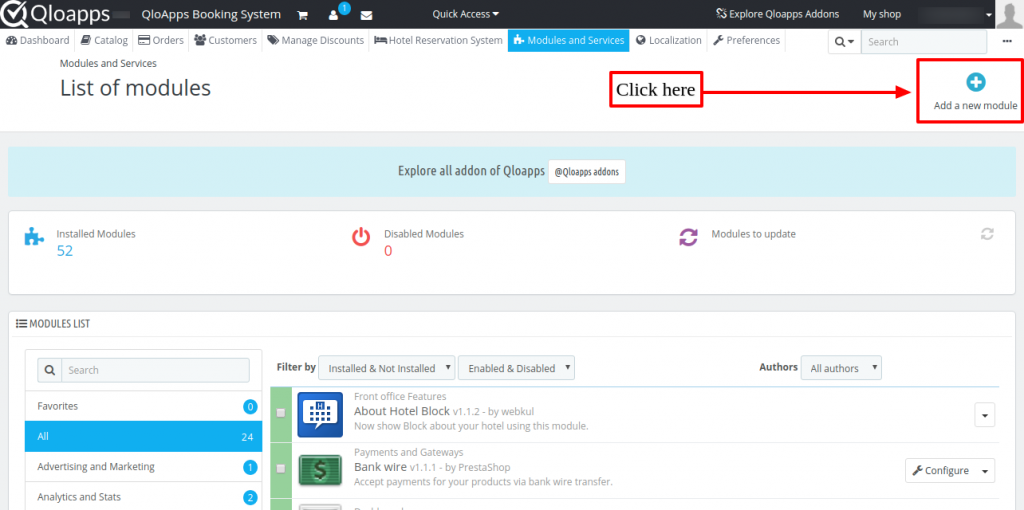
- Go to the “Module and Services” tab.
- Click on “Add New Module”.
Now upload the zip file of the marketplace module.
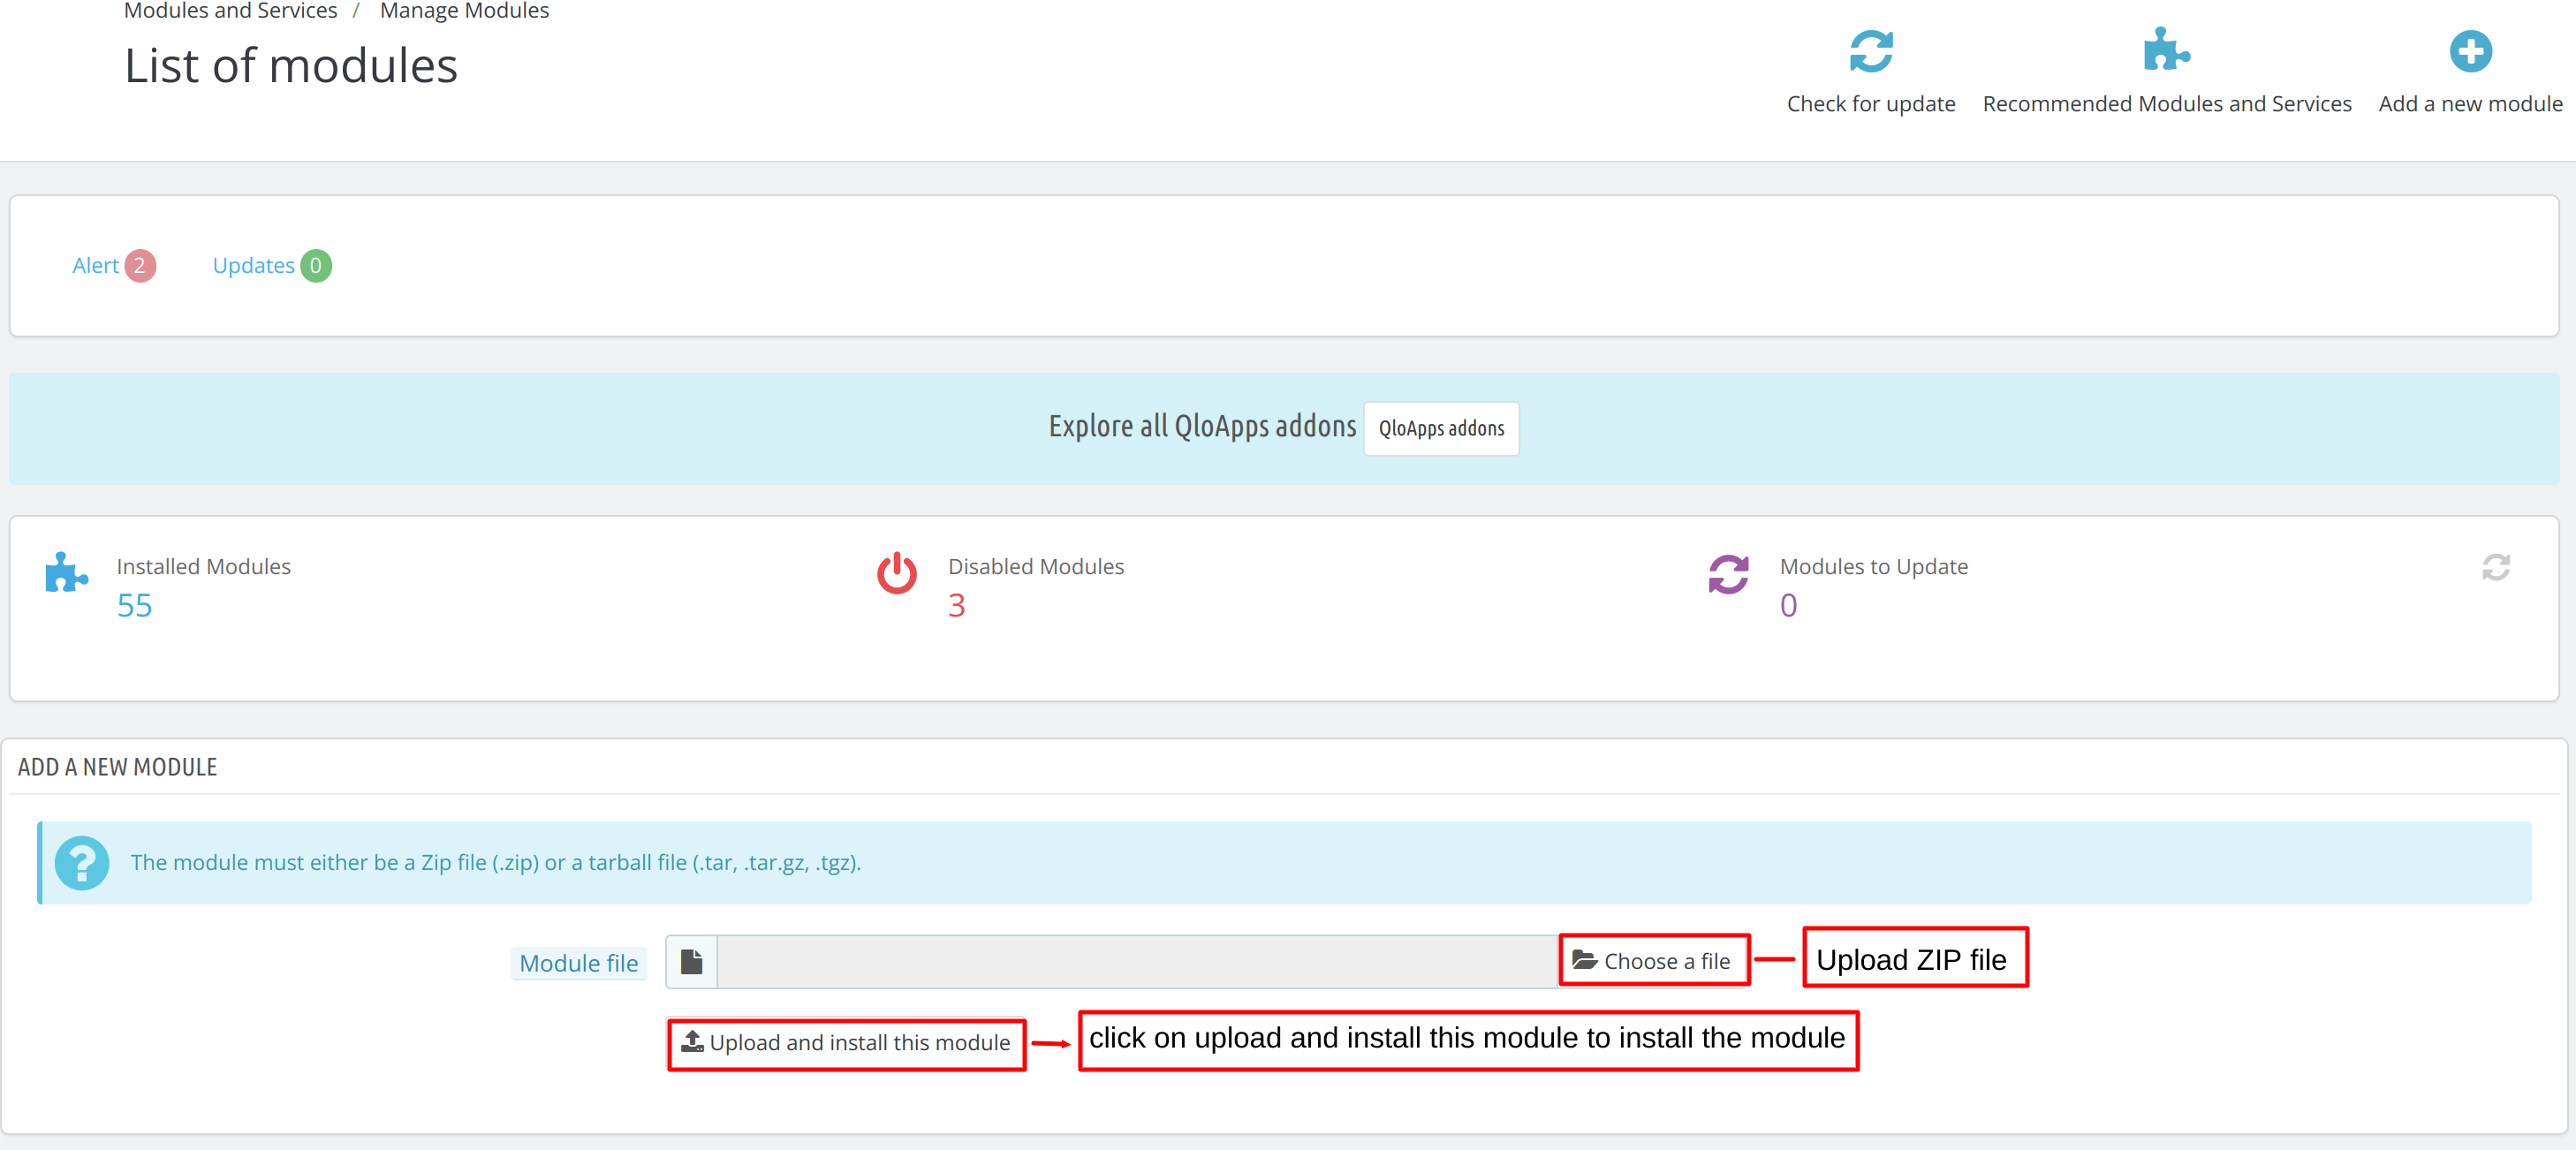
Click on “Upload and Install this module” to install the module. By following these steps the Admin can successfully install the “QloApps Marketplace” module.
After installing the Marketplace module, a new tab of Marketplace will be added to the menu bar of QloApps. Using this tab, the admin can configure the various settings of the marketplace.
Marketplace Configuration
After clicking on the marketplace tab or “configure” button in manage modules, you will be redirected to the configuration page.
There are eight sections in the Marketplace Configuration Tab:
- Configuration
- Seller Profiles
- Seller Hotels
- Seller Room Types
- Seller refund Rules
- Seller Service Products
- Commission Rates
- Seller Orders
Let’s discuss the functionality and features of each section.
Configuration
Let’s understand the first section i.e., the configuration tab.
It is further subdivided into three sections:
- Manage General settings
- Manage Approval settings
- Manage Payment modes
Manage General Settings
Admin can configure the general settings of the hotel marketplace from here.
General Settings
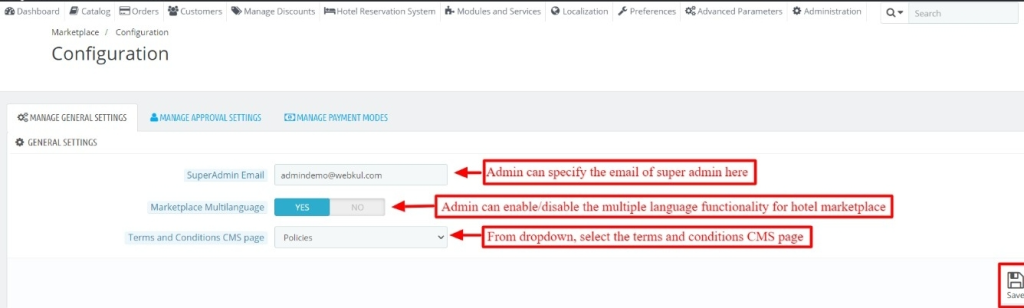
- Super Admin Email: The Admin can specify the Super Admin Email to which all the hotel marketplace emails will be sent.
- Marketplace Multilanguage: Enable or disable the sellers to use multiple languages in the marketplace.
If the admin disables the hotel marketplace multiple language functionalities, then the admin can decide whether the marketplace will be managed based on “Admin’s default language” or “Seller default language”.
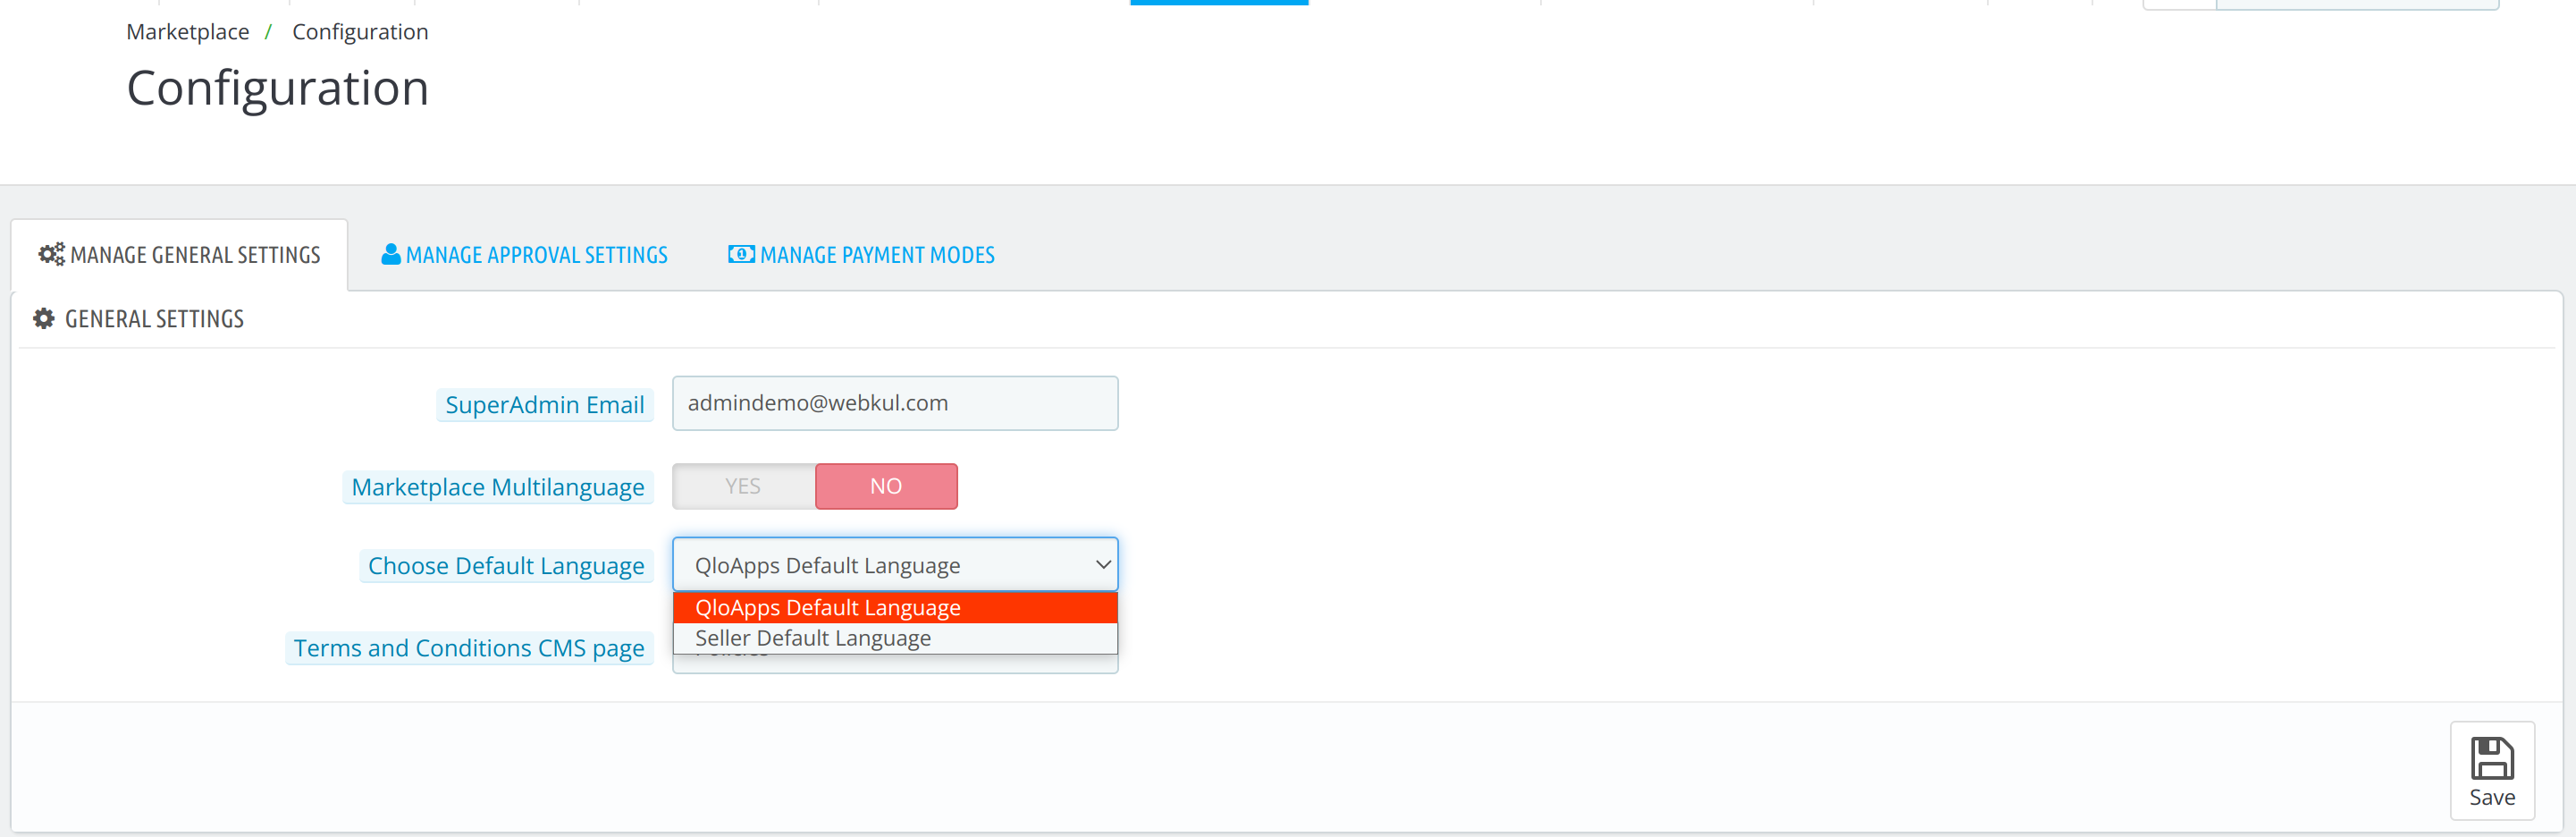
- Terms and Conditions CMS page: From the dropdown, the admin can select which CMS page will open when the seller clicks on the terms and conditions option that displays at the time of registration.
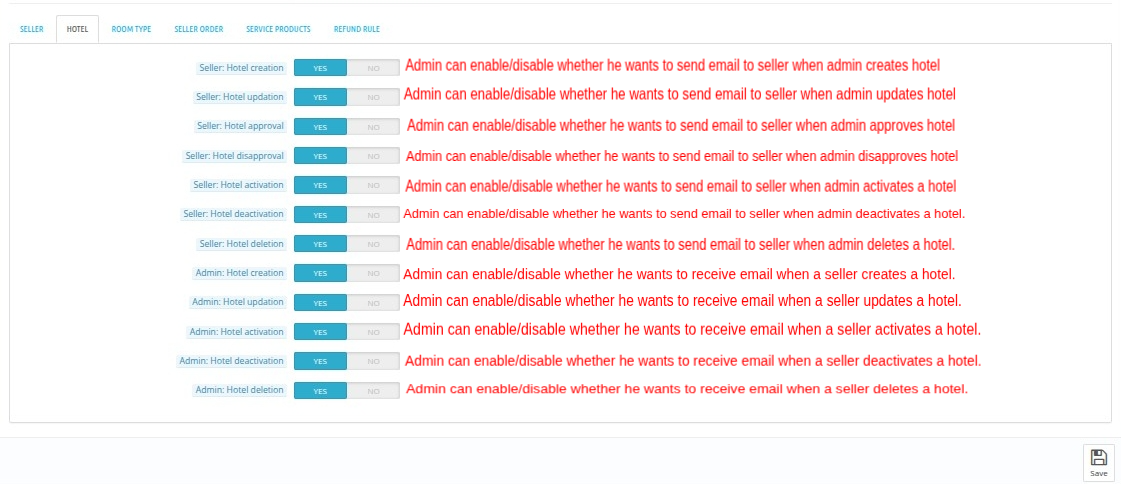
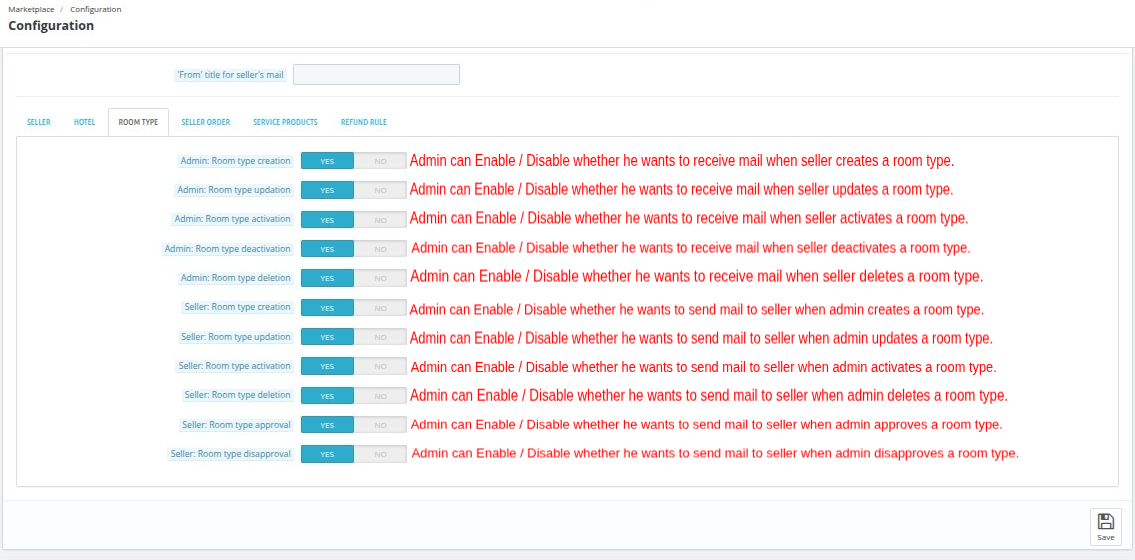
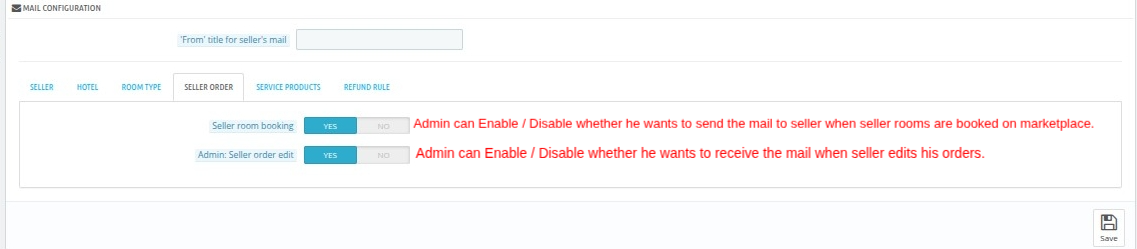
Mail Configuration
Seller
Admin can manage the hotel marketplace mail settings from the mail configuration page.

‘From’ title for seller’s mail- The text will display in the ‘From’ title in the Seller’s mail.
Hotel
Room Type
Seller Order
Service Products
Refund Rule
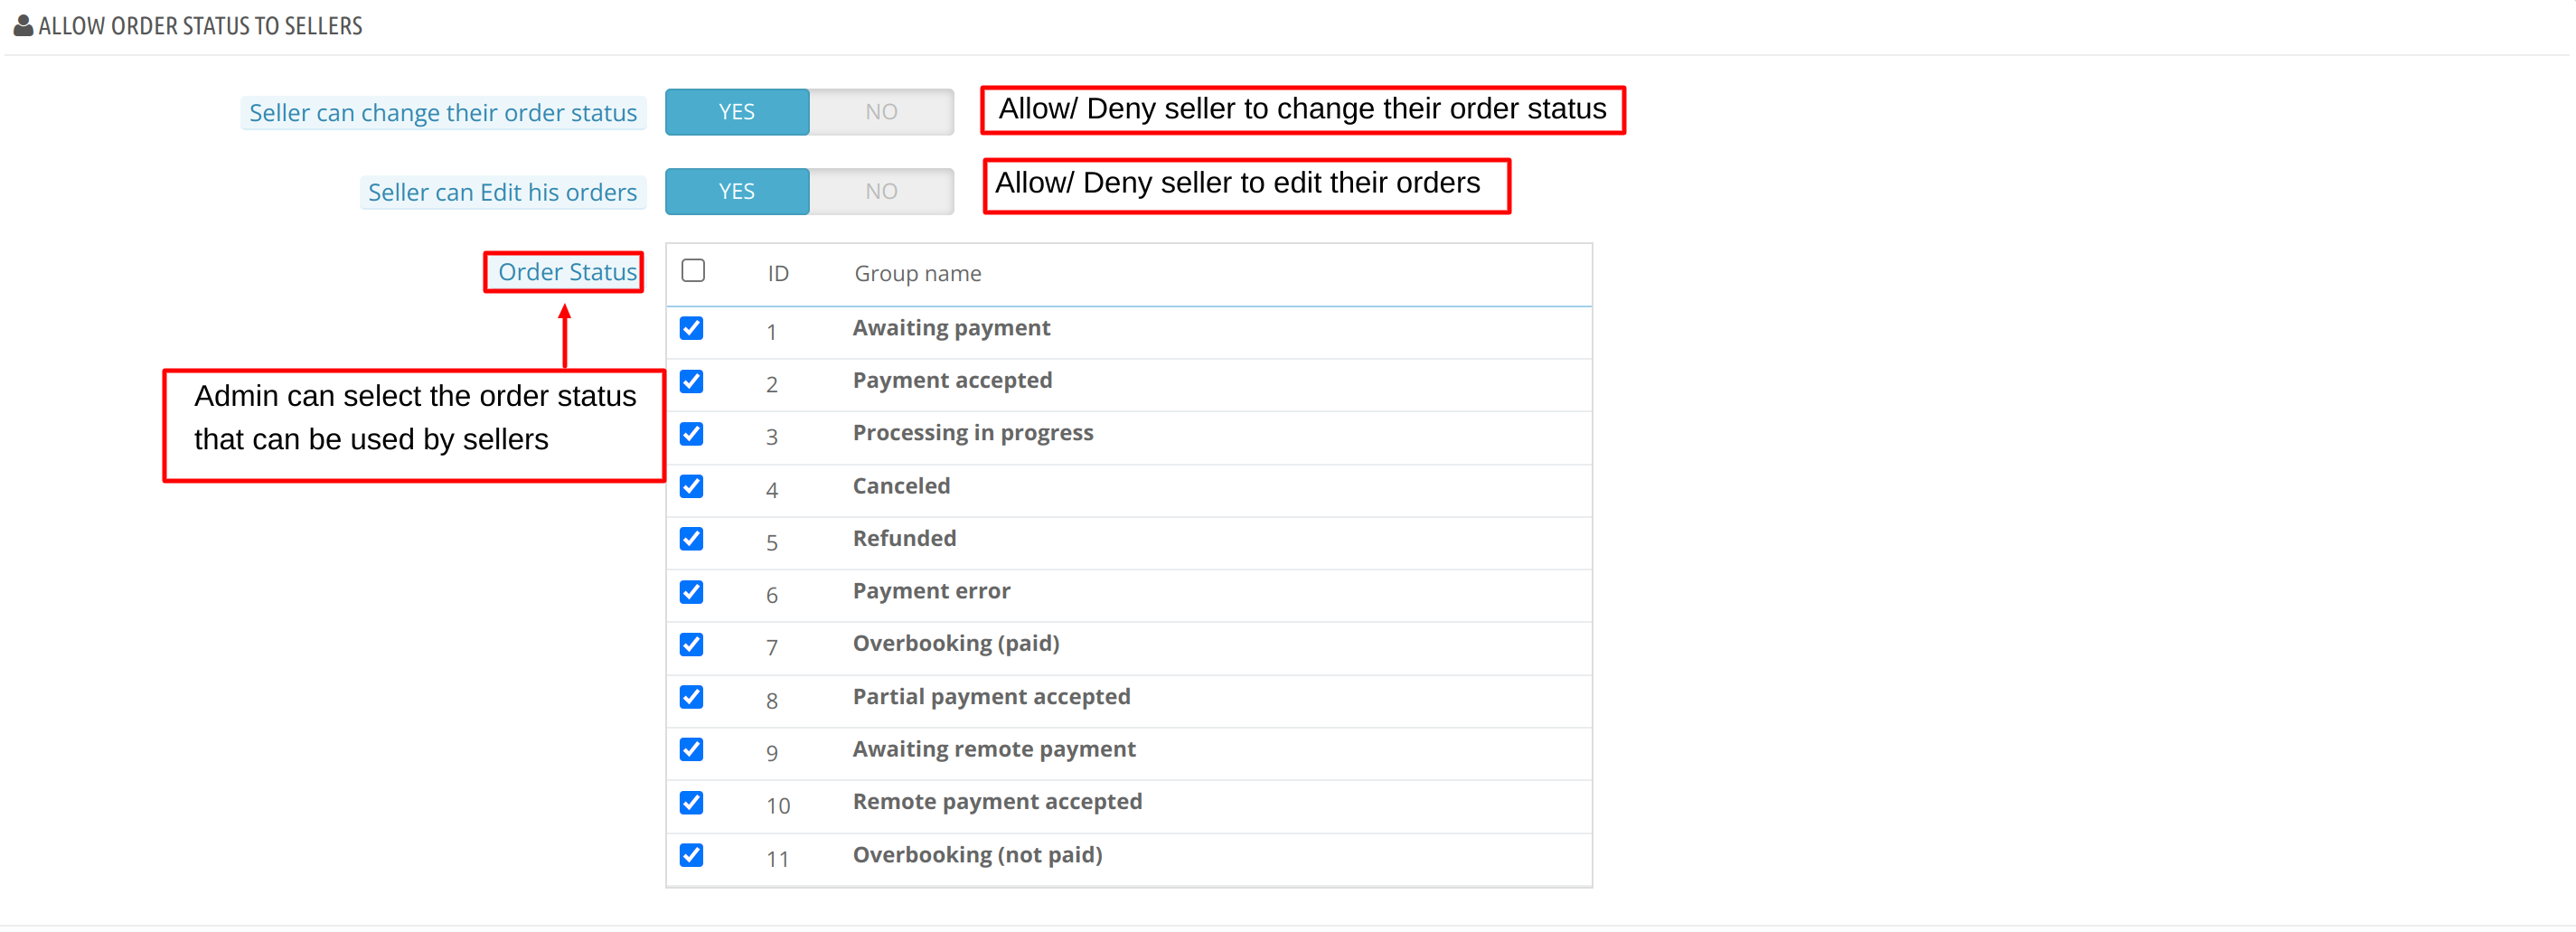
Allow Order Status To Sellers
Admin has control of order status. Henceforth, the admin has the option to allow or disallow sellers to change their order status.
Also, the admin can decide whether sellers can edit the order status or not.
If the admin allows the seller to edit the order status, then further he can also decide the status options he wants to provide to the seller for editing the order status.
Manage Approval Settings
From here, the admin can manage various approval settings which will provide different functionalities to sellers.
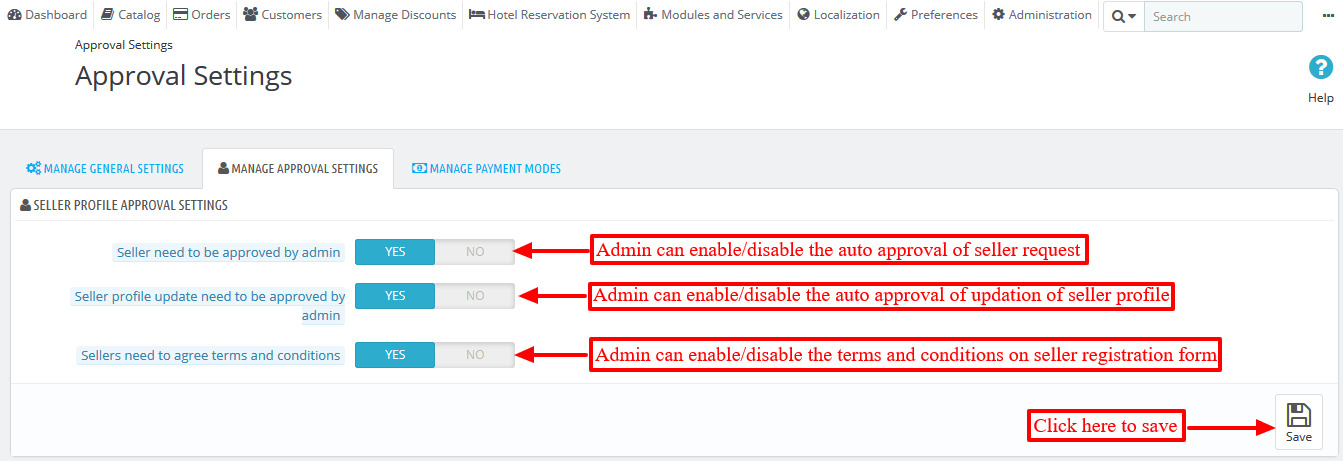
Seller Profile Approval Settings
On this page, the Admin has options for providing automatic approval to users for becoming sellers.
Moreover, the admin can allow the seller to update the seller’s profile without the approval of the admin, and the seller has to agree to the terms and conditions while registering.
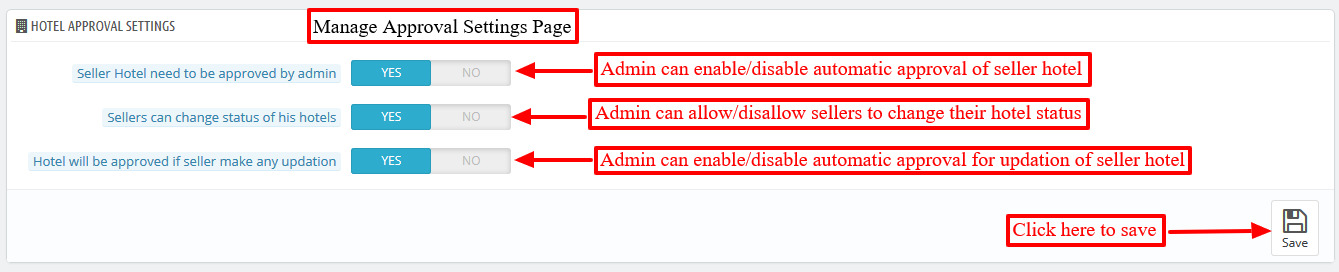
Hotel Approval Settings
Admin can manage seller hotel approval settings from here.
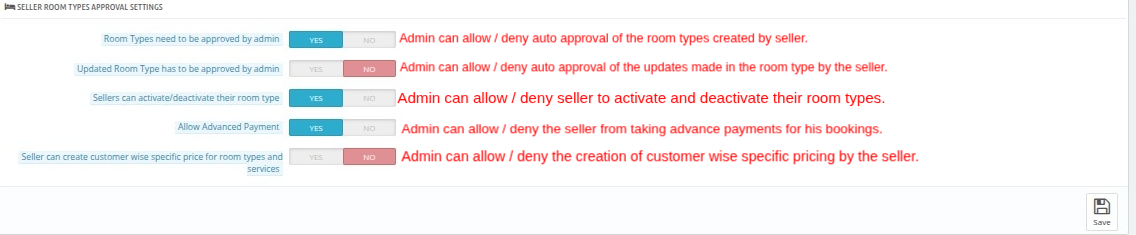
Seller Room Type Approval Settings
Admin can configure approval settings for the seller room type.
Seller Service Products Settings
These settings allow the marketplace admin to control how sellers create and use service products for their hotels.
Enable Seller Service Products
This is the master switch for seller service products. When enabled, sellers can manage service products from their seller panel.
Note: Disabling this option permanently deletes all seller-owned service products. This action cannot be undone.
- Case 1:
- When Seller Can Create Service Products = No
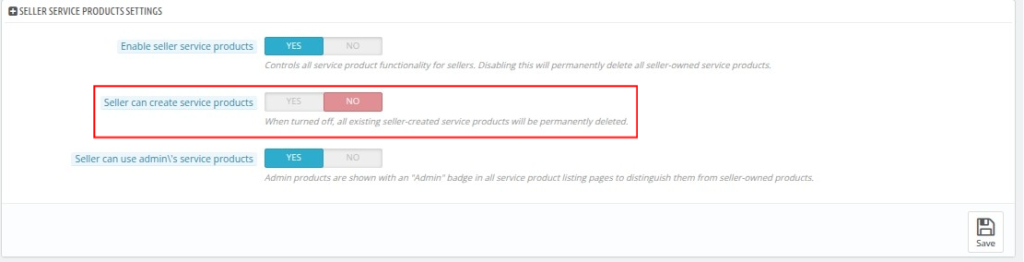
Seller Can Use Admin’s Service Products: Allows sellers to assign and use service products created by the marketplace admin.
Note: Admin service products are displayed with an “Admin” badge in the service product listings to distinguish them from seller-owned products.
- Case 2:
- When Seller Can Create Service Products = Yes
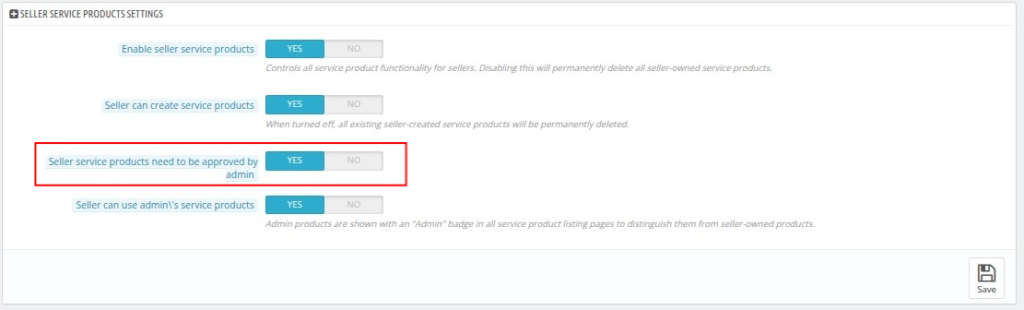
Seller Service Products Need Admin Approval: When enabled, service products created by sellers must be approved by the marketplace admin before they become available for use.
Order Management General Settings
These settings control how sellers communicate with customers and manage order-related notes from the seller panel.

- Allow Seller to Send Messages to Customers: When enabled, sellers can compose and send messages to customers directly from the order details page.
When Allow Seller to Send Messages to Customers = No

Allow Seller Private Notes: When enabled, sellers can add private notes to orders for internal reference. These notes are visible only to the seller and are not shared with customers.
Seller Order Refund Requests Settings
These settings allow the marketplace admin to control how sellers use refund rules and manage refund requests from the seller panel.
- Enable Refund Rules in Front Office:
This is the master switch for the Refund Rules feature in the seller front office. When enabled, sellers can access the Refund Rules and Hotel Refund Policies sections from their seller dashboard.
If Yes:
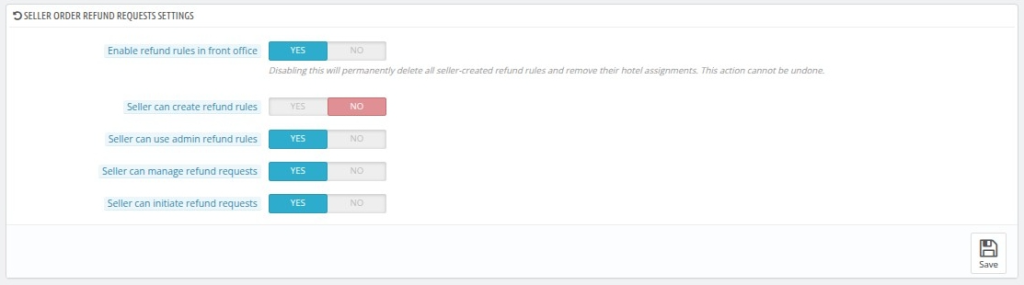
- Case1:
- When Seller Can Create Refund Rules = No
Seller Can Use Admin Refund Rules: Allows sellers to assign and use refund rules created by the marketplace admin for their hotels.
Can Manage Refund Requests: Allows sellers to view and process refund requests for bookings made at their hotels.
Seller Can Initiate Refund Requests: Allows sellers to submit refund requests for eligible bookings directly from the seller panel.
- Case2:
- When Seller Can Create Refund Rules = Yes
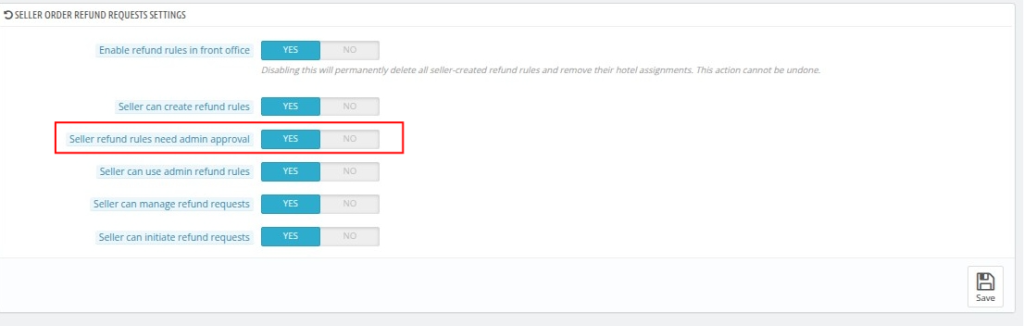
Seller Refund Rules Need Admin Approval: When enabled, every refund rule created by a seller must be approved by the marketplace admin before it can be assigned to a hotel or used for bookings.
- Enable Refund Rules in Front Office:
If No
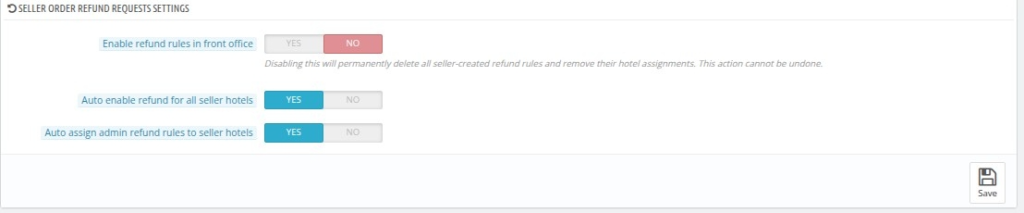
Auto Enable Refund for All Seller Hotels: When enabled, refund functionality is automatically enabled for all seller hotels, so sellers don’t need to activate it individually for each hotel.
Auto Assign Admin Refund Rules to Seller Hotels: When enabled, admin-created refund rules are automatically assigned to all seller hotels, so sellers don’t need to assign them manually.
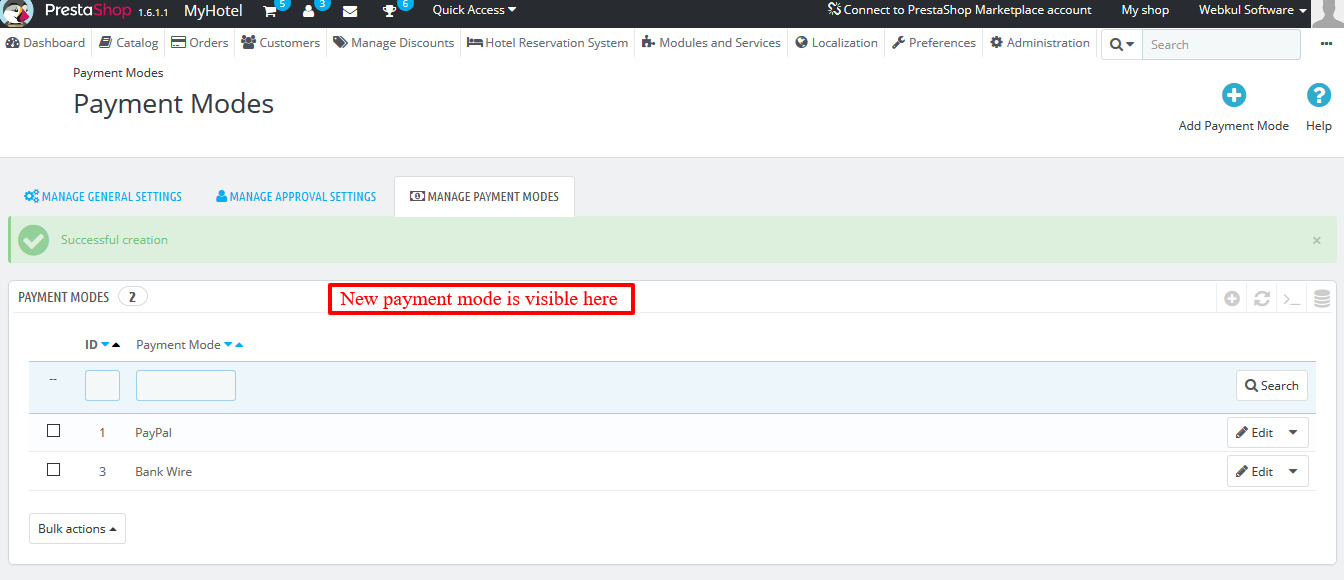
Manage Payment Modes
The payments made by customers are credited to the admin’s account. Afterwards, the admin transfers the seller’s share from his end.
In this section, the admin can add various payment modes using which each seller can provide their desired account detail to receive the payment.

Admin can add a new payment mode by Clicking on ‘Add Payment Mode’ and then adding the name of the mode.

After saving the details you can view the list of payment modes added.
How To Register As a QloApps Marketplace Seller?
To become a seller in the marketplace, the sellers have to first register as a user and then they can send a request to become a seller.
New Seller Creation (Frontend)
After installing the marketplace, sellers can create their user accounts and send requests to the admin to become a sellers on the marketplace from the front end.
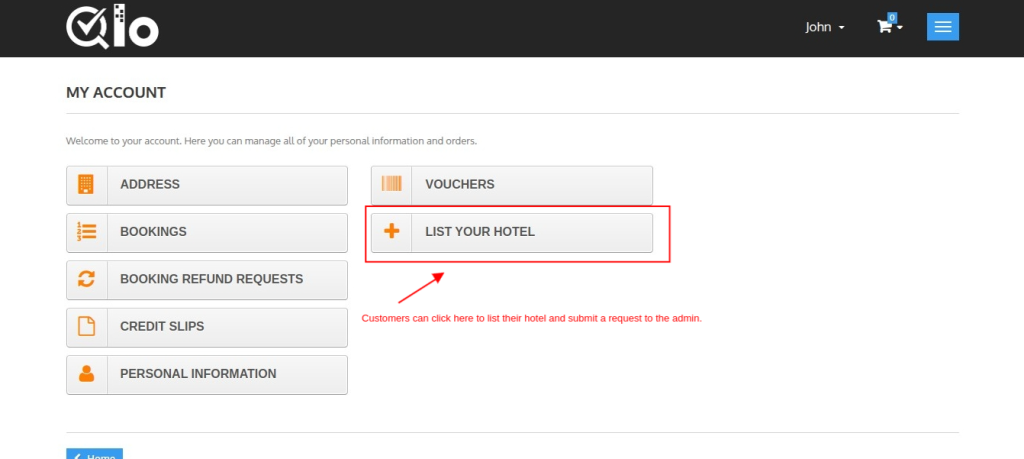
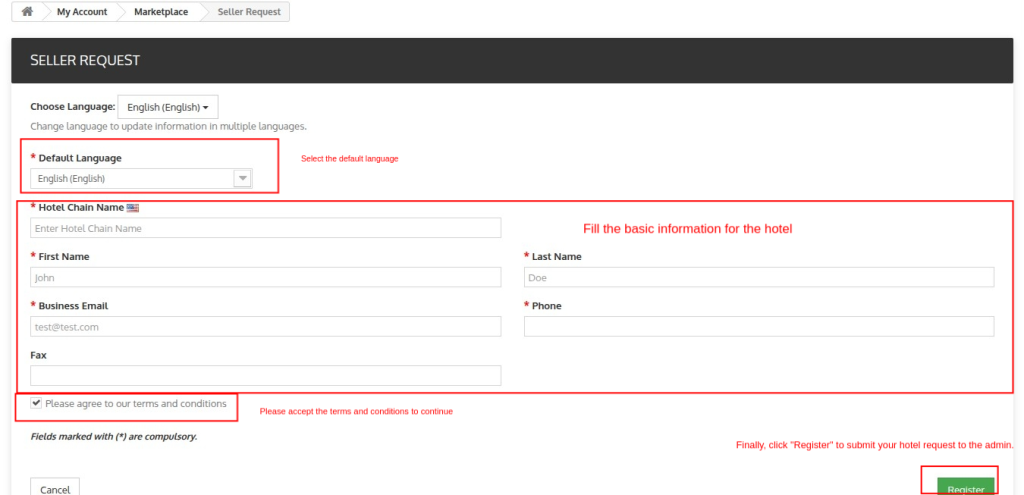
On clicking the ‘List your Hotel’ tab, a seller request form will appear which has to be filled by the seller to send the seller request to admin.
A message will display to the seller stating that the seller’s request has been sent to the admin and the seller will have to wait for the approval.

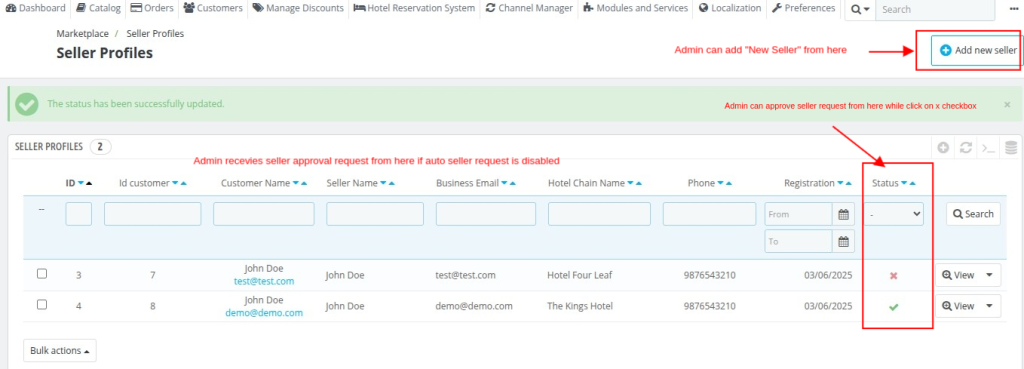
As soon as the seller submits the seller request, the admin can view the seller request in the “Manage Seller Profile” tab.
How To Approve a User’s Request To Become a Marketplace Seller?
Go to Marketplace -> Manage Seller Profile -> Seller Profile.
Admin can approve or disapprove the seller profile from here.
Note- If you (admin) have configured the module for auto-approval, then there is no requirement for the admin’s approval.
After approval from the admin, a seller can view the marketplace account at the front end under the ‘Accounts’ tab.
New Seller Creation (Backend)
Admin can also create a seller from the back end.
In that case, the admin will have to first create the seller as a user/customer. Then admin can convert the user into a seller from the seller profile section of the marketplace menu.
Seller Profiles Creation
After creating the user/customer, the admin has to go to Marketplace -> Seller Profile -> Click on Add new Seller.

Then admin will have to fill in the details of the new seller form in two sections.
Information section
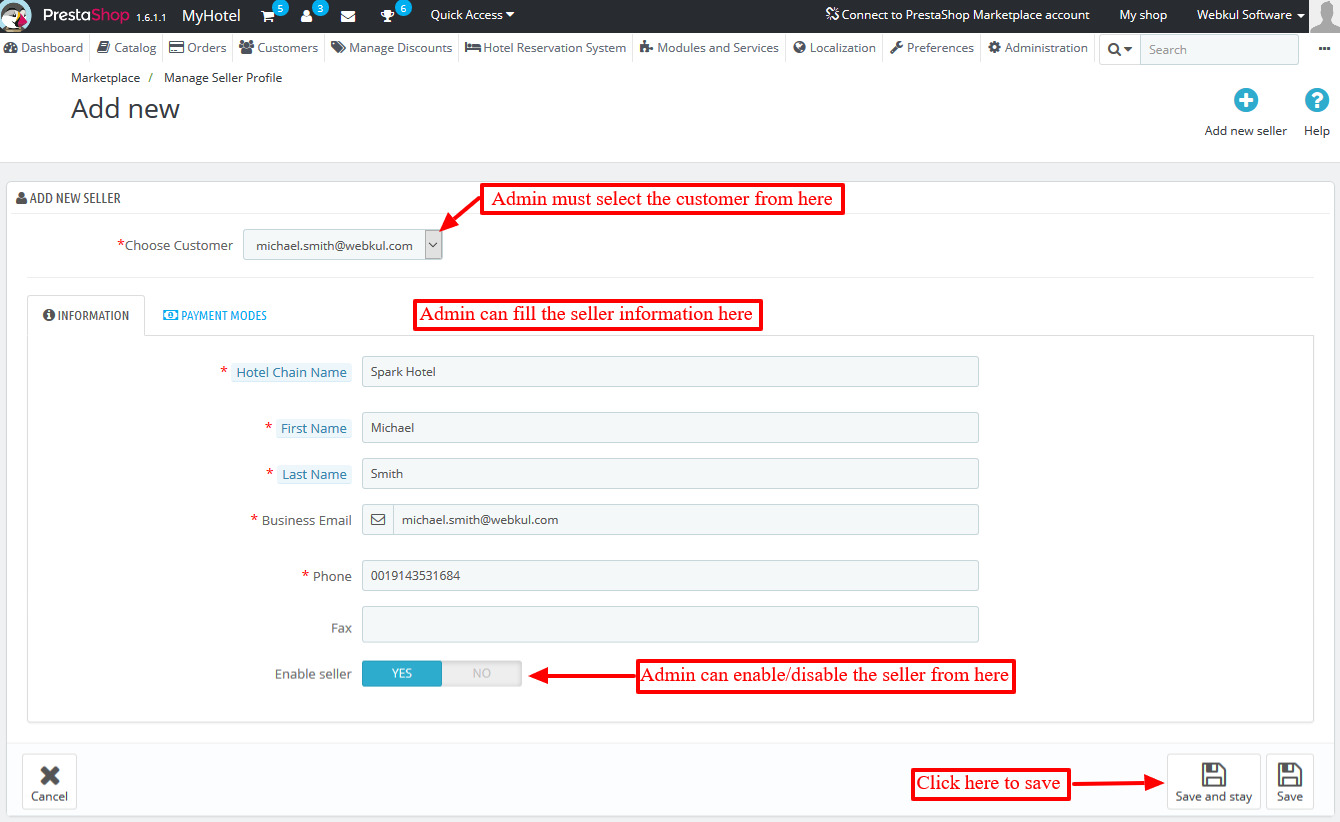
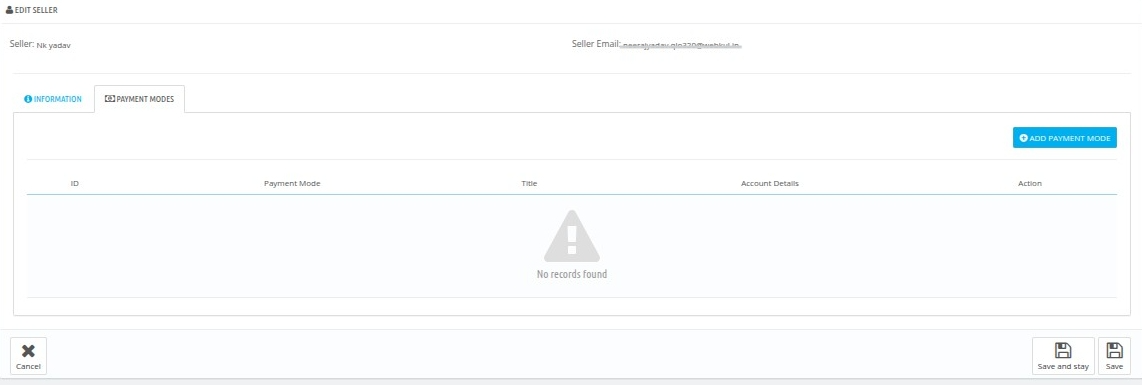
Payment Modes
Admin has to select the payment mode and enter the account details that will be used for seller transactions.
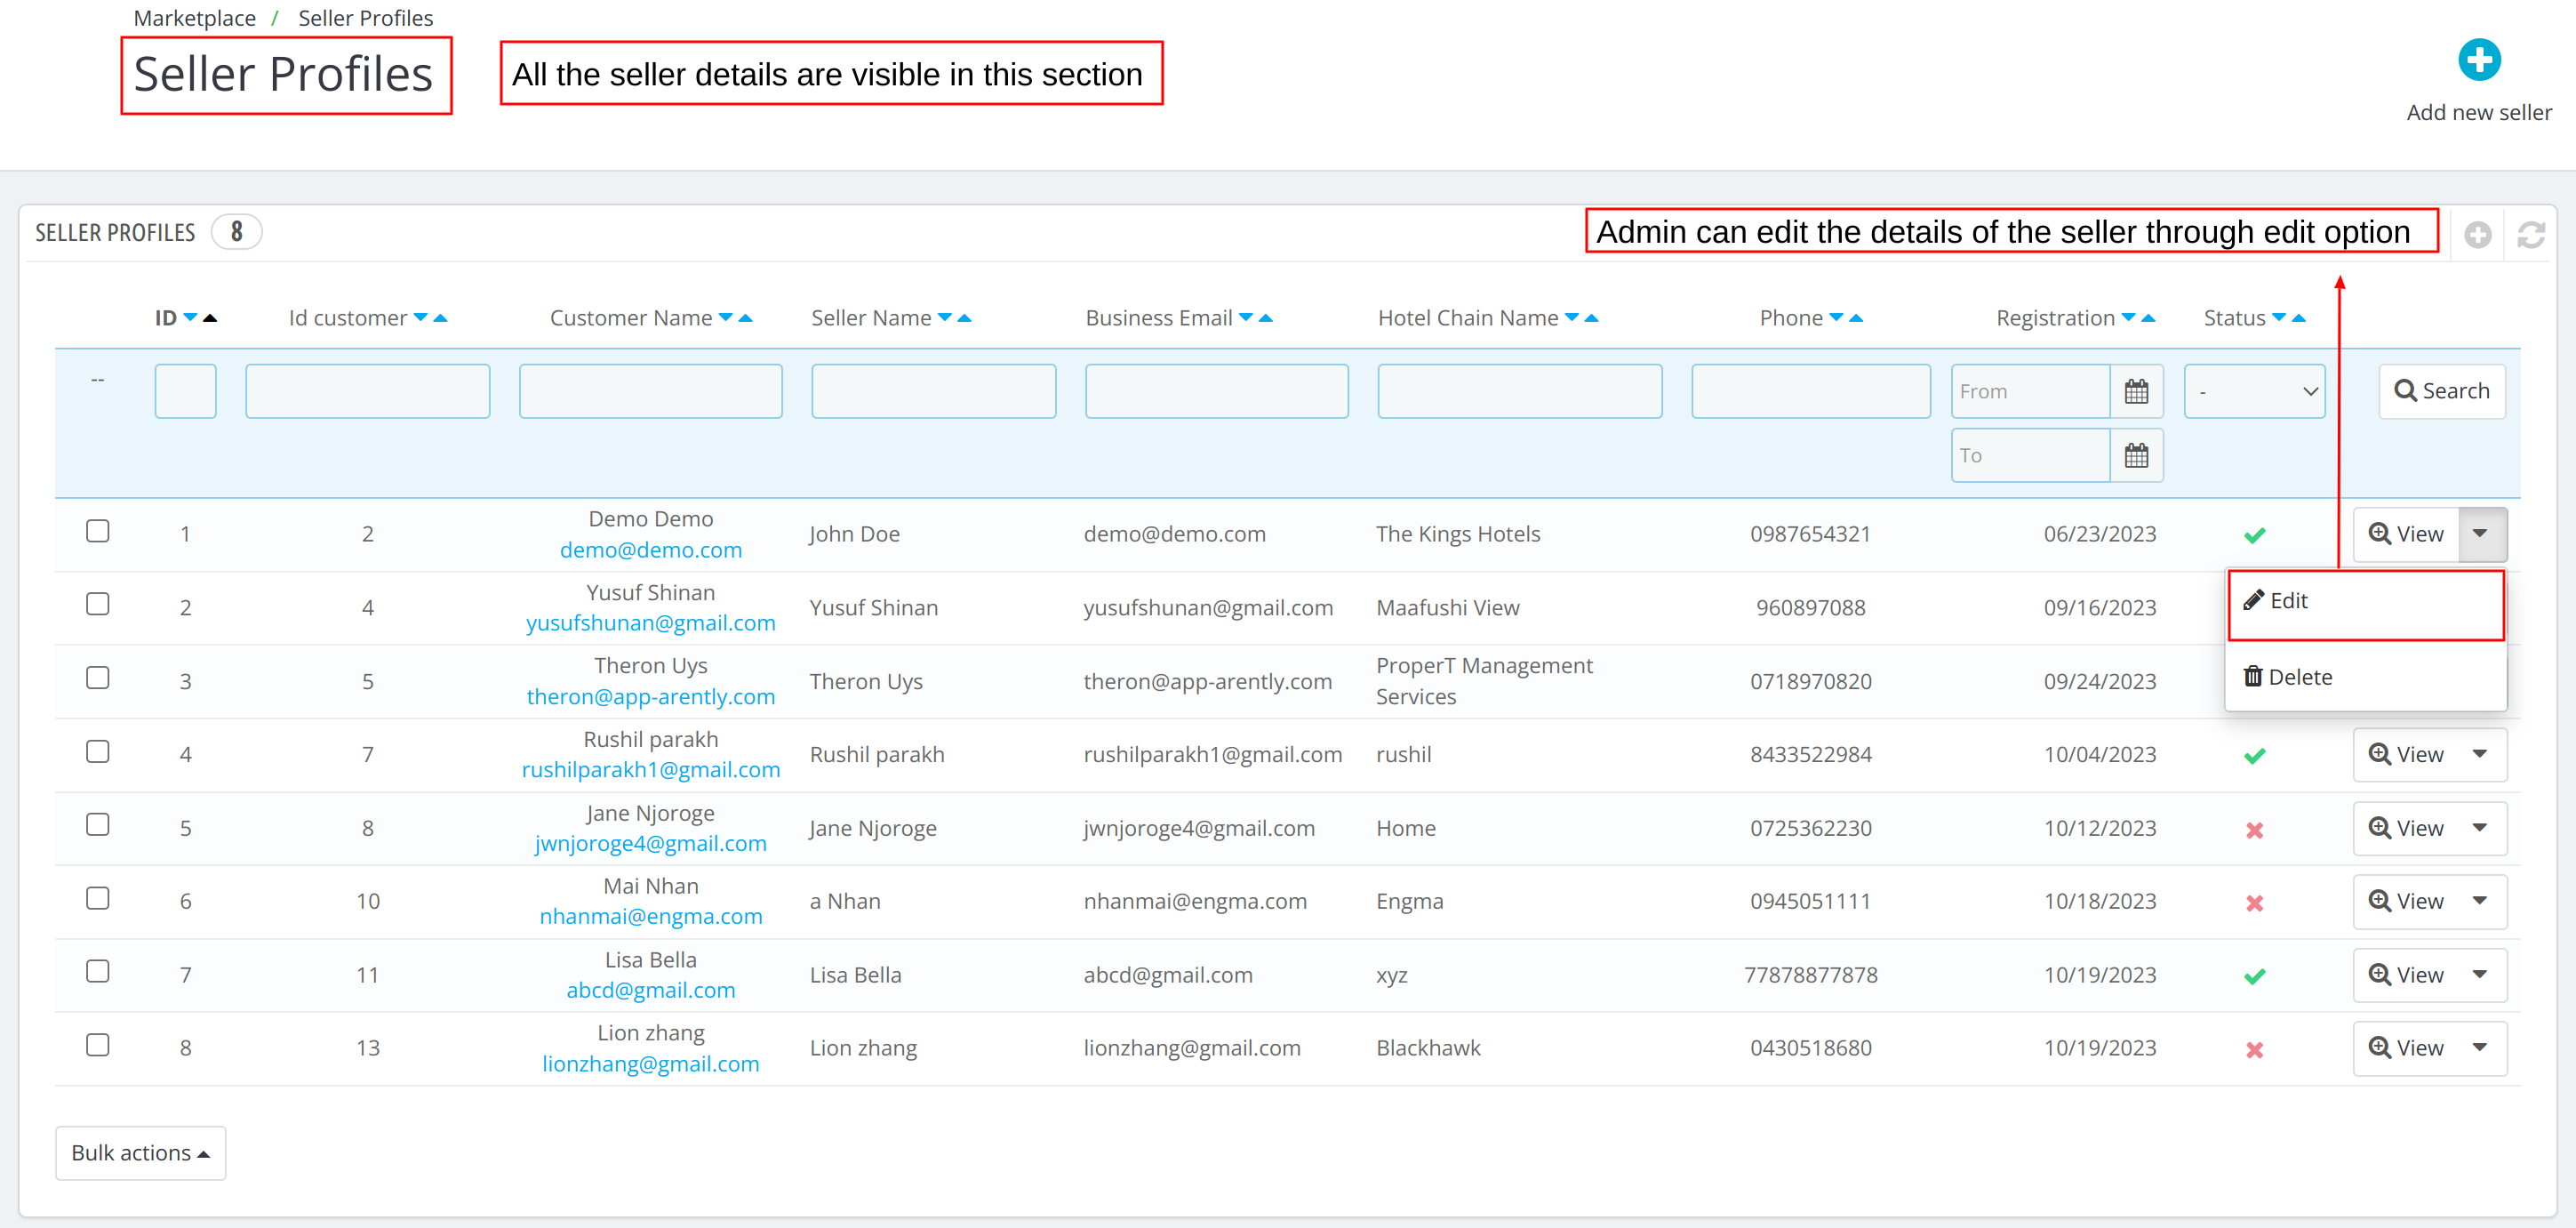
Hence, in this way, the admin can create new sellers for the hotel marketplace. And their list is visible on the ‘Manage Seller Profile’.

Update Seller Profile From Backend
Edit process of seller profile
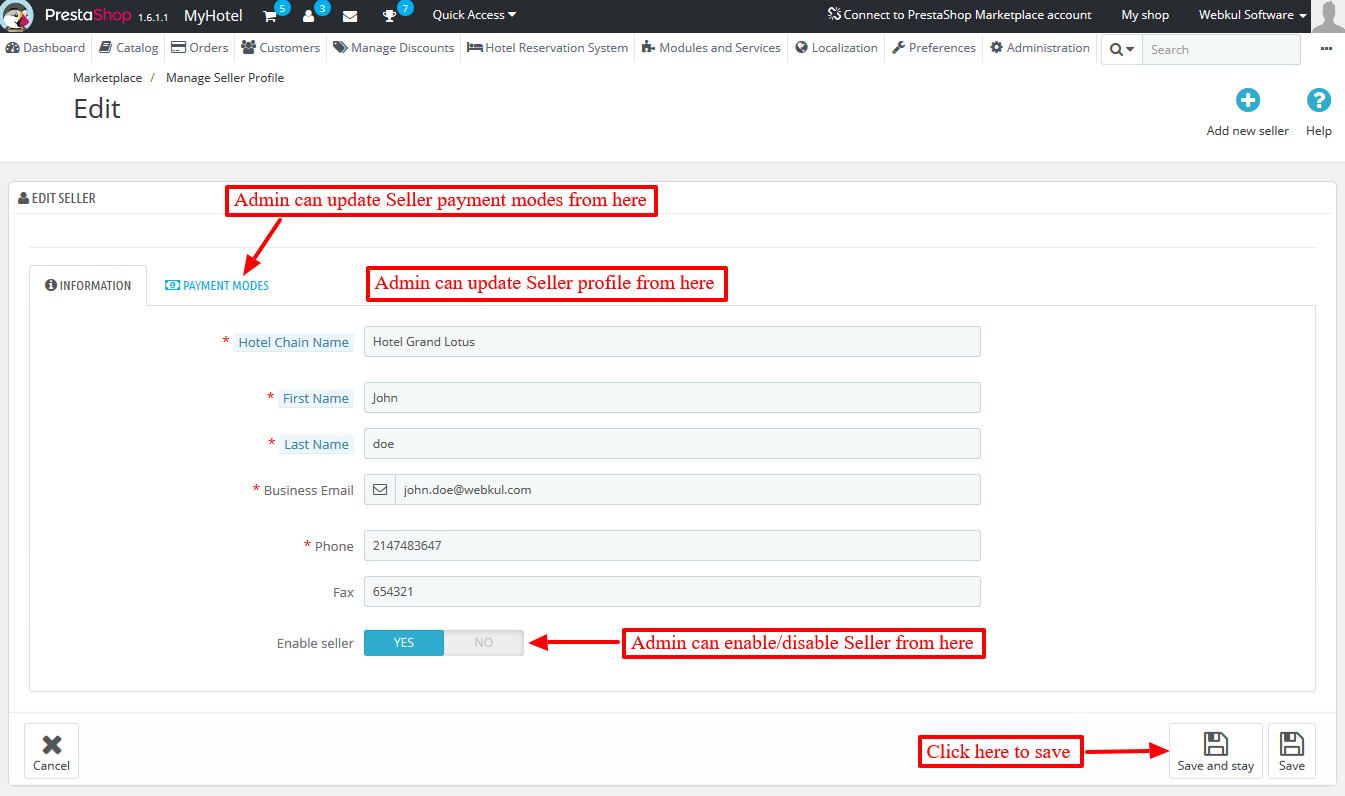
The admin can edit or update the seller profile from the back office.
Go to Marketplace -> Manage Seller Profile -> -> Particular Seller Profile -> Click on ‘Edit’ button
After clicking the ‘Edit button’ the admin can update the seller profile and payment mode.
Overview of Seller Profile
Admin can get a complete comprehensive overview of the seller profile and its details easily on one page by clicking on the view button.

Once the admin clicks on the view button, a page will open displaying all the data about the seller including the seller’s profile, bookings, hotels, room types, and cancellation requests.

Process of adding seller property in the QloApps marketplace by Admin from the Back Office
Seller Hotels
Admin can easily add seller hotels from the back office.
Go to Marketplace -> Seller Hotels -> Click ‘Add new Hotel’
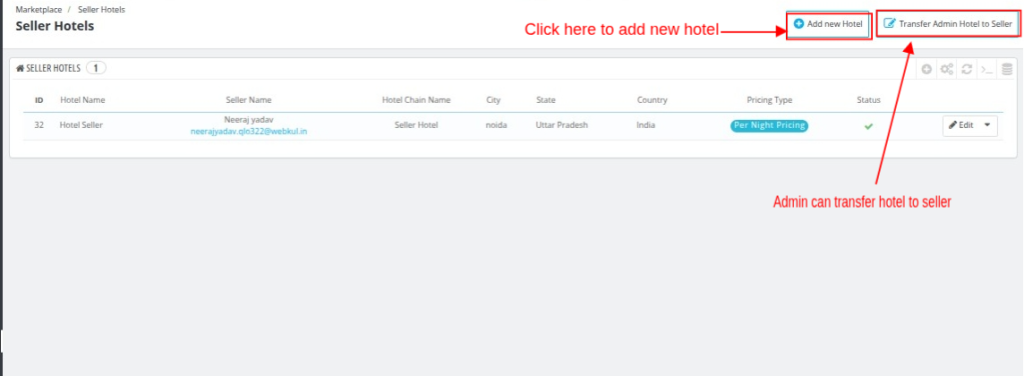
Transfer Admin Hotel to Seller
The “Transfer Admin Hotel to Seller” feature allows the admin to assign an already created admin hotel to a marketplace seller.
Along with the hotel, all the associated room types and service products created for that hotel are also transferred automatically to the seller account.
The admin has to select the seller and fill in the hotel details in 5 sections.
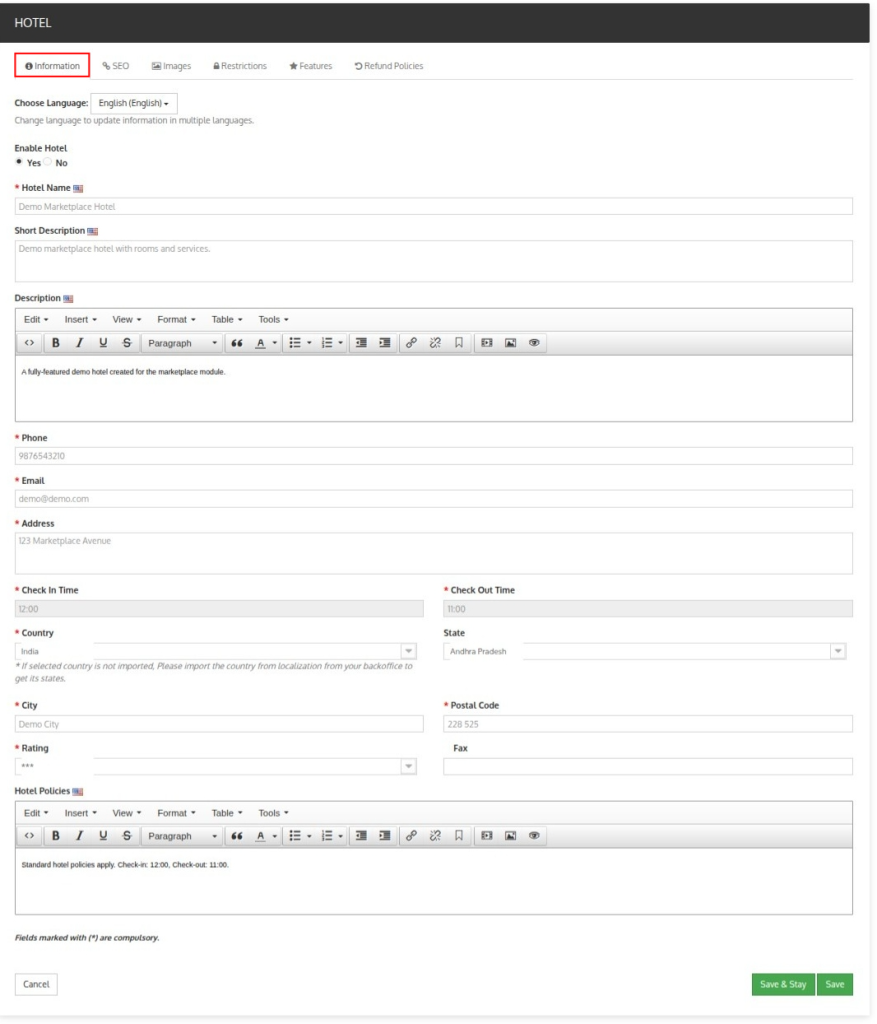
Information
In the Information panel, the admin provides the basic details of the seller hotel, such as its name, address, contact information, and description.
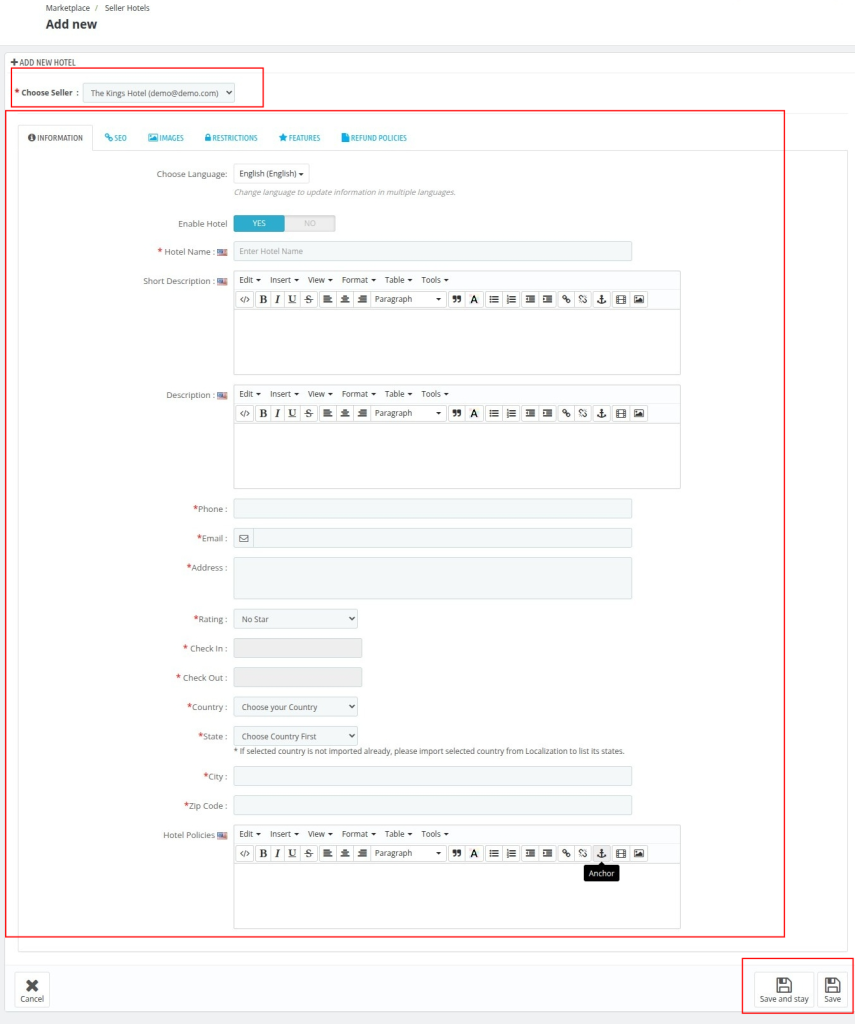
- Enable Hotel: To enable/disable the hotel
- Hotel Name: Enter the name of the hotel.
- Short Description: Give a Short description of the hotel.
- Description: Give a detailed description of the hotel.
- Phone: Contact number of the hotel.
- Email: Enter the official Email-ID of the hotel.All booking information and related details will be sent to this email.
- Address: Enter the Address of the hotel.
- Rating: Select the star rating of your hotel from the drop-down menu.
- Check-In: Set the check-in time in hours and minutes.
- Check-Out: Set the check-out time in hours and minutes.
- Country: Choose your country from the drop-down menu.Note: If your country is not available in the drop-down menu, then you need to import that country from the Localization tab.
- City: Enter your city name.
- State: Choose your state from the drop-down menu. You need to first choose the country before selecting the state.
- Zip Code: Enter the zip code of the hotel.
- Hotel Policies: Provide the key policies of your hotel, such as pet policies, cancellation rules, or any other important guidelines that guests need to know
Click on save to save the information
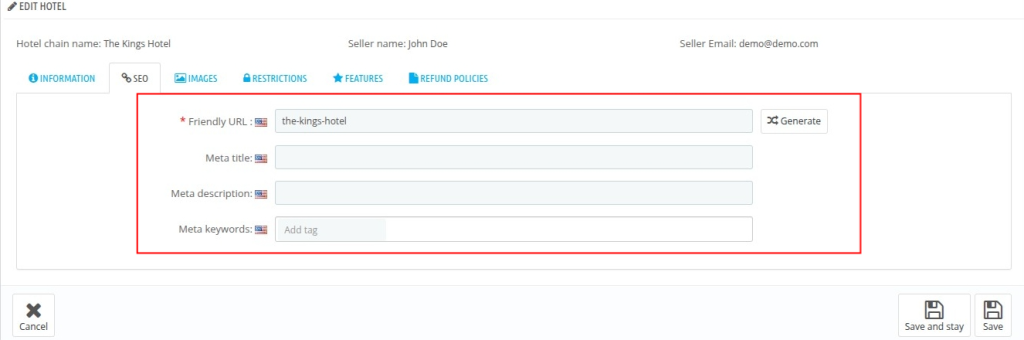
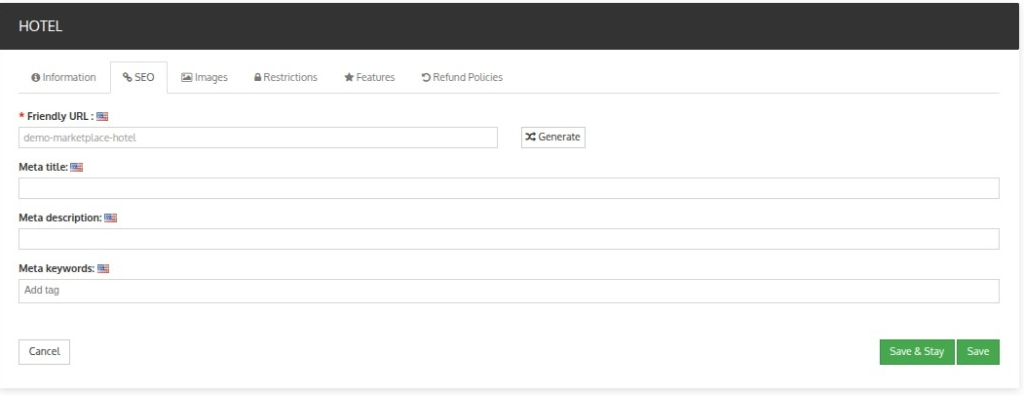
SEO
These fields help improve the seller hotel’s online visibility and make it easier for people to find your hotel on search engines.
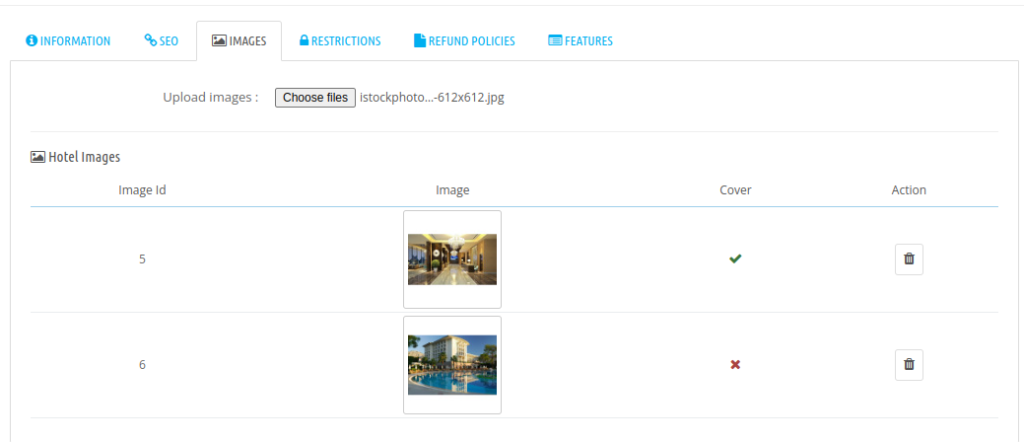
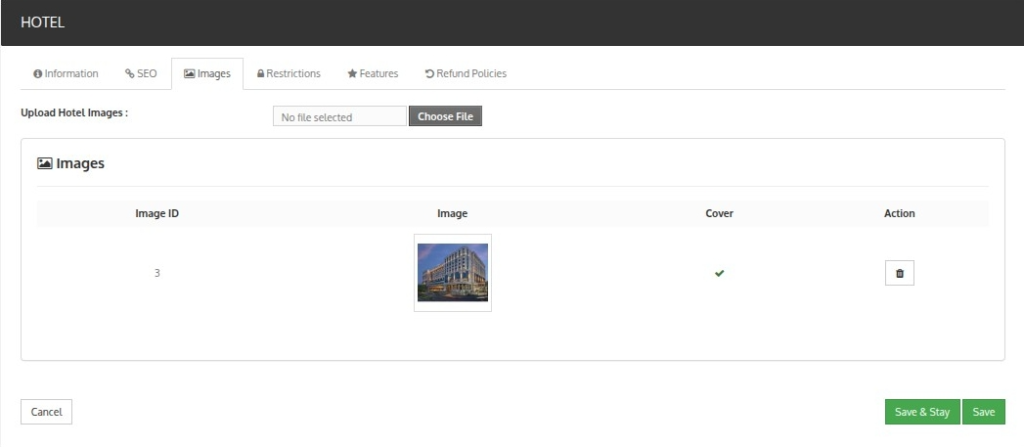
Images
In the Images panel, upload images of the hotel to showcase its features. You can select one image as the cover image, and the others will be arranged in the order you upload them.Then click on save
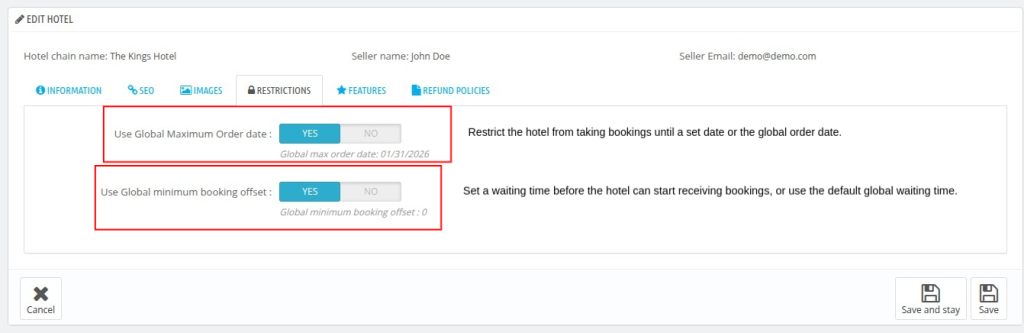
Restrictions
The section allows the admin to manage booking offset limitations for the hotel.
Using these settings, the admin can define the maximum checkout offset and minimum booking offset globally for hotel bookings.
- Use Global Maximum Checkout Offset
This setting allows the admin to apply the global maximum checkout offset for the hotel bookings.
- Use Global Minimum Booking Offset
This setting allows the admin to apply the global minimum booking offset for the hotel bookings.
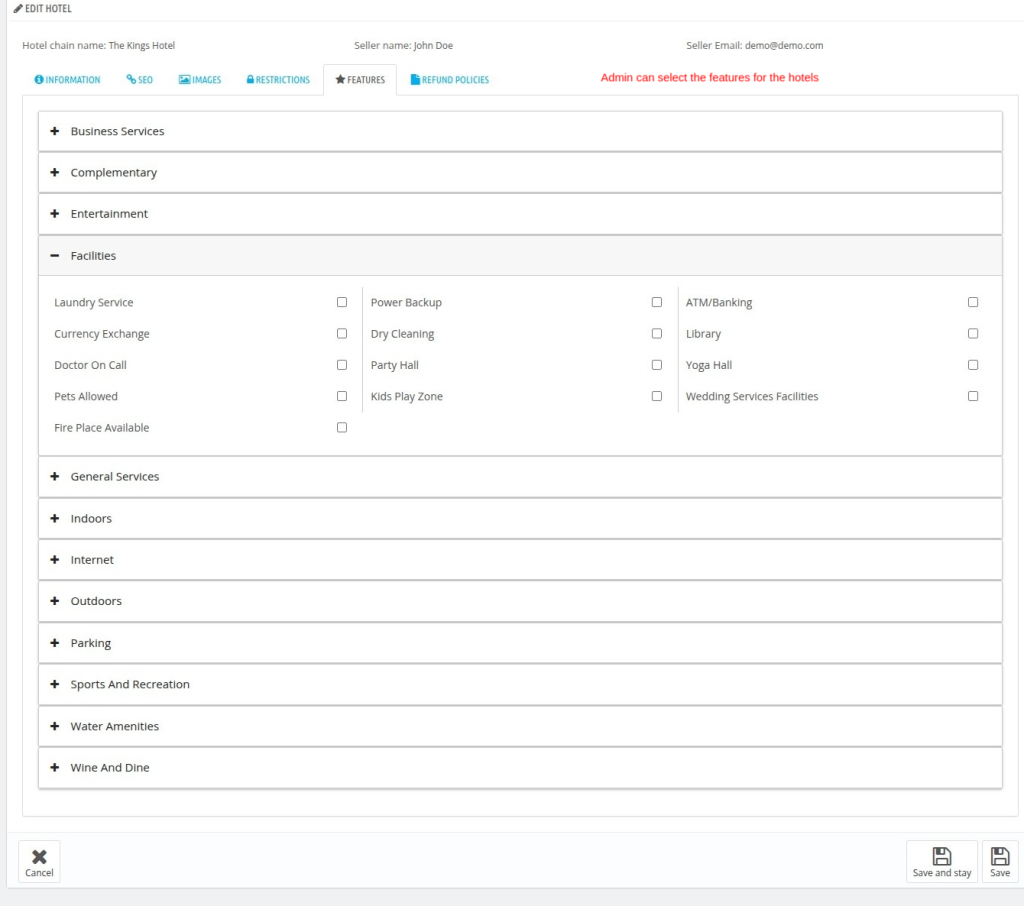
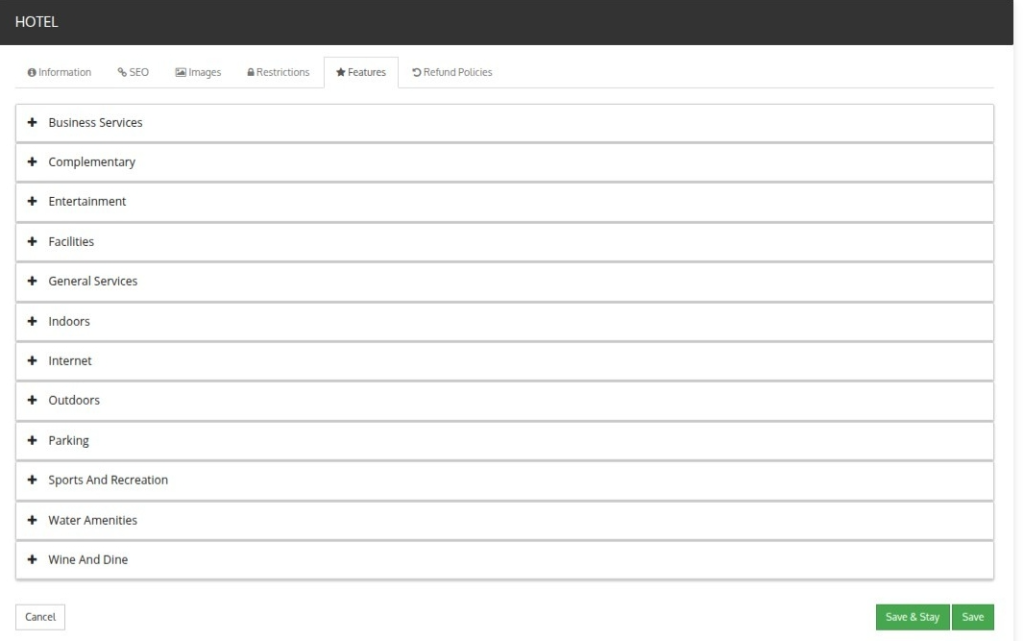
Features
The admin will assign all the relevant features that the seller hotel offers.
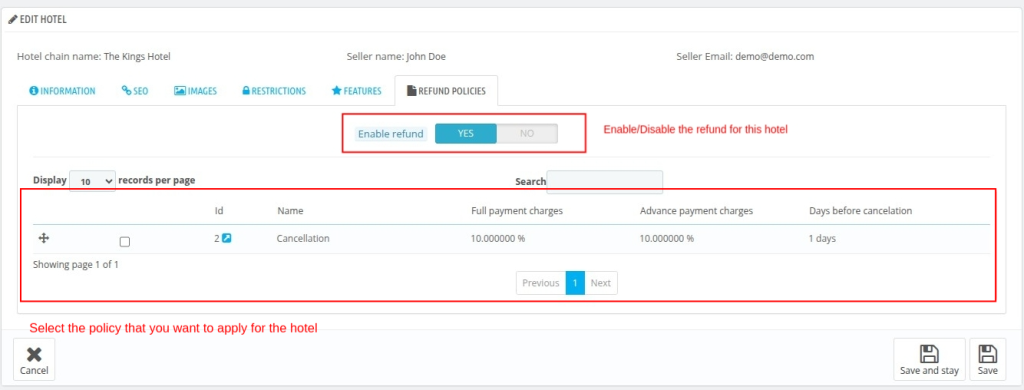
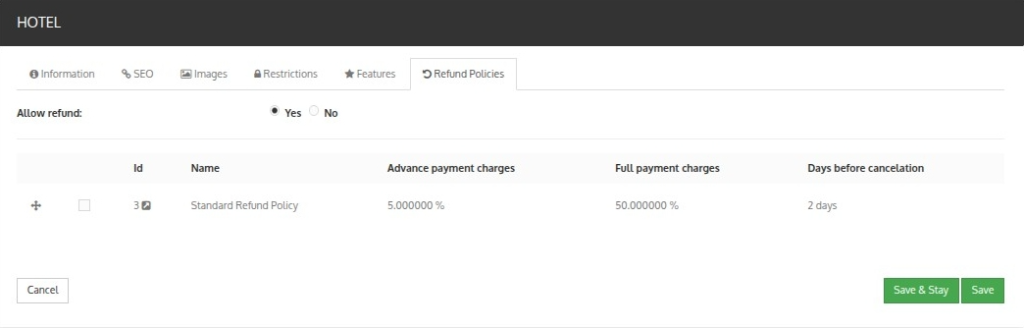
Refund Policies
The admin can choose seller hotel refund policies from the Refund Policies tab. Before doing so, they must ensure that a refund policy is already created.
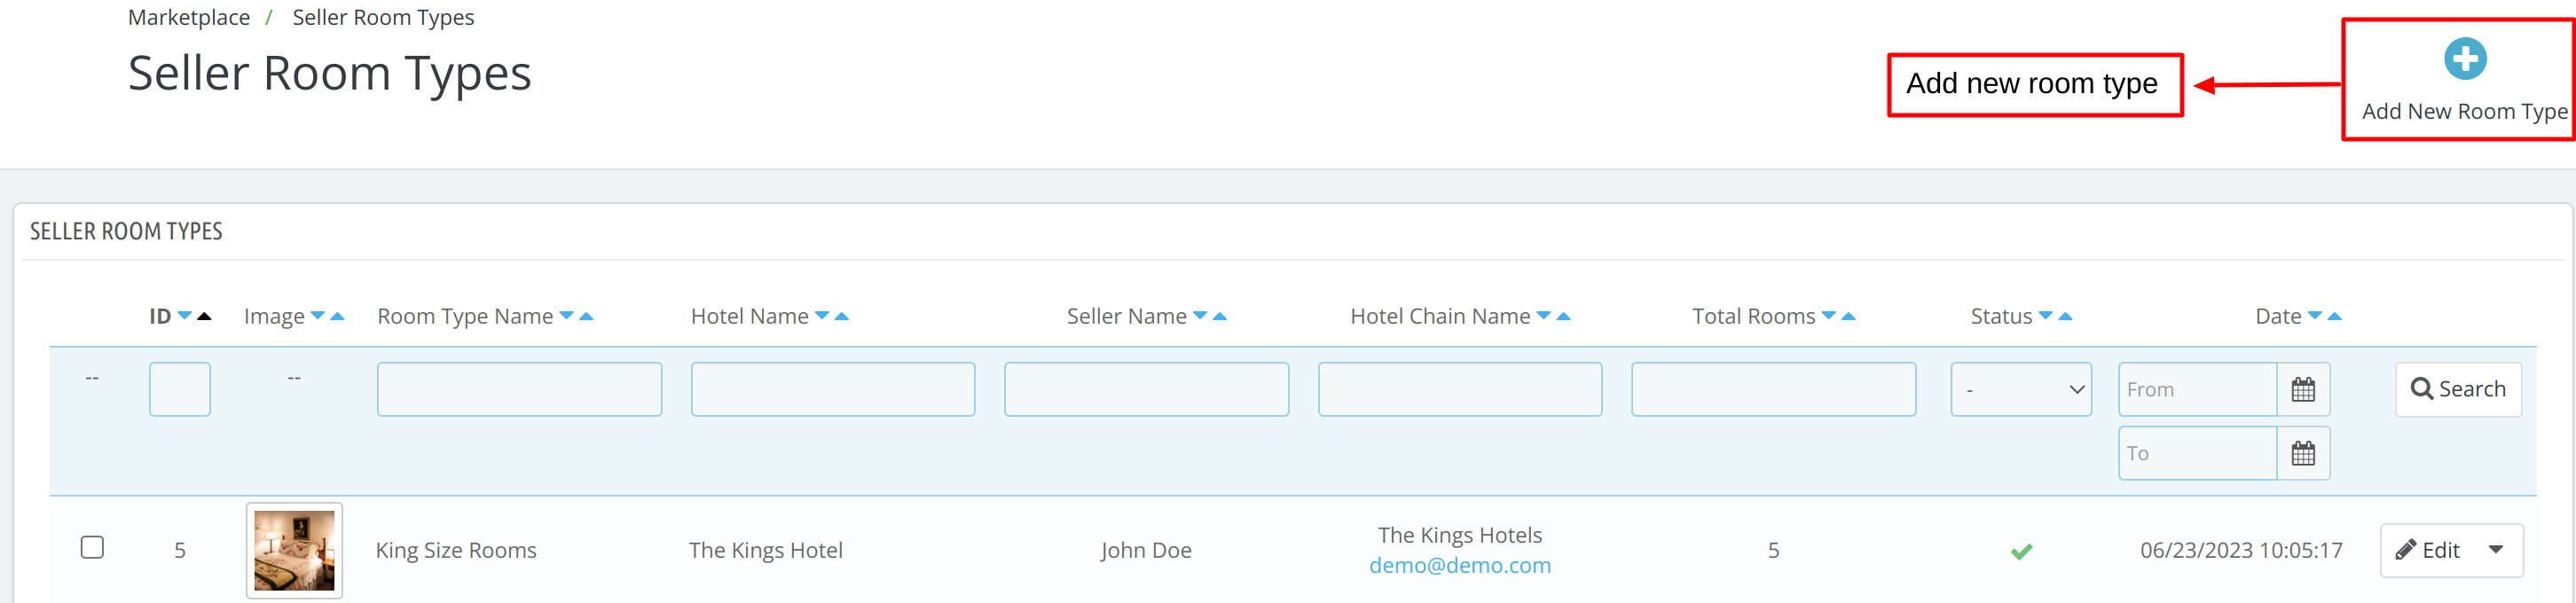
Seller Room Types
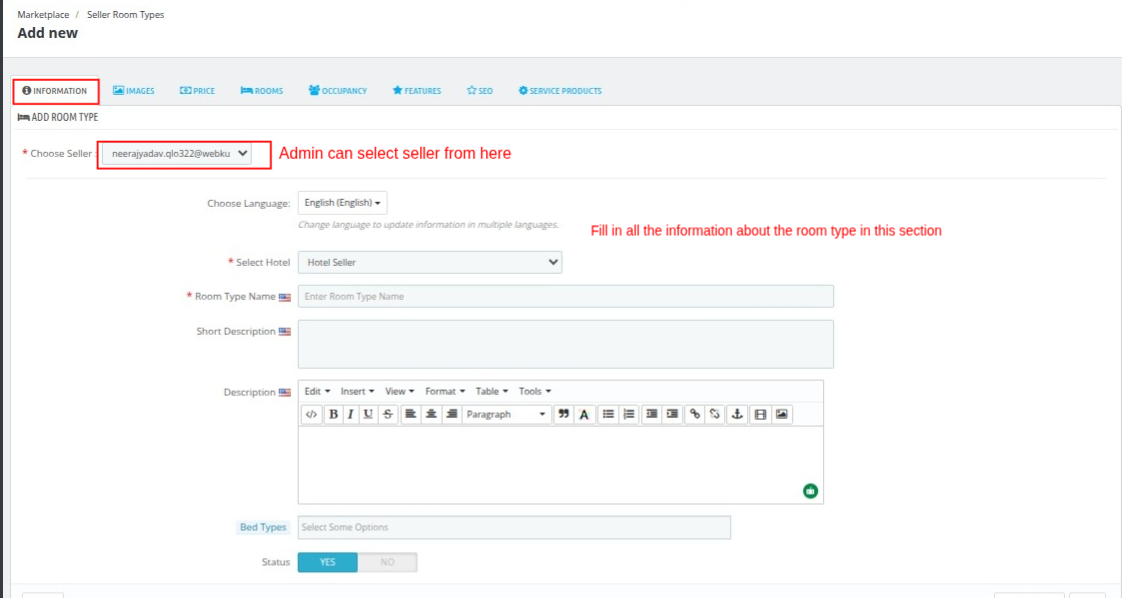
To add a room type in the hotel from the back end admin had to go to Marketplace -> Seller Room Type -> Add New Room Type
Now we have to fill the 8 sections to add a new room type in Marketplace.
Information
Now, the admin has to choose the seller and fill in room type information.
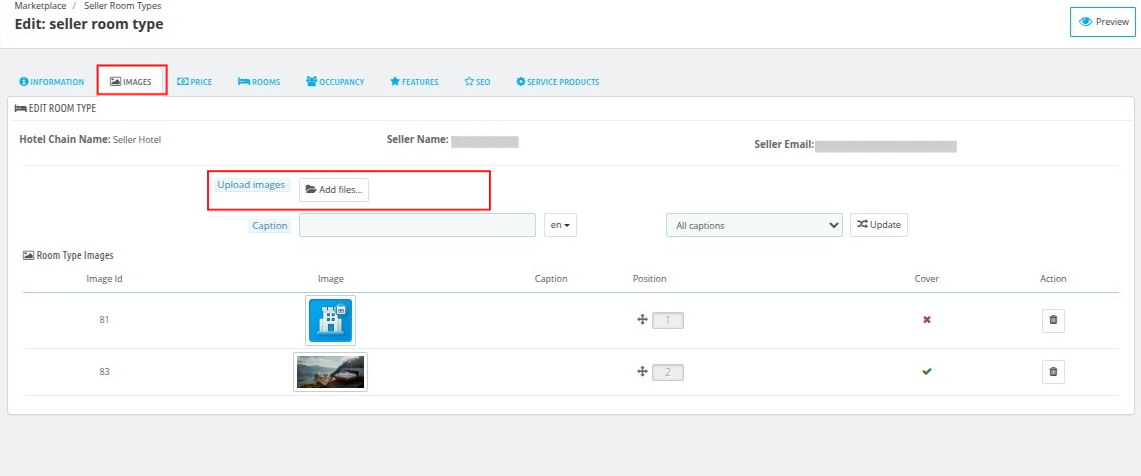
Images
Next, upload the images of the room type.
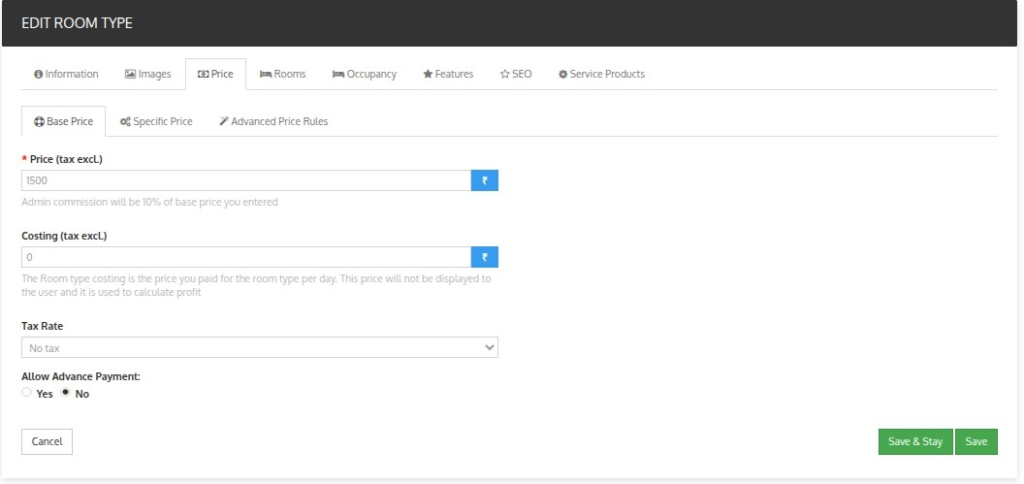
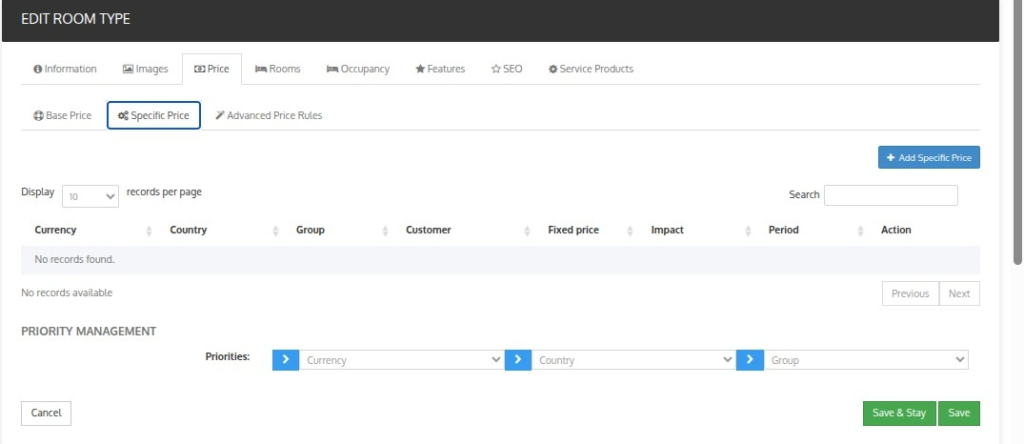
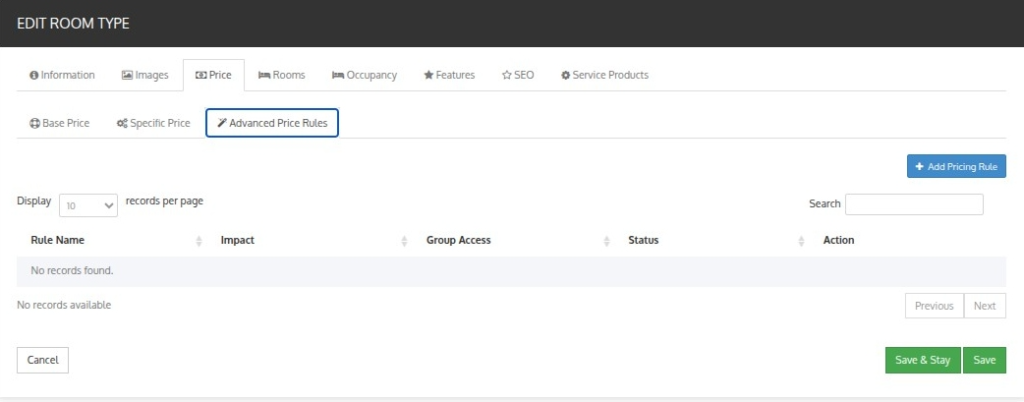
Price
Admin can set the price of the room type using the 3 different price sections.
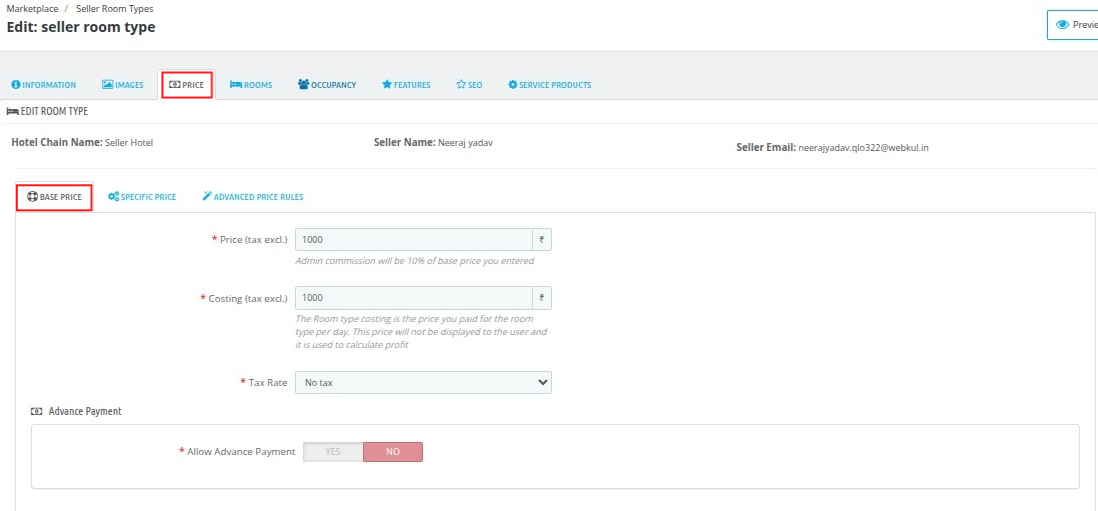
Base Price
- Price(tax excluding): Enter the base price of the room type. The admin commission will be calculated on the base price.
- Costing(tax excluding): It means the price you pay for the room type per day. It will not display to the user.
- Tax Rate: Select the rate of tax.
Advance Payment
- Allow advance payment: Enable it, to allow customers to make the advance payments.
- Set advance payment: If disabled, advance payment for this room type will be calculated by global advance payment value (i.e., 10 percent).
- Price calculation method: Set percent or amount.
- Value: Enter the value of the percent or amount you will charge.
- Tax include: Enable to include tax.
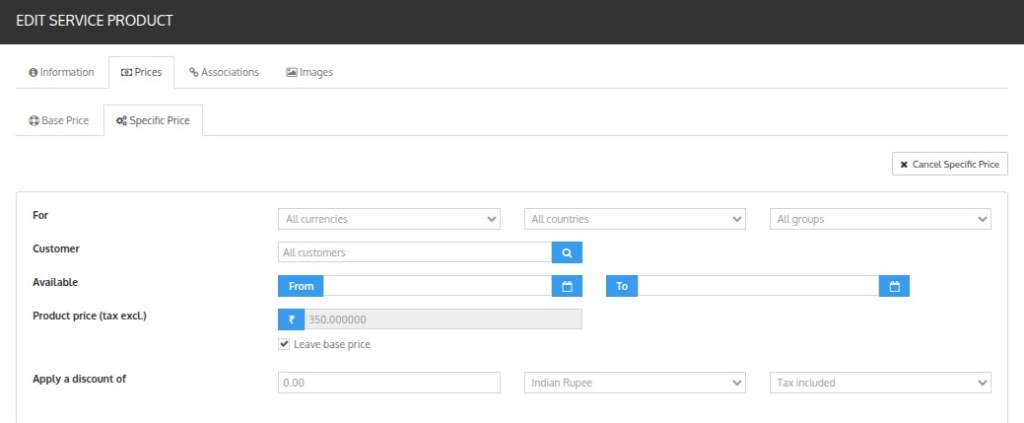
Specific Price
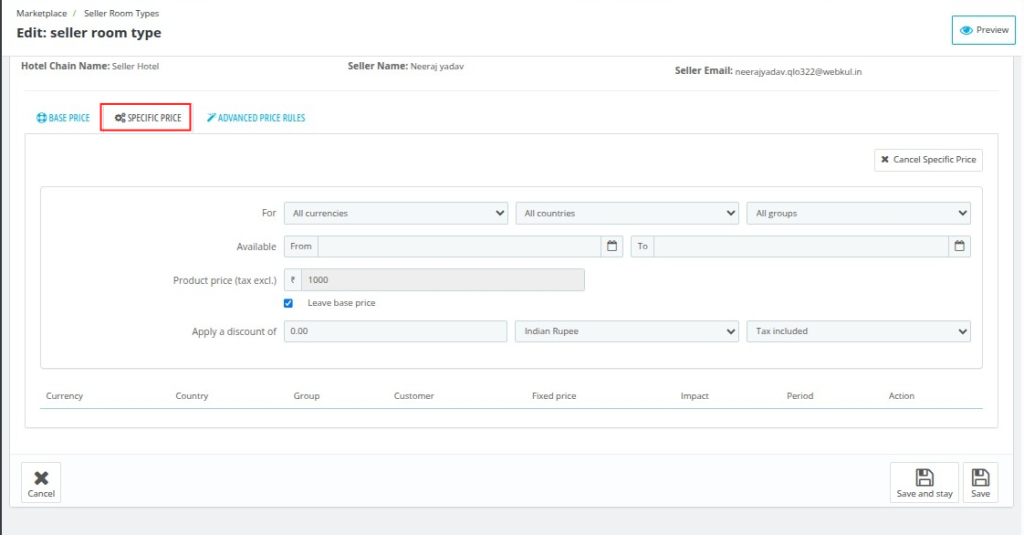
- For: Set the specific price for the room type for all or specific currencies, countries, and groups.
- Available: Select the date range for which this price is available.
- Product price: Write the price of the product or leave the base price as the product price.
- Apply Discount: Write the discount you want (with or without tax)
Advanced Price Rule
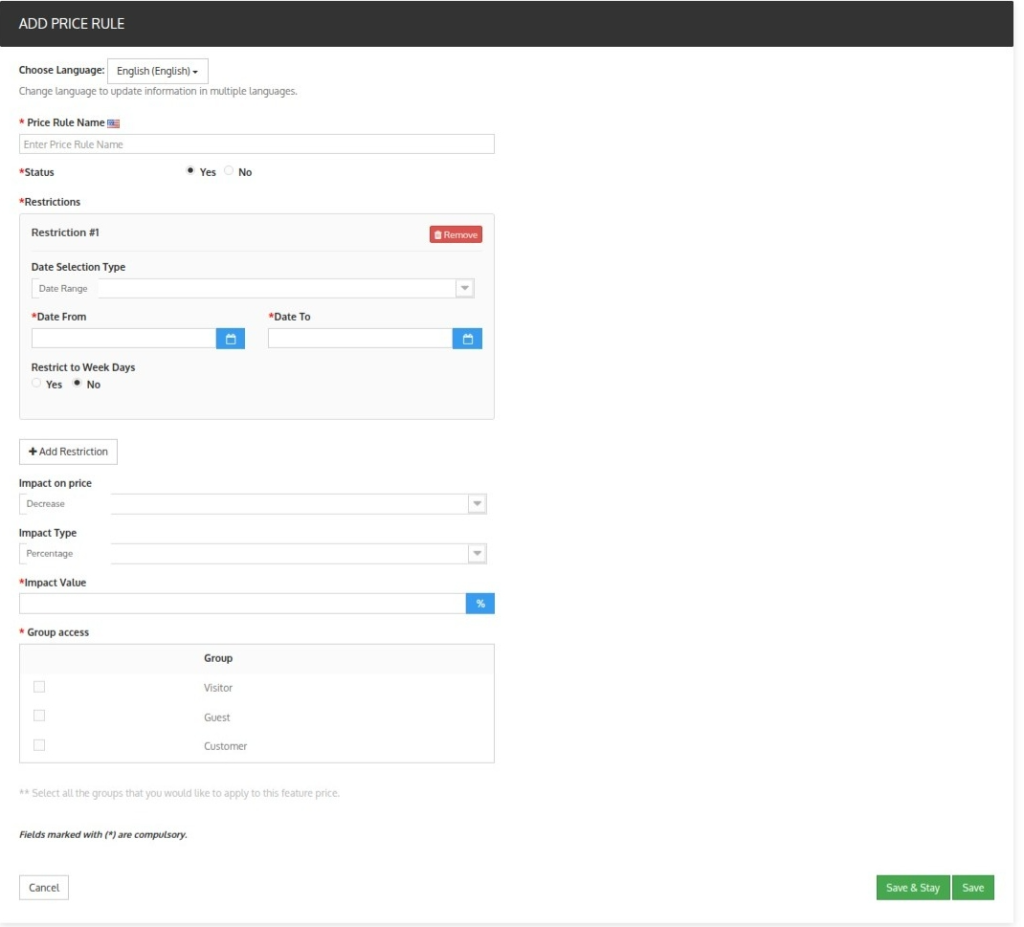
Add a new pricing rule by clicking on the tab ‘Add Pricing Rule’.
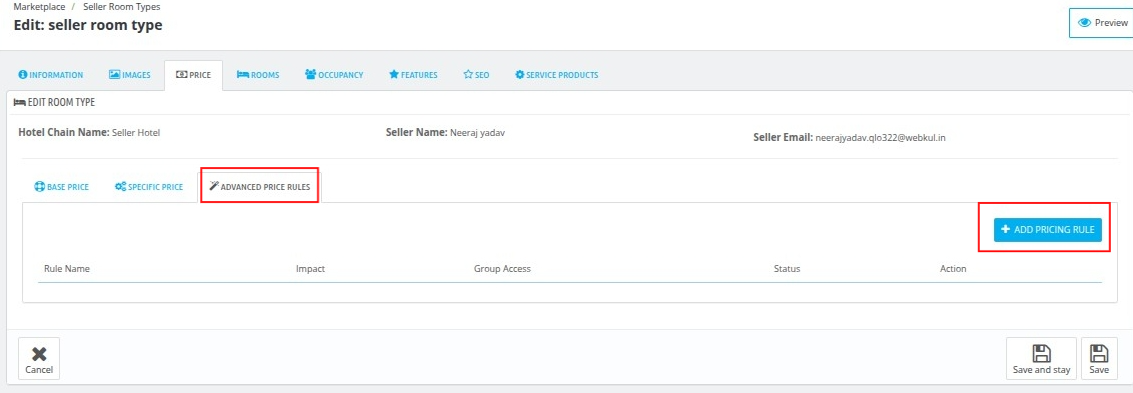
- Price rule name: Write the name of the pricing rule.
- Date selection type: Want to apply this rule for a specific date or date range.
- Date from-Date to: Likewise, you will have to select the date range (if you select date range under date selection type).
- Particular days: Select the days if you want to apply this price for specific days.
- Impact on Price: Select the impact you want on price. Like whether it will increase or decrease.
- Impact Type: Select percentage or amount.
- Impact Value: Value of percentage or amount that you will charge.
- Status: Enable or disable the advance price rule from here.
- Group access: Select the group that can enjoy this pricing.
Now, the admin can add multiple restrictions together within the same pricing rule.
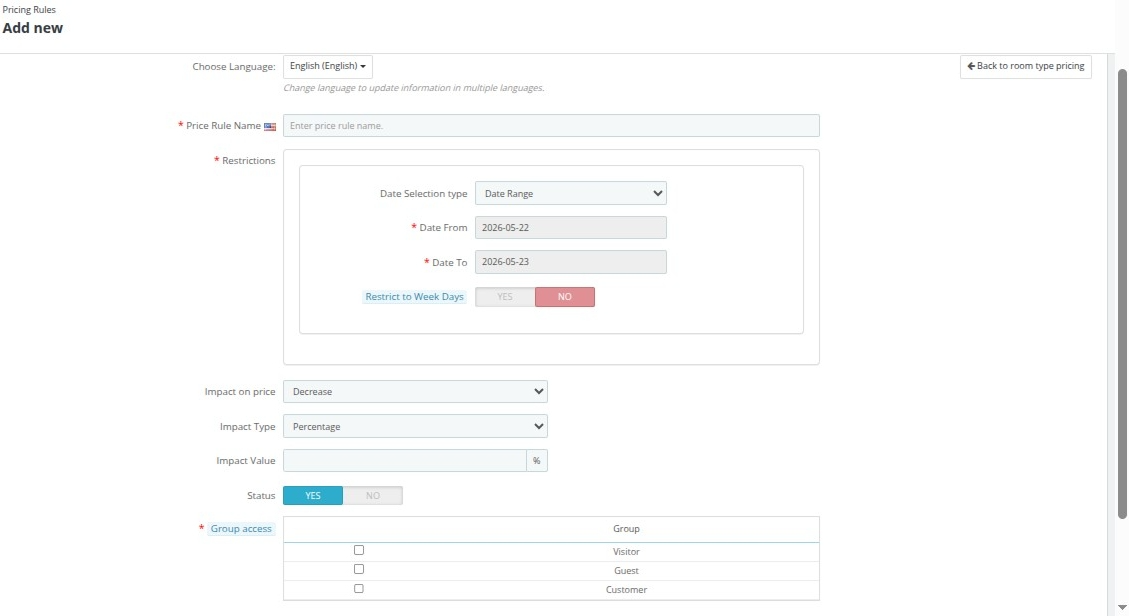
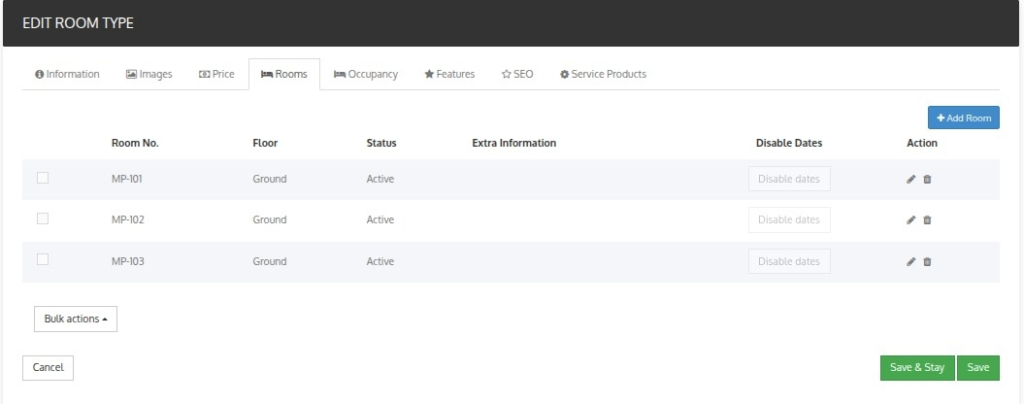
Rooms
Using this section, the admin can add and edit the inventory of the room type.
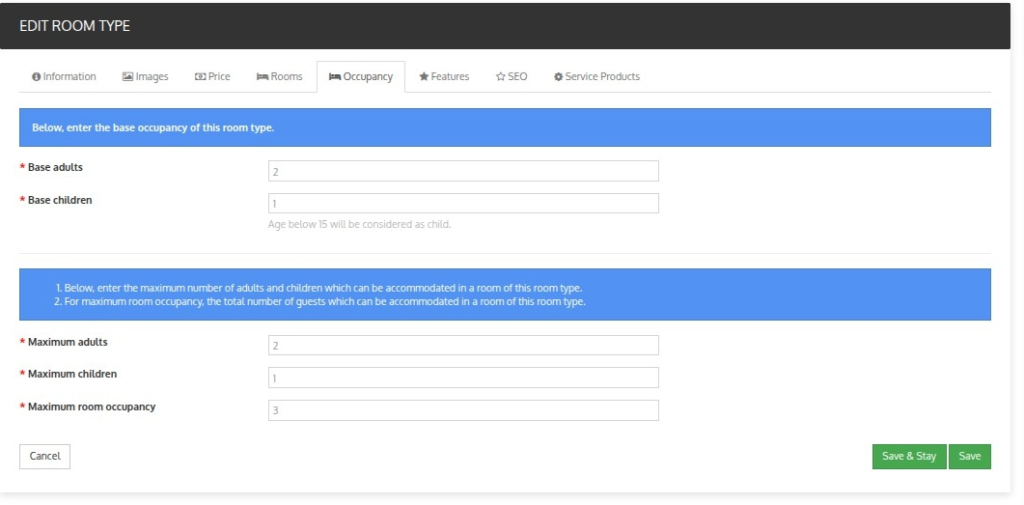
Occupancy
Specify the base and maximum occupancy of the adults and children in the room type.

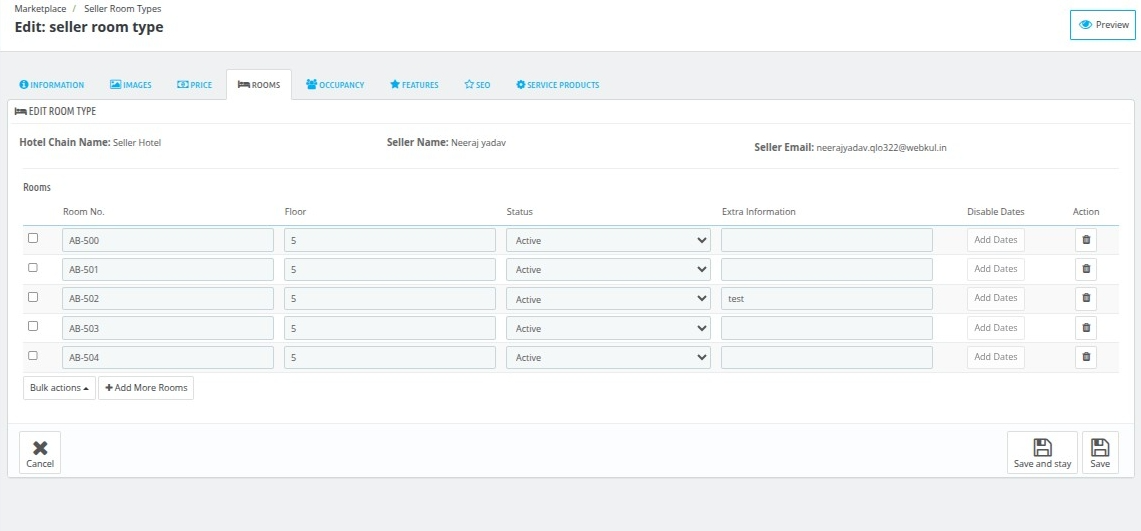
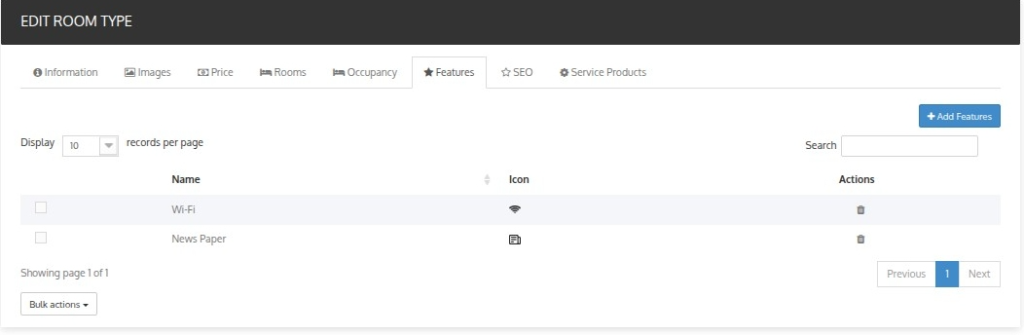
Features
Select the features available with this room type.
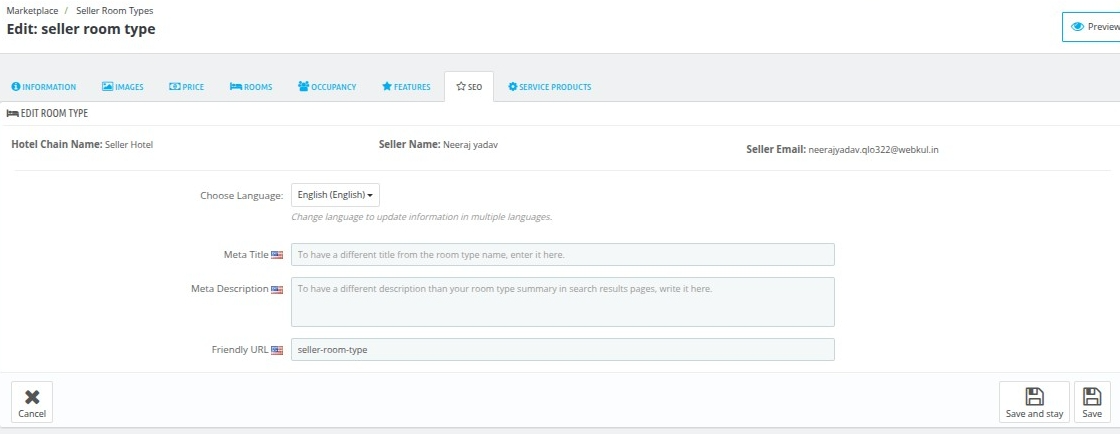
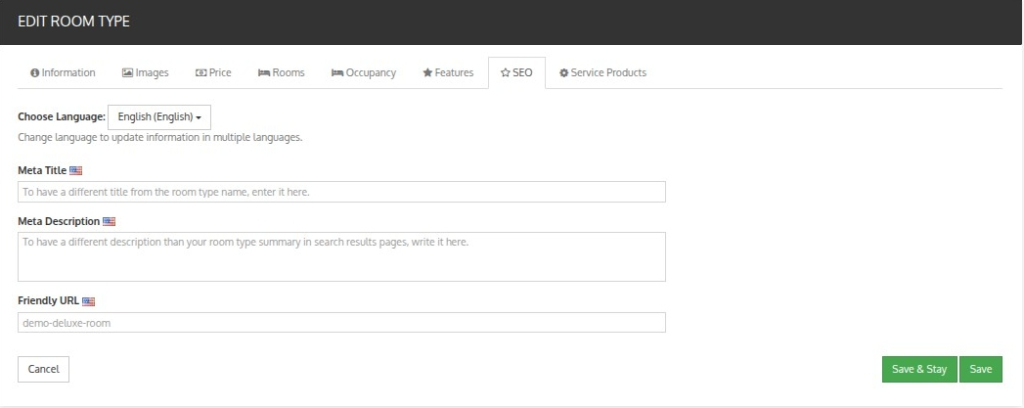
SEO
Write the meta title, description, and friendly URL to rank higher in the search result pages.
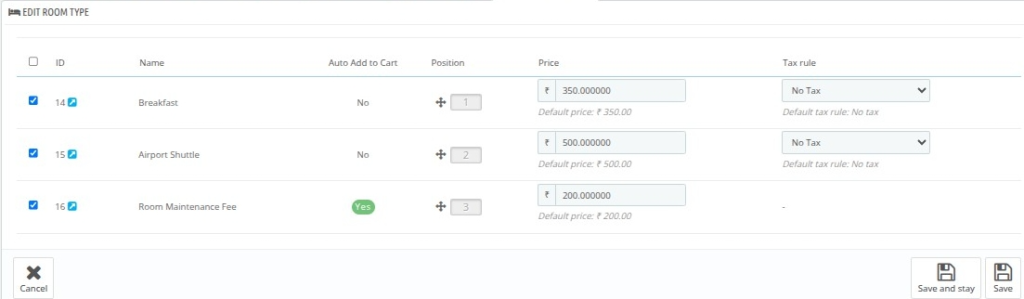
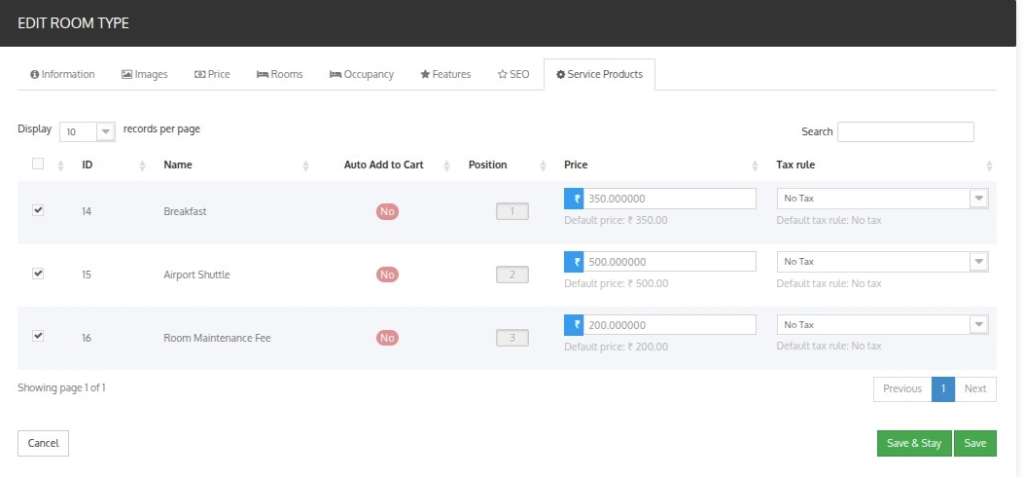
Service Product
Assign the service products you provide in your hotel to the room type with this section.
Hence, in this way, the admin can add seller room types in the marketplace.
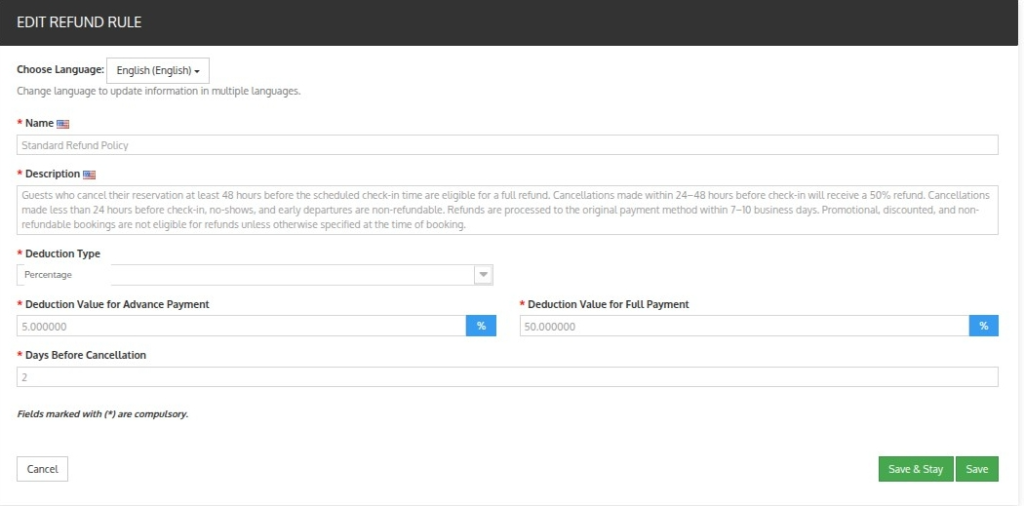
Seller Refund Rules
To add a refund rule from the back end admin had to go to Marketplace -> Seller Refund Rule -> Add New Refund rule.

The admin will then choose the seller and enter the details about the refund rule to create a new refund rule for the hotel.

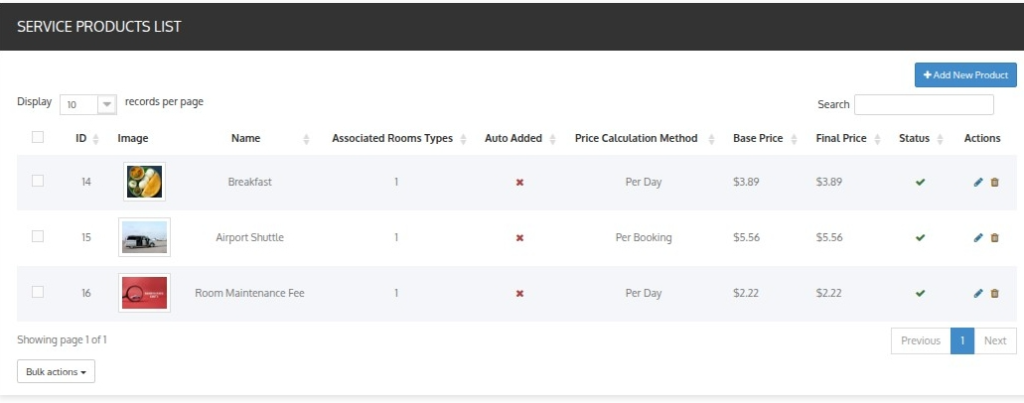
Seller Service Products
To add a new service product for the hotel from the back end admin had to go to Marketplace -> Seller Service Product -> Add New product.
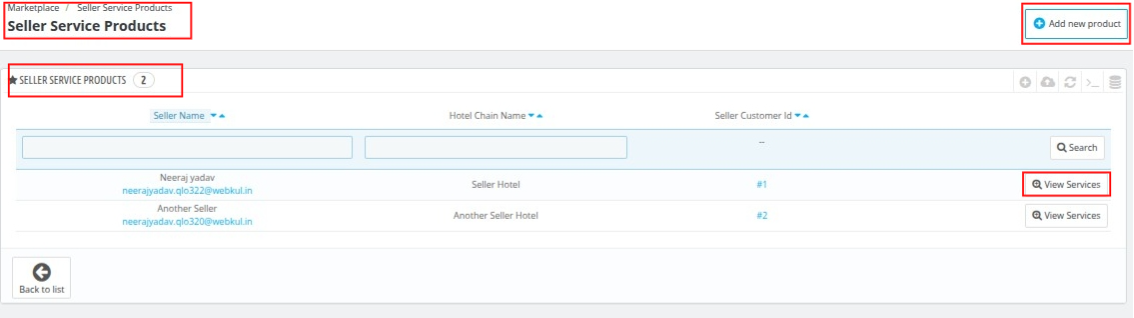
When the admin clicks on “Add New Product”, they will choose the seller for whom they want to create the service product, and you can also view services for the assigned seller.
When you click on the View Services option for an assigned seller, you will be redirected to the services page where all the seller’s service products are displayed.

After clicking on Add New Product, the admin needs to assign the seller and then can enter the required details under the Information, Prices, Association, and Images tabs.
Information
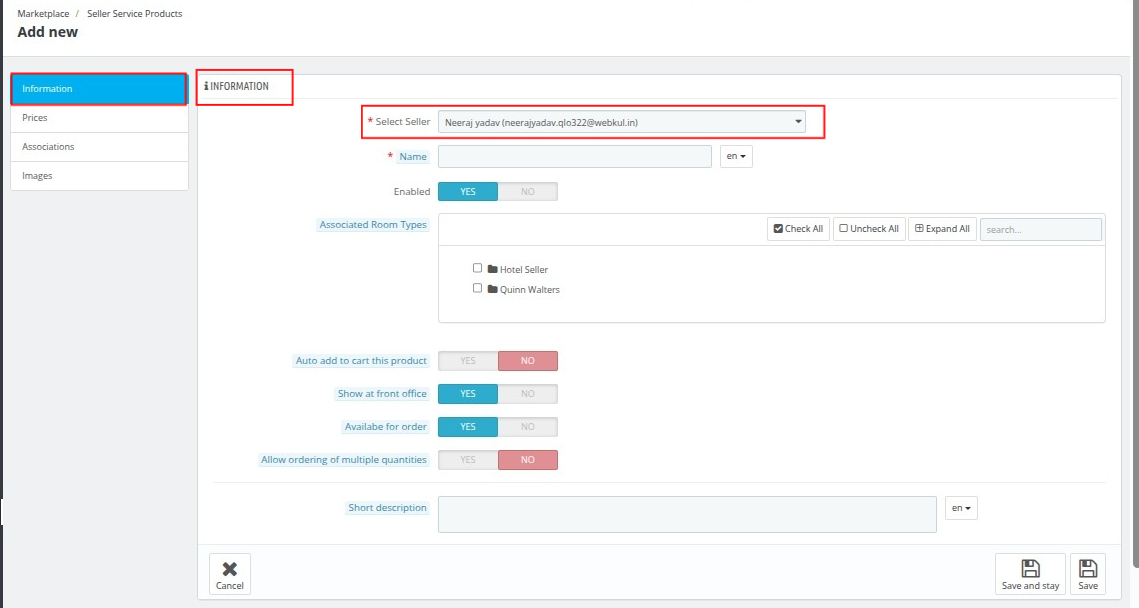
In the Information panel, fill in the following details:
- Name: Give a name to your service product.
- Enabled: Select yes to enable your service.
- Associated Hotel and Room Type: Select the hotel or its room type that gets associated with the service.
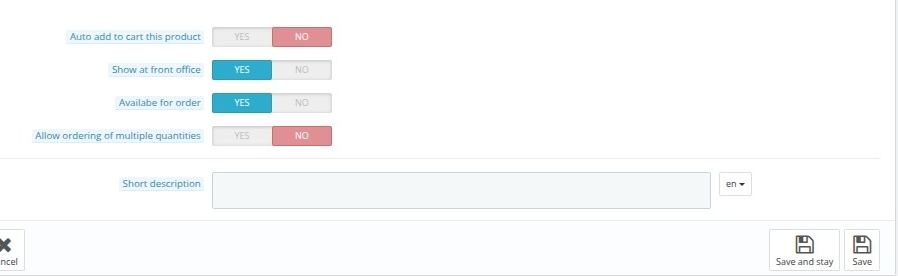
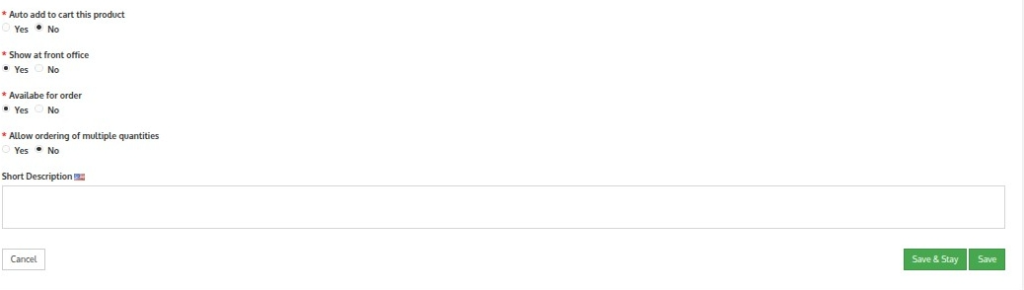
- Auto Add to cart this product: Select Yes or No.

When you select Yes the product gets added to the cart automatically. In the drop-down you will get two options as given below:
- Add price in room price: The service price will be added to the room base price. (e.g., Room price: 500, service price: 50, final room price: 550)
- Add price as convenience fee: Service price will be displayed in the order summary as “Convenience Fees”.
In auto add to cart product is not visible to the customer, and the price is added to the final total.
When you select No you will get the following option:
- Show at the front office: Enable if you want this product to be visible at the front office
- Available for order: Enable if you want this product to get selected.
- Allow ordering of multiple quantities: Enable ordering multiple quantities of the product for one room.
- Max quantity allowed: Enter the maximum quantity you want to get ordered. The default quantity to order is 1.
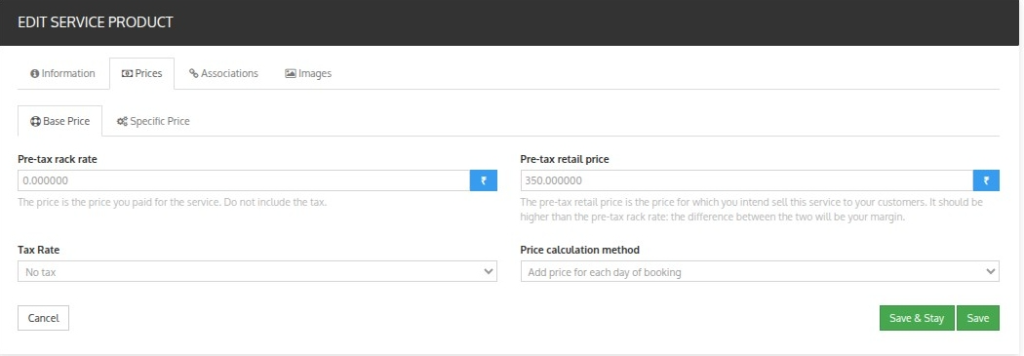
Price Section
In the Price section, the admin can define the pricing structure for the service product.

- Pre-Tax rack rate: This includes the base cost of the service product
- Pre-Tax Retail Price: Pre-tax retail price is the price for which you intend to sell this service product to your customer. It should be higher than the pre-tax operating cost. The difference between the two will be your margin
- Tax Rule: Select the tax rule from the drop-down you want to apply in the invoice. Here you can add the new rule by clicking on Create a new tax..
- Price calculation Method: Calculate the price of the service product on two bases. Firstly per day calculation or the price for the entire stay.
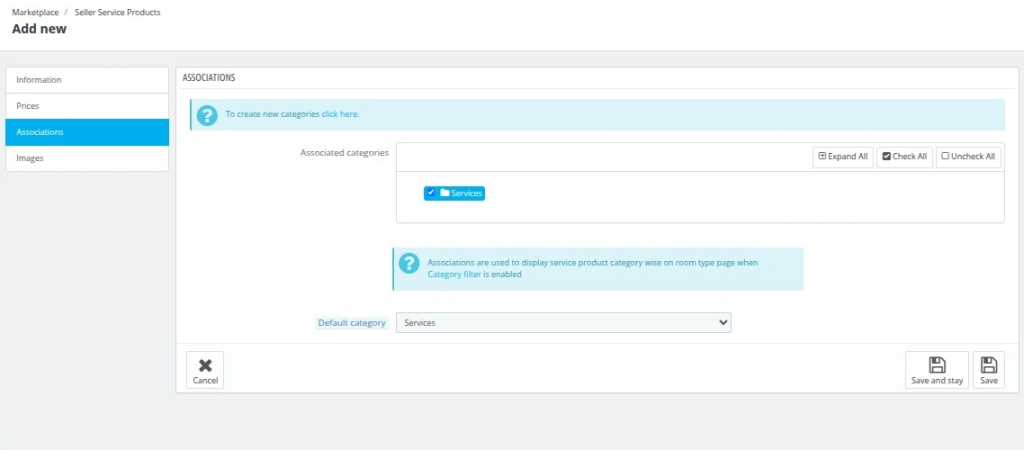
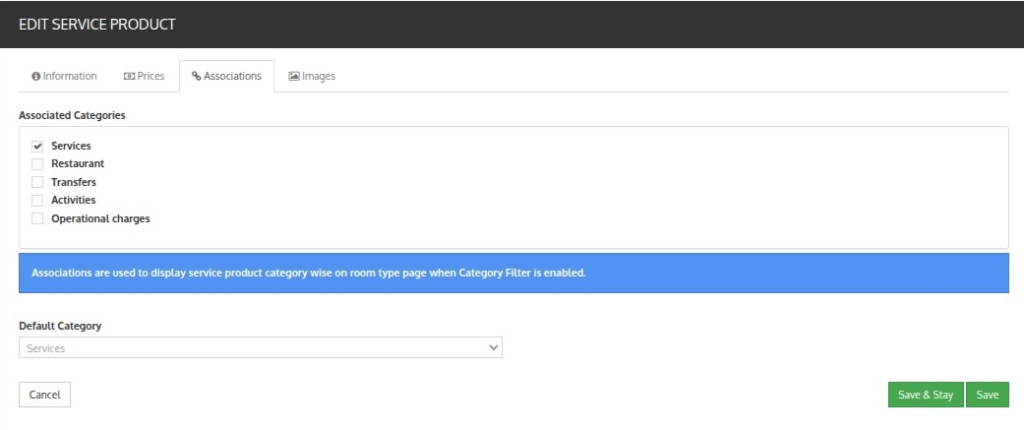
Association Section
The service products are linked with categories for better management and organization. By default, a default category is already available in the system.
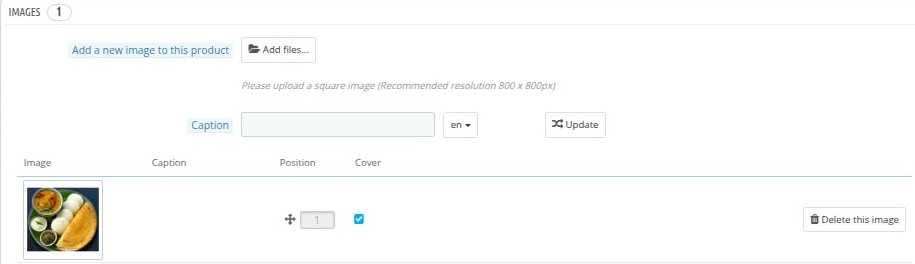
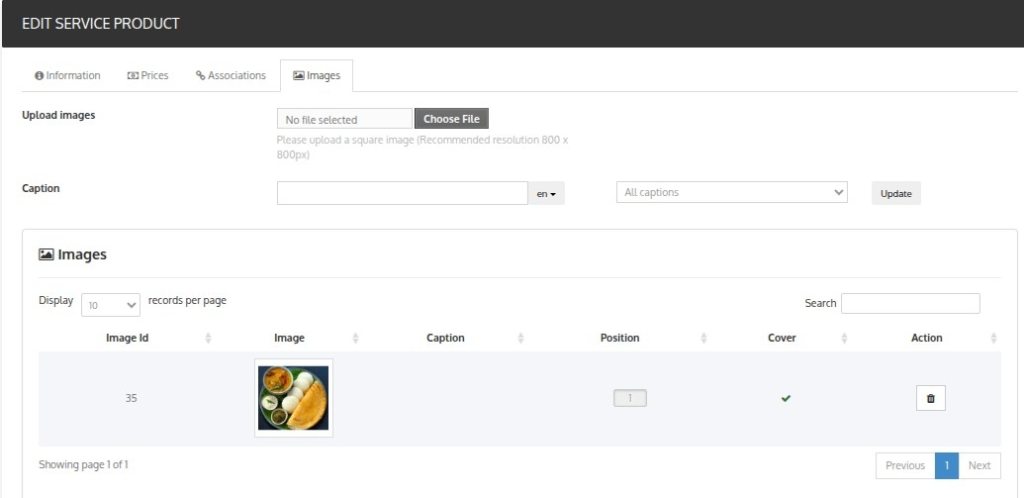
Images Section
Admins can upload images related to the service product to improve its presentation on the hotel website. Suitable captions can also be added for each image.
Commission Rates
Admin can set commission in the marketplace in two ways –
- Global Commission
- Seller Wise Commission
To edit or add commission in the marketplace, Go to Marketplace -> Commission Rates.
You will be redirected to the manage commissions page where you can view the list of seller-wise commissions, and global commissions.
Seller – Wise Commission
To add seller-wise commission, the admin should first select ‘Add Admin Commission’.
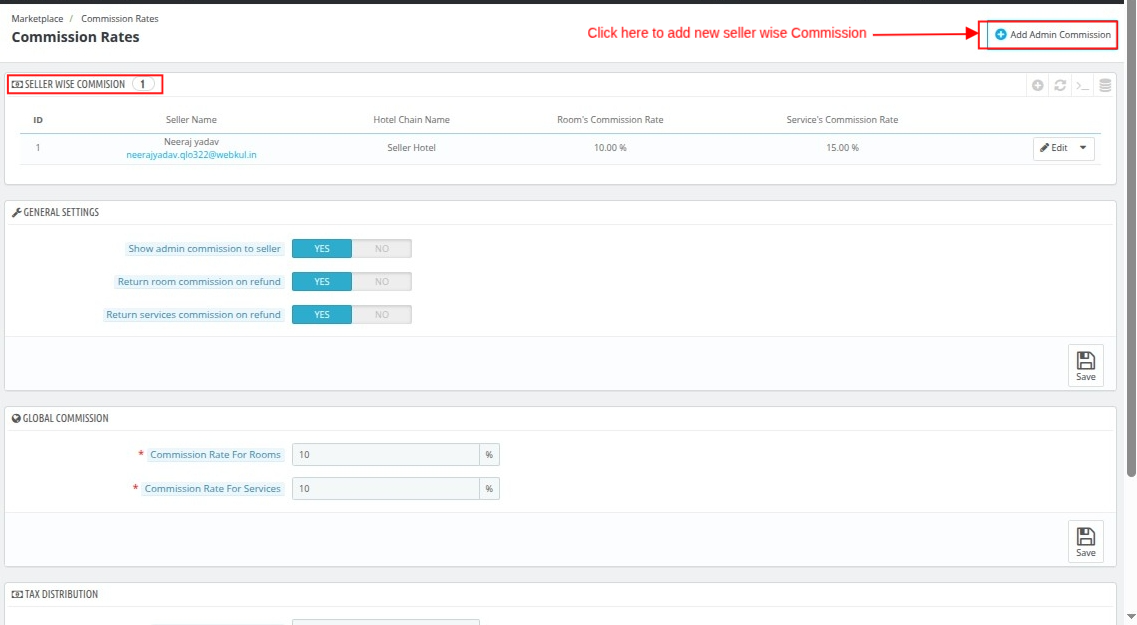

From here, the admin can select the seller and set the commission rates on rooms and services both.
General Settings
The General Settings section allows the admin to manage important marketplace commission and refund-related configurations.

- Show admin commission to seller
This setting allows the admin to decide whether sellers can view the admin commission applied on bookings and orders. The admin can enable or disable the visibility of commission details for sellers.
- Return room commission on refund
Using this option, the admin can return room booking commission during the refund process.
- Return services commission on refund
This setting allows the admin to refund service product commission during the refund process.
Global Commission
The admin can set the global commission rate using the global commission section.

The Global Commission settings allow the admin to define the default commission rates for rooms and service products across the marketplace.
- Commission Rate For Rooms
Using this setting, the admin can define the default commission percentage that will be charged on room bookings made by sellers.
- Commission Rate For Services
This option allows the admin to set the default commission percentage for service products offered by sellers on the marketplace.
Tax Distribution
The Tax Distribution settings allow the admin to decide whether the tax collected from bookings and services will go to the admin, seller, or both.

- Room Type Tax Distribution
This setting allows the admin to decide whether the tax collected on room bookings will be distributed to the admin, the seller, or both.
- Service Products Tax Distribution
Using this option, the admin can configure whether the tax collected on service products will be distributed to the admin, the seller, or both.
Sellers Orders
The admin can track and manage the orders of his seller as well as manage the settlement of the booking amount from the seller orders section of the marketplace menu.
Orders
Here the admin can view the total earnings of the hotel marketplace and the list of seller order details.
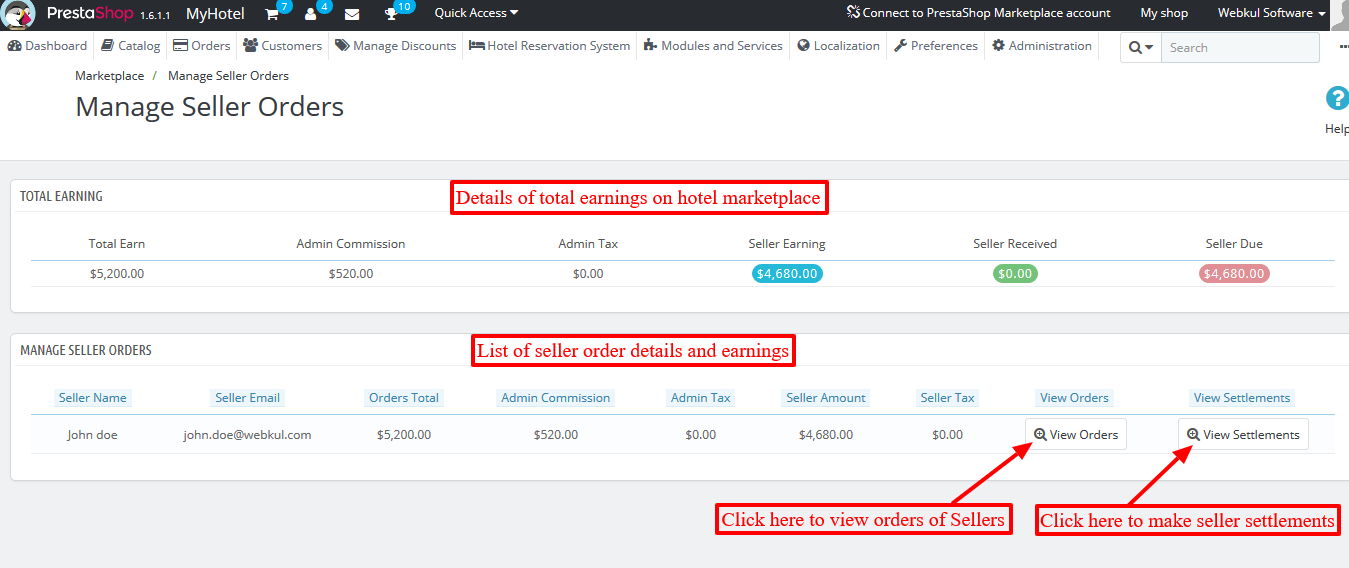
After going to ‘View Orders’ the admin can view the list of orders for the Seller.
Admin can go to the order detail page by clicking ‘View Order Details’ for a particular order.
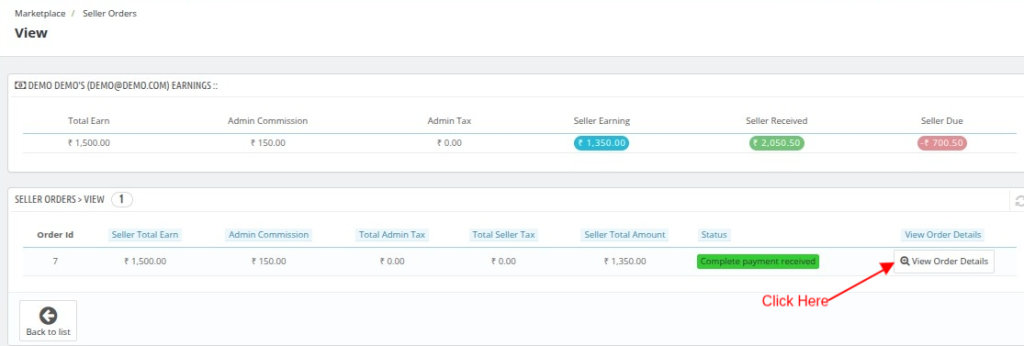
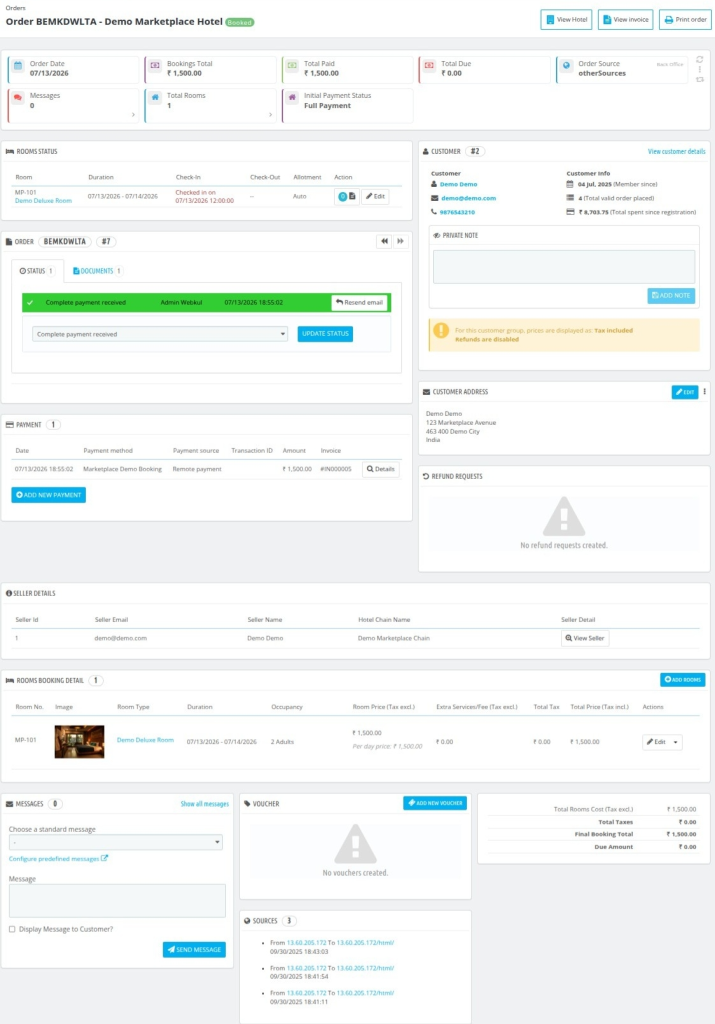
Henceforth, the admin will redirect to the order page.
Settlement
The admin can pay the due amount to the seller manually and make settlements from the back office.
To make settlements go to Marketplace -> Seller Orders -> Go to a Seller Order -> Click ‘View Settlements’

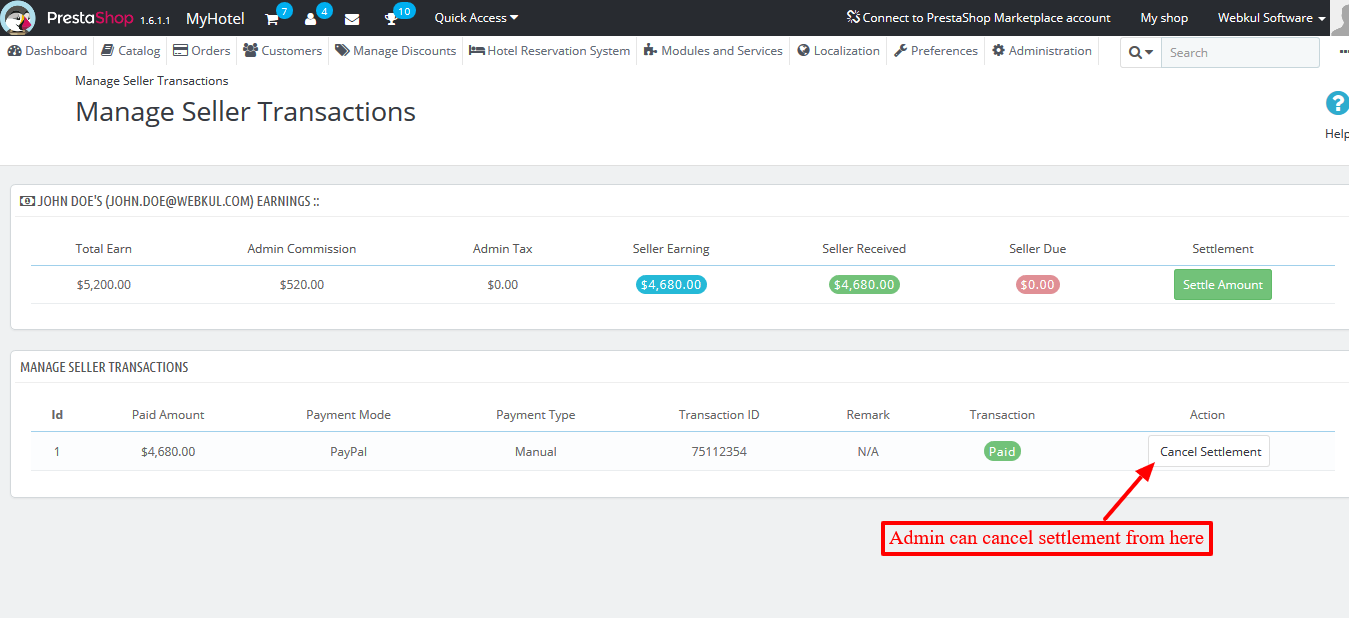
Then, the admin will reach the Manage Seller Transactions page.
Here admin can view the seller’s earnings on the marketplace and a list of transactions of all settlements made by the seller.
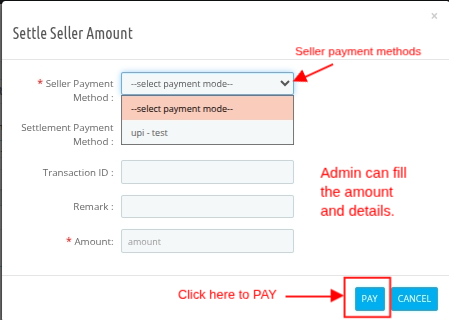
When the admin clicks on ‘Settle Amount’, a pop-up will open on the screen displaying the Seller payment mode.
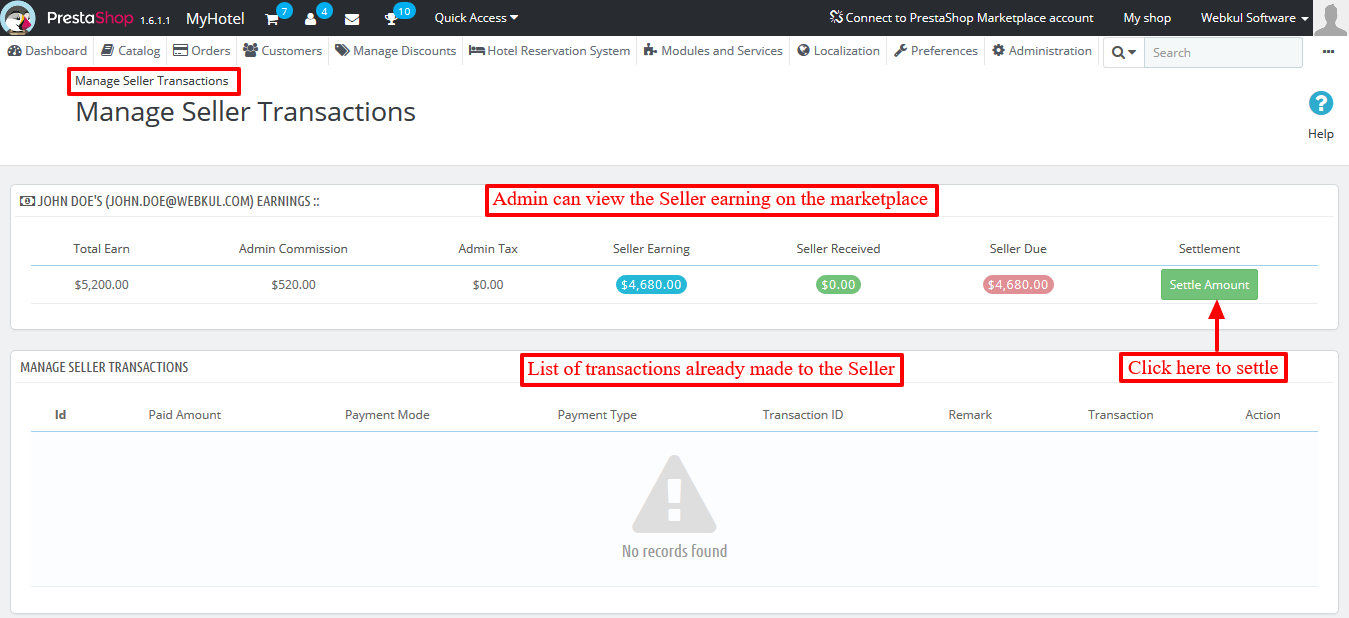
The admin will fill in the payment mode information and the due amount, and then he will click on the ‘Pay’ button to successfully complete the settlement.
The admin can also cancel the settlement by clicking the ‘Cancel Settlement’ button on the Manage Seller Transactions page.
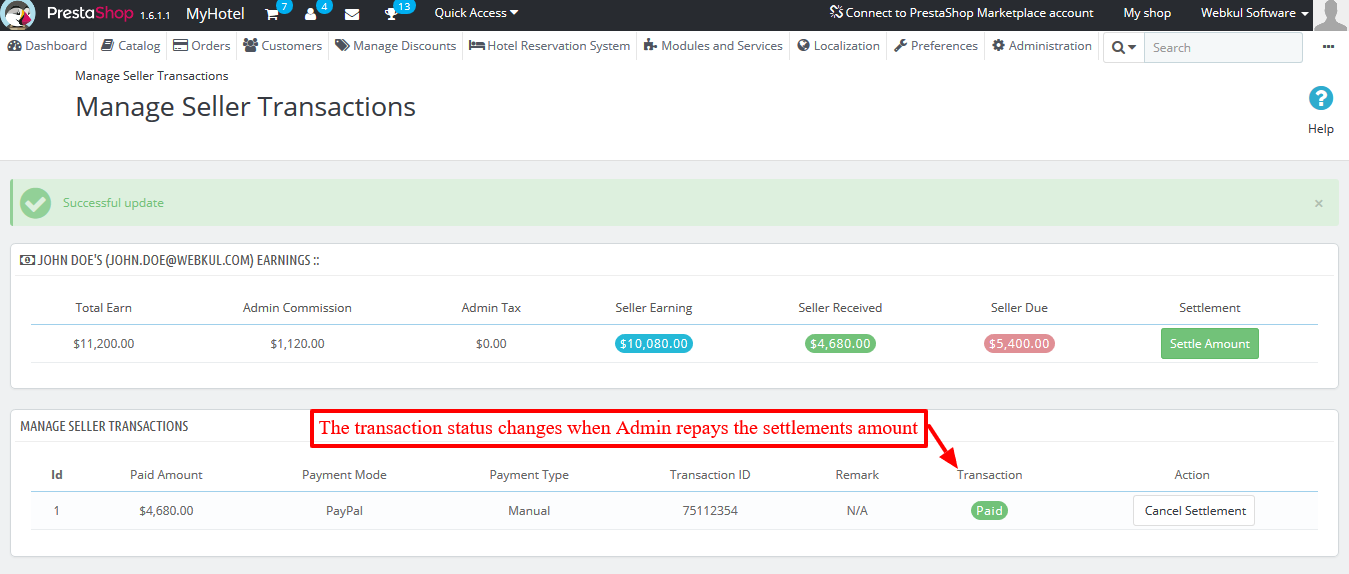
Admin can also repay the canceled settlement from the back end.

After repayment, the transaction status changes.
So this is how the Admin can manage the settlements.
Seller Marketplace Portal
After installing the marketplace, sellers can create their user accounts and send requests to Admin to become a seller on the marketplace.
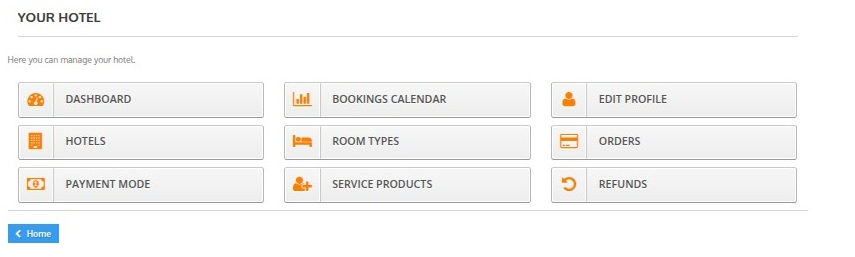
Once the admin approves the seller’s request, the seller can then manage their property on the marketplace using the various tabs of the marketplace available in their accounts section.
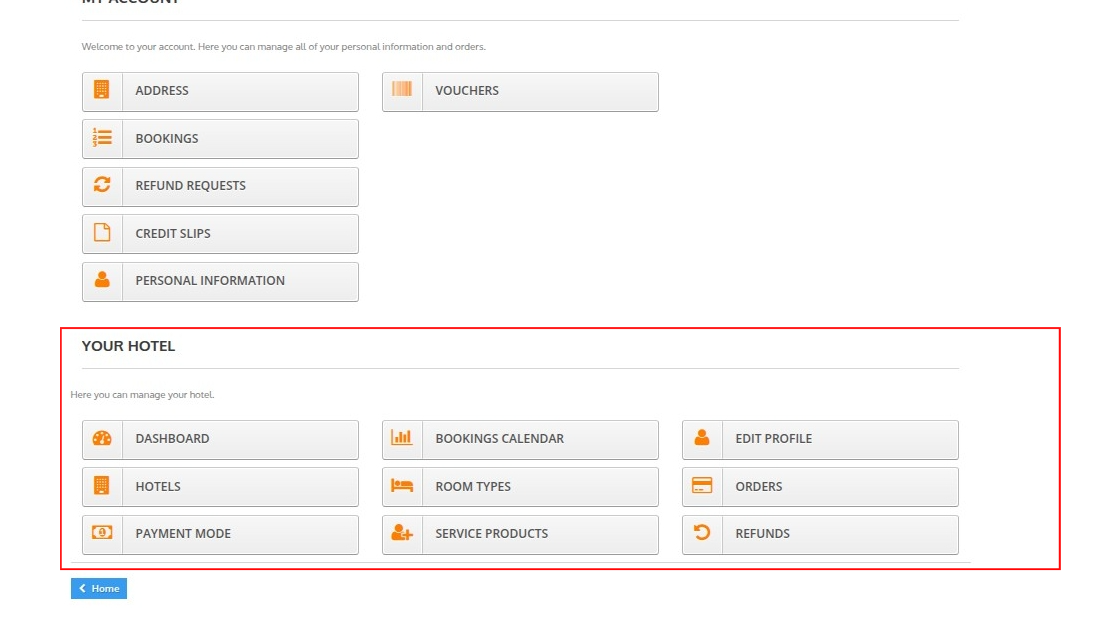
Dashboard
On the marketplace dashboard, the seller can view the daily activity of his hotel including check-ins, check-outs, new bookings, stayovers, cancelled bookings, and guests.
It also displays the stats for the hotel through which the seller can analyze the performance of his properties.
Sellers can switch the dashboard view by day, month, or year, and use the mini calendar to filter and view data for a specific date range.
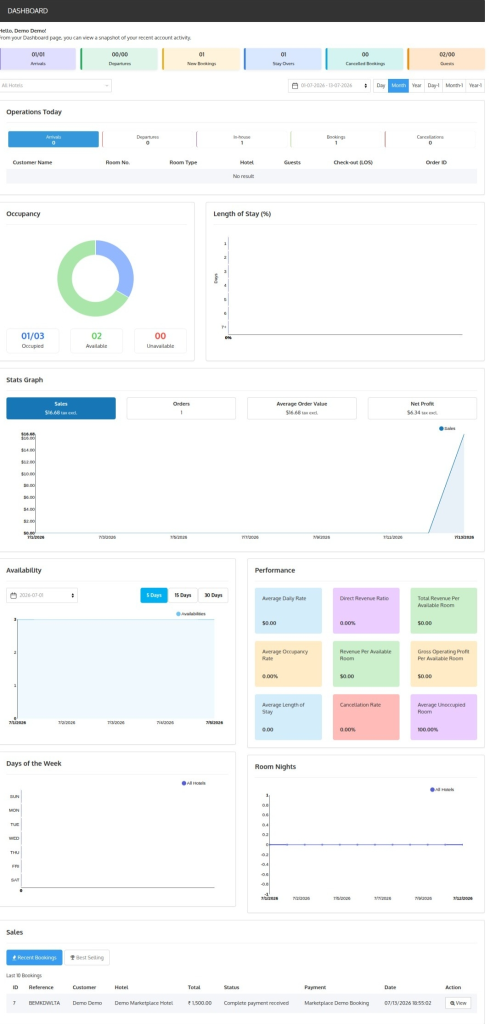
Data on Dashboard
The dashboard displays the following hotel parameters:
- Operations Today
- Occupancy
- Length of Stay
- Stats Graph: It includes data on sales, orders, average order value, and net profit.
- Availability
- Performance
- Days of week
- Room Nights
- Sales:It can toggle with “Recent Booking” and “Best Selling”
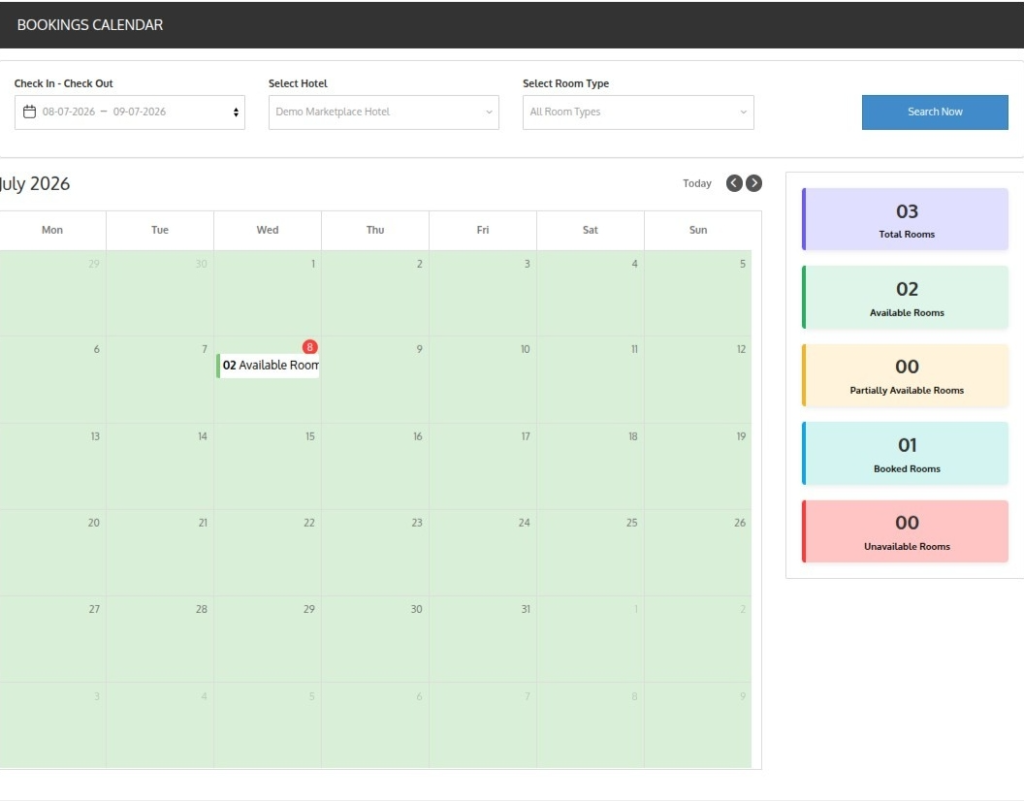
Booking Calendar
On the booking calendar tab, sellers have the option to view the occupancy status of selected room types of a particular hotel for a duration.
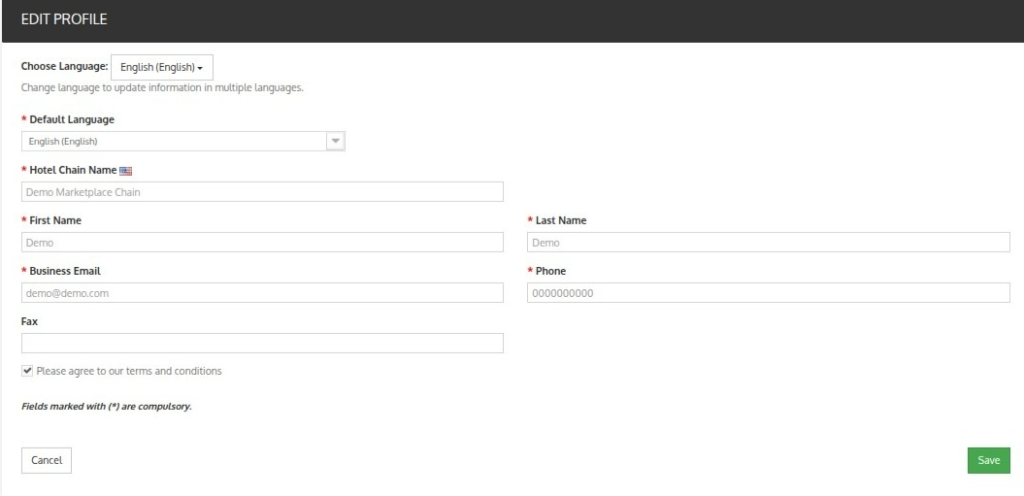
Edit Profile
In this section, Sellers can add and update their profile information that is displayed to the admin through this ‘Edit Profile’ tab.
Hotels
Using this hotels tab, the sellers can add and manage hotels in the marketplace.
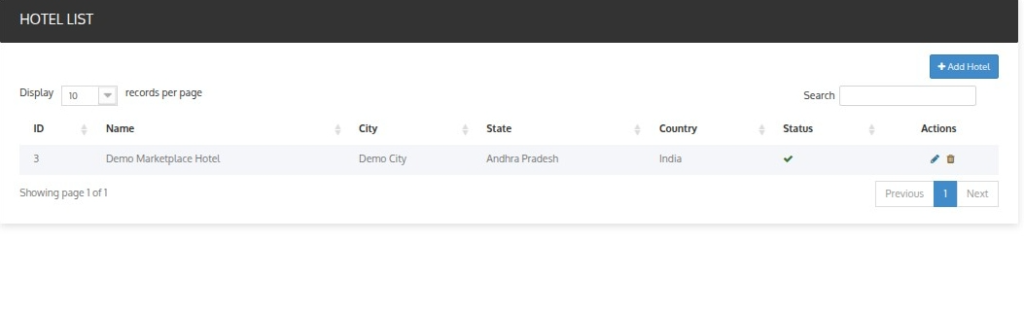
To add a new hotel, the seller will click on add hotel and then fill in various fields on the hotel page.
Information Section
In this Section Seller provides basic details of the hotel.
SEO
In this Section,Seller can add SEO details that helps hotel online visibility and make it easier for people to find your hotel on search engines.
Images
In this section, sellers can add hotel images after saving the hotel information.
Restrictions
In this section, the seller can enable/disable the maximum checkout offset and the minimum checkout offset restriction for the hotel.

Features
In the next tab, the seller can select hotel features.
Refund Policies
In this section, the seller can enable and select the refund policies for the hotel.
Once the hotel is created by sellers the request is sent to Admin. Then, the admin can approve or disapprove the hotel from the back end.
If the admin enables auto-approval of the seller hotel then the hotel status will be approved automatically.
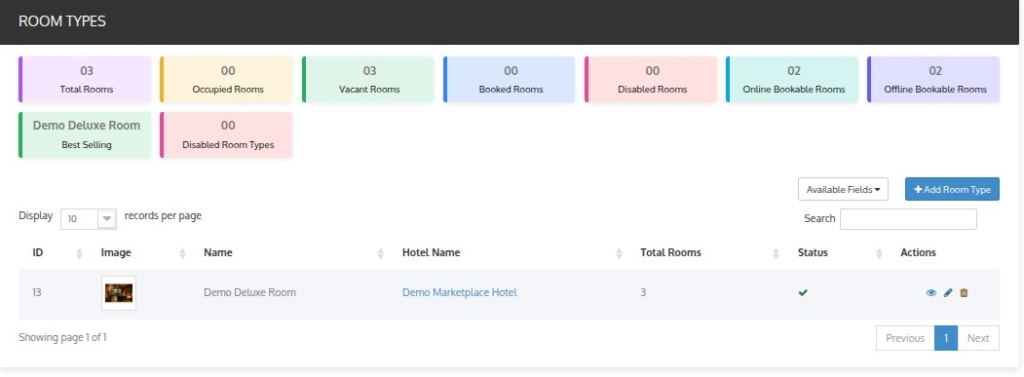
Room Types
Using the room types tab, the seller can add and update the room types of the hotel.
When the seller hotel is live on the Admin’s marketplace, they can start adding room types to it.
To add a new room type the seller will Go to the ‘Room Types’ tab -> Click on the ‘Add Room Type’ button.
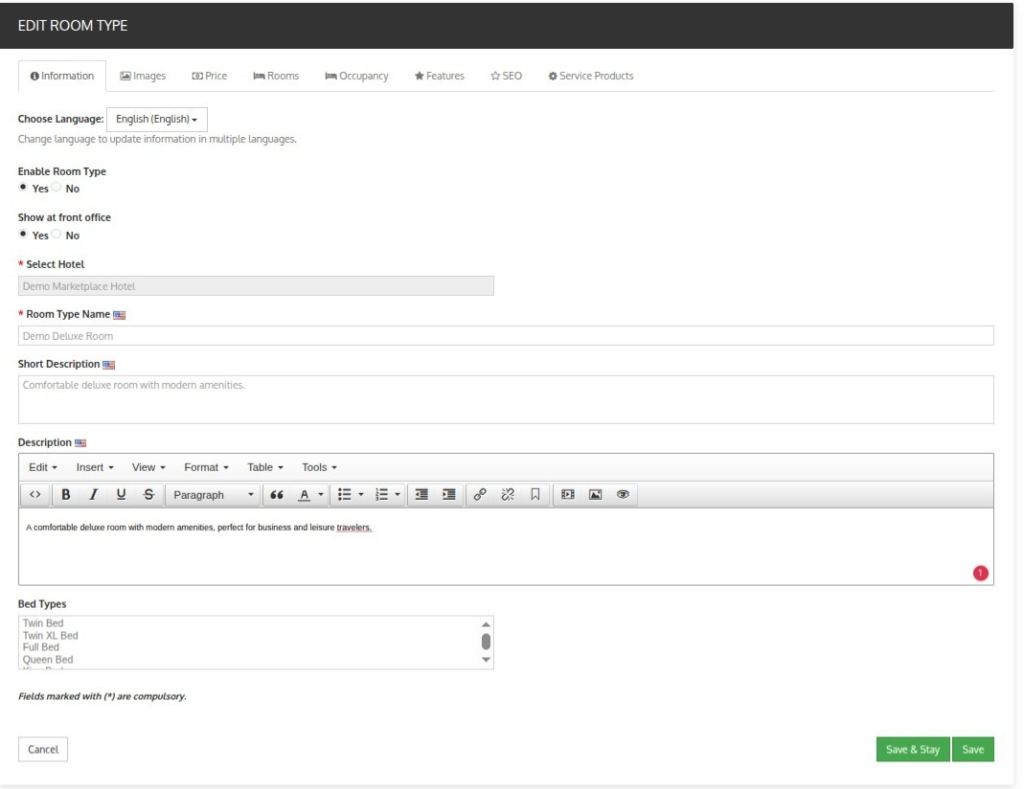
Once the seller clicks on Add new room type, a form will appear and the seller needs to fill in all the room type-related information in various sections and save it.
Information
In this section, the seller will add the basic details of the room type and assign the room type to a particular hotel.
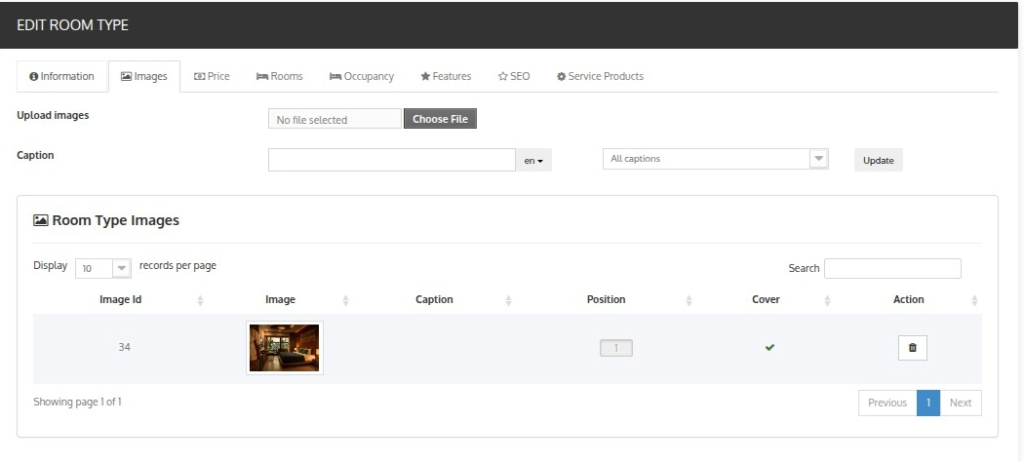
Images
The seller can upload room-type images in the Images section.
Price
The Price section allows Sellers to set the base price, tax rate, advance payment, specific price and pricing rules of the room type.
Base Price
In the base price section, the seller will add the base price and the cost price of the room type.
He can also set the tax rule that applies to the cost of room type using the tax rule option.
Using the advance payment option the seller can enable and manage the advance payment option for the room type.
Specific Price
You can set the specific price of the room type using this section.
Advanced Price Rule
Sellers can view all the created advanced price rules for the room type in this section.
To create a new price rule, the seller has to click on the add pricing rule and fill in all the information about the rule.
- Price rule name: Write the name of the pricing rule.
- Date selection type: Want to apply this rule for a specific date or date range.
- Date from-Date to: Likewise, you will have to select the date range (if you select date range under date selection type).
- Particular days: Select the days if you want to apply this price for specific days.
- Impact on Price: Select the impact you want on price. Like whether it will increase or decrease.
- Impact Type: Select percentage or amount.
- Impact Value: Value of percentage or amount that you will charge.
- Status: Enable or disable the advance price rule from here.
- Group access: Select the group that can enjoy this pricing.
Now, the admin can add multiple restrictions together within the same pricing rule.
Rooms
After setting the prices seller can add the inventory for the room type from the room’s section.
Occupancy
In this section, the seller can set the base occupancy and the maximum occupancy of the room type.
Features
In the Features section, the seller can select and add features for the room type.
After clicking on Add Features, the seller can choose and add the features from a list of available features in the room type.

SEO
The seller can add a meta title, meta description and friendly URL for room type.
Service Products
The seller can assign the service product to the room type through this section.
Service Products
The seller can also add and manage the various service products provided by him through this tab.
After clicking on Add New Product, the seller can enter the required details under the Information, Prices, Association, and Images tabs.
Information

In the Information panel, fill in the following details:
- Name: Give a name to your service product.
- Enabled: Select yes to enable your service.
- Associated Hotel and Room Type: Select the hotel or its room type that gets associated with the service.
- Auto Add to cart this product: Select Yes or No.

When you select Yes the product gets added to the cart automatically. In the drop-down you will get two options as given below:
- Add price in room price: The service price will be added to the room base price. (e.g., Room price: 500, service price: 50, final room price: 550)
- Add price as convenience fee: Service price will be displayed in the order summary as “Convenience Fees”.
In auto add to cart product is not visible to the customer and the price is added to the final total.
When you select No you will get the following option:
- Show at the front office: Enable if you want this product to be visible at the front office
- Available for order: Enable if you want this product to sell from the hotel website
- Allow ordering of multiple quantities: Enable ordering multiple quantities of the product for one room.
- Max quantity allowed: Enter the maximum quantity you want to get ordered. The default quantity to order is 1.
After the seller has created the service product, it will go to admin for approval, after which the seller can assign them to particular room types for booking.
If the admin has enabled the auto-approval of the service products.
Price Section
Base Price
In the Price section, the seller can define the pricing structure for the service product.
- Pre-Tax rack rate: This includes the base cost of the service product
- Pre-Tax Retail Price: Pre-tax retail price is the price for which you intend to sell this service product to your customer. It should be higher than the pre-tax operating cost. The difference between the two will be your margin
- Tax Rule: Select the tax rule from the drop-down you want to apply in the invoice. Here you can add the new rule by clicking on Create a new tax.
- Price calculation Method: Calculate the price of the service product on two bases. Firstly, the per-day calculation or the price for the entire stay.
Specific Price
- For: Set the specific price for the room type for all or specific currencies, countries, and groups.
- Available: Select the date range for which this price is available.
- Product price: Write the price of the product or leave the base price as the product price.
- Apply Discount: Write the discount you want (with or without tax)
Association Section
The service products are linked with categories for better management and organization. By default, a default category is already available in the system.
Images Section
Admins can upload images related to the service product to improve its presentation on the hotel website. Suitable captions can also be added for each image.
Then the service product created by the seller will get approved automatically, and the seller can add these products to a particular room type for booking.
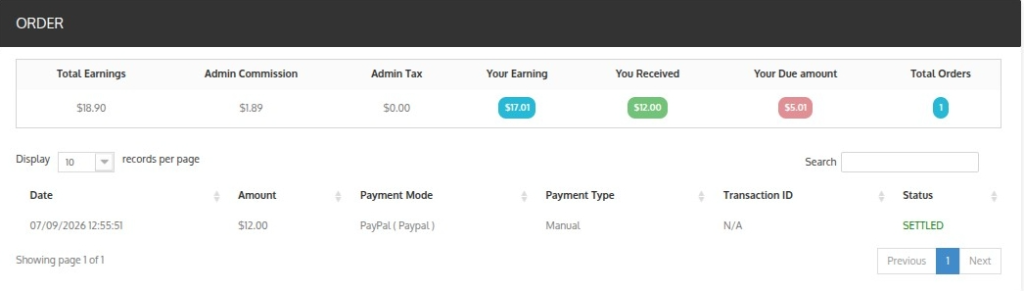
Orders
The seller can view the order details, total earnings, admin commission, admin tax, total orders, seller’s earnings, earnings received, seller’s due amount, and total orders.
They can also view the amount received and the amount due to be paid by the admin.
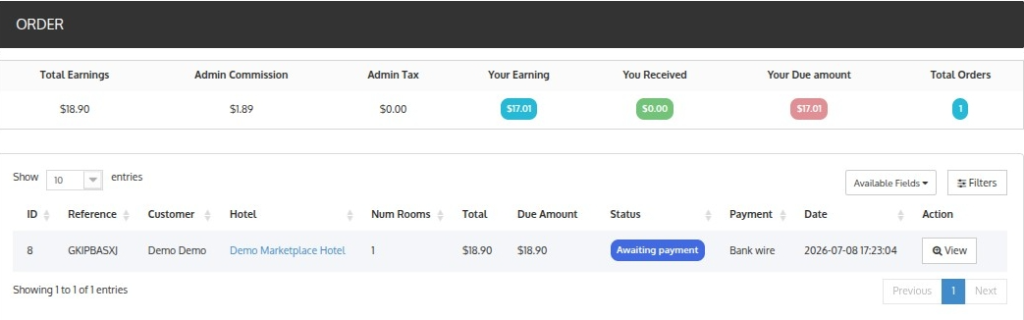
The list of all orders is displayed in this section. The seller can view the order details for each order by clicking the ‘view’ button for particular orders.
Seller Order Details Page
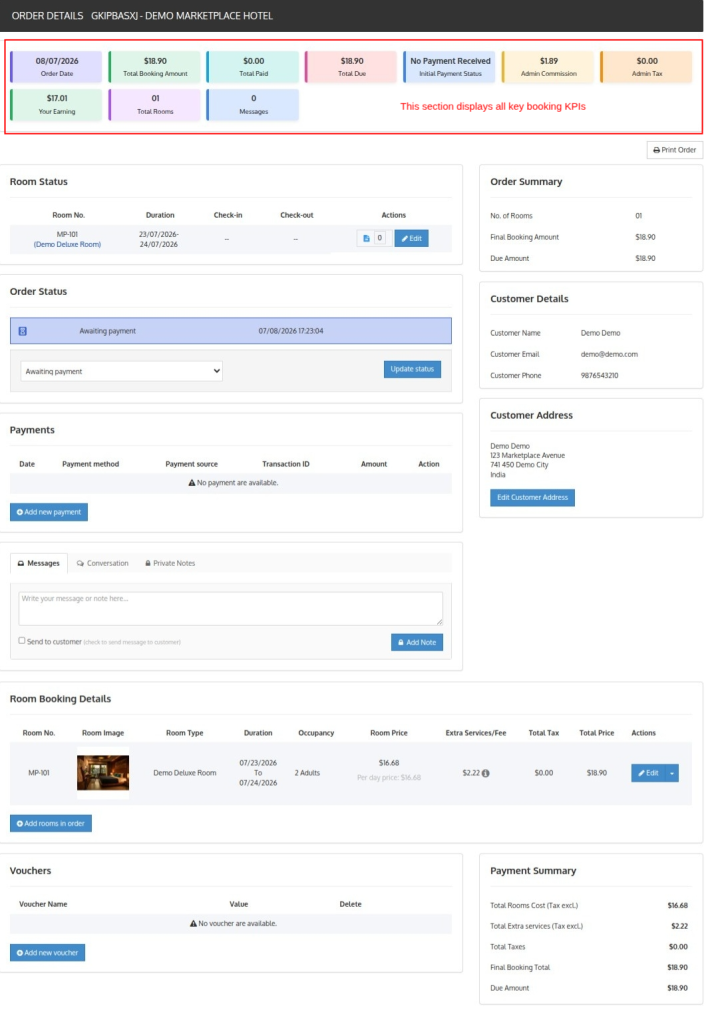
Room Status
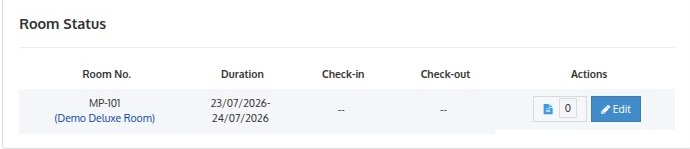
This section displays room-related booking information, including room number, booking duration, check-in, and check-out details.
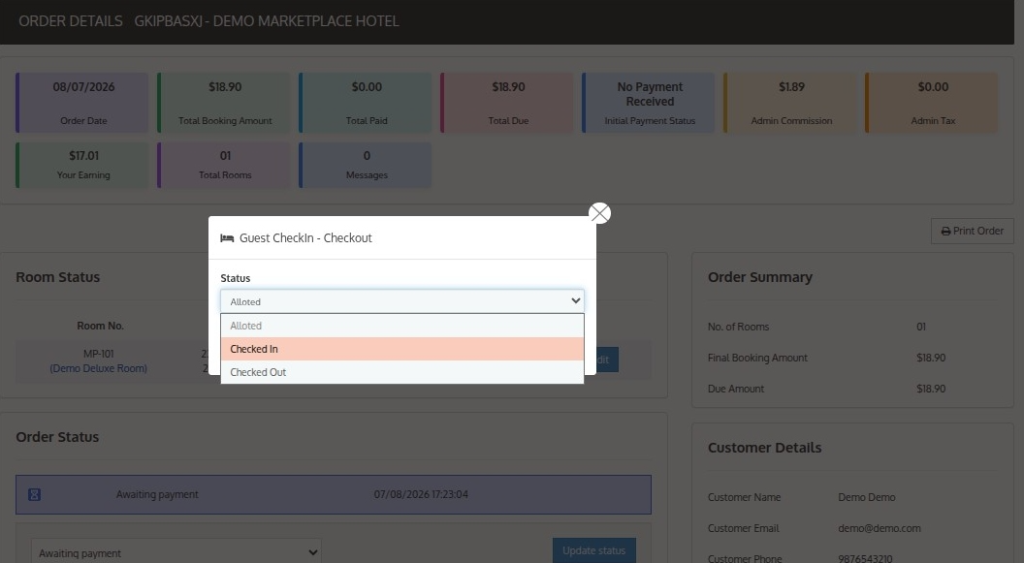
The seller can also manage room status and update guest check-in/check-out from this section.
Customer Details
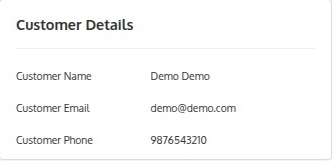
Displays customer information related to the booking, including customer name, email address, and phone number for quick reference.
Order Status
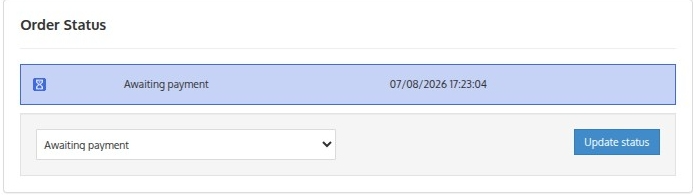
This section allows the seller to view the current booking status and update the order status whenever required during the booking process.
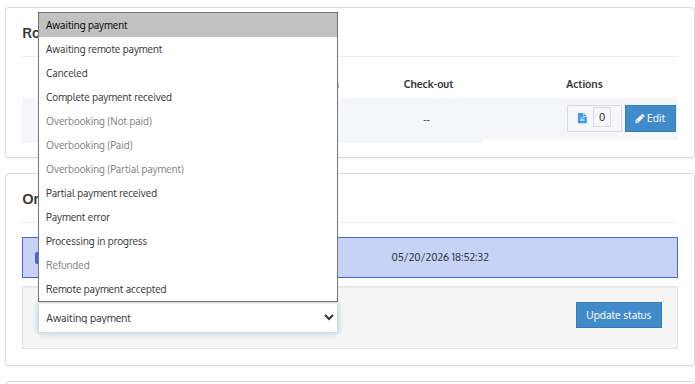
Sellers can also manage various payment-related updates by changing the order status according to the booking stage, such as pending payment, payment accepted, refunded, cancelled, or completed.
Customer Address
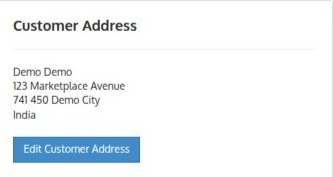
Displays the customer address information associated with the booking. The seller can also add or manage customer address details if required.
Payments
The Payments section helps the seller manage payment details related to the booking, including payment method, payment source, transaction ID, and payment amount.
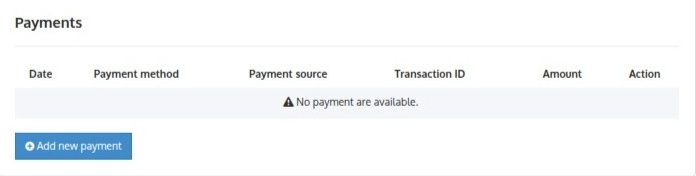
Sellers can also manually add payment records.
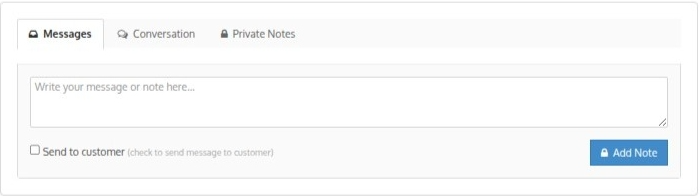
Messages
The Messages section contains three tabs: Messages, Conversations, and Private Notes. If “Send to Customer” is enabled, messages are sent to the customer and appear under the Conversation.
If it is disabled, the content is saved as a Private Note, visible only to the seller.
Order Summary
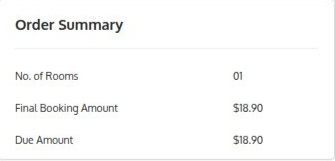
Displays a quick summary of the booking, including total rooms, final booking amount, and pending due amount.
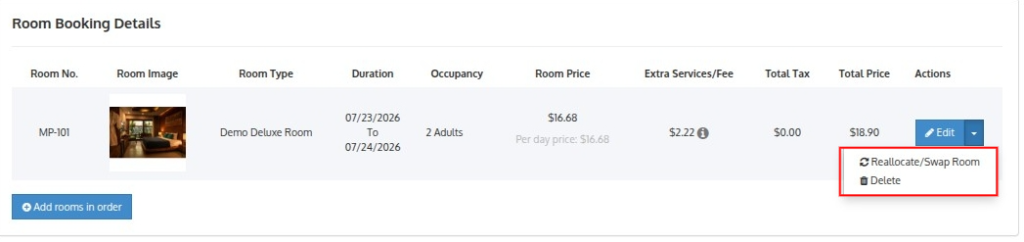
Room Booking Details
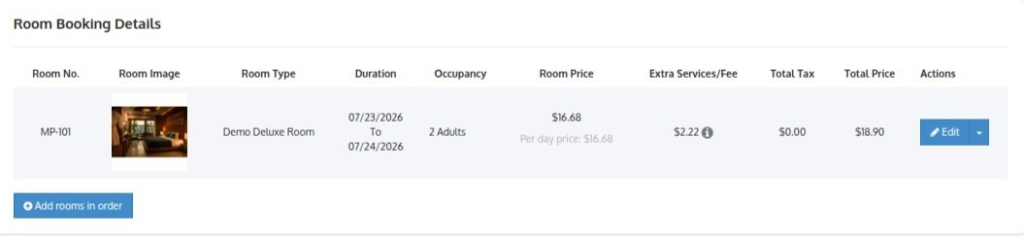
This section provides complete room booking information, including room number, room type, booking duration, occupancy, room price, extra services or fees, tax amount, and total booking price.
Sellers can also edit rooms, manage services from edit button.

Additionally, sellers can reallocate or swap rooms by clicking on the dropdown.
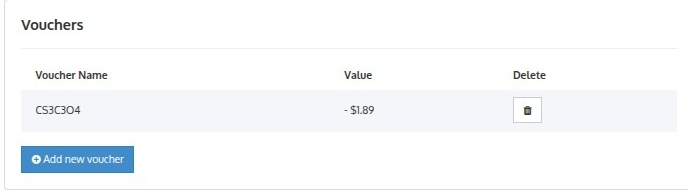
Vouchers
The Vouchers section allows the seller to view and manage vouchers applied to the booking. Sellers can also add new vouchers.
Payment Summary
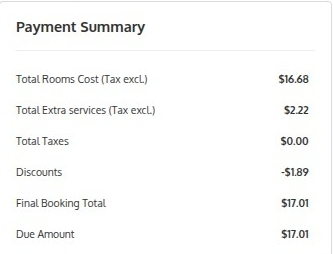
Displays a detailed breakdown of booking charges, including room cost, extra services cost, convenience fee, taxes, final booking total, and due amount.
Transactions
When the admin pays the due amount, sellers can view the list of settlements done by the admin under the transactions tab.
Payment Mode
Using the payment mode tab, the seller can add and edit the payment mode provided by the admin through which he wants to receive the settlement amount.
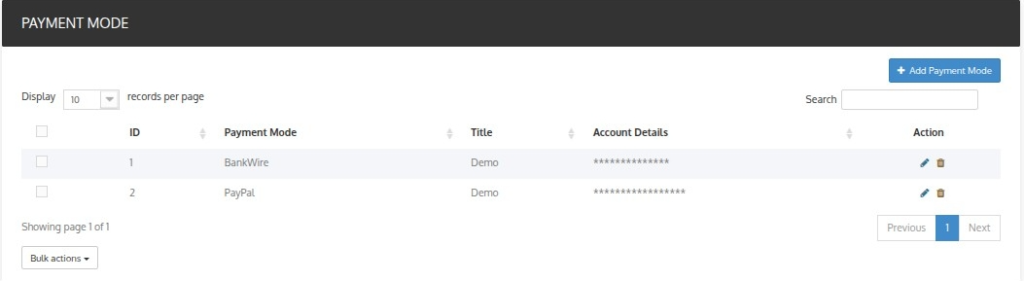
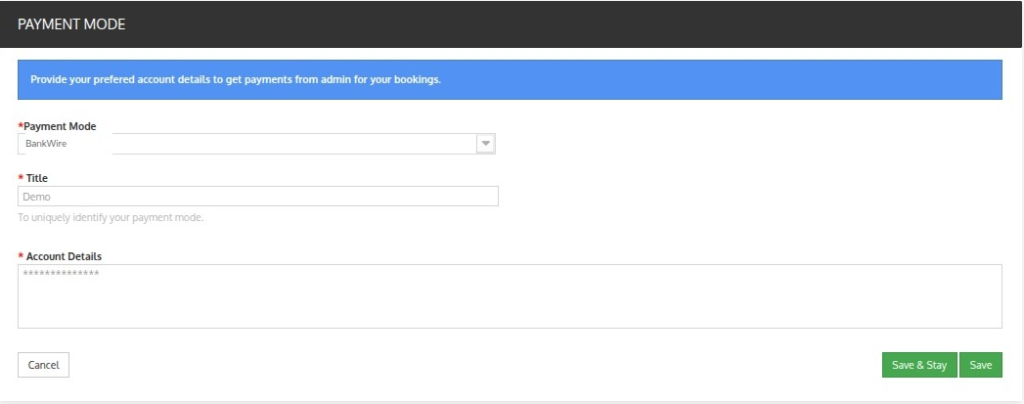
He will enter his account details and save the payment mode to receive payments from the admin for his hotel bookings.
Refunds
The seller can manage all the refund requests and refund rules through the refunds tab.
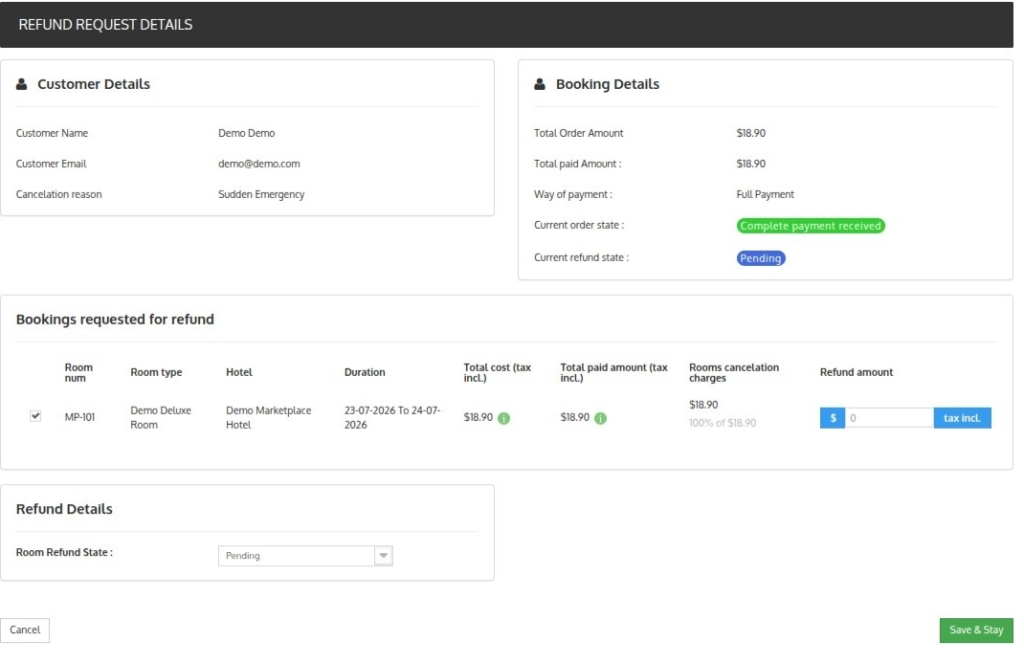
Refund requests
In this section, the seller can view all the refund requests received by his guests. Through this section, he can manage his refund requests and provide his guests with partial or full refunds.
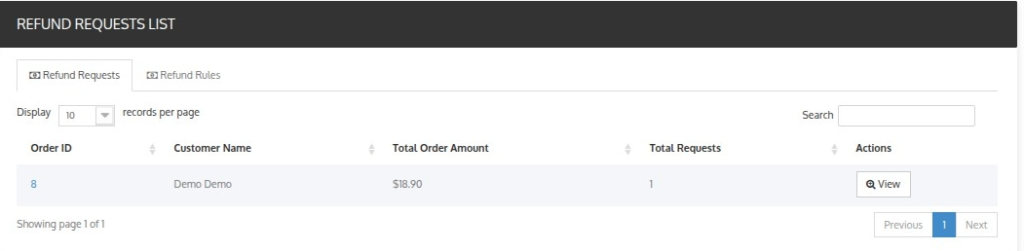
The seller can view the details of the refund by clicking on the view button. Once the seller clicks on the view button, a new page displays the customer and booking details.
Refund Rules
The seller can view and add new refund rules from this section.
The seller can create a new refund rule by clicking on the ” Add new rule” Button.
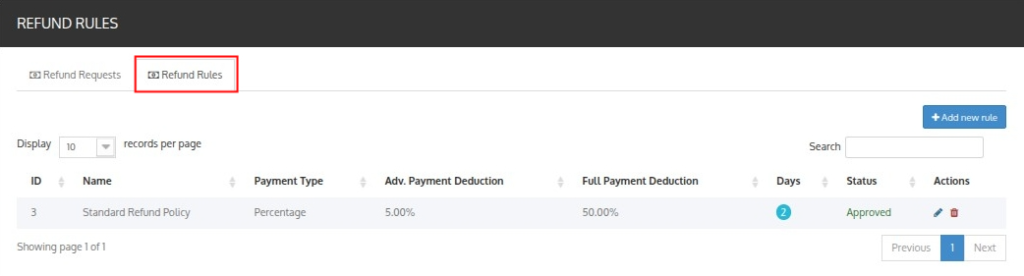
Then the seller will add the necessary details of the refund rule and once the admin approves the created refund rule, the seller can apply the rule to his hotels.
Conclusion
This was all from the QloApps Marketplace. I hope I was able to clarify the functioning of the module to you.
If you want to learn about the functionality of QloApps then you can visit this link: QLO Reservation System – Free Open-Source Hotel Booking & Reservation System.
In case of any query, issue, or requirement please feel free to raise it on QloApps Forum.
Moreover, for any support, you can raise a ticket from here.
Current Product Version – 5.0.0 & 2.0.0
Supported Framework Version – QloApps 1.7.x & 1.6.x

Be the first to comment.