With the QloApps Marketplace Stripe Payment Gateway Module, the marketplace admin can ease his process of managing commission and seller booking amounts manifold.
This module lets guests pay via Stripe, auto-splits the booking amount in real-time, and transfers shares to the admin and seller accounts instantly.
The QloApps Marketplace Stripe Payment Gateway Module automates payments, removing the need for admins to manually transfer sellers’ shares of the booking amount.
Therefore, saving admin’s time and bringing efficiency and accuracy to the transaction process.
Let’s discuss how the admin can configure and use the QloApps Marketplace Stripe Payment Gateway Module to facilitate your payout process.
NOTE: Before buying this module, you have to visit Stripe to confirm the availability of the Stripe payment gateway in your country.
Compatibility with QloApps
- This module is compatible with QloApps version 1.7.x.
- QloApps Marketplace Stripe Payment Gateway module is compatible with PSD2.
- QloApps Marketplace Stripe Payment Gateway module is compatible with QloApps Marketplace Module version 4.0.0 and above.
Features of the QloApps Marketplace Stripe Payment Gateway Module
- Allow guests to pay for their bookings through the Stripe payment gateway
- Provides a safe and secure payment option to users
- Real-time split of booking amount into admin commission and seller earnings as per the set commission
- The direct transfer of the share of the booking amount of admin and seller to their accounts
- Seller can easily connect his stripe account with the marketplace
- Allow admin to enable/disable this payment method from the back office
- Ease payment processing and payout process for admin
How to Install the QloApps Marketplace Stripe Payment Gateway Module in QloApps?
Note: Kindly install the QloApps Marketplace module before installing this module.
You can easily install the QloApps Marketplace Stripe Payment Gateway Module in QloApps in 3 steps.
- Go to the “Module and Services” tab.
- Click on “Add New Module”.
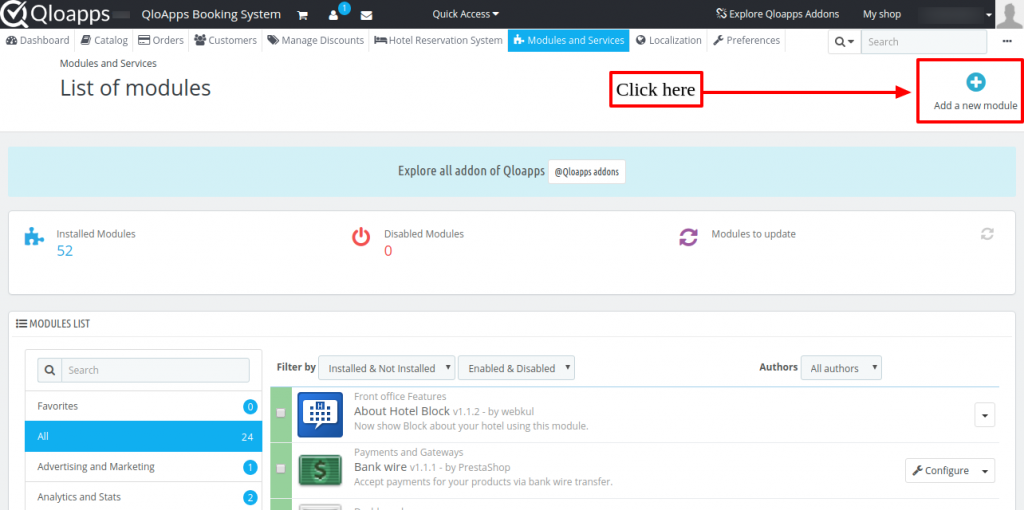
- Now upload the zip file of the Module and click on “Upload and Install this module” to install the module.
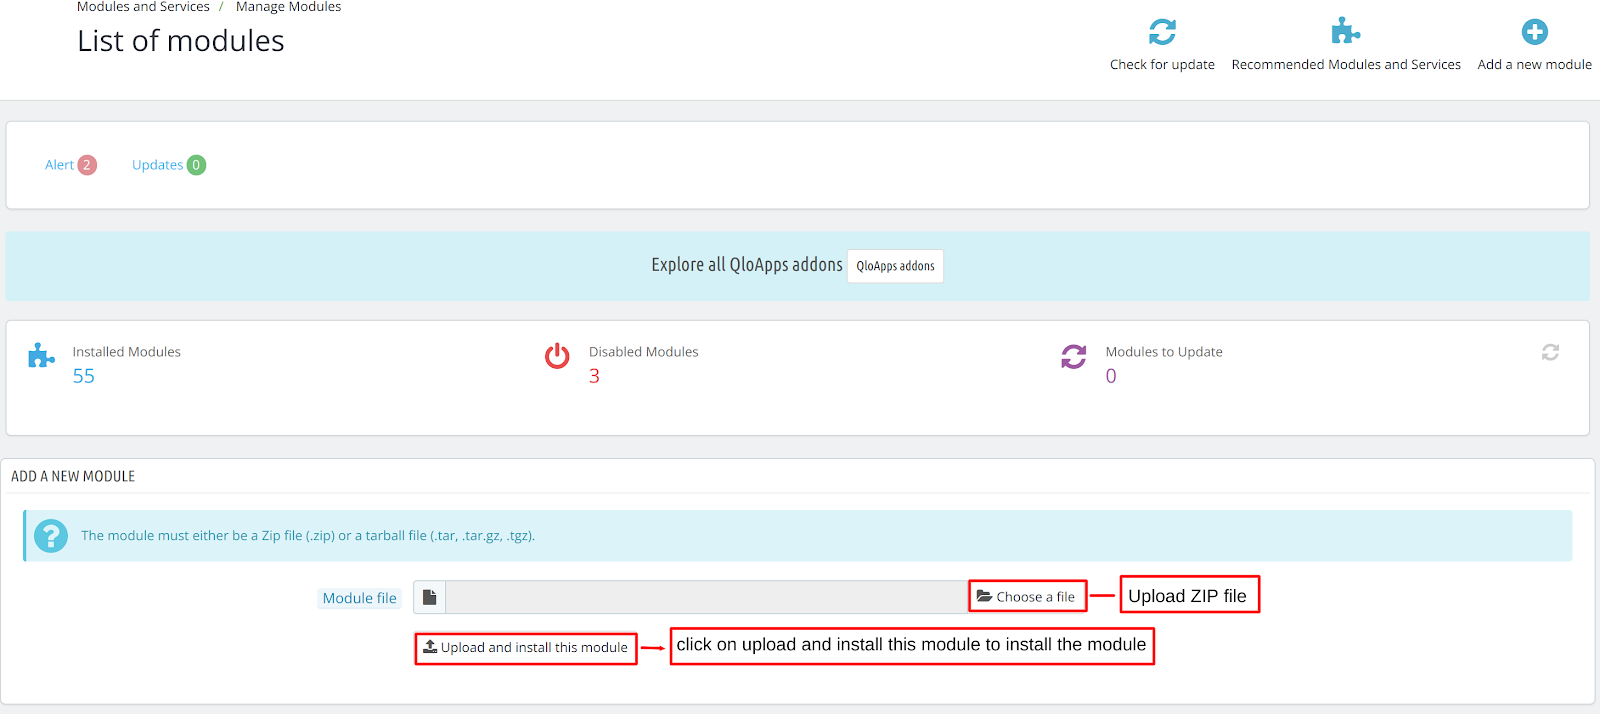
By following these steps the Admin can successfully install the “QloApps Marketplace Stripe Payment Gateway Module” in QloApps.
Configuration Process
After completing the installation of the module, it will be added to manage modules. The admin will click on the configure button to configure this module.

Now, to configure the module you have to enter the following details:
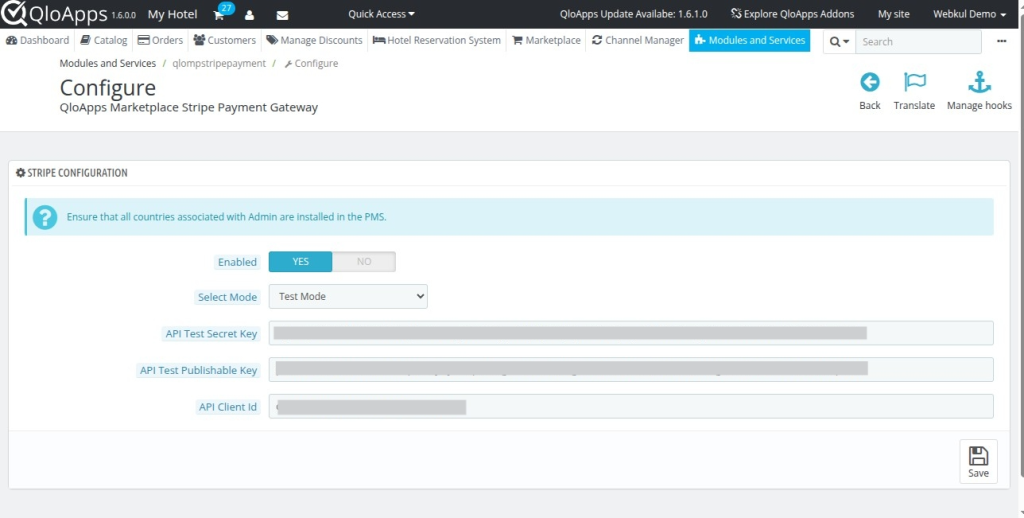
- Enabled: The admin can enable/ disable guests to pay for their bookings using the strip payment gateway from this option.
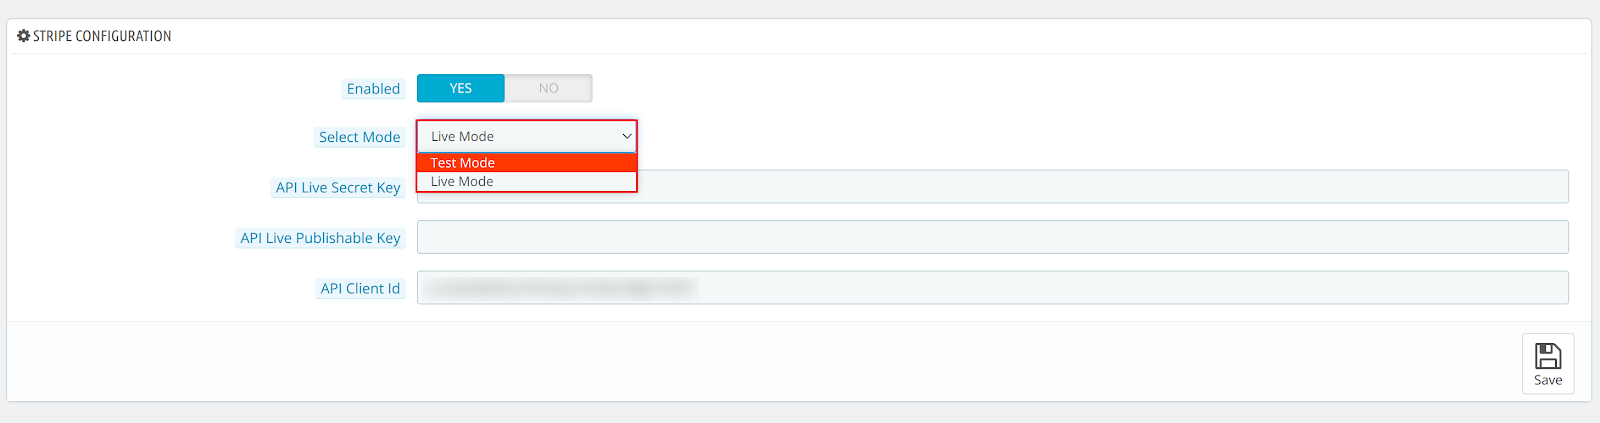
- Select Mode:
- Test Mode: If you are testing your module and its functionalities then select this option.
- Live Mode: If you are using it for real-live transactions then select this option.
- API Secret Key : Enter the API secret key obtained by the Stripe Account
- API Publishable Key: Enter the API Publishable key obtained by the Stripe Account
- API Client ID: Enter the API Client ID acquired by Stripe Account
How to get the API keys and Client ID from the stripe account?
Admin must have an account on https://stripe.com/, only then the admin can have the API keys required for setting up a Stripe payment gateway on the site.
Therefore, if the admin is a new user, he first will have to create his account on Stripe. After creating the account, follow the following steps:
Process to obtain API Keys:
- Click on the “API Keys” option.
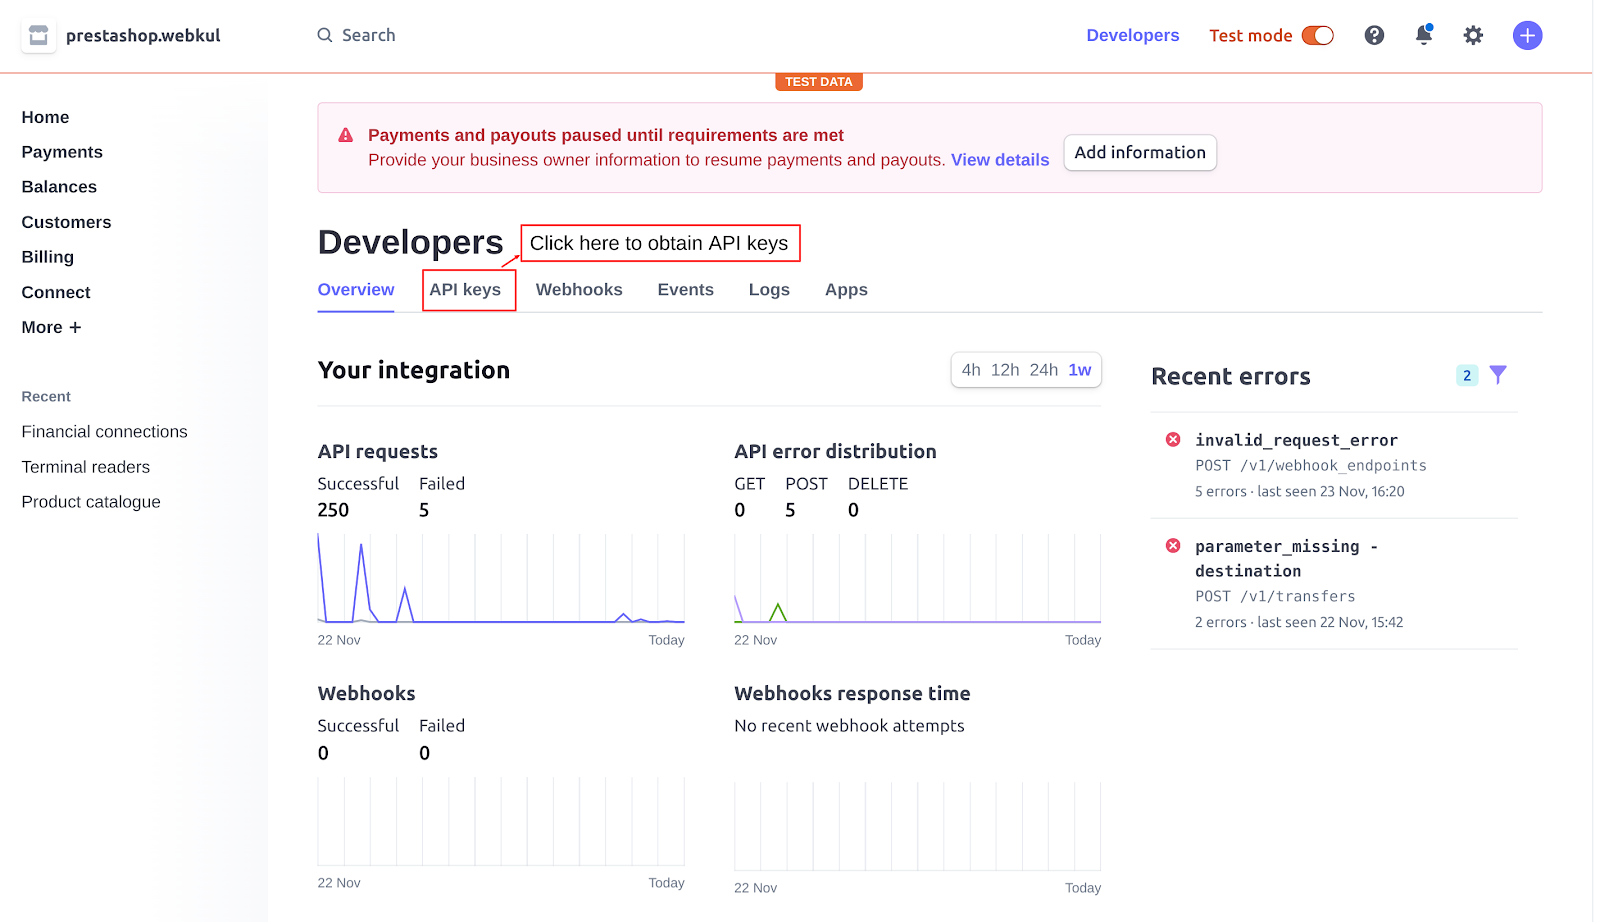
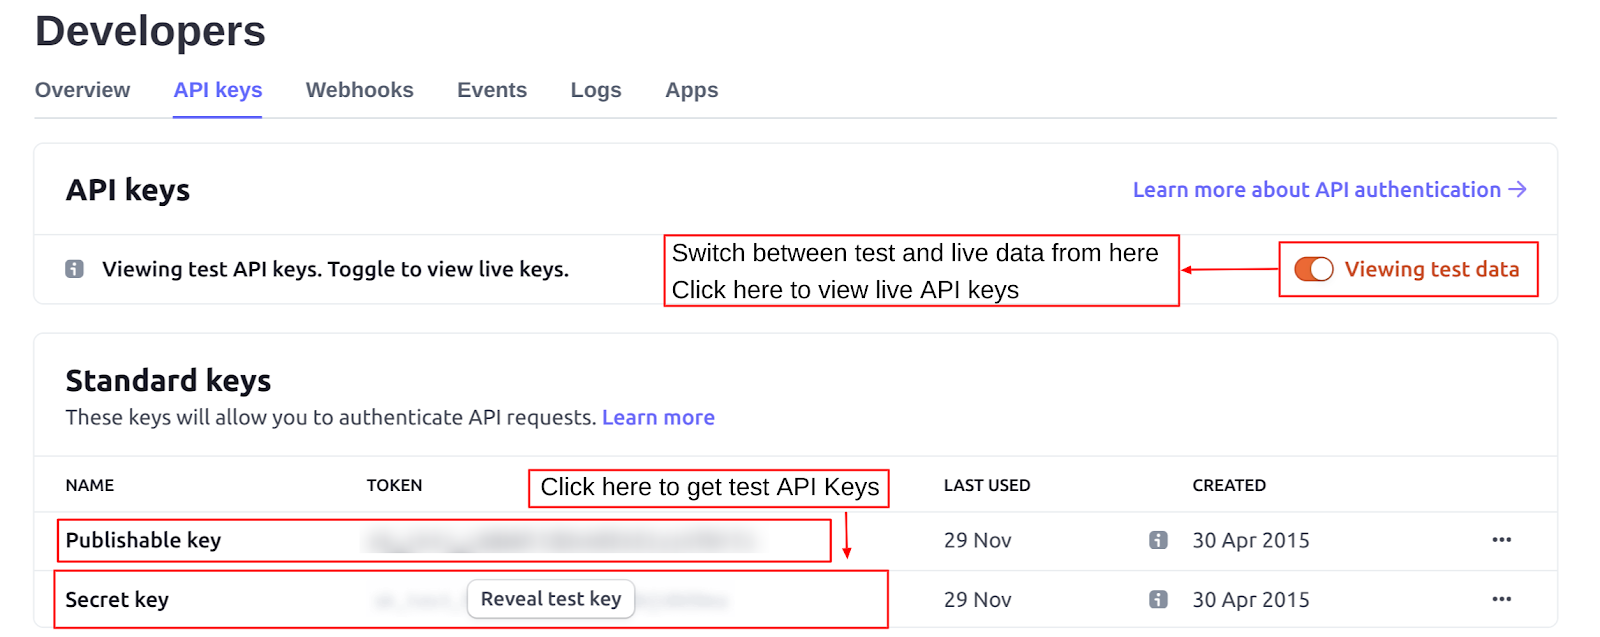
- Here you will find both, publishable and secret API keys. You have to click on “reveal test keys”, to get the secret API keys. You can switch the test and live mode to get API keys as per the type of mode.
Note: Use test keys if you are using it in test mode otherwise use live keys if you are using it in live mode.
Procedure to obtain a Client ID
- To obtain the client ID, first click on the settings icon and select the settings option from the dropdown.

- Then click on the settings option from the connect section.
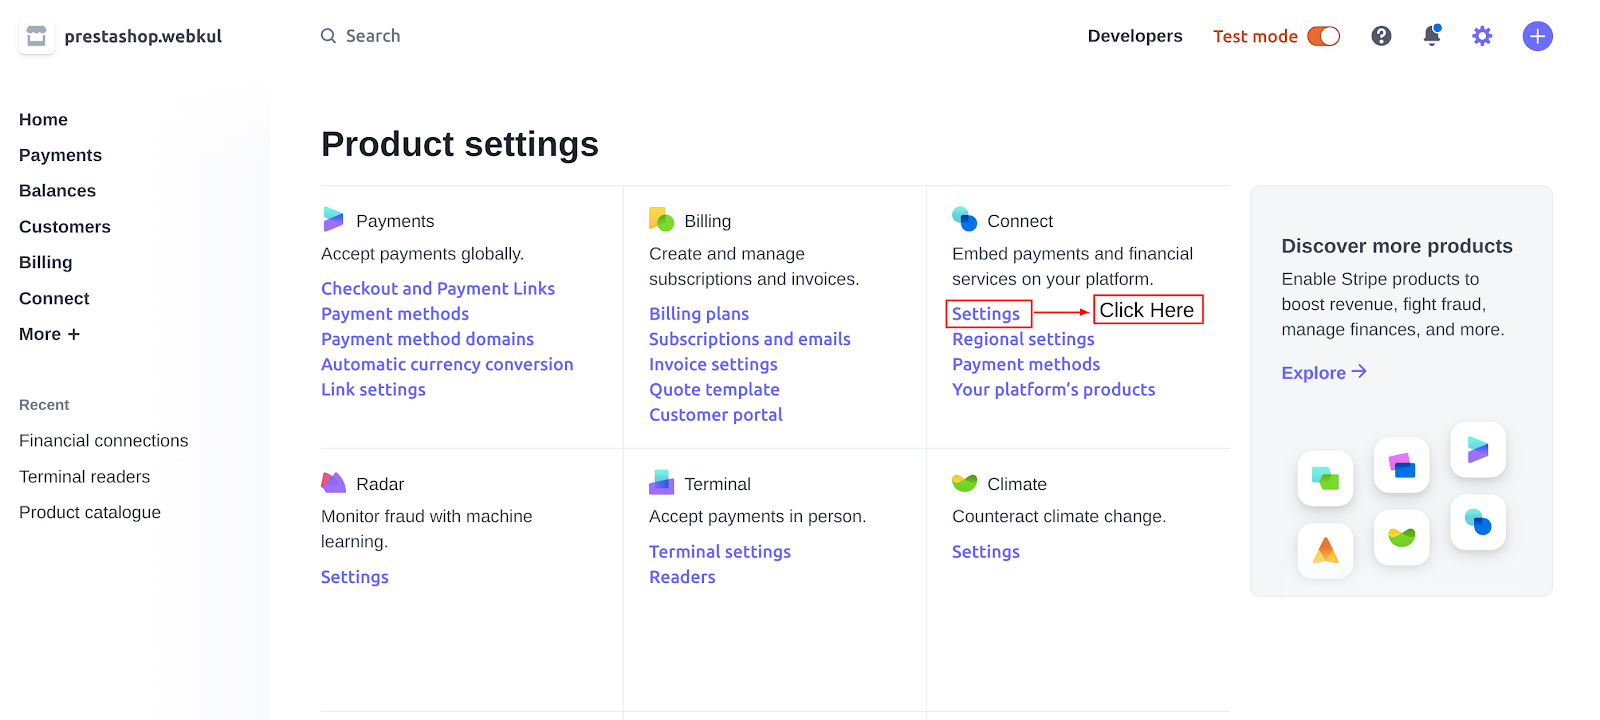
- Now, go to the integrations section and click on client ID to obtain client ID.
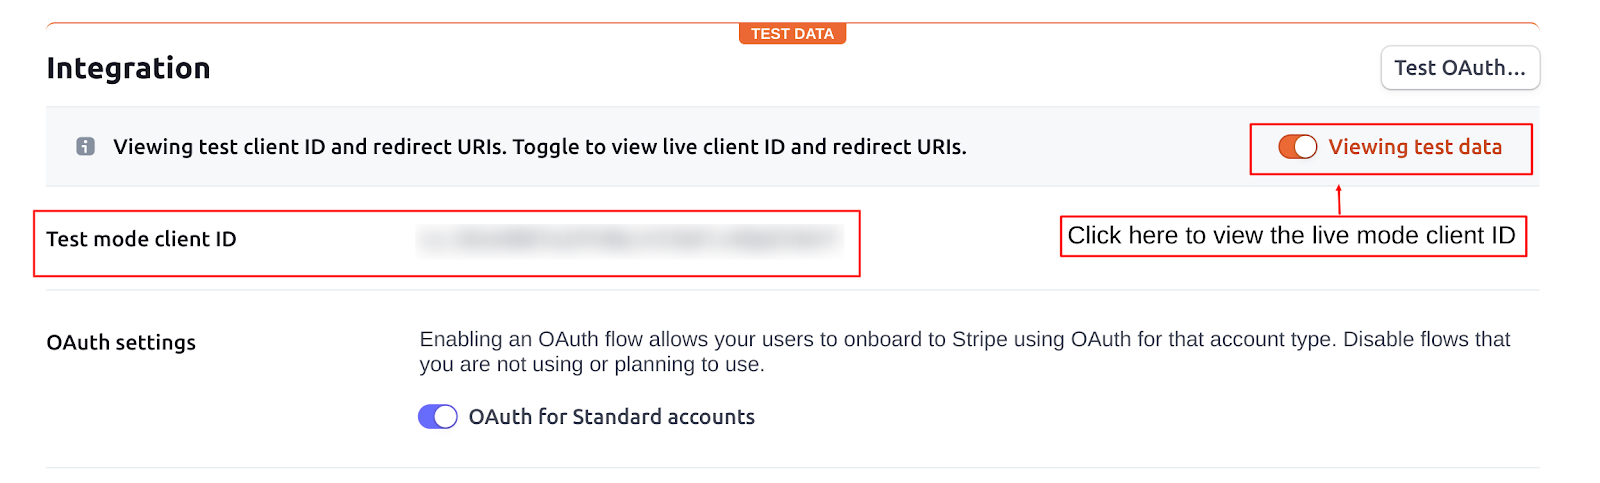
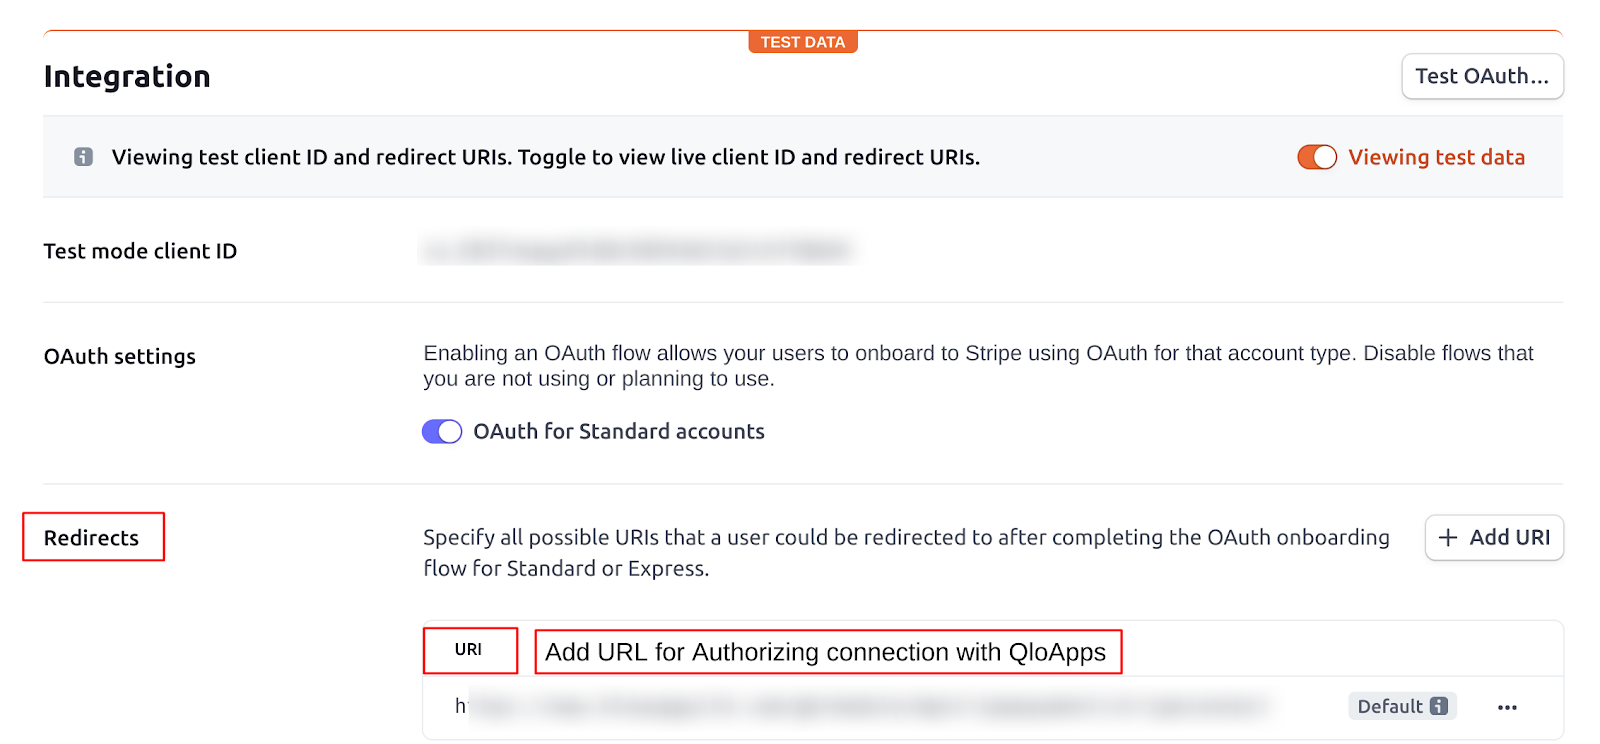
Redirect URL
After getting the client ID, the admin must add the redirect URL under OAuth Settings > Redirects in the Integrations section of their Stripe account to authorize the connection.
Redirect URL to be used: https://yourwebsite.com/module/qlompstripepayment/stripeconnect
Note: The admin has to replace yourwebsite.com in the redirect URL with his site domain
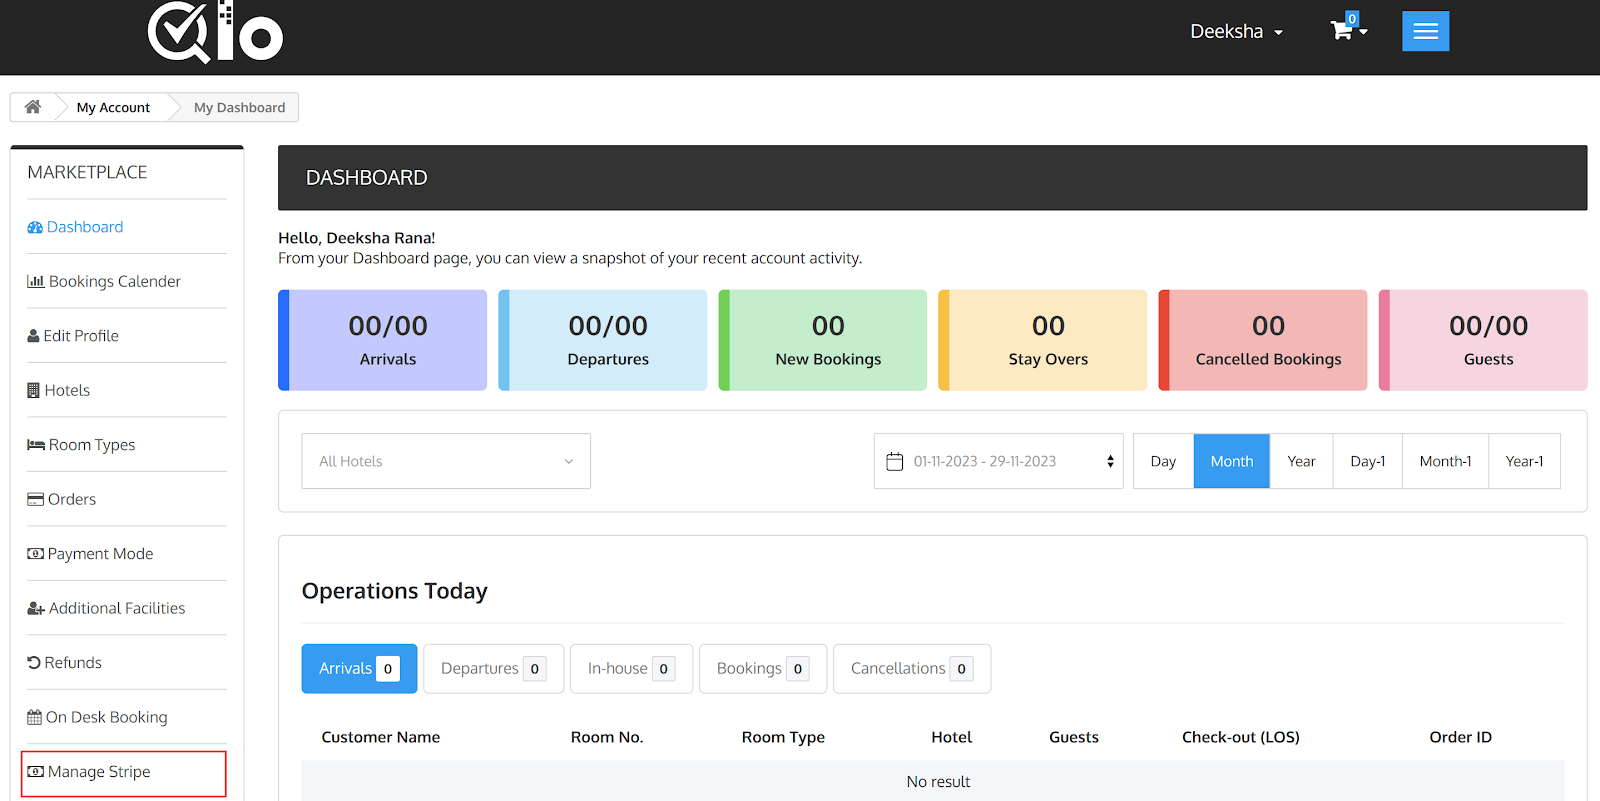
Seller Stripe Setup Procedure
Once the admin has enabled the module, it’s time for sellers to connect their Stripe accounts.
The seller can connect the Stripe account using the newly added tab of Manage Stripe in his account.
- Once the seller clicks on the manage stripe option, he can see the connect option using which he will connect his stripe account with the QloApps marketplace stripe payment gateway module.
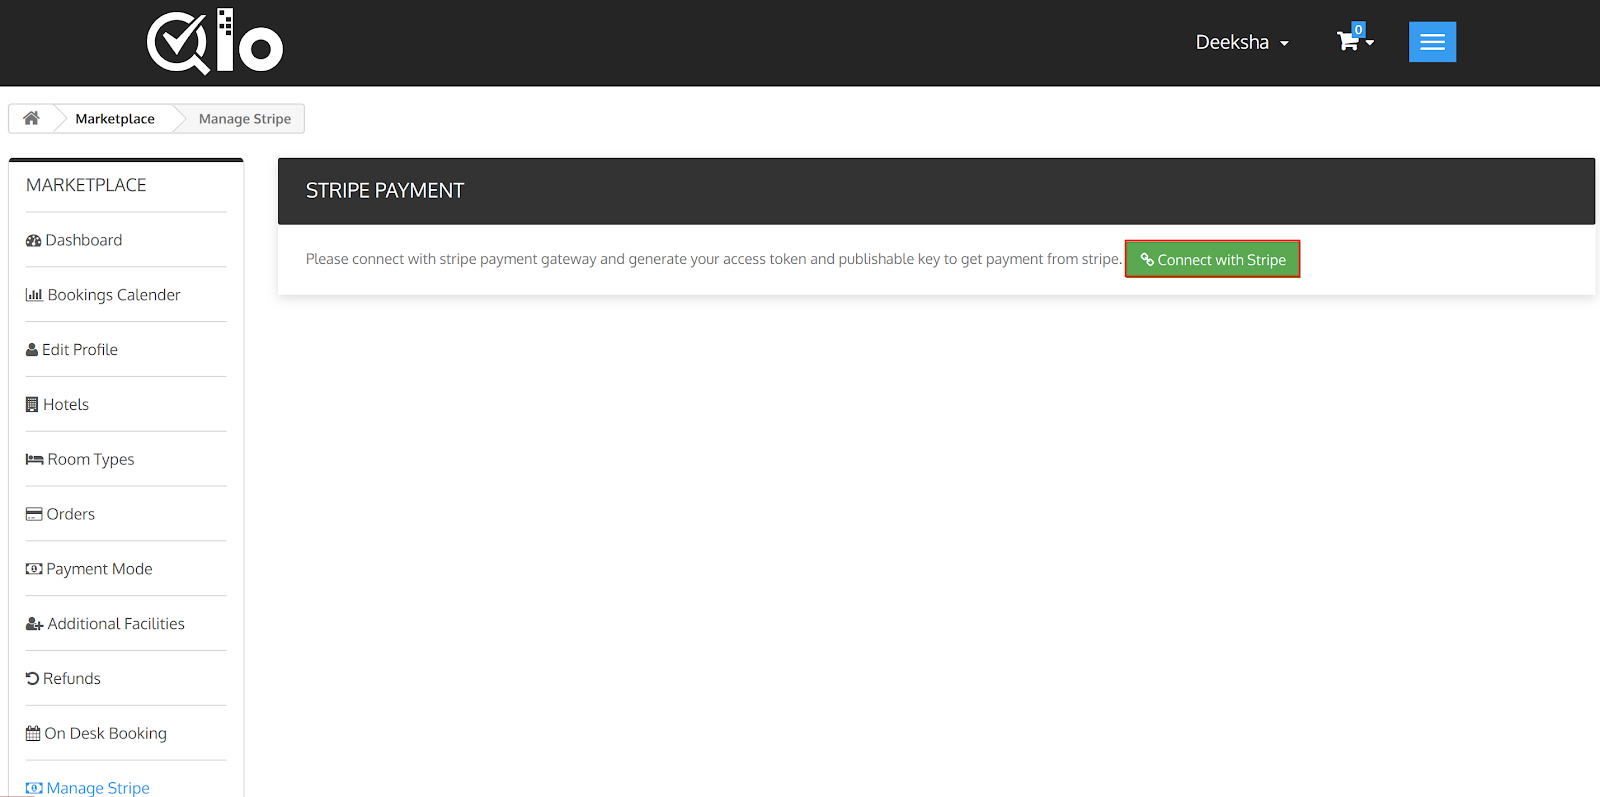
- Once the seller clicks on connect with Stripe button, he will be redirected to the Stripe website where he will have to enter all his Stripe merchant account details.
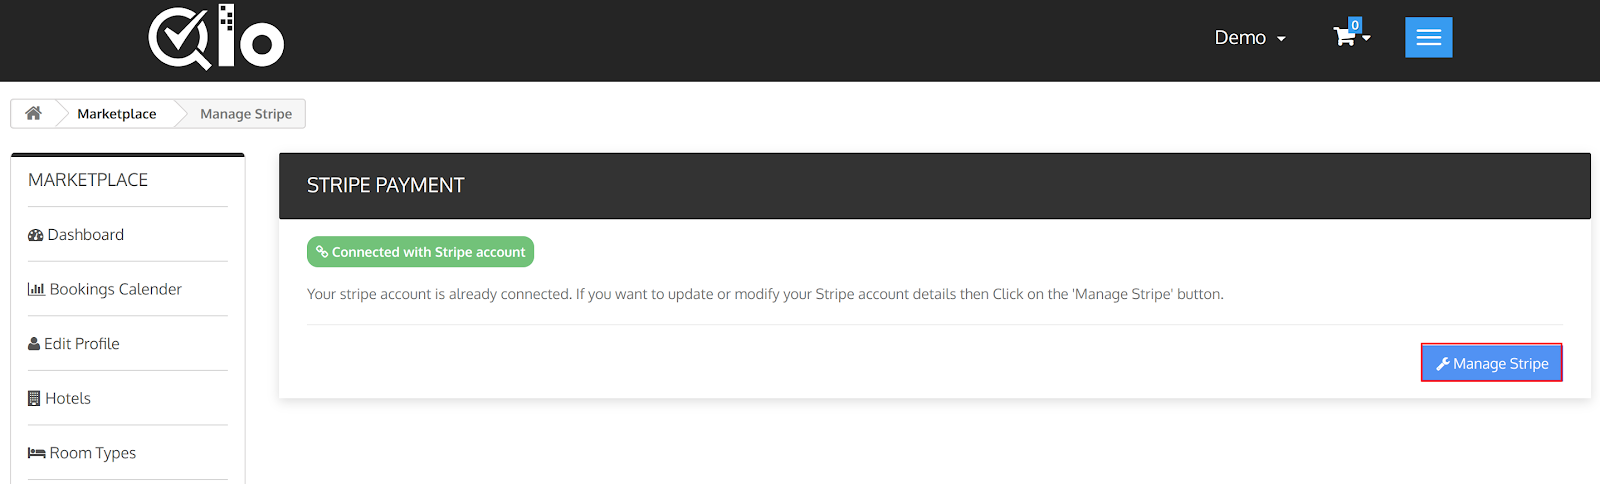
- After the seller completes the setup process of his stripe account, he can then manage his stripe payments using the manage stripe option.
Sellers can connect their Stripe account to receive real-time payouts as soon as a guest books and pays via the QloApps Marketplace Stripe Payment Gateway..
How do Guests pay for bookings using Stripe Payment Gateway?
After the admin and seller complete the configuration process of the module, the stripe payment gateway will be added as an available mode of payment using which guest can pay for his booking order.
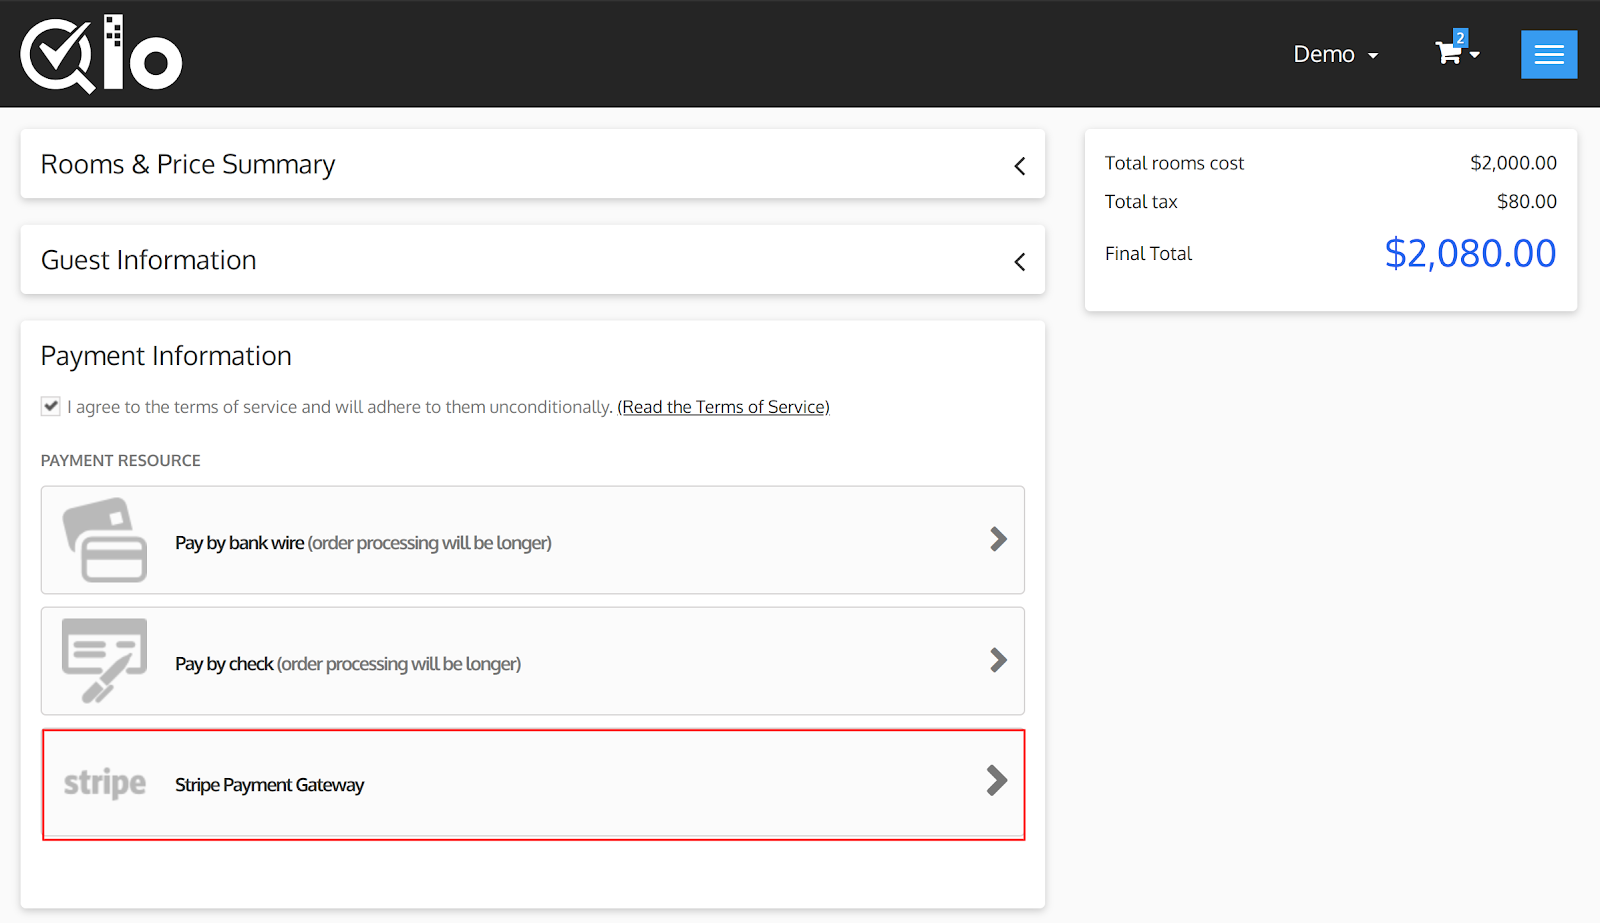
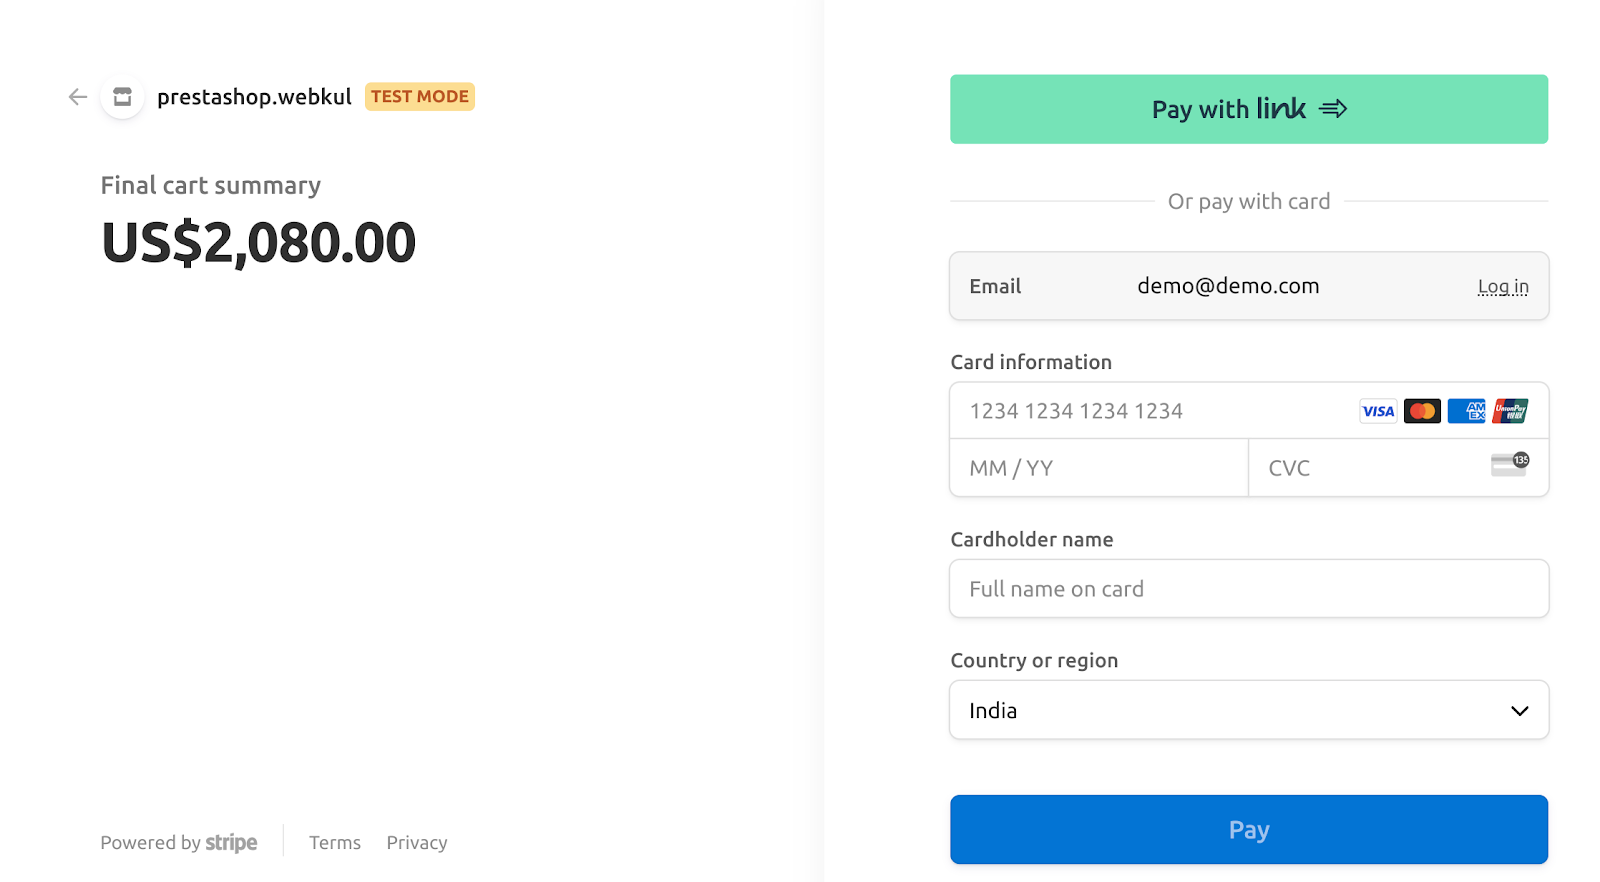
On clicking Stripe Payment Gateway, users are redirected to Stripe where they can pay via card or payment link to complete the booking process.
After the guest completes the payment process, the booking amount will be transferred into the admin account after which it will get split into two parts: admin commission and seller earnings.
The share of seller earnings will be transferred into the seller’s connected stripe account automatically from the admin account in real time. Thus, easing the transfer process for the admin.
Transaction Details
Admin can view the list of all the transactions made by the guests using Stripe Payment Gateway under the marketplace stripe transaction menu bar in the transactions option.
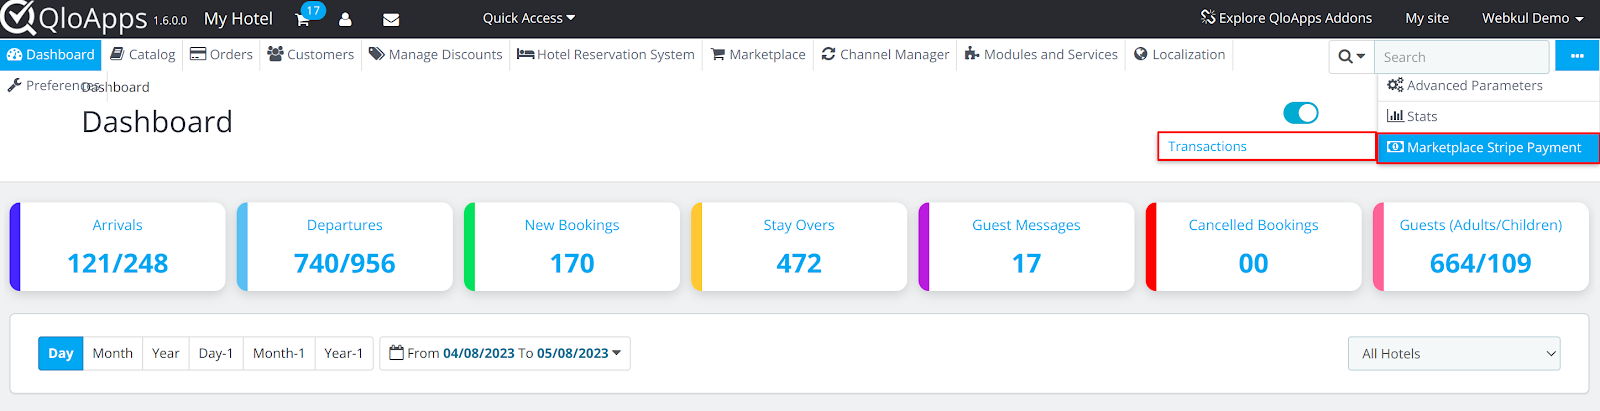
Once the admin clicks on the transactions option, a new page of transactions will open on which the list of all the transactions will be displayed to the admin.
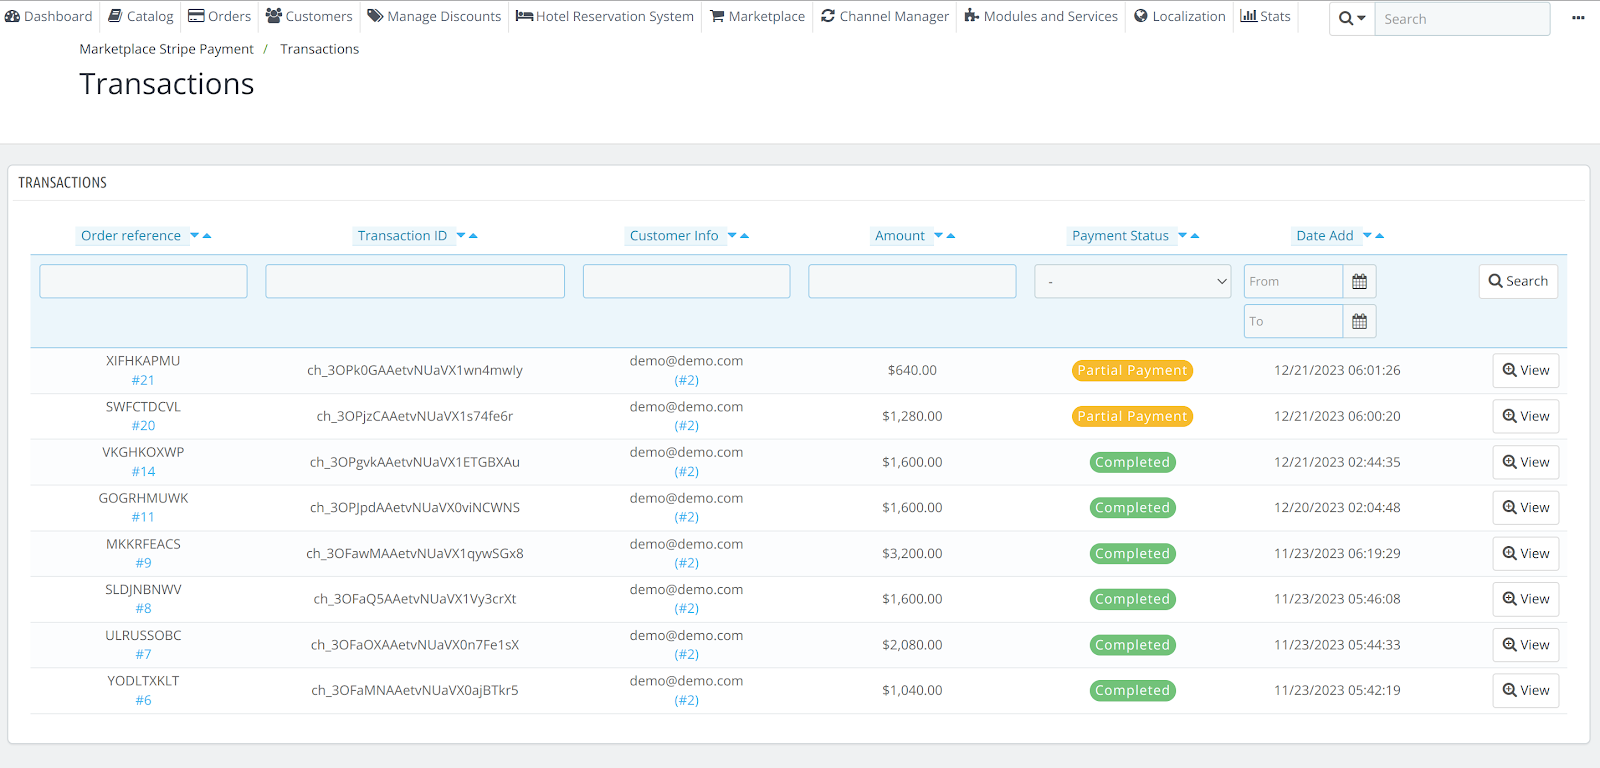
The admin can view the details of each transaction by clicking on the view option.
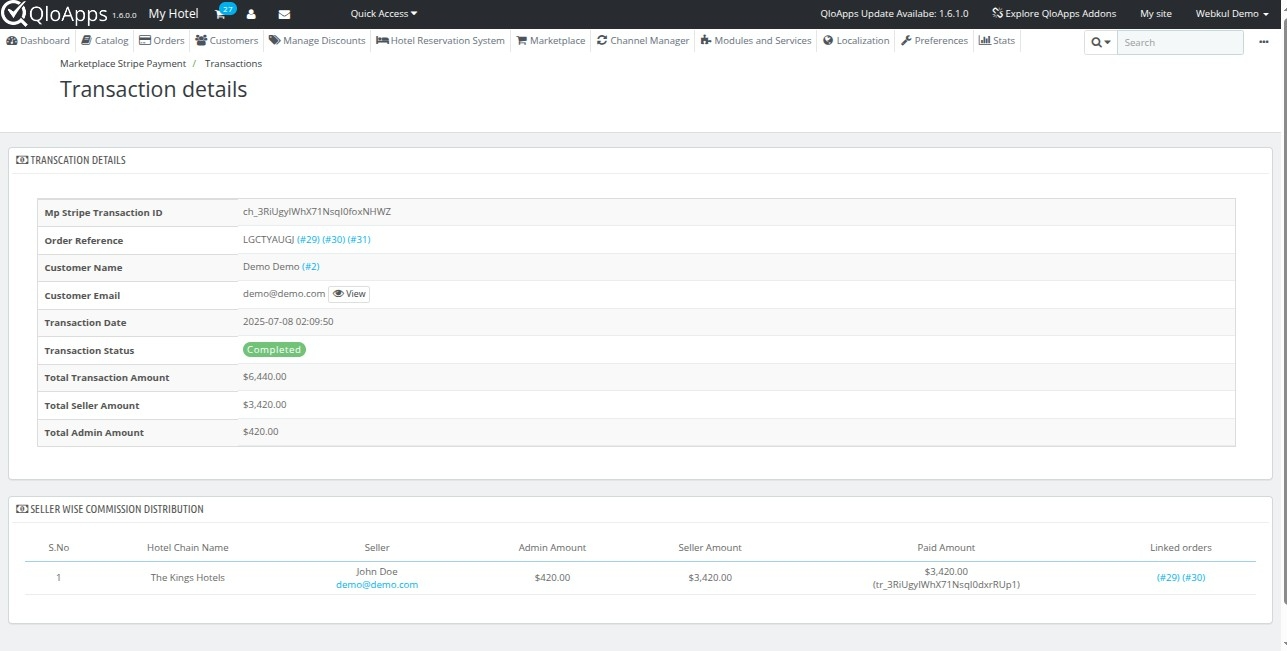
Transaction Details Section
TRANSACTION DETAILS
This section displays the complete summary of the transaction carried out via Stripe, including IDs, customer information, transaction status, and the amount distributed to sellers and admin.
Seller Wise Commission Distribution
This table provides a breakdown of earnings for each seller involved in the transaction.
S.No
Serial number representing the order of entries in the commission table.
Hotel Chain Name
Displays the name of the hotel or property group to which the booking is linked.
Seller
Identifies the individual or vendor (along with their email) who owns the hotel listing or booking.
Admin Amount
The commission amount earned by the platform admin from that specific seller’s transaction.
Seller Amount
The revenue portion that goes to the seller after deducting the admin commission.
Paid Amount
Shows the amount already transferred or settled with the seller.
Linked Orders
Lists the order(s) tied to this transaction. Each order ID is clickable and opens the corresponding order details.
After clicking on the order, the order detail page gets opened
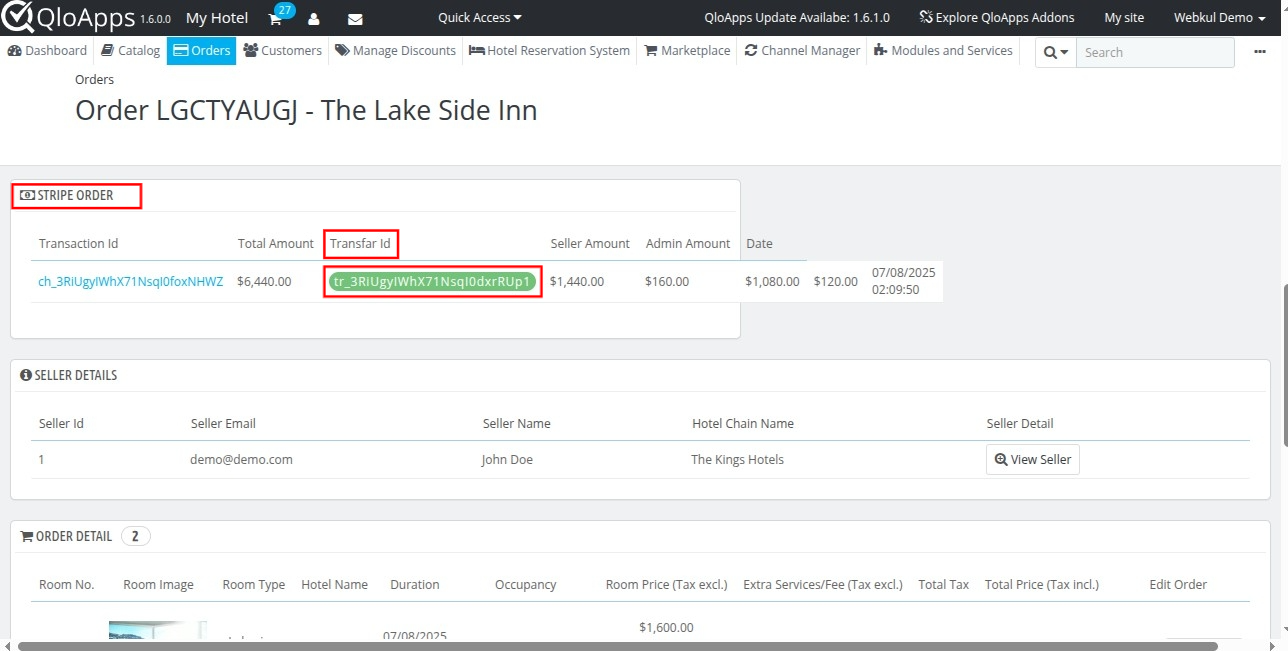
🔄 Stripe Order – Transfer Status
In the Order Detail page under the Stripe Order section, the Transfer Id field indicates whether the seller’s payment has been processed via Stripe:
- ✅ If a Transfer ID is displayed:
This confirms that the payment has been successfully transferred to the seller via Stripe. - ⛔ If the Transfer ID is missing or not shown:
This means the amount is still held by the admin and has not yet been transferred to the seller.
This allows admins to easily track and verify fund disbursement per order.
Conclusion
If you’re using QloApps Marketplace, this module is a must to automate payments and save time by removing manual seller payout processes.
I hope this blog helped you understand the working and configuration of the QloApps Marketplace Stripe Payment Gateway Module.
Current Product Version – V 4.0.0
Supported Framework Version – QloApps 1.7.x

Be the first to comment.