
Introduction
The QloApps Group Booking module allows hotels to manage multiple room reservations under a single group booking.
It is ideal for hotels that frequently receive reservations from corporate clients, travel agencies, educational institutions, tour groups, event parties, and other large guest groups.
Instead of managing every reservation separately, the module groups all related bookings together, making reservation management, invoicing, and order tracking much simpler.
The module also provides dedicated group booking invoices and allows hotels to display a Group Booking badge on the booking details page for easy identification.
Features
The QloApps Group Booking module offers the following features:
- Create and manage multiple reservations under a single group booking.
- Generate dedicated invoices for group bookings.
- Display group booking invoices on the front office.
- Show a Group Booking badge on booking detail pages.
- Easily identify group reservations from the admin panel.
- Simplifies reservation management for travel agencies and corporate bookings.
- Reduces manual effort while handling large reservations.
- One-click enable or disable configuration options.
- Fully integrated with the QloApps reservation management system.
How to Install QloApps Group Booking
Installing the module is simple.
- Go to Modules and Services.
- Click Add New Module.
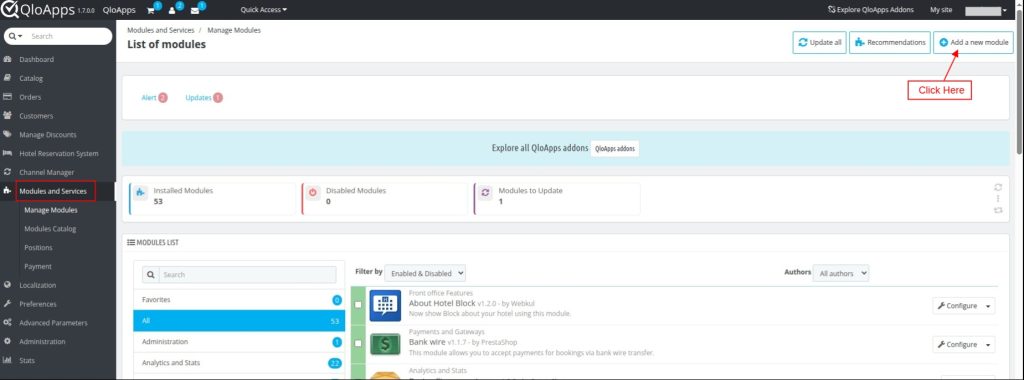
- Click Choose a File and upload the module ZIP.
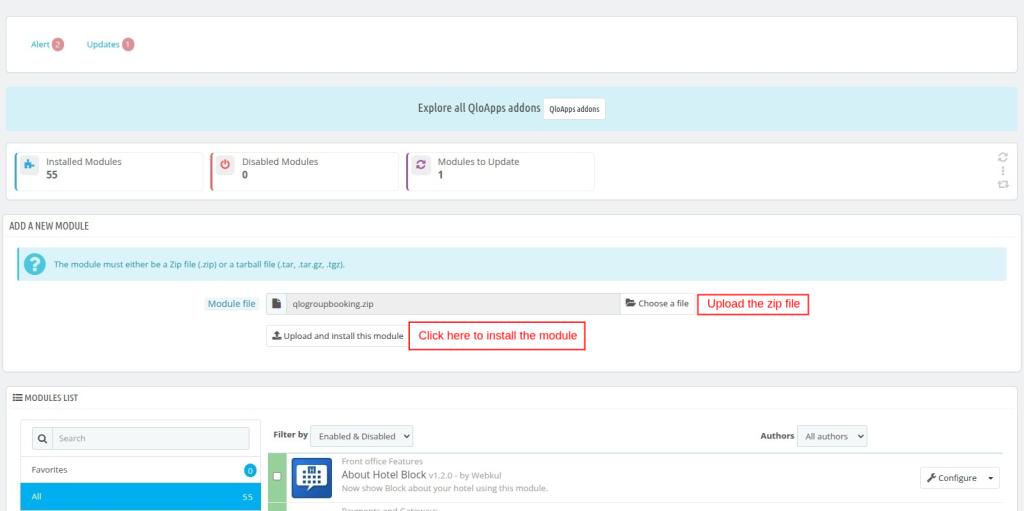
- The installation will begin automatically.
Configuration
After installation:
- Log in to the QloApps Back Office.
- Navigate to Modules and Services.
- Search for QloApps Group Booking.
- Click Configure.
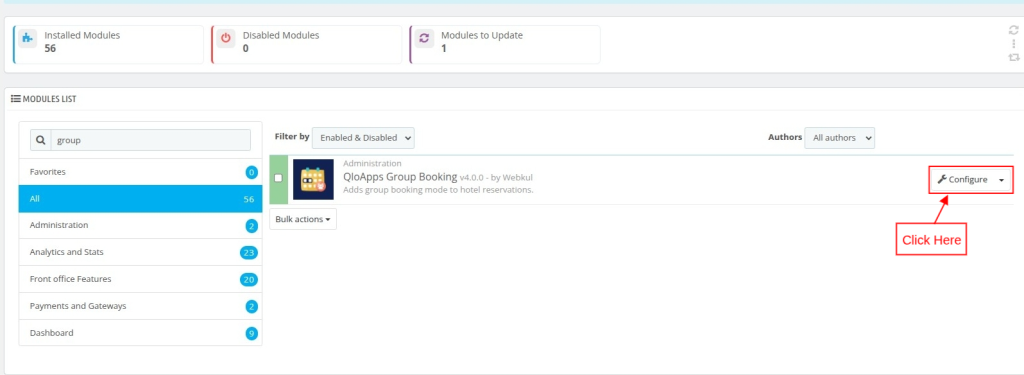
The Group Booking Configuration page contains the following options.
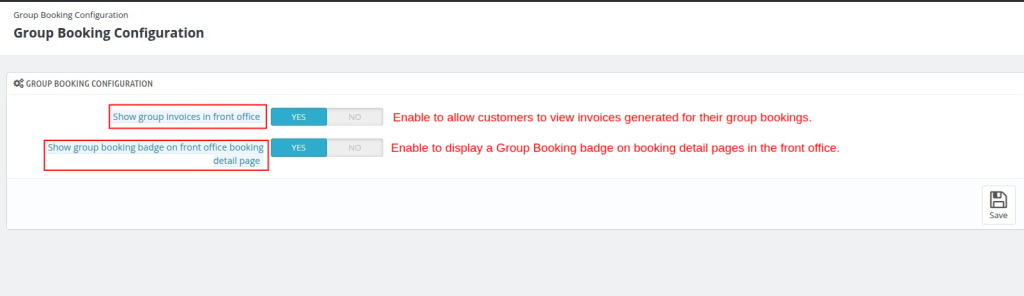
- Show Group Invoices in Front Office– Enable this option to allow customers to view invoices generated for their group bookings from the front office.
- Show Group Booking Badge on Front Office Booking Detail Page– Enable this option to display a Group Booking badge on booking detail pages in the front office.
After making the required changes, click Save.
Back Office
Creating a Group Booking
To create a group booking, navigate to Hotel Reservation System tab > Book Now and select Group Booking as the booking mode.
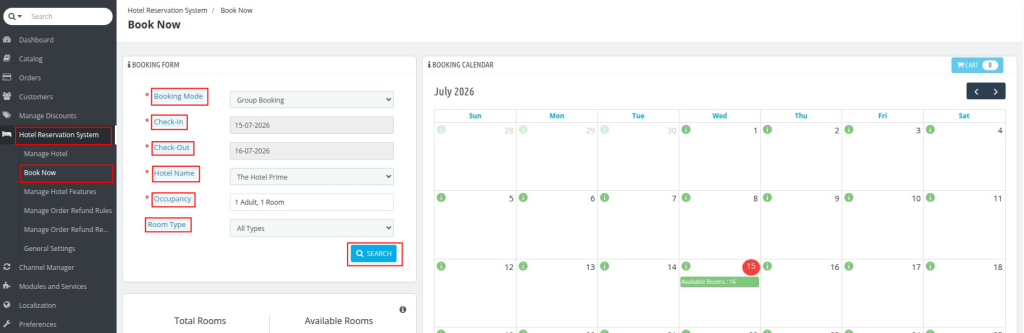
Select the hotel, enter the check-in and check-out dates, choose the occupancy, and optionally filter rooms by room type.
After entering the required information, click Search to display the available rooms.
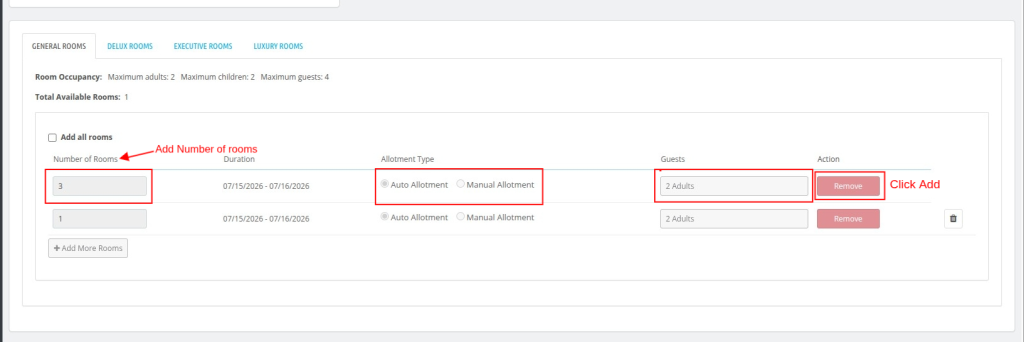
The administrator can specify the required number of rooms, configure the occupancy for each room, and choose either Auto Allotment or Manual Allotment.
Additional room groups can also be added by clicking Add More Rooms.
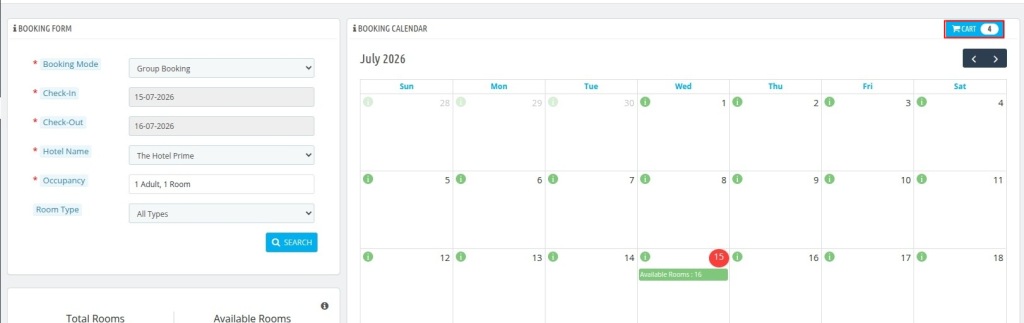
After selecting the rooms, click the Cart button to continue.
The Cart Options popup displays a complete summary of the selected room groups, including room charges, convenience fees, and the total booking amount.
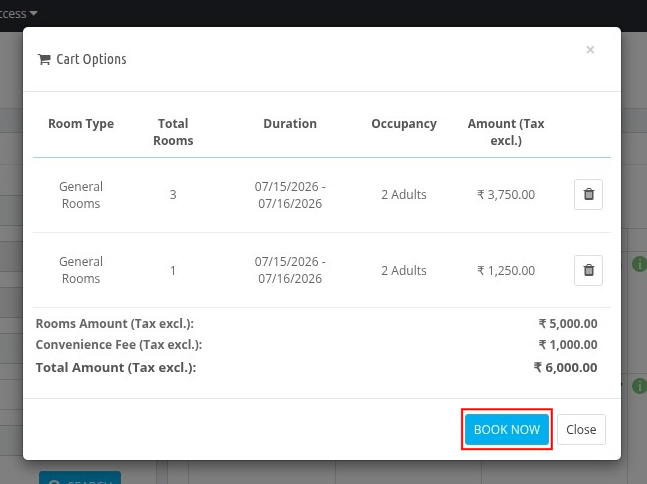
Click Book Now to proceed.
Selecting the Customer
After proceeding to the booking page, the administrator must assign a customer to the reservation.
The customer can be selected by searching existing customers or by creating a new customer directly from the booking page.
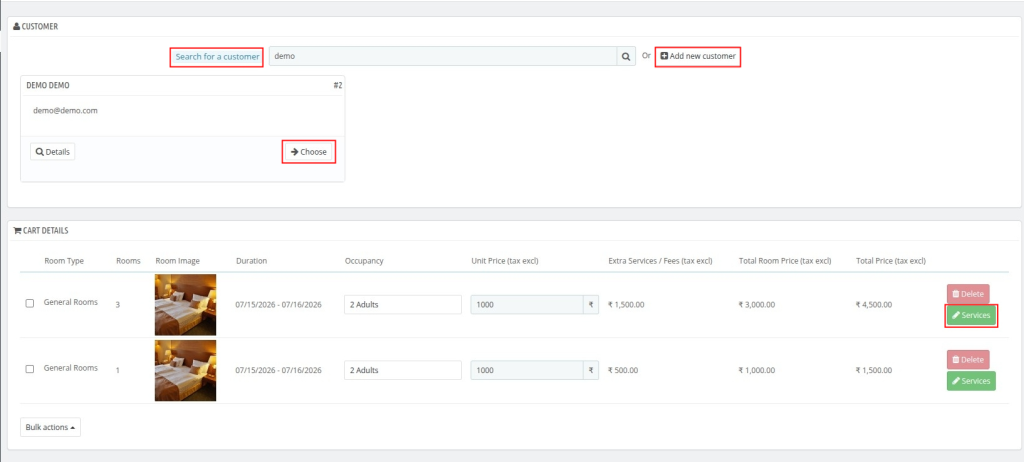
Click Choose to assign the required customer.
Cart Details Section:
The administrator can review all selected room groups before confirming the booking.
The administrator can also:
- Update room information.
- Modify room occupancy.
- Review room charges.
- Manage room services.
- Remove room groups if required.
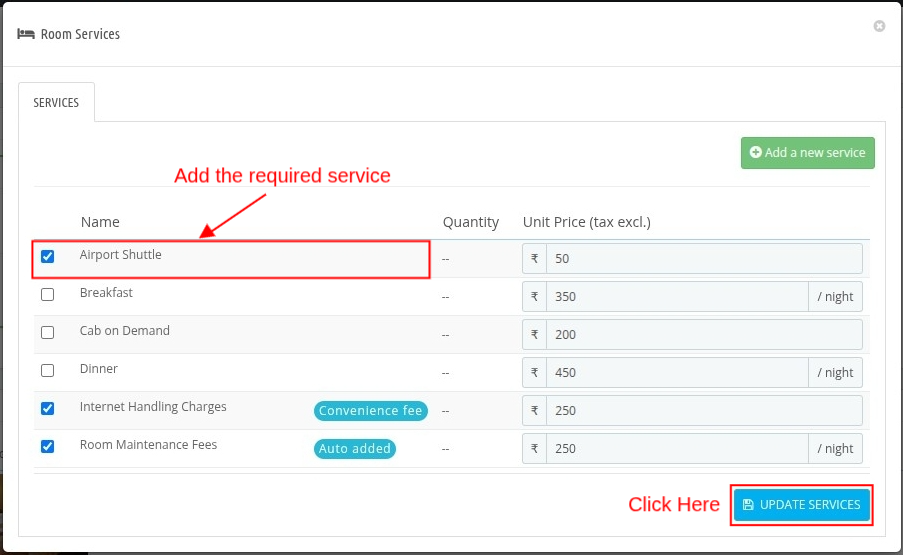
Managing Room Services– Click the Services button for any room group to manage additional room services.
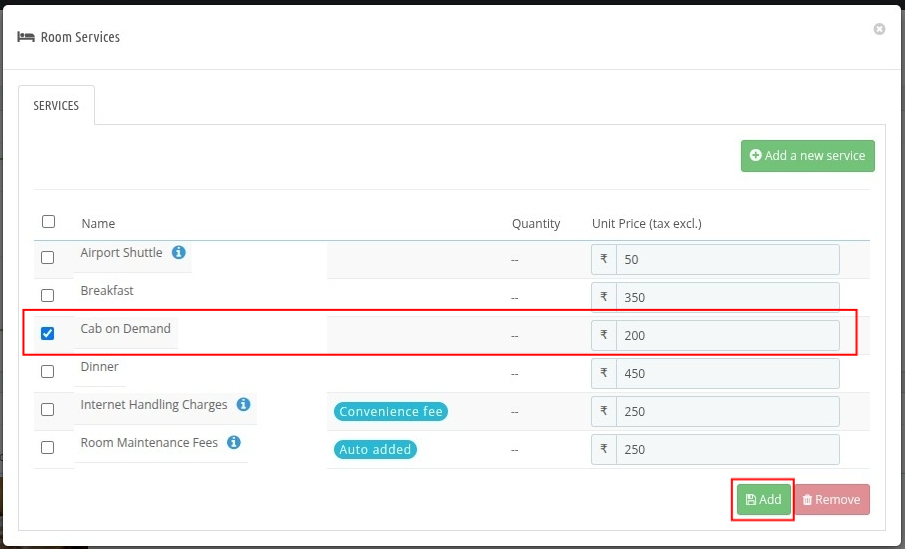
The administrator can add or remove services, update existing services, and configure convenience fee services for the selected rooms.
Bulk Actions are also available to:
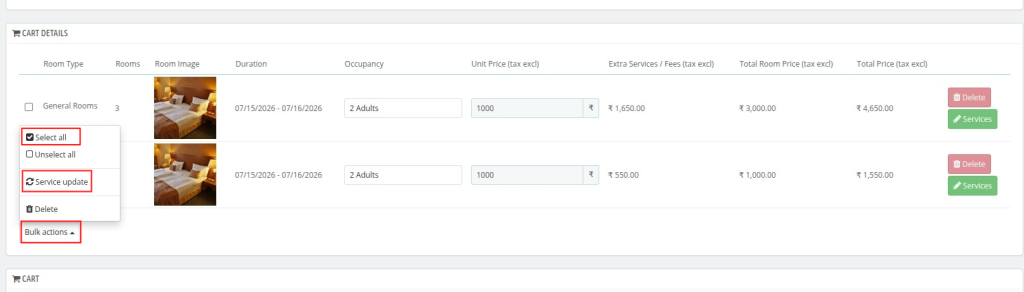
- Select multiple room groups.
- Update services for selected room groups.
- Delete selected room groups.
Completing the Booking
After reviewing the booking details, the administrator can finalize the reservation.
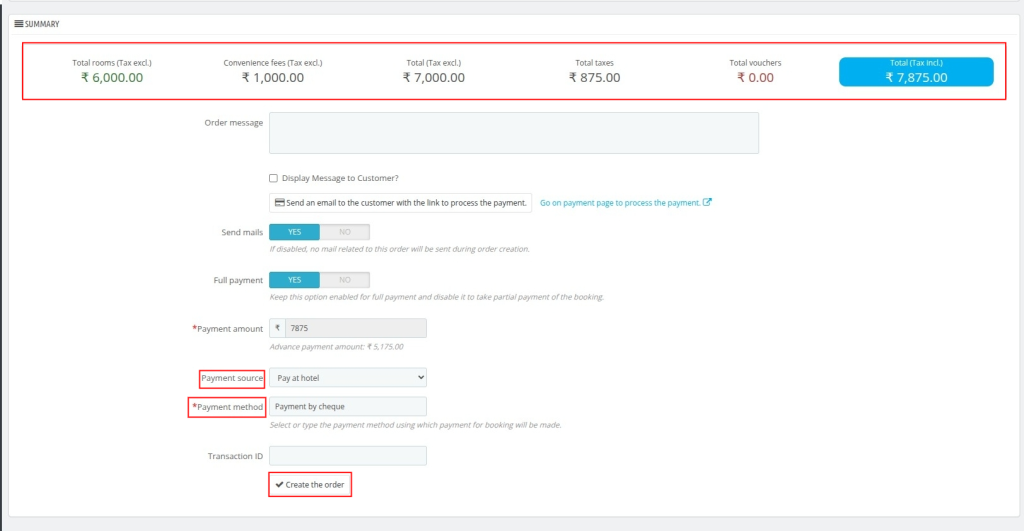
The booking summary displays the room charges, convenience fees, taxes, and the final payable amount.
The administrator can also:
- Add an order message.
- Select the payment method.
- Enter the payment amount.
- Complete the booking.
Once the booking is successfully created, the administrator is redirected to the Order Details page.
Navigate to Orders > Orders to view all reservations.
Viewing Bookings
Navigate to Orders > Orders to view all reservations.
The Orders page displays separate booking statistics KPI for Group Bookings and Individual Bookings, allowing the administrator to quickly monitor the number of bookings under each category.
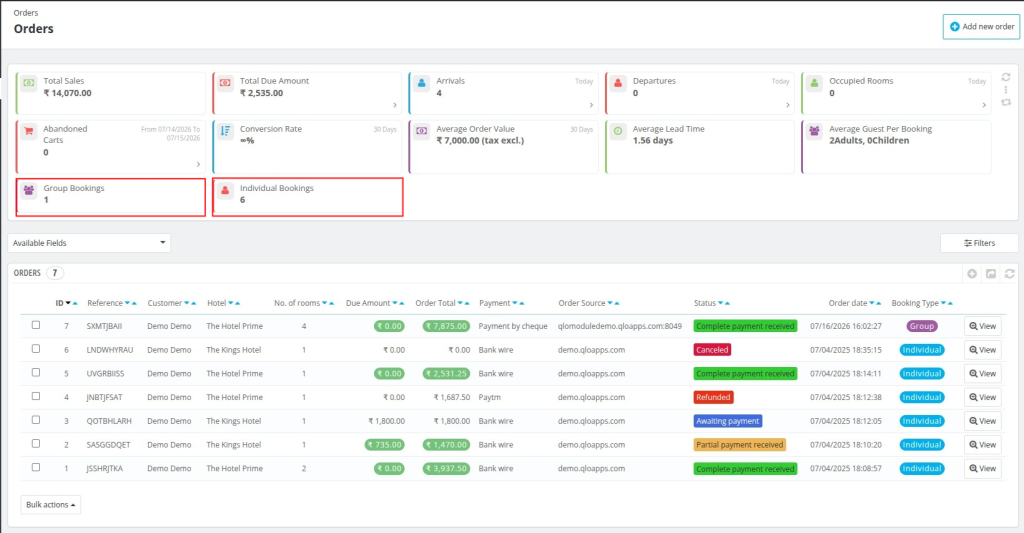
Each order also displays a Booking Type label in the listing, making it easy to identify whether the reservation is a Group or Individual booking before opening the order details.
Managing Group Bookings
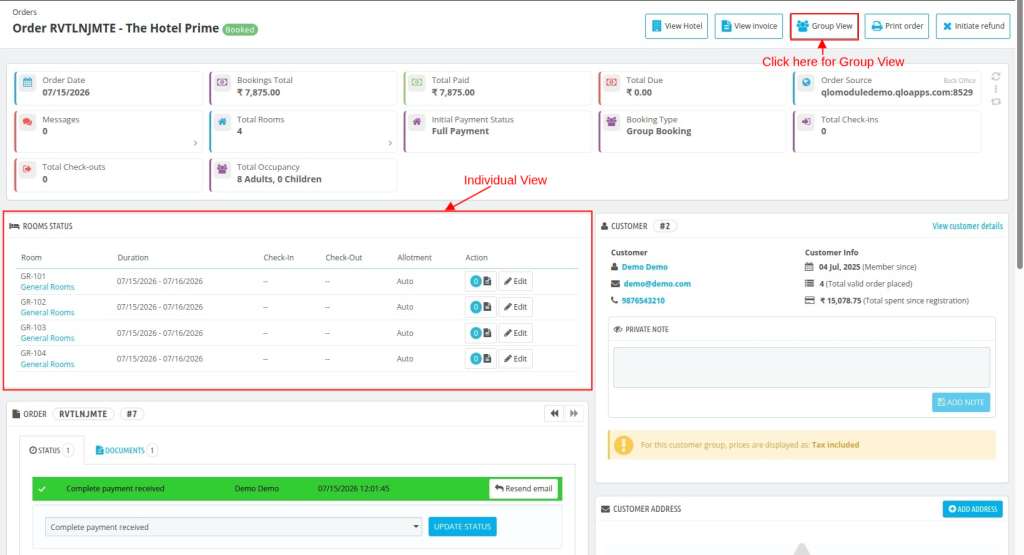
To view a group booking, navigate to Orders > Orders > View to open the required order.
The Order Details page provides complete booking information, including booking status, payment details, room information, invoices, and available actions.
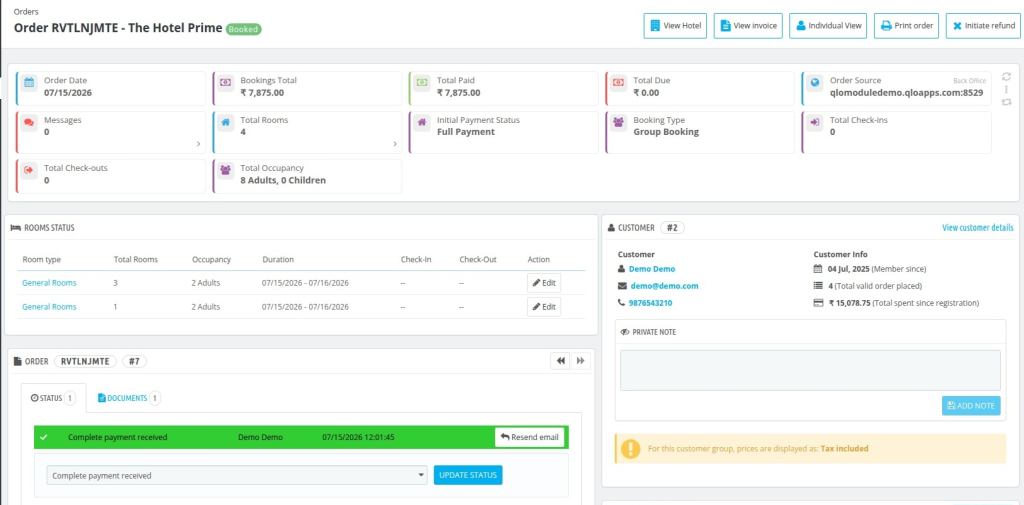
The Booking Type KPI displays Group Booking, allowing administrators to quickly distinguish group reservations from regular bookings.

The administrator can also:
- View hotel details.
- Print the order.
- Generate invoices.
- Initiate refunds.
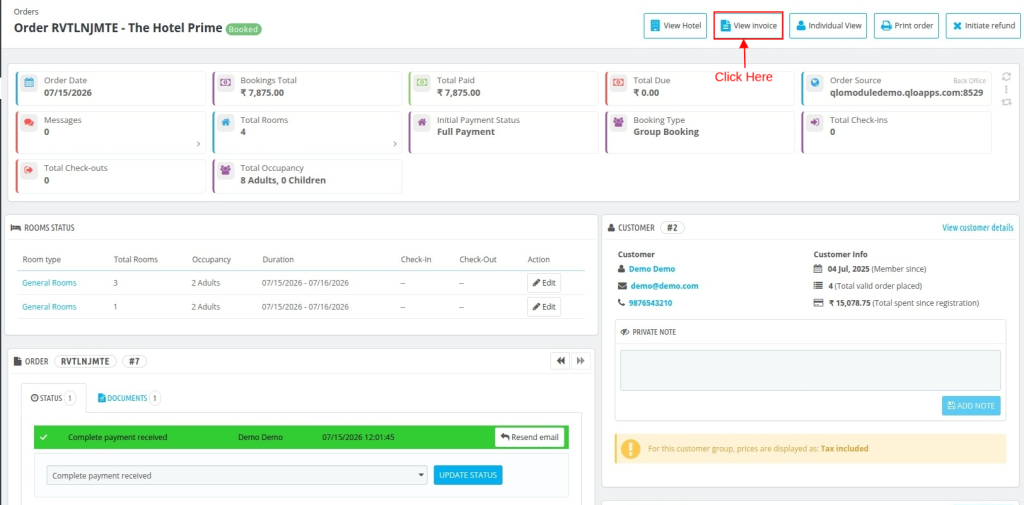
The Order Details page provides two viewing modes.
- Group View: The Group View combines rooms of the same room type into a single entry, making large reservations easier to manage.
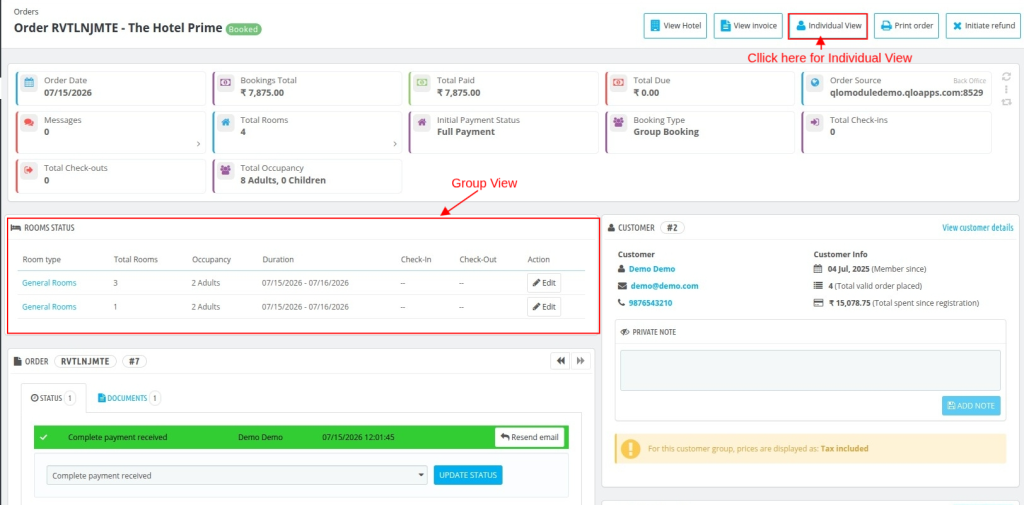
- Individual View: The Individual View displays every booked room separately, providing detailed room-level information for each reservation.
Booking Invoices
Click View Invoice on the Order Details page.
The administrator can choose between two invoice formats.
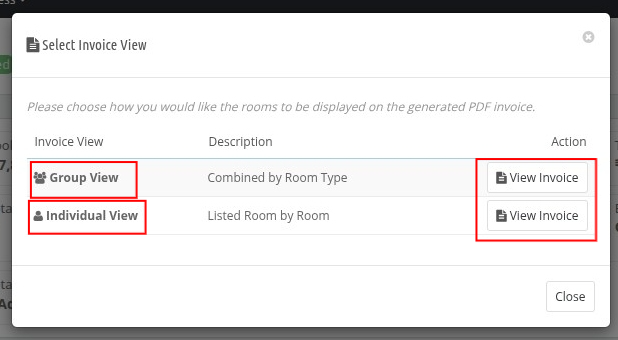
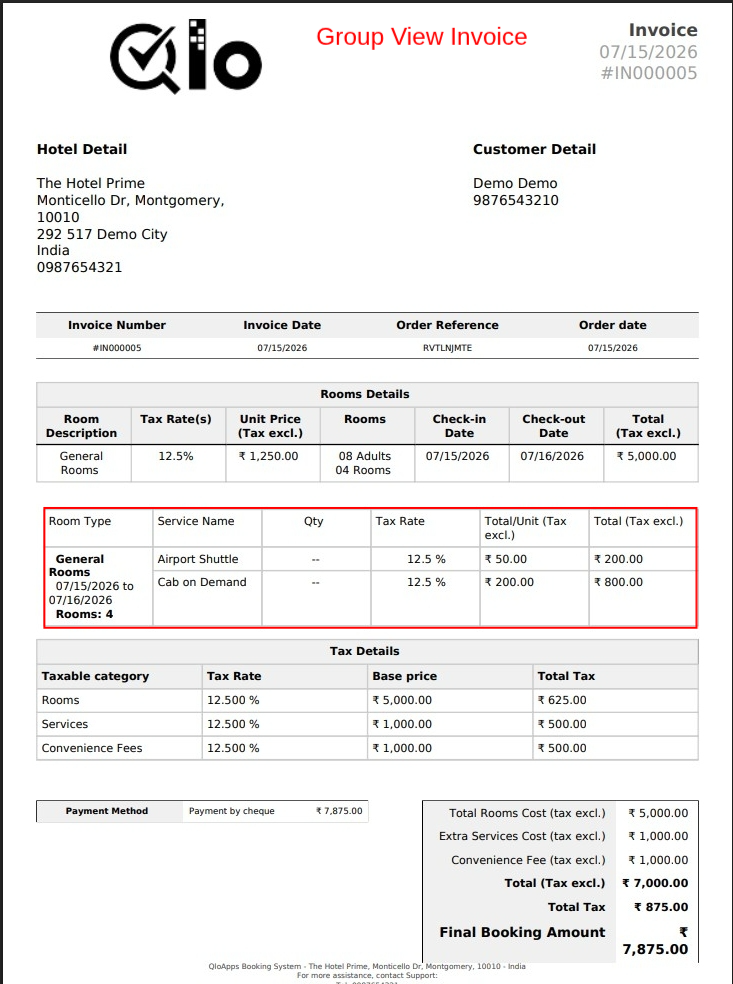
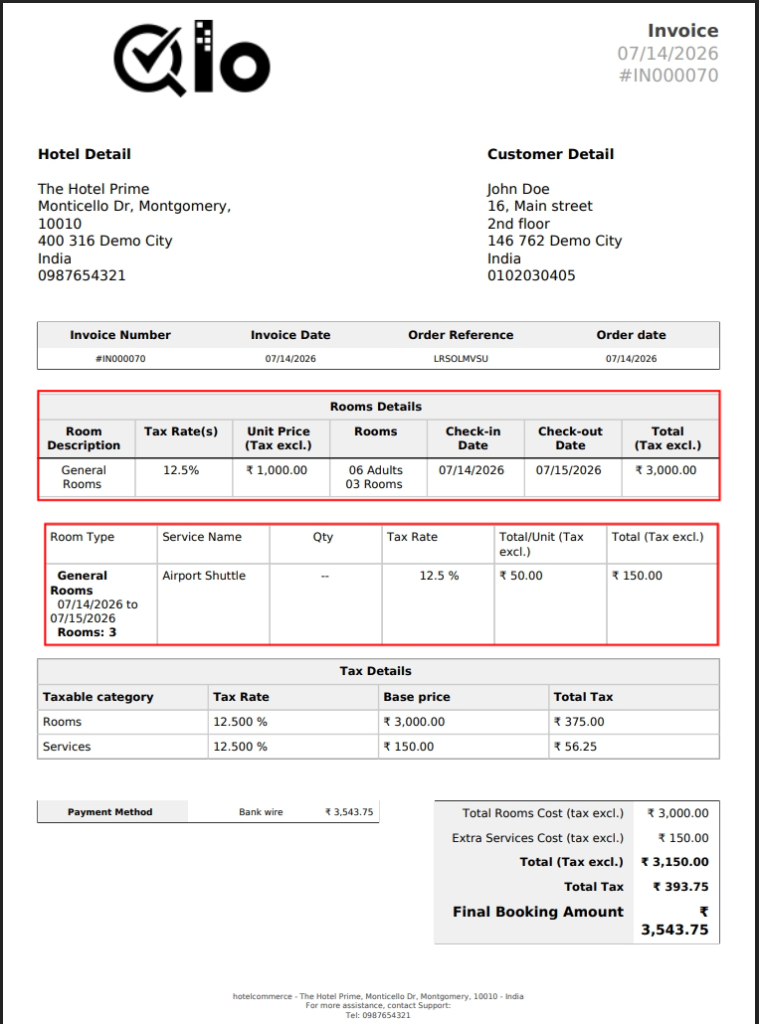
- Group View Invoice: Displays rooms grouped by room type in a single invoice.
- Individual View Invoice: Displays every room separately along with its individual charges and services.
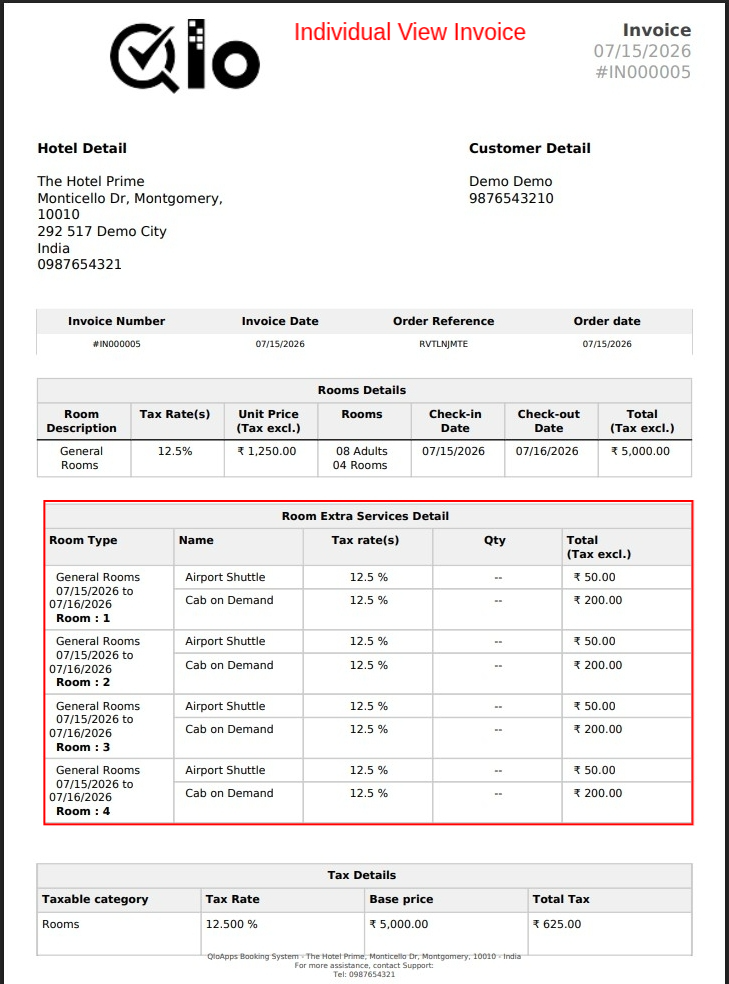
Note: The invoice-related changes introduced are applicable only to service products. Room booking invoices remain unchanged unless explicitly stated.
The administrator can also generate invoices directly from the Orders > Invoices page.
Select the required date range and choose Invoice Type from the dropdown. Then, click Generate PDF File by Date to download the invoices for all group bookings within the selected period.
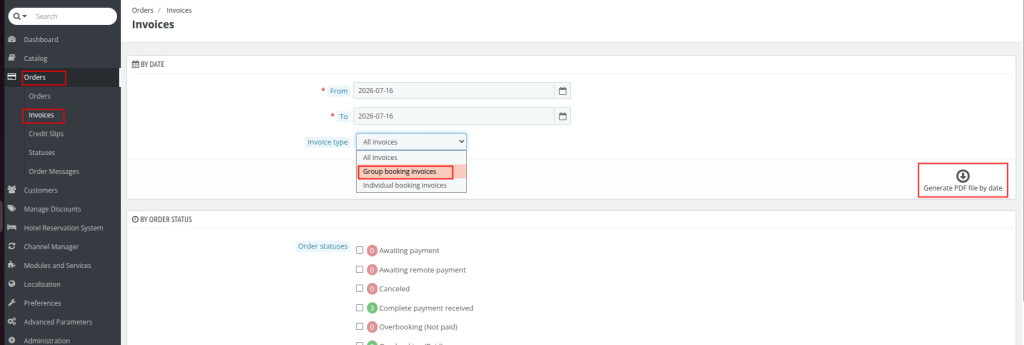
The Invoice Type dropdown provides the following options:
- All Invoices – Generates invoices for all bookings.
- Group Booking Invoices – Generates invoices only for group bookings.
- Individual Booking Invoices – Generates invoices only for individual bookings.
Managing Refunds
To initiate a refund, open the required booking from the Orders page and click Initiate Refund.
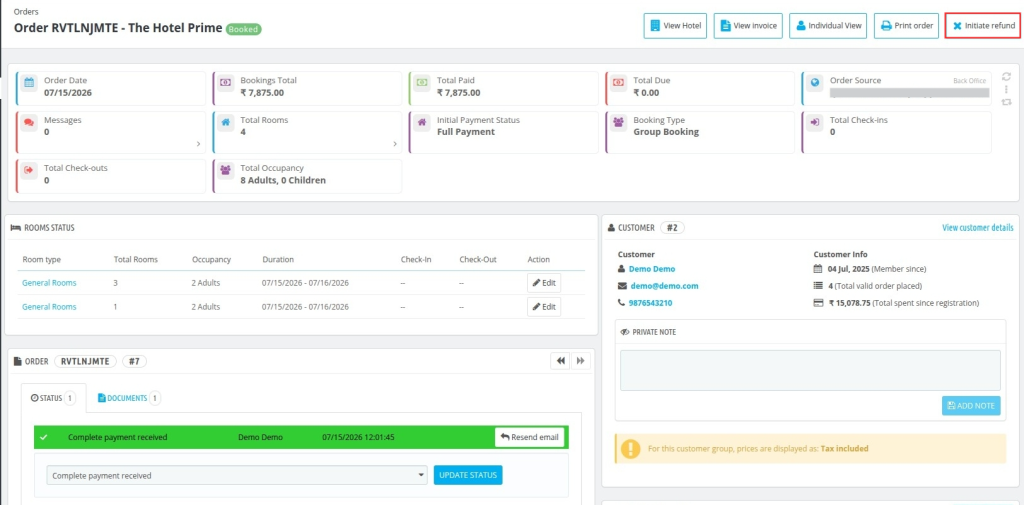
The administrator can process refunds directly from the Order Details page according to the booking requirements.
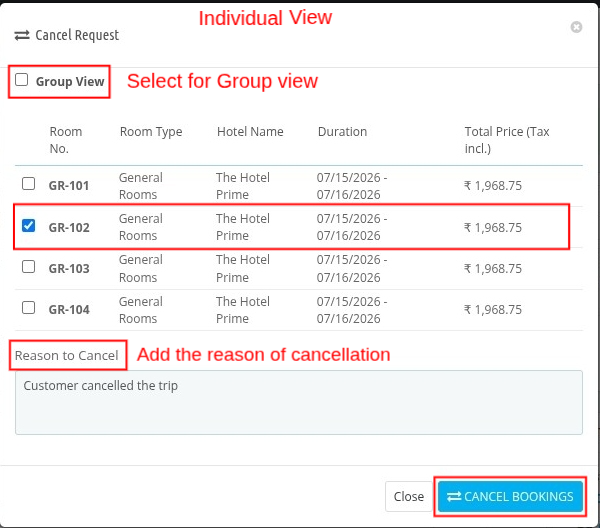
Managing Room Groups
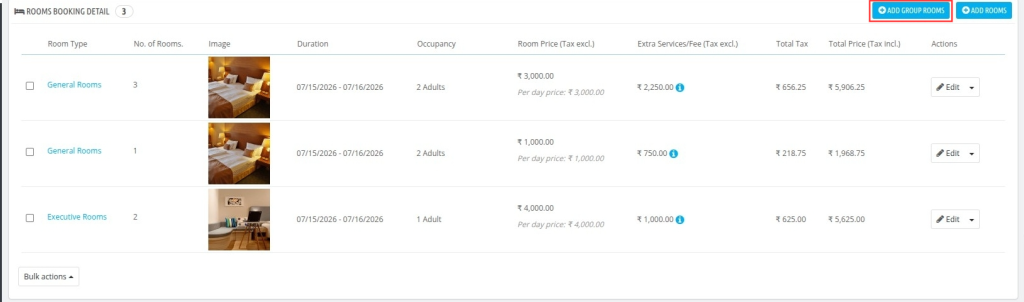
In the Orders page, the administrator can manage the booked room groups directly from the Room Booking Details section.
To modify an existing room group, click the Edit button available in the Actions column.
Additionally, the administrator can use the following options:
- Add Group Rooms – Add multiple rooms as a new room group to the existing group booking.
- Add Rooms – Add individual rooms to the current booking.
Front Office
- Group Booking Badge: If enabled by the administrator, a Group Booking badge appears on the booking details page.
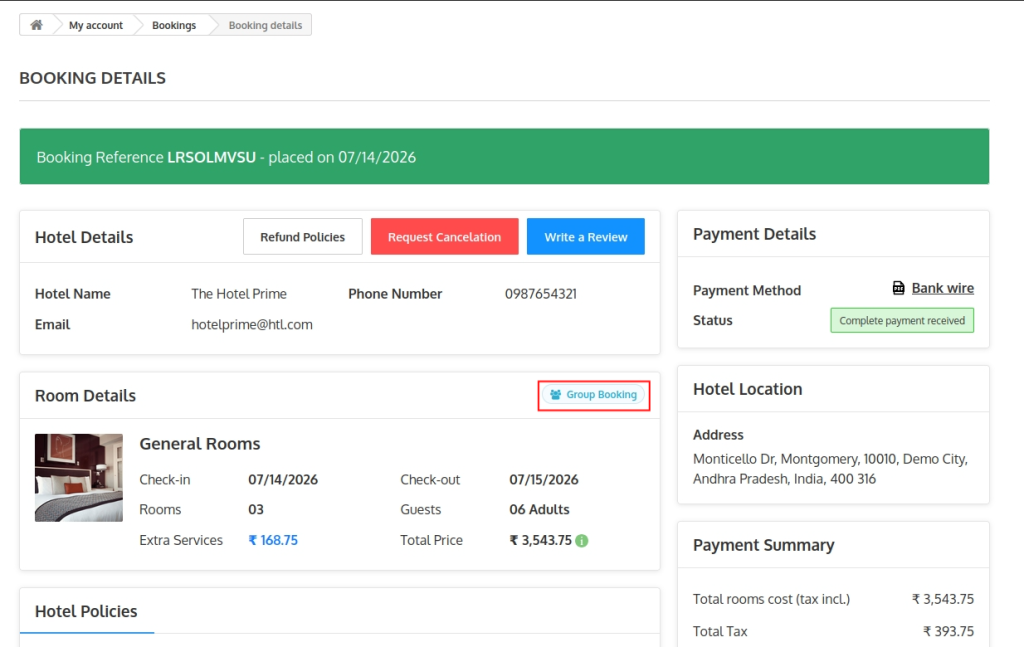
This helps guests easily identify bookings that are part of a group reservation.
- Group Booking Invoices: If the Show Group Invoices in Front Office option is enabled, guests can also access their group booking invoices directly from the front office without contacting the hotel.
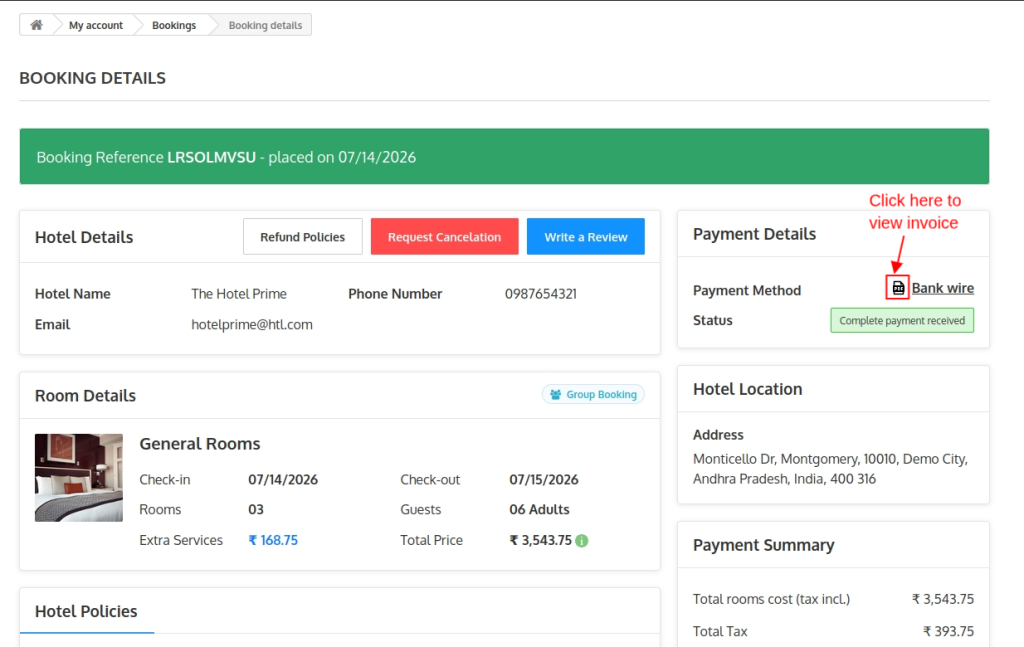
This provides greater transparency and improves the guest experience.
Conclusion
This was all from the QloApps Group Booking. I hope I was able to clarify the functioning of the module to you.
If you want to learn about the functionality of QloApps then you can visit this link: QLO Reservation System – Free Open-Source Hotel Booking & Reservation System
In case of any query, issue, or requirement please feel free to raise it on QloApps Forum
Current Product Version – v4.0.0
Supported Framework Version – QloApps 1.7.x

Be the first to comment.