QloApps Google Analytics is an add-on that will show all the real-time data from your QloApps website on Google Analytics.
It will show the details in numbers and graphs about your hotel business place so that you can make sound decisions.
First, you have to set up a Google Analytics account and it will generate a Measurement ID , API Secret key, and Property ID.
Also, you have to create a Google Cloud Console account it will generate a Client ID and Client Secret Key.
Subsequently, you have to install the QloApps Google Analytics module and configure the required options on the module configuration page.
Along with this, other installed modules can request this module for analytics data for their own uses like most viewed pages list, conversion rate, calculation, etc.
Afterward, check your Google Analytics Account to view the statistics.
Fetaures of QloApps Google Analytics
- The hotelier can configure the module by entering the Measurement ID, API Secret Key, Property ID, Client ID, and Client secret key in the QloApps back office.
- Hotel owners can track guests’ activities (page visits, page clicks, and various events) of their own QloApps hotel website.
- Display real-time statistics in numbers and graphs to frame a solid business strategy for better future results.
- Generate analytical reports of a page view, clicks on pages, and events performed.
- Capture timestamps when guests cancel booking or they abandon the cart.
- Retail conversion rate helps you determine the sales report of your business.
- Get insights about your customers, like their age, gender, interests, and where they are located.
- Other modules can get information from the QloApps Google Analytics module for updated values of various parameters.
Installation of QloApps Google Analytics
The installation of any module is very simple in QloApps.
- Go to the “Module and Services” tab.
- Click on “Add New Module”.
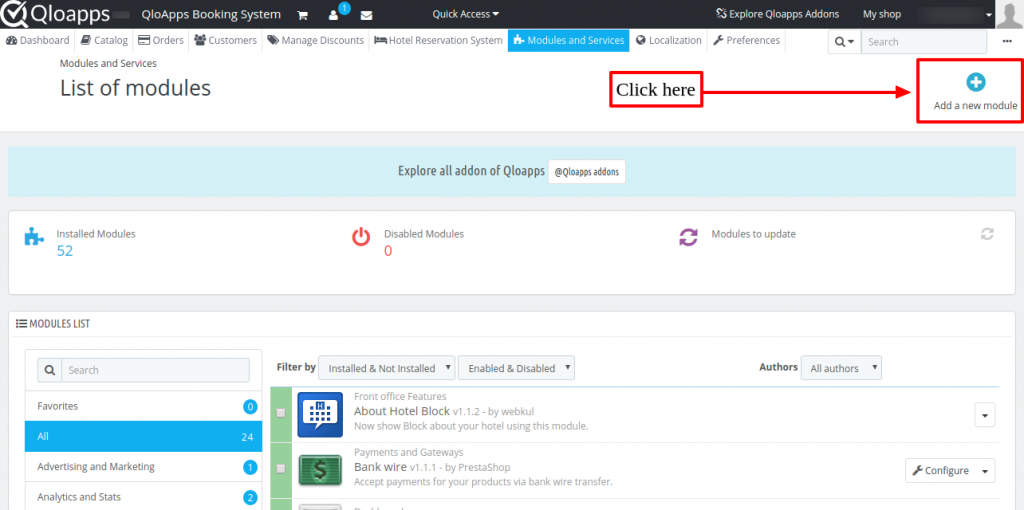
Now, upload the zip file of the module and click on Install.
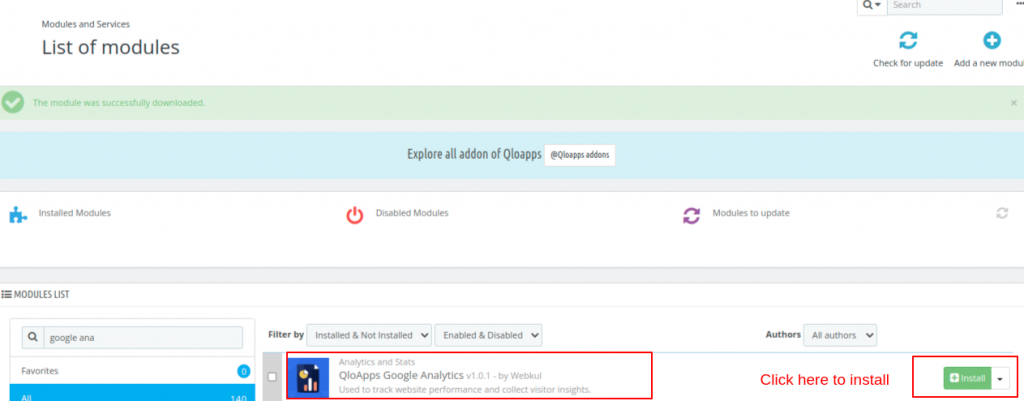
Now, we have installed the module. So, let’s check out how to configure it.
Configuration of QloApps Google Analytics
Once you install the module the following window will appear as given below.
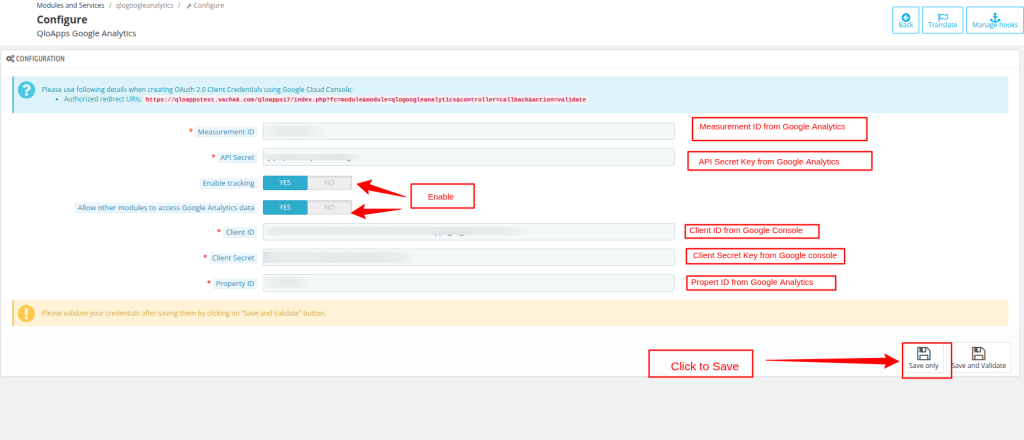
To configure the module:
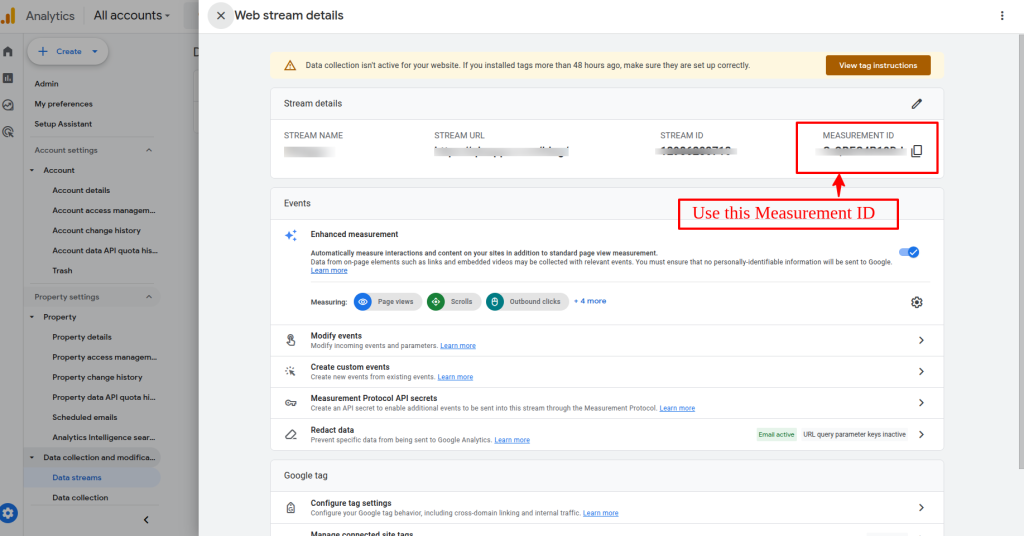
- Measurement ID: Feed this space with the Measurement ID generated on the Google Analytics page.
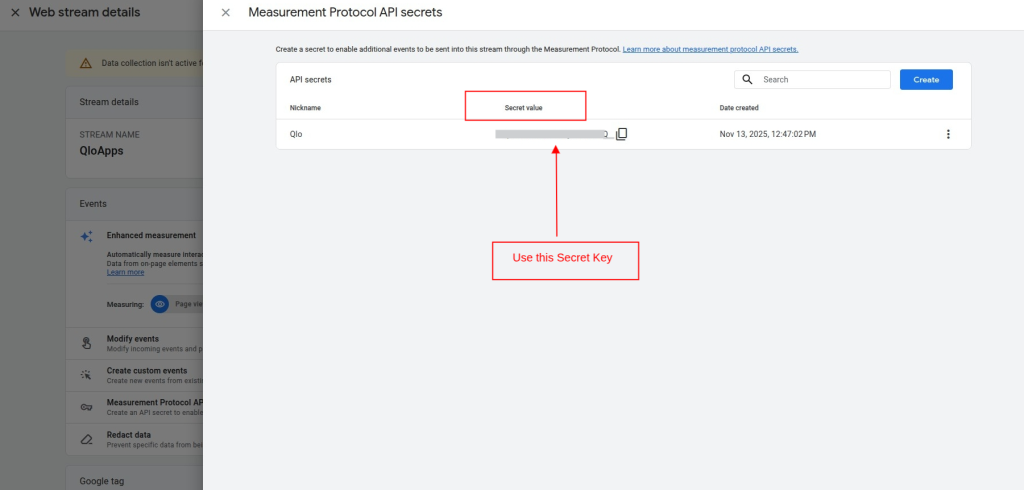
- API Secret Key: Enter the API Secret key generate don Google Analytics
- Enable User Tracking ID: Enable to add Google Analytics tags to pages for Analytics data collection.
- Client ID: Enter the client ID that is associated with the project. You can get a client ID from the Google Cloud Console.
- Client Secret: Enter the client secret key associated with the project. You can get a client ID from the Google Cloud Console.
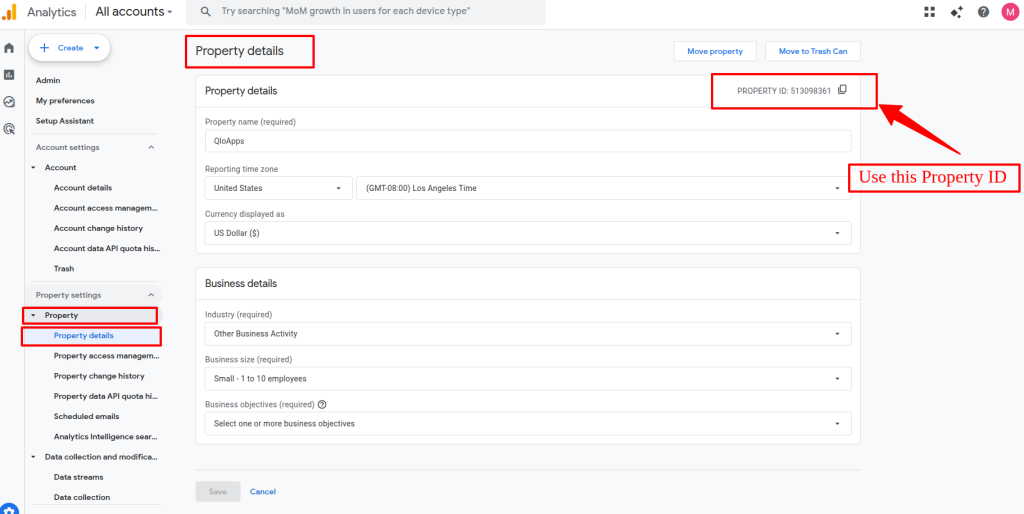
- Property ID: Enter the Property ID obtained from the Google Analytics page.
Then click on the “Save” Button. After that Click on Save and Validate. The Save and Validate button is used to match the fields.
How to get Measurement ID, API Secret Key, and Profile ID From Your Google Analytics Account?
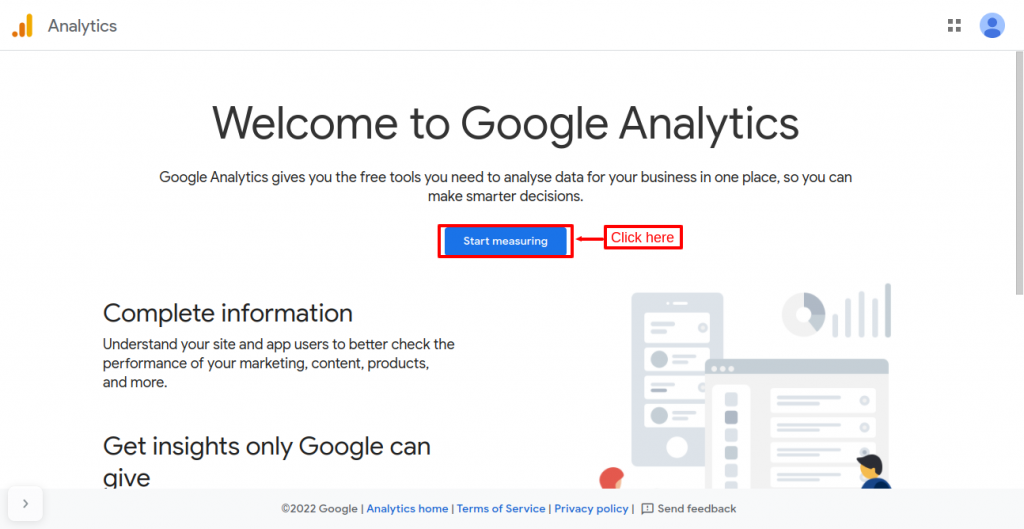
The very first thing you need is a Google Analytics account. If you don’t already have one, then you’ll have to Sign up.
To set up QloApps Google Analytics, follow these step-wise instructions:
To set up a Google Analytics account, create an account on Google.
After creating an account on Google, Go to Google Analytics.
You need a Google Analytics account and sign-up if you don’t already have an account.
Subsequently, you will redirect to the Google Analytics page, here click on ‘Start Measuring’.
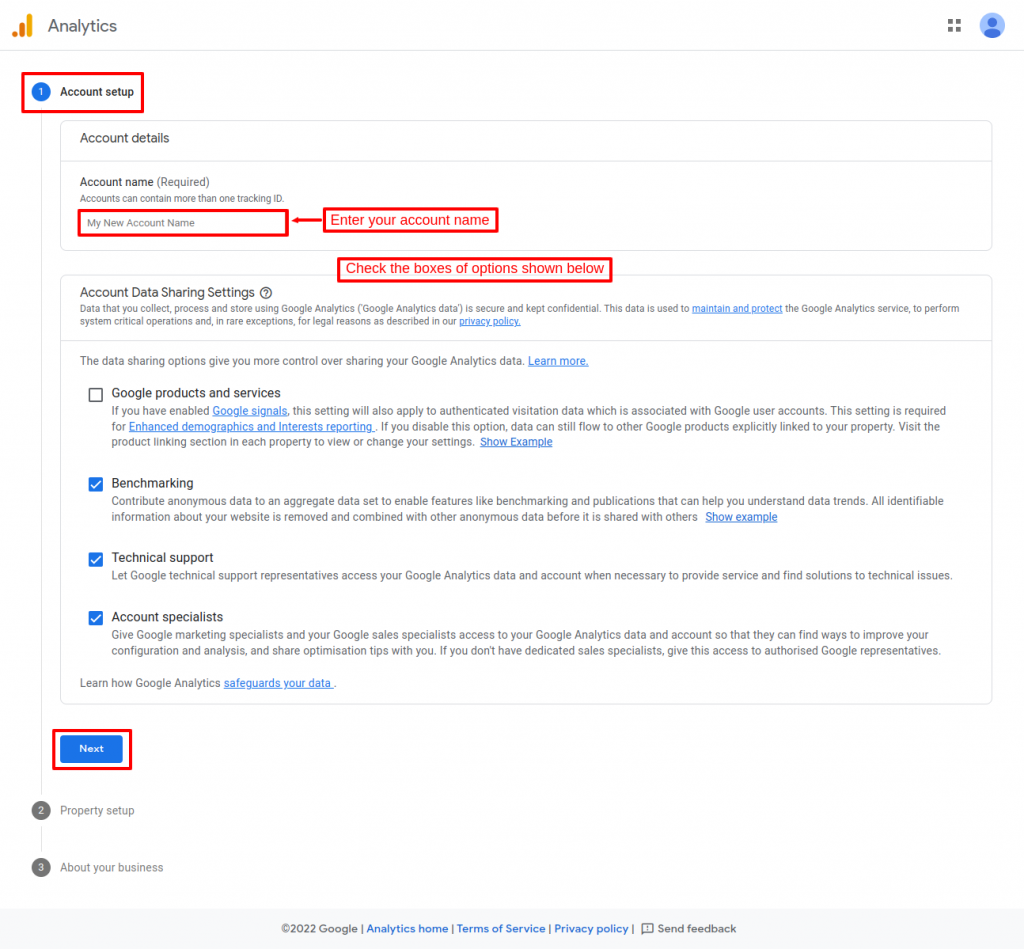
Account Setup
Afterward, you will redirect to the ‘Account setup’ tab. Enter all the fields relating to your account.
Write your account name, and check the boxes for which you permit Google Analytics to use the data collected for you.
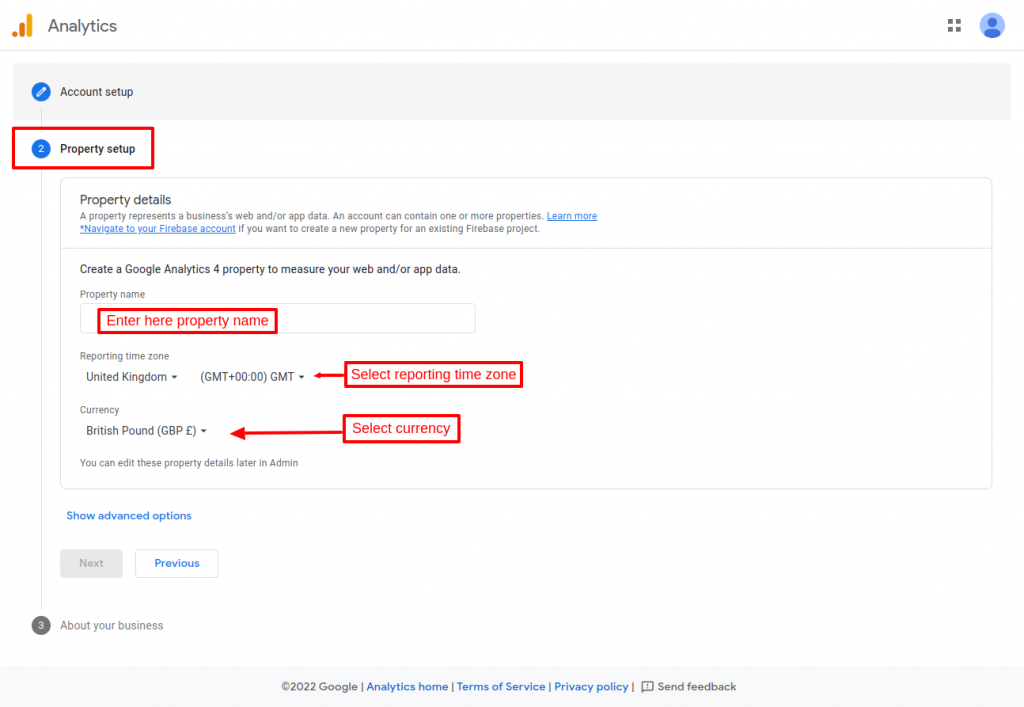
Property Setup
Your account can have more than one property. Write the property name, and select reporting time and currency.
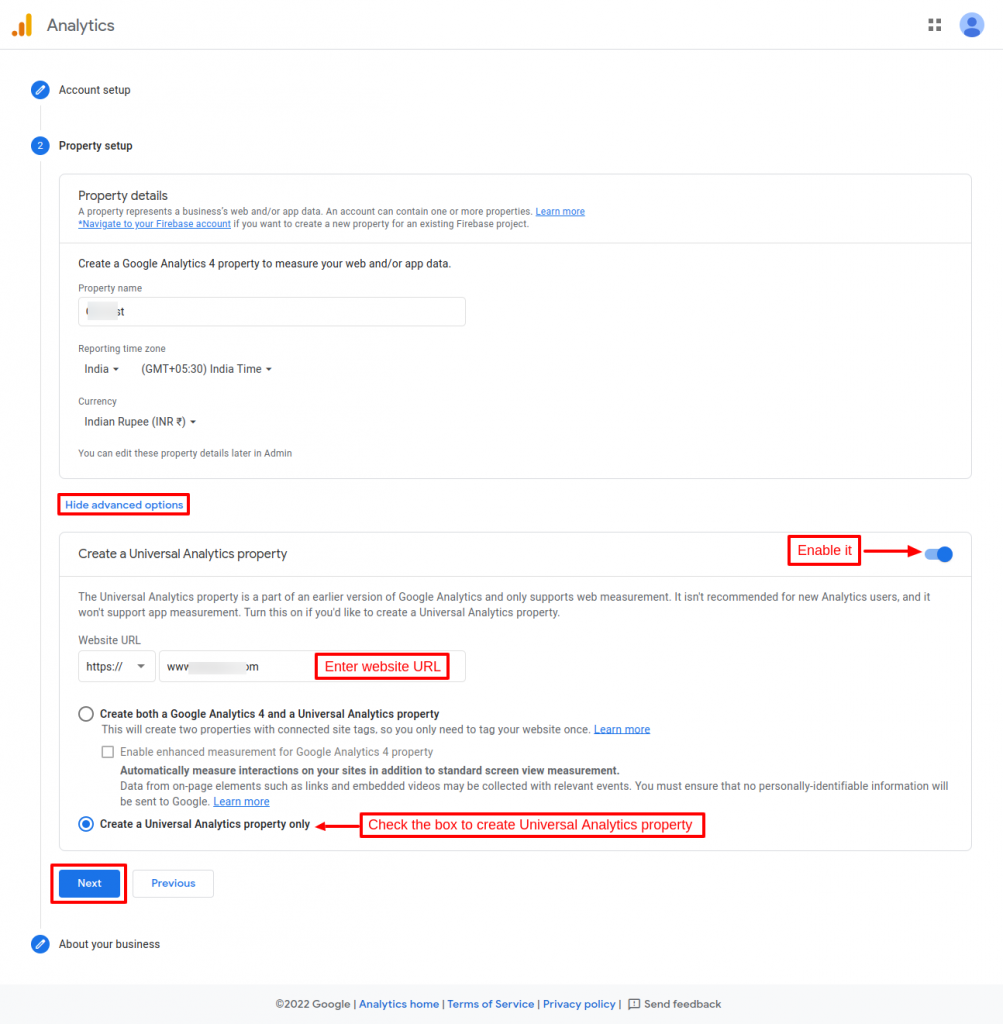
Apart from that, click on ‘Show advanced options.
To create a Universal Analytics Property, enable the option, enter the website URL, and check the box ‘Create a Universal Analytics property only.’
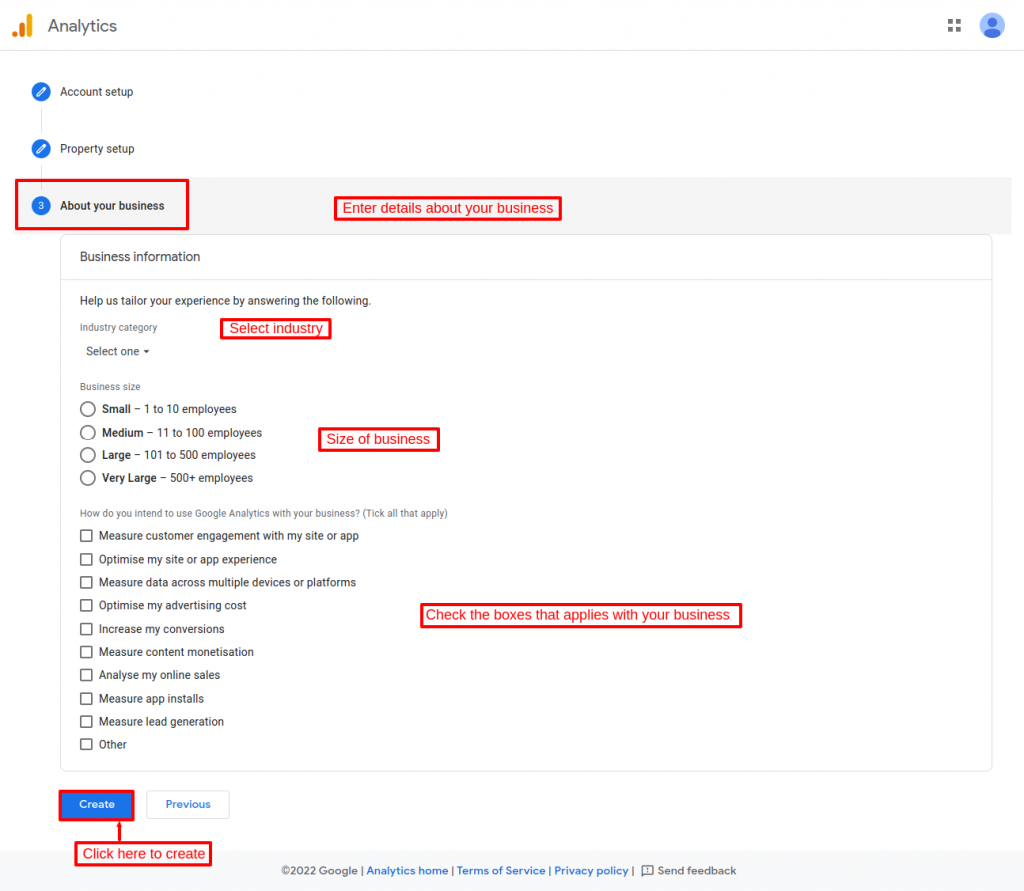
About Your Business
Lastly, you have to select the industry of your business, its size, and your intention for using Google Analytics.
To obtain the Measurement ID click on Data Stream Under Admin Tab.
To Obtain the API Secret Key click on Measurement Protocol API secrets.

To obtain the Property ID, click on the Property Detail tab under Property Section.
Once the Property details are open in the right corner, there will be the property ID.
How To Get The Client ID and Client Secret Key From Your Google Cloud Console account?
Now for getting the client ID and client secret key set up the Google Cloud Console account. If you do not have an account then you have to sign up.
Then the below-given window will appear. After this, you will create a project.
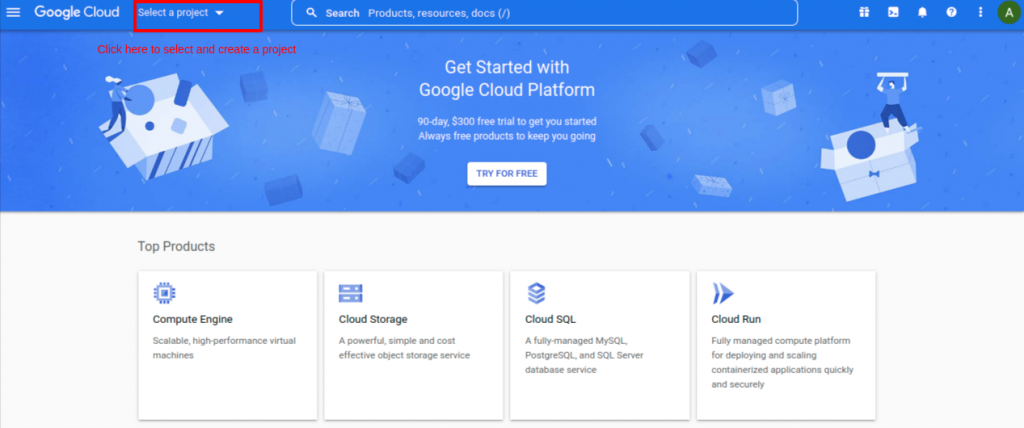
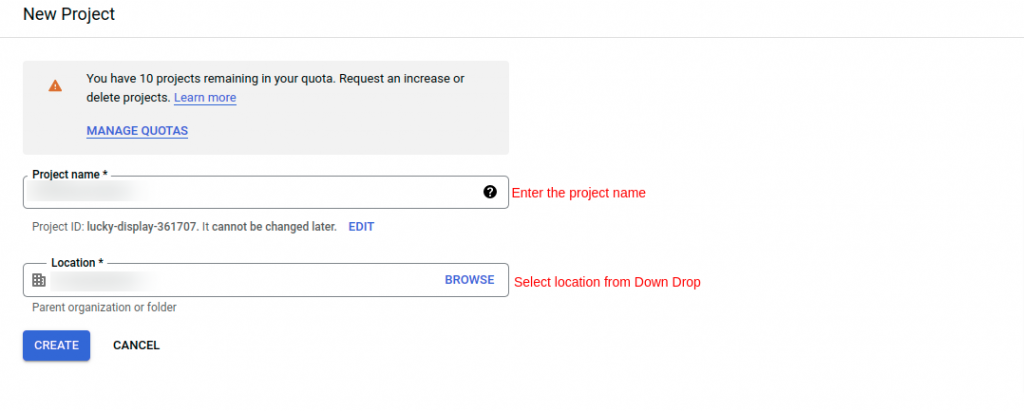
From here you can select a project or create a new project. To create a new project click on “New Project”.

The new project window will appear. Here enter the project name and from “Location” select the location from the dropdown. Then click on the “Create” button.
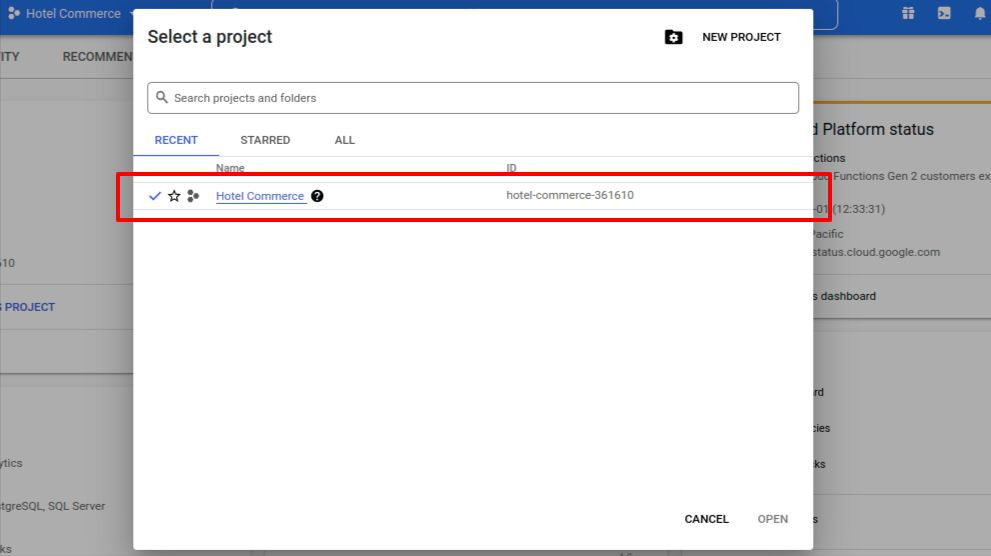
Hence your project is successfully created. Here you will get the newly created project in the list.
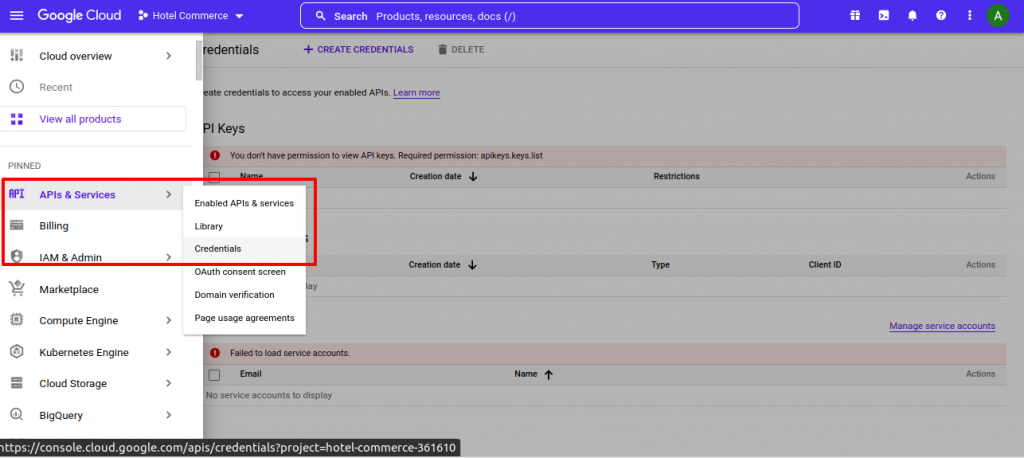
After creating the project user will create the credentials for the project. For that go to the main menu> API and services>Credentials.
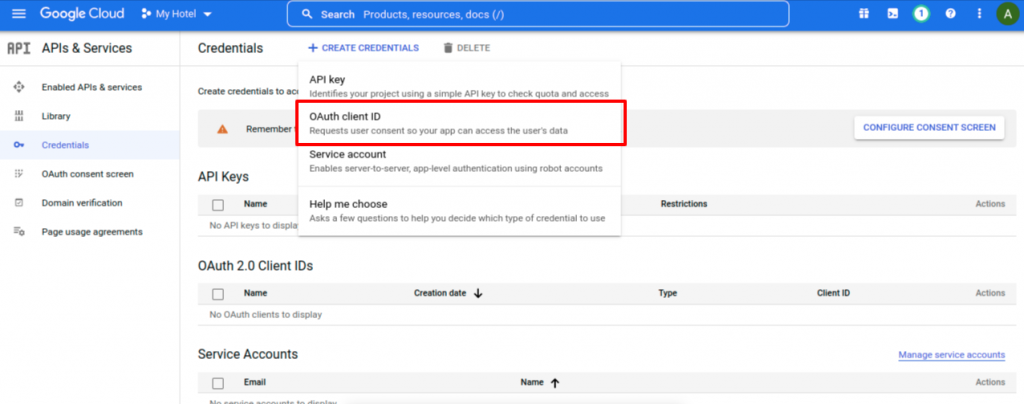
Then from credentials go to “Create Credentials“. Then select the “OAuth Client ID”.
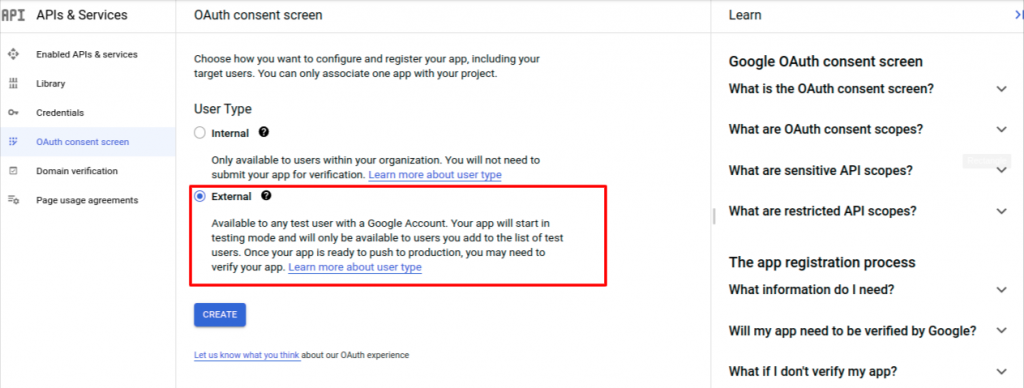
Before creating a credential you have to configure your consent screen. For this click on “CONFIGURE CONSENT SCREEN“.

After doing the above process the below window will appear. Here select the user type as “External“. After that click on “Create“.
After this, the user will fill in the details of app information, app domain, and app authorized domain.
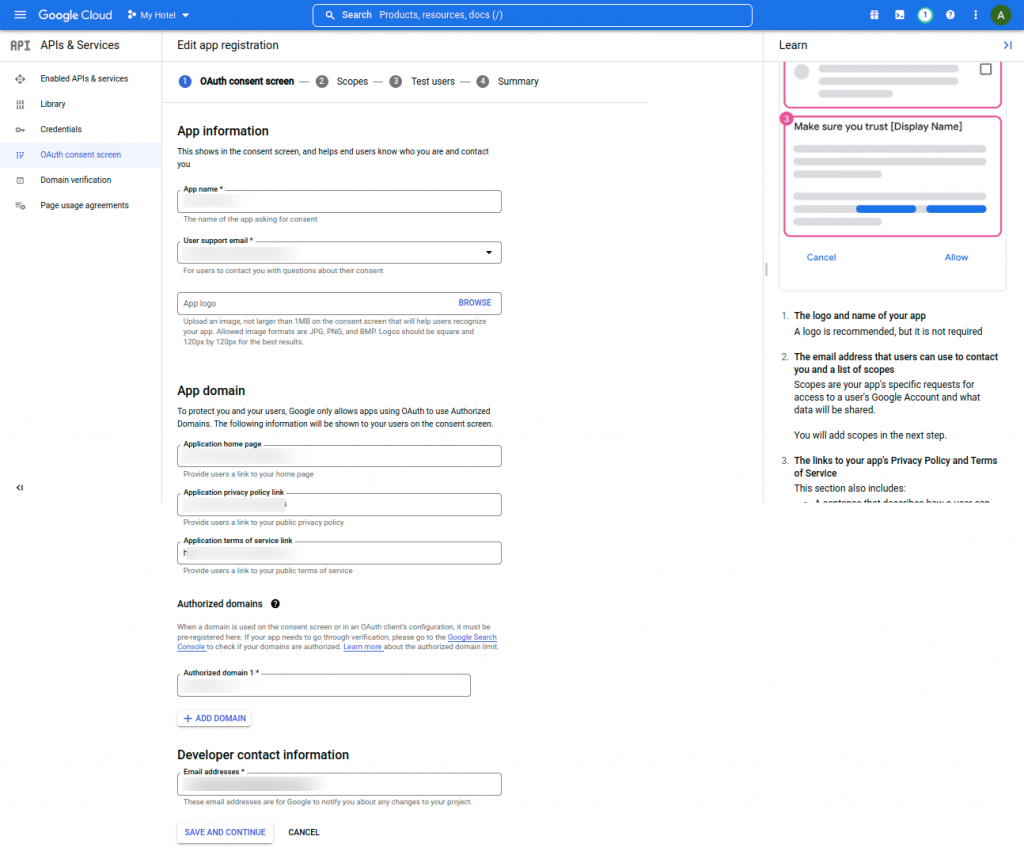
Then click on save and continue. Click on “Save and Continue” till the summary step. After that, the credential page will appear.
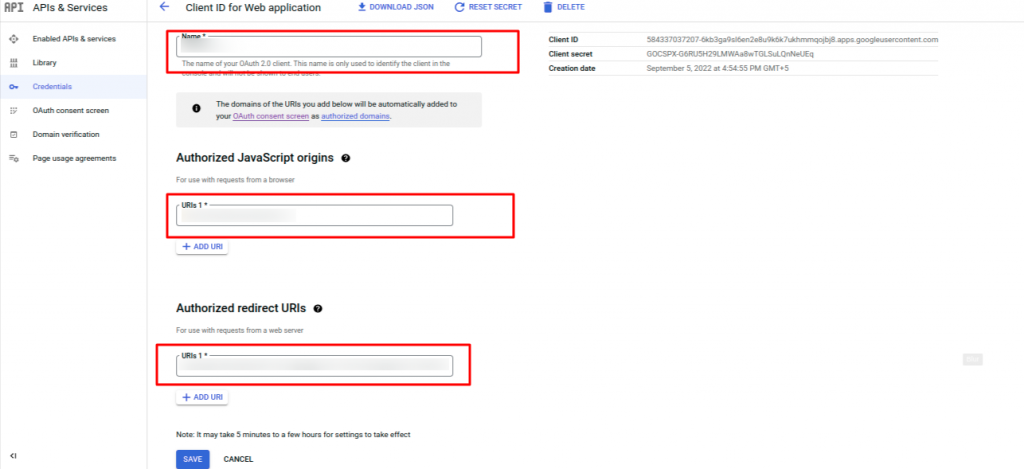
Users will get the “Authorized JavaScript origins” and “Authorized redirect URIs” from the QloApps module configuration page.
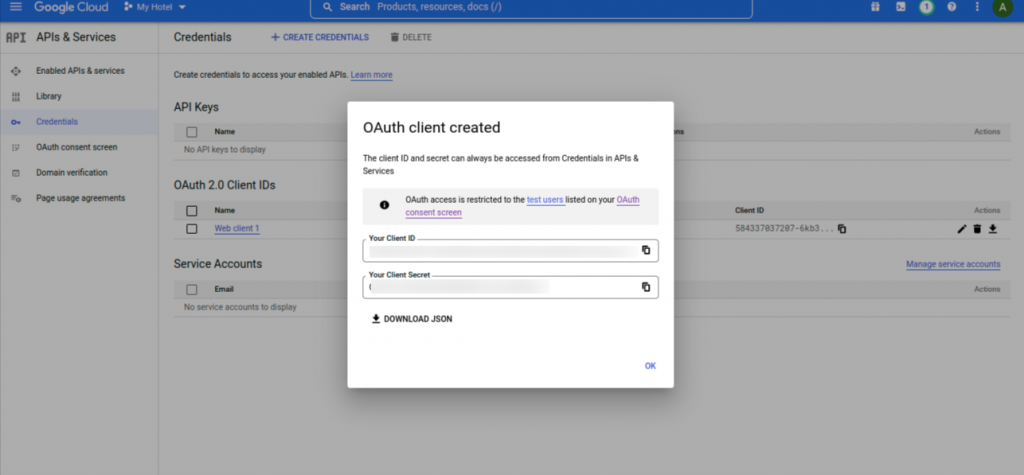
After entering the above field click on “Save“. Hence the credentials will be created. From here you can get the credentials and configure your QloApps Google Analytics module.
Events and Views on Google Analytics
After doing all the above processes the user can see real-time analytics as given below
For Events
On Google Analytics go to Real time> Events Tab. Then we can see what events occur on the website in event action.

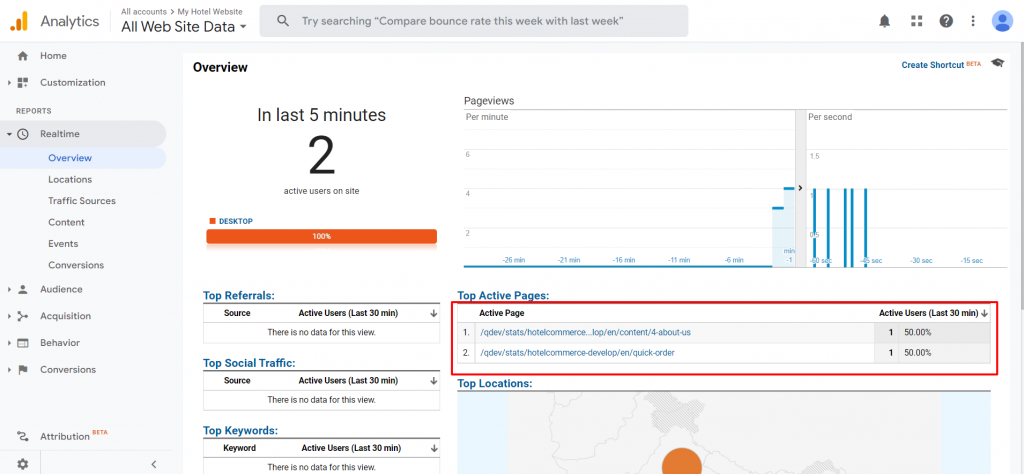
For OverView
Here go to Realtime>Overview tab. Here user will get the list of the active pages of the website, page view, and others.
Conclusion
This was all from the QloApps Google Analytics. I hope I was able to clarify the functioning of the module for you.
If you want to learn about the functionality of QloApps then you can visit this link: QLO Reservation System – Free Open-Source Hotel Booking & Reservation System.
In case of any query, issue, or requirement please feel free to raise it on QloApps Forum.
Moreover, for any support, you can raise a ticket from here.
Current Product Version – V 1.0.3
Supported Framework Version – 1.7.x

Be the first to comment.