QloApps Cashfree payment | UPI | Wallet is a handy add-on for QloApps. It allows you to accept online payments using the Cashfree payment gateway.
Cashfree payment | UPI | Wallet provides you the flexibility to accept payment using UPI, Wallet, or cards.
A safe and secure payment gateway makes the booking experience trustworthy and convenient.
So if you want your transactions to be easily processed, then Cashfree is for you.
Features:
- The Cashfree payment gateway is supported by SBI, Y Combinator, and Apis partners and was incubated by PayPal.
- Unlike other payment gateways, in Cashfree, the customer never leaves the merchant site. Thus making it an easy-to-manage platform.
- Moreover, it provides you with single-click payment options.
- It supports 30+ currencies.
- It gives you multiple payment options, including net banking, UPI, and wallets.
- On the other hand, It is one of the safest and most secure gateways.
- Easy to set up and use from the back office by the admin.
- At the back office of QloApps, there will be a new tab named “Cashfree Transactions” from where the admin can view the list of payments made through the gateway.
- Cashfree provides you with an easily integrable and user-friendly refund process. Admin can provide both, partial and complete refunds to his customers.
- When a user raises a refund request, the admin can manage the amount to be refunded manually from the back office.
- Cashfree is reliable and scalable.
Installation of QloApps Cashfree Payment | UPI | Wallet
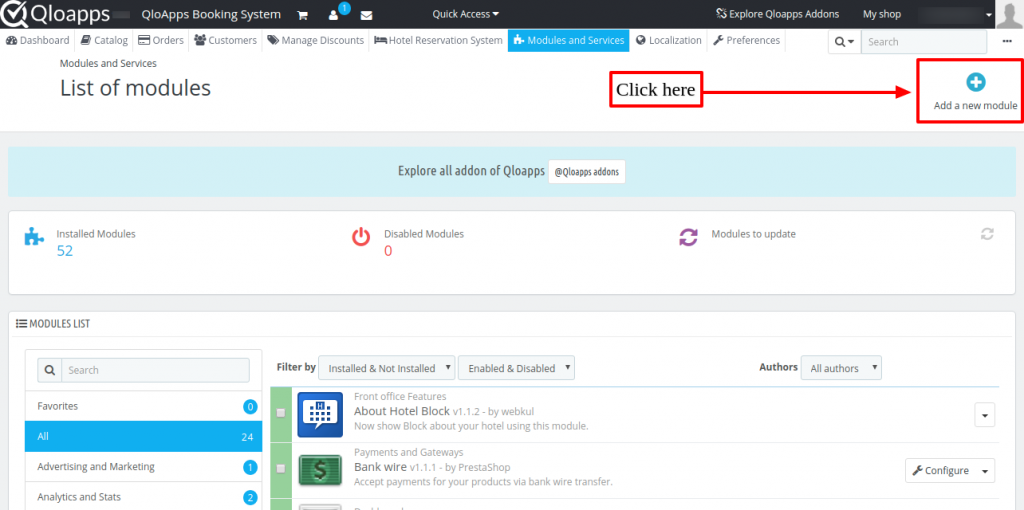
QloApps provides you with modules with a very simple installation process. To install the Cashfree payment gateway:
- At the admin back office panel, Go to the Modules and Services tab present in the menu.
- Click on Add a new module
- Upload the ZIP file of the module.
Now upload the ZIP File of the module and click on install.
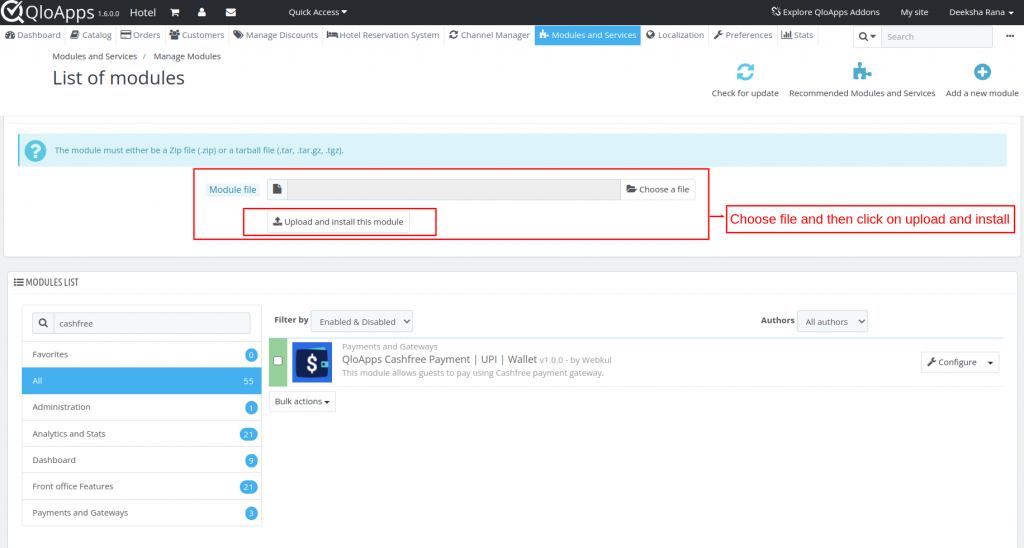
After this process, your module will be successfully installed. Now let’s discuss how you can configure it.
Configuration of QloApps Cashfree Payment | UPI | Wallet
As soon as you install your module. Your module will be added to manage modules.
At any time, if you want to configure the module, you can easily do so by clicking on the Configure button.
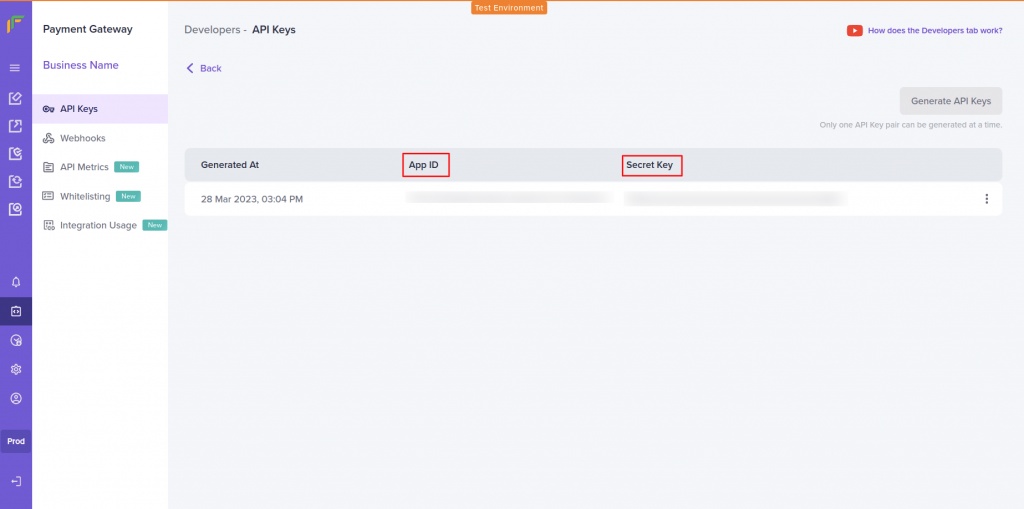
Now, to configure the module you have to enter the following details:
- App ID
- Secret key
- Environment:
- SandBox: If you are testing your module and its functionalities then select this option.
- Production: If you are using it for real-live transactions then select this option.
- Allowed payment methods: Choose all those payment methods which you want to use for transactions. There are 4 payment methods available in Cashfree.
- UPI
- Card
- Wallet
- NetBanking
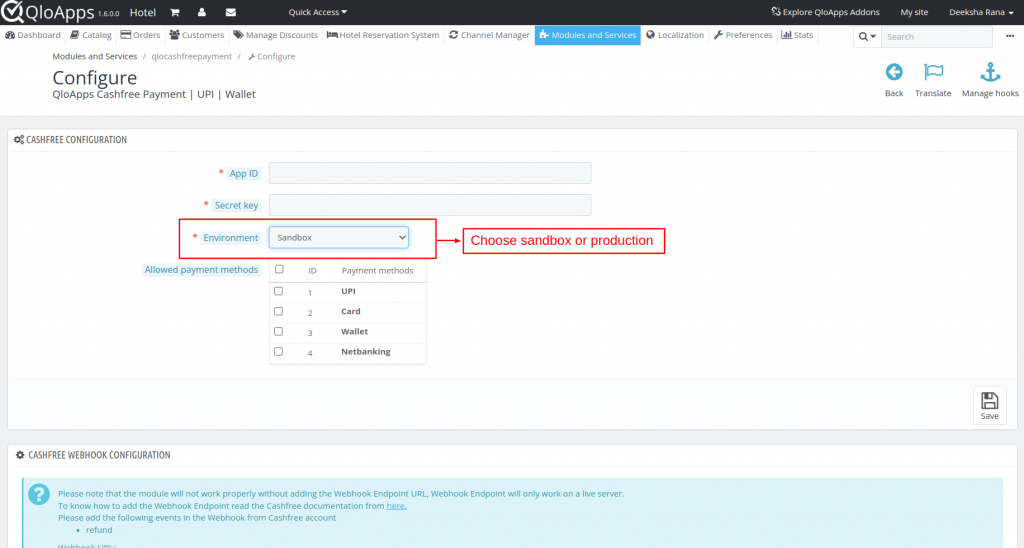
Once you fill out all these details, your module will be ready to use.
Steps to Obtain the App ID and Secret Key
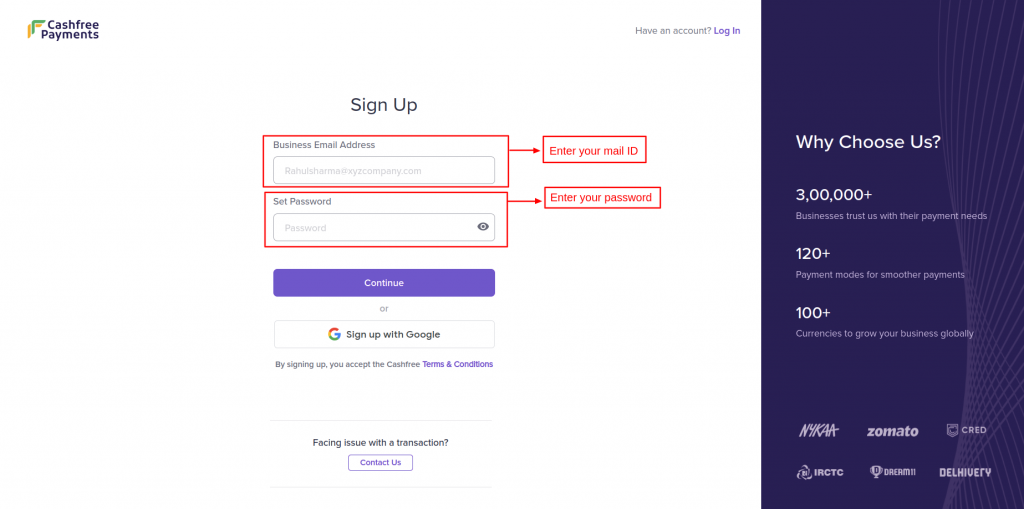
For the configuration of this module, you need to insert the App ID and Secret key. You can obtain this from the Cashfree payment gateway website. Firstly, visit the Cashfree website.
Then log in to your Cashfree account using your registered mail Id.
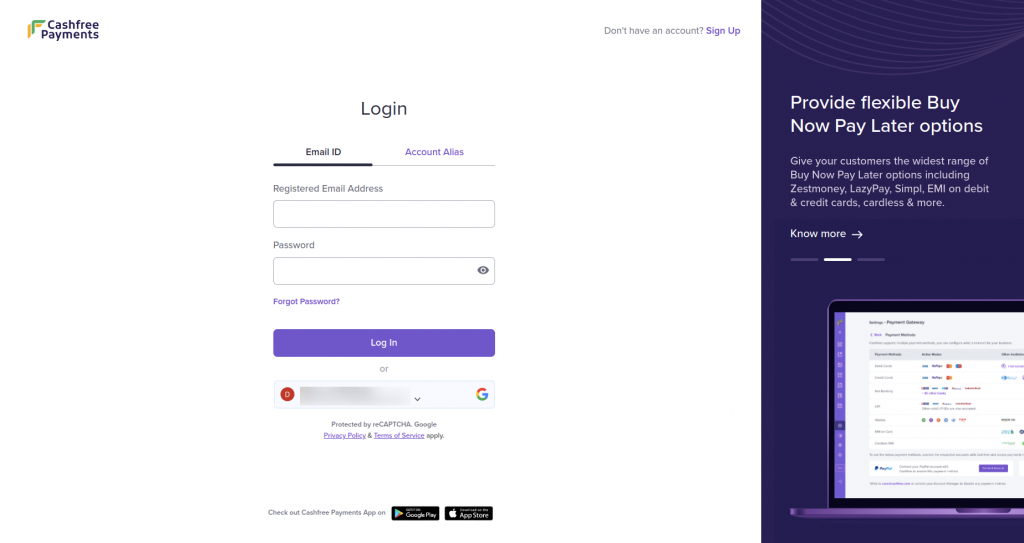
If you don’t have an existing account on Cashfree, then you have to first create your account on Cashfree and then follow the further explained process.
You can refer to Cashfree create account documentation to better understand the account creation process. Fill in all the required details in Cashfree.
As soon as the details are verified by Cashfree, a window with an activation button will open.
Next, click on the “Activate” button to activate various payment gateways of the account. Then go to the ‘Credentials’ tab to access the test API credentials for payment gateways.
Workflow of Cashfree Payment Module
Once the customer completes his booking, at the time of check-out, he will get the option of making his payment using Cashfree .
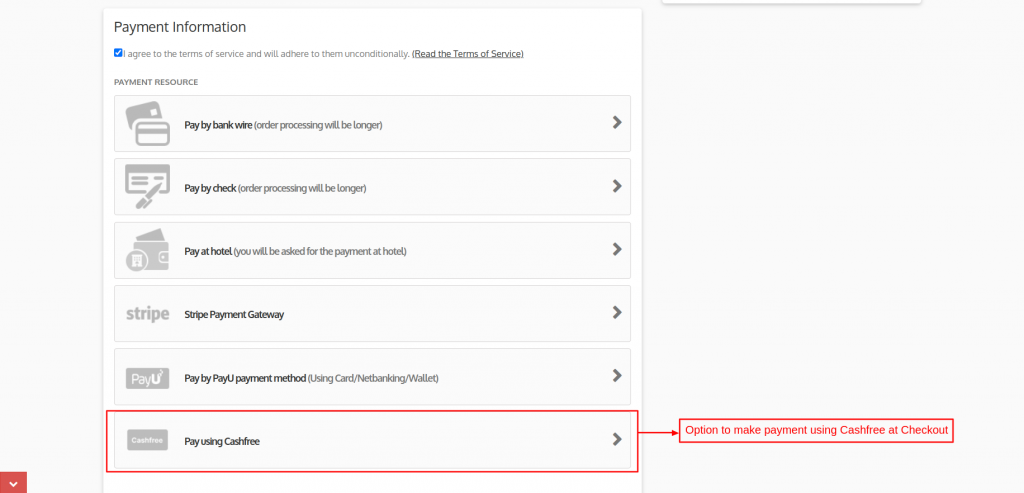
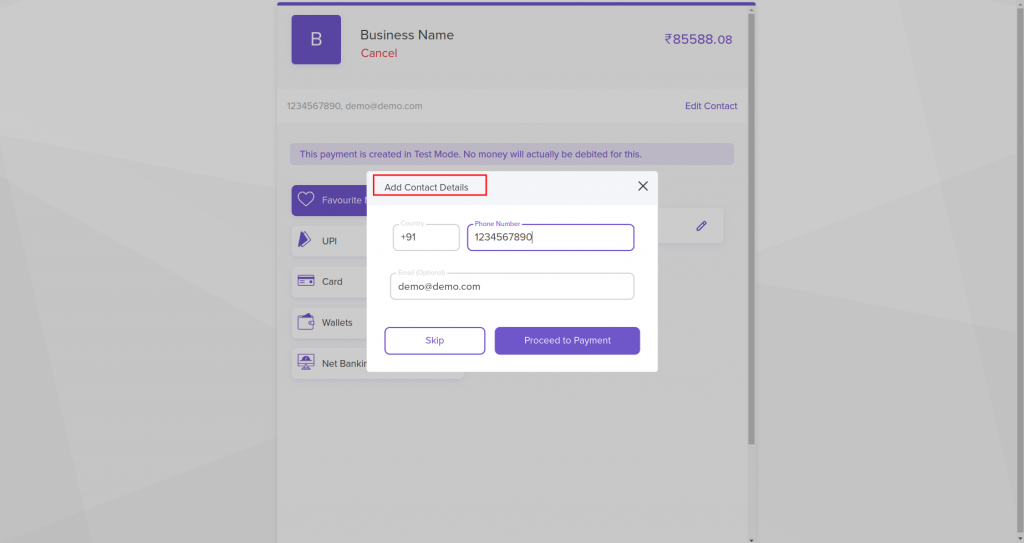
After selecting the Pay using Cashfree payment option, the Cashfree payment gateway page will open.
In which, firstly the customer will have to fill in his contact details including the contact number and email ID.
Cashfree offers various payment gateways:
- Credit Card/Debit Card
- Net Banking
- UPI
- Wallet
All gateways enabled by the admin will be visible to the customers.
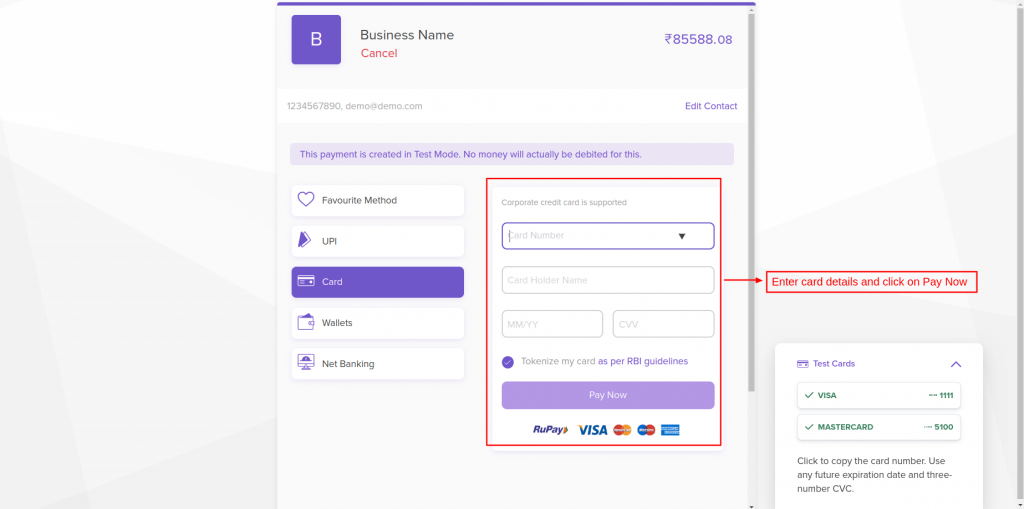
Payment by Card
A customer can choose to pay via either a credit or debit card. For making his payment, he has to enter his card details & click on make payment.
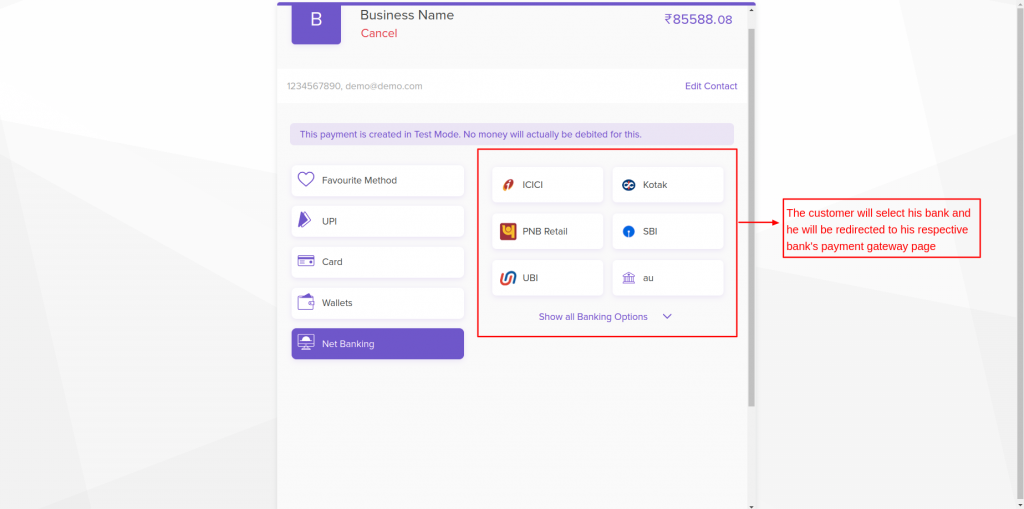
Payment Using Net Banking
The customer will select the name of the bank to proceed to the bank’s payment gateway page to make a payment.
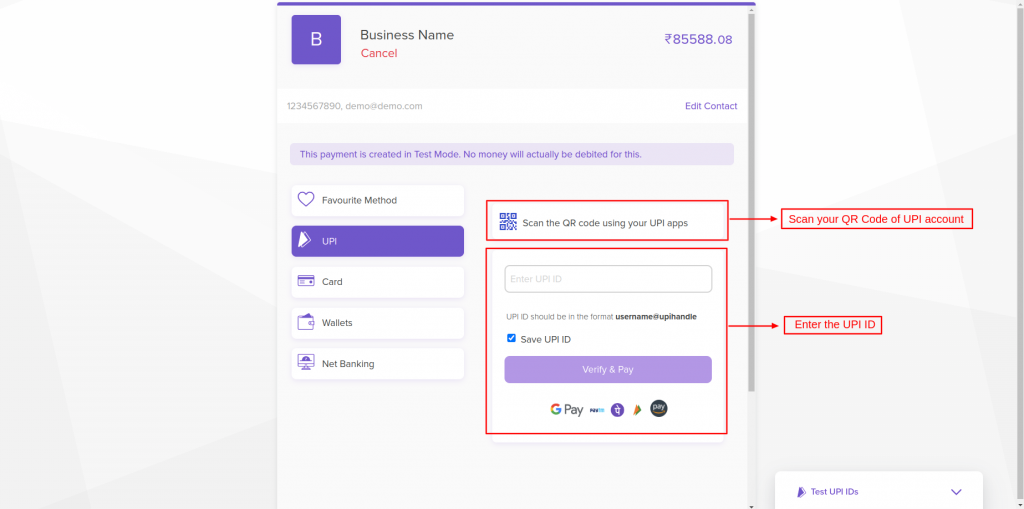
Payment Using UPI
The customer can scan the QR Code of the UPI account or can enter his UPI ID to complete his payment.
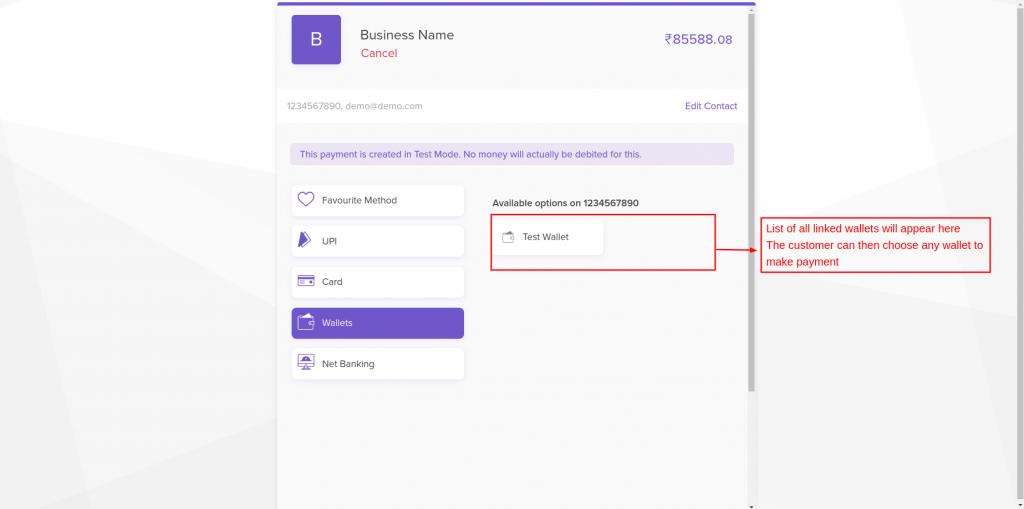
Pay Using Wallet
When the customer selects this payment option, then a list of all the wallets linked to his entered contact number will be displayed.
The customer will then select any wallet to complete his transaction.
These were all the ways through which the customer can make payment using the Cashfree module.
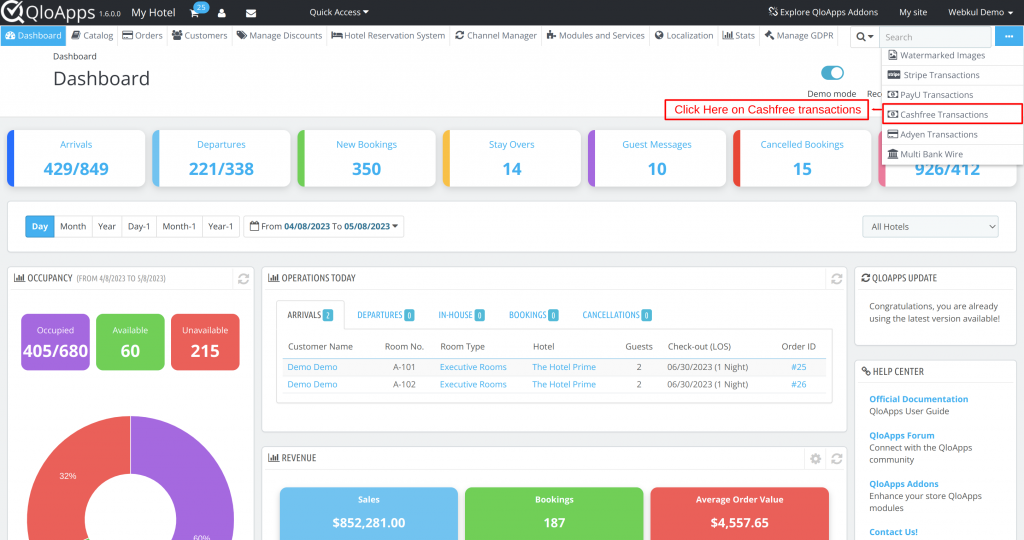
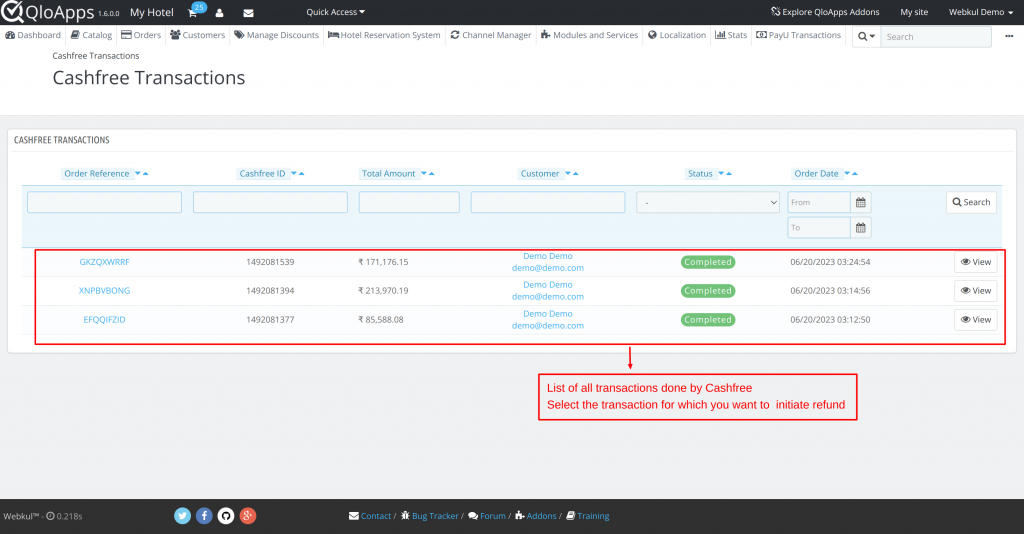
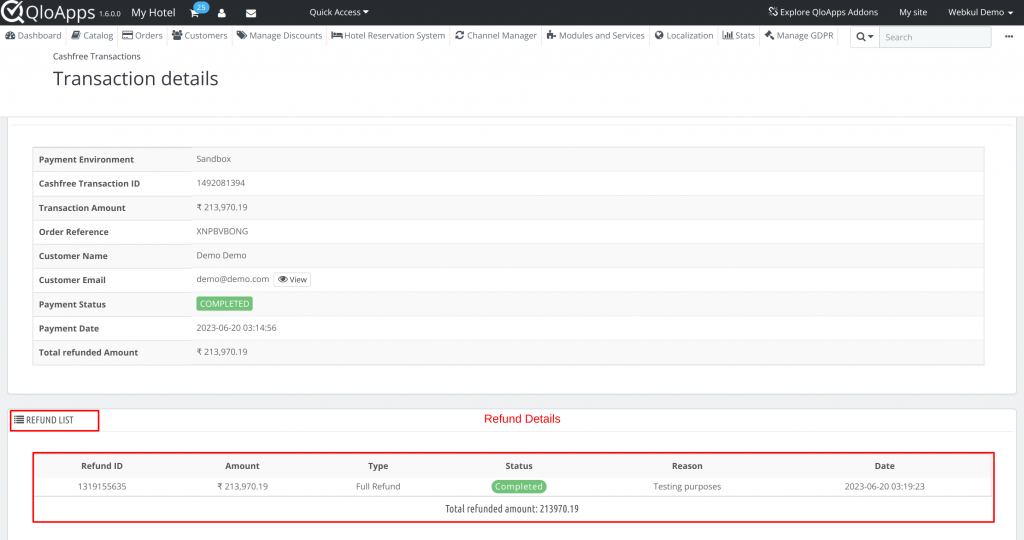
Once the customer makes the payment, the details of the payment will be visible to you in the backend under Cashfree Transactions.
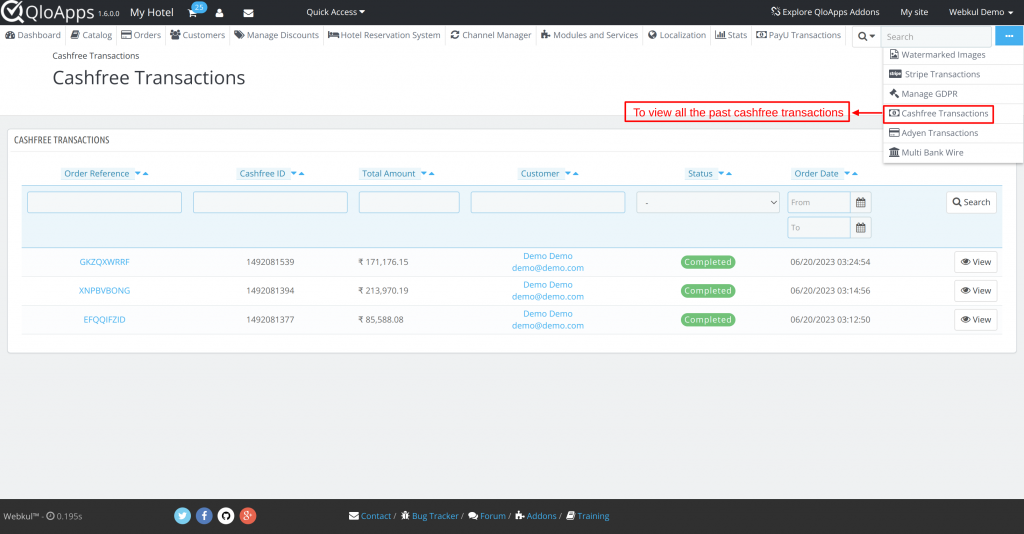
Once you open the Cashfree Transactions page, click on View to go through the details of the transaction.

Refund Process
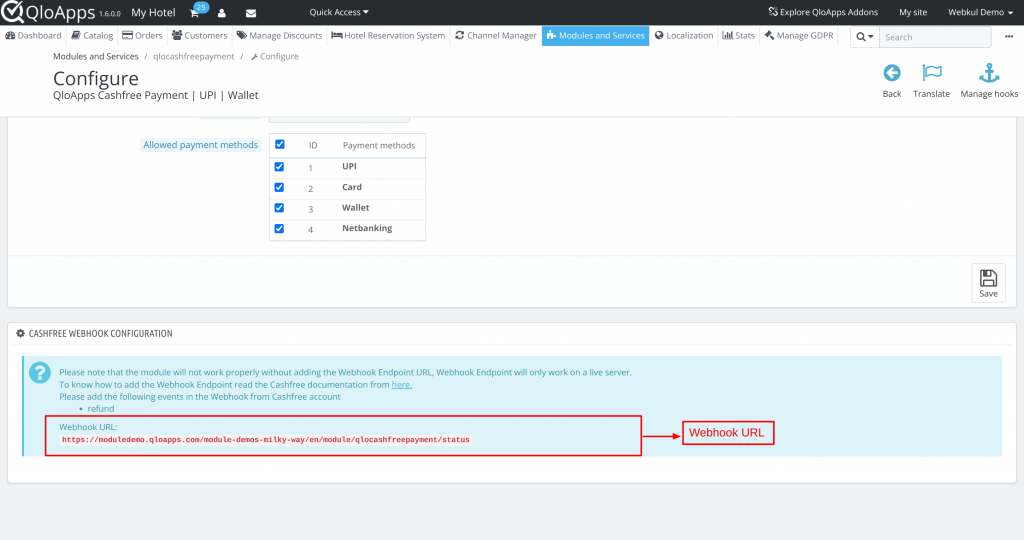
If you want to provide refunds to your guests, then you have to activate the refunds in Cashfree by linking the Webhook URL from the module to Cashfree.

So, In order to link the Webhook, you first have to go to Modules and Services. Then click on the Configure option in QloApps Cashfree Payment Module.
Once you click it, at the bottom of the page you will see the URL of the Webhook.
Now, Login into your Cashfree account and go to the webhook option.
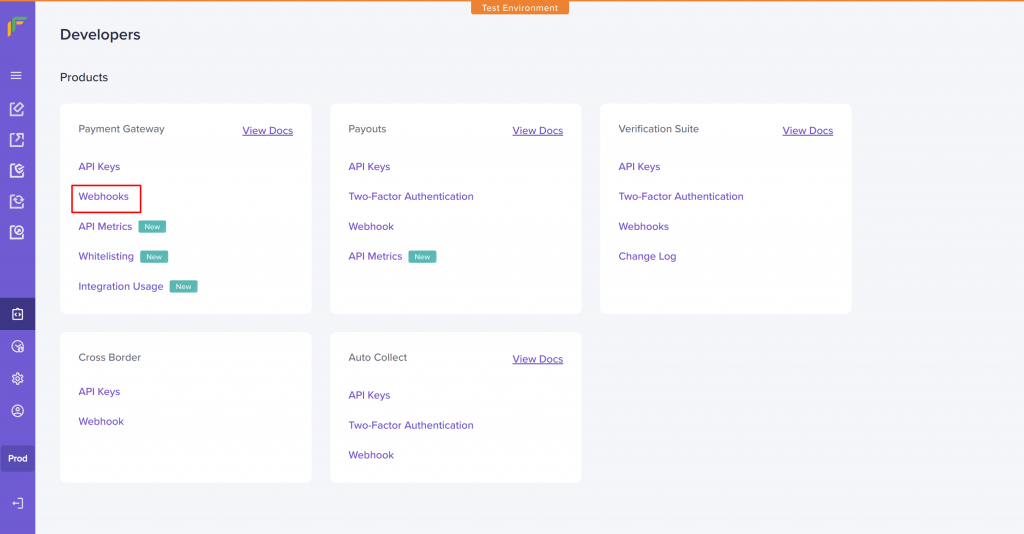
Next, click on this webhook option under the payment gateway.
Once you click and open the webhook page, click on the Add Webhook Endpoint.
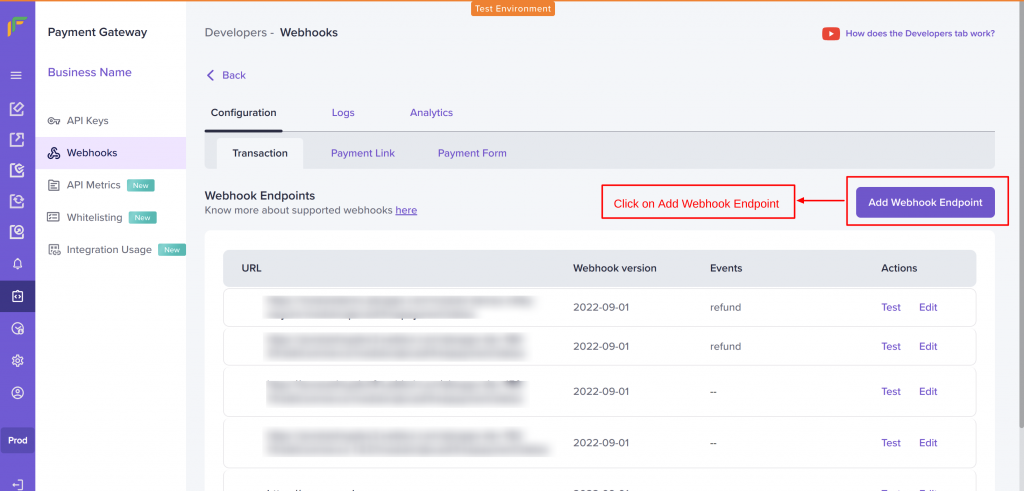
Once you click on Add webhook endpoint, then a dialogue box will open.
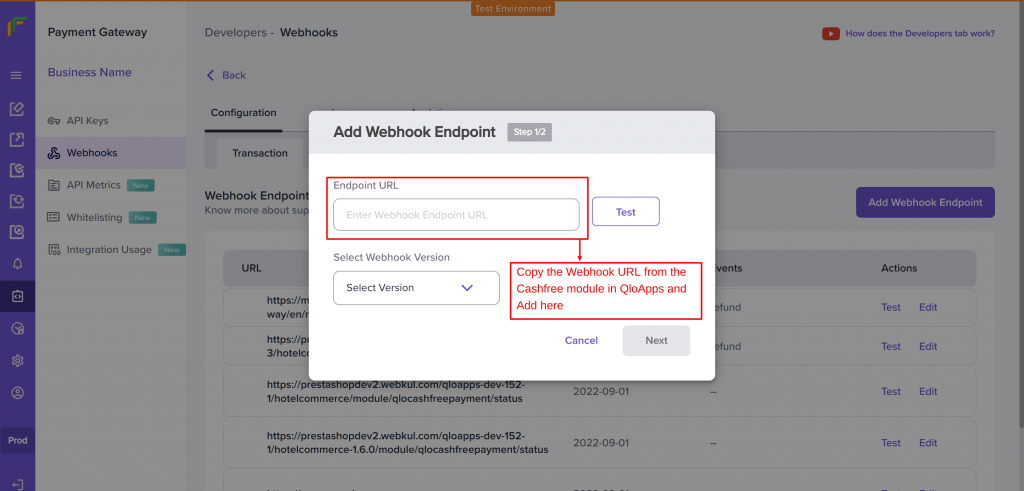
In step 1 of Add Webhook Endpoint: Add the Webhook URL, which you can find in the Cashfree module configuration page of QloApps in the Endpoint URL, and click on Test.
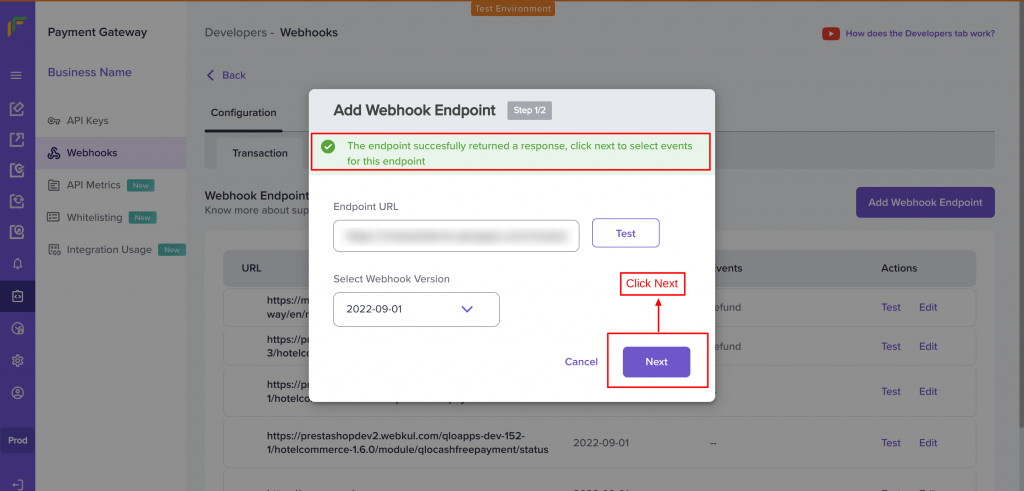
Once the URL successfully returns the response, click on next.
In step 2 of ‘Add Webhook Endpoint’, you must select the event. Select refund as the event to enable refunds for your guests.
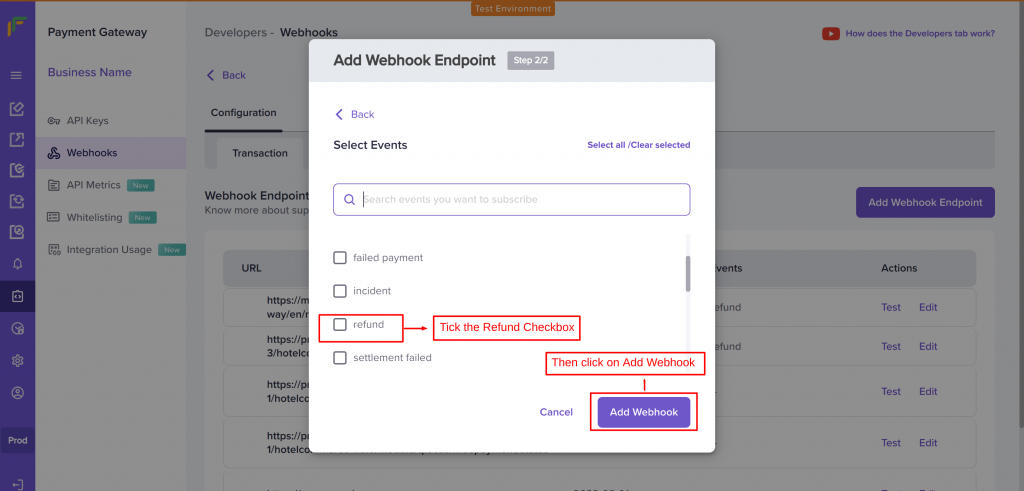
Then click on Add Webhook. This is how you can enable a refund for the Cashfree payment gateway.
Once you have enabled the refund for your property through Cashfree, let’s see how you can initiate the refund for an order.
Go to the Cashfree Transactions page.
Now open the order for which you want to initiate the refund process.
Once you open the order transaction details page, you will find the transaction details of the booking.
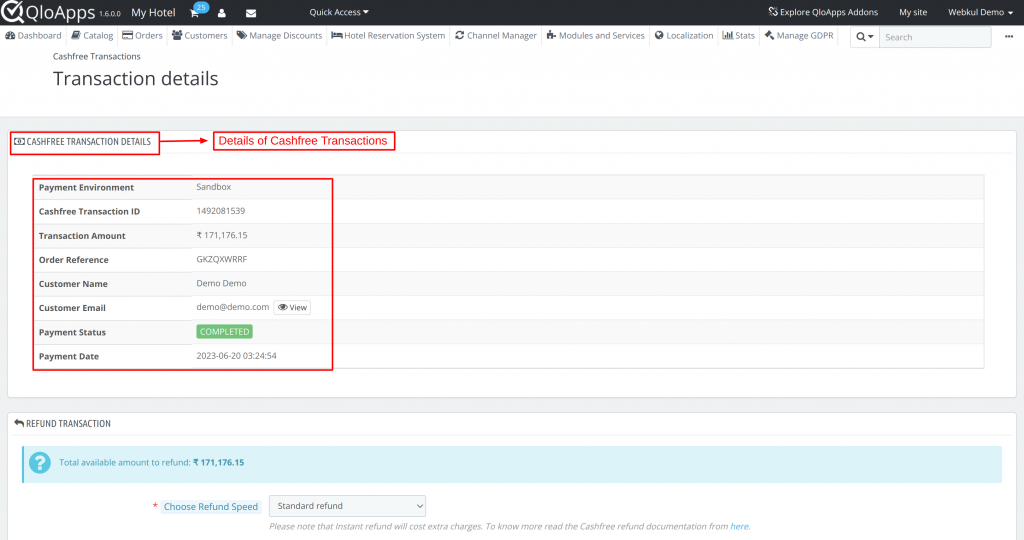
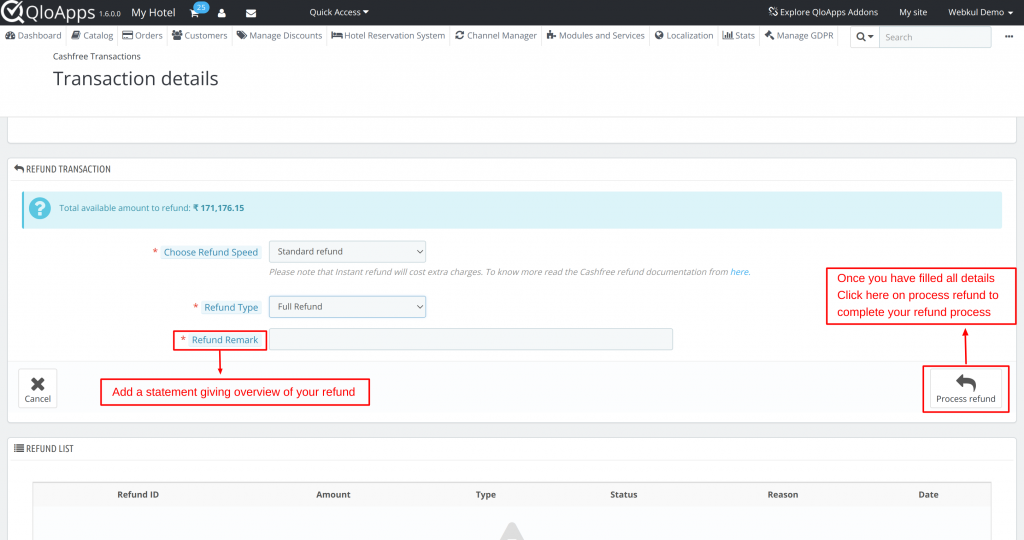
Using the refund transaction option in the Transaction Detail page, we can initiate the refund.
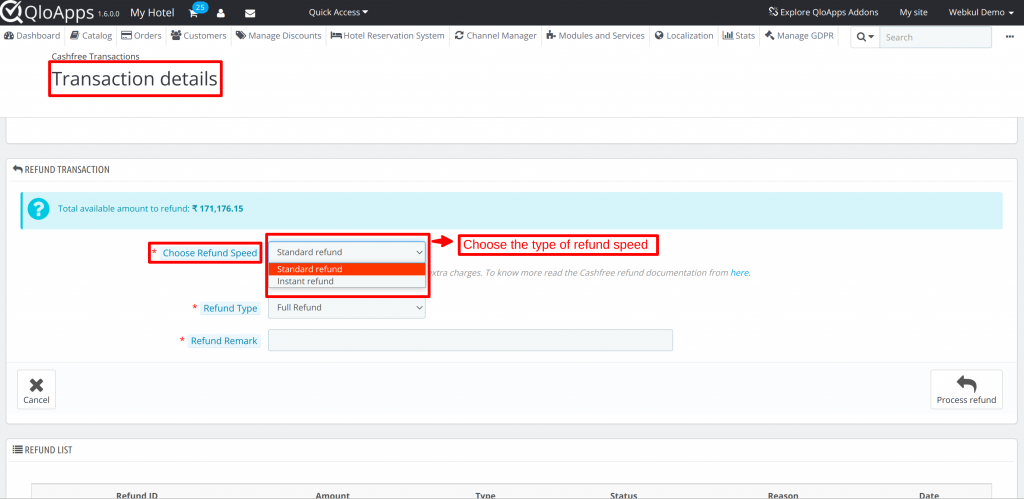
For initiating a refund, firstly Choose the Refund speed. You can choose one of the two refund speeds:
- Standard Refund: The refund will be processed in 15- 20 minutes.
- Instant Refund: The refund will be processed immediately, but you have to pay extra charges If you want an instant refund process.
Next, select the Refund type :
- Full Refund: When you want to refund the total booking amount to the guests.
- Partial Refund: When you want to refund a percentage of the total amount to the guests.
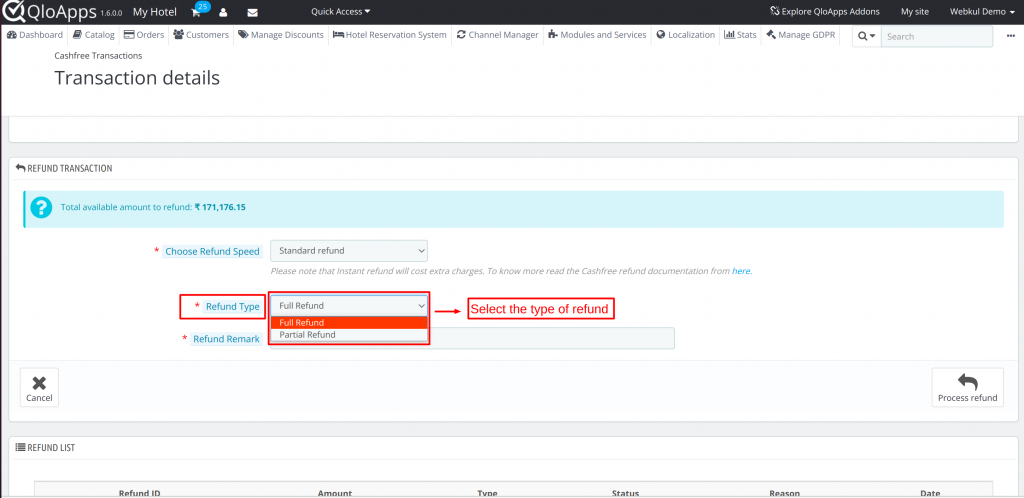
Lastly, Add the refund remark explaining a brief about the refund and then click on process refund.
You can check the refund details of the refunded order under the refund list option.
Conclusion
This is the complete process of Setup and use of QloApps Cashfree Payment | UPI | Wallet. I hope I was able to clarify the functioning of the module to you.
Moreover, if you want to learn about the functionality of QloApps, then you can visit this link: QLO Reservation System – Free Open-Source Hotel Booking & Reservation System.
In case of any query, issue or requirement, please feel free to raise it on QloApps Forum.
Current Product Version – 4.0.1
Supported Framework Version- QloApps 1.7.x

Be the first to comment.