QloApps buy button is a clickable button that enables the admin to embed the button anywhere he wants, that is, on your blog posts or any external website.
With just a click, the potential guests of your hotel can access the hotel website.
You can send your customers directly to the page where you want them to land.
Moreover, guests can conveniently be redirected to the website room type page, checkout page, and landing page. Hence, you can start receiving payment quickly and easily for bookings made.
With the QloApps Buy Button addon, hoteliers can boost their traffic as well as conversion rate.
Features of QloApps Buy Button
- Select the room type you want to display on blog posts or other external websites.
- Customize the look and feel of the Search Widget, Card, and Buy Button.
- Select the page of your website where you want to redirect visitors.
- Moreover admin can show the price of the room type on blog posts and other websites.
- On the configuration page, view, edit, and delete all the buy buttons added.
- Highlight the specific room types of your hotel on your external sites, CMS, or blog.
- Redirect visitors from external sites or blogs to your website to increase traffic.
- Saves time and reduces the number of stages in the customer’s booking process to improve conversion rates.
- Moreover it makes your room types available on a variety of non-commercial websites.
Installation of QloApps Buy Button
However the installation of any module is very simple in QloApps.
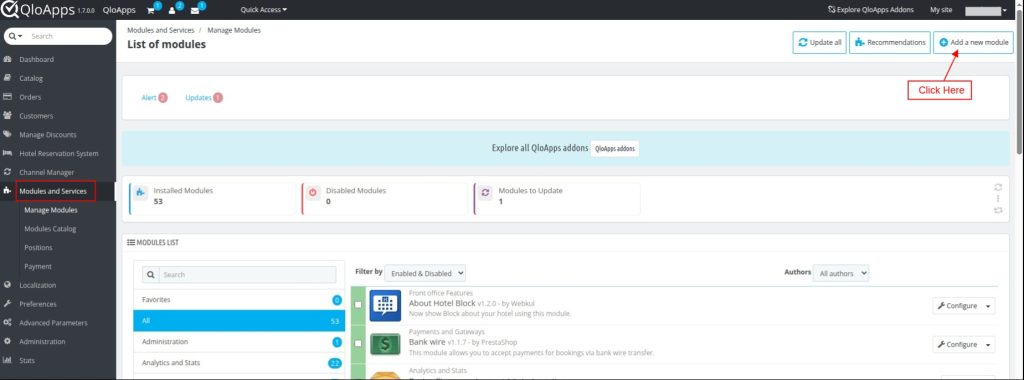
- Go to the “Module and Services” tab.
- Click on “Add New Module”.
Now upload the Zip file of the module, then click on install.
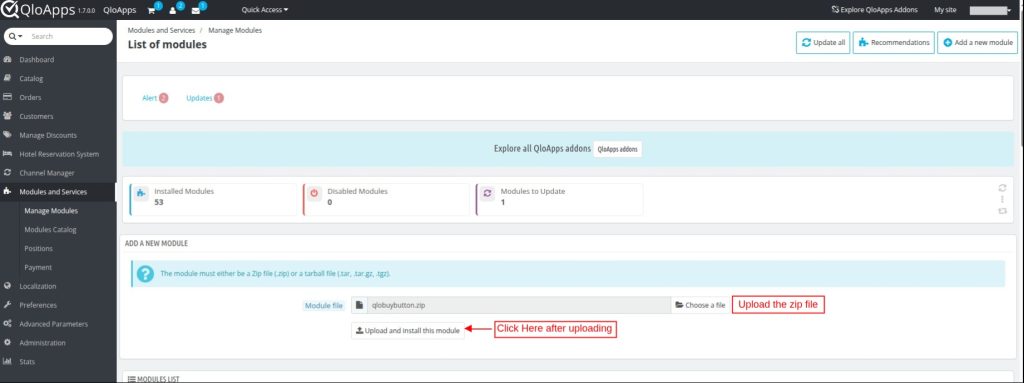
Now you have installed the module. So let’s check how to configure it.
Configuration of QloApps Search Widget
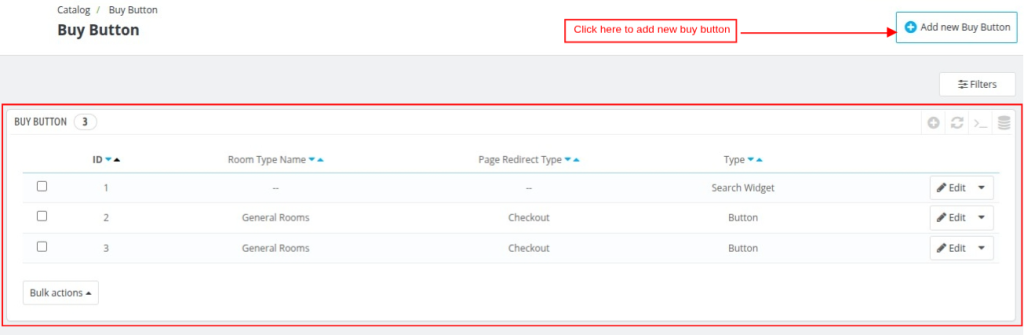
After clicking on the configure button, then you will be redirected to the configuration page.
Here you can add a new buy button. After adding buy buttons and saving them, the admin can see the list of buy buttons added.
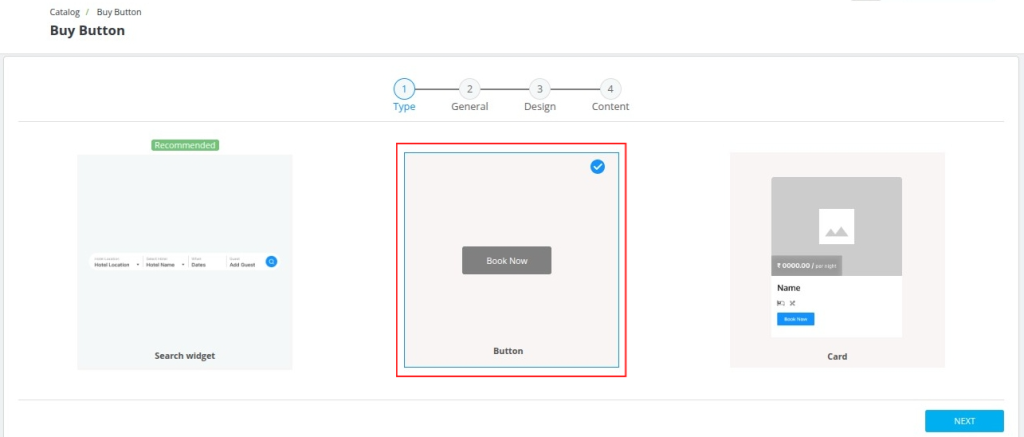
When the admin clicks on the ‘Add new buy button’, they will be redirected to the page to choose between creating a “Search Widget,” or “Buy Button,” or “Card”.
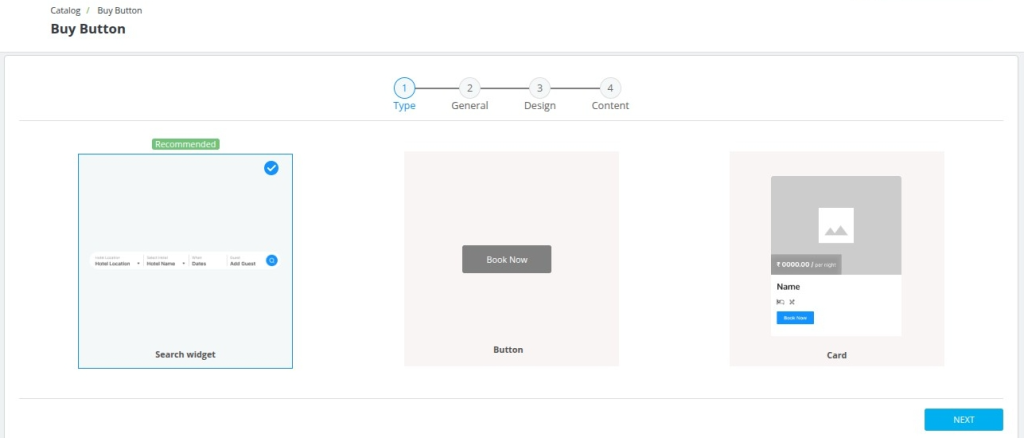
Note: By default, the Search Widget will be selected as the recommended option. However, users can choose any option according to their preference.
Search Widget General Screen
Once you select the “Search Widget” option and click on the Next button you will be redirected to the Search Widget configuration page, as shown below:
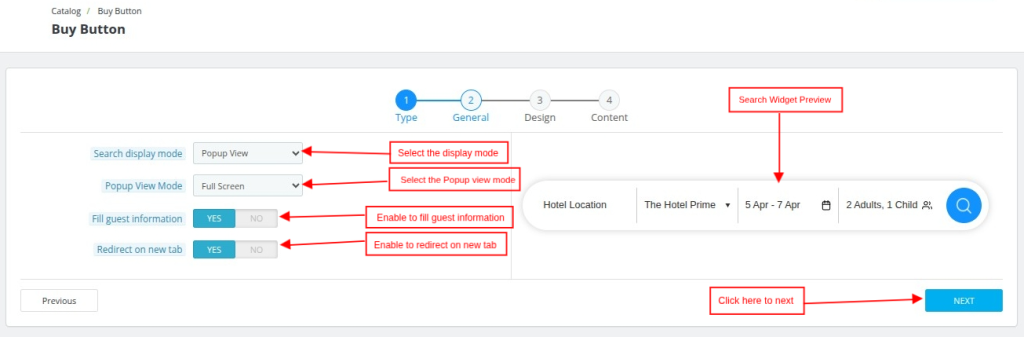
Configure the following options to customize the look of the search widget:
- Search Display Mode: Select the display mode from the dropdown menu. You can choose either Popup View or Standard View.
Note: The below option will be available only when you select Popup View in the Search Display Mode.
- Popup View Mode: Select how you want to display the popup from the dropdown menu. You can choose between Full Screen or Center View.
- Fill Guest Information: Enable this option if you want customers to enter their guest details directly on the website.
- Redirect on new tab: Enable this option if you want to open the redirected page in a new browser tab.
Click on next to proceed further with the configuration of the search widget.
Search Widget Design Screen
Next, you will be redirected to the design configuration page where you can customize the search widget color, size, and much more.
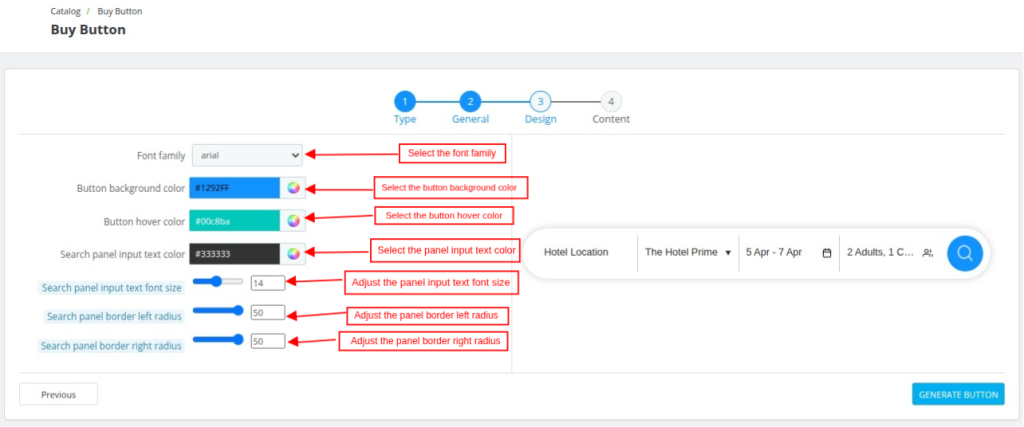
Configure the following options to customize the look of the search widget.
- Font Family: Select your preferred font family for the button text.
- Button Background Color: Choose the background color for the button.
- Button Hover Color: Choose the hover color that appears when users hover over the button.
- Search Panel Input Text Font Size: Set the preferred font size for the search panel input text.
- Search Panel Border Left Radius: Customize the left border radius of the search panel.
- Search Panel Border Right Radius: Customize the right border radius of the search panel.
Moreover, click on the generate button to generate the button and save it.

Once the Search Widget has been generated, the next page will give you the HTML Code and a preview of how the button will be displayed.
Don’t forget to click on the copy button, and then paste it where you want to display the Search Widget.
Configuration of QloApps Buy Button
To configure the QloApps Buy Button, when the admin clicks on the ‘Add new buy button’, you have to choose “Button” option.
Buy Button General Screen
Once you select the “Button” option, and click on the Next button you will be redirected to the Button configuration page, as shown below:
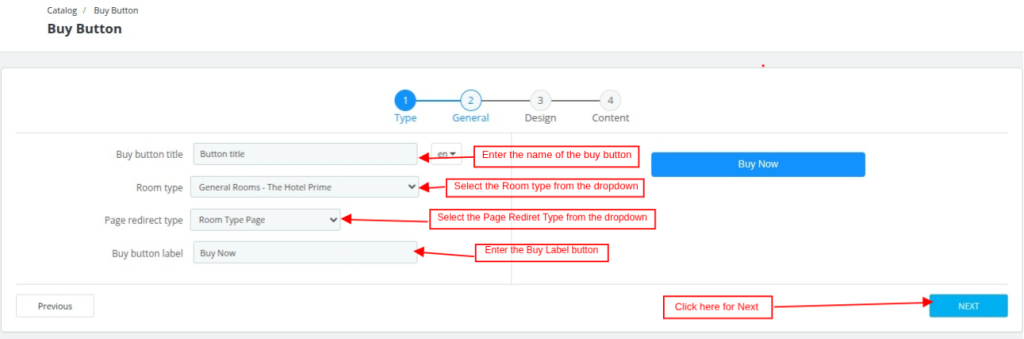
Configure the following options to customize the look of the buy button.
- Buy button title- Enter the buy button name of your property to redirect customers
- Room type- From the dropdown, select the room type where you want to redirect guests.
- Page redirect type- From the dropdown, select the checkout page or landing page where you want to redirect guests.
- Buy button label- Enter the label for the button.
Click on next to proceed further with the configuration of the button.
Buy Button Design Screen
Next, you will be redirected to the design configuration page where you can customize the button color, size, and much more.
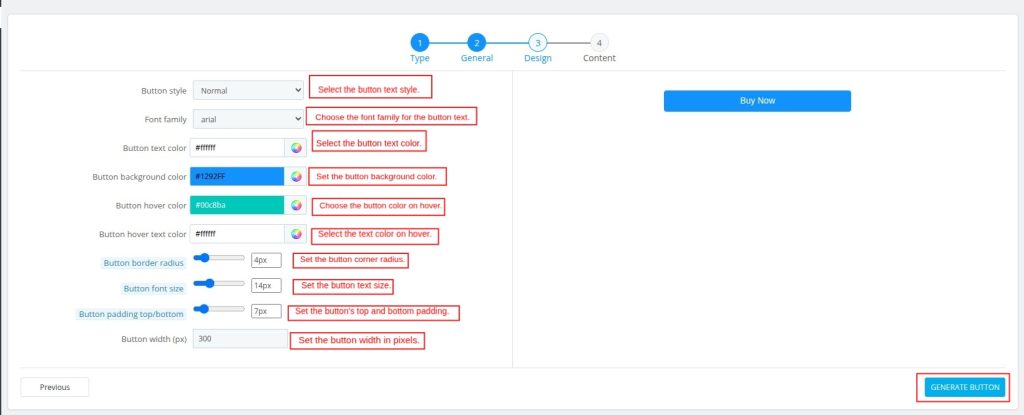
Configure the following options to customize the look of the button.
- Button Style- Select the button text style from the normal and italic font styles.
- Font Family- Select the font family of the buy now text from Arial, monospace, sans-serif, etc.
- Button text color- Choose the text color of the buy button.
- Button background color- Set the background color of the button.
- Hover color- Choose the button hover color, meaning when someone hovers the cursor on the buy button what color it shows.
- Button hover text color- Choose the button hover text color.
- Button border radius- Choose button border-radius.
- font size- Set the button font size.
- Button padding top/bottom- Set the padding for the top and bottom of the button.
- Width (px)- Select the width of the button.
Moreover, click on the generate button to generate the button and save it.
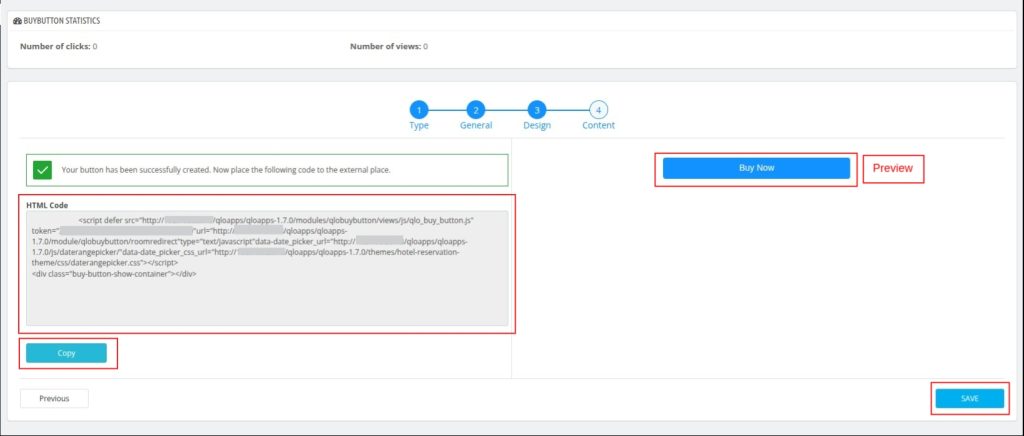
Once the button has been generated, the next page will give you the HTML Code and a preview of how the button will be displayed.
Don’t forget to click on the copy button, and than paste it where you want to display the button.
Configuration of QloApps Buy Button with Card
To configure the QloApps Buy Button with Card, when the admin clicks on the ‘Add new buy button’, you have to choose “Card”.
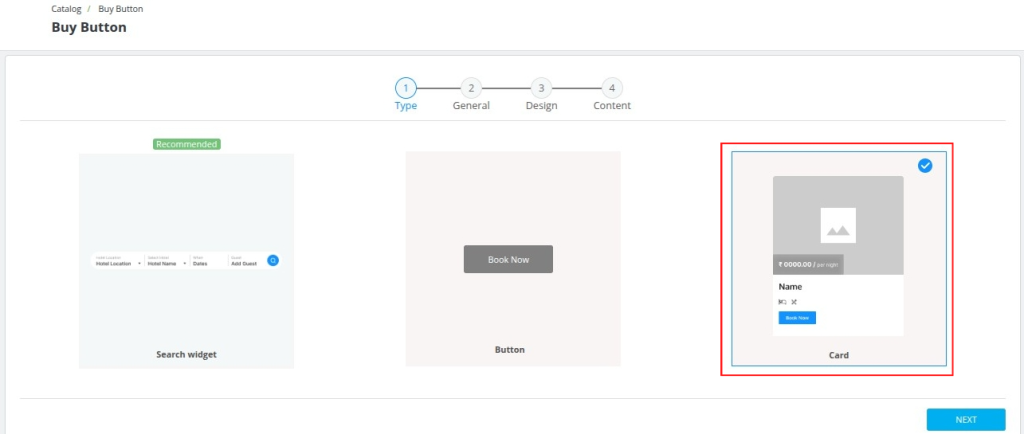
Card General Screen
Once you select the “Card” option, and click on the Next button you will be redirected to the Button configuration page, as shown below:
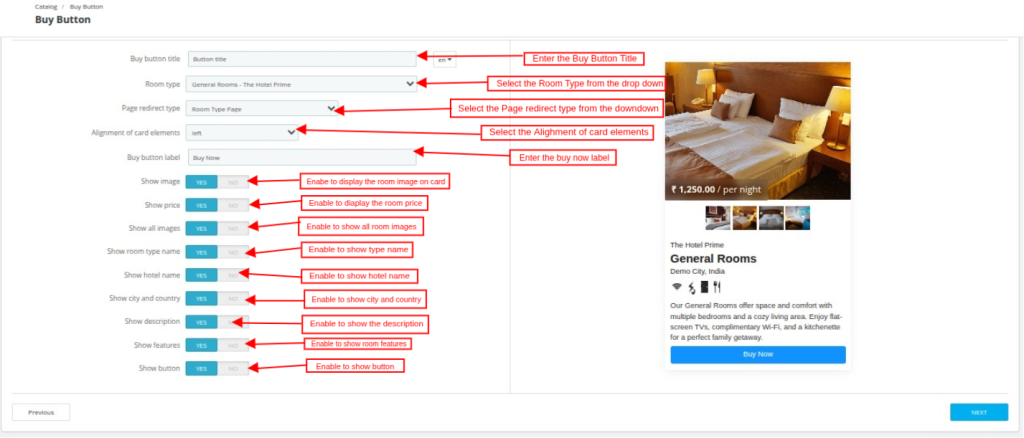
Configure the following options to customize the look of the card and button.
- Buy button title- Enter the title for the buy button on the card.
- Room Type- Select the room type from the drop-down for which you want to create the buy button card.
- Page Redirect- From the dropdown, select the checkout page, landing, or room type page where you want to redirect guests.
- Alignment of card elements- Select the alignment of the card elements from left, right, or center.
- Buy button label- Enter the label for the button.
- Show date and occupancy- Display the check-in and check-out date along with the occupancy on the card.
- Show image- Display the images of the hotel room.
- Price- Display per night price of that particular room
- Show all images- Display all the images of that particular room
- Room type name- Display the room type of that particular room
- Show hotel name- To Display the name of the hotel
- Show description- Display the description of the hotel room
- Features- Display the features of the hotel room
- Show Button- Display the buy button on the card itself
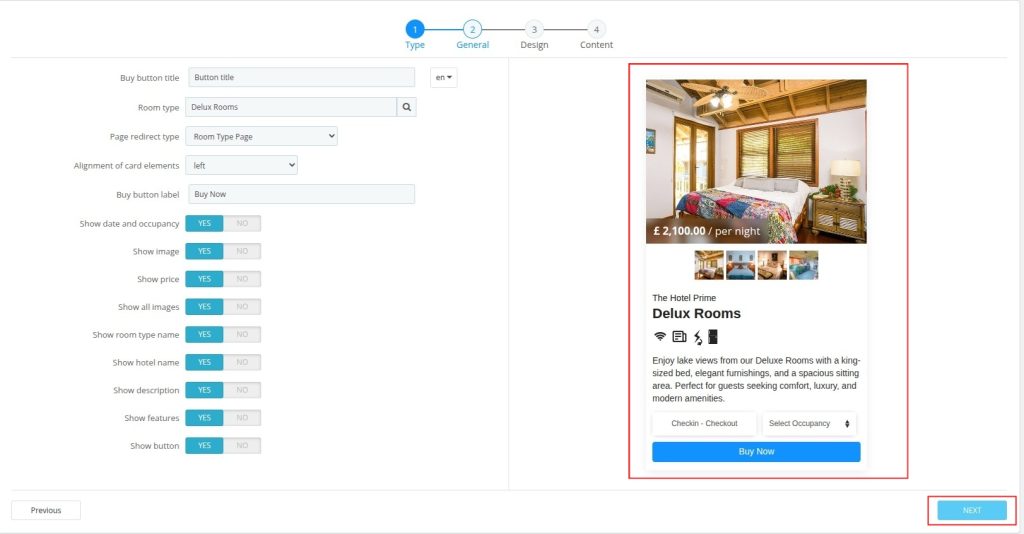
The card preview will be displayed on the right side of the screen. Click on the Next button to make the design of the button.
Card Design Screen
Here, you can configure the design of the card for the customize look.
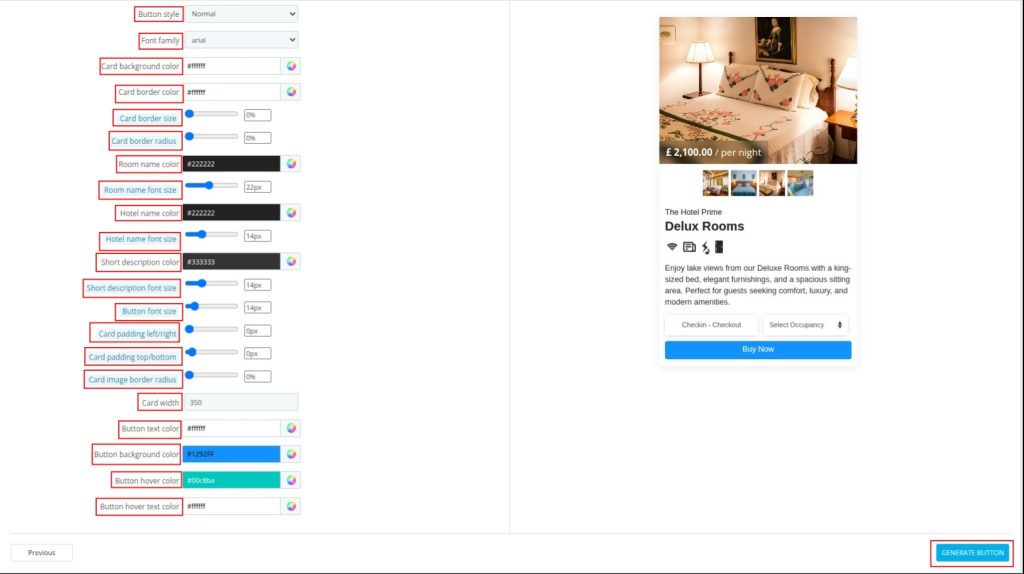
Configure the following options to customize the look of the card and button.
- Button style- Select the content text style from the normal and italic font styles.
- Font family- Select the font family of the content text from Arial, monospace, sans-serif, etc.
- Card background color- Set the background color of the card.
- Card border color- Customize the border color of the card.
- Border size- Set card border size.
- Room name color- Set the color for the room name.
- Room name font size- Adjust the font size of the room name.
- Hotel name color- Set the color of the room name.
- Hotel name font size- Adjust the font size of the hotel name.
- Short description color- Select the color for the short description.
- Short description font size- Set the font size of the short description.
- Button font size- Adjust the button font size
- Card padding-left/right- Adjust the padding for the card on the left and right.
- Card padding top/bottom- Adjust the padding for the card for the top and bottom.
- Image border radius- Adjust the border radius of the card images.
- Width- Select the width of the card.
- Button text color- Set the button text color.
- Button background color- Set the button background color.
- Hover color- Set the button hover color.
- Hover text color- Set the button hover text color.
Moreover, click on the generate button to generate the card and save it.
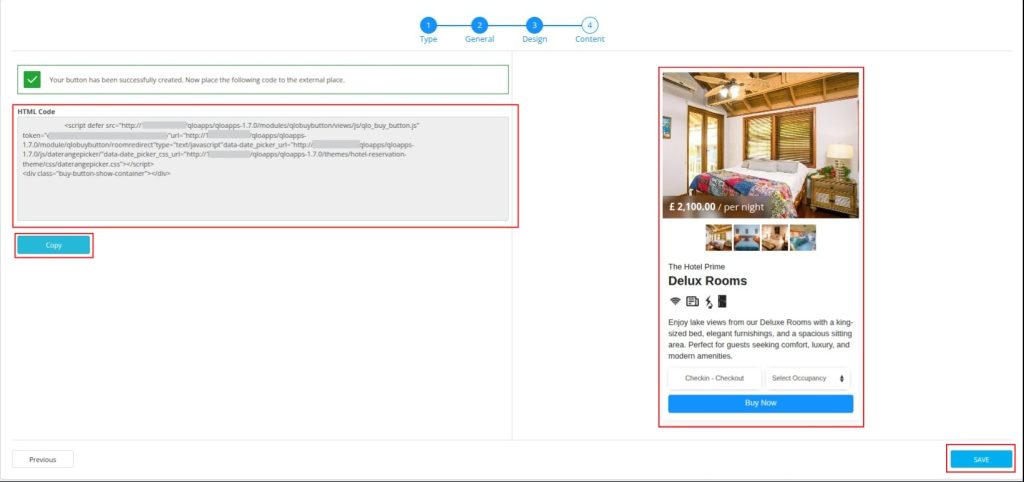
As soon as the card has been generated, the next page will give you the HTML Code and a preview of how the card with the button will be displayed.
Now copy the HTML Code, and then paste it where you want to display the card.
Button display on the Blog page
After copying the code, the admin can easily embed the button on the blog page or any other external website.
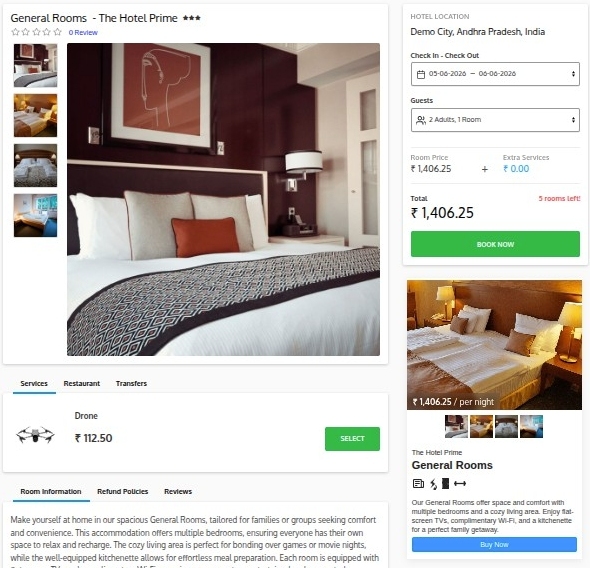
Afterward, by clicking on the Buy Now button, visitors will be redirected to the QloApps website’s room type page or checkout page, whatever option is selected by the admin in the backend.
Conclusion
This was all from the QloApps Buy Button. I hope I was able to clarify the functioning of the module to you.
If you want to learn about the functionality of QloApps then you can visit this link: QLO Reservation System – Free Open-Source Hotel Booking & Reservation System
In case of any query, issue, or requirement please feel free to raise it on QloApps Forum
Current Product Version – 2.0.0 and 5.0.0
Supported Framework Version- QloApps 1.6.0 and 1.7.0

Be the first to comment.