The QloApps BlueSnap Payment Gateway allows hotels to accept secure online payments directly through their booking system.
As a result, it helps customers complete reservations using a smooth and reliable payment process.
Additionally, this integration connects QloApps with BlueSnap to process customer transactions securely. It securely processes payment details through a trusted payment processing platform.
Moreover, the BlueSnap Payment Gateway enables guests to make payments using supported payment methods during the booking process.
In addition, it helps hotels provide a convenient and user-friendly checkout experience.
With this integration, QloApps automatically manages payment responses after transaction completion. The system updates the booking status based on the payment success or failure response.
The QloApps BlueSnap Payment Gateway helps streamline online payment collection for hotels. It improves booking management by providing a secure and efficient payment solution.
Features of QloApps BlueSnap Payment Gateway
- Allows customers to make secure online payments through the BlueSnap payment gateway during the booking process.
- In addition, it provides smooth integration between QloApps and BlueSnap for efficient payment transaction management.
- Additionally, it enables guests to complete bookings using supported credit and debit card payment options.
- As a result, it updates booking status automatically based on successful or failed payment responses.
- With this feature, customers get a simple and convenient payment process while making reservations.
- At the same time, it ensures safe transaction processing by connecting customers with the authorized payment gateway.
- Helps hotels accept payments from customers using BlueSnap-supported payment options and currencies.
How To Install QloApps BlueSnap Payment Gateway
To get started, you can install the QloApps BlueSnap Payment Gateway easily by performing the following steps:
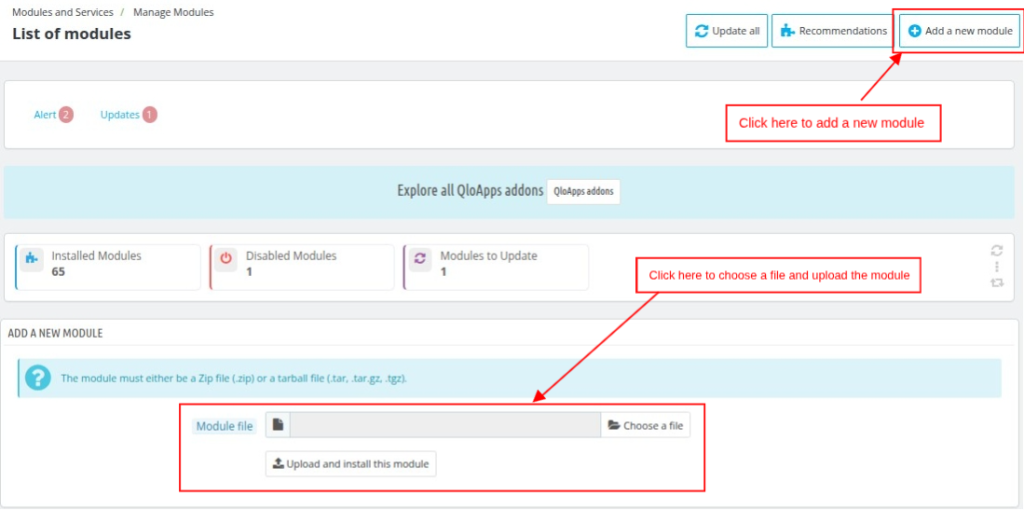
- At the admin back office panel, go to the Modules and Services tab present in the menu.
- After that, click on Add a new module.
- Then, upload the ZIP file of the module.
- After that, upload the ZIP file of the module and click on install.
Once the installation is complete, the system will install your module successfully and display a new BlueSnap Payment menu in your system.
Before discussing how you can use this add-on, let’s first discuss how you can configure this add-on.
Configuration of QloApps BlueSnap Payment
Next, to configure this module, search for the BlueSnap Payment module in the module list on the manage module tab. Now, click on the configure button.
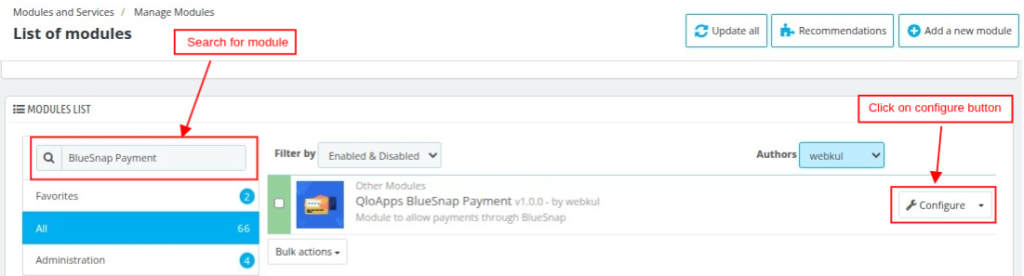
Moreover, you can open the configuration page directly from the BlueSnap Payment menu.
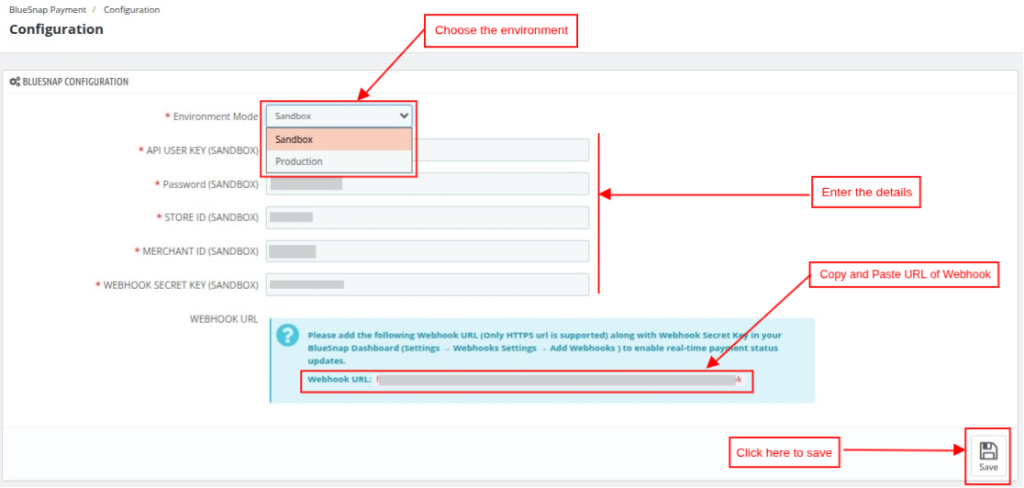
Afterward, the system will open the Configuration page when you click on the Configure button.
Environment Mode: You can select the appropriate environment based on your requirements — Sandbox or Production.
- Sandbox: This is a testing environment that allows you to simulate and verify payments without processing real transactions.
- Production: This is the live environment where actual customer payments are processed and received.
API User Key: Enter the API User Key provided in your BlueSnap account.
Password: Enter the password created while generating the API credentials.
Store ID: Enter the Default Store ID generated during the creation of API credentials.
Merchant ID: Enter the Merchant ID generated during the BlueSnap Payment account creation process.
Webhook Secret Key: Enter the Webhook Secret Key provided under the Webhook settings in your BlueSnap account.
Webhook URL: Copy the Webhook URL from QloApps and paste it into the Endpoint URL field in your BlueSnap account settings.
How to Setup BlueSnap API and Webhook Configuration
API Configuration
To get the Merchant ID, API Key, Store ID, and Webhook Secret Key, you must have an account in the BlueSnap Payment System.
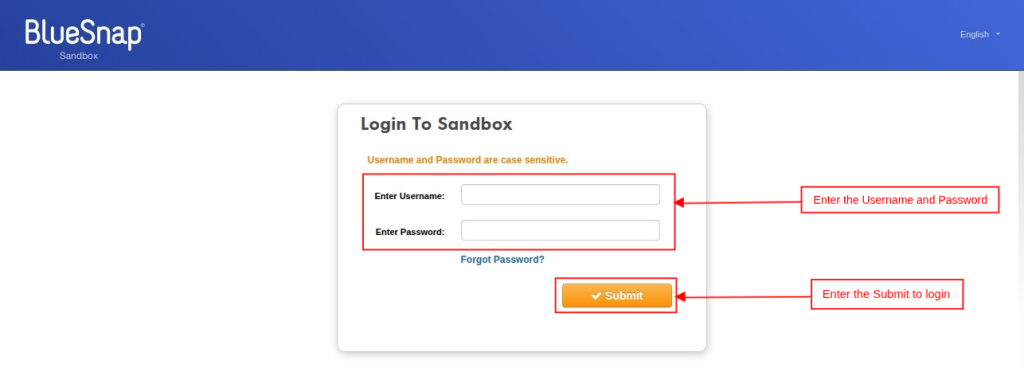
If you already have an account, enter the details and log in to the application.

First, enter the Username and Password and click on the Submit button to log in to your account.
After you log in to your account, the system redirects you to the Dashboard screen. Next, look for the Merchant ID at the left top corner, as shown below:
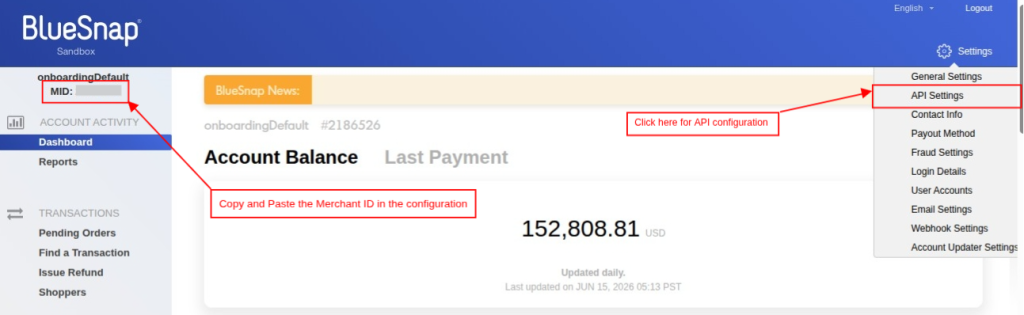
Next, click on the Settings option to generate the API User Key, Password, and Store ID at the top-right corner. The system will display the API Settings option.

How you can generate the API Key?
On the API setting screen, click in the Add Credentials to generate the API creds for payment creds.
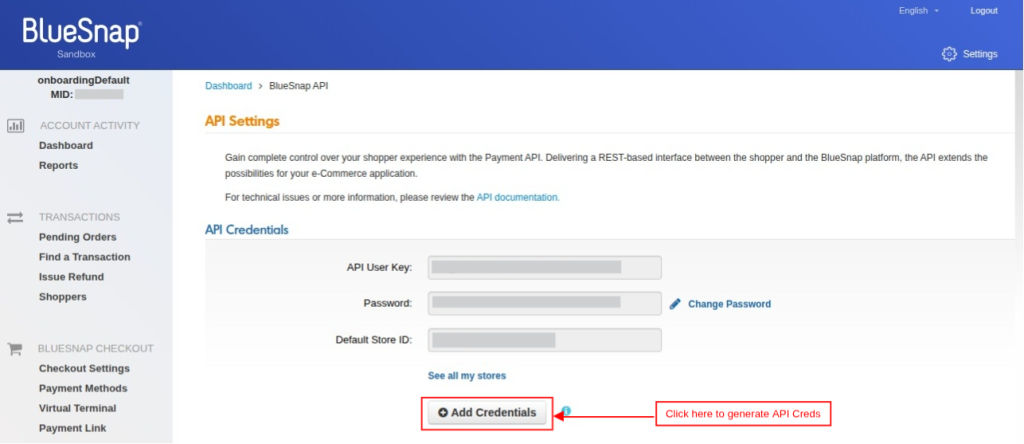
After clicking on the Add Credentials button, API creating page will be open, as shown below:
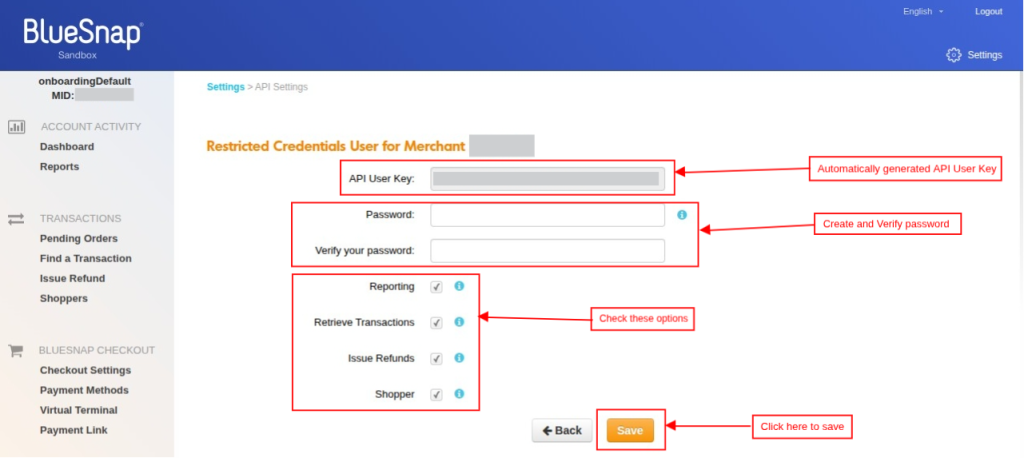
- API User Key: API key will be generated automatically by the system.
- Password: Enter the API password.
- Verify your password: Enter the same password for verification.
- Reporting: Check this option to provide permissions to retrieve/view reports.
- Retrieve Transaction: Check this option to allow retrieving transaction details for viewing purposes. It does not allow creating or updating transactions.
- Issue Refund: Check this option to provide permission to issue refund.
- Shopper: Check this option to provide permission to Create, Retrieve, Update or Delete a shopper.
Webhook Configuration
After that, you need to configure the Webhook settings, click on the Webhook Settings under the Settings option, as shown below:
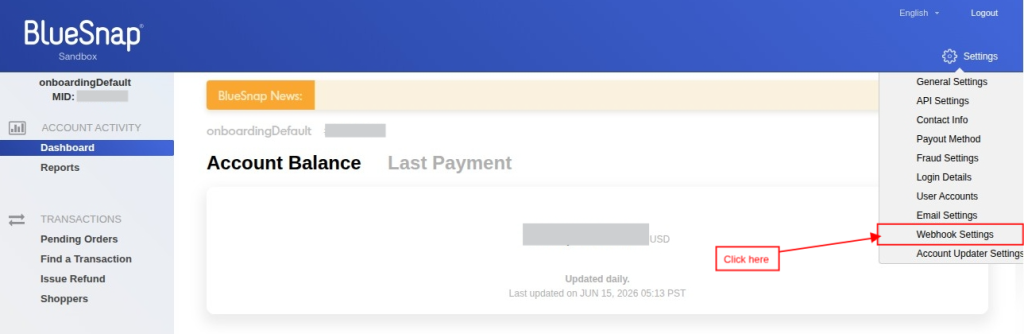
After you click on the Webhook Settings option, the system will redirect you to the webhook configuration page, as shown below:
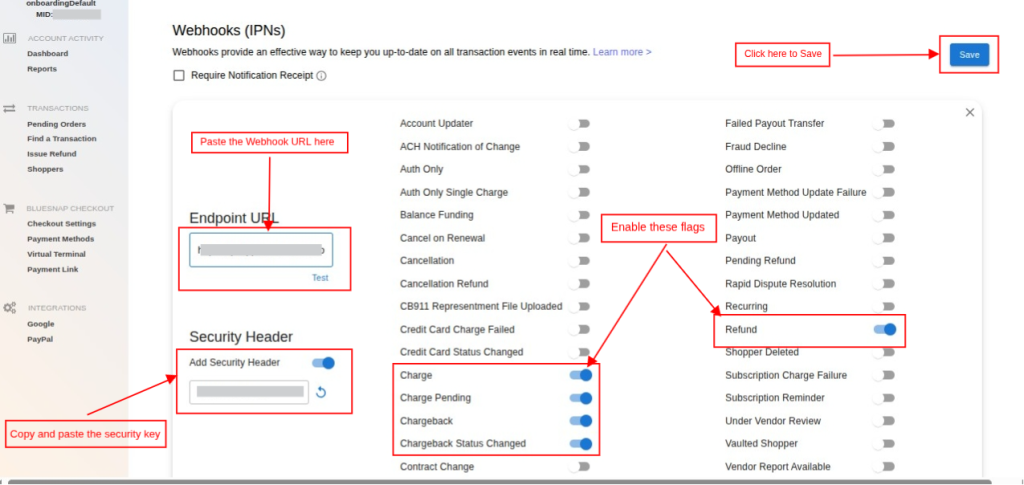
- Endpoint URL: Paste the Webhook URL, which is provided in the BlueSnap Configuration section.
Note: After pasting the Webhook URL in Endpoint URL, click on the Test button, to check the provided URL is accessible or not.
- Security Header: Copy the Security Header value from BlueSnap Webhook Settings and paste it into the Webhook Secret Key field in the QloApps BlueSnap Configuration.
- Charge: Enable this flag to confirm successful guest payments.
- Charge Pending: Enable this flag to handle pending payment cases.
- Chargeback: Enable this flag to handle payment disputes.
- Chargeback Status Changed: Enable this flag to track dispute updates.
- Decline: Enable this flag to capture bank declines.
- Refund: Enable this flag to update refunded bookings.
BlueSnap Transactions
Once the payment process is completed, all transactions made through BlueSnap will be visible in the Transactions section, as shown below:
- Order Reference: Order Reference will be displayed here for BlueSnap Transaction.
- BlueSnap ID: BlueSnap ID will be displayed here.
- Customer: Customer Name and Email Id will be displayed here.
- Total Amount: Total Amount will be displayed here for which the payment has been made through BlueSnap Payment.
- Status: Payment status will be displayed here.
- Order Date: Order Creation date will be displayed here on which date the order has been created.
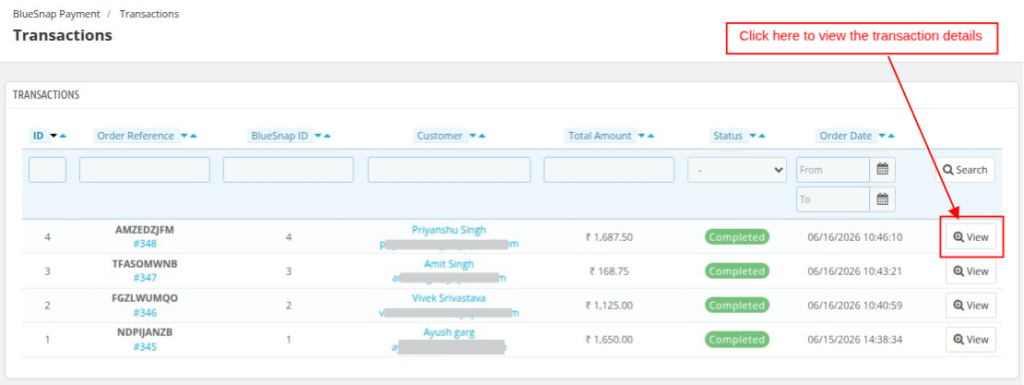
To view the complete details of the transaction, click on the view button in the transaction detail screen, as shown above.
This screen is divided into three sections:
- BlueSnap Transaction Details
- Refund Transaction
- BlueSnap Refund Details
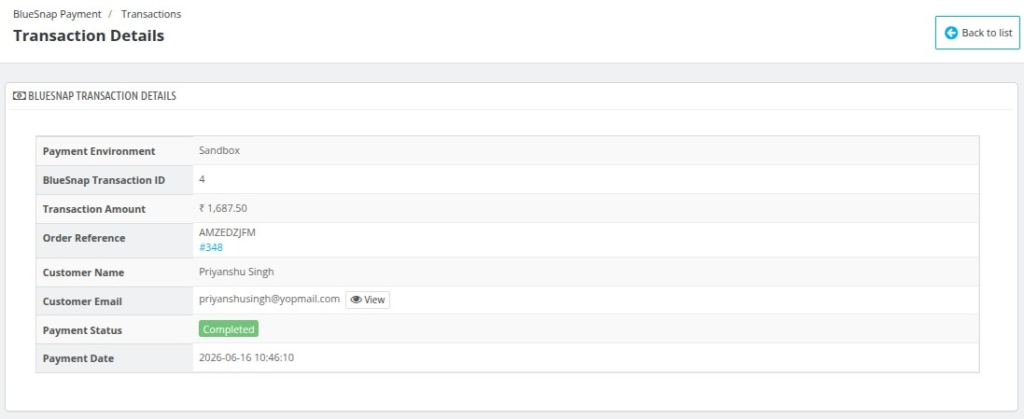
BlueSnap Transaction Details
In this section the user can view the complete transaction details that have been made, as shown below:
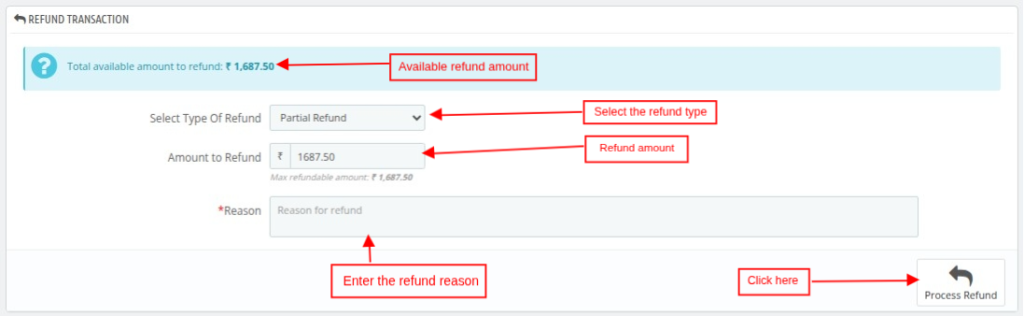
Refund Transaction
If a payment is completed through BlueSnap, the admin user can initiate a refund from the Refund Transaction section.
Refund Type: There are two types of transactions that the admin can make.
- Full Refund: After selecting this, the admin user can refund the complete amount to the customer account via BlueSnap Payment.
- Partial Refund: After selecting this option the admin user can refund the partial amount to the customer account via BlueSnap Payment.
Refund Amount: In case of a full refund, no need to enter the refund amount. But in case of a partial refund, you need to enter the amount.
Reason: Add the Reason before the refund process.
Refund History
All the refund records will be shown in the refund history section of the detailed transaction history, as shown below:
- Refund ID: Refund transaction ID
- Type: Type of refund.
- Amount: Total Amount which is refunded.
- Status: Status of the refund.
- Reason: Reason of refund.
- Date: Date and Time of the refund transaction.

Conclusion
QloApps BlueSnap Payment Gateway makes online payments simple and secure for hotels. It helps guests enjoy a smooth journey while businesses manage transactions with confidence it.
With simple setup and automated payment updates, this module reduces manual efforts for hotel teams. It provides reliable way to handle payments and improve the booking experience.
By connecting QloApps with BlueSnap, hotels can offer a trusted checkout process for guest. The integration supports payment management and creates a better reservation experience.
Additionally, to learn more about the functionality of QloApps, you can visit this link: All-in-One Property Management System.
In case of any query, issue, or requirement, please feel free to raise it on the QloApps Forum.
Current Product Version: 1.0.0
Supported Framework: QloApps 1.6.1 & 1.7.x

Be the first to comment.