
QloApps AI Locale Translator lets a hotelier translate the website into any language installed in QloApps using an AI service. It covers hotel content such as room types, hotels, amenities and CMS pages, and it covers QloApps core, modules, themes and email templates.
NOTE: The module needs an API key from a hosted AI provider, or the address of your own AI server. A cron job is recommended so queued translations run in the background.
Features of QloApps AI Locale Translator
- Translate hotel content such as room types, service products, hotels, locations, amenities, features, CMS pages and refund rules
- Translate QloApps core, installed modules, themes and email templates
- Connect OpenAI, Gemini, Anthropic, OpenRouter, Cerebras, DeepSeek or your own AI server
- Fetch the model list from your provider and validate the connection before you save
- Queue translations as jobs and set each job to High, Medium or Low priority
- Hold, resume, retry or cancel a job from the jobs list
- Add Translate buttons and bulk actions to the pages where you already manage content
- Process queued jobs in the background with a secure cron URL
How to Install QloApps AI Locale Translator
- In the Back Office go to Modules and Services › Manage Modules and click Add a new module.
- Choose the module ZIP under Module file, then click Upload and install this module.
- When the upload finishes, QloApps installs the module and lists it under Manage Modules. Click Configure to open its settings.
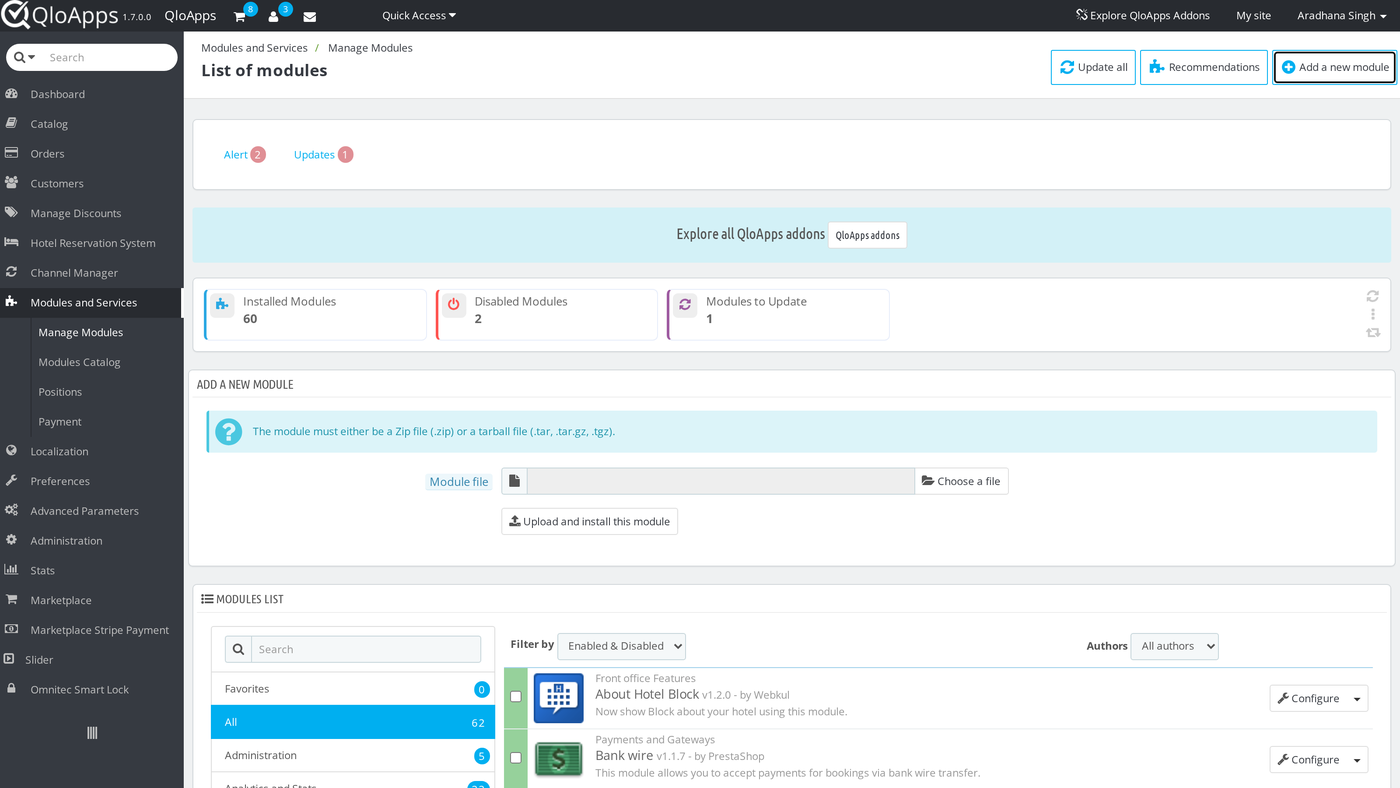
After the install, search for AI Locale in the module list to confirm that the module is active.
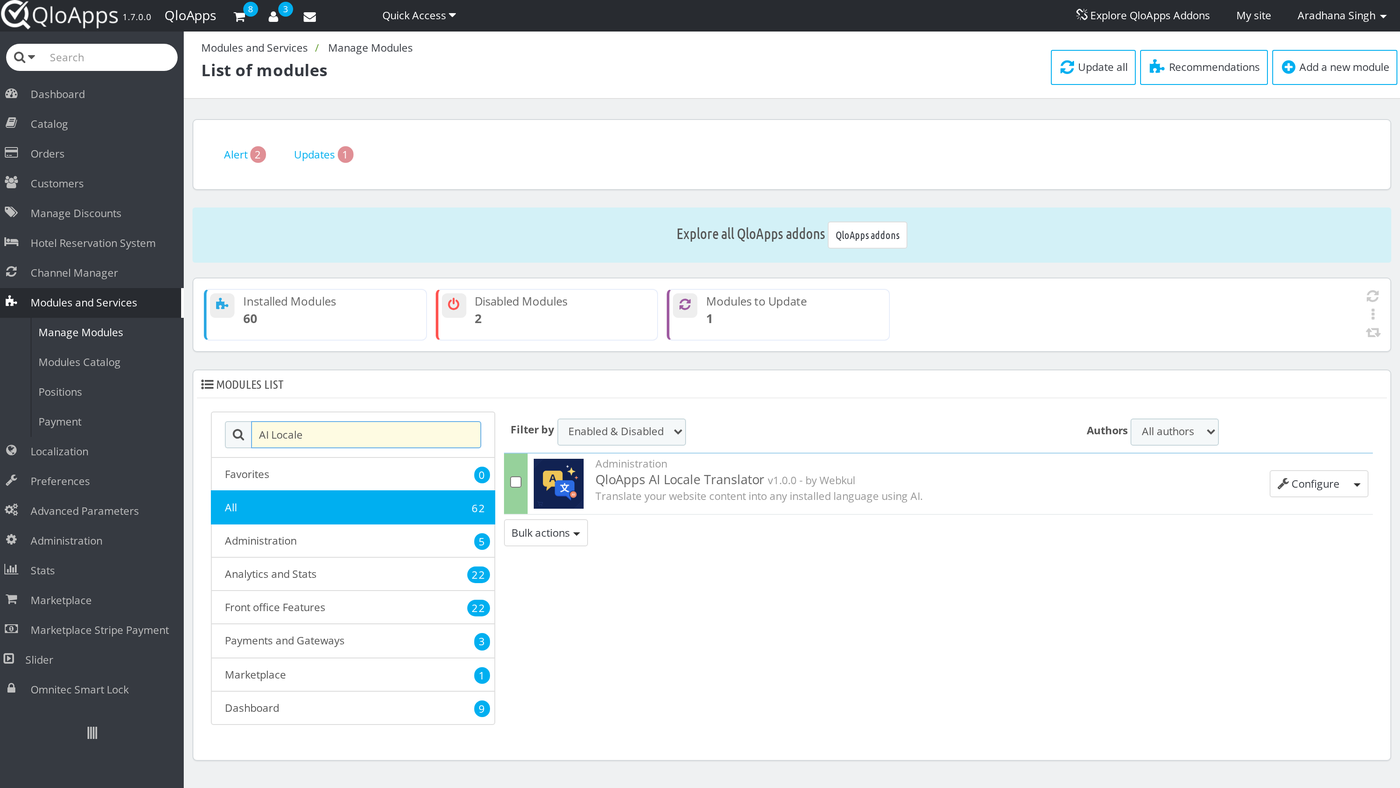
Configuration of QloApps AI Locale Translator
Open the settings from Modules and Services › Manage Modules by clicking Configure on the module. The page has two panels: General configuration and Cron settings. The translation jobs themselves live under Localization › AI Locale Translator.
General Configuration
Set these fields in the order they appear:
- Enable module — Turns the module on or off. The default is Yes. While it is off, queued jobs are not processed.
- AI model type — Choose LLM Provider to use a hosted AI service with an API key. Choose Preconfigured to use your own AI server by URL. The default is Preconfigured.
- LLM provider — Shown for LLM Provider. Pick OpenAI, Gemini, Anthropic, OpenRouter, Cerebras or DeepSeek. The default is OpenAI.
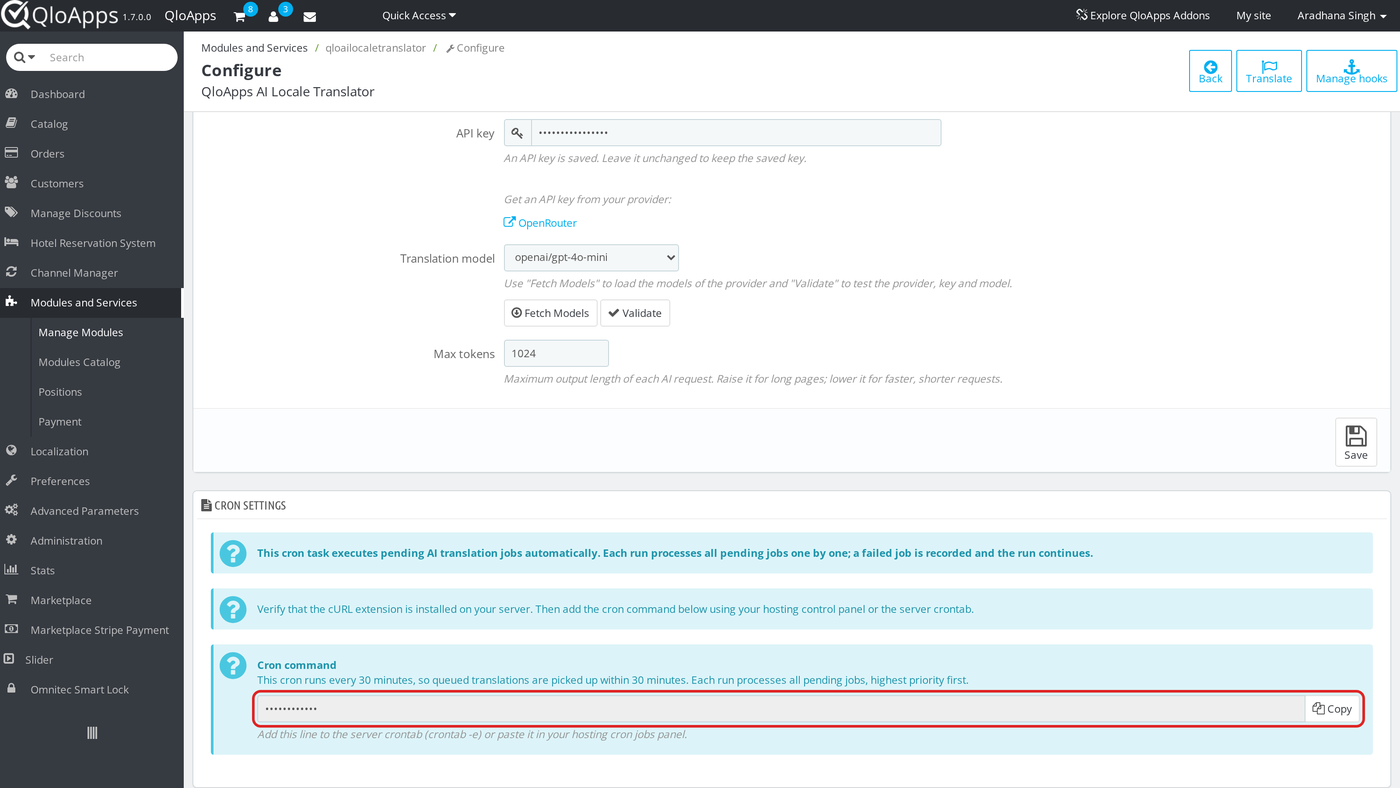
- API key — Paste the key from your provider. The module stores it encrypted. After you save, the field stays masked and shows “An API key is saved”. If you leave it unchanged, the module keeps the saved key.
- Translation model — The model that does the translation. Click Fetch Models to load the list from your provider, then pick one.
- Max tokens — The maximum length of each AI request. Raise it for long pages, and lower it when you want faster, shorter requests. The default is 1024.
Click Validate to send a short test request with the provider, key and model you chose. Then click Save once the test passes.
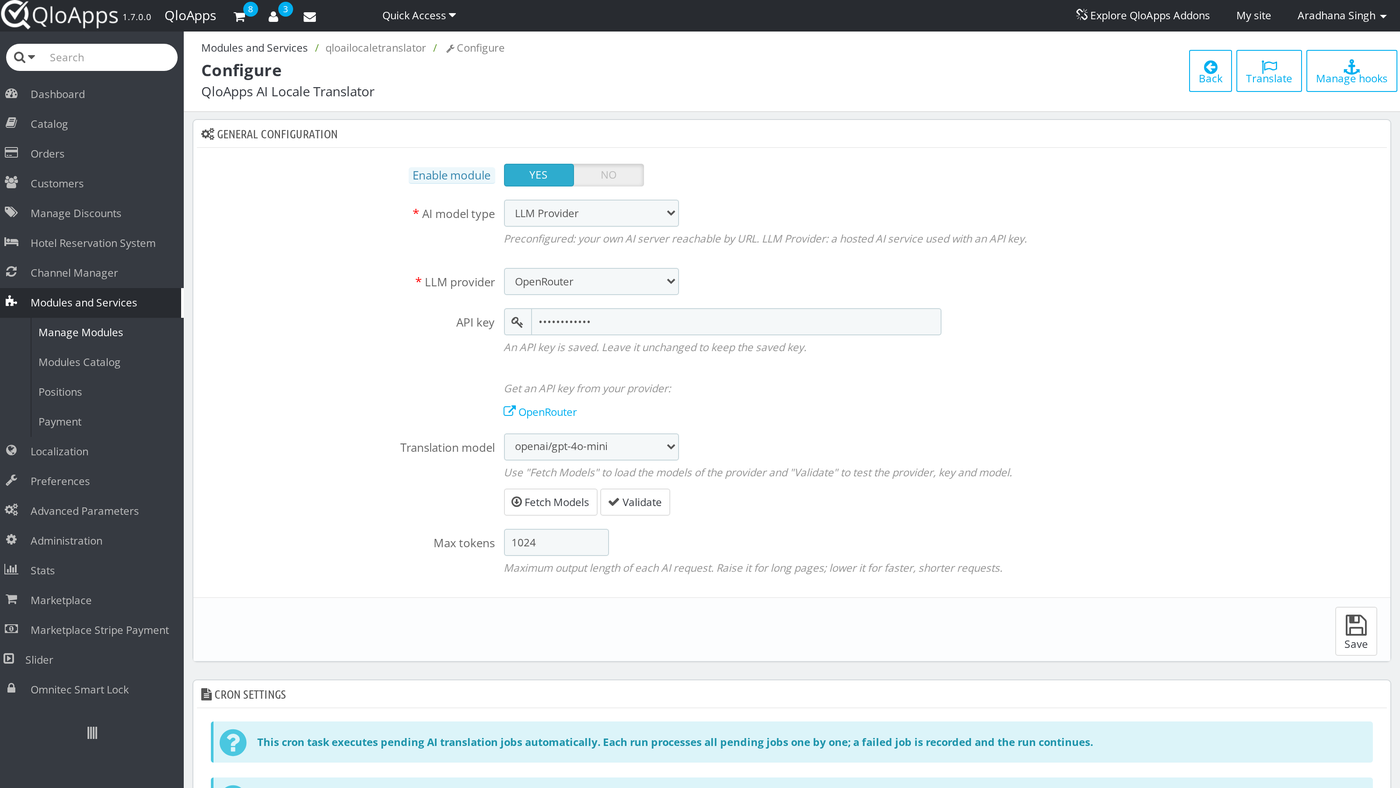
Using your own AI server
Set AI model type to Preconfigured to use a server you run yourself. Three fields appear:
- Content generation endpoint — The web address of your server. It must accept OpenAI-compatible chat completion requests.
- Model fetch endpoint — The web address that lists the models on your server.
- Preconfigured model — Click Fetch Models, then pick the model to use.
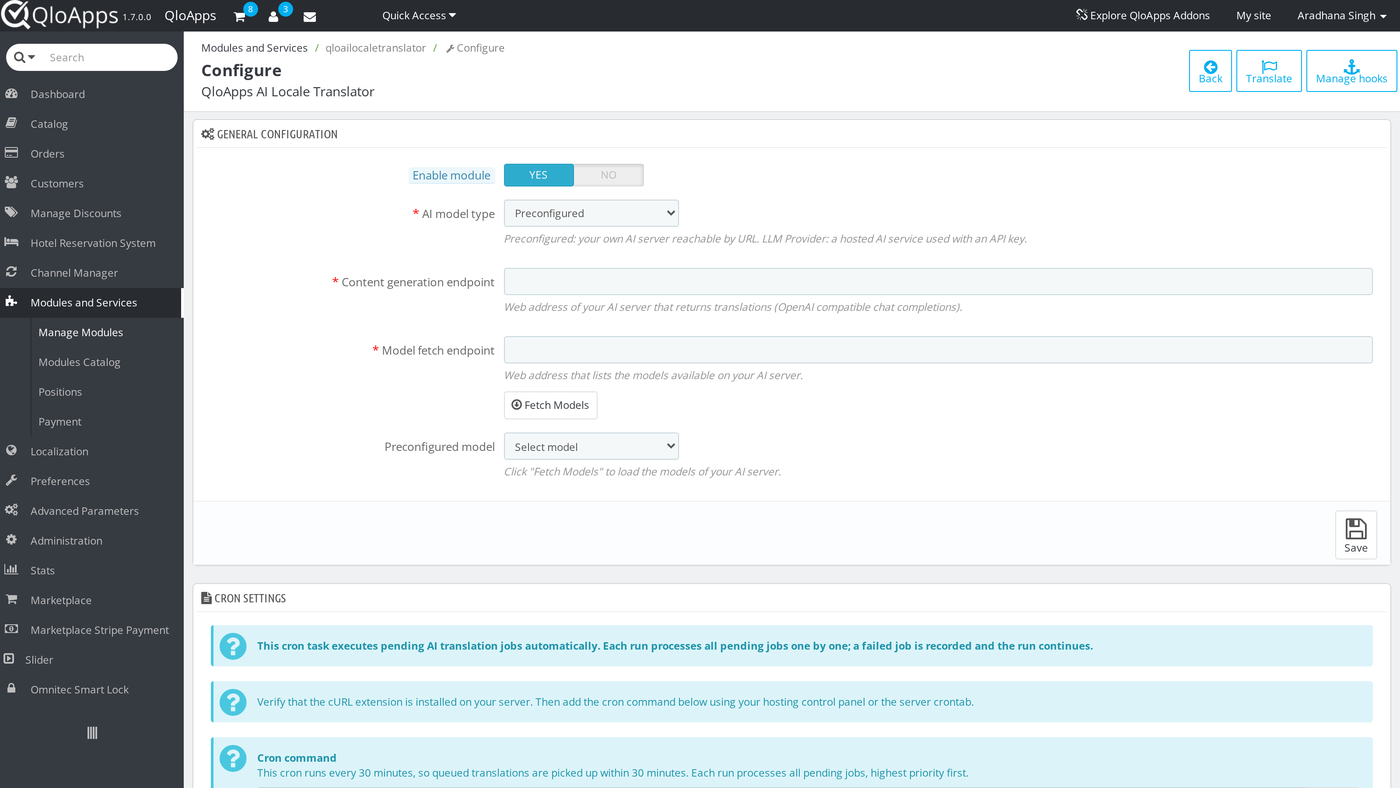
Cron Settings
Queued jobs are processed by a cron job, so the Cron settings panel shows a ready-made command that runs every 30 minutes. Each run processes all pending jobs, highest priority first. If a job fails, the run records the error and then continues with the next job.
Click Copy, then add the line to the server crontab with crontab -e, or paste it into the cron jobs panel of your hosting. The command contains a secure key, so only a request that carries the key can start a run. If the cURL extension is missing on the server, the panel warns you; install it first.
If you do not set up the cron, you can still run a job by hand. Use the Translate action in the jobs list, described below.
Creating a Translation Job
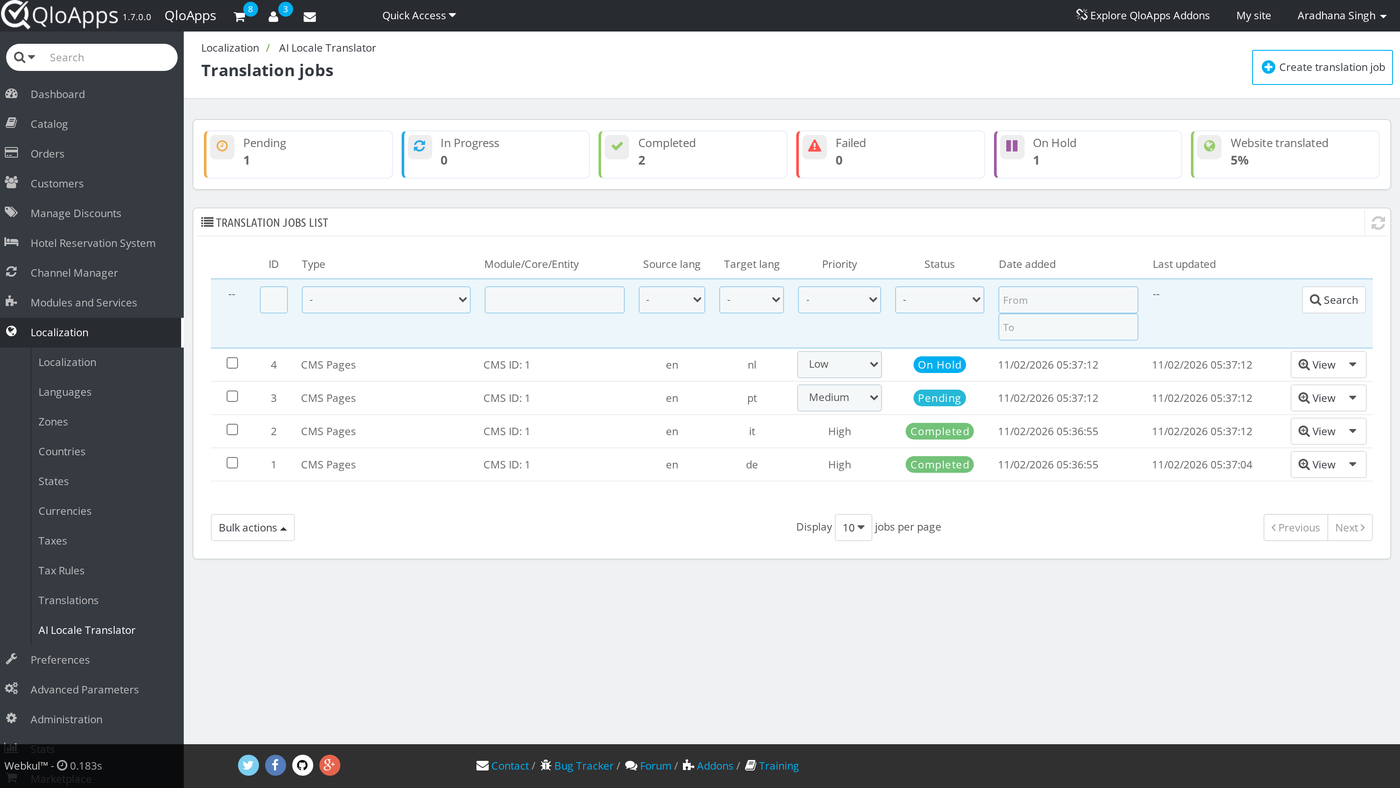
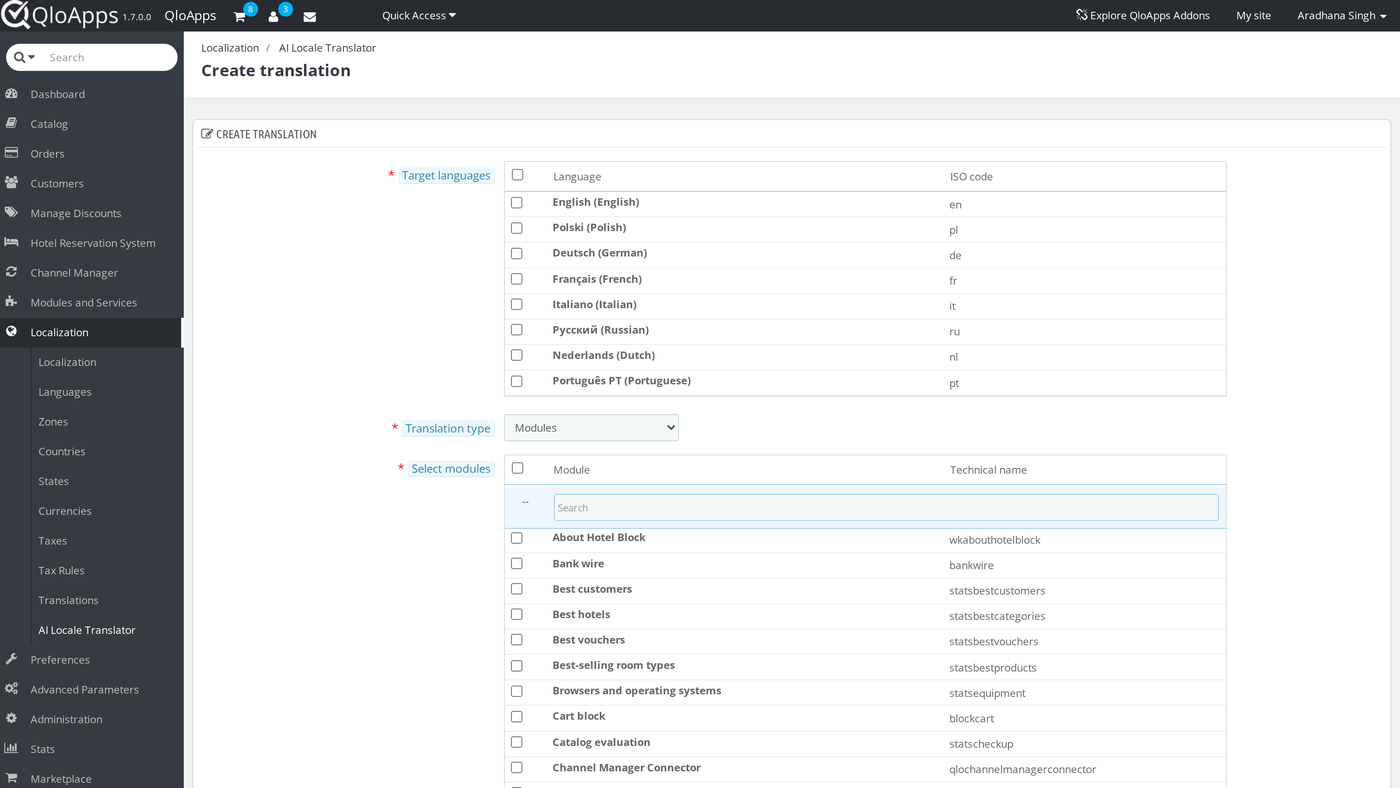
Go to Localization › AI Locale Translator. The page shows a counter for each status and the list of translation jobs. Then click Create translation job to queue new work.
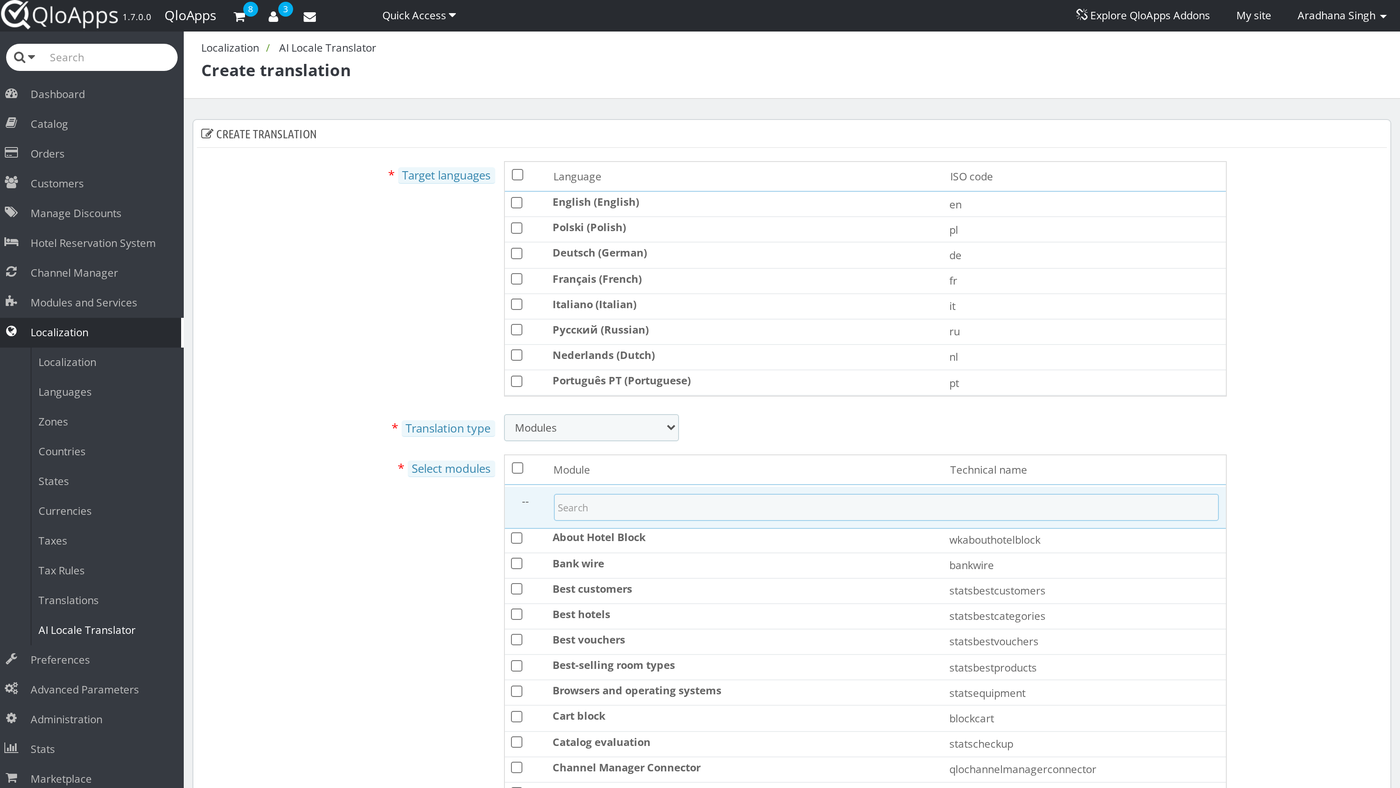
On the Create translation page, fill in these fields:
- Source language — The language you translate from.
- Target languages — Tick one or more languages. Tick the box in the table header to select all.
- Translation type — Choose what to translate: Full Translation, QloApps Core, Modules, Themes, Email Templates, or one of the hotel content types such as Room Types, Hotels or CMS Pages.
- Job priority — High, Medium or Low. Because of this, the module processes higher priority jobs first. The default is Medium.
Translating hotel content
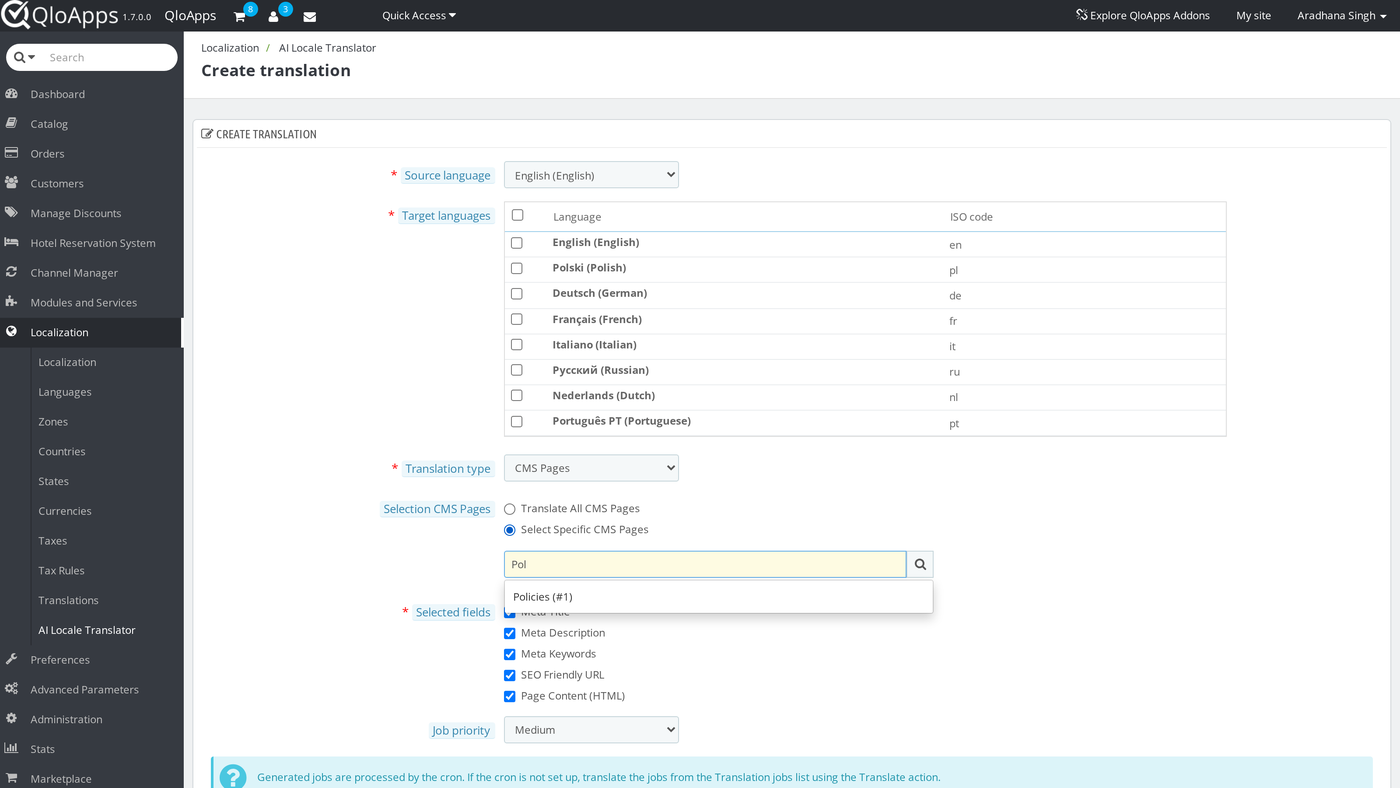
When you pick a content type, choose between Translate All and Select Specific. With Select Specific, type part of a name in the search box and click the result to add it. Then tick the fields to translate, such as Meta Title, Meta Description and Page Content (HTML). For content types that have child items, such as hotels or locations, tick Translate children to queue the child items too. Click Generate to queue one job for each item and target language.
Translating core, modules, themes and emails
First, for QloApps Core, tick the parts to translate under Select core phases: back office, front office, PDF and errors. Next, tick the installed modules under Select modules to translate Modules. Themes work differently, because you pick one theme under Select theme. Finally, choose an Email scope to translate Email Templates: Core emails, Email subjects or the emails of the modules you select. Full Translation queues all of these together with all database content. These jobs always translate from English. As a result, the module writes the output to the translation files of the target language.
Managing Translation Jobs
Each job in the list shows its type, item, languages, priority and status. A job is Pending, In Progress, Completed, Failed or On Hold. Next, use the actions on each row:
- View — Opens the job details.
- Translate — Runs a pending job now, without waiting for the cron.
- Hold and Resume — Pause a pending job and put it back in the queue.
- Cancel — Stops a pending job and removes it. A finished job shows Delete instead.
- Retry — Queues a failed job again.
You can also change the priority of a pending job straight from the Priority column. Tick several jobs and open Bulk actions to run Translate selected, Hold selected, Resume selected, Retry failed or Delete selected.
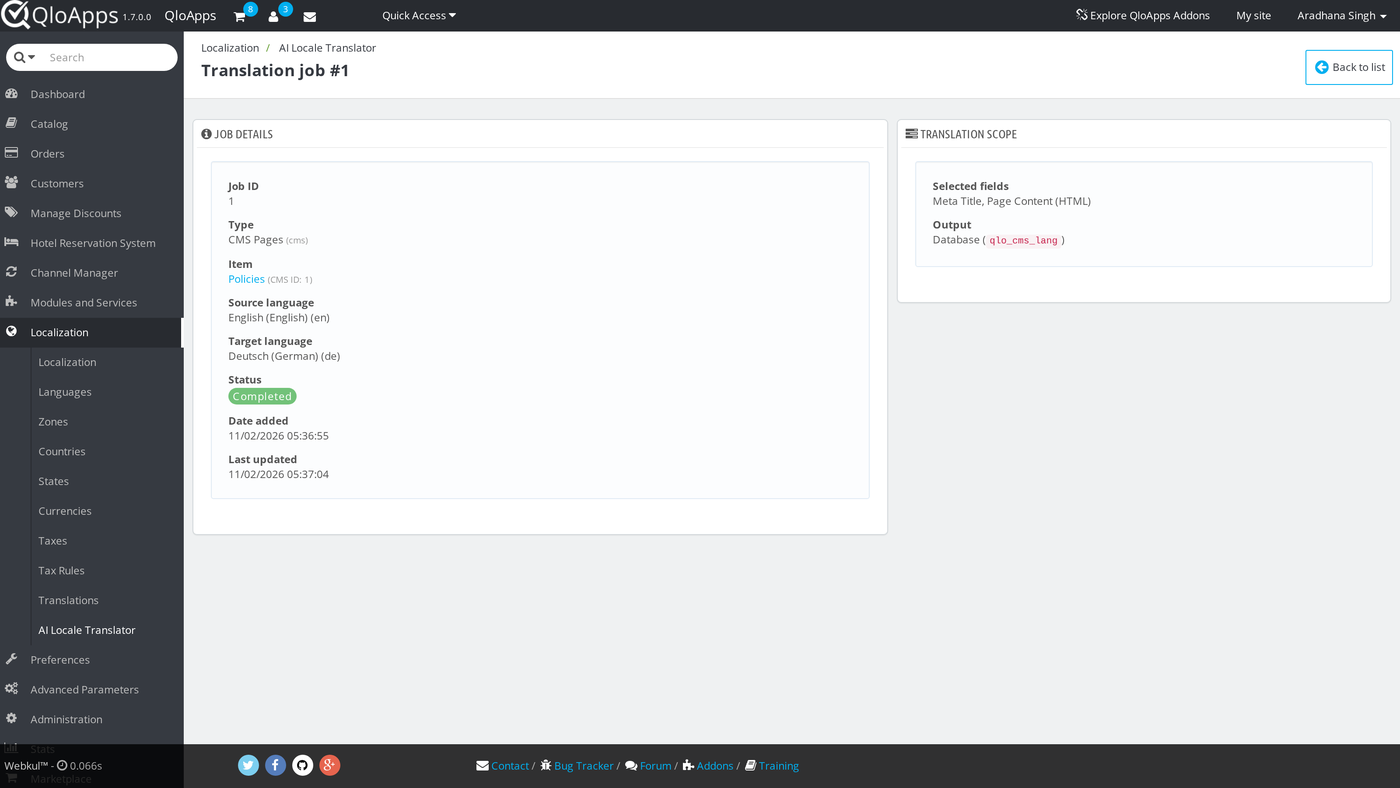
Click View to see the job details. The page shows the type, item, languages and status, the translated fields, and where the output went. For a failed job it also shows the error message and a Retry button.
Translating From the Pages You Already Use
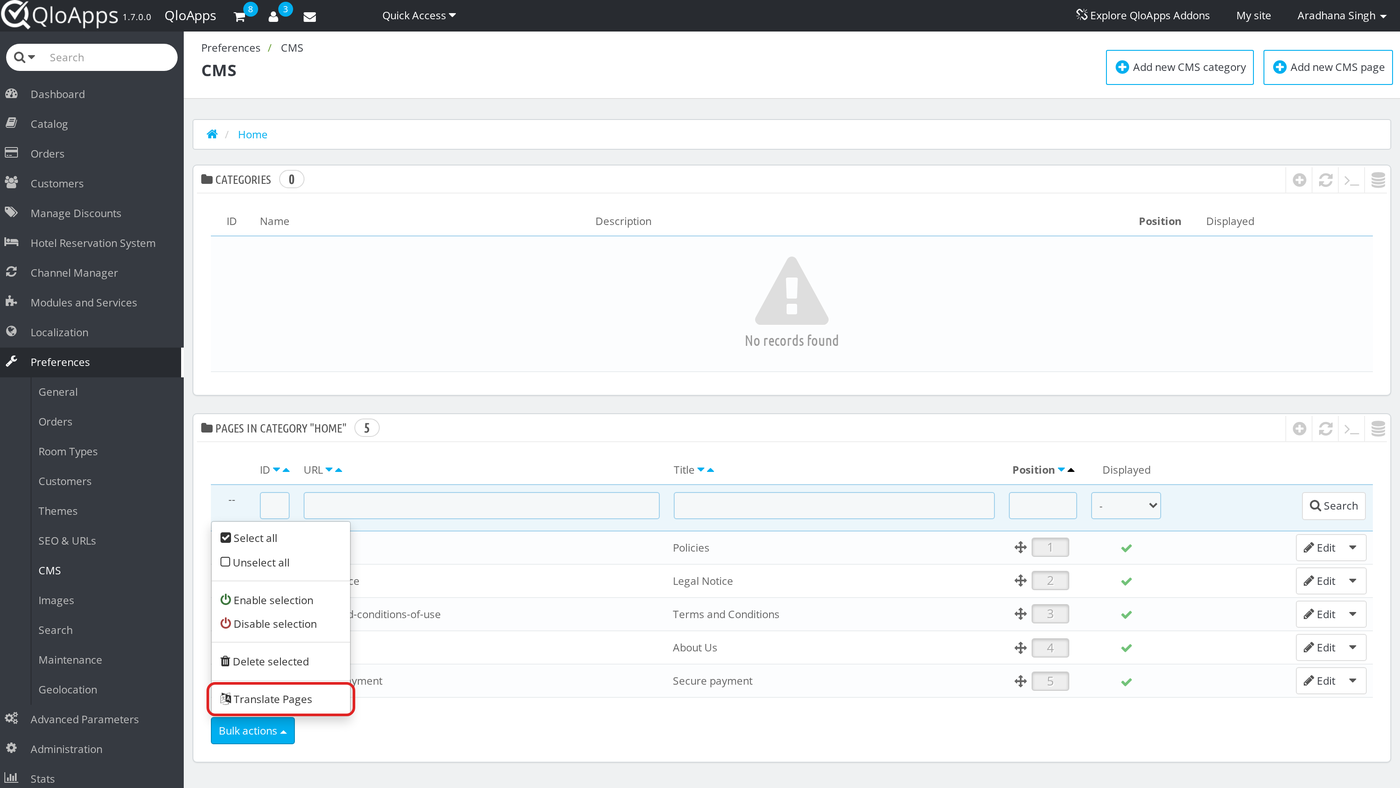
Also, you do not have to open the jobs page each time. The module adds a Translate button to the edit page and a Translate bulk action to the list on these pages:
- Room types and service products under Catalog
- Hotels under Hotel Reservation System › Manage Hotels
- Categories (locations), features and CMS pages
- Hotel amenities, order refund rules and additional facilities
To use it, first tick one or more items in a list. Then open Bulk actions and choose the Translate action.
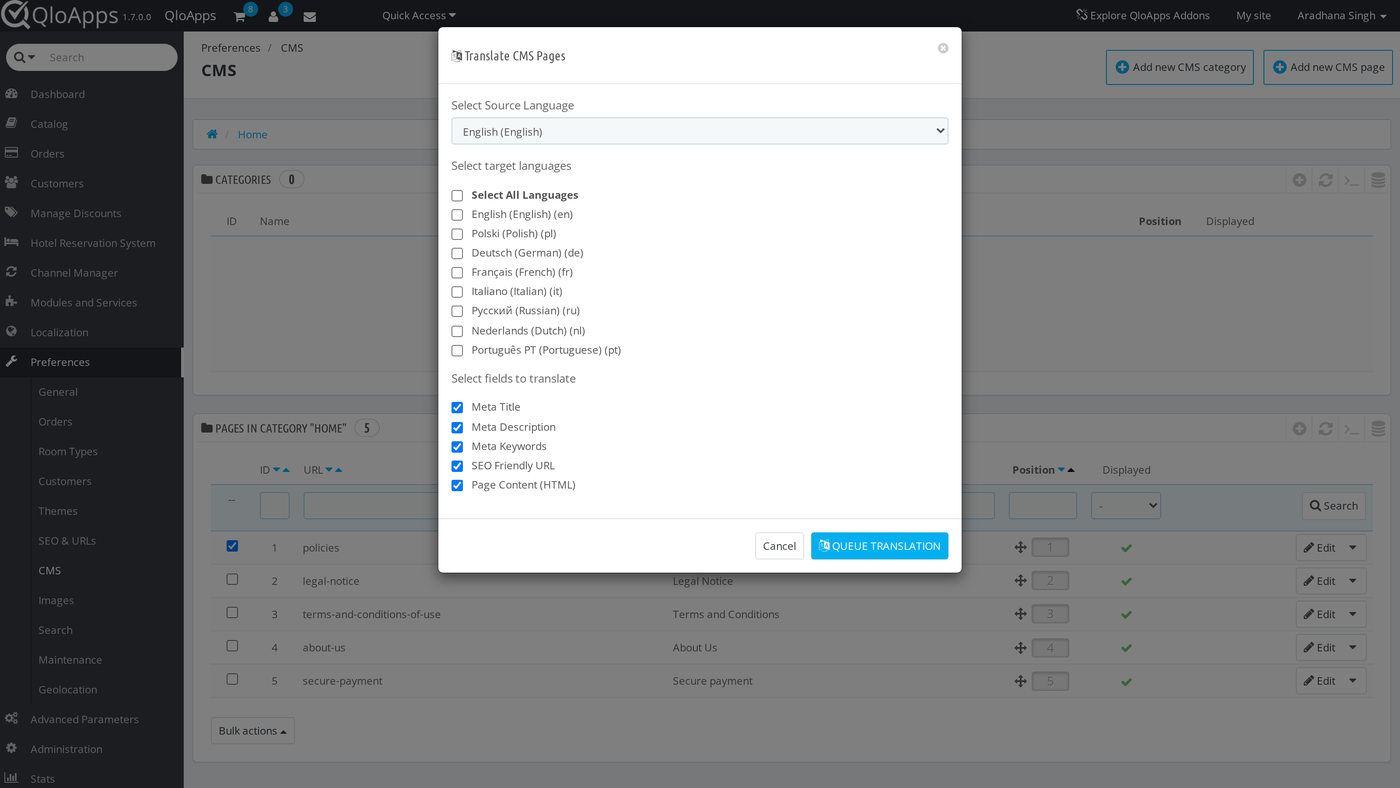
When a window opens, choose the source language, tick the target languages and the fields to translate, and then click Queue translation. As a result, the module adds one job for each item and language to the queue.
Conclusion
QloApps AI Locale Translator lets you translate hotel content and the QloApps interface into your installed languages with an AI service. This guide covered installing the module, connecting a provider or your own server, setting up the cron, creating and managing translation jobs, and translating from the pages you already use. Finally, we hope this guide has helped you configure and use QloApps AI Locale Translator with confidence.
Additionally, to learn more about the functionality of QloApps, you can visit this link: All-in-One Property Management System. For technical assistance, raise a ticket at QloApps Support. In case of any query, issue, or requirement, please feel free to raise it on the QloApps Forum.
Current Module Version: 1.0.0
Supported QloApps Versions: 1.6.x and 1.7.x

Be the first to comment.