QloApps Adyen Payment Gateway is a useful and necessary addon. It will provide your guests with an option to pay using the Adyen payment gateway.
A user wants a flexible and trustable payment gateway that ensures safe transactions. Adyen is a very flexible payment gateway.
It provides various modes of payment to your guests so that they can make payments conveniently.
Using Adyen payment you can deliver a reliable payment experience to your guests and ensure safe transactions.
Note: This module is compatible with QloApps version 1.6.x.
Features of QloApps Adyen Payment Gateway
- Easily receive payments using Adyen Payment Gateway.
- It provides various ways through which your guests can make payments.
- Safe, reliable and convenient payment gateway.
- Admin can configure this module for two environments: Test mode and Production mode.
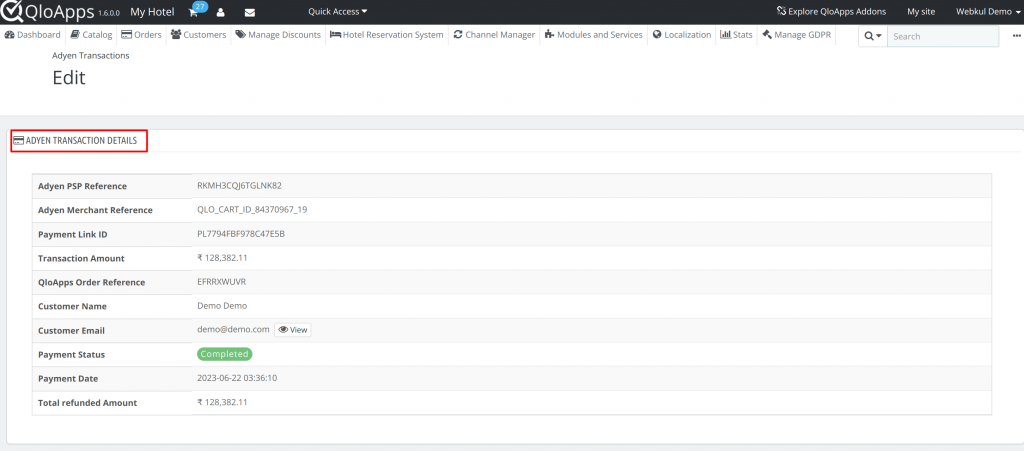
- Admin can view a list of all the orders placed by the guests using Adyen Payment Gateway on a separate tab of Adyen Transactions at the back office.
- Admin can get the order details by clicking on any order from the order list present in the Adyen Transactions tab.
- If the admin is willing to provide his guests with a refund, in that case, he can enable the refund option.
- Admin can provide either full or partial refunds to his guests.
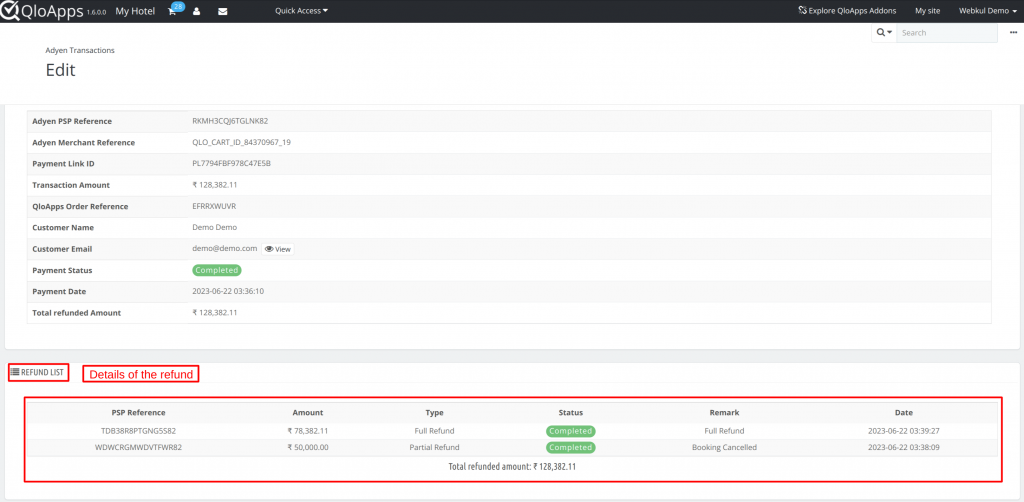
- The refunded amount details will be updated on the Adyen Transactions Details page.
- Once the guest selects Adyen as his payment gateway, then the Admin can either redirect him to the website of Adyen or can provide an Adyen Web Drop-in so that the guest can make his payment on the checkout page itself.
Installation Process of QloApps Adyen Payment Gateway
The installation process of QloApps modules is very easy and user-friendly.
To install the QloApps Adyen Payment Gateway module in your QloApps system:
- Firstly, go to the Modules and Services tab present in the menu at the Back Office.
- Click on Add a new module.
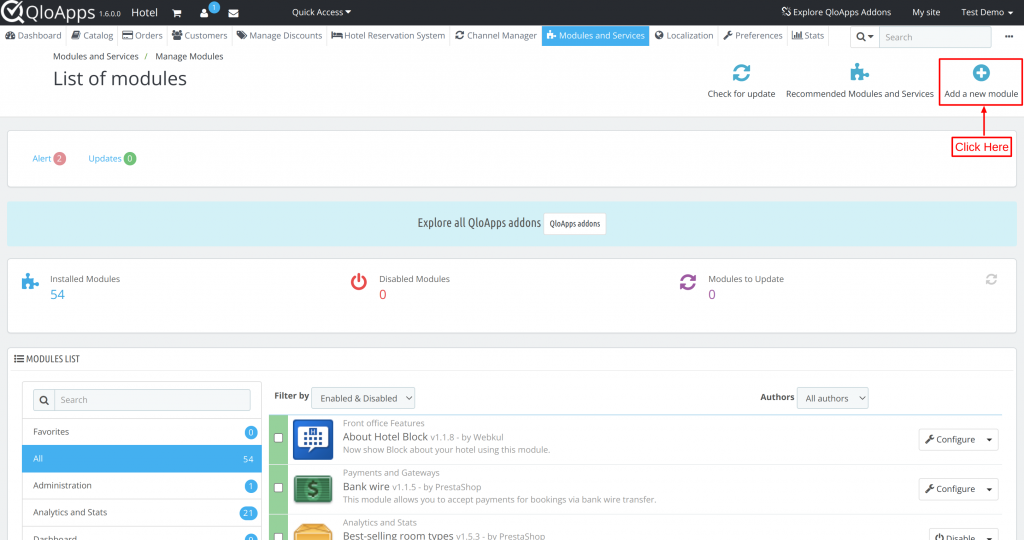
- Upload the ZIP file of the QloApps Adyen Payment module.
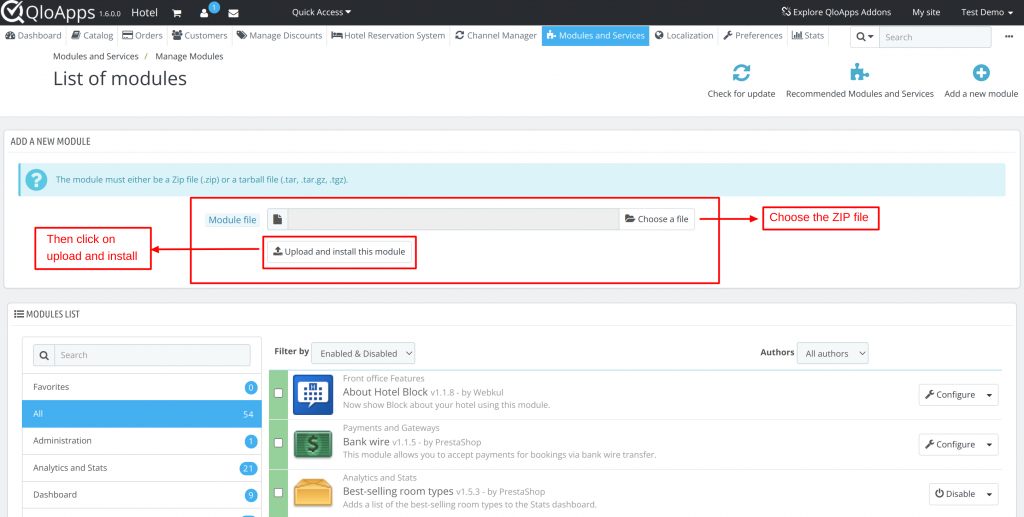
Once you click on upload and install, your module will be installed in the system. You will be able to configure your module at any point in time.
After installation, let’s now discuss the process of configuration of the module.
Configuration of QloApps Adyen Payment Gateway
After successful installation of the module, the admin has to configure the module.
To configure the module you need to set up the following categories:
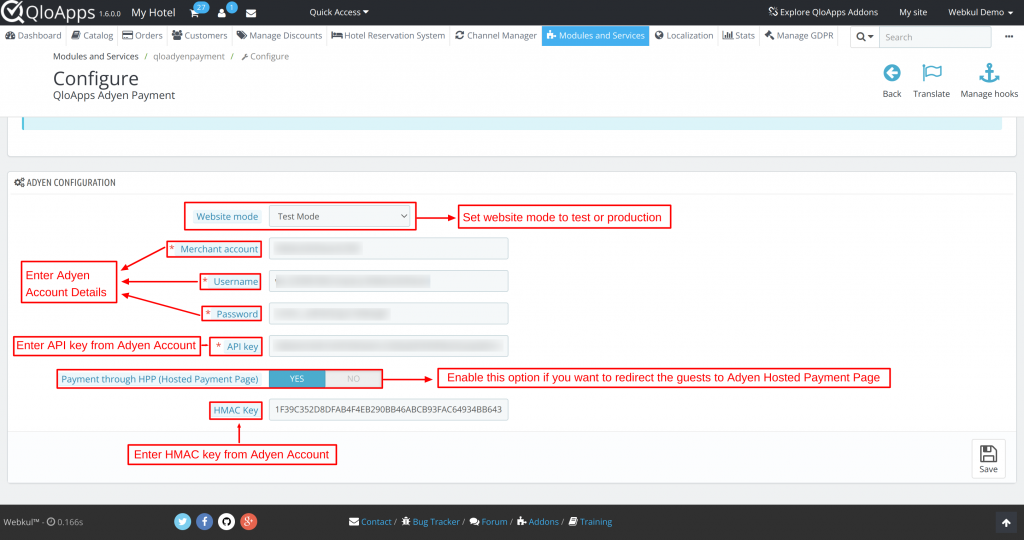
- Website Mode:
- Test Mode: If you are testing your module and its functionalities then select Test Mode.
- Production Mode: If you are using it for real and live transactions then select Production Mode.
- Merchant Account
- Username
- Password
- API Key
- Payment through HPP:
- Select Yes: When you want to redirect the guests to the Adyen Hosted Payment Page. In this case, you have to add the HMAC key.
- HMAC Key
- Select Yes: When you want to redirect the guests to the Adyen Hosted Payment Page. In this case, you have to add the HMAC key.
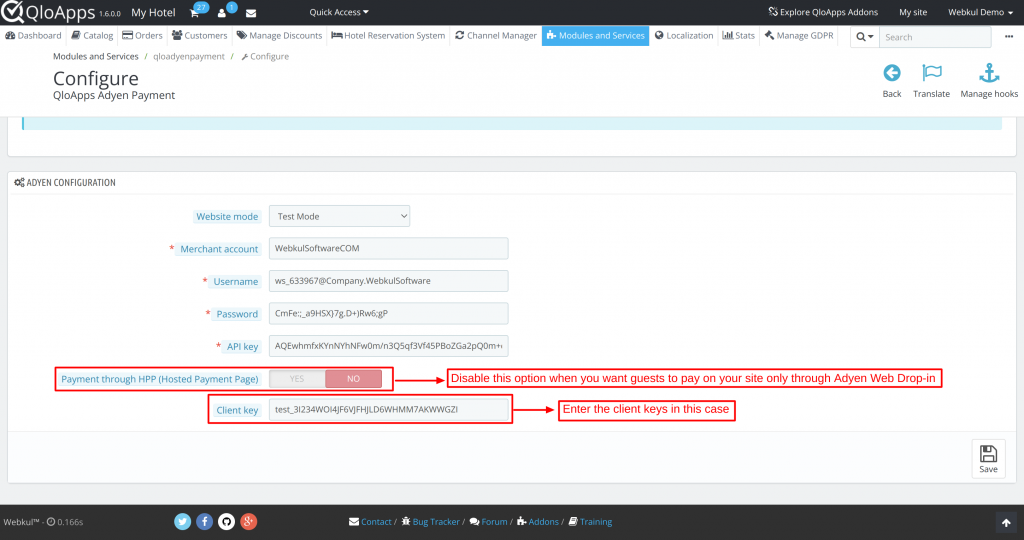
- Payment through HPP:
- Select No: When you want the guests to complete their payment using your website only. In this case, a form will be generated by Adyen Web Drop-in on the website itself so that the guests can complete the payment on your website. In this case, you have to add the Client Key.
When you fill in all the above details on the Adyen Configuration page, your module will be configured.
Steps to Obtain API Key and Client Key
How to Obtain API Keys?
To obtain the API credentials of Adyen Payment Gateway, firstly you have to create a merchant account on Adyen Payment Gateway.
To know more about the process of account creation on Adyen Payment Gateway, refer to this document: https://docs.adyen.com/get-started-with-adyen#apply-for-your-live-account
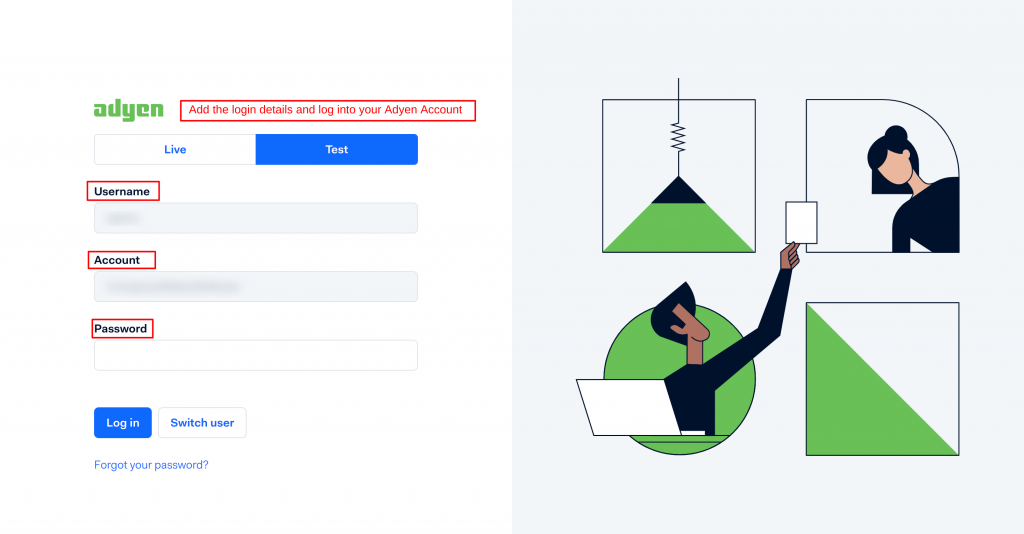
Once you have created your merchant account on Adyen Payment Gateway, log into your account using the created account credentials.
Link for Admin to login to their accounts:
- Under Live mode: https://ca-live.adyen.com/ca/ca/login.shtml
- Under Test mode: https://ca-test.adyen.com/ca/ca/login.shtml
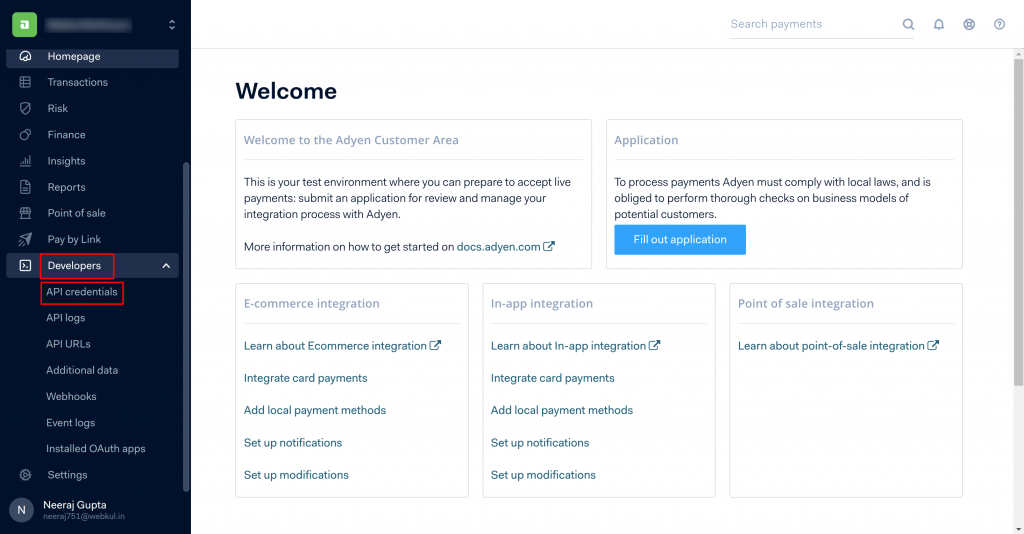
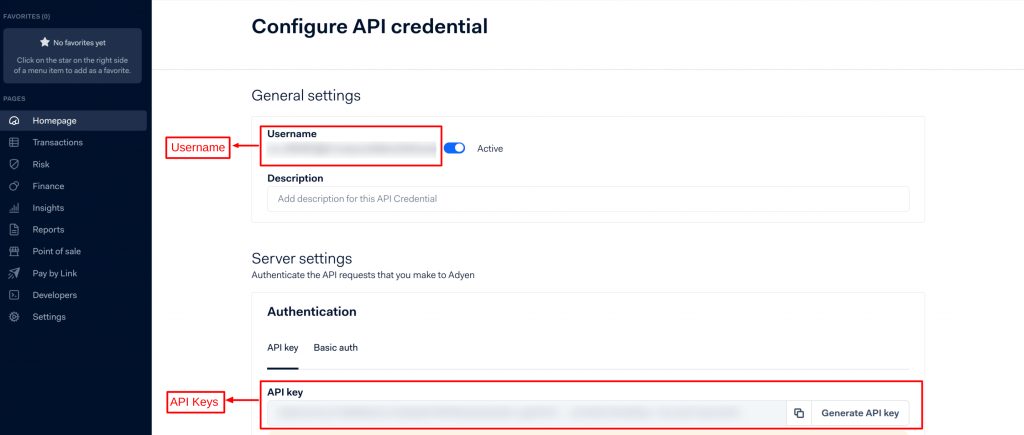
Once you have logged into your account, then to collect the API keys:
- Go to Developers > API Credentials
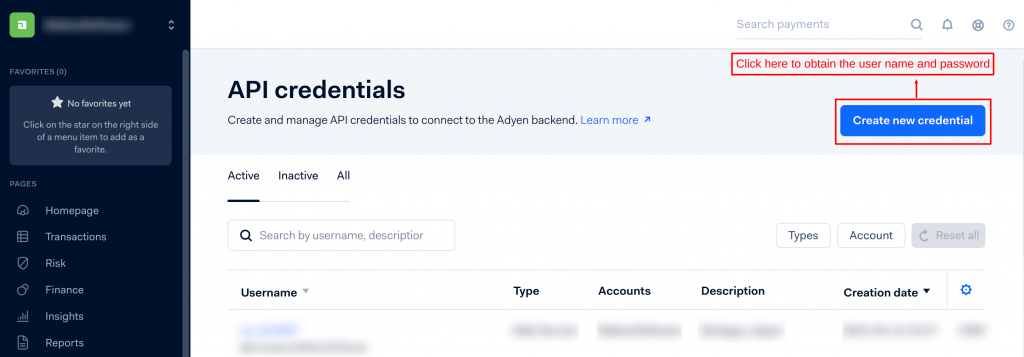
- Click on the “Create new credentials” button on the API credentials page.
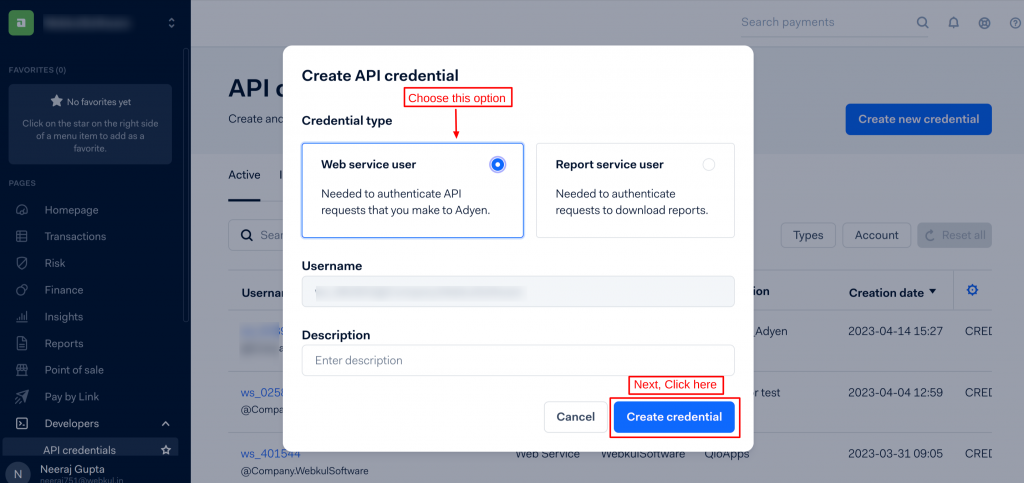
- After clicking on Create new credential, a pop-up will appear on the screen where the admin has to select the Web Service User as the credential type and then click on Create credential.
- Once you click on Create credential, a new page “Configure API credential” will open. On this page under the server setting, in the authentication option, you will find the API Keys.
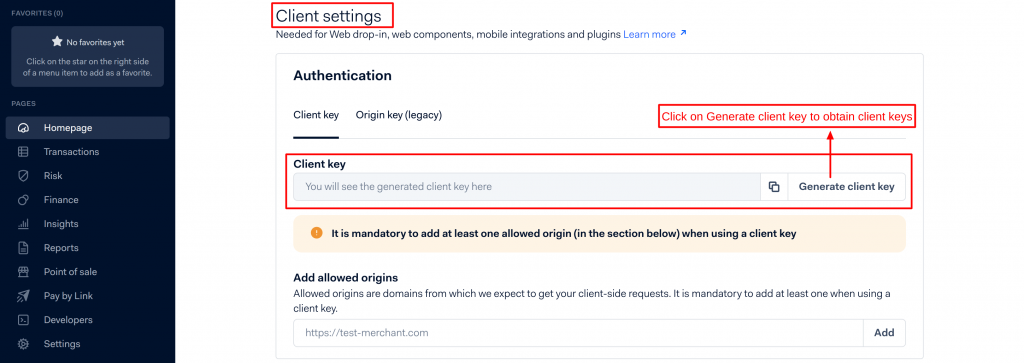
How to Obtain Client Key in cases when you disable Payment through HPP(Hosted Payment Page) ?
When you select no payment through HPP (Hosted Payment Page), in that case, you have to add the Client Key. You will find it under the client settings option on the Configure API Credential page.
Steps to obtain HMAC Keys
Once you enable Payment through HPP( Hosted Payment Page), then the next step is to add the HMAC key so that the guest can be redirected to the Adyen Payment Page.
To obtain the HMAC key:
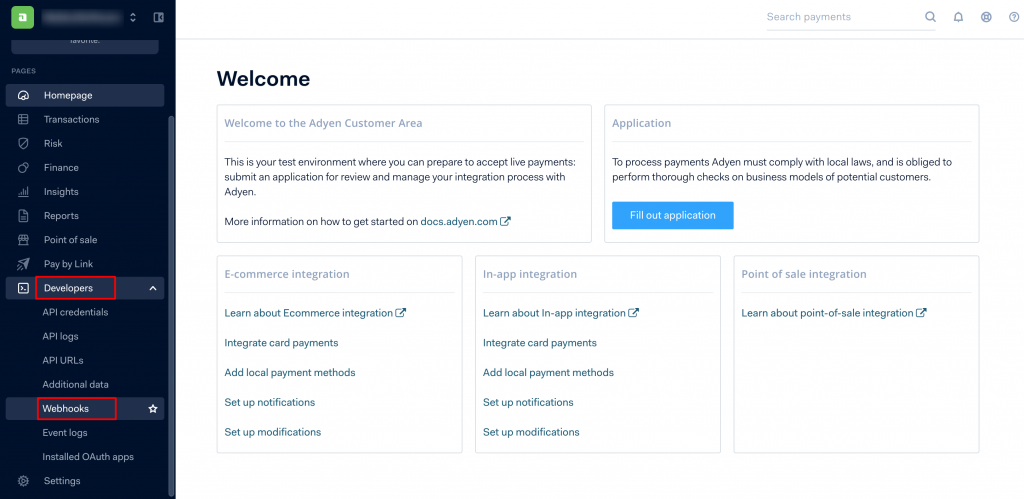
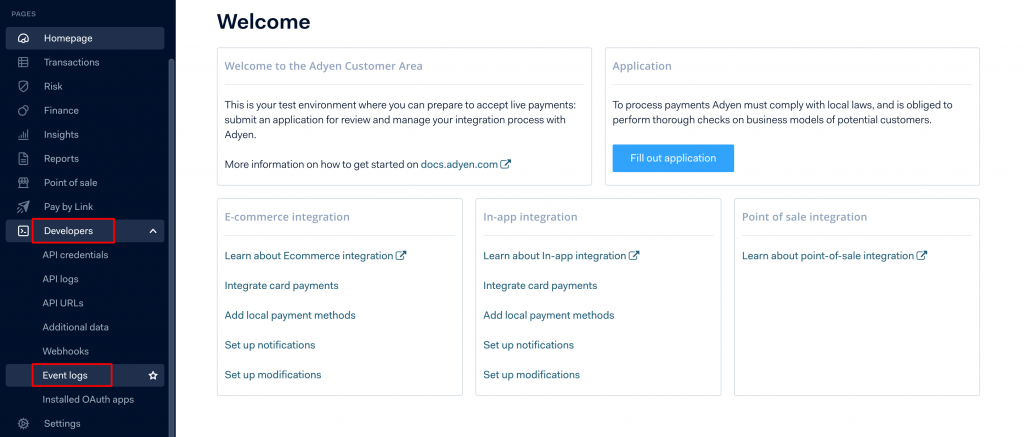
- Go to Developers > Webhooks
- On the webhooks page, click on the webhook button to add a new webhook.
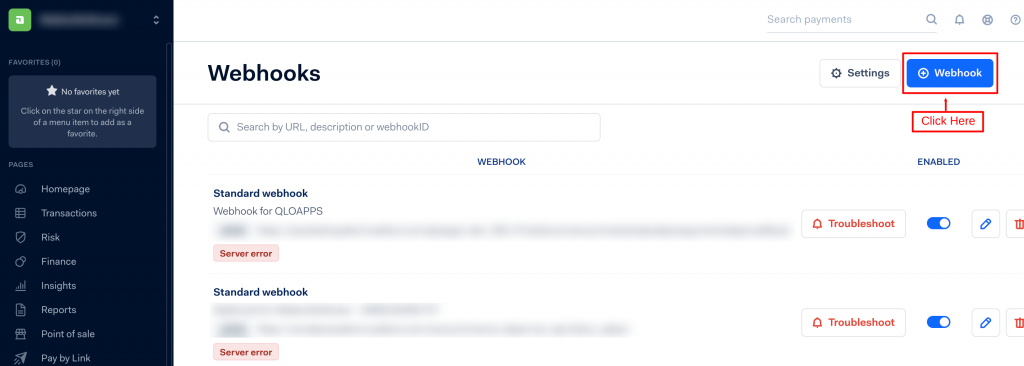
Once you click on the Webhook button, a popup will appear in which all the possible webhooks will be displayed. Select standard webhook and click on Add.
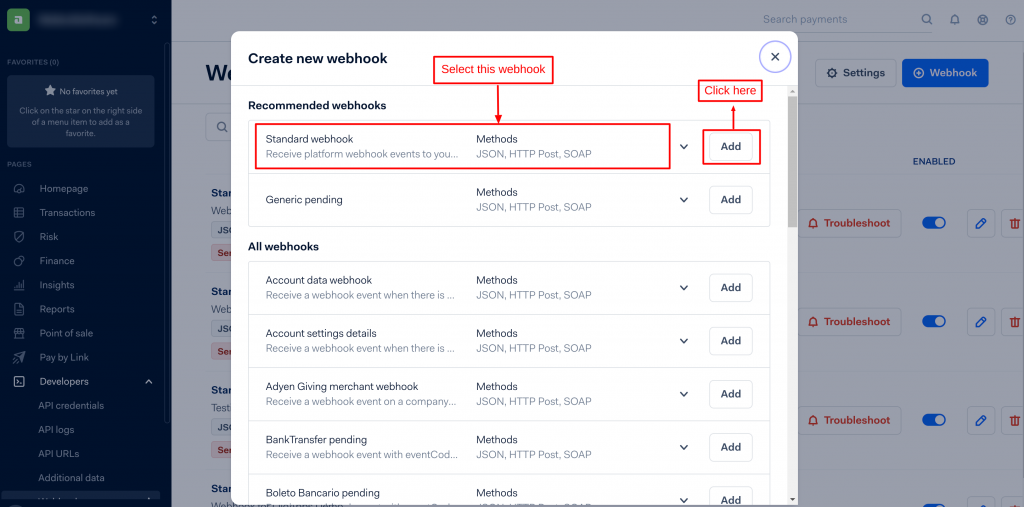
- After clicking on Add, the Standard Webhook page will open on your screen. Now, to link the webhook of the module: Go Under General settings > Click server configuration edit symbol.
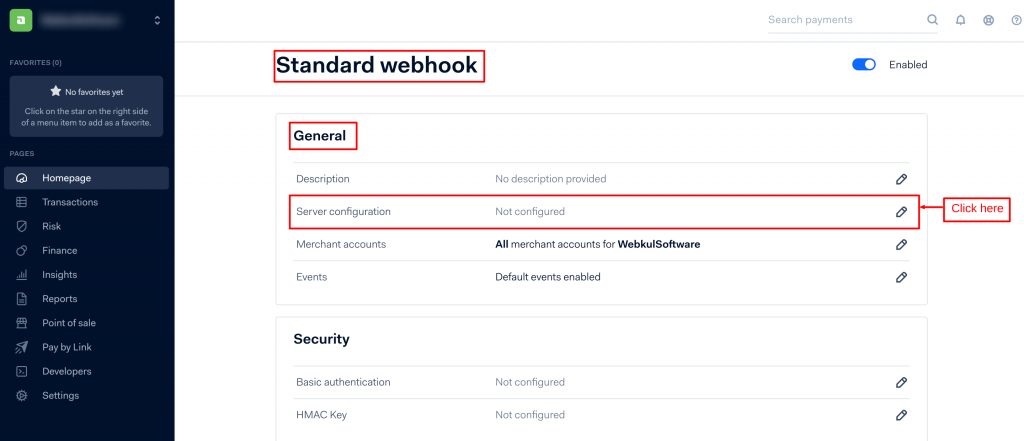
- After clicking on the edit symbol, you have to fill in the server configuration details.
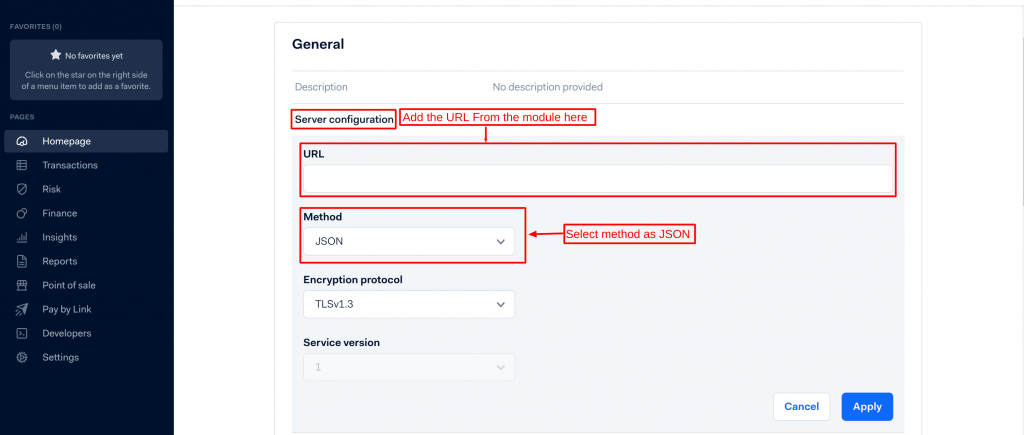
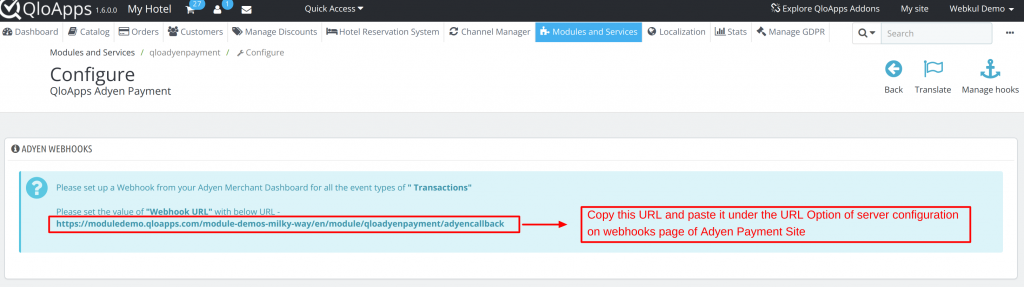
- Add the URL of the webhook given in the module in the URL option of Server configuration.
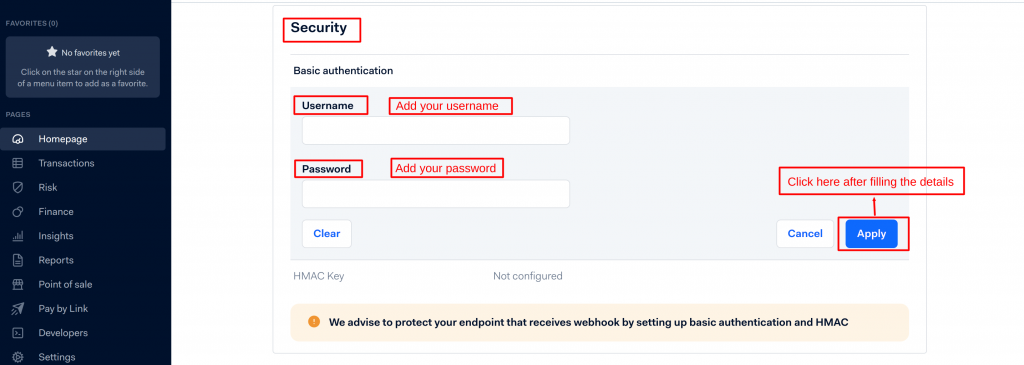
Next, configure the Basic Authentication details under the security section.
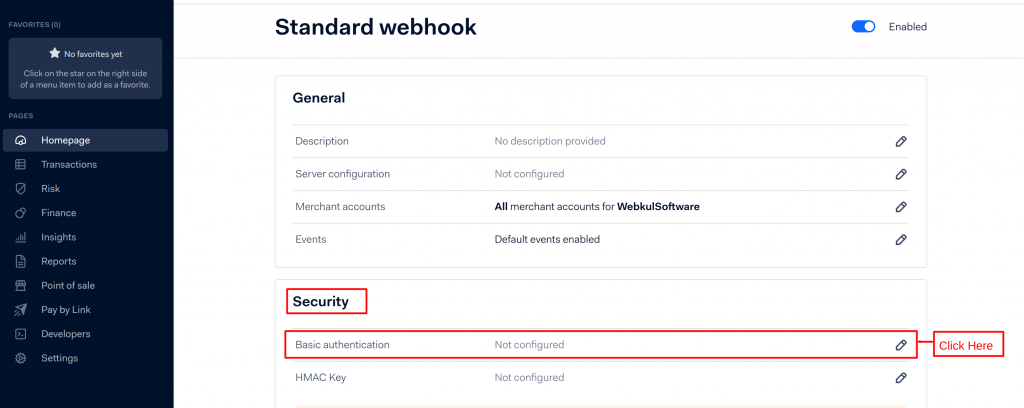
In the Basic Authentication option, fill in the username and password of your merchant account and click on Apply.
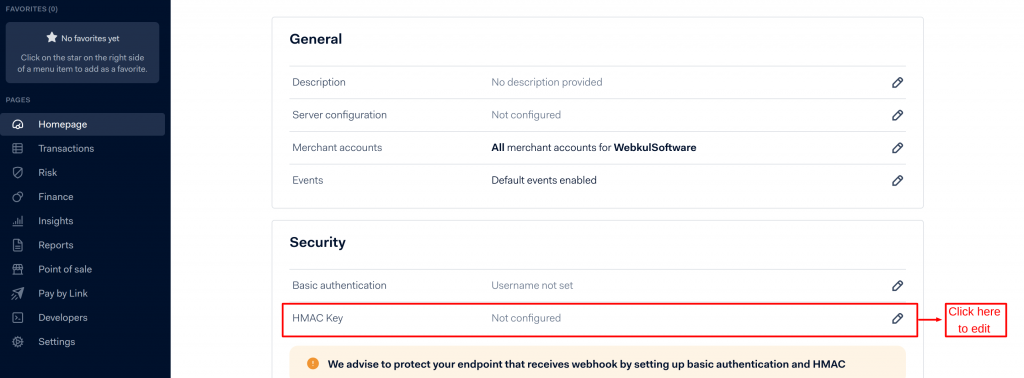
After configuring the Basic Authentication Details, next you have to configure the HMAC Key. To configure the HMAC key, first, click on the edit icon of the HMAC key configuration.
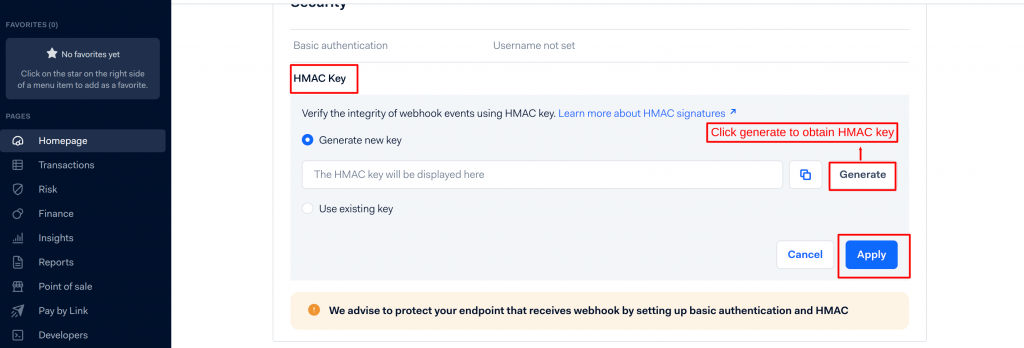
Once you click on generate, the HMAC key will be generated.
Workflow of QloApps Adyen Payment Gateway
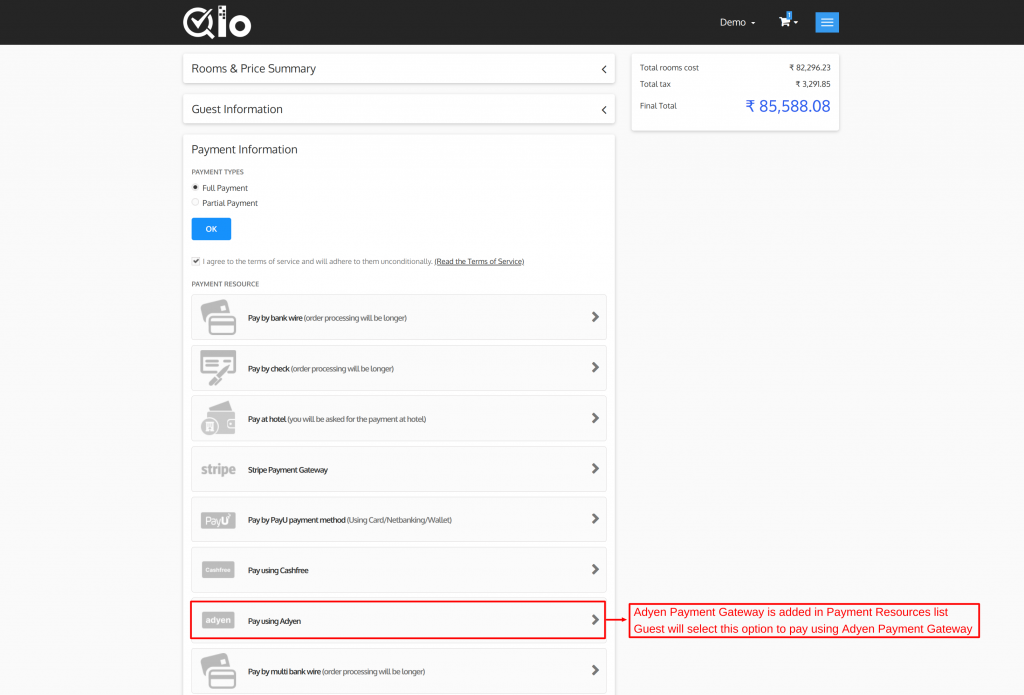
Once you have successfully completed the configuration of the Adyen Payment Gateway module, the Pay using Adyen option will get added to the Payment Resources section on the checkout page.
So when your guest proceeds with payment after adding rooms to the cart, he can use the Pay using Adyen option to place his order.
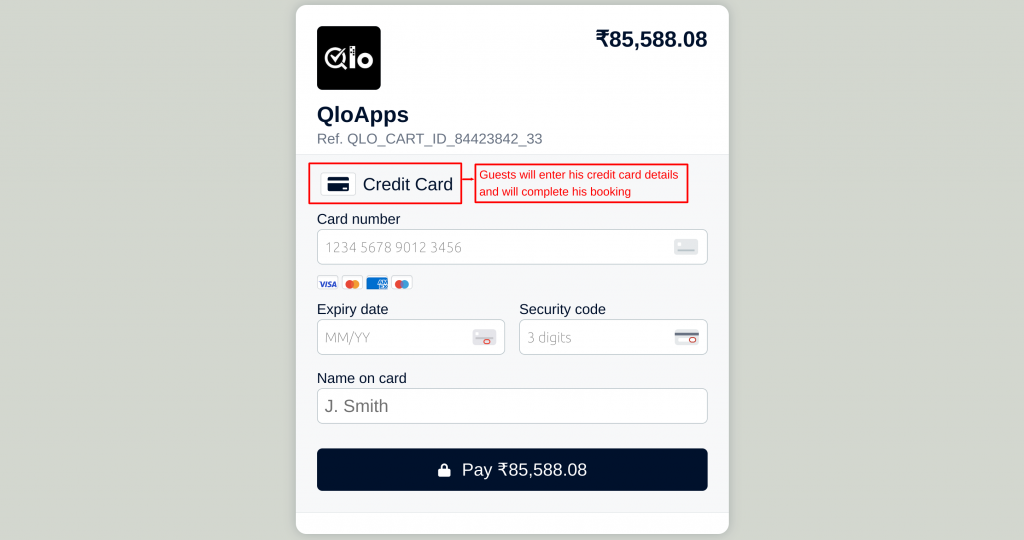
When the guest selects the Pay using Adyen option, he will be redirected to the Adyen Payment page where he will enter his credit card details to complete the booking.
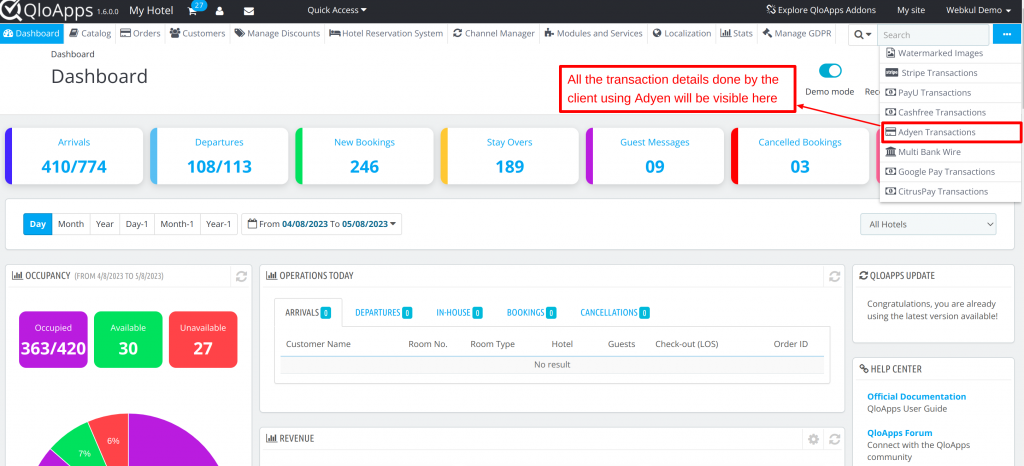
Back Office View
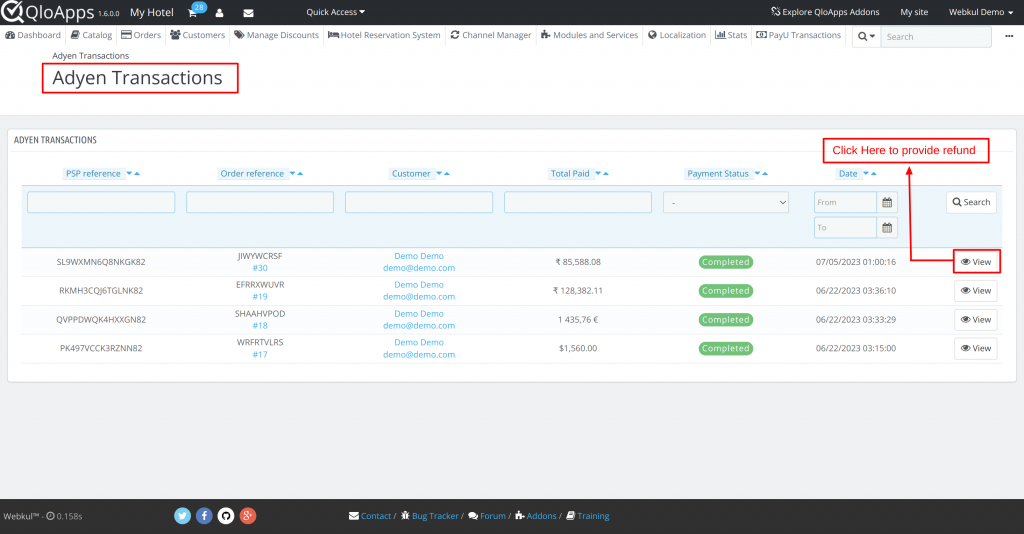
All the details of the transactions done by the guests using the Adyen Payment gateway can be viewed at the back office using the Adyen Transactions tab in the menu.
Once you open the Adyen Transactions Tab, a page with a list of all the transactions will be visible to the admin.
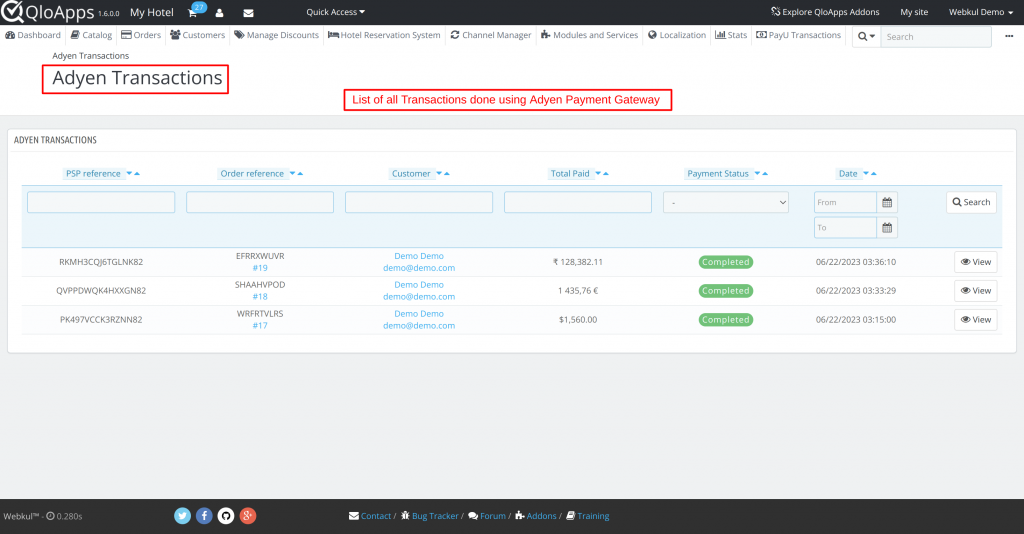
To view the details of each transaction the admin should click on the View option.
Refund Process
Admin can refund the amount of booking to the guest very conveniently for the transactions made using Adyen Payment Gateway.
To provide a refund for the booking:
- Go to the Adyen Transactions tab
- Next, click on View for the transaction for which you want to provide the refund.
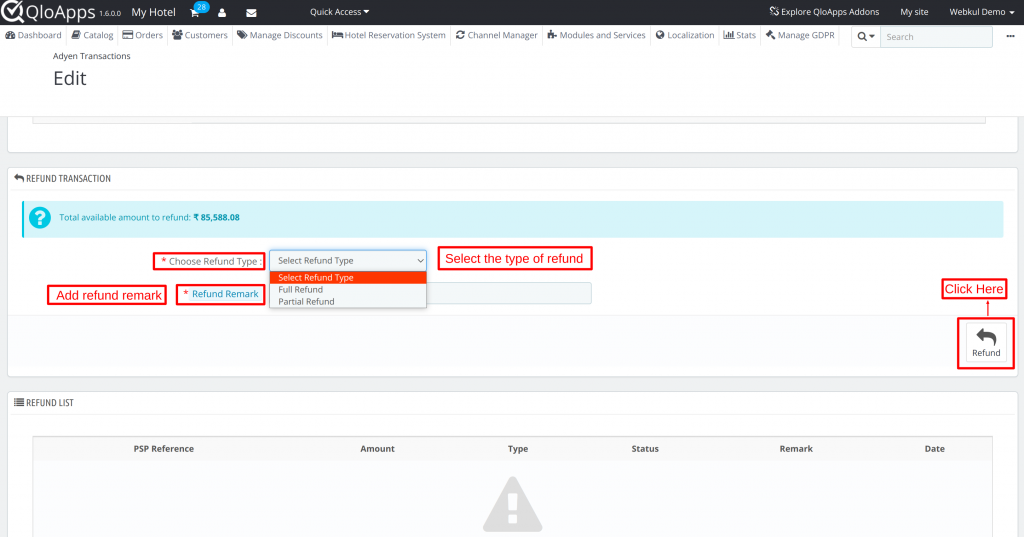
- Once you click on View, go to the Refund Transactions section.
- To transfer the refund to your guest, first, select the Refund Type. There are two refund types available:
- Full Refund
- Partial Refund
- Then add the Refund Remark and click on the Refund button and then within a few minutes, your refund will be processed.
- Once the refund is processed, the admin can see the details under the Refund List section.
Details of Transactions on Adyen Account
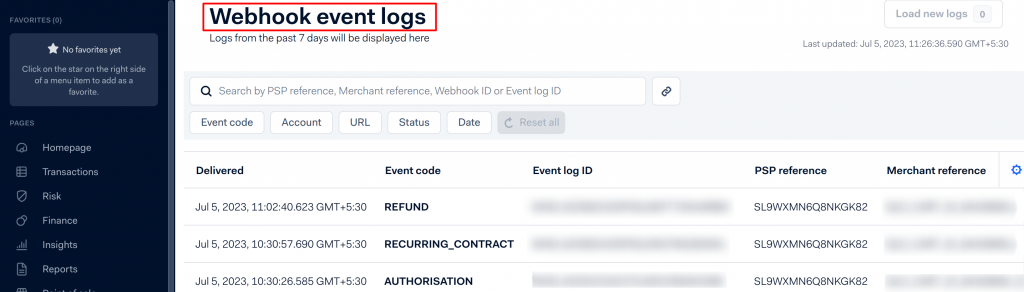
The admin can also view the details of all the payments from his Adyen Account. To view the transaction details:
- Go to Developers > Event logs
- On the Event log page, all the details of past transactions will be visible.
Conclusion
This is the end of the explanation of the setup and configuration process of Adyen Payment Gateway.
I hope this document will help you install and set up the QloApps Adyen Payment Gateway process with ease.
If you want to learn about the functionality of QloApps then you can visit this link: QLO Reservation System – Free Open-Source Hotel Booking & Reservation System.
In case of any query, issue, or requirement please feel free to raise it on QloApps Forum.
Current Product Version – 4.0.0
Supported Framework Version- QloApps 1.7.x

Be the first to comment.