The QloApps Front Desk System has been upgraded to version, bringing a more efficient and intuitive way for hotel front desk staff to manage check-ins, check-outs, and reservations.
With a brand-new interface and enhanced functionality, this update simplifies hotel operations while ensuring a smooth guest experience.
A Redesigned Front Desk Page
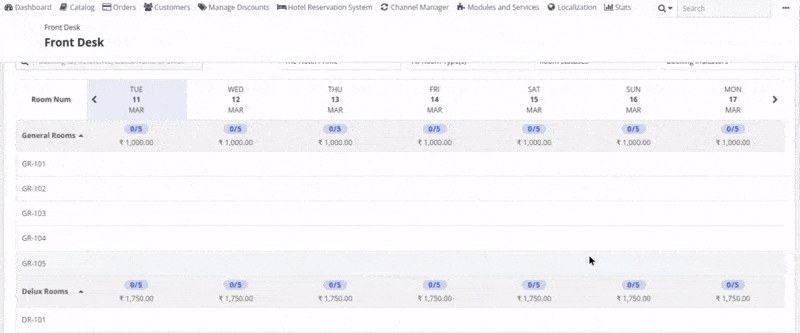
To improve usability and navigation, we have introduced a dedicated Front Desk page in QloApps.
The new design features:
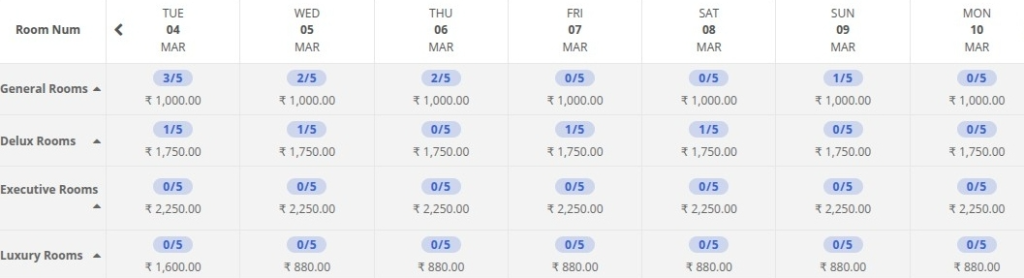
- Rows for rooms and columns for dates, creating a structured and clear display.
- An interactive calendar that allows easy tracking of bookings, rates, and inventory.
- A streamlined interface for quick access to essential booking details.
Enhanced Features in QloApps Front Desk
- Staff can see only permitted hotels on their dashboard
- A dedicated Front Desk Page with a structured interface
- Rooms displayed in rows, while dates/days appear in columns
- Option to switch between months without loading intermediate data
- Interactive mini-calendar for quick navigation
- Display room type rates and inventory in the front desk calendar
- Show real-time updates on availability and rate
- Create New Bookings directly from the Calendar
- Add a Booking Button for quick reservation creation
- Drag-and-drop functionality to create and modify bookings
- Change booking dates by dragging and dropping the reservation
- Reallocate or Swap Rooms from the Calendar itself
- Show all bookings on the calendar with relevant details
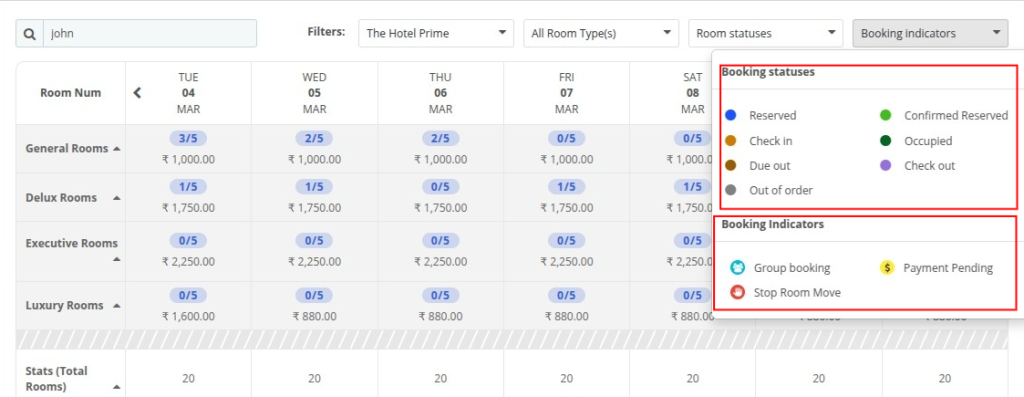
Comprehensive Booking Statuses
Here are the booking status definitions in simple terms:
- Reserved – The room is booked, but the reservation is not yet confirmed
- Confirmed Reserved – The room is booked, and the reservation is confirmed
- Check-in – The guest is arriving today
- Occupied – The guest has checked in and is currently staying in the room
- Due Out – Guests are checking out today
- Check-out – The guest has already left the room
- Out of Order – The room is temporarily unavailable for maintenance or other reasons
Booking Indicators
- Group Booking: Multiple rooms in the same booking for the same date range
- Payment Pending: Bookings with unpaid balances
- Stop Room Move: Indicates that the room was manually assigned
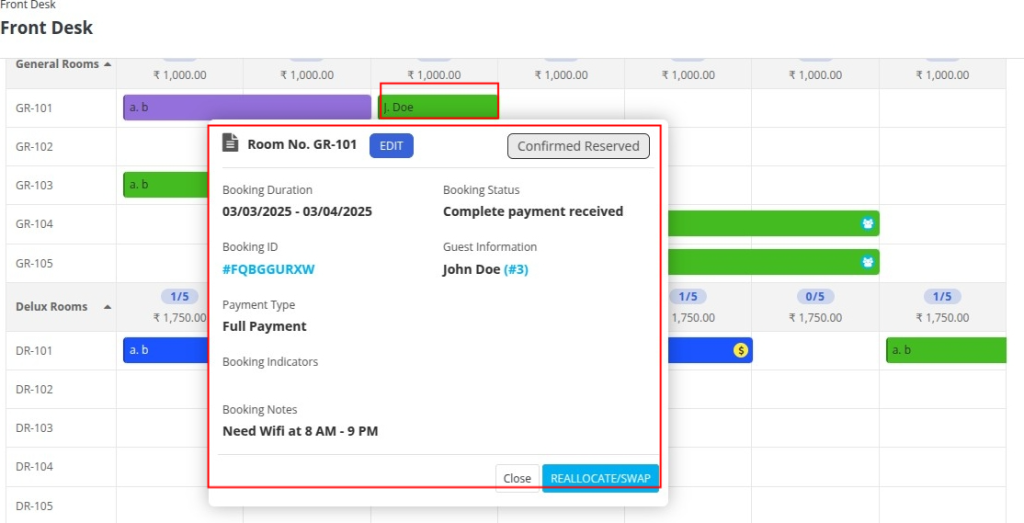
Detailed Booking Information
- Booking Tooltip displaying:
- Booking Duration
- Booking Status & Booking ID
- Payment Type
- Guest Information
- Booking Indicators
- Notes related to the reservation
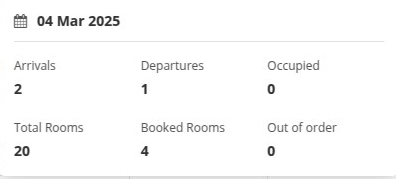
Daily & Global Statistics
- Calendar Date Section: Shows relevant daily info, including:
- Arrivals
- Departures
- Occupied Rooms
- Total Rooms
- Booked Rooms
- Out of Order Rooms
- Global Stats for Selected Date:
- Arrivals
- Departures
- Occupied Rooms
- Total Booked

- Date-Wise Stats:
- Total Rooms
- Available Rooms
- Booked Rooms
- Out of Order Rooms

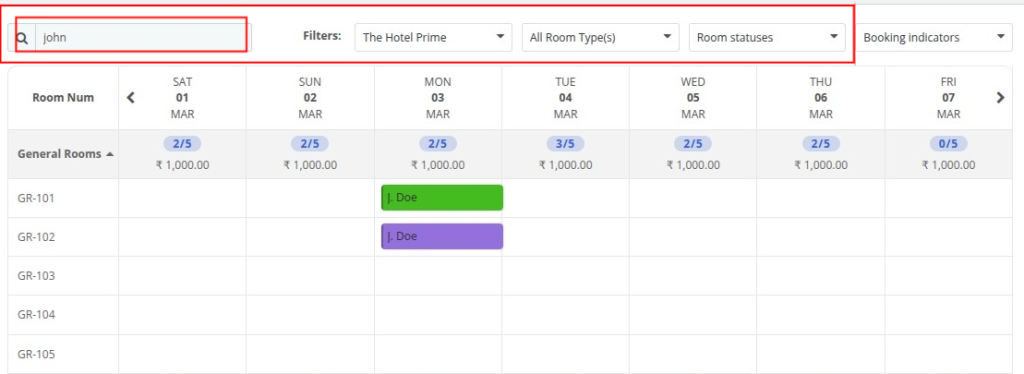
Advanced Booking Filters
- Filter by Room Statuses:
- Reserved – All rooms that have been booked, but the reservation is not yet confirmed, are visible
- Confirmed Reserved – All rooms with a confirmed reservation are visible
- Check-in – All rooms where guests will scheduled are visible
- Occupied – All rooms currently being used by guests who haven’t checked out yet are visible
- Due Out – All rooms that are expected to be vacated by guests today are visible
- Check-out – All rooms where guests have already checked out and left are visible
- Out of Order – All rooms temporarily unavailable or disabled rooms due to maintenance or other issues are visible
- Filter by Hotel and Room Type
- Filter by Booking and Customer Info:
- Booking ID
- Booking Reference
- Guest name and Guest Email
Installation of QloApps Front Desk System
The installation of any module is very simple in QloApps:
- Go to the Modules and Services tab
- Click on Add New Module
- Now upload the Zip file of the Module and click on Install
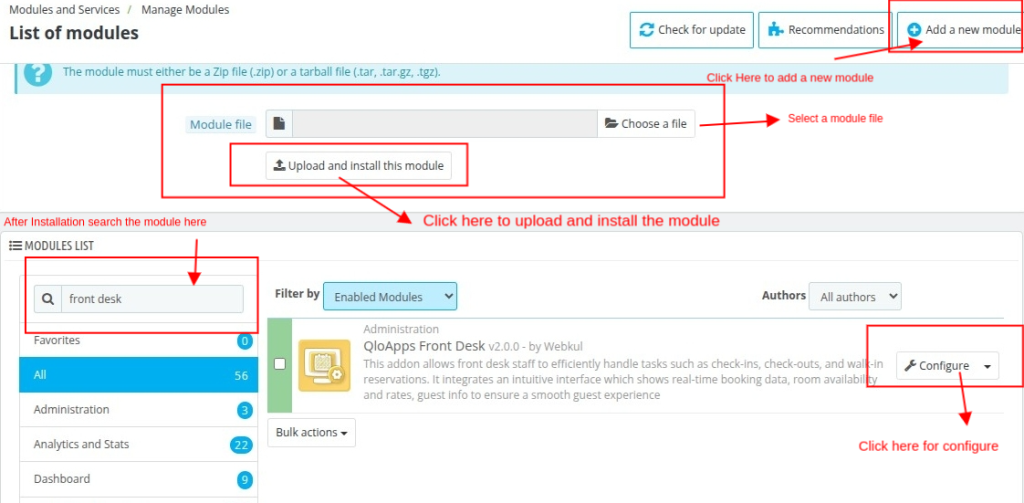
Now you have installed the module so let us check the module configuration
Configuration of QloApps Front Desk System
The configuration of the QloApps Front Desk System consists of two types:
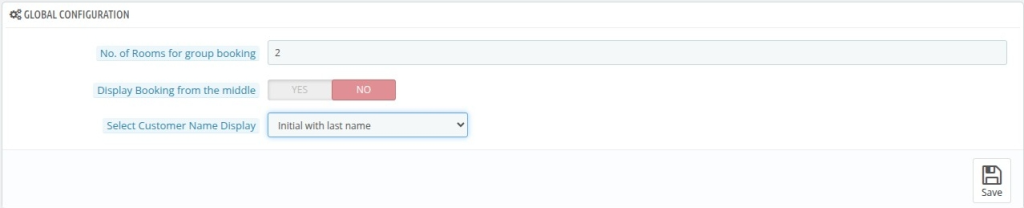
1. Global Configuration
The Global Configuration includes the following options:
- Number of Rooms for Group Booking: Specify the minimum number of rooms booked within the same date range required for a reservation to be considered a group booking.
- Display Booking from the Middle: If enabled, bookings will be displayed with a partial width on check-in and check-out days for better visual representation.
- Customer Name Display Format: Choose how the customer’s name appears in the booking details. Available options include:
- Initial with Last Name (e.g., J. Smith)
- Full Name (e.g., John Smith)
- First Name Only (e.g., John)
- No Name Displayed
2. Booking Status Configuration
The Booking Status Configuration allows administrators to customize the booking statuses displayed in the Front Desk calendar.
By default, statuses such as Reserved, Confirmed Reserved, Check-in, Occupied, Due Out, Check-out, and Out of Order are included, each with a predefined color for easy identification.
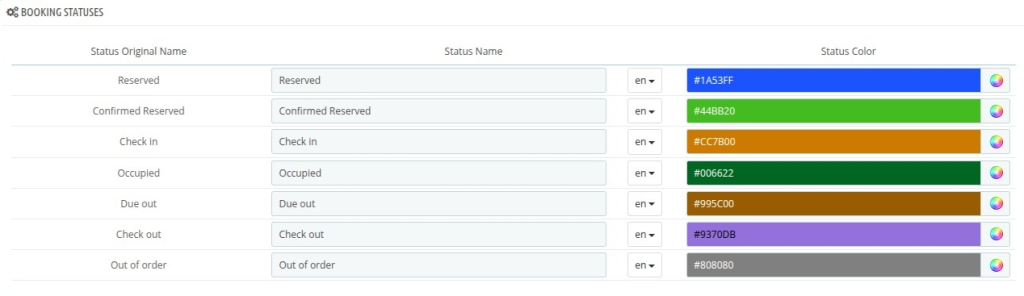
Admins have the flexibility to set custom status names and colours in the configuration settings.
This allows hotels to personalise the booking workflow according to their internal operations.
The selected status colours will be reflected in the Front Desk Calendar, clearly representing room occupancy and booking progress.
Working of QloApps Front Desk System
To access the QloApps Front Desk System 2.0.2 you will find all the details on the Dashboard of your QloApps backend interface
The system has the following usabilities:
- Real time Rate and Inventory Update
- Booking Managment
- Comprehensive Booking Display
- Change the Booking Dates
- Reallocate or Swap Rooms
So let us check each feature one by one:
Real time Rate and Inventory Update
The front desk calendar now displays real-time room rates and inventory, ensuring up-to-date information
Booking Management
- Add Bookings from the Calendar: Admins can directly create reservations from the front desk calendar
- New ‘Add Booking’ Button: Quickly initiate a booking with a dedicated button
- Drag-and-Drop Functionality:
- Create bookings by dragging them across the calendar
- Modify booking dates effortlessly using drag-and-drop
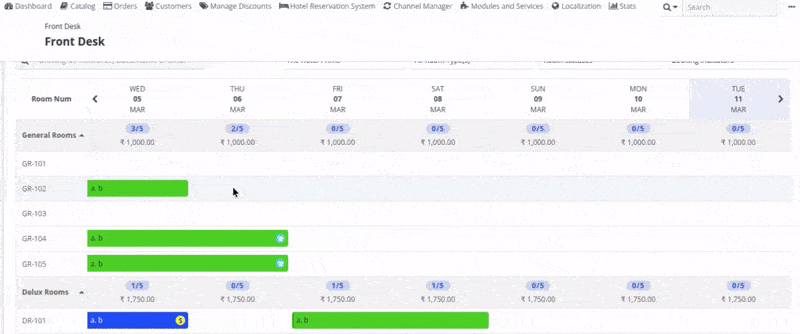
Comprehensive Booking Display
- All bookings are displayed on the front desk calendar with guest details, statuses, and indicators
- Booking statuses are visually represented to enhance clarity
- Admin can see the booking for 7 days/14 days
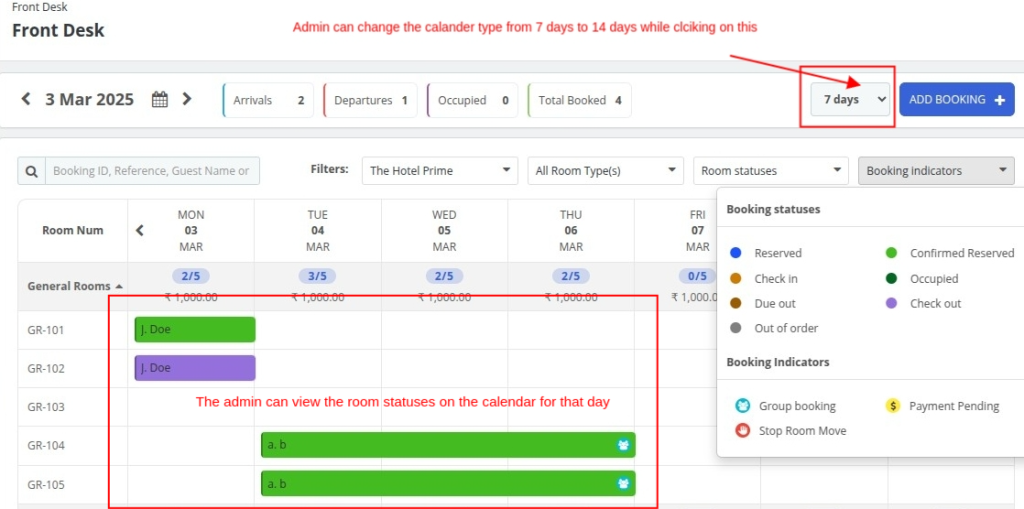
Detailed Booking Statuses for Quick Identification
To improve tracking and management, bookings will be categorised under the following statuses:
- Reserved – Rooms booked but Booking Status is not confirmed
- Confirmed Reserved – Rooms booked with a valid (confirmed) Booking Status
- Check-in – Rooms scheduled for guest arrival today
- Occupied – Checked-in rooms that haven’t been checked out yet by guests
- Due out – Rooms scheduled for check-out today
- Check-out – Rooms that guests have left
- Out of Order – Temporarily unavailable rooms or disabled rooms
Booking Indicators for Additional Information
- Group Booking: Identifies multiple rooms booked under the same booking
- Payment Pending: Highlights bookings with unpaid balances
- Stop Room Move: Stops any changes to the room that was manually assigned
Booking Information Tooltip
Hover over any booking in the calendar to view detailed information, including:
- Duration
- Booking Status & Booking ID
- Payment Type
- Guest Information
- Booking Indicators
- Reservation Notes
Date Section with Key Insights
The calendar date section now displays relevant daily information, including:
- Arrivals, Departures, Occupied Rooms, Total Booked Rooms
- Future dates reflect expected operations
Advanced Booking Filters for Better Control
Users can now filter bookings in the calendar based on:
- Booking Status: Reserved, Confirmed Reserved, Check-in, Occupied, Due Out, Check-out, Out of Order
- Hotel and Room Type: Filter by hotel or specific room categories
- Booking and Guest Details: Search using Booking ID, Booking Reference, or Guest Name
Global & Date-Wise Statistics
- Global Stats for Selected Date: Displays key statistics at the top of the calendar for the selected start date
- Date-Wise Stats: Provides an overview of Total Rooms, Available Rooms, Booked Rooms, and Out of Order Rooms
Change the Booking Dates
The addon provides an easy-to-use drag-and-drop feature to extend a booking, decrease its length, or change the booking date altogether.
To Extend or Decrease the length of stay just select the Room Number view go to the corner of the booking bar and increase or decrease its length.
Also, just go to the Room Number view and hover over a booking bar and you will have the option to “Edit”
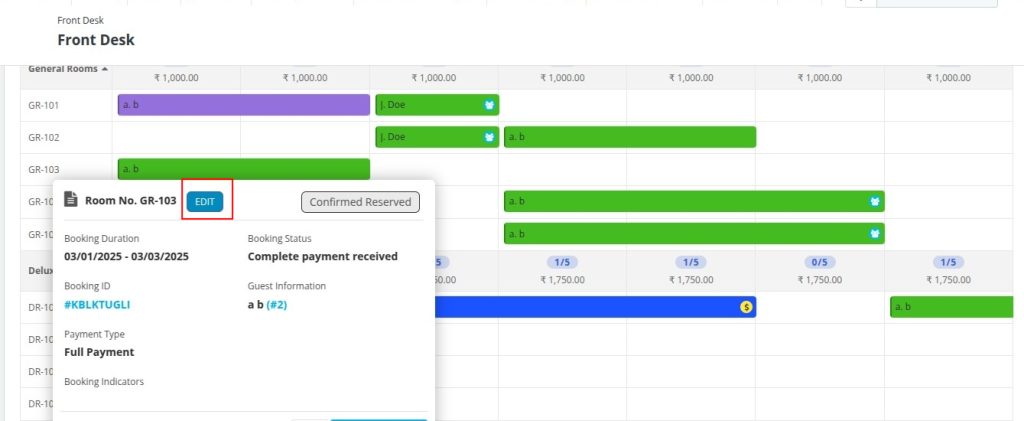
While Clicking on edit Admin can also update the check-in & check-out/prices/occupancy/ services/ facilities.
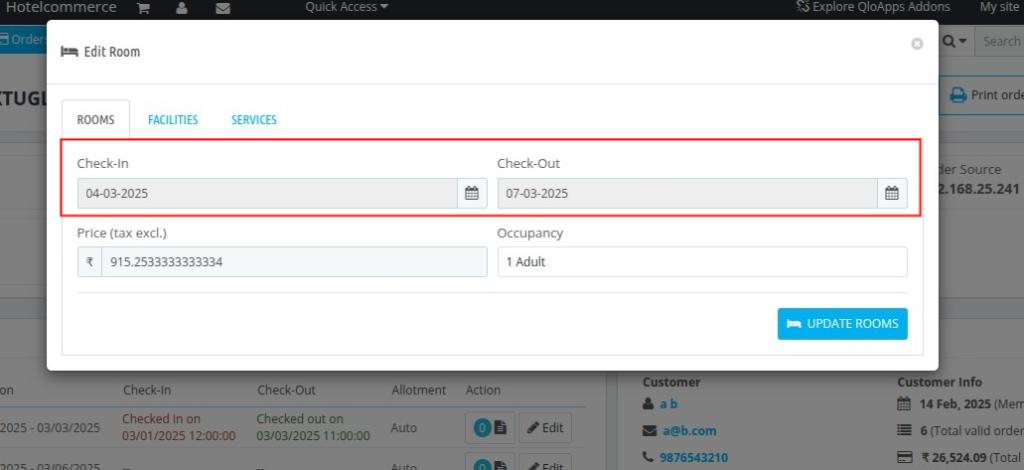
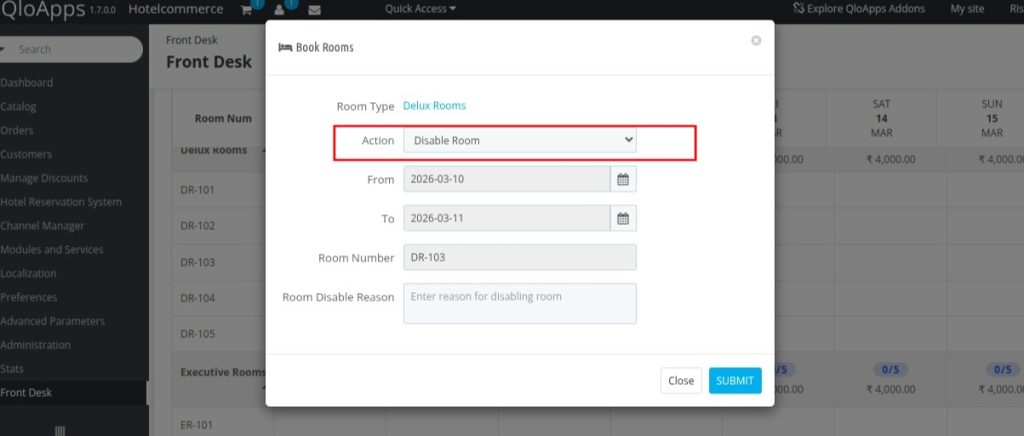
Admin can also disable a particular Room under the Action option.
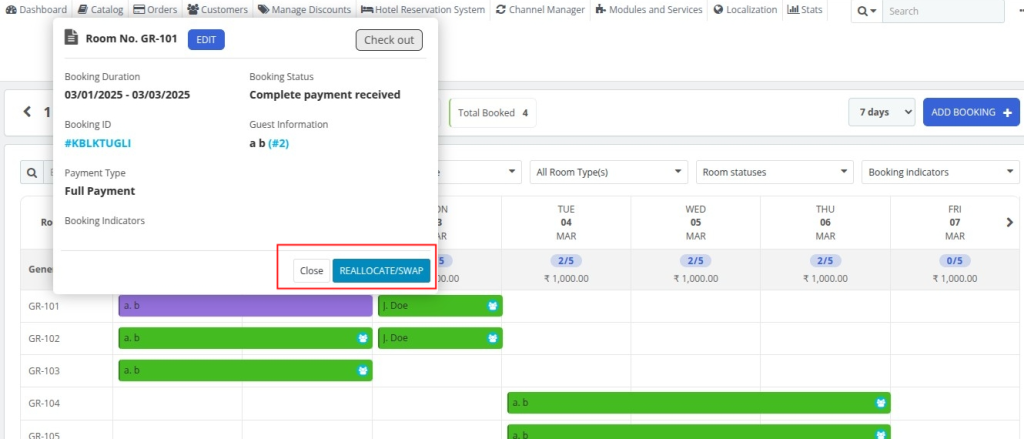
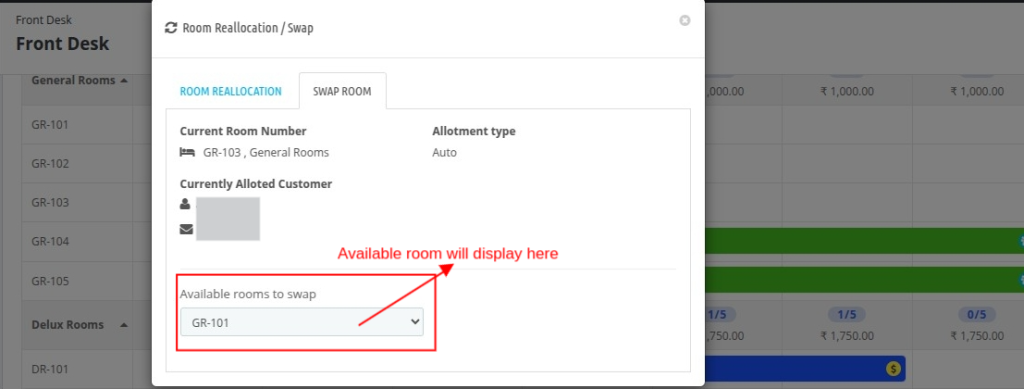
Reallocate or Swap Rooms
Just go to the Room Number view and hover over a booking bar and you will have the option to Reallocate or Swap
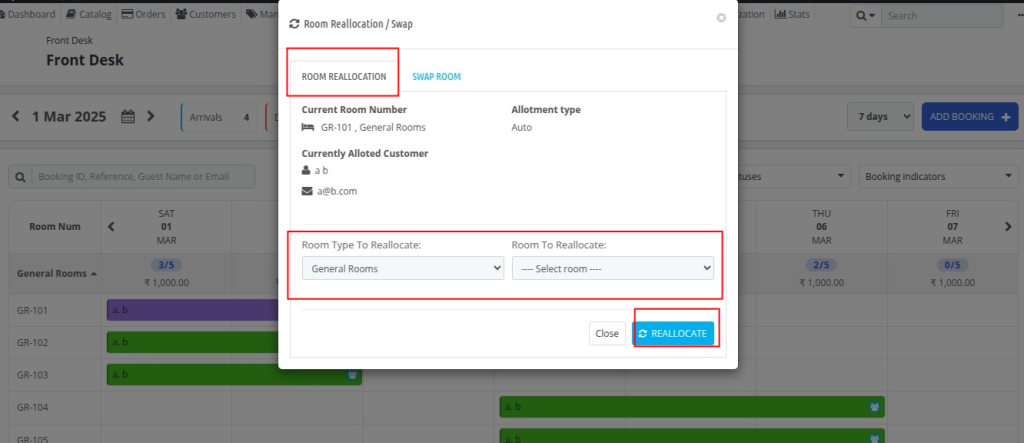
If Admin wants to Reallocate the room
Now Select the room type and number to reallocate then click on reallocate
If Admin wants to swap the room then click on swap room
It will show the available room
Conclusion
The QloApps Front Desk V_2.0.2 upgrade introduces a more refined, feature-rich, and user-friendly experience.
With a redesigned layout, advanced booking functionalities, real-time updates, and comprehensive filtering options, managing hotel front desk operations has never been this seamless.
Stay ahead in hotel management with QloApps Front Desk 2.0.2 that provide an enhanced experience for your guests and staff alike.
Upgrade now and transform your hotel’s front desk operations!
If you want to learn about the functionality of QloApps then you can visit this link: QLO Reservation System – Free Open-Source Hotel Booking & Reservation System
In case of any query, issue, or requirement please feel free to raise it on QloApps Forum
Current Product Version – 2.0.2 & 4.0.1
Supported Framework Version- QloApps 1.6.x and QloApps 1.7.x

Be the first to comment.