The wait is over! QloApps now brings you the much-anticipated Hourly Booking Module, designed for the guests seeking short-term stays with unmatched flexibility.
Whether it’s a few hours for business meetings or a brief layover, this module empowers hotels to meet diverse guest needs while maximizing occupancy and revenue.
With this QloApps module, hoteliers can manage both overnight and hourly reservations from the same platform.
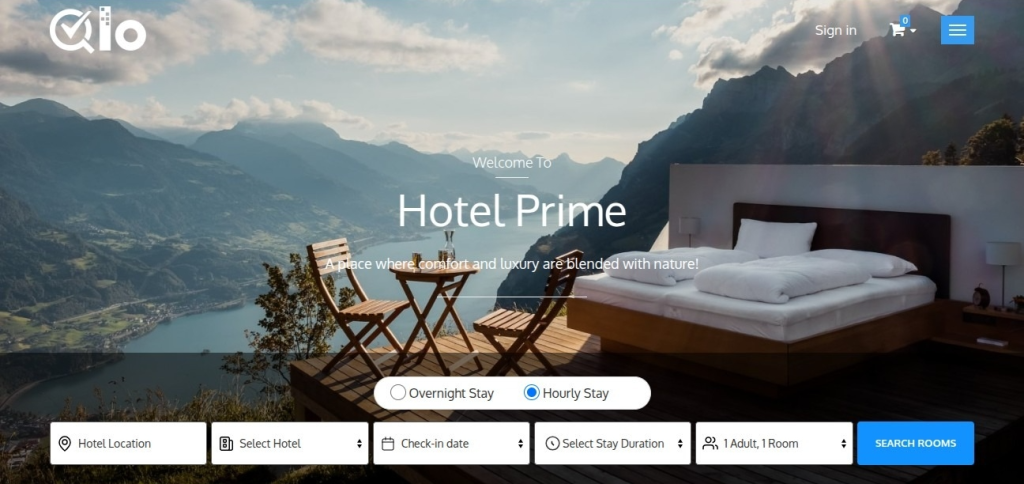
The module increases revenue potential by maximizing room usage and offering an additional booking option for guests with varied needs.
Features of QloApps Hourly Booking Module:
- Flexible Booking Window: The admin can define the start and end time for hourly bookings,so offering complete control over booking schedules.
- Set Minimum Booking Hours: The admin can specify the minimum number of hours required for a booking.
- Customizable Time Format Display: Easily switch between 12-hour and 24-hour clock formats for the front-end display to match your preferences.
- Multiple Hourly Booking Types: Choose from three booking types – Time Period (based on specific start and end times), Fixed Duration (preset hourly slots), or Fixed Slot (custom time slots with defined start and end times).
- Hotel-Specific Hourly Booking: Enable hourly bookings for individual hotels, set specific booking windows, and minimum booking offset times, and assign hourly rates.
- Room-Type Specific Hourly Booking: Apply hourly booking options to specific room types, with the ability to set pricing either as a percentage of the daily rate or as a fixed price for selected durations.
- Service Products Hourly booking: Hotels can now create hourly bookings for service products and can manage them efficiently leading to improved guest satisfaction.
- Advance Price Rule for Hourly Booking: Admin can create advance price rules for specified hourly duration and for specific room types.
- Flexible Admin Hourly Booking: Admin can create custom hourly bookings for offline guests via the back office, with room-type-specific pricing.
Admin can set prices for back-office bookings that will be only visible to him. - Combined Hourly and Nightly Booking Front-End: Guests can seamlessly switch between hourly and nightly booking options directly from the home booking page for added convenience
How to Install QloApps Hourly Booking
Installing the QloApps Hourly Booking addon is a straightforward process. Follow these steps:-
1. Log in to the back office of QloApps
2. Go to the Modules and Services tab
3. Click on Add a new module
4. Upload the ZIP file of the module
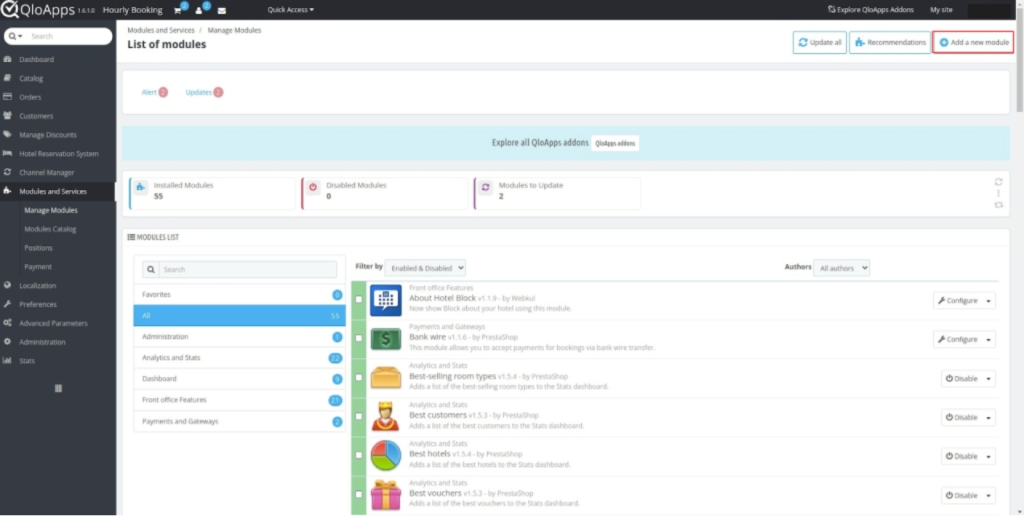
5. Click on the “Choose File “ to select the zip file and the “Upload and install this module” option
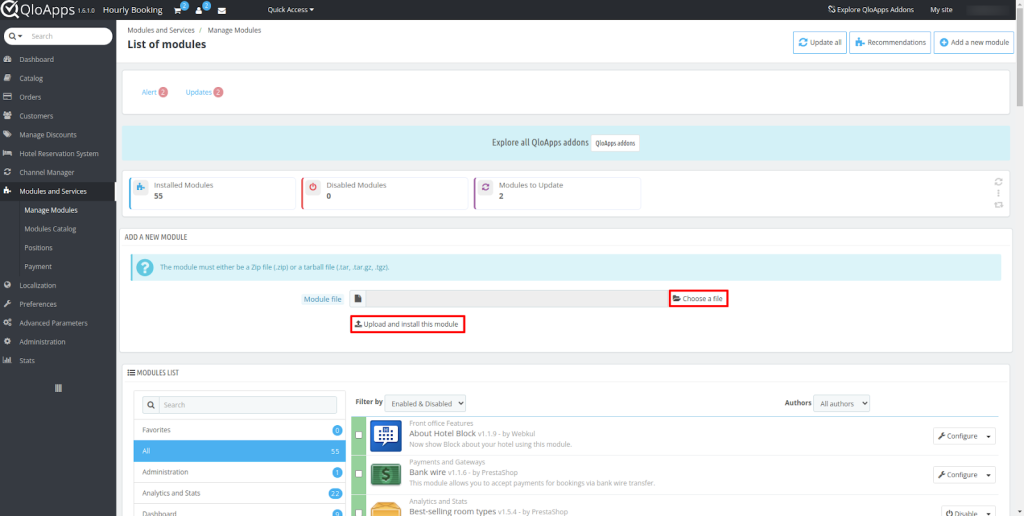
After uploading the ZIP file the module will start installing automatically.
Once the module is installed, the user can see the prompt for successful installation and the module will be listed below.
Note:- Before installing the QloApps Hourly Booking Module, you must make a few changes in the core files for the proper functioning of the module.
You just have to follow simple steps and replace the mentioned codes for the proper functioning of the module.
You Have to Add Hook to the following Path in the given function
Add Hook:
Hook::exec('actionDatesDifferenceModifier', array('date_from'=> $dateFrom, 'date_to'=> $dateTo, 'days_difference'=>&$daysDifference));
Path:
QloApps/modules/hotelreservationsystem/classes/HotelHelper.php
In the function getNumberofDays() after line 2497:
Kindly refer to the screenshot:

Now,
Add Hook:
Hook::exec('actionValidateCartBookingsErrors', array('errors' => &$errors));
Path:
QloApps/modules/hotelreservationsystem/classes/HotelCartBookingData.php
Find the function validateCartBookings() and then add the following hook after line 1081:
Kindly refer to the screenshot:

Add Hook:
Hook::exec('actionSearchPanelVariablesModifier', array('smartyVars' => &$smartyVars));
Path:
QloApps/modules/wkroomsearchblock/classes/WkRoomSearchHelper.php
Find the function assignSearchPanelVariables() and then add the following hook after line 265
Kindly refer to the screenshot:

Now,
Path:
QloApps/modules/hotelreservationsystem/classes/HotelBookingDemands.php
Find the function getRoomTypeBookingExtraDemands() and then replace with the following code from line 105-112

 if ($dateFrom && $dateTo) {
      $result = Hook::exec('actionRoomTypeBookingDemandsDatesModifierBefore', array('date_from' => &$dateFrom, 'date_to' => &$dateTo), null, true);
      $dateFrom = date('Y-m-d', strtotime($dateFrom));
      $dateTo = date('Y-m-d', strtotime($dateTo));
      Hook::exec('actionRoomTypeBookingDemandsDatesModifierAfter', array('date_from' => &$dateFrom, 'date_to' => &$dateTo, 'result' => $result));
      $sql .= ' AND hb.`date_from`=''.pSQL($dateFrom).'' AND hb.`date_to`= ''.pSQL($dateTo).''';
  }
Now, locate
Path:
QloApps/modules/hotelreservationsystem/classes/RoomTypeServiceProductCartDetail.php
Find the function addServiceProductInCart(); and then add the following from line 56
$isServiceAvailable = Hook::exec('actionCheckServiceAvailability', array(
      'idProduct' => $idProduct,
      'quantity' => $quantity,
      'idCart' => $idCart,
      'idHtlCartData' => $idHtlCartData
  ));

  if (!$isServiceAvailable) {
      return false;
  }
Kindly Refer to the screenshot:

Now,
Add Hook:
Hook::exec('actionAutoAddServices', array('services' => &$services, 'dateFrom' => $dateFrom, 'dateTo' => $dateTo));
Path:
QloApps/modules/hotelreservationsystem/classes/RoomTypeServiceProduct.php
Find the function getAutoAddServices() and then add the following code after line 147:
Kindly refer to the screenshot:

Now, Locate
Path:
QloApps/modules/blockcart/ajax-cart.js
Add the following code at line 940:
content += '<a class="remove_rooms_from_cart_link" href="#" rm_price=' + date_diff_v.amount + ' id_product=' + productId + ' date_from="' + date_diff_v.data_form + '" date_to="' + date_diff_v.data_to + '" num_rooms=' + date_diff_v.num_rm + ' title="' + remove_rm_title + '"></a>';
Add the following code at line 980:
booking_dates_content += '<a class="remove_rooms_from_cart_link" href="#" rm_price=' + date_diff_v1.amount + ' id_product=' + productId + ' date_from="' + date_diff_v1.data_form + '" date_to="' + date_diff_v1.data_to + '" num_rooms=' + date_diff_v1.num_rm + ' title="' + remove_rm_title + '"></a>';
Configuring QloApps Hourly Booking Module
Once you have installed the QloApps Hourly Booking Module, you can easily configure its settings by following these steps:
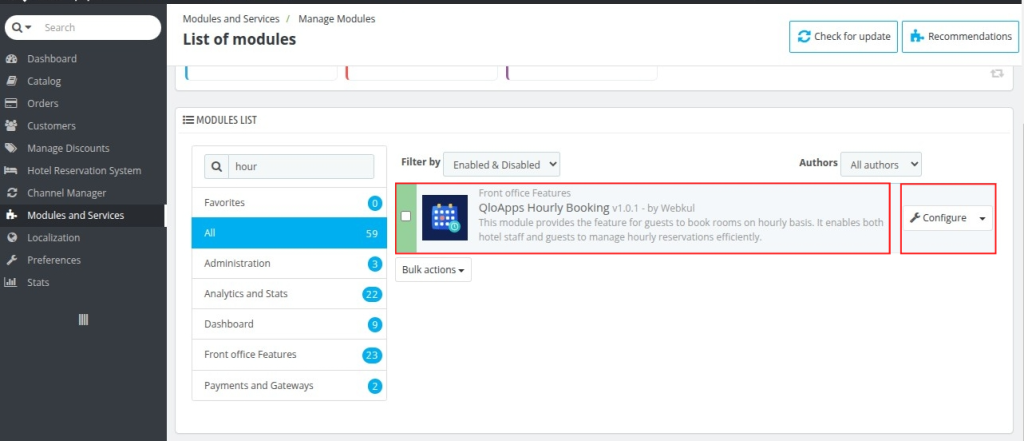
- Navigate to the “Modules & Services” tab.
- Select “Manage Module”.
- Search for “Hourly Booking”.
- Click on “Configure” to customize the module settings.
Hourly Booking Configuration Options
Booking Start Time: Set the time when bookings for rooms become available.
Booking End Time: The time when a guest’s booking ends, marking the checkout or departure time of guests.
Minimum Booking Hours: Specify the minimum duration for bookings in hours.
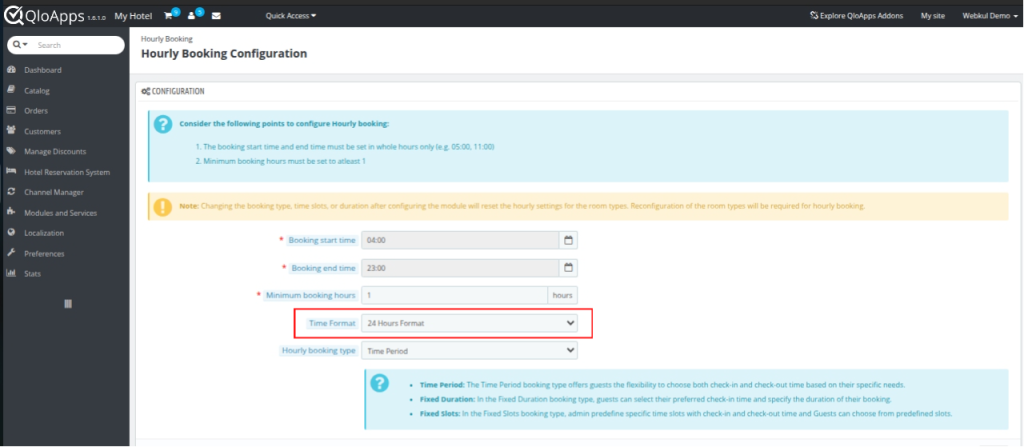
Time Format: Choose the time format (12-hour or 24-hour) to be displayed on the front end.
Hourly Booking Types: Select from different types of hourly bookings based on your hotel’s needs:
- Time Period: This type allows guests to select both their check-in and check-out times according to their specific needs. Ideal for guests seeking flexible booking times without being limited to predefined durations.
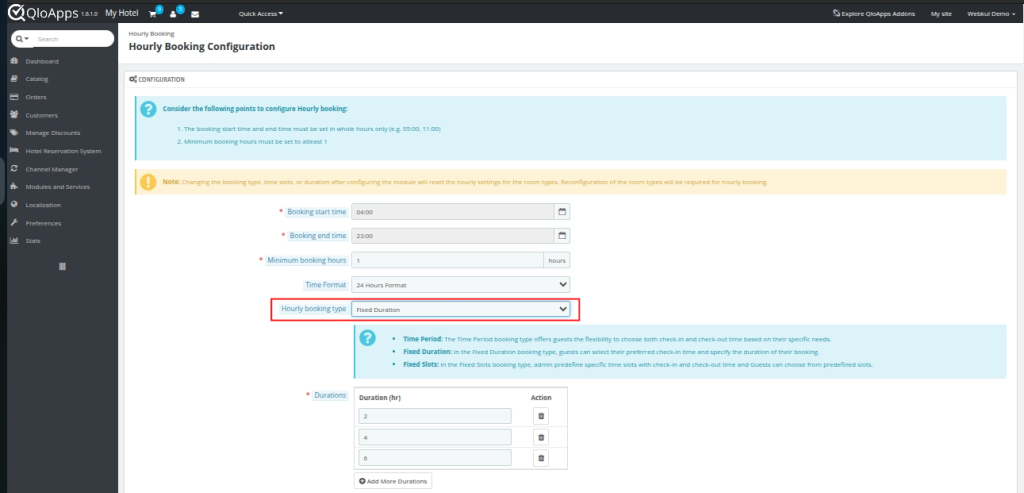
- Fixed Duration: Guests can choose their check-in time and set the duration of their booking. Suitable for those who know their start time and require flexibility in determining how long they will stay.
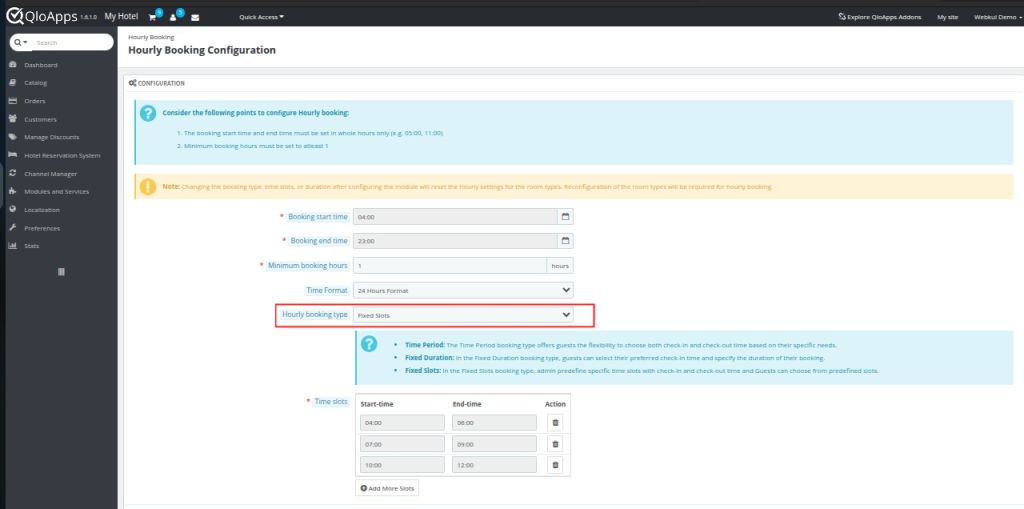
- Fixed Slots: The admin defines specific check-in and check-out times in predefined time slots. Guests can choose from these fixed options, providing a more structured booking experience.
With these configurations, you can easily manage and customize your hotel’s hourly bookings to suit different guest requirements.
Note for Configuring Hourly Booking Process:
- The booking start time and booking end time can only be set in complete hours.
- You cannot specify times in minutes (e.g., the booking time can be set to 05:00 but not 05:30 or 05:45).
- The minimum booking hours must be equal to 1 or greater. Please consider these points while configuring your Hourly Booking process to ensure a smooth booking experience for your guests.
Hotel-Specific Hourly Booking
You need to enable the hourly booking feature for each hotel in QloApps.
This feature allows you to customize hourly booking settings for individual hotels.
It give the flexibility to apply different rules for each property.
To enable hourly booking for a hotel:
- Go to the Hotel Reservation tab.
- Select Manage Hotel.
- Click the Edit button for the specific hotel.

Hotel-Specific Hourly Booking Configuration
On the Edit Hotel page, there’s a dedicated tab for Hourly Booking.
Using this you can enable the feature, set minimum booking offsets, adjust the booking window, and define date ranges for hourly bookings

Enable Hourly Booking: Select “Yes” to enable hourly bookings for the hotel. Choose “No” to disable it.
Hourly Booking Offset: If the Hourly booking offset is set to 2 hours, and the current time is 10:00 AM, the earliest time a guest can book a room for that day is 12:00 PM.
Or if the Hourly Booking Offset is set to 0, bookings can start from the next hour.
For example, if the current time is 2:01 PM, the earliest booking can start at 3:00 PM.
For example, if you set it to 2 hours, guests must book at least 2 hours in advance.
Booking Window: Example – If the Booking window is set to 5 days, and today is March 7th, guests can book a room up to 11th of March.
This ensures that bookings cannot be made for dates beyond the set limit. Or you can set 0 to disable this feature.
NOTE: The booking window cannot be shorter than the hotel’s minimum booking offset in days. Please adjust your settings accordingly.
Allow Date Range: Select “Yes” to enable bookings within a specific date range. Choose “No” to disable this option.
- Date From: Set the start date of the booking period.
- Date To: Set the end date of the booking period.
This detailed setup allows you to have precise control over how hourly bookings are managed for each hotel. Even you can add more date ranges.
Configuring Hourly Booking for Room Types
You can also configure hourly bookings for individual room types.
Just like for the hotel. If hourly booking is enabled for the hotel, each room type must also be enabled; otherwise, it will function as a standard night booking.
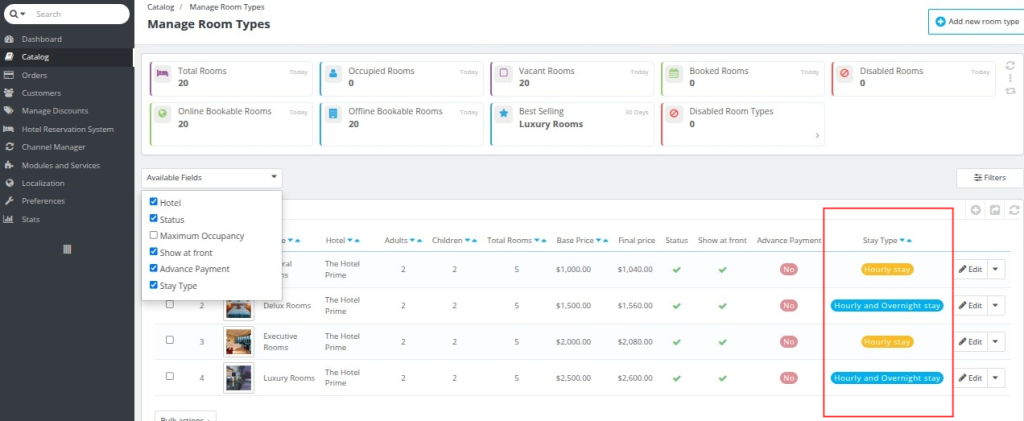
To enable hourly booking for a room type, go to the Catalog tab and select Manage Room Types. Click on the Edit button for the desired room type.

Navigate to the dedicated Hourly Booking tab on the Edit Room Type page.
Configuration for Room Type Hourly Booking
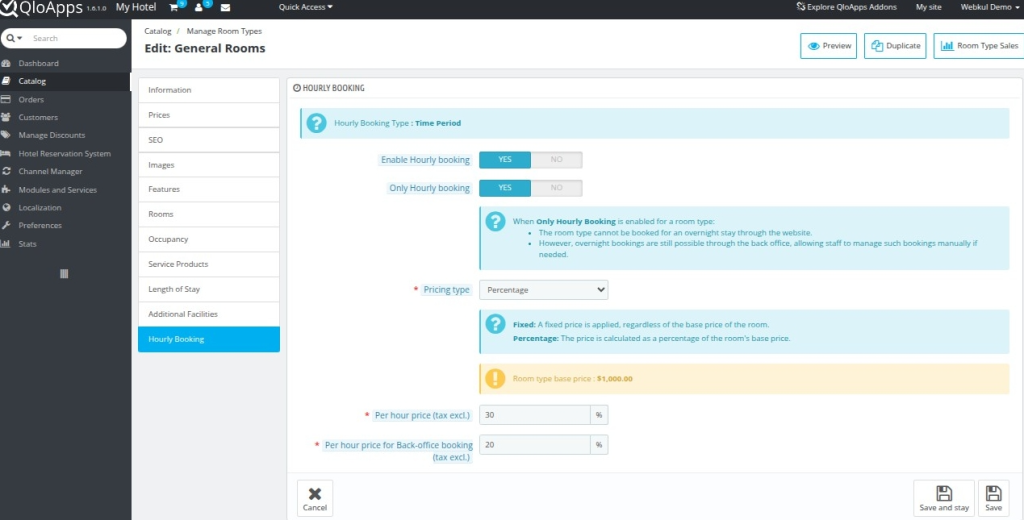
Time Period:
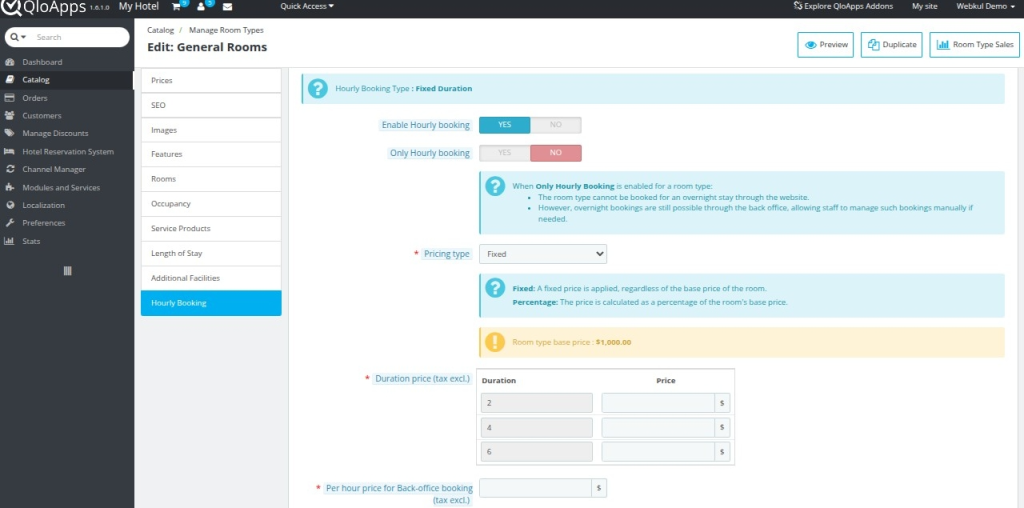
Fixed Duration:
Fixed Slot:
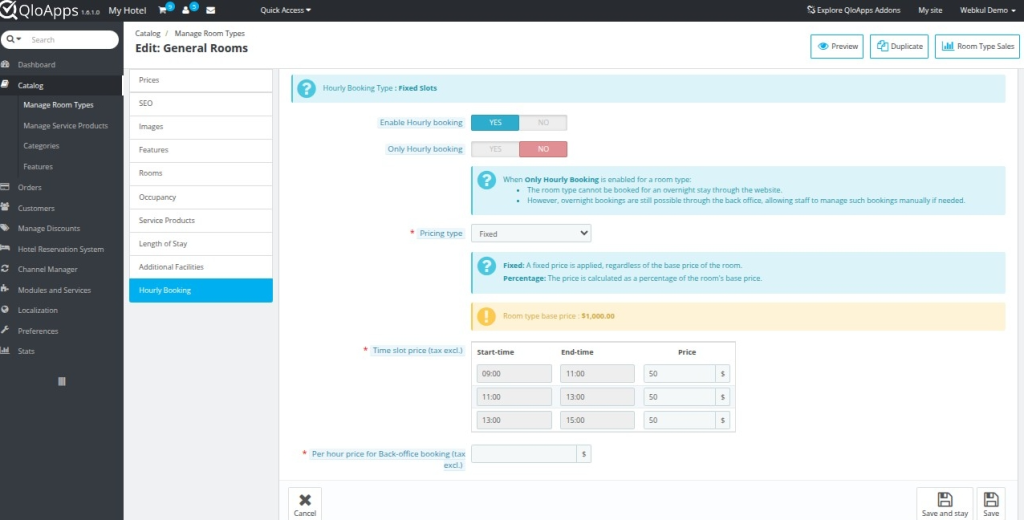
Enable Hourly Booking: Select Yes to allow hourly bookings for the room type, or No to disable it.
Only Hourly Booking: Choose Yes to restrict bookings only to hourly rates; select No to allow traditional overnight bookings as well.
Pricing type: Select between Fixed Price and and Percentage Price.
- Fixed Price: Enter a fixed rate for each hour booked, applied on an hourly basis.
- Percentage Price: Enter a percentage that will be calculated based on the total amount for day-wise bookings.
Time slot price: Now you can create time slots for your hotel at which people can make bookings
- You can select the start and end of time of the slots
- You can set different pricing for different time slots
Per Hour Price for Back office: You can set special prices for guests booking a room. Only the admin in the back office can see these prices.
Managing Service Products with Hourly Booking
For managing service product with hourly booking, you have to navigate:
Catalog > Manage Service Products
Now You Can Configure the Service Products for hourly booking but while clicking on the Edit button shown in the screenshot.
Enable for Hourly Booking: Enable to set the hourly prices of service products.
Price: You can enter the percentage rate of price for the service products.
Note:- Please consider the following points before setting up the Service’s for Hourly booking:
- For services product with hourly booked rooms,”per night price” is automatically treated as “per hour price” by default.
- By default, service products are not available for hourly booking. To make a service product available for hourly booking, you need to enable the “Hourly Booking” option for the specific service.
- To set the hourly price for a service product, enter the percentage rate. The price will be calculated based on the base price of the service product.
I. Add Price for Each Day of Booking: The total price is calculated based on the total number of hours in the booking duration.
II. Add Price Once for the Booking Range: The total price is calculated for the entire booking duration, regardless of the number of hours.
Setting Up Advanced Price Rule with Hourly Booking
With the new version upgrade now you can set advance price rules for any hourly booking for your hotel.To set up the price rules you have to navigate:
Hotel Reservation System > General Settings > Click > Advance Price Rule
After clicking on this you can “Edit” or “Add New” Advanced Price rule.
Advanced Price Rule Name: Set name for your advance price rule
Room Type: Select the type of room for which you want to apply the advance pricing rules
Date Selection type: You can either select “Date Ranges” or any “Specific Date”.
DateFrom: Starting Date for the price rule.
DateTo: Date till you want the advance price rules to be applied.
Restrict to Week Days: Whether you want to restrict advance price rule bookings for any specific days in a week
ImpactWay: It is of three types
- Decrease price: If you want to decrease the price.
- Increase price: If you want to increase the price.
- Fixed price: If you want the price to be fixed.
ImpactType: It is of two types either “Percentage” or in “Amount”
ImpactValue(tax excl): Choose impact value for the advance pricing
Apply Advance price rule for Hourly booking: Whether to enable or disable the advance pricing rule for Hourly bookings.
Duration & Price: You can make slots of different duration and their prices.
Impact Value on front-office hourly price(tax excl.): This will impact the amount value at the front-office
Per hour price for Back-office booking (tax excl.): This will impact the amount value at the back office.
Impact Value on back-office hourly price(tax excl.): This will be only visible to the admin and this will lead in impact of advance price rules values at the back office.
Group access: Types of customer groups for whom so you want to apply the price rule.
Front-End Flow for Hourly Booking
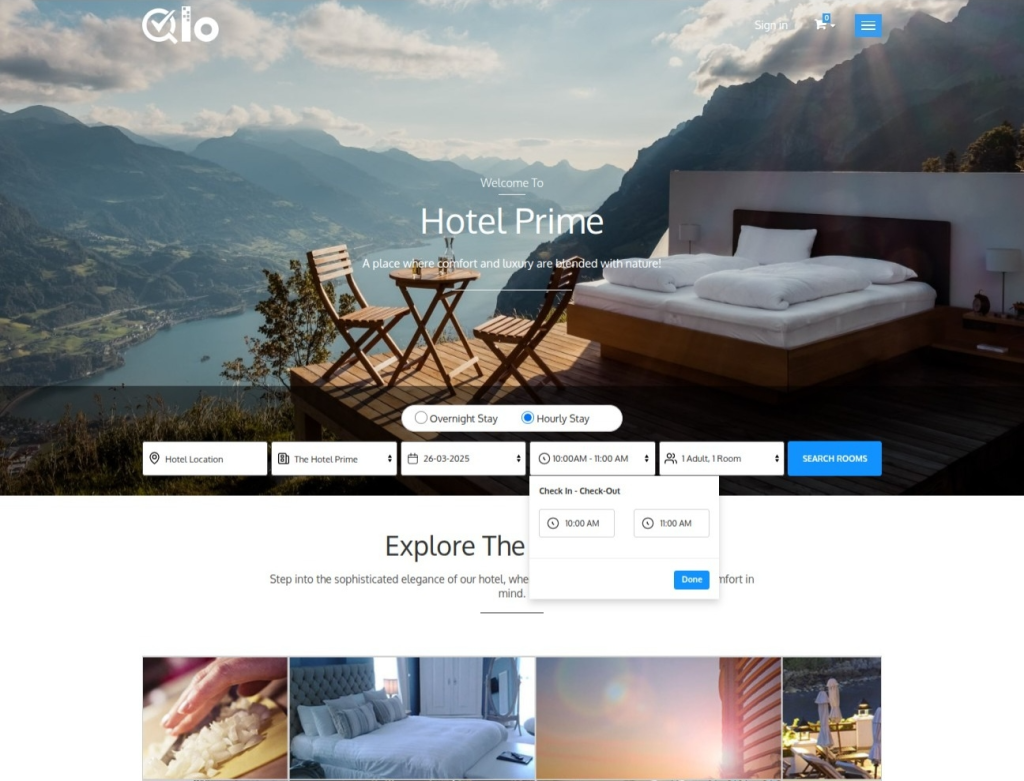
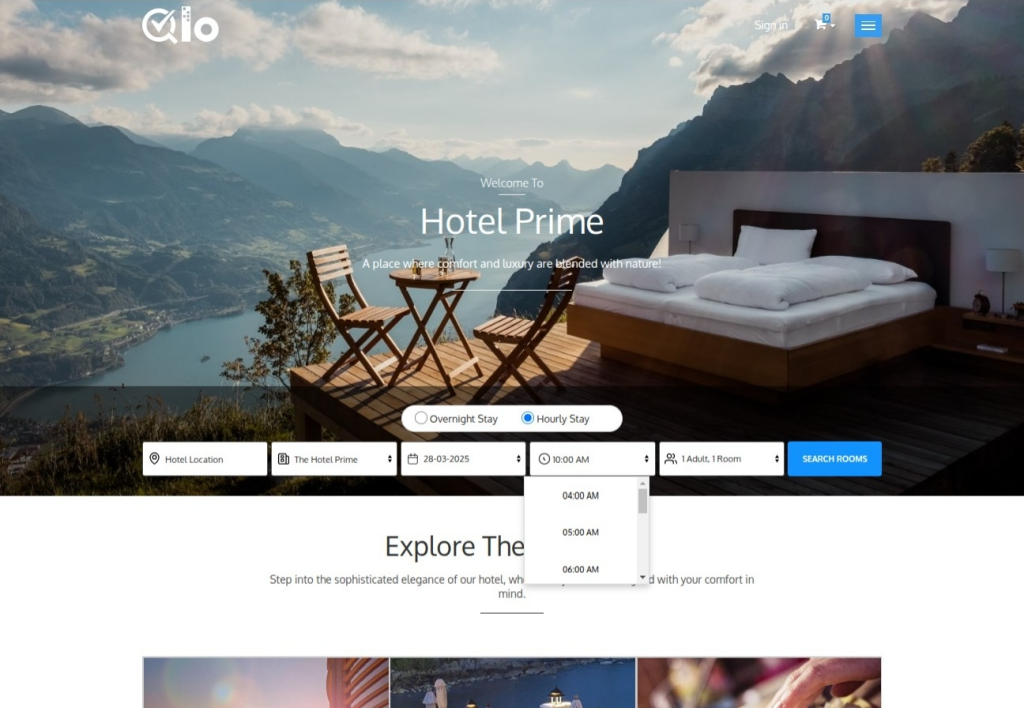
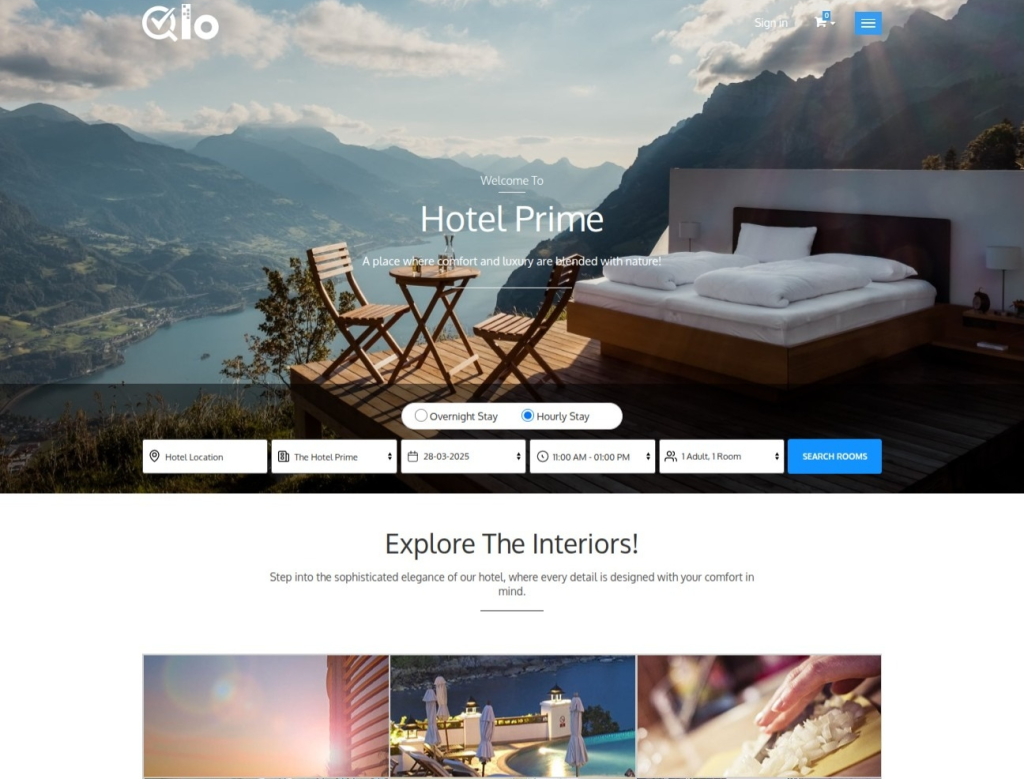
Booking Home Page: A toggle option will be available to the switch from regular booking to the Hourly Booking.
Select Hotel & Check-in Date: Choose the desired hotel and set the Check-in date.
Specify the stay duration. Once done you can hit the search rooms for the results
Time Period:
Once all the back-office configurations are complete,so the front-end flow for hourly booking with the “Time Period” option will work as follows:
Fixed Duration
Fixed Slots:
Category Room Type Page
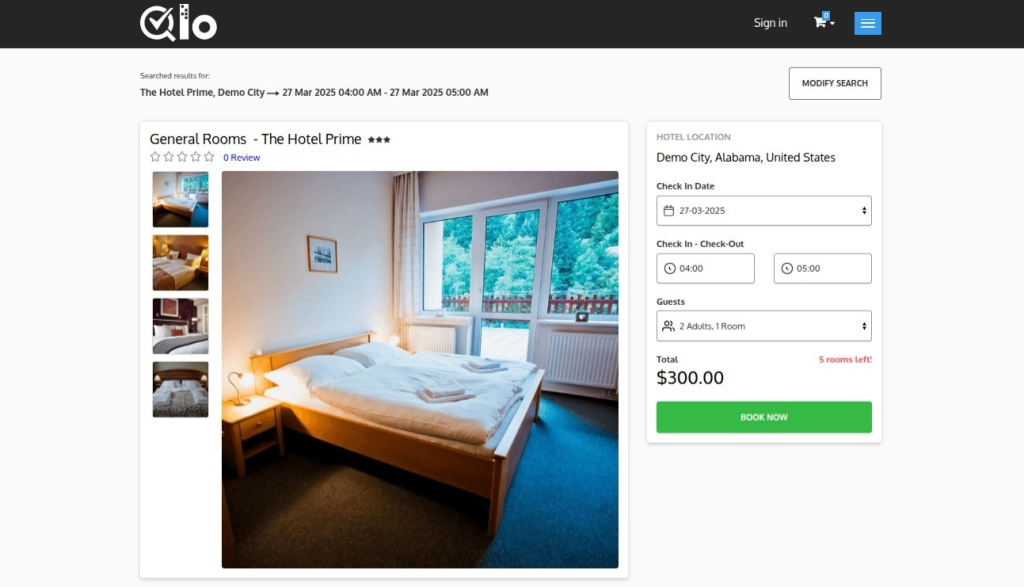
Time Period:
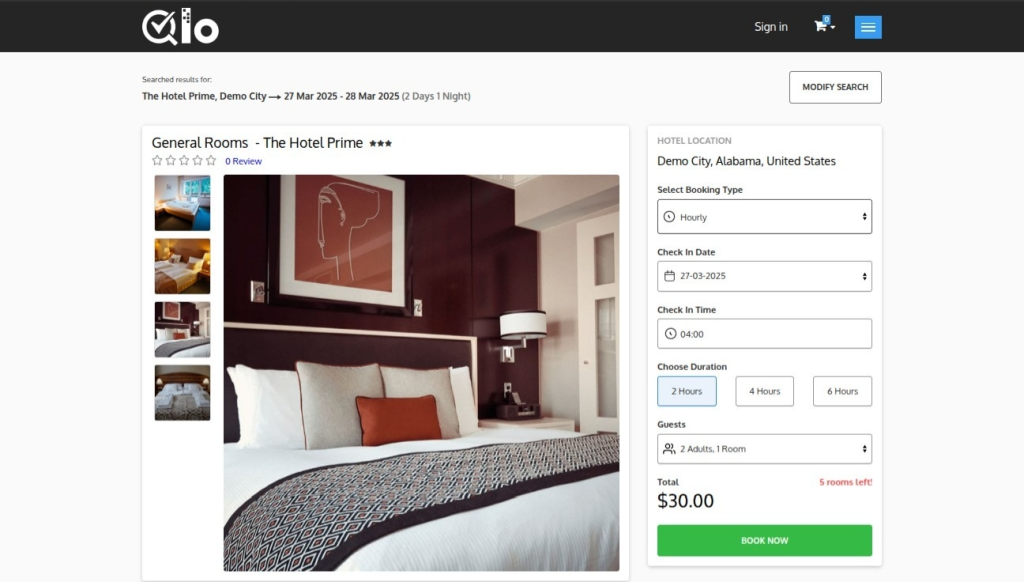
Fixed Duration:
Fixed Slots:
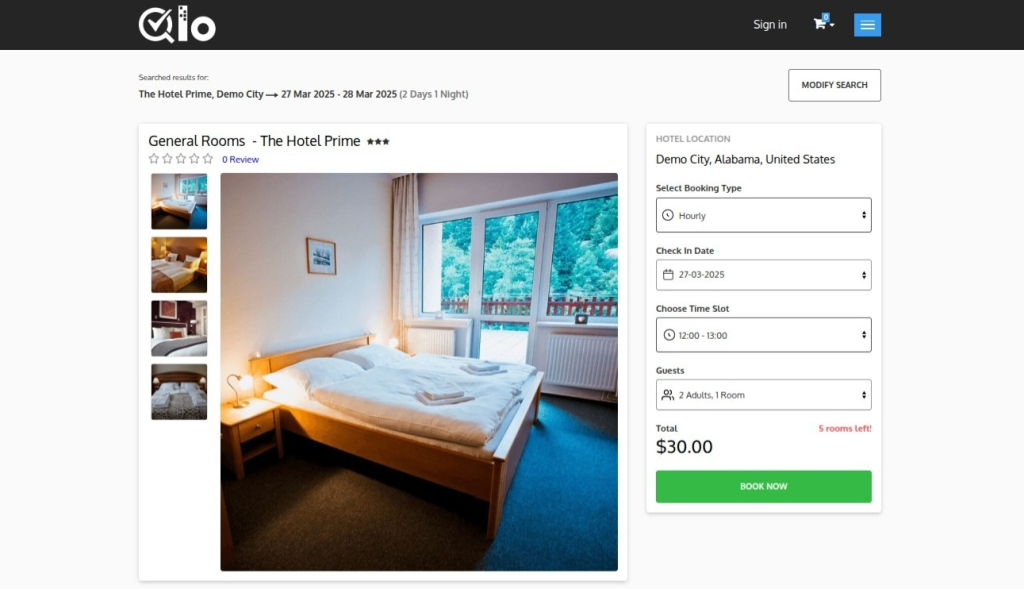
Room Type Page
Time Period:
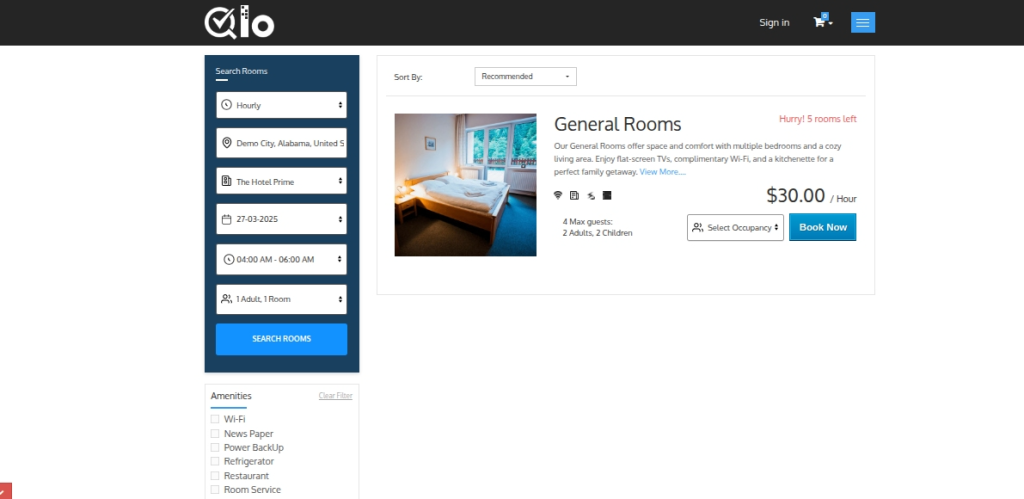
After selecting the Time period,so the room types available for hourly booking will be displayed.
Fixed Duration:
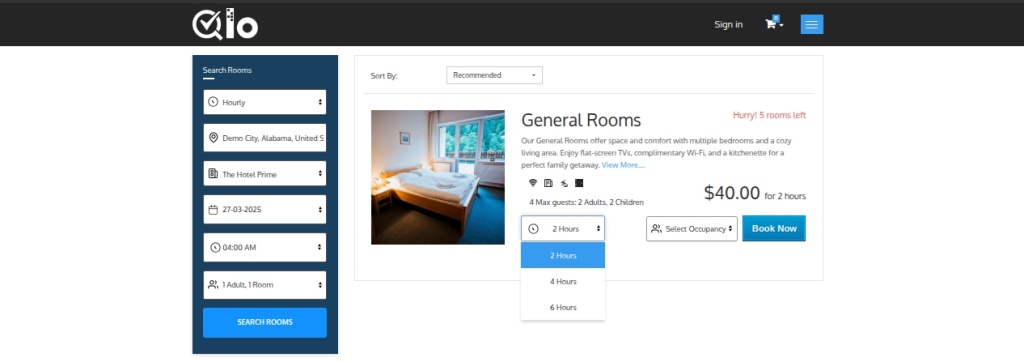
After selecting the Fixed Duration,so the room types available for hourly booking will be displayed.
Fixed Slots:

After selecting the Fixed Slots, the room types available for hourly booking will be displayed.
Flexible Hourly Booking Creation from the Back Office
Note:- When an admin creates a booking from the back office, so they have the flexibility to create hourly bookings regardless of the Hourly Booking Type selected for the hotel. To do this:
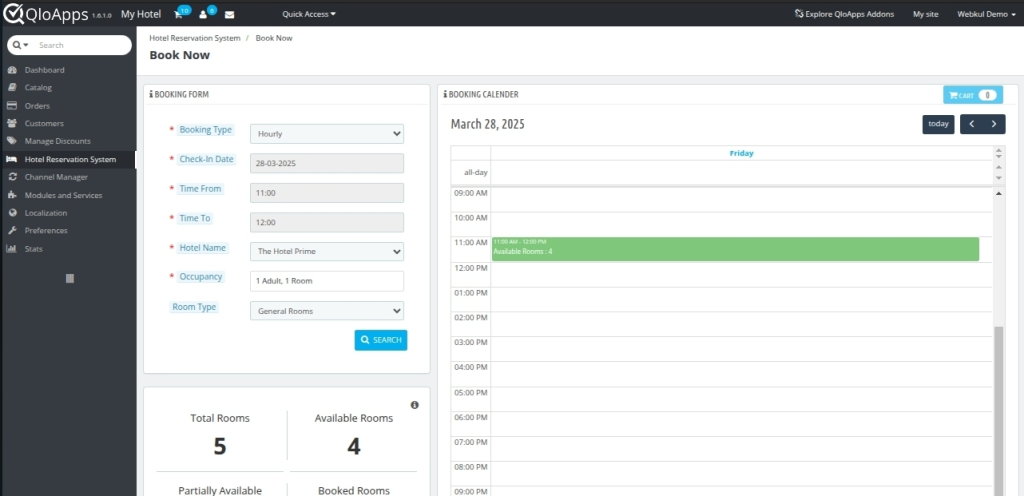
- Go to the Hotel Reservation tab.
- Click on Book Now.
- Select Hourly in the Booking Type.
- Add the check-in date and create any hourly slot using the Time From and Time To fields.
This feature provides greater control and customization for handling special cases directly from the back office.
Order Edit Page for Hourly Booking
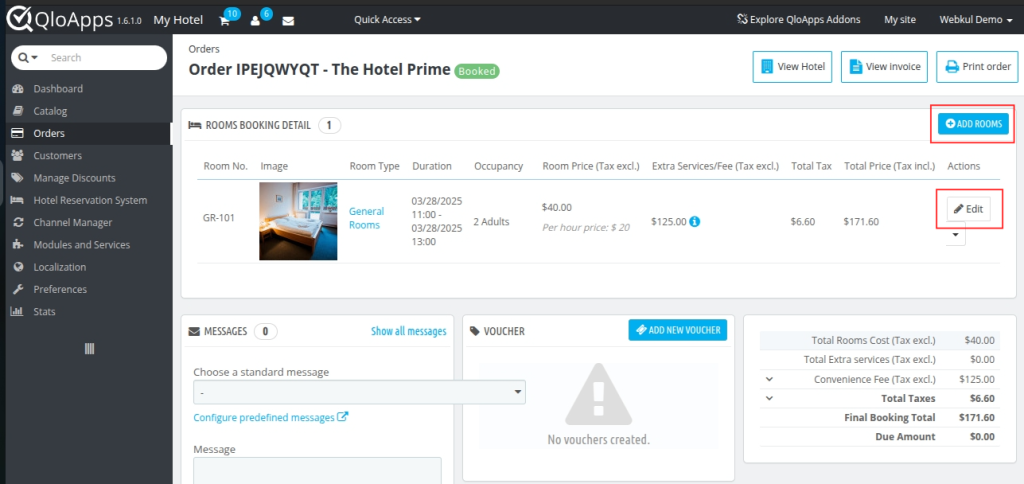
Once the admin receives an hourly booking order, so they can edit the check-in date and create a flexible hourly booking, regardless of the selected hourly booking type.
This flexibility helps manage bookings according to the hotel’s needs and policies.
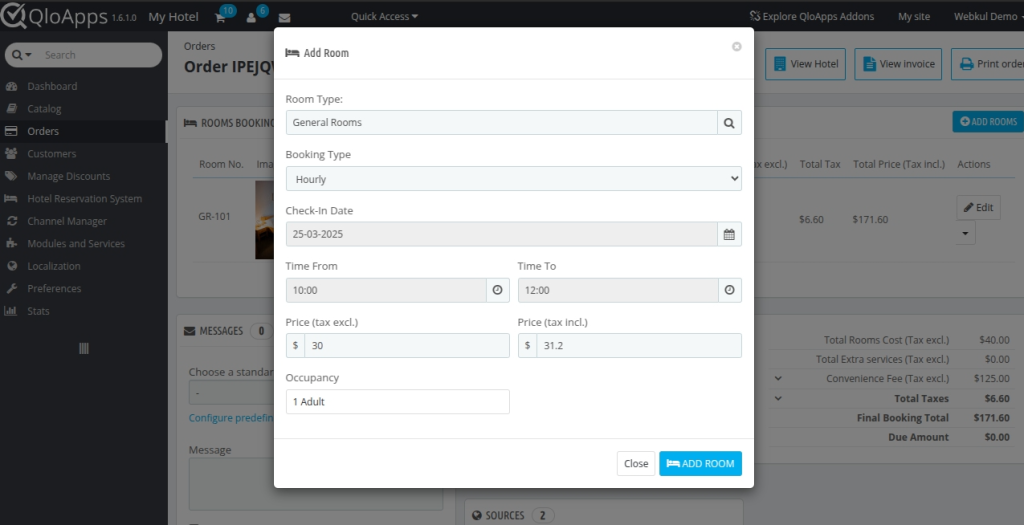
To edit an order:
- Navigate to the Orders tab and select the Orders option.
- So Click on the View button of the order so you wish to edit.
- Scroll down to the Rooms Booking Details section.
- Click Edit on the room’s booking details.
- So From here, you can create a Flexible Hourly Booking for any duration, complying with the hourly booking rules.
Conclusion
That’s all from the QloApps Hourly Booking Module. So I hope this guide has provided a clear understanding of how to manage and customize hourly bookings for your hotel.
For more information about QloApps, feel free to visit the official website: QloApps Reservation System – Free Open-Source Hotel Booking & Reservation System.
Should you have any queries, issues, or additional requirements, don’t hesitate to share them on the QloApps Forum.
Current Product Version – V_1.0.1
Supported Framework Version – QloApps 1.6.1

Be the first to comment.