QloApps Travel Agent Management is a powerful add-on designed to help hoteliers expand their booking network by seamlessly onboarding and managing travel agents within the QloApps ecosystem.
It equips both travel agents and administrators with comprehensive tools to streamline bookings, commissions, payouts, and performance tracking.
Travel Agent Features
- Creation of Travel Agent Profile
- Travel agents receive a personalised dashboard to view booking statistics, sales graphs, top-selling room types, earnings, commissions, and credit limit alerts.
- Create and Manage Bookings
- Profile and Payment Setup
- Travel agents can view and download the invoices.
Admin Features
- Admins can set CMS terms, define policies, control hotel access after registration, and require agents to agree to terms and conditions.
- Admins can add, edit, or approve travel agent profiles from the back office.
- Admins can set commission rates for rooms, services, and taxes
- Admin can monitor total earnings and dues from each agent.
- Admins can track and manage all bookings made by agents.
- Admins can easily manage financial settlements with agents.
- Admins can generate, view, and manage invoices per agent.
- Admin can configure email settings for the actions.
Installation of QloApps Travel Agent Management
The process of installing the Travel Agent module in QloApps is very simple.
- Log in to your QloApps Admin Panel.
- Navigate to Modules & Services > Manage Module
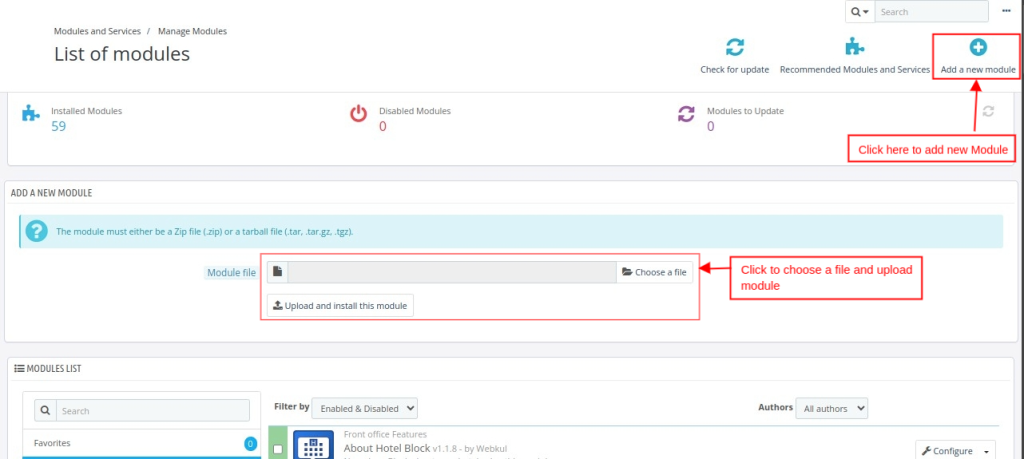
- Click on “Upload and Install this module” to install the module. By following these steps the Admin can successfully install the module.
How to configure QloApps Travel Agent Management Module
- Log in to your QloApps Admin Panel.
- Navigate to Modules & Services
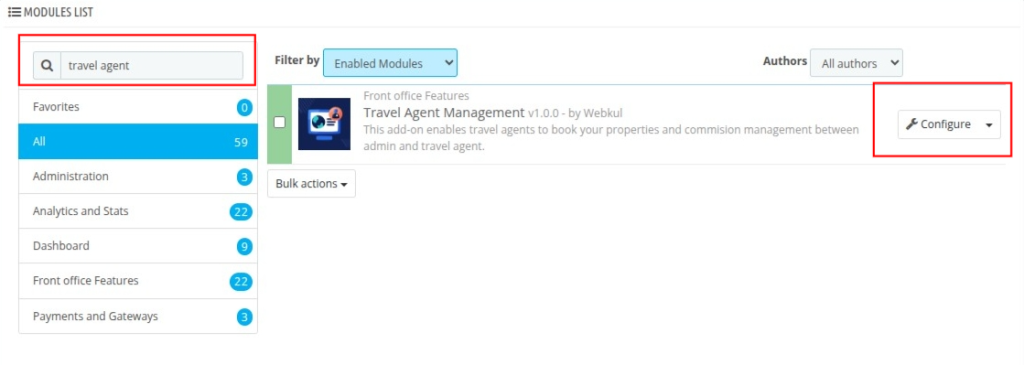
- Then, search for your Module in the Module List
- Click on Configure
Now you can configure we look all configuration settings:
- General Configuration
- Profile Approval Configuration
- Commissions Configuration
- Order Configuration
- Email Configuration
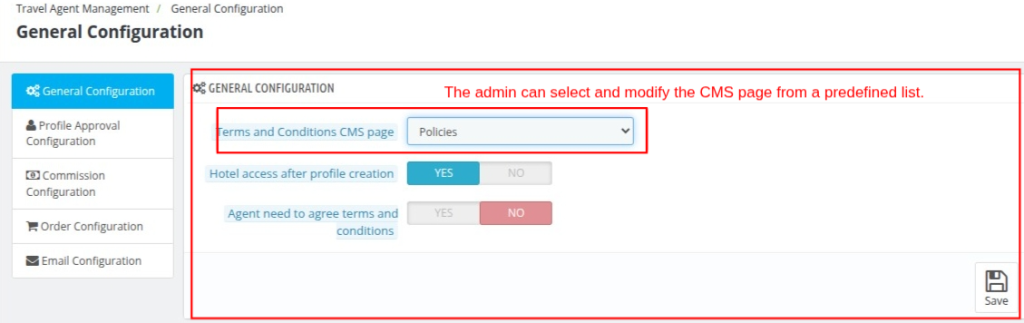
General Configuration
Admins can choose a CMS page for terms and conditions, set hotel access after agent profile creation, and require agents to agree to policies during registration.
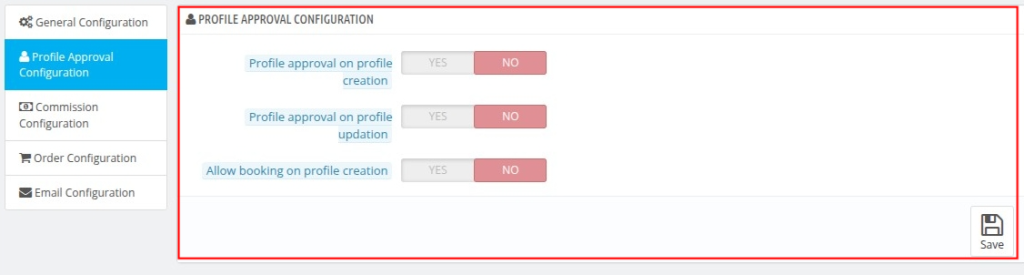
Profile Approval Configuration
Admins can enable approval for new agent profiles and profile updates, and choose whether agents can create bookings immediately after profile creation.
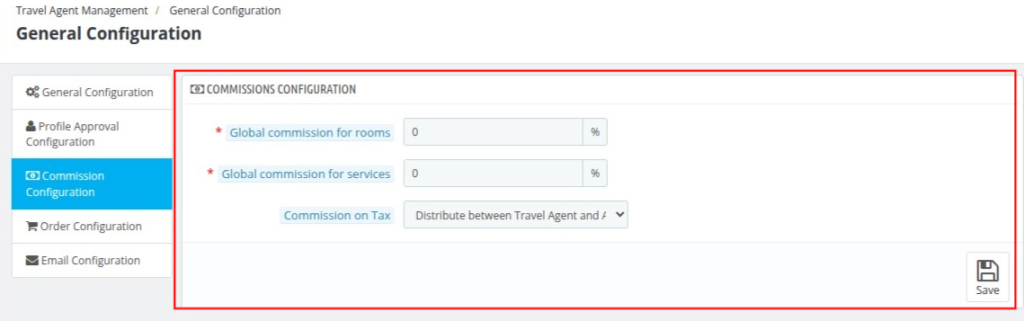
Commissions Configuration
Admins can set commission rates for rooms and services (in %), and choose how tax commission is assigned—fully to the admin, to the travel agent, or distributed between both.
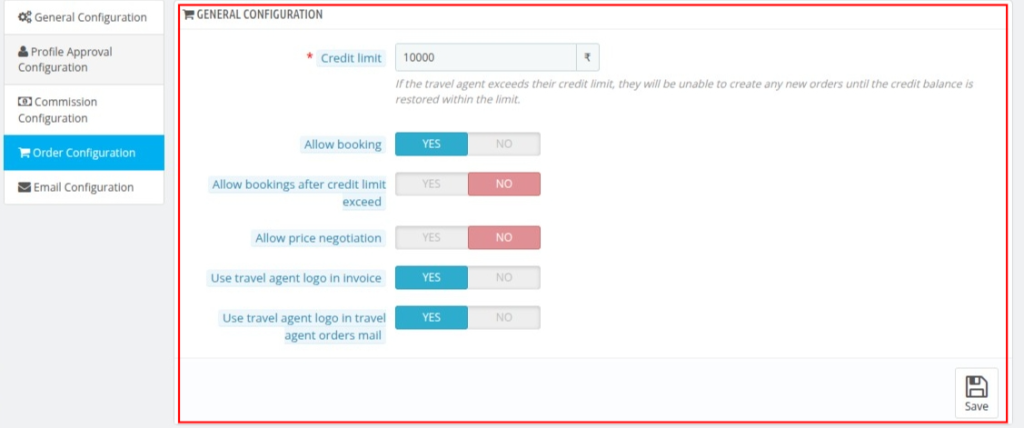
Order Configuration
General Configuration
- Admin can set a credit limit for travel agents to control booking thresholds.
- Admin can enable/disable bookings after the credit limit is exceeded.
- Admin can allow travel agents to negotiate prices with guests.
- Admin can allow an option to include the travel agent’s logo in invoices and booking emails.
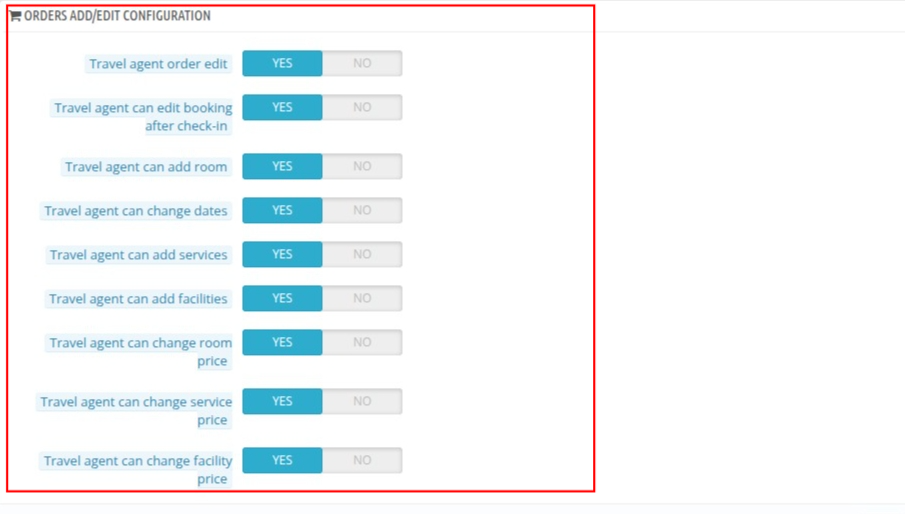
Order Add/Edit Configuration
- Allow travel agents to edit bookings after check-in.
- Permit adding rooms, services, and facilities during order editing.
- Enable travel agents to change booking dates.
- Allow travel agents to modify room, service, and facility prices.
Email Configuration
The admin can manage email notifications for both travel agents and themselves.
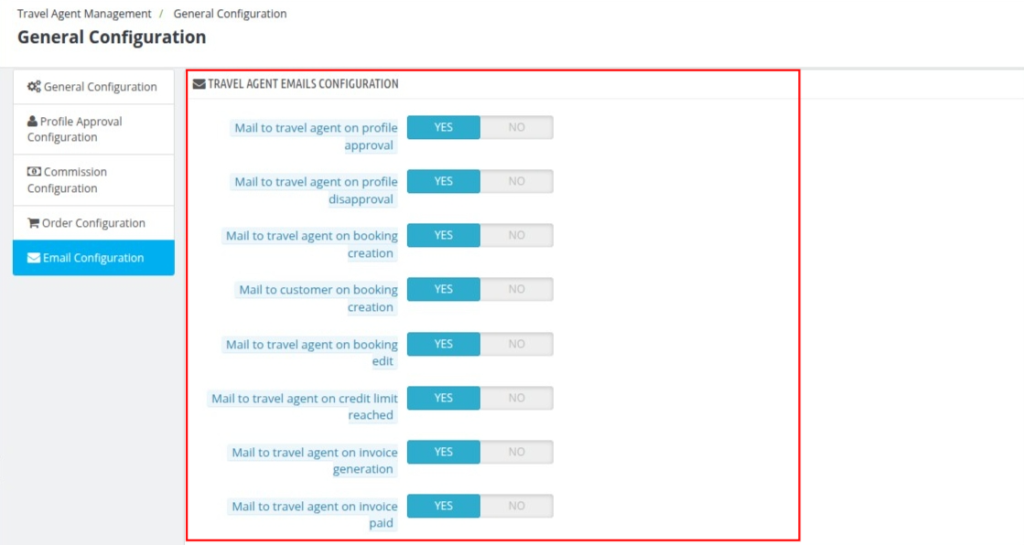
Travel Agent Emails Configuration
Under Travel Agent Emails Configuration, the following email notifications can be enabled or disabled:
- Notification to the travel agent upon profile approval.
- Notification to the travel agent upon profile disapproval.
- Notification to the travel agent when a booking is created.
- Notification to the customer when a booking is created.
- Notification to the travel agent when a booking is edited.
- Notification to the travel agent when their credit limit is reached.
- Notification to the travel agent upon invoice generation.
- Notification to the travel agent when an invoice is marked as paid.
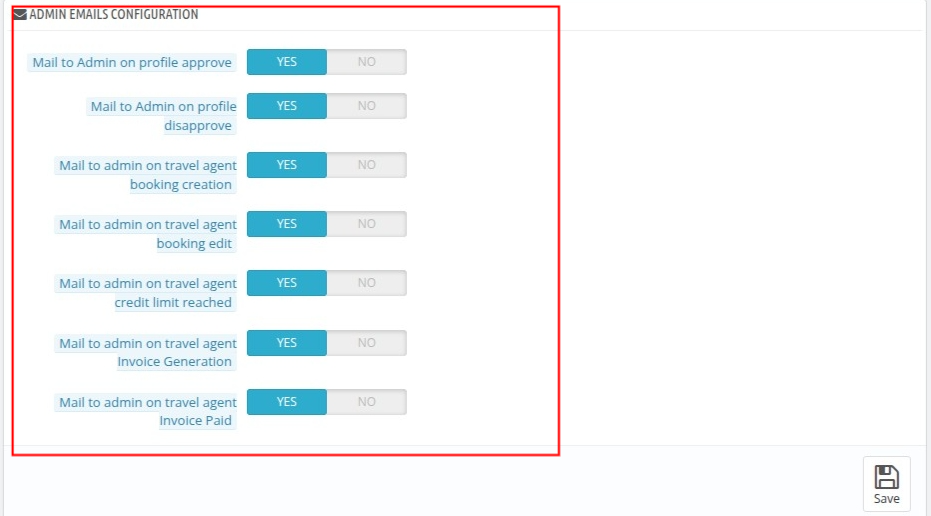
Admin Emails Configuration
- Notification when a travel agent’s profile is approved.
- Notification when a travel agent’s profile is disapproved.
- Notification when a booking is created by a travel agent.
- Notification when a booking is edited by a travel agent.
- Notification when a travel agent’s credit limit is reached.
- Notification when an invoice is generated for a travel agent.
- Notification when a travel agent’s invoice is marked as paid.
How to register as QloApps Travel Agent ?
Frontend: Travel Agent Registration Process
To become a travel agent, the applicant must first register as a regular user on the website. After successful registration.
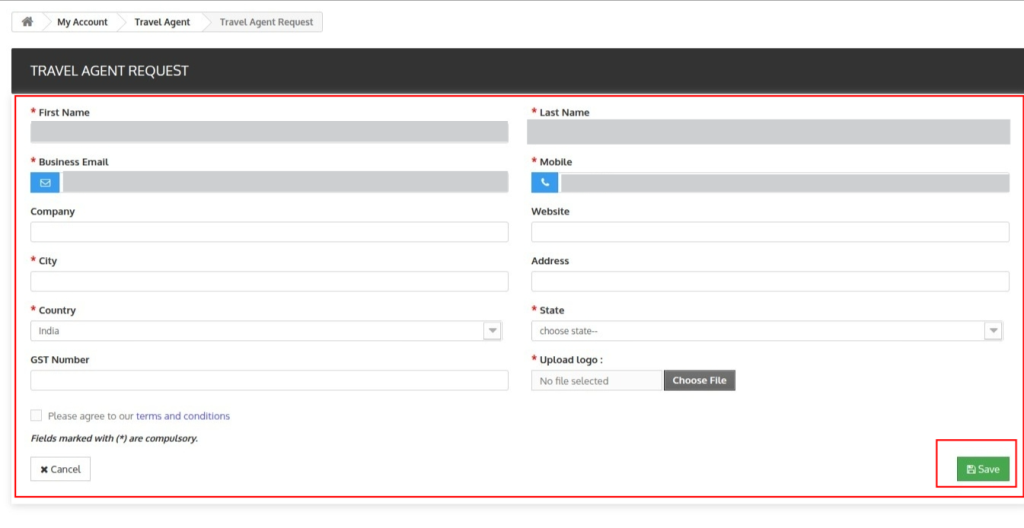
They can then submit a request to become a travel agent by filling out the Travel Agent Registration form.
- Visit the website’s login page and sign in with your existing account, or create a new user account if you don’t have one.
- After logging in, go to the My Account section from the user dashboard.
- Inside the My Account area, look for the Become a Travel Agent.

- Click on the tab and fill the form and necessary details.
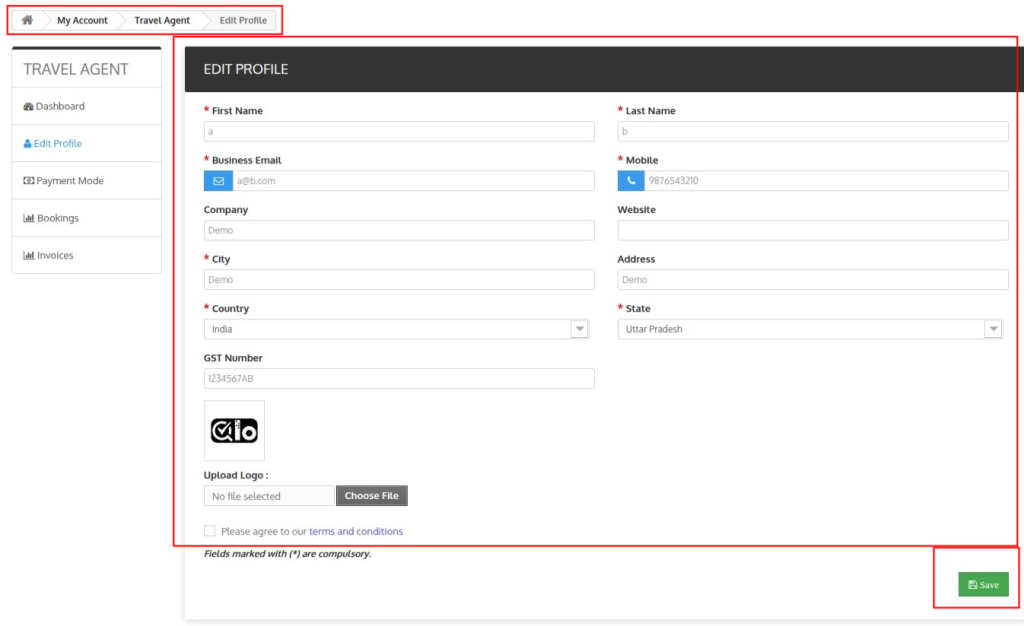
- First Name*
- Last Name*
- Business Email*
- Mobile Number*
- Company
- Website
- City*
- Address
- Country*
- State*
- GST Number
- Upload Logo*
- Please agree to our Terms and Conditions*
Note: The details you filled during user registration will be pre-filled in this form. You can review and update them before submitting if needed.
Once you submit the Travel Agent registration form:
- A confirmation message will be displayed:
“Congratulations!! Your request has been approved by the admin.” - You will also see a “Go to Account” button that redirects you to your agent dashboard or account area.

Note: If admin approval on profile creation is enabled, you will see the message: “Your request has been sent to admin”. Please wait till the approval from admin.”
The admin will then manually review and approve your request.
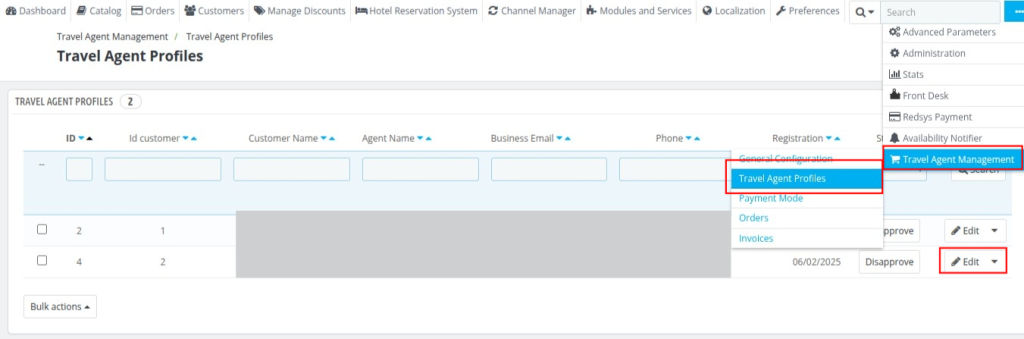
How To Approve a User’s Request To Become Travel Agent?
- Login in the QloApp Backoffice
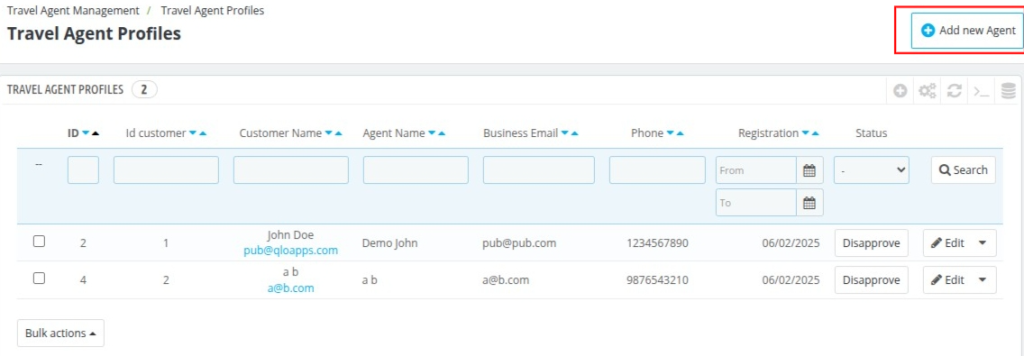
- Go to Travel Agent Management – > Travel Agent Profiles
Admin can approve or disapprove the travel agent profile from here.

Note– If you (admin) have configured the module for auto-approval, then there is no requirement for the admin’s approval.
After approval from the admin, an agent can view their account at the front end under the ‘Accounts’ tab.
Backend: Travel Agent Registration Process
Admin can also create a travel agent from the backend.
To do this, the admin must first create the travel agent as a user/customer. After that, the admin can convert the user into a travel agent from the Travel Agent profile section.
How to create a customer
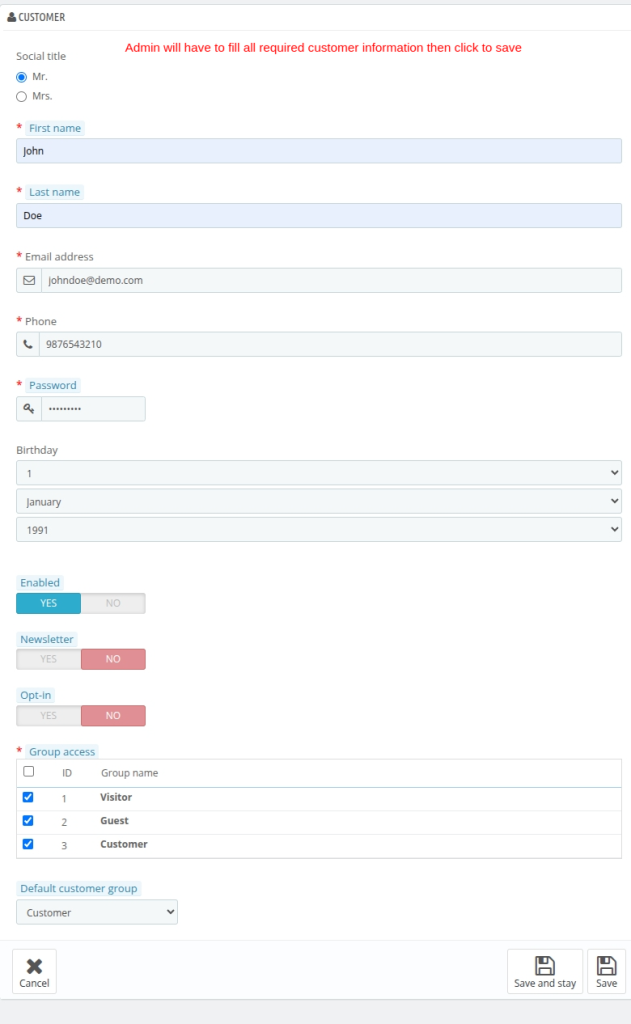
The admin will have to Go to Customers -> Add new customer

A new user/customer form will appear that the admin has to fill in.
Once the admin has added the travel agent as a customer, they can create the travel agent profile by adding the user from the Travel Agent Profile section.
Travel Agent Profile Creation
After creating the user/customer, the admin needs to navigate to Travel Agent Management → Travel Agent Profile → Click on “Add New Travel Agent”.
The admin will need to fill in the details in the New Travel Agent form and the admin will found 4 tabs
- Information
- Payment Modes
- Hotel Access
- Agent Commission
Information
- Select an existing customer/user from the list.
- Fill the necessary details that are listed in form.
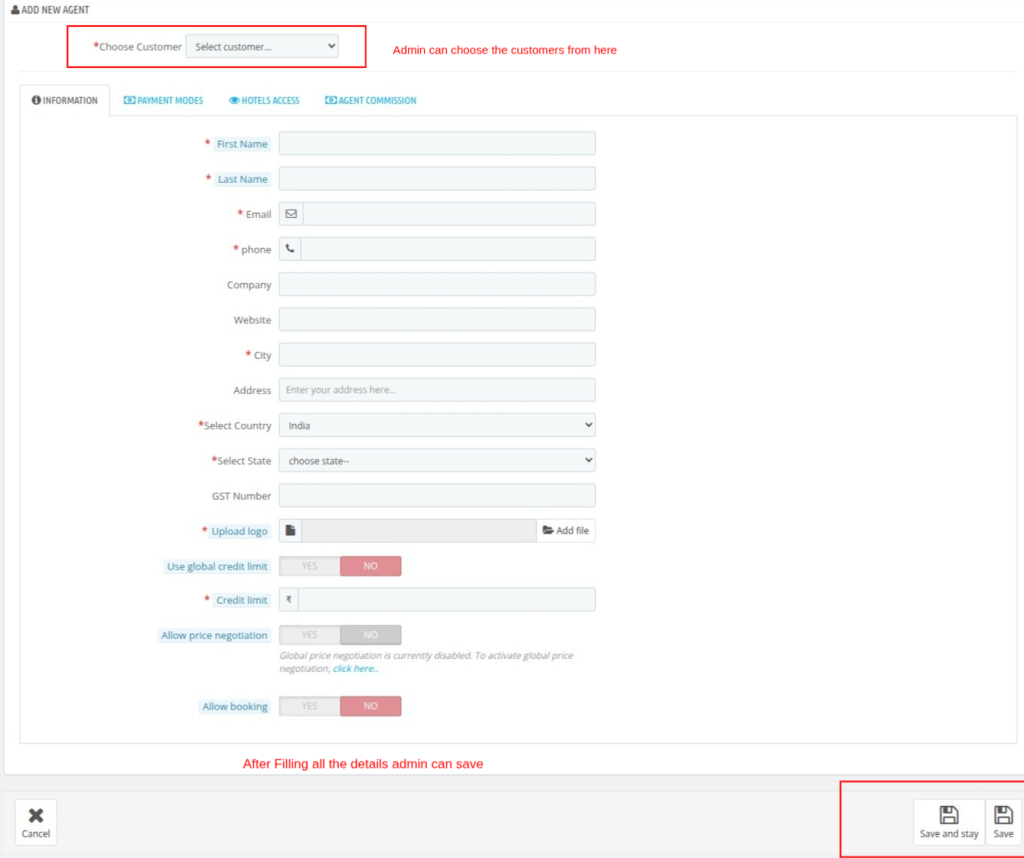
Note: The credit limit defines the maximum amount a travel agent can use for bookings on credit. If the agent exceeds this limit, they won’t be able to place new bookings.
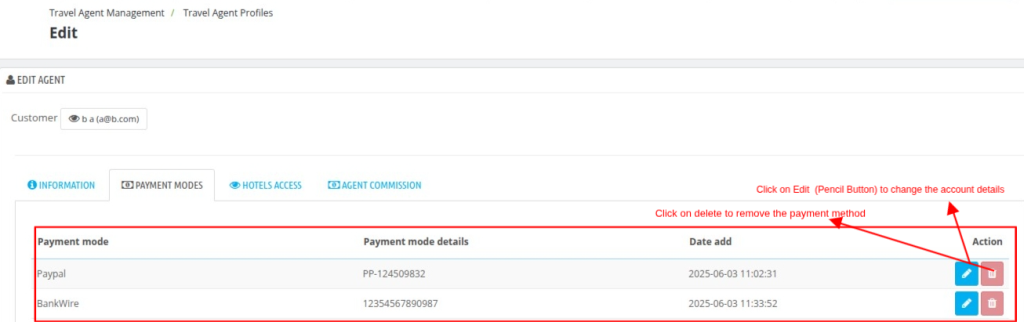
Payment Modes
Admin can add and manage various payment sources for travel agents.These payment sources can be configured in the backend.
This allows flexibility in recording how travel agents make payments, such as via bank transfer, UPI, cheque, or any custom mode.
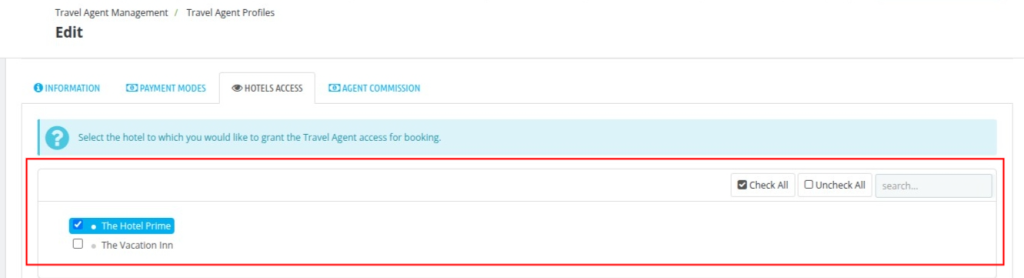
Hotel Access
Admin can select specific hotels to which the Travel Agent should have access.
From the backend, navigate to the agent’s profile and choose the hotels the agent is allowed to manage or make bookings for.
Agent Commission
If the global commission is enabled, a predefined commission rate for rooms and services will automatically apply.
However, if the global commission is disabled, the admin can set specific commission rates for each travel agent individually.
The commission on tax can be assigned either to the admin, the travel agent or distributed between both.
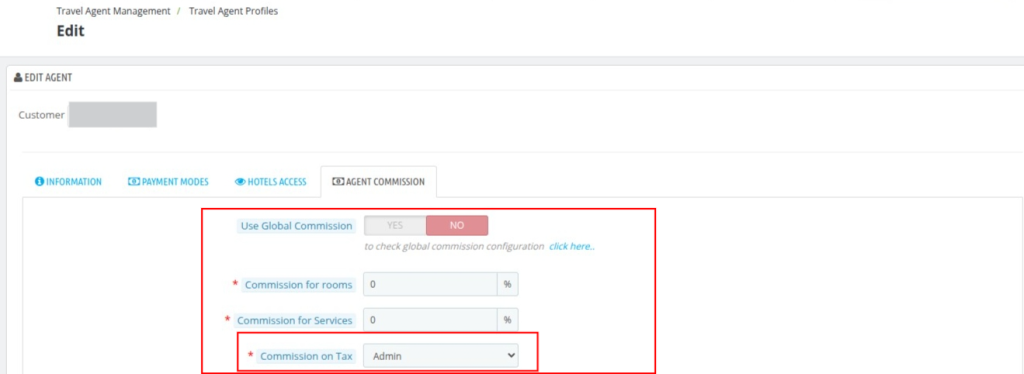
How to edit Travel Agent Profile
The admin can edit or update a travel agent’s profile from the back office.
To do this, navigate to:
Travel Agent Management → Travel Agent Profile → Select the specific Travel Agent → Click on the ‘Edit’ button.
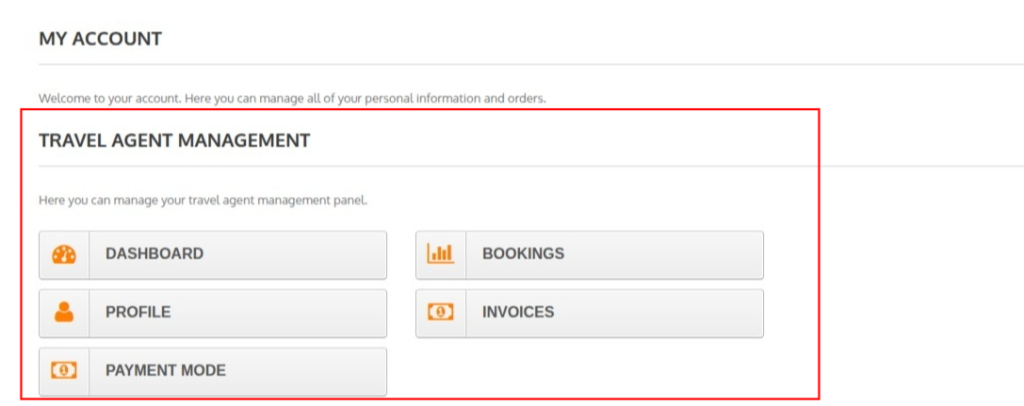
How Travel Agents Manage Their Account
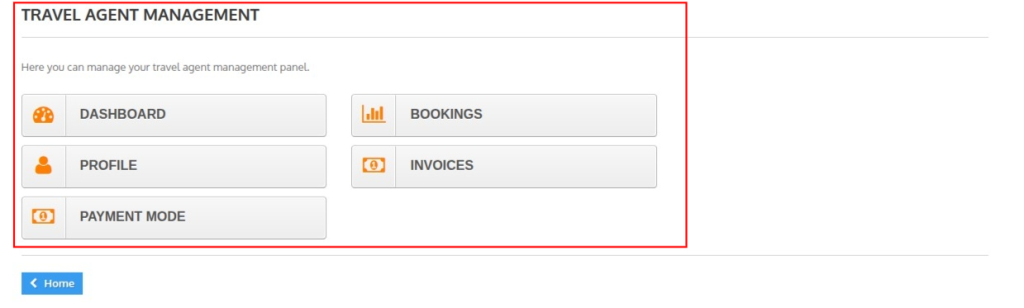
When travel agents log in to their account in the QloApps Travel Agent Management system, they gain access to various sections designed to help them manage their business efficiently.
Here are the key sections available in their account:
- Dashboard
- Profile
- Payment Modes
- Bookings
- Invoices
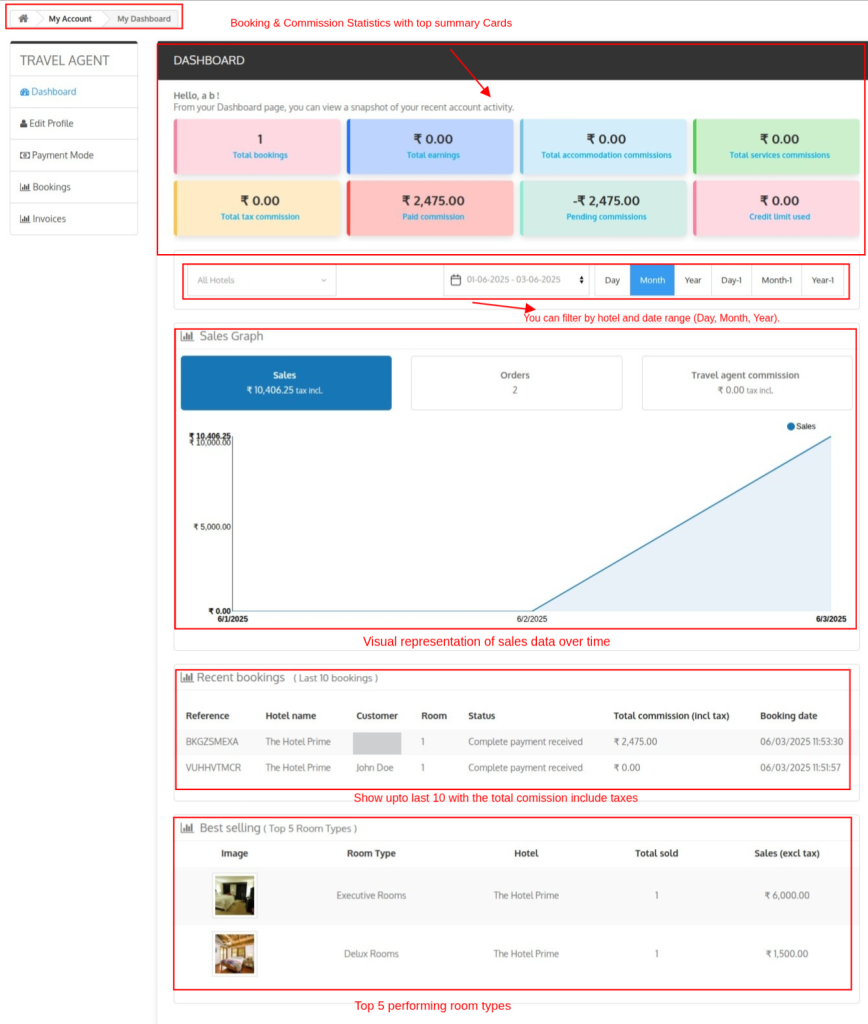
How the Dashboard Helps Travel Agents
The Dashboard gives travel agents a quick overview of their business performance. This centralised view enables agents to track and manage their bookings and revenue effectively. It includes:
- Booking & Commission Stats
- Hotel and Date Range Filter
- Sales Graph
- Recent Booking (Last 10 Bookings)
- Best Selling Room Types (Top 5 selling room types)
Note: You can filter by hotel and date range (Day, Month, Year).
Edit Process of Travel Agent Profile from Frontend
The Travel Agent can edit or update their profile from the “My Account” section under Travel Agent Management.
They simply need to log in, go to My Account → Travel Agent Management, and click on the Profile to update their details.
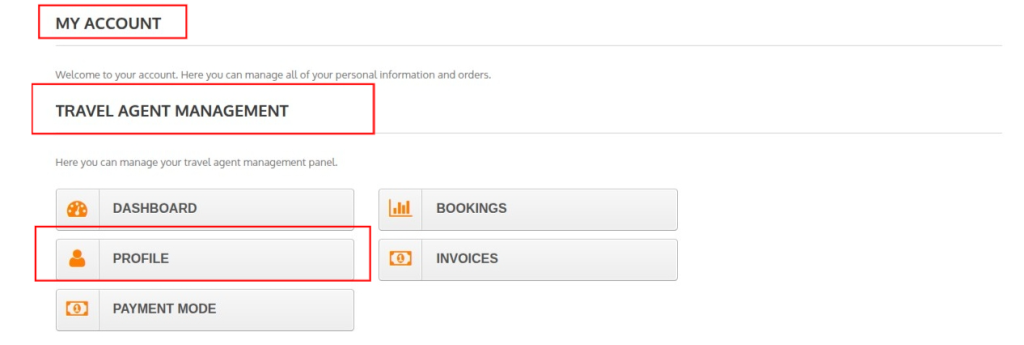
Once the Travel Agent clicks the ‘profile’ button, a form will appear with their existing profile details. They can then make the necessary changes and submit the form to update their profile.
How Travel Agents Add Payment Modes
- Travel Agents can navigate to the My Account – > Travel Agent Management -> Payment.
- Inside the Payment Mode section, Travel Agents will see a button “Add Payment Mode.
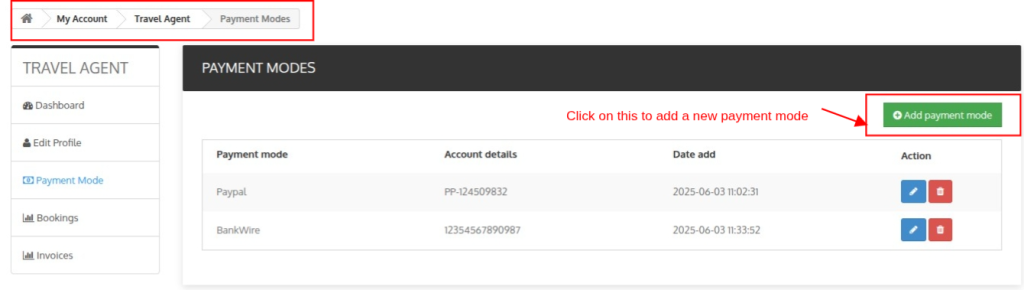
3. Click on the “Add Payment Mode” button to fill in and submit your payment details for the selected payment source.
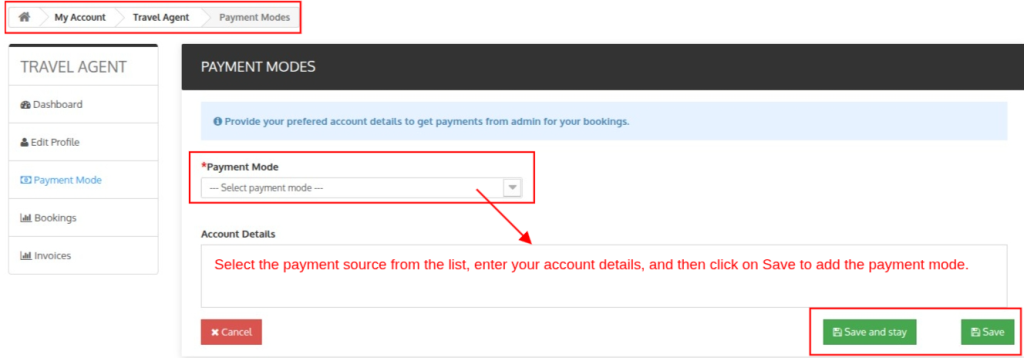
Note: Once the Admin adds a payment mode (such as Bank Transfer, UPI, PayPal, etc.) in the system,
Then Travel Agents will be able to view and select from these options while adding their payment details.
How Admin add Payment Modes
- In the Back Office, go to Travel Agent Management → Payment Modes.
- Click “Add New Payment Mode.”
- Enter the Payment Mode Name (e.g., “Wire Transfer,” “Stripe,” “Cheque”).
- Save to create the mode; it appears instantly in the list.
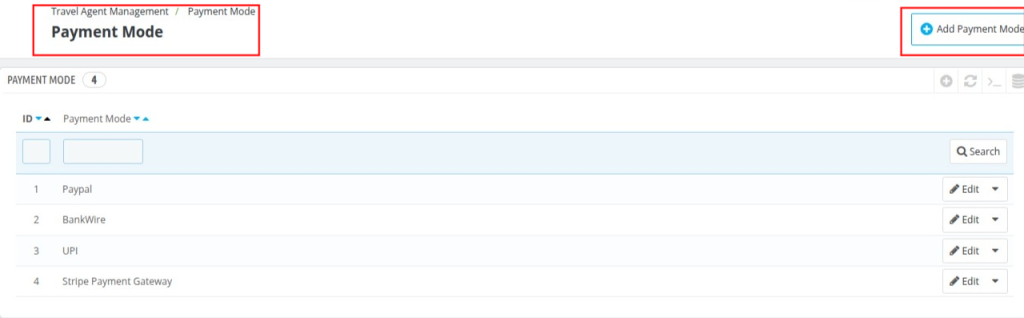
- Use the Edit button to rename or update a mode.
- Use Delete to remove a mode (helpful for outdated or unused methods)
Note: Any payment mode added here becomes available to Travel Agents when they set up their payout details under My Account → Payment Modes.
Creating multiple modes lets agents choose the payout method that works best for them, streamlining commission settlements.
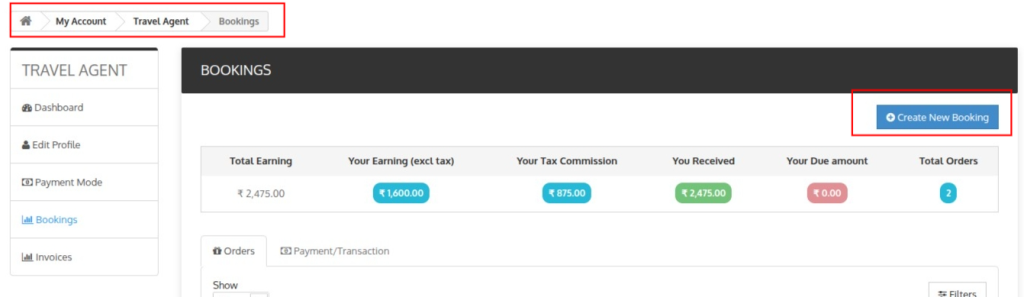
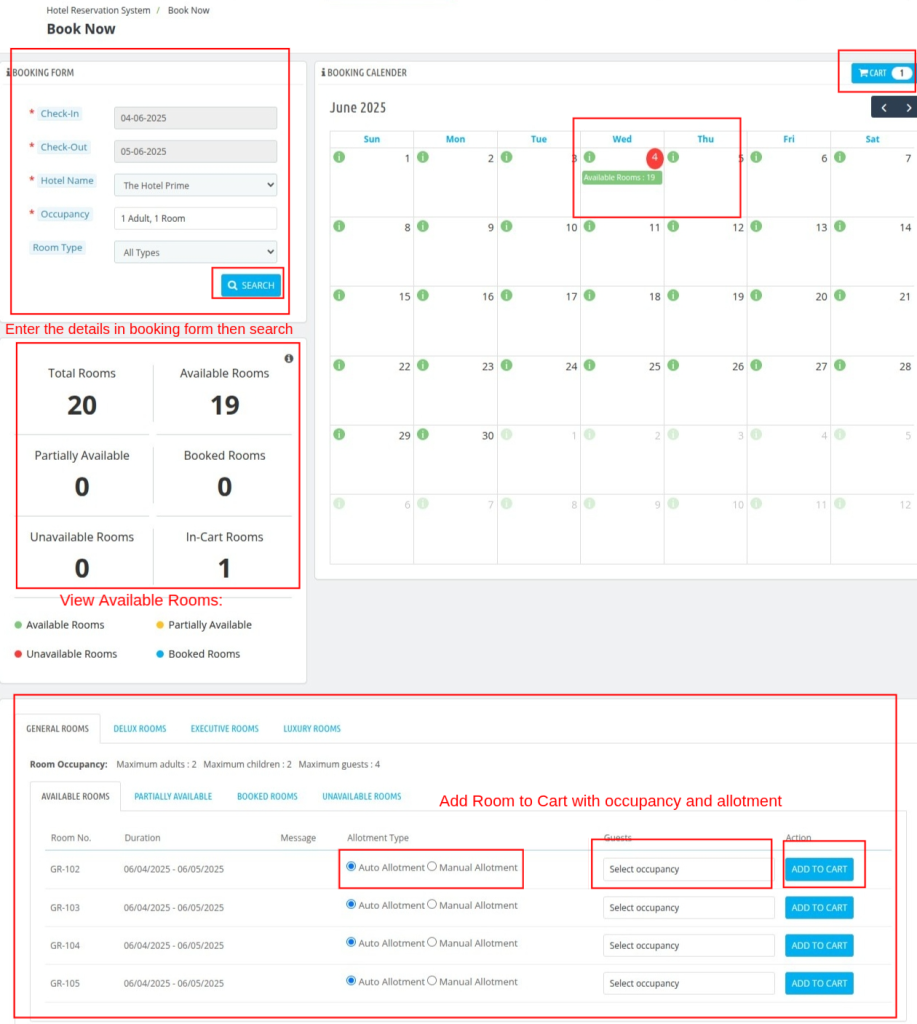
How Travel Agents Create a Booking
- Travel Agents can navigate to the My Account – > Travel Agent Management -> Booking.
- Inside the Booking section, Travel Agents will see a button “Create new booking”.
- Click on the “Create new booking” button to start the booking process.
- The Travel Agent can search based on the following fields to view reservations and book new ones:
- Check-in Date: Search rooms based on the guest’s arrival date.
- Check-out Date: Search for rooms based on the guest’s departure date.
- Hotel name: Select your hotel from here.
- Room Type: Select a specific room type from the dropdown menu.
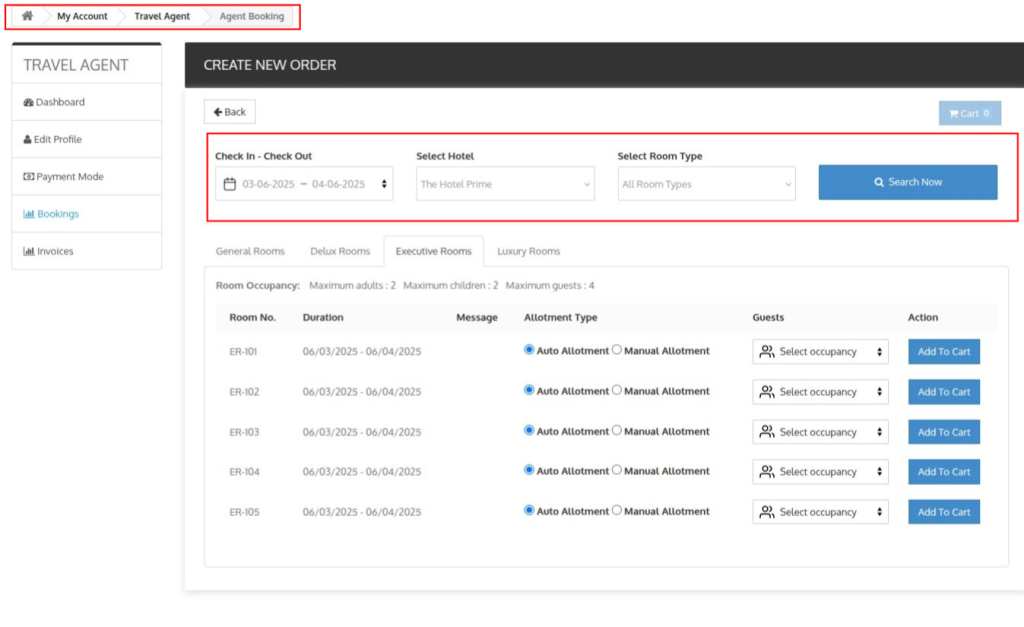
- Enter the occupancy and set the allotment type to auto or manual (Admin can enter a custom message if the manual allotment is selected).
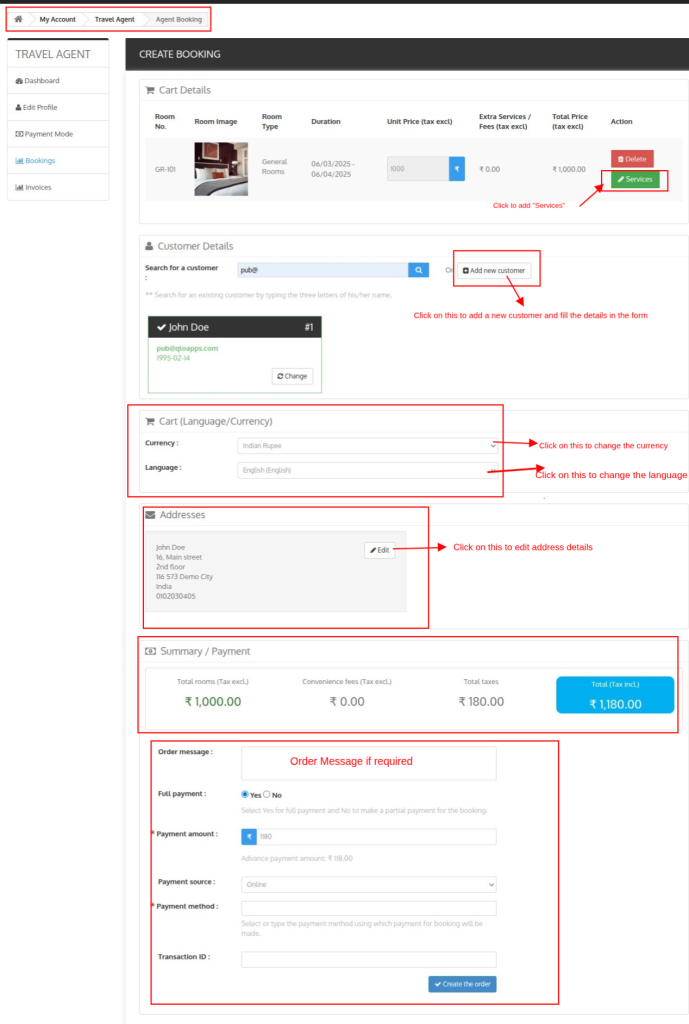
- Once the rooms are added, the admin can proceed with the booking by clicking on the cart icon.

- In cart options order details will be displayed such as room number, room type, duration, and amount.
- Admin can also remove the room from the cart.
- Click on “Proceed to checkout” to proceed with booking.
- On the cart details page, the admin can also add services to the order, allowing customisation of the booking.
- Now, the Travel Agent can either search for an existing customer or create a new customer.
- Then, the Travel Agent can select the preferred currency and language, add an address if needed,
- Finally, enter the payment details to complete the booking order.
How Travel Agents Edit a Booking
- Navigate to My Account → Travel Agent Management → Booking.
- Scroll down to the Orders section and select the specific order you wish to modify.
Click “View” to open the Order Detail page.

- In the Room Booking Detail section, click on the Edit button.
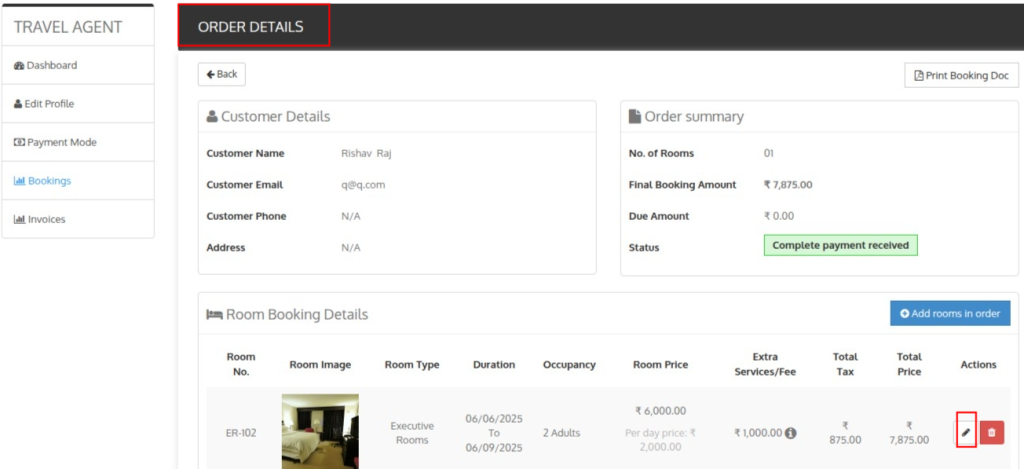
- From there, you can make the following changes:
- Check-in and Check-out Dates
- Room Occupancy
- Facilities
- Services
Note: To view the Booking Summary, click on Print Booking Doc.
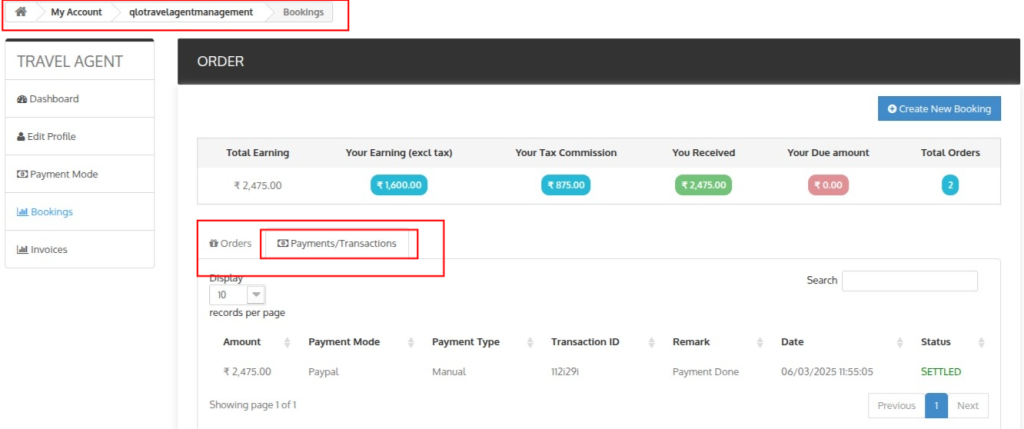
How Travel Agents View the Payment/Transactions
- Navigate to My Account → Travel Agent Management → Booking.
- On the Booking page, locate the section that allows toggling between Orders and Payments.
- Click on the Payments tab to view a detailed list of all transaction records.
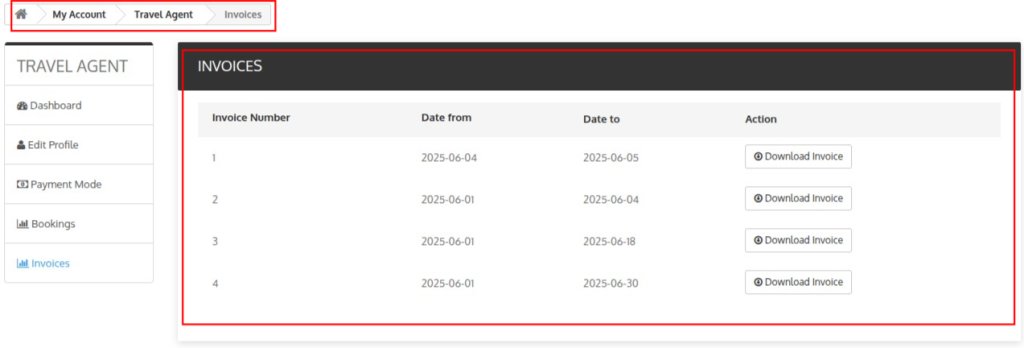
How Travel Agents View the Invoices
- Navigate to My Account → Travel Agent Management → Invoices.
- Here, Travel Agents can view a list of all their commission-related invoices.
Note: The Admin generates these invoices and reflect the commission details earned by the Travel Agent on their bookings.
How Admin Manage Travel Agent
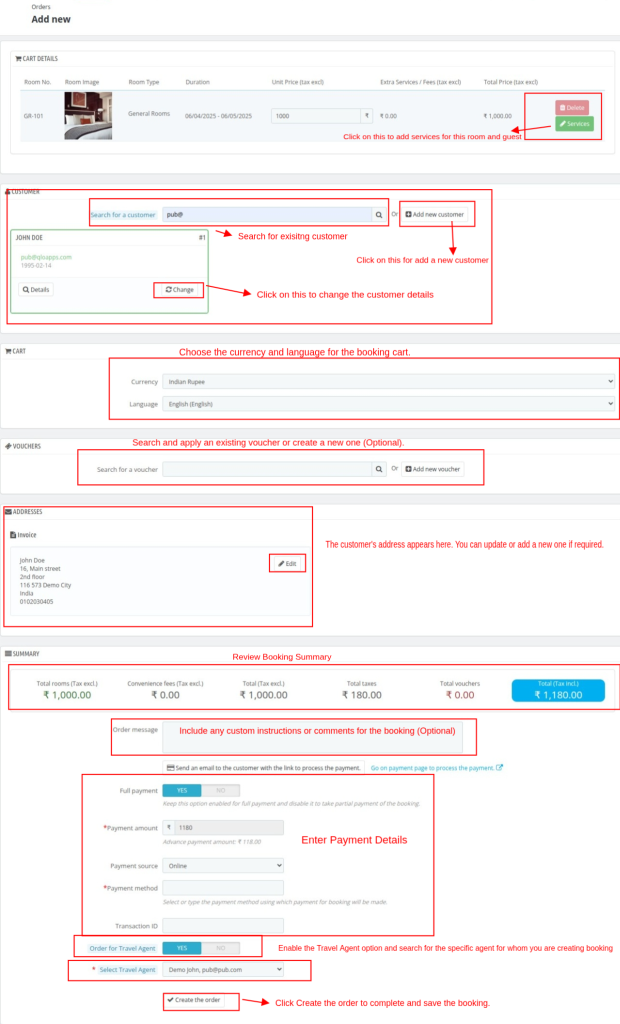
Booking Creation by Admin
- Go to the Booking section in the admin panel and fill out the Booking Form with check-in/check-out dates, hotel name, and preferences. Then, click Search.
- The system will display all available room types for the selected duration.
- Select a room type and add it to the cart. Enter room occupancy and choose between Auto or Manual allotment. If manual, you can enter a custom message.
- Click the Cart icon above the calendar to proceed. You’ll see details like room type, duration, and total amount and the button “book now”
- Click on Book Now to proceed with booking.
- (Optional) Add services or amenities to the cart to customize the booking.
- Search for an existing customer or create a new one. Click Choose to select and continue.
- Select the Currency and Language preferences for the booking.
- (Optional) Apply a Voucher by searching for an existing one or creating a new one.
- Review or update the customer’s Address in the Address section.
- In the Summary section, review all pricing details:
- Room Price (Excl. Tax)
- Convenience Fees
- Vouchers
- Taxes
- Total (Incl. Tax)
- Add an Order Message if you want to leave any notes or instructions.
- Add Payment Details
- Enable Travel Agent Booking and search for the Travel Agent to assign the order.
- Click Create the order to complete the booking process.
How Admin can settle Travel Agent Payment
- Log in to the QloApp Backoffice
- Go to Travel Agent Management – > Orders
- The admin will see a list of travel agents with key booking details:
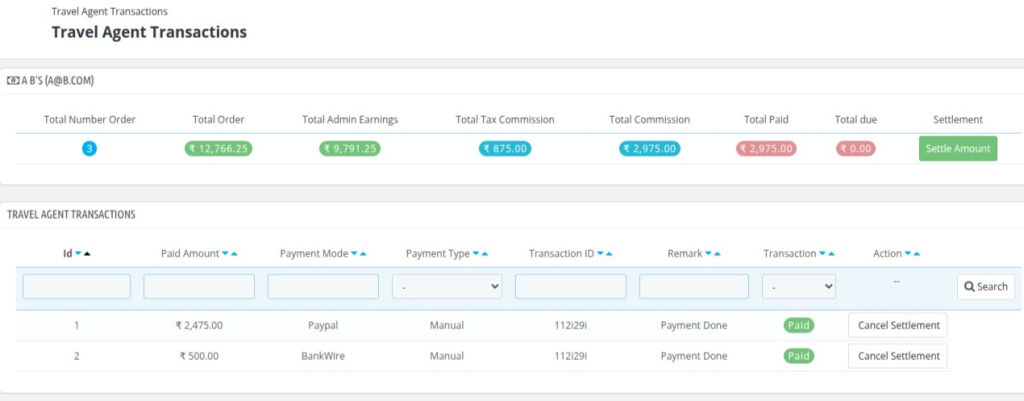
How Admin can view Travel Agent Booking Orders and Settlements
- Log in to the QloApp Backoffice
- Go to Travel Agent Management – > Orders
- The admin will see a list of travel agents with comissions details:

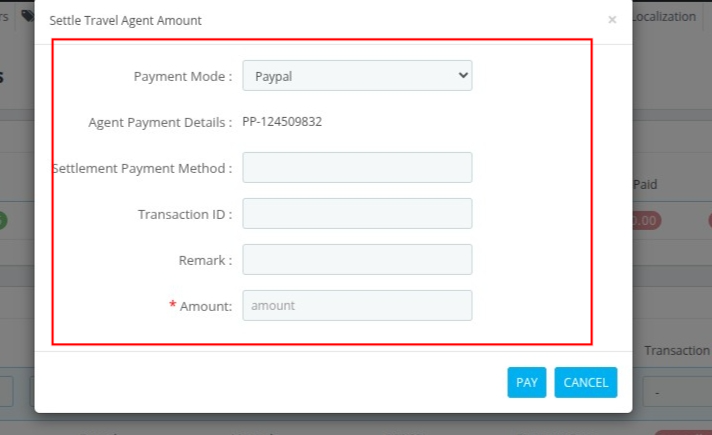
- Click on Settle Amount to transfer the Travel Agent Commission.
- After clicking, a form will appear where the admin must fill in the following details:
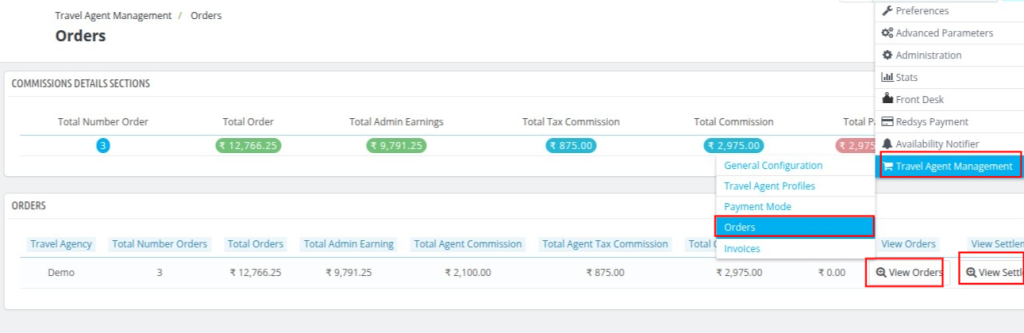
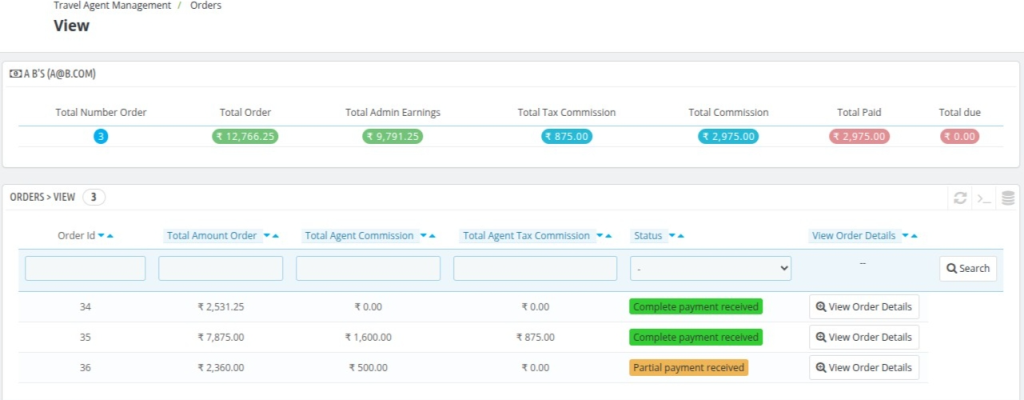
- Click on View Orders to see detailed bookings made by the selected travel agent.
- Click on View Settlements to track payments/settlements between the admin and the travel agent.
Note:- Click on “Cancel Settlement” to cancel the amount that was previously settled for the Travel Agent.
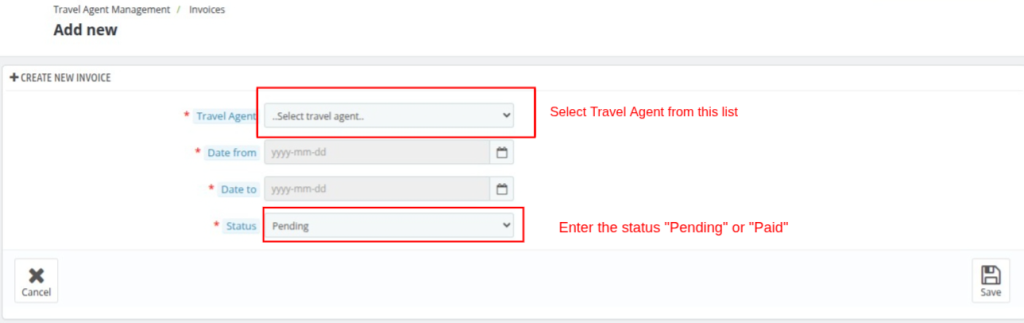
How Admin Creates Invoices
- Log in to the QloApp Backoffice
- Go to Travel Agent Management -> Invoices
- Click on “Create New Invoice”
- Fill in the Invoice Details:
- Travel Agent: Select the agent for whom you want to generate the invoice.
- Date From: Choose the start date of the period you want to invoice.
- Date To: Select the end date of the invoice period.
- Status: Set the invoice status as either Pending or Paid.
- Click Save to create the invoice.
Note: Only bookings that have been checked out within the selected date range will be included.
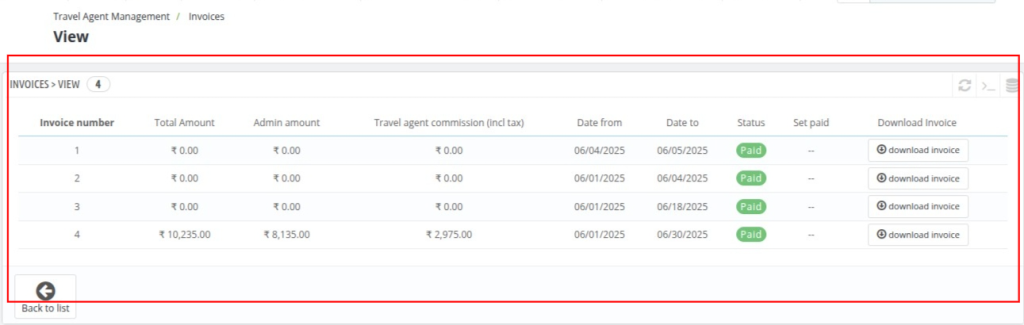
How Admin Views Invoices
- Login to the QloApps Back Office
- Navigate to: Travel Agent Management → Invoices
- You will see a list of all generated invoices with details
- Name
- Travel Agent Company
- Total Invocies
- Click on “Invoice Details”
- A detailed view will open, showing all invoices generated for that travel agent, including statuses, amounts, and dates.
Conclusion
The QloApps Travel Agent Management system offers a powerful and structured way for hotels to collaborate with travel agents efficiently.
With features like profile management, booking control, commission tracking, payment modes, and detailed invoicing, it empowers both admins and travel agents to manage operations smoothly.
By enabling transparency and automation, this system reduces manual efforts and fosters strong partnerships between hotels and travel professionals.
And ultimately boosting bookings and revenue for your property.
If you want to learn about the functionality of QloApps then you can visit this link: QLO Reservation System – Free Open-Source Hotel Booking & Reservation System.
In case of any query, issue, or requirement please feel free to raise it on QloApps Forum.
Moreover, for any support, you can raise a ticket from here.
Current Product Version – V_4.0.0
Supported Framework Version – QloApps 1.7.x

Be the first to comment.