QloApps POS is a modern billing and sales tool for hospitality businesses. It is built to serve hotels, hostels, B&Bs, and resorts with ease.
It helps you manage walk-in sales for bars and spas.
Unlike e-commerce POS, it is designed for guests. Each sale can link to a booking or be served to local walk-in customers.
The POS simplifies guest experiences. Staff can create bills quickly, accept payments, and print receipts in seconds.
It reduces manual paperwork and errors. Automated sync, stock tracking, and registers make outlet operations efficient.
It centralizes the payments from restaurants and syncs them with rooms.
With multi-outlet support, you can set up bars, spas, and kiosks separately. Each outlet has staff and stock control.
This flexibility ensures smooth operations at every point of your property. It keeps your team fast, organized, and guest-focused.
Key Features of QloApps POS
- Add multiple outlets like bars, spas, kiosks, tour desks, and gift shops.
- Add multiple cashiers and assign them to specific outlets.
- Add items to the cart by clicking tiles or scanning barcodes.
- Update quantity, price, and apply discounts at the product or order level.
- Create new guest profiles by entering basic details at the POS.
- Edit guest details while billing without leaving the POS.
- Accept payments in cash, card, or split form.
- Put orders on hold and resume them later.
- Set initial load capacity for products, orders, and guests.
- Track transactions by payment method with the cash register.
- Limit how many orders appear on the POS screen.
- POS screen auto-rotates in mobile browser view.
- Supports multiple languages and currencies.
- Search orders by guest name, ID, or amount
- Print sales receipts instantly after order completion.
- Connect the cash drawer to the POS printer to open after printing.
- Show stock quantity for each product at the outlet.
- Show cart item count directly in the POS panel.
- Auto-assign products to selected outlets when created.
- POS dashboard to view sales, orders, and outlet profits.
- View top cashiers and top-selling items in the dashboard.
- Supports guest checkout for faster sales.
- Partially redeem vouchers during payment.
- Fully supports hospitality-specific price rules.
- Get an alert sound when any error occurs in the POS.
- Use keyboard shortcuts and number keys for quick entry.
How to Install QloApps Point of Sale System
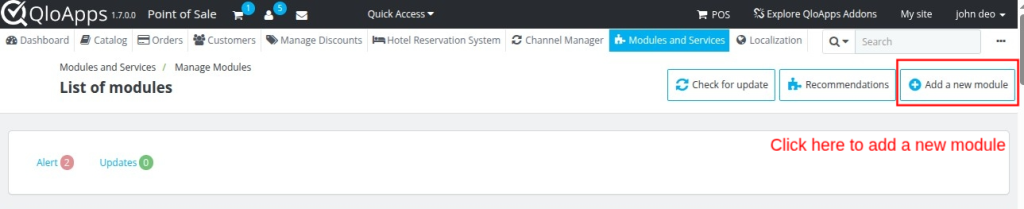
- Firstly, go to Module and Services in the Back office and click on ‘Add a new module’.
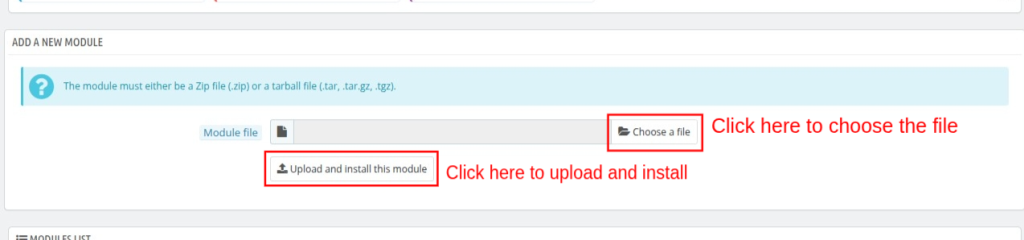
- Now, click on ‘Choose a file’ and select the file from the system.
- Now, click on Upload and install this module.
- In this way, the module installation will be successful.
Note:- Before installing the QloApps POS Module, you must make a few changes in the core files for the proper functioning of the module.
You just have to follow the simple steps and add the mentioned codes for the proper functioning of the module.
You have to Add Hook to the following Path
Path: QloApps/classes/Product.php
1: Add a hook after line 3296, or the line may vary
Hook::exec('actionAdminProductPriceSqlModifier', array( 'id_product' => $id_product, 'id_product_option' => $id_product_option, 'id_shop' => $id_shop, 'sql' => &$sql, ));
Github Reference: https://github.com/Qloapps/QloApps/blob/v1.7.0/classes/Product.php#L3296
2: Add a hook after line 3389, or the line may vary
Hook::exec('actionProductTaxRuleGroupModifier', array( 'id_product' => $id_product, 'id_tax_rule_group' => &$id_tax_rule_group ));
Github Reference: https://github.com/Qloapps/QloApps/blob/v1.7.0/classes/Product.php#L3389
POS Management – Admin’s End
After the successful installation of the module, a new tab “Manage POS” is added to configure the module settings. Please note that the module configuration can be set in multiple languages.
General Configuration
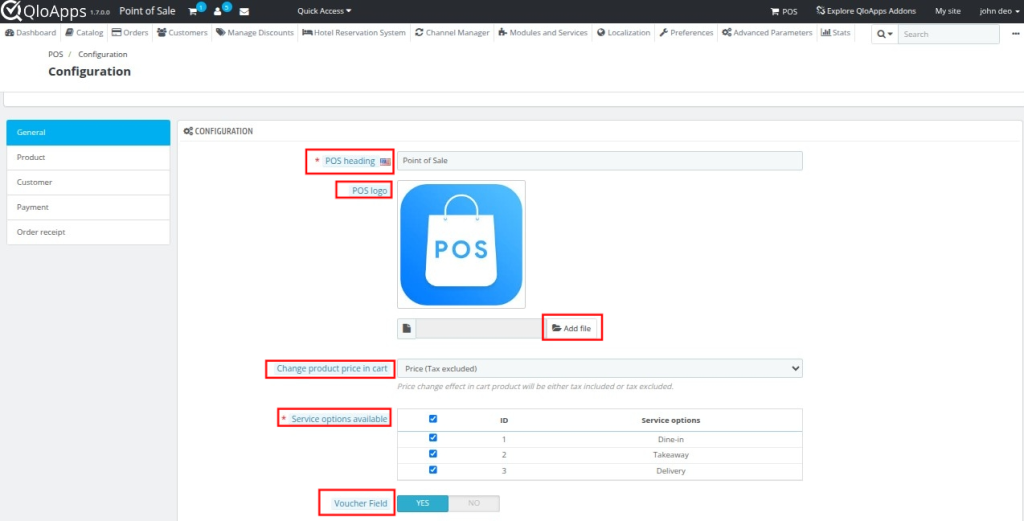
POS Heading – Set the title for your POS panel (e.g., Hotel Bar POS).
POS Logo – Upload a logo to display on the POS screen and on receipts.
Change Product Price in Cart – Allow cashiers to adjust product prices directly in the cart.
Service Options Available – Enable different service modes like Dine-in, Takeaway, or Delivery.
Voucher Field – Activate voucher input to apply discounts during checkout.
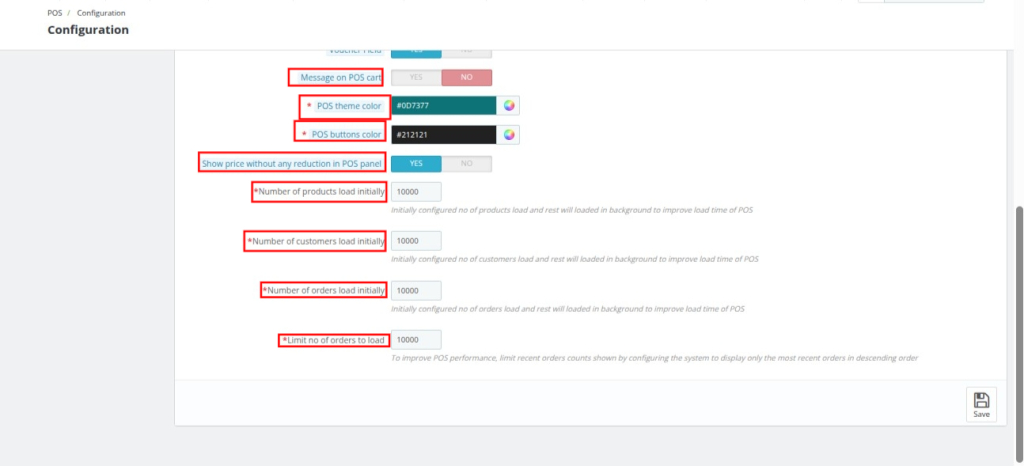
Message on POS Cart – Show or hide a custom message on the POS cart screen.
POS Theme Color – Choose the main theme color for your POS panel.
POS Buttons Color – Customize the button colors in the POS interface.
Show Price Without Any Reduction – Display the original product price without showing discounts.
Numbers of Products Load Initially – Define how many products should load when the POS starts.
Number of Customers Load Initially – Set the number of customers that load at startup.
Numbers of Orders Load Initially – Choose how many past orders should appear initially.
Limit Number of Orders to Load – Restrict recent orders displayed to improve POS performance.
Change product price in cart
Suppose an employee has added a product to the cart.

Admin has selected “Price (Tax Excluded) in the “Change Product Price in cart” field. Now, when the POS agent changes the product price, the “tax excluded price” will also change as shown below:

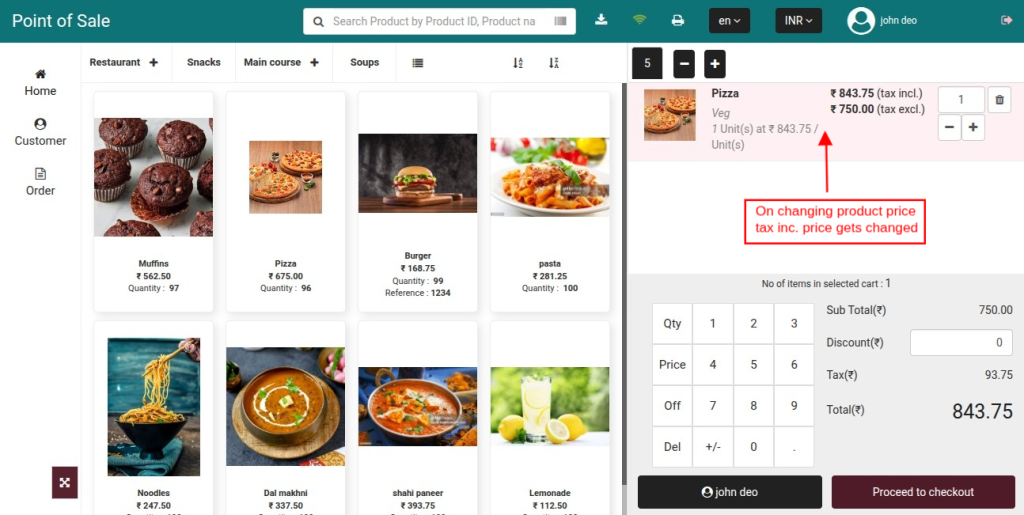
If the admin has selected “Price (Tax Included) in the “Change Product Price in cart” field.
Now, when an employee changes the product price, then the “tax-included price” will also change as shown below:
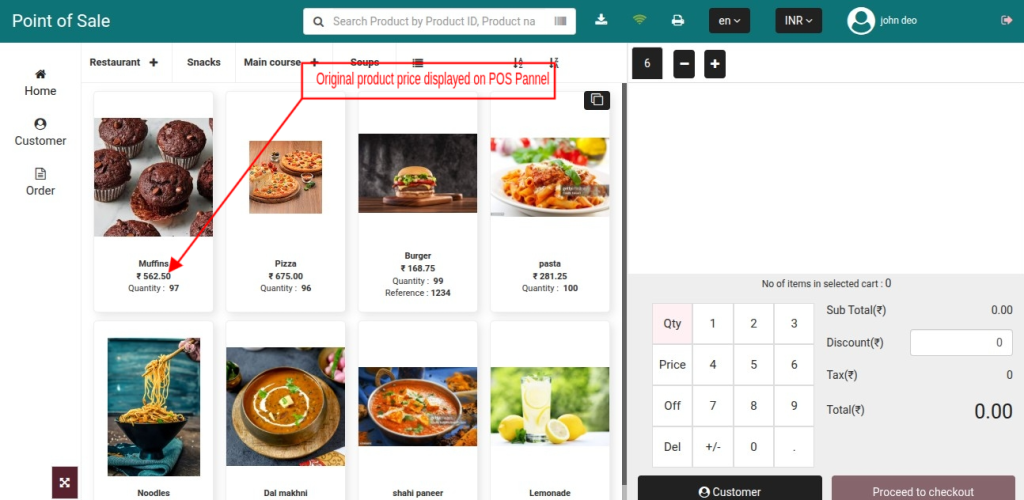
Show price without any reduction in the POS panel
If enabled, then the original price of the product will also display in the POS panel.
Product Configuration
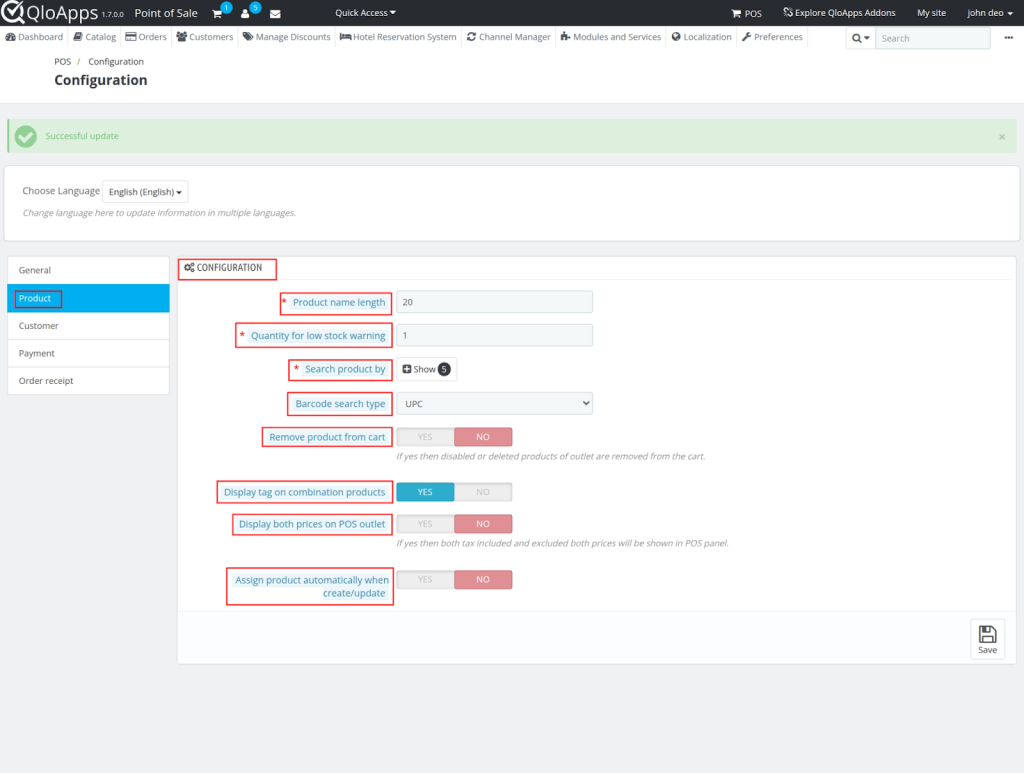
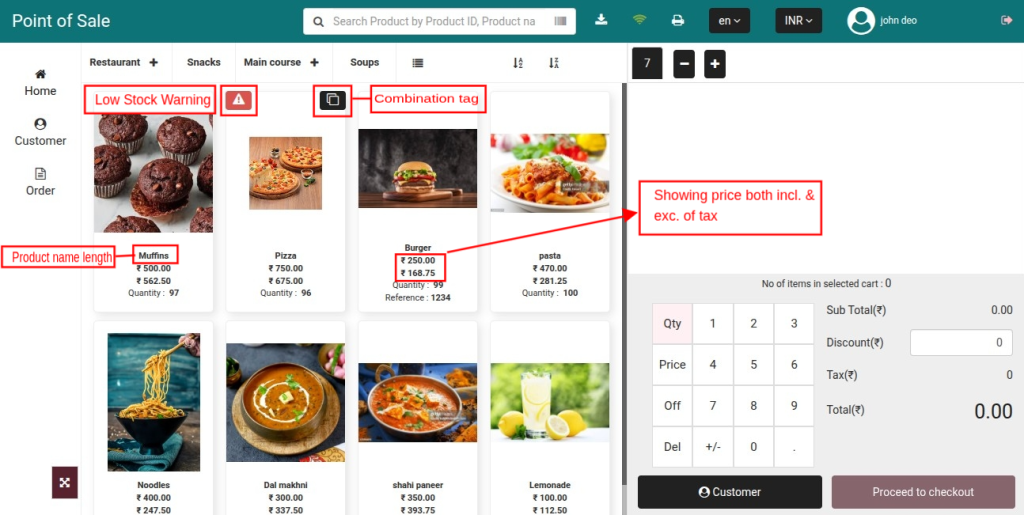
- Product name length – Set the maximum number of characters allowed for product names.
- Quantity for low stock warning – Set the stock threshold to trigger a low-stock alert.
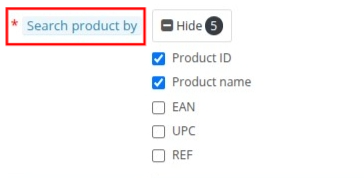
- Search product by – Select how products can be searched (name, reference, barcode).
- Remove product from cart – Enable or disable the option for cashiers to remove items from the cart.
- Display tag on combination products – Enable or disable the option to show tags on variation products.
- Display both prices on the POS outlet – Enable or disable the option to show both tax-included and tax-excluded prices.
- Assign product automatically when create/update – Enable or disable the option to auto-assign products when created or updated. If enabled, you can select whether to assign them to all outlets or a specific outlet.

Front office-view of Product configuration
Customer Configuration
By default, the guest checkout is disabled in the QloApps point of sale system, as only the registered customers can place an order.
Admin can enable guest checkout by setting up a default email id which can be used for placing all the guest orders.

Guest checkout – Enable or disable the option to allow customers to complete purchases without creating an account.
Guest checkout type – Select between a customer for checkout or guest info while checkout.
If you select a customer for checkout, then

Guest account – Define the default account (with email) that will be used for handling guest checkouts.
Or if you select Guest info while checking out, then.
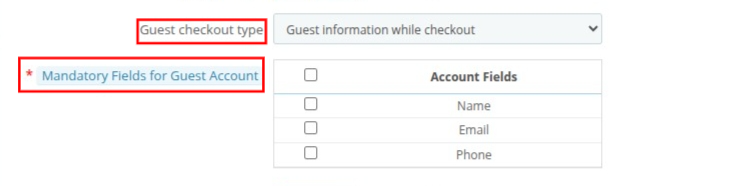
Guest checkout type – Select how guest checkout works (e.g., collect guest info during checkout).
Mandatory Fields for Guest Account – Choose required fields (Name, Email, Phone) for guest checkout.
Customer group selection – Enable or disable the option for assigning customers to specific groups during checkout.
Front office-view of Customer.
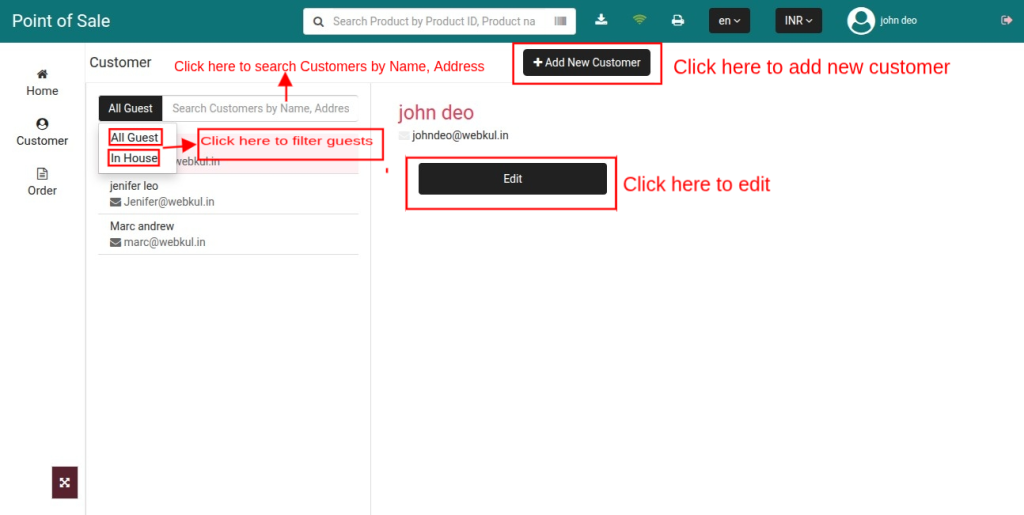
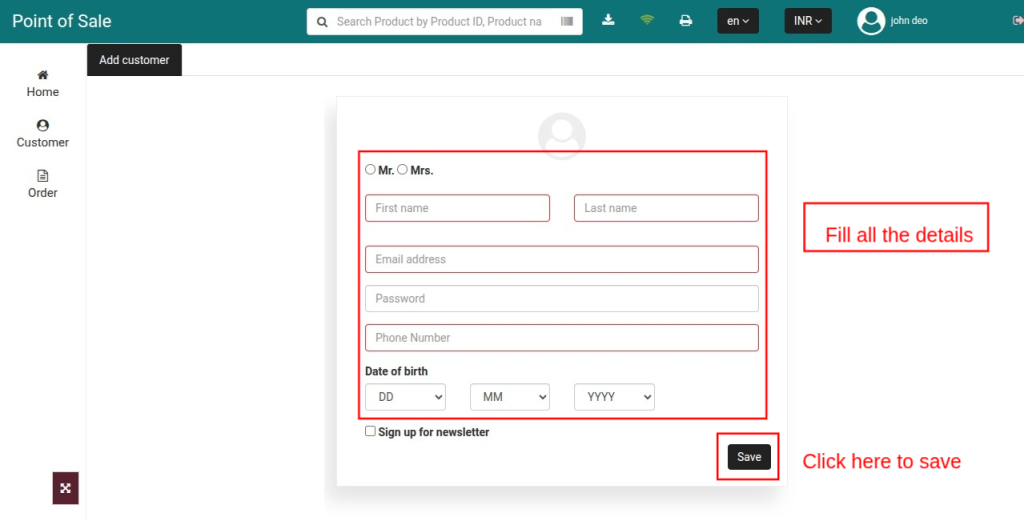
If you click Add New Customer
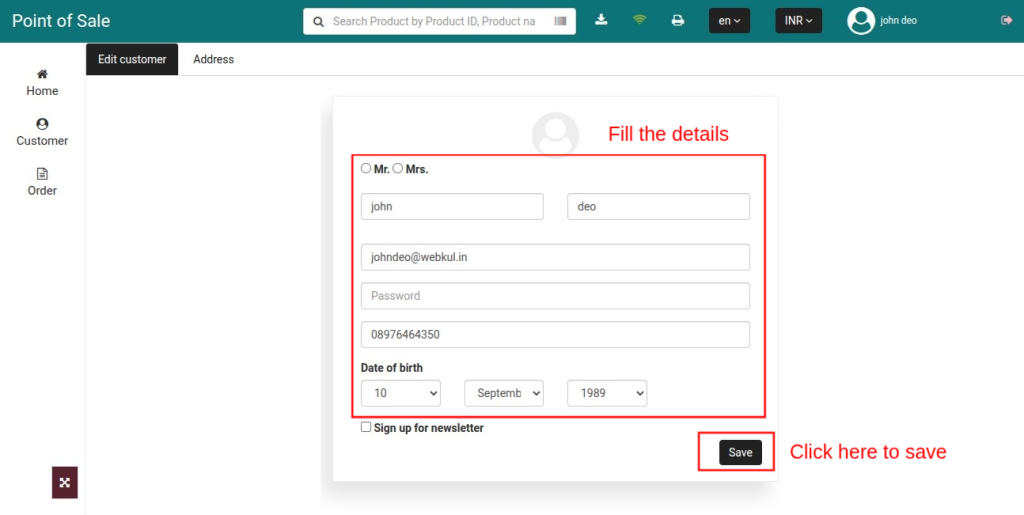
If you click Edit for the previous customer
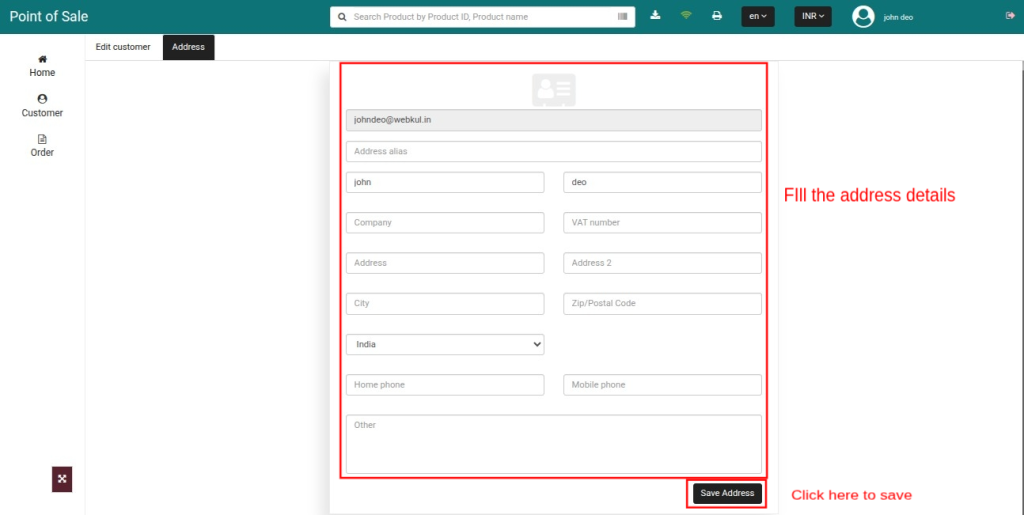
Once you click Address under edit
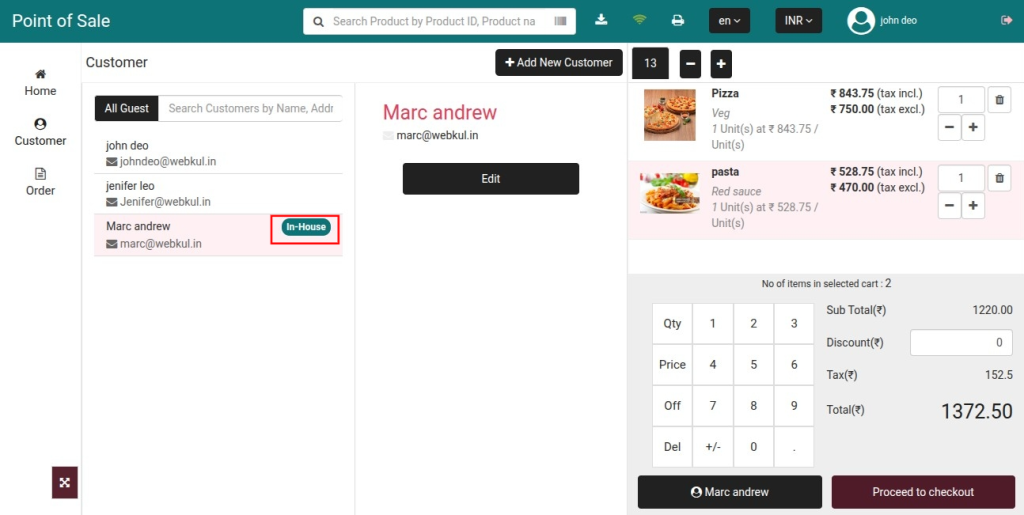
If there is an in-house guest
Once you select in house guest, then you have to select eithera separate order or Attach with Room Number

Select, separate order, then just click on proceed to move forward.
If selected, attach with Room Number.
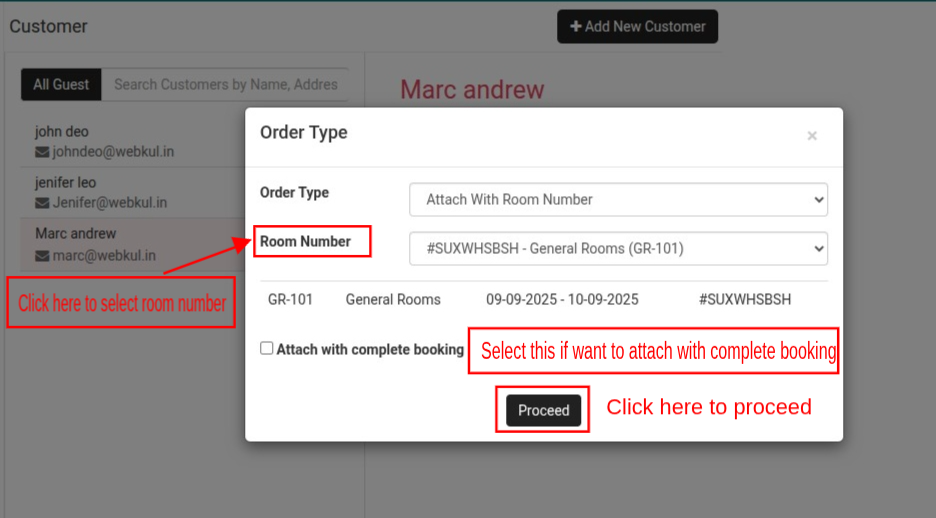
If it is attached with room is selected then the bill will be attached with the room number.
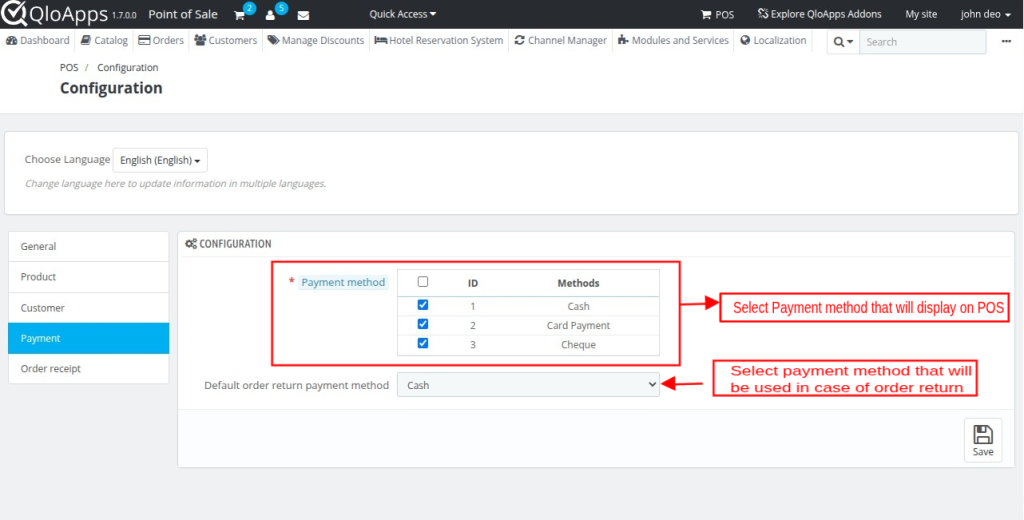
Payment Methods
Under “Payment Methods”, the admin can:
- Select payment modes which that will be available to employees on POS.
- Choose payment method to be used in case of order return.
Order Receipt
Under “Order Receipt” admin can:
- Choose which type of printing you want to use.
- Enter the printer name with which system gets connected.
- Enable/Disable the display of product discount, order discount, and barcode on order receipt.
- Enable cash drawer to open it on the command of invoice printing.
Raw printing
Our module supports ESCPOS language. For raw printing, the POS printer/ thermal printer which you are using must support ESCPOS language.
How to configure Printer
Before using the printer, follow the instructions given below:
- Install Java 8 or the higher version from the link: https://java.com/en/download/
- Download the QZ tray from the link: https://qz.io/download/
- Install it as a typical program on your PC
- Launch the QZ tray application
- Configure the printer name in the backend POS configuration page.
In order to check the compatibility of the POS printer with our POS. Please open the link. Then, select ESC/POS language and then print.
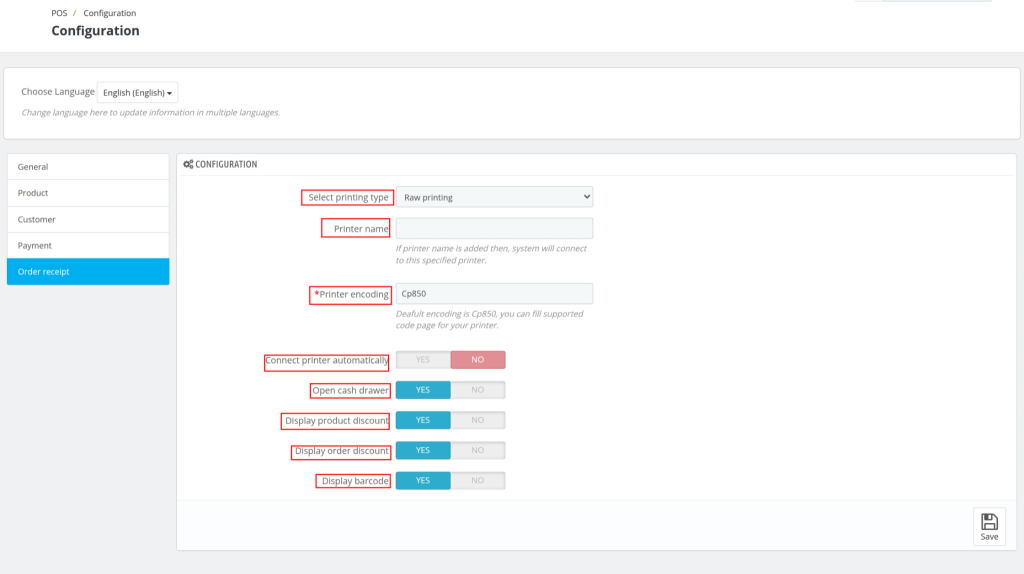
Select printing type – Choose the method of printing receipts
Printer name – Enter the printer’s name to allow the system to connect directly to that printer when printing receipts.
Printer encoding – Define the encoding standard for the printer (default is Cp850). Update this value if your printer requires a different code page for proper character printing.
Connect printer automatically – Enable or disable the option for the system to connect with the configured printer automatically.
Open cash drawer – Enable or disable the option to open the cash drawer automatically after printing a receipt.
product discount – Enable or disable the option to show discounts applied on individual products on the receipt.
Display order discount – Enable or disable the option to show discounts applied on the entire order on the receipt.
barcode – Enable or disable the option to print a barcode representing the order on the receipt.
HTML printing
The module also supports HTML printing.
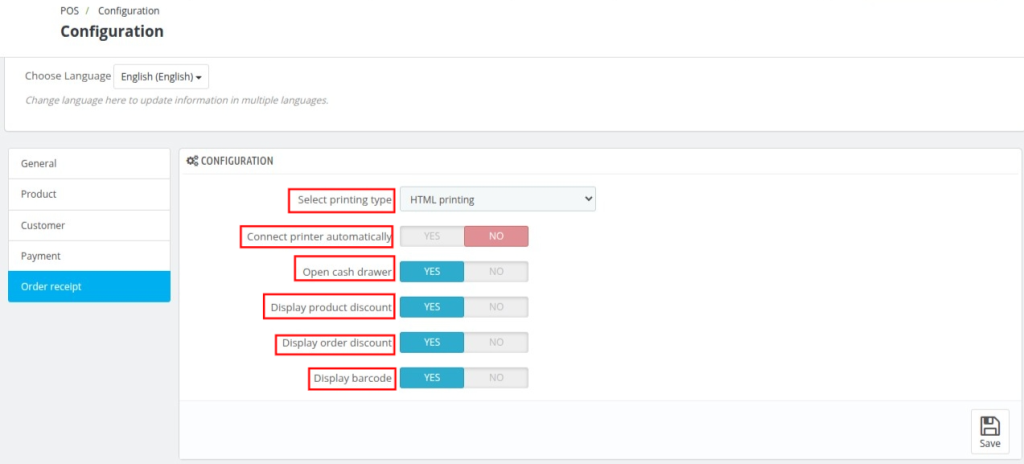
Select printing type – Choose the method for printing receipts (e.g., HTML printing or Raw printing). HTML printing allows formatted receipts, while Raw printing is mostly used for thermal printers.
Connect printer automatically – Enable or disable the option for the POS system to automatically connect to the configured printer when printing receipts.
Open cash drawer – Enable or disable the option to automatically open the cash drawer after printing a receipt (if supported by the printer).
Display product discount – Enable or disable the option to show discounts applied on individual products in the receipt.
order discount – Enable or disable the option to show discounts applied on the entire order in the receipt.
barcode – Enable or disable the option to include a barcode representing the order on the receipt for easy scanning and quick order lookups.
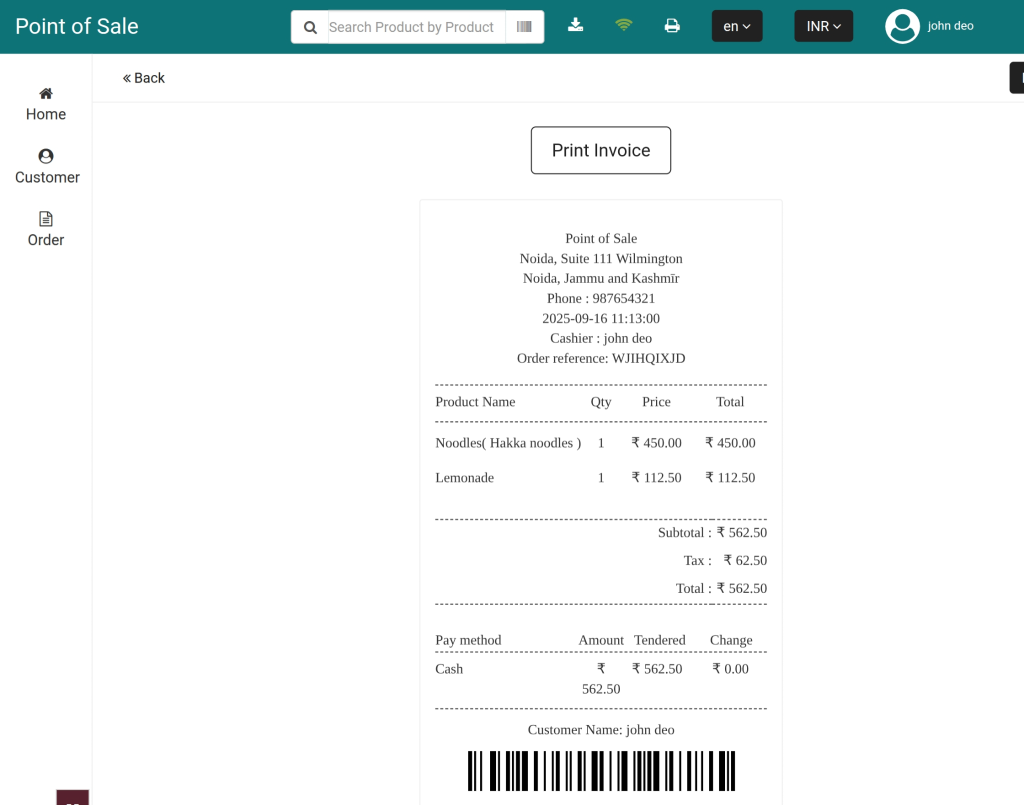
Front End View
In the case of raw printing, the following page opens at the POS end.
Add/Manage Outlets
Admin can add/manage outlets by navigating through Manage POS->Outlets.
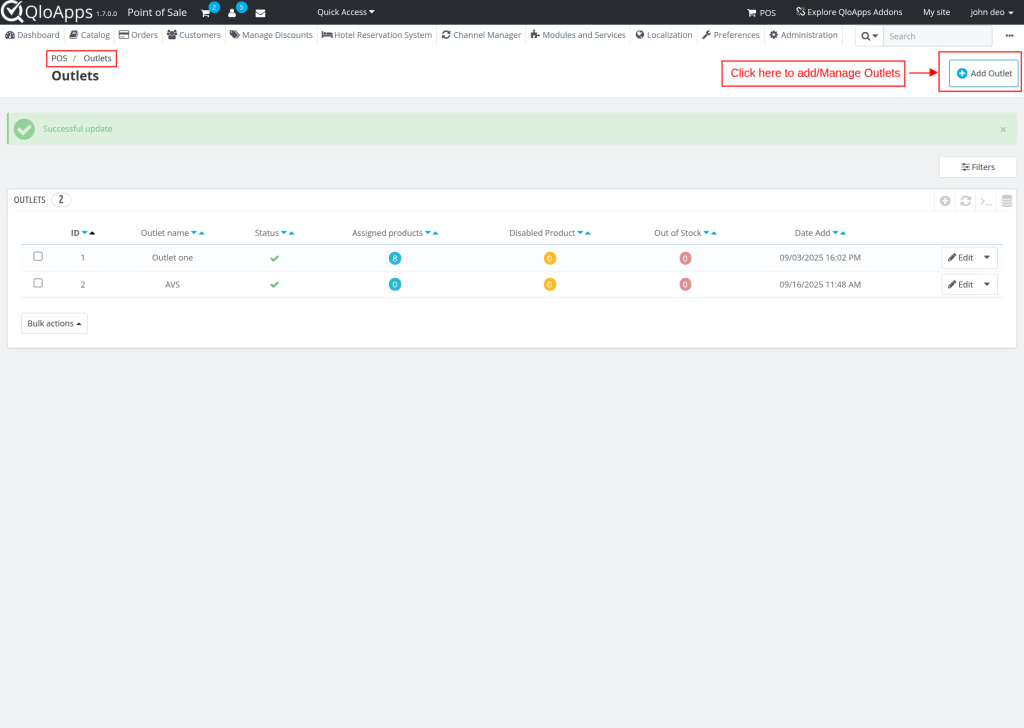
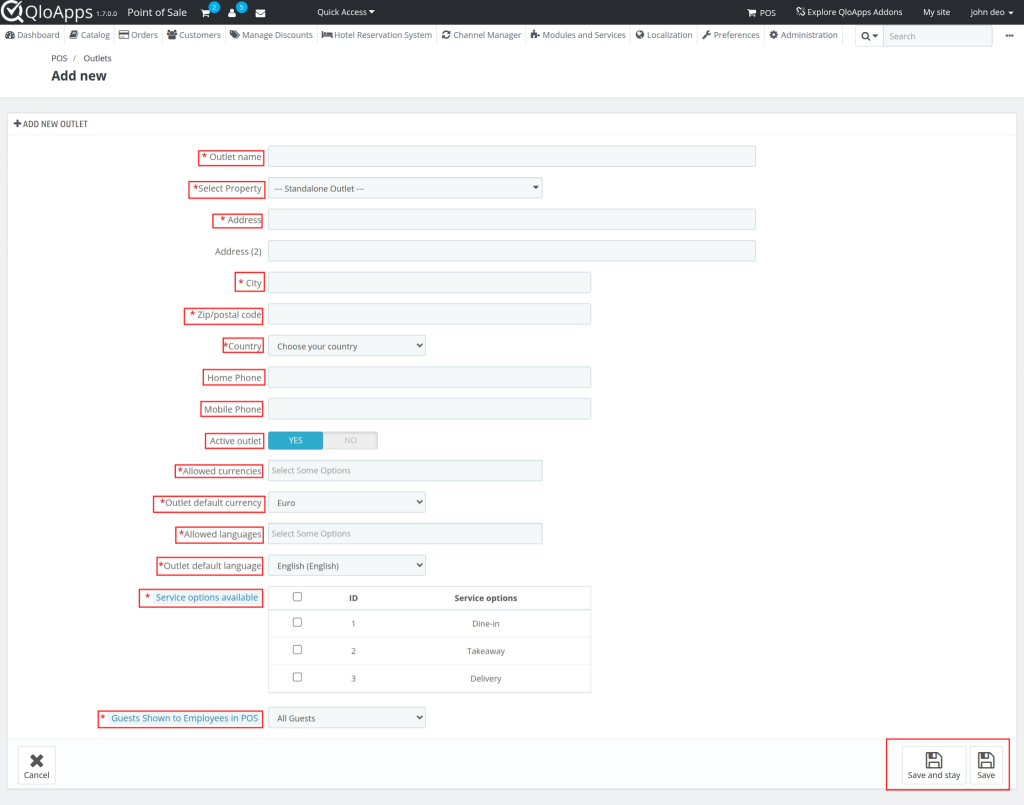
Outlet name – Enter the name of the POS outlet. This will be used to identify the outlet in the system.
Select Property – Choose the property to which this outlet belongs. For standalone outlets, select “Standalone Outlet.”
Address – Enter the street address of the outlet. An additional address line is available if required.
City – Enter the city where the outlet is located.
Zip/postal code – Enter the postal or zip code of the outlet’s location.
Country – Select the country where the outlet is located from the dropdown menu.
Home Phone – Enter the outlet’s landline phone number (optional).
Mobile Phone – Enter the outlet’s mobile phone number (optional).
Active outlet – Enable or disable the outlet’s active status. Active outlets will be available for use in the POS.
Allowed currencies – Select the currencies that can be used in this outlet for transactions.
Outlet default currency – Choose the primary currency that will be used by default for this outlet.
Allowed languages – Select the languages that can be used in this outlet for POS operations.
Outlet default language – Choose the default language for the outlet. This language will be applied when using the POS.
Service options available – Select the types of services the outlet provides (e.g., Dine-in, Takeaway, Delivery).
Guests Shown to Employees in POS – Define which guests should be visible to employees in the POS system (e.g., All Guests or In-house Guests).
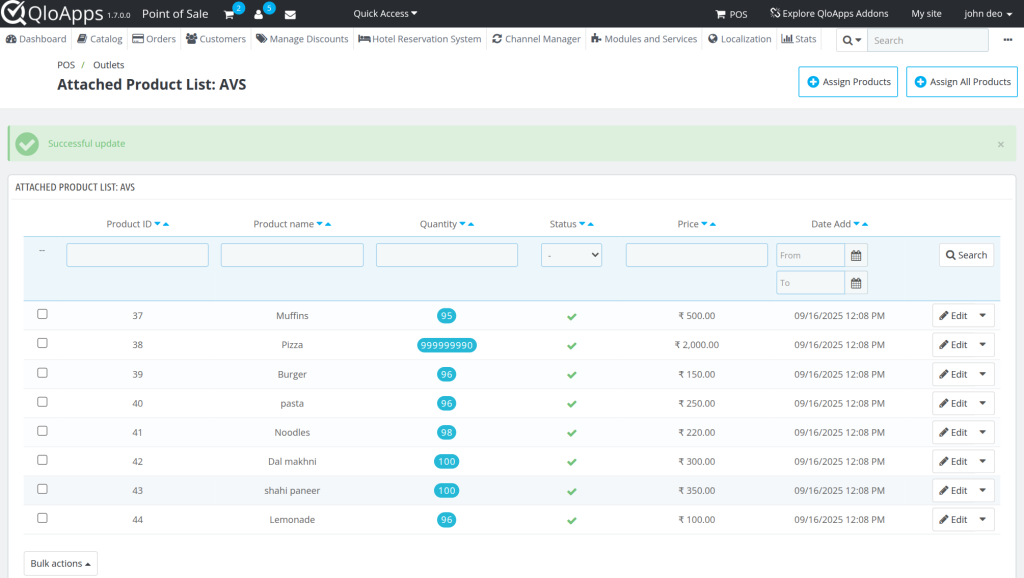
Assign Products to Outlet
Once added, the admin can assign products to the outlet. The admin can assign products to the outlet from Outlets list or edit outlet page.
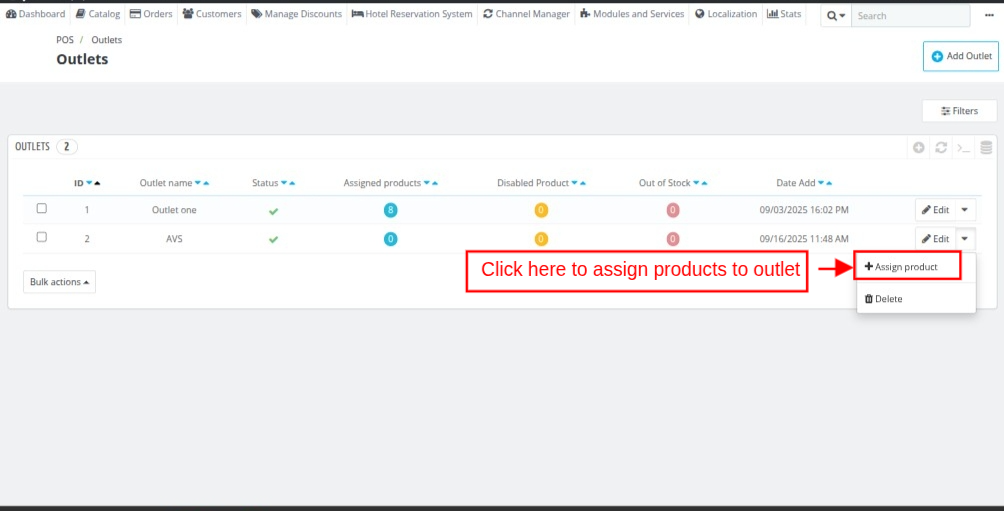
Click on ‘Assign products’ button under Edit option in Outlets tab.
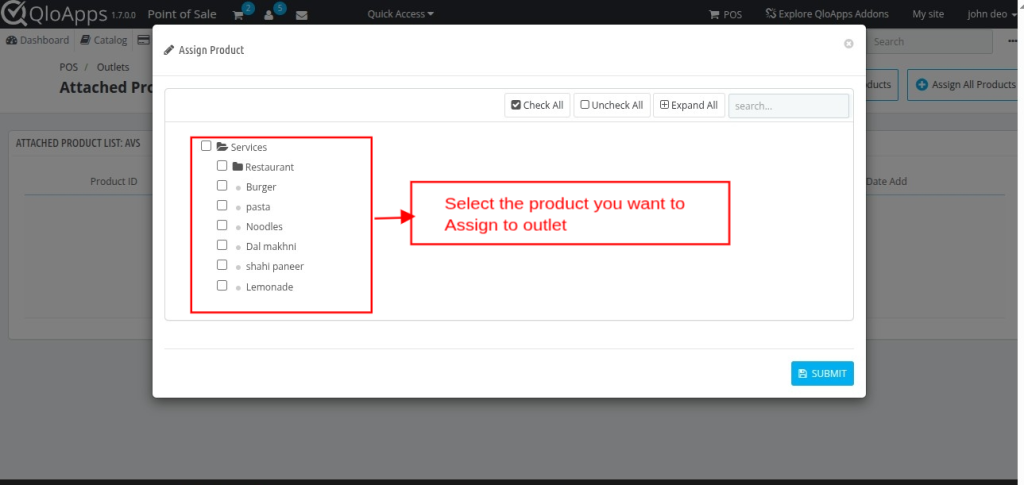
Admin can assign all the products to an outlet at once or specific products from the edit outlet page.
Click on ‘Assign All Product’ button to assign all the products to the outlet.
POS Dashboard
Dashboard – The central area of the POS system that provides a quick overview of sales performance, orders, profits, and reports.

Sales, Orders, Average Cart, Net Profit – Key performance indicators (KPIs) displayed at the top:
- Sales – Total value of sales made.
- Orders – Number of POS orders placed.
- Average Cart – Average order value per cart.
- Net Profit – Profit after deducting taxes and other applicable costs.
Sales Chart – A graphical representation of POS sales over a selected time range (Day, Month, Year, etc.). Helps in analyzing sales trends.
Sales Summary Report – Provides a breakdown of key sales metrics:
- Gross Sales – Total sales before deductions.
- Returns – Value of returned sales.
- Net Sales – Final sales value after returns.
- Taxes – Total tax collected.
- No. of POS Orders – Total orders placed.
- No. of Returned POS Orders – Count of returned orders.
Payment Method Report – Displays total sales collection grouped by payment methods (e.g., Cash, Card, Online).
Top Cashier – Shows the performance of cashiers, including employee ID, name, outlet, number of orders handled, and total sales. Provides quick insights into employee productivity.
Category Wise Sales – Breakdown of sales by category, showing sold quantity, total sales, and percentage contribution to overall sales.
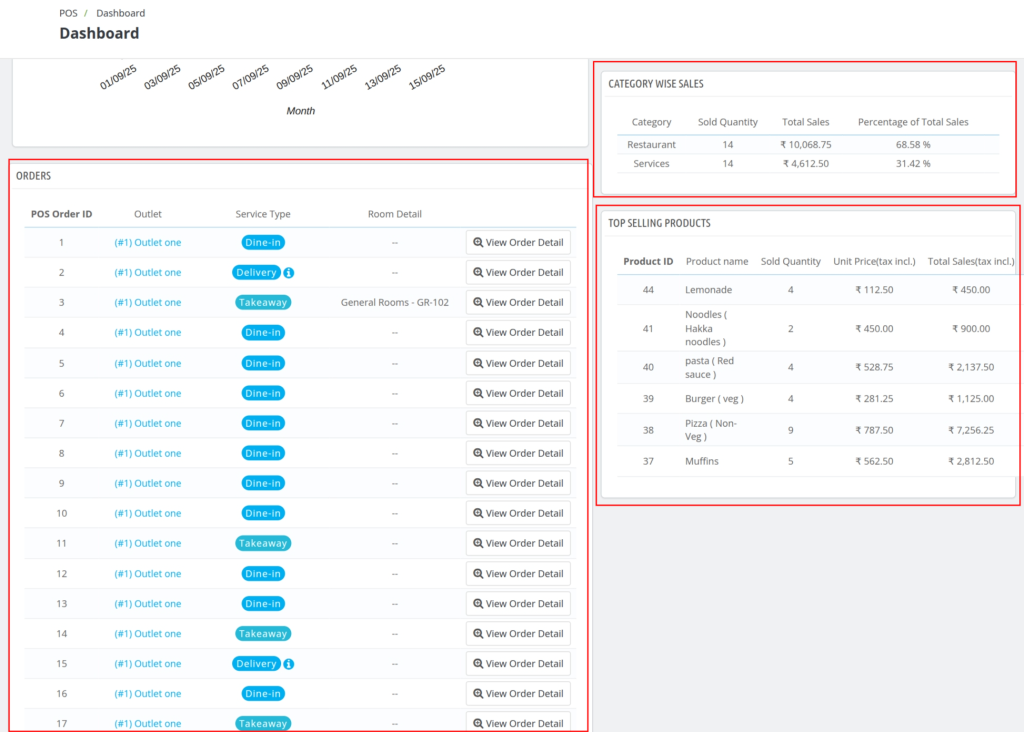
Orders – Displays a list of all POS orders placed. Each entry shows:
- POS Order ID – Unique identifier of the order.
- Outlet – The outlet where the order was placed.
- Service Type – Mode of service (Dine-in, Delivery, Takeaway).
- Room Detail – Room number if linked with a hotel property.
- View Order Detail – Button to check detailed information about a specific order.
Category Wise Sales – Breakdown of sales performance by category, showing:
- Category – The type of product or service (e.g., Restaurant, Services).
- Sold Quantity – Number of items sold in that category.
- Total Sales – Total revenue generated from that category.
- Percentage of Total Sales – Contribution of the category to overall sales.
Top Selling Products – Displays the most popular products based on sales, showing:
- Product ID – Unique identifier of the product.
- Product Name – Name of the product sold.
- Sold Quantity – Number of units sold.
- Unit Price (tax incl.) – Price per unit including tax.
Total Sales (tax incl.) – Total sales value generated by that product.
Adding New Product
Admin can add the new product by navigating through POS>PRODUCT>ADD NEW PRODUCT
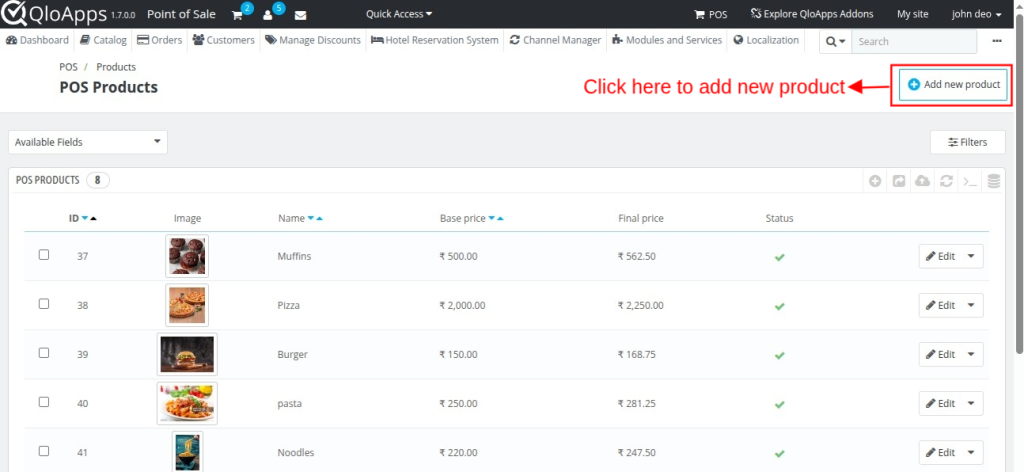
After clicking add new product fill following details
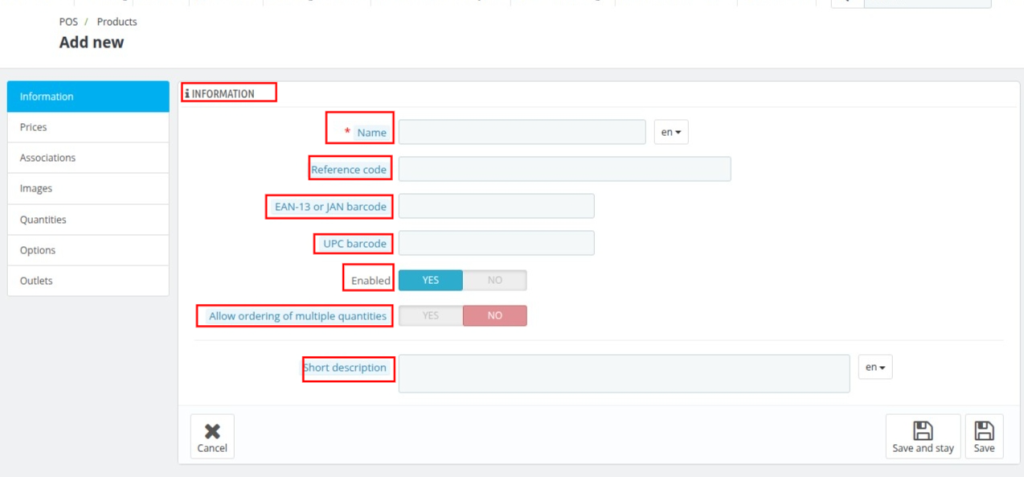
Information Tab
Name – Enter the product name. This field is mandatory and will be visible on the POS interface.
Reference Code – Unique identifier or reference number for internal tracking of the product.
EAN-13 or JAN Barcode – Add the international article number for scanning products through barcode readers.
UPC Barcode – Enter the Universal Product Code if applicable.
Enabled – Toggle to enable or disable the product in the POS system. If disabled, the product will not be available for sale.
Allow Ordering of Multiple Quantities – Enable or disable the option to allow customers to purchase multiple quantities of this product in a single order.
Short Description – Provide a brief description of the product. This helps cashiers quickly identify the product on the POS.
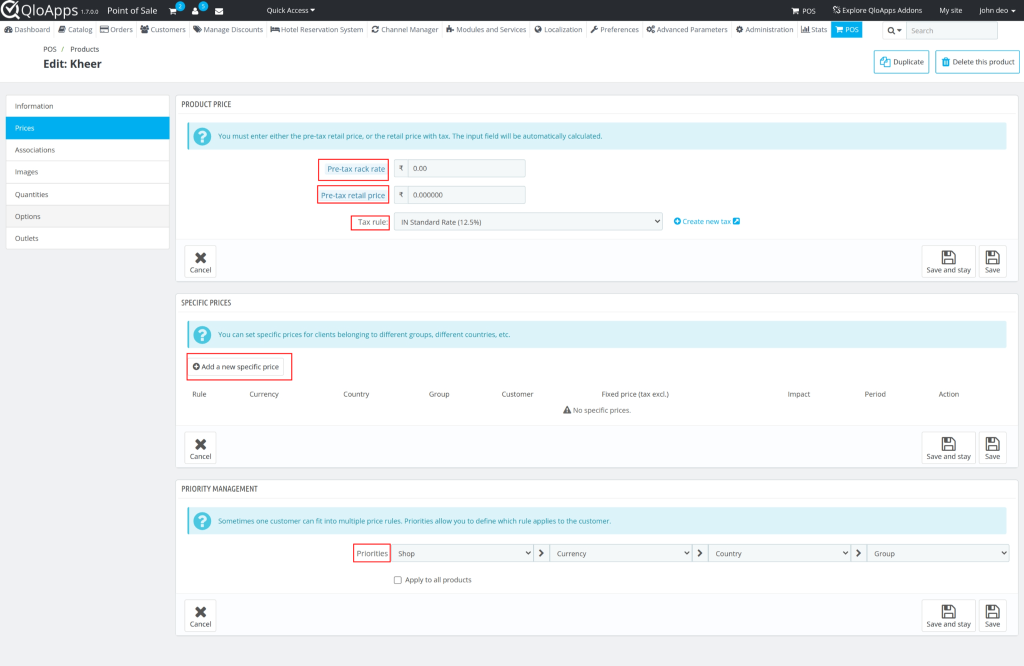
Prices Tab
- Pre-tax Rack Rate – Enter the base price of the product before applying any discounts or taxes.
- Pre-tax Retail Price – Enter the final selling price before tax after applying any discounts or adjustments.
- Tax Rule – Select the applicable tax rate (e.g., IN Standard Rate 12.5%). You can also create new tax rules if needed.
- Add a New Specific Price – Allows you to define custom prices for different customers, groups, countries, or currencies. Useful for targeted discounts and promotions.
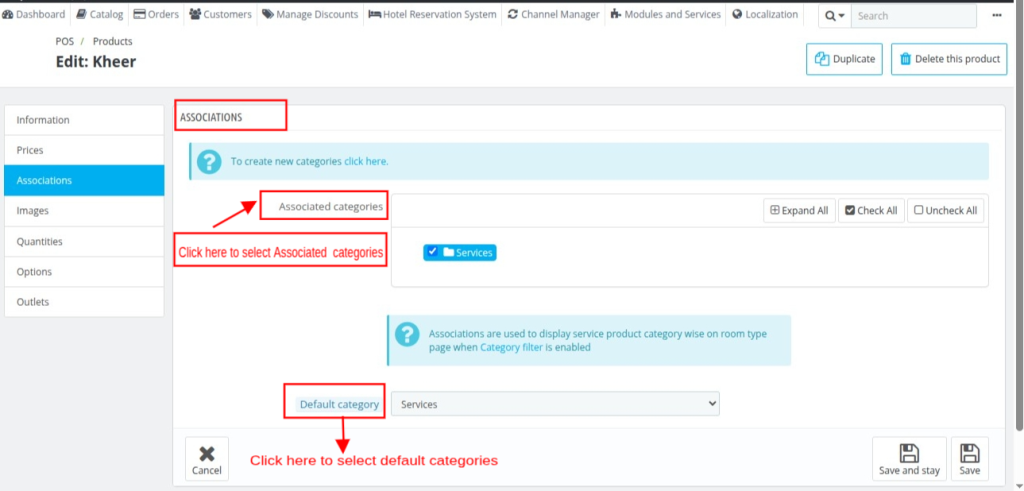
Associations
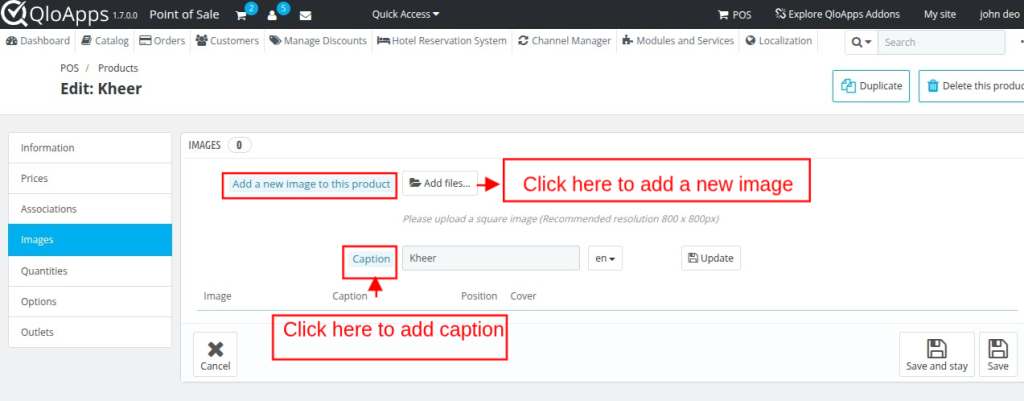
Images
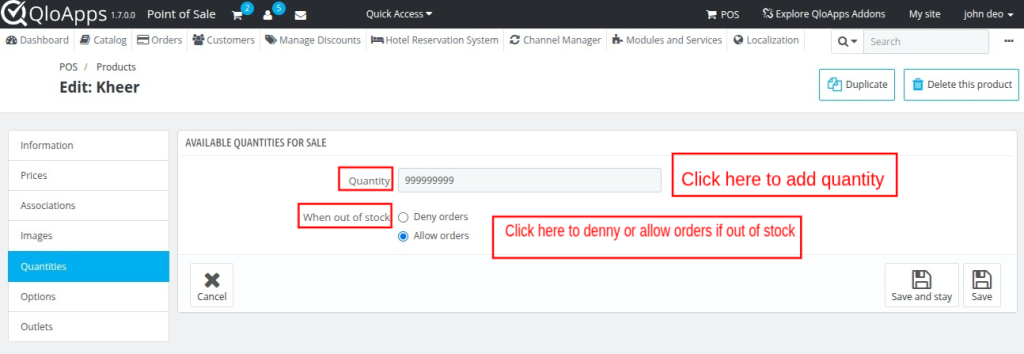
Quantity
Options
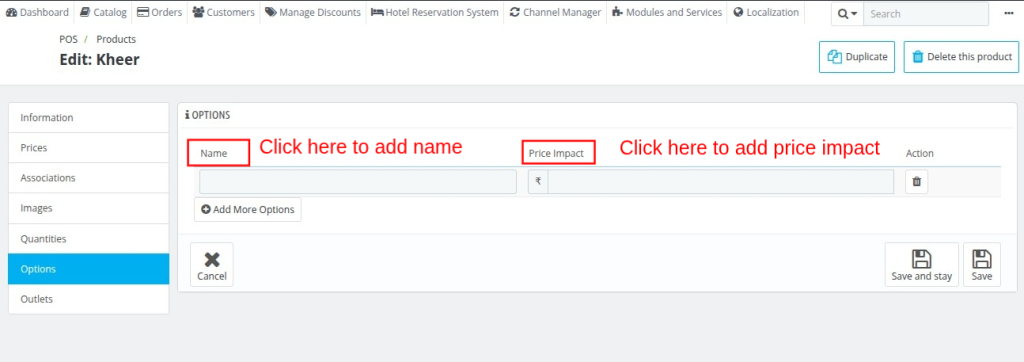
Adding Sales Employees
Admin can add the sales employee by navigating through Admin> Administration>Employees.
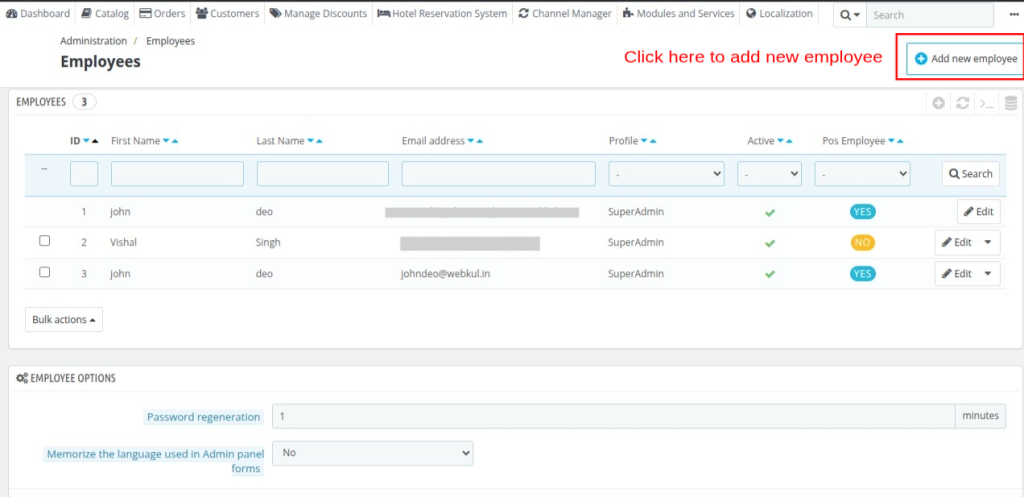
While adding a new employee admin can assign him/her to the outlet.
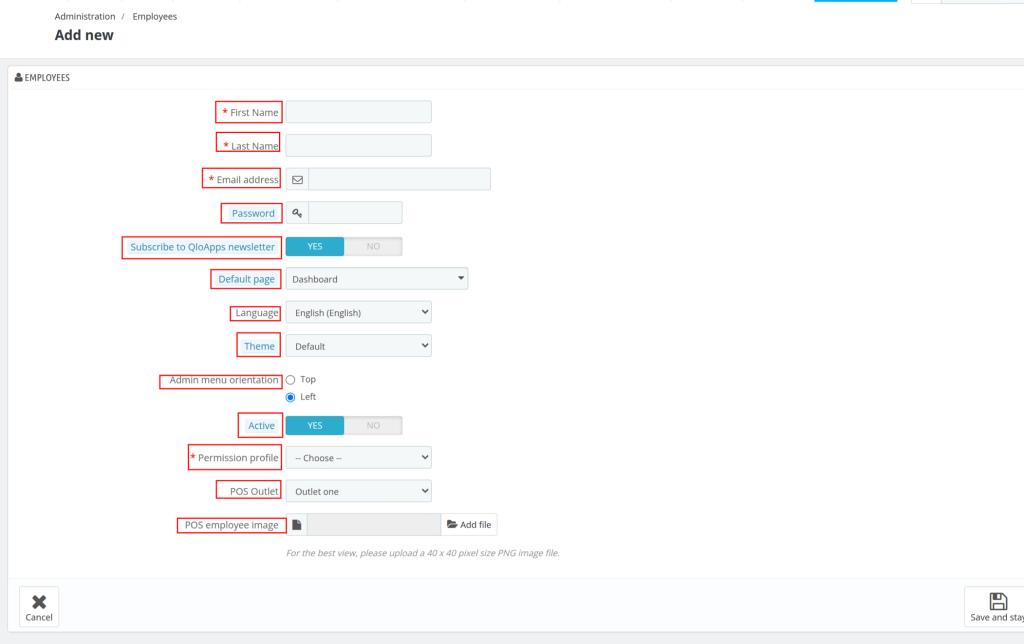
Employees – Add New
- First Name* – Enter the employee’s first name. This is a mandatory field.
- Last Name* – Enter the employee’s last name. This is a mandatory field.
- Email Address* – Provide the employee’s valid email address. This will be used for login and communication.
- Password – Set a secure password for the employee’s account.
- Subscribe to QloApps Newsletter – Choose Yes to subscribe the employee to QloApps updates, or No to opt out.
- Default Page – Select the default landing page the employee sees after logging into the system (e.g., Dashboard).
- Language – Define the interface language for the employee (e.g., English).
- Theme – Choose the preferred visual theme for the back office interface.
- Admin Menu Orientation – Select whether the admin menu should appear at the Top or on the Left side.
- Active – Toggle to activate or deactivate the employee account. If set to No, the employee cannot log in.
- Permission Profile* – Assign the employee a role/profile to define their access rights (e.g., Admin, Cashier, Manager). Mandatory field.
- POS Outlet – Link the employee to a specific POS outlet where they will be working.
- POS Employee Image – Upload a profile image of the employee (recommended size: 40×40 pixels, PNG format).
If the admin has not assigned any POS Outlet to an employee, then that employee will not be able to log in to POS

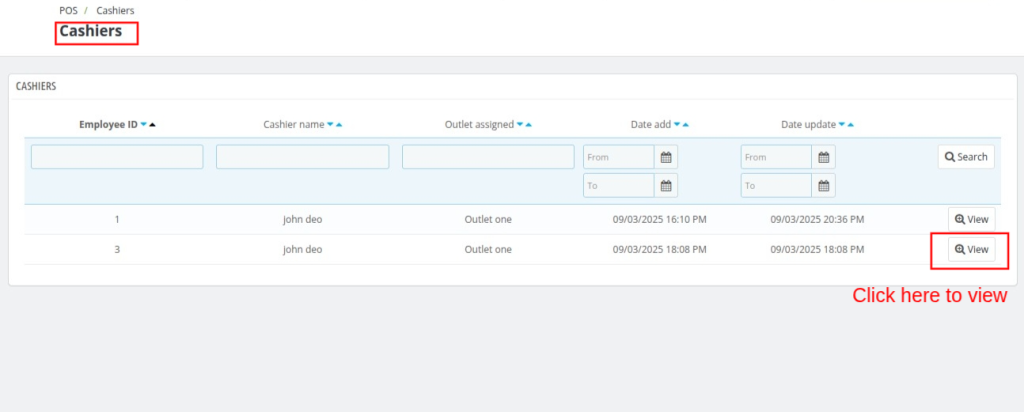
Cashier
When the employee is created and assigned to an outlet is will be displayed as cashier
The following message will display on screen if an employee has not assigned to any POS outlet by admin.
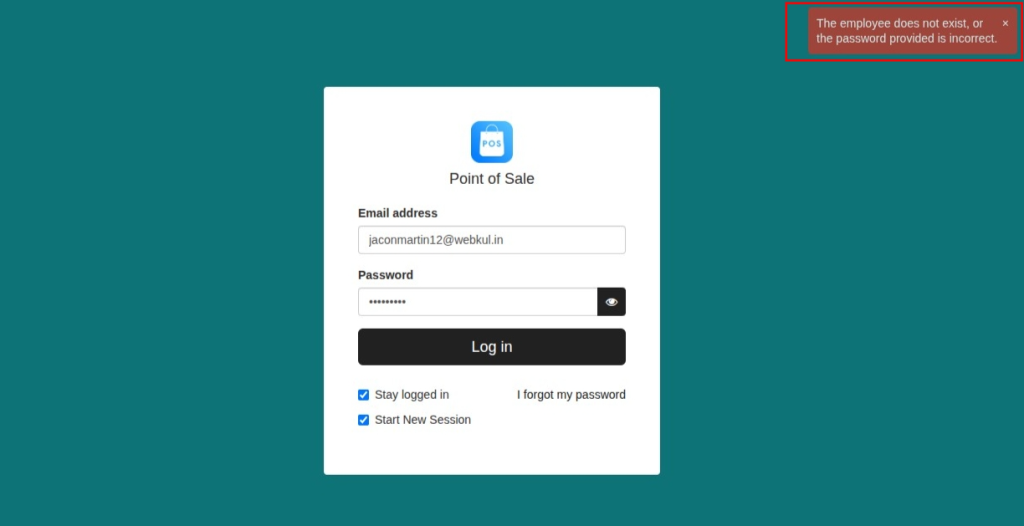
POS System – Front End Flow
First of all, an employee or sales agent has to log in to the POS System by entering email address and password.

Once the employee has successfully logged in he will redirect to the POS System.
Start New Session
If an employee clicks on “Start New Session“, then the products which were added in the cart by an employee during the previous session will be removed and a new session will get started.
After login to POS shop, an employee can view the products, categories and checkout panel. Also, the available stock for each product displayed in the POS panel.
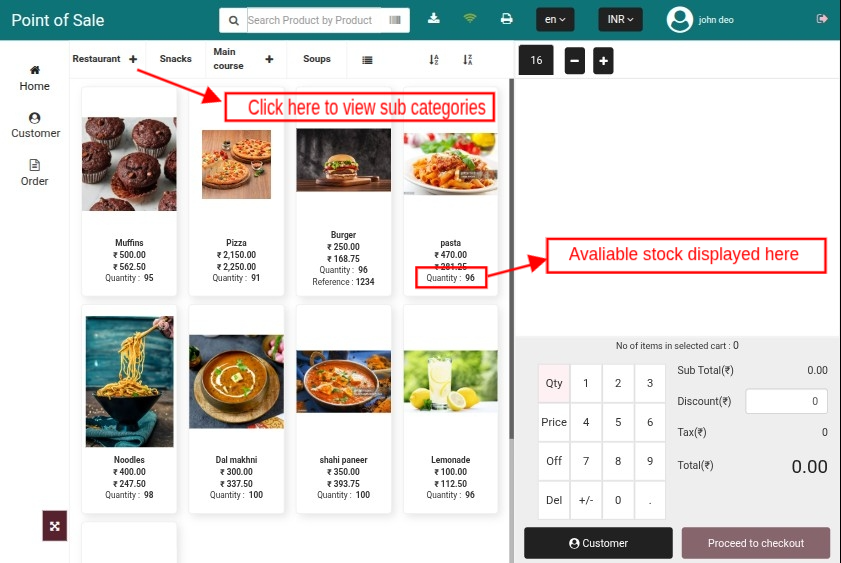
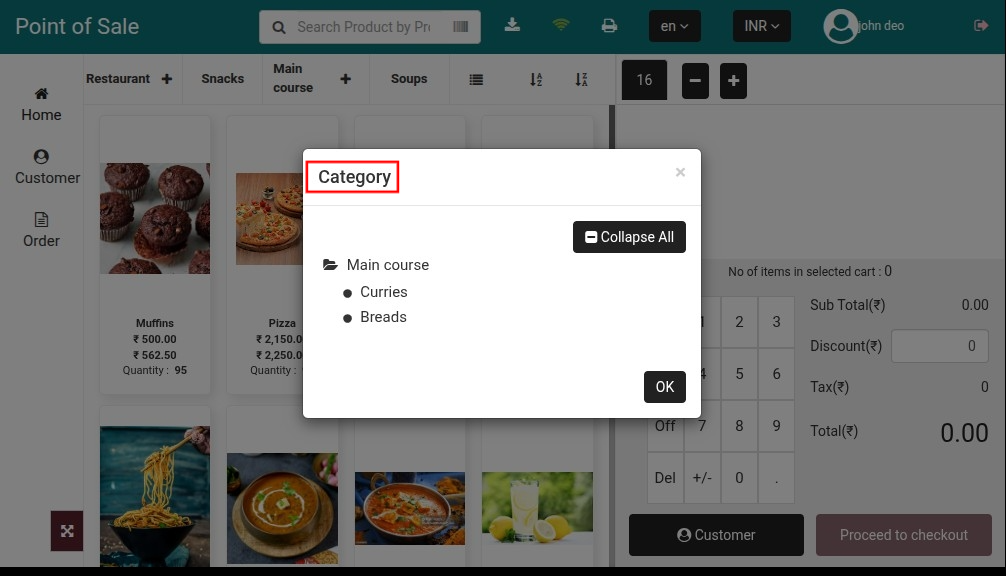
On clicking the ‘+’ icon, a popup appears on POS panel where all the subcategories are displayed.
An employee just needs to click on a product for adding it to the cart.
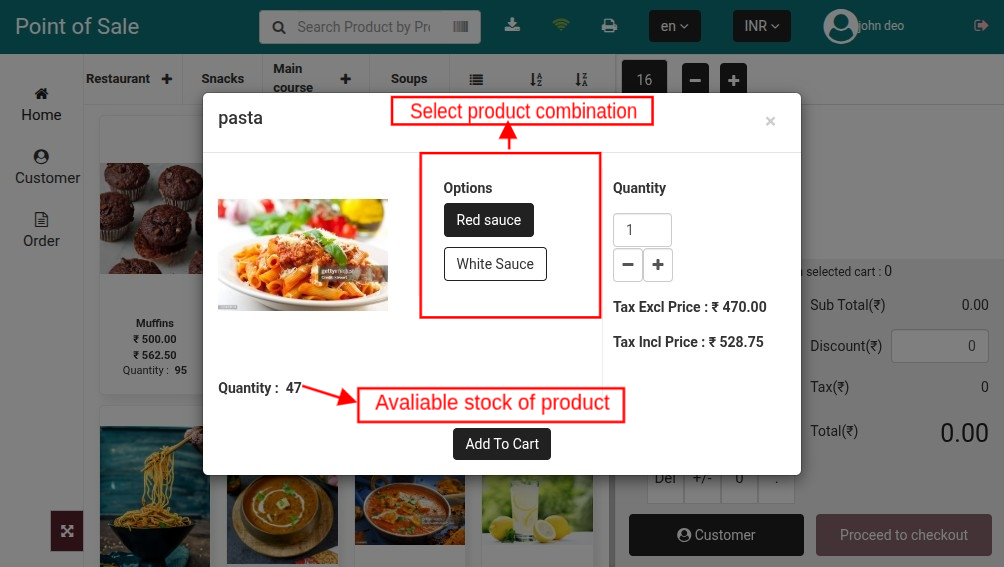
In case of a combination product when an employee clicks on the product, a popup appears on screen where he has to select a combination, enter its quantity and then click on “Add To Cart” button.
The stock available for a product also displays in the popup.
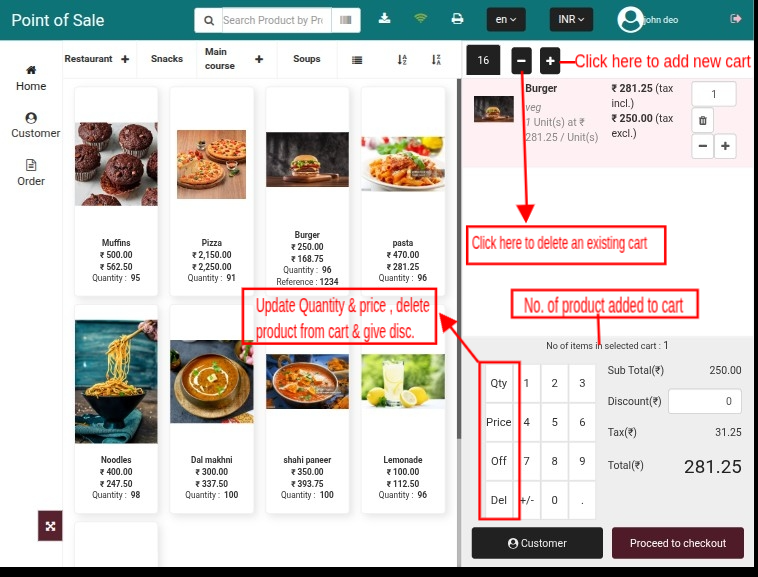
Once the products have added to cart, then an employee can:
- Update the quantity of the products.
- Update the Price of the products.
- Give a discount on the products.
- Give Cash discount on an order.
- Remove products from the cart.
- View the number of products added to cart.
When an employee clicks on “Proceed to checkout” button he’ll redirect to “Customer” page where he has to select a customer.
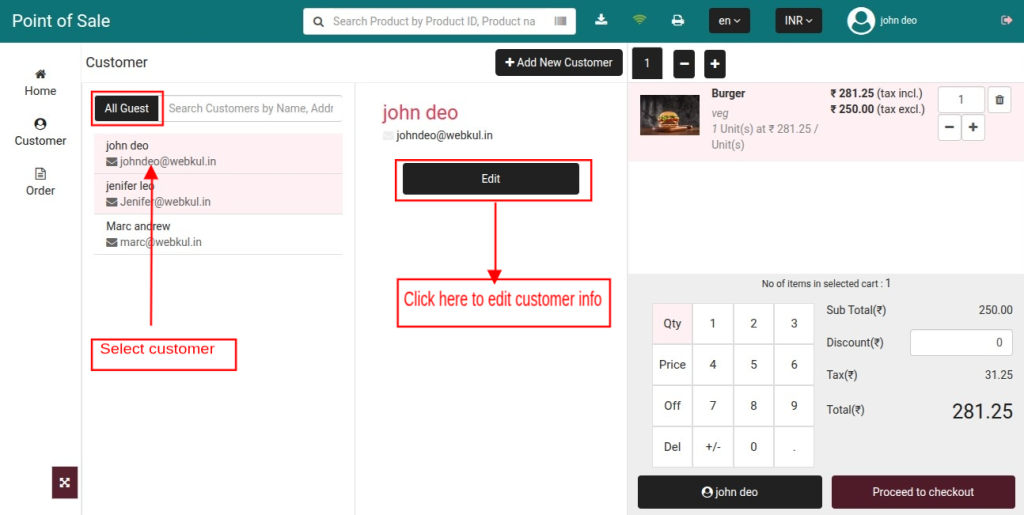
After selecting a customer, when an employee clicks on proceed to checkout button he’ll redirect to payment page.
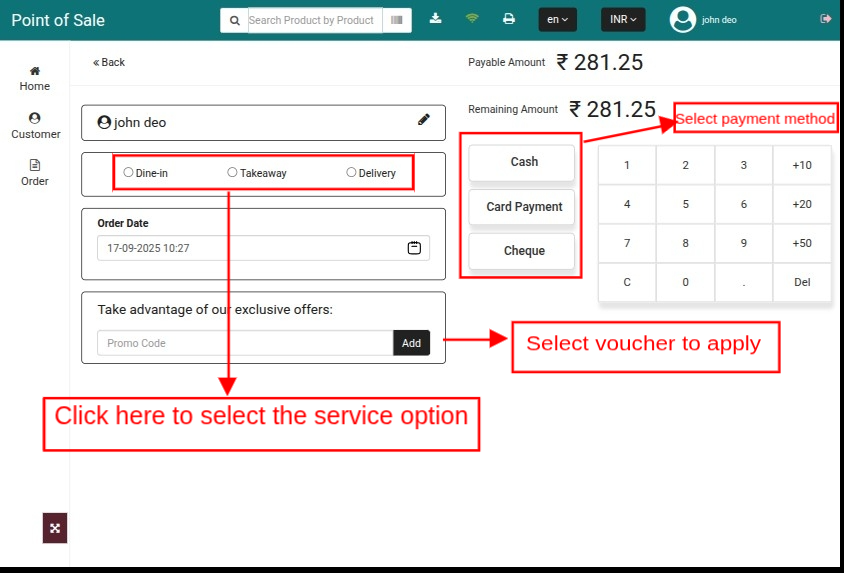
On Payment page, an employee can apply voucher on a cart, can select service option and select payment method for processing the payment.
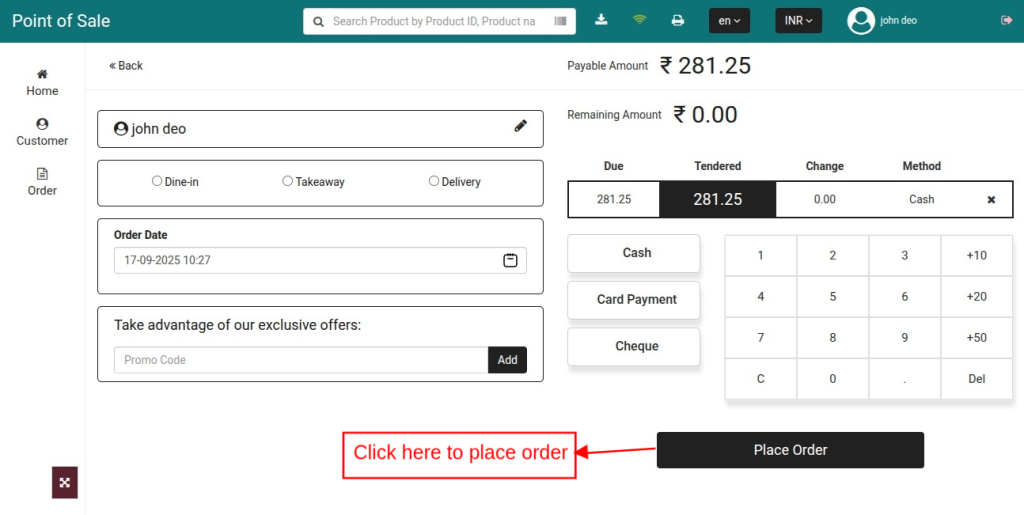
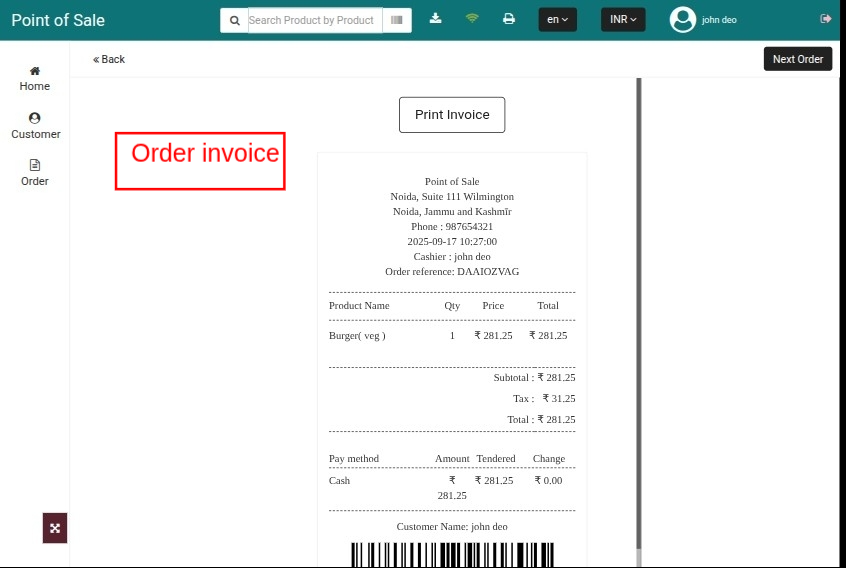
When an employee clicks on “Place order” button for completing the payment, invoice for an order will generate with the mentioned details.
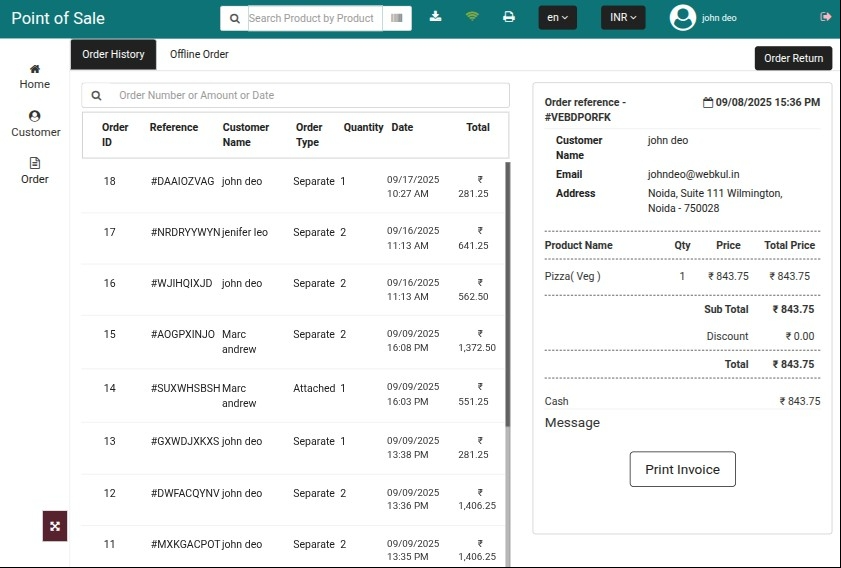
Orders
An employee can check the list of orders under” Orders” tab.
Also, the POS agent can search the orders via various parameters, like customer name, price, mode of payment, order reference etc on POS end.
Order Return
In the POS system, an employee can place a request to return an order and refund the amount under the “Order History” tab.
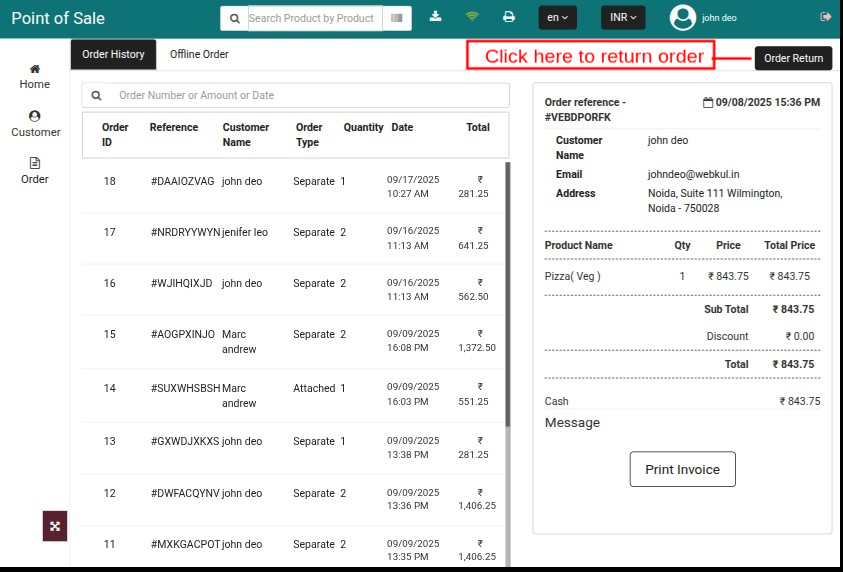
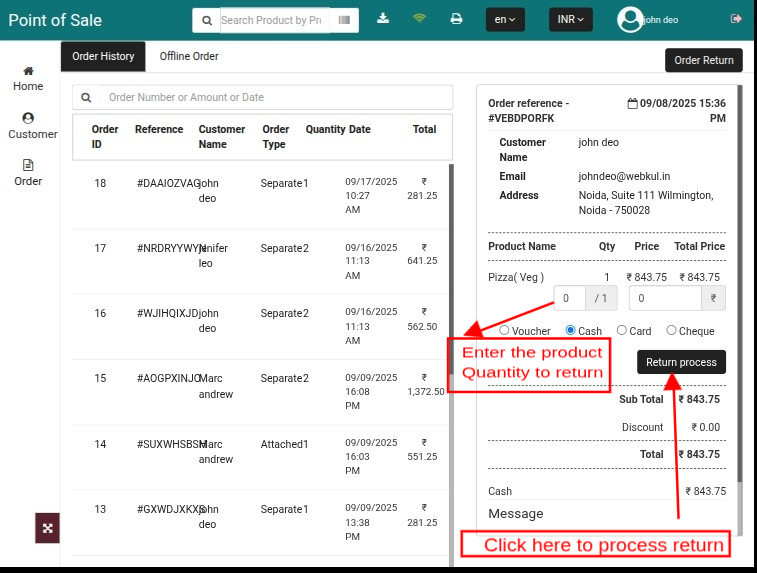
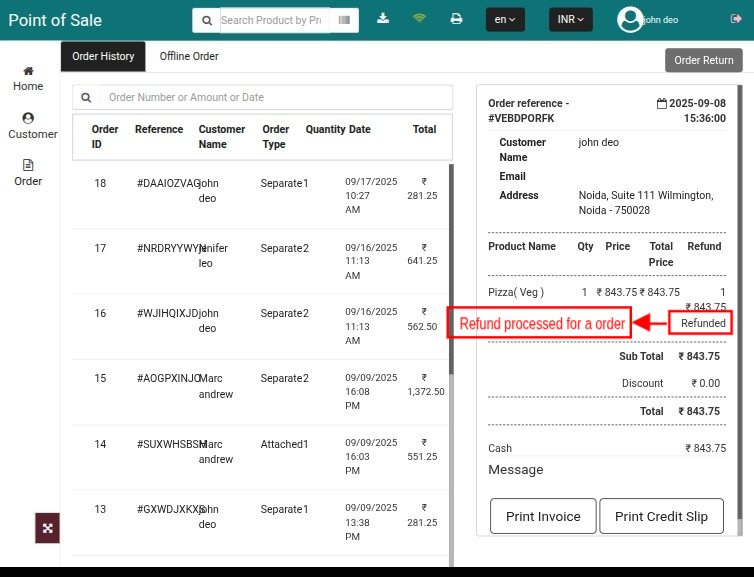
Return order stock assigned to the same outlet.
Conclusion
So, this was all about the QloApps Point of Sale module. I hope this document will help you in checking the functionality of the module in a better way.
Also, do let us know about your views in the comments.
If you want to learn about the functionality of QloApps then you can visit this link: QLO Reservation System.
In case of any query, issue, or requirement please feel free to raise it on QloApps Forum.
Moreover, for any support, you can raise a ticket from here.
Current Product Version – V_1.0.0
Supported Framework Version – QloApps 1.7.0

Be the first to comment.