QloApps PayPal Checkout is an add-on that will allow your users to make online payments via the PayPal payment gateway.
An insufficient payment mode can cost you real bookings in extremely high numbers. Hence, giving you revenue loss in such a competitive business environment.
These days, guests are worried about payment security and their own information like never before. They truly prefer to utilize the payment mode that can give these securities without a doubt.
Subsequently, we are here with one such addon to give your guests and website users enough payment security.
QloApps PayPal Checkout will be an insurance for better revenue with its user-friendliness and sense of security.
So let us understand how this addon works, what are its features, and how we can configure it.
Please Note, As per the current integration, Seller Protection Plan (SPP) is not applicable.
Features of QloApps PayPal Checkout Payments
- Add a new online payment method to the hotel website.
- The guest can pay via a PayPal account or Credit/Debit Card.
- Use the addon in the sandbox mode or in live mode as per your requirement.
- The list of all the PayPal transactions is available at the admin’s end.
- Admin can easily manage the refund from his end.
- Make a partial as well as a full refund to the customer.
- Refund history is also maintained for each transaction.
Note: PayPal checkout is currently available for the following supported countries.
Australian dollar (AUD), Brazilian real 2 (BRL), Canadian dollar (CAD), Chinese Renminbi 3 (CNY), Czech koruna (CZK), Danish krone (DKK), Euro (EUR), Hong Kong dollar (HKD), Hungarian forint 1 (HUF), Israeli new shekel (ILS), Japanese yen 1 (JPY), Malaysian ringgit 3 (MYR), Mexican peso (MXN), New Taiwan dollar 1 (TWD), New Zealand dollar (NZD), Norwegian krone (NOK), Philippine peso (PHP), Polish złoty (PLN), Pound sterling (GBP), Russian ruble (RUB), Singapore dollar (SGD), Swedish krona (SEK), Swiss franc (CHF), Thai baht (THB), United States dollar (USD).
QloApps Paypal Checkout Payment Installation
The installation of any module is very simple in QloApps.
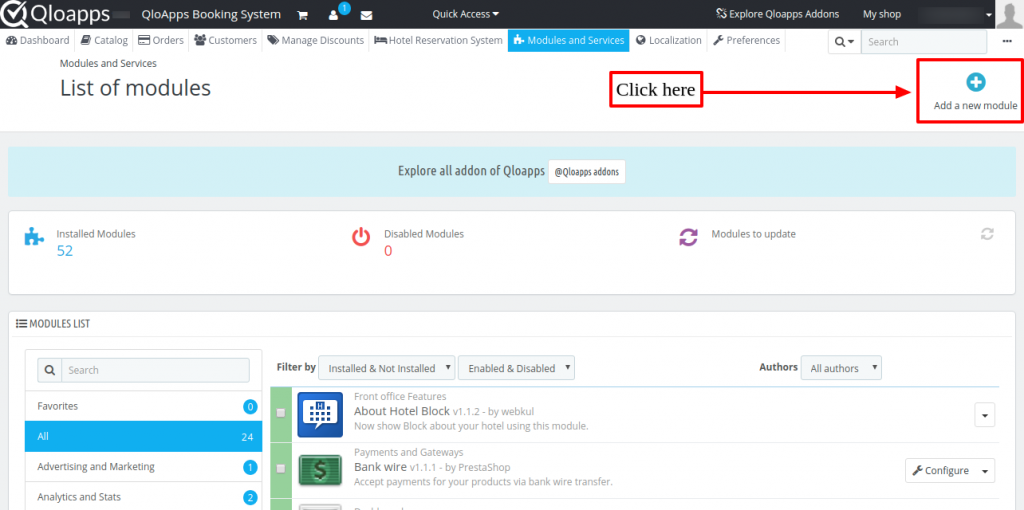
- Go to the “Module and Services”.
- Click on “Add New Module”.
Now upload the Zip file of the module and click on install.
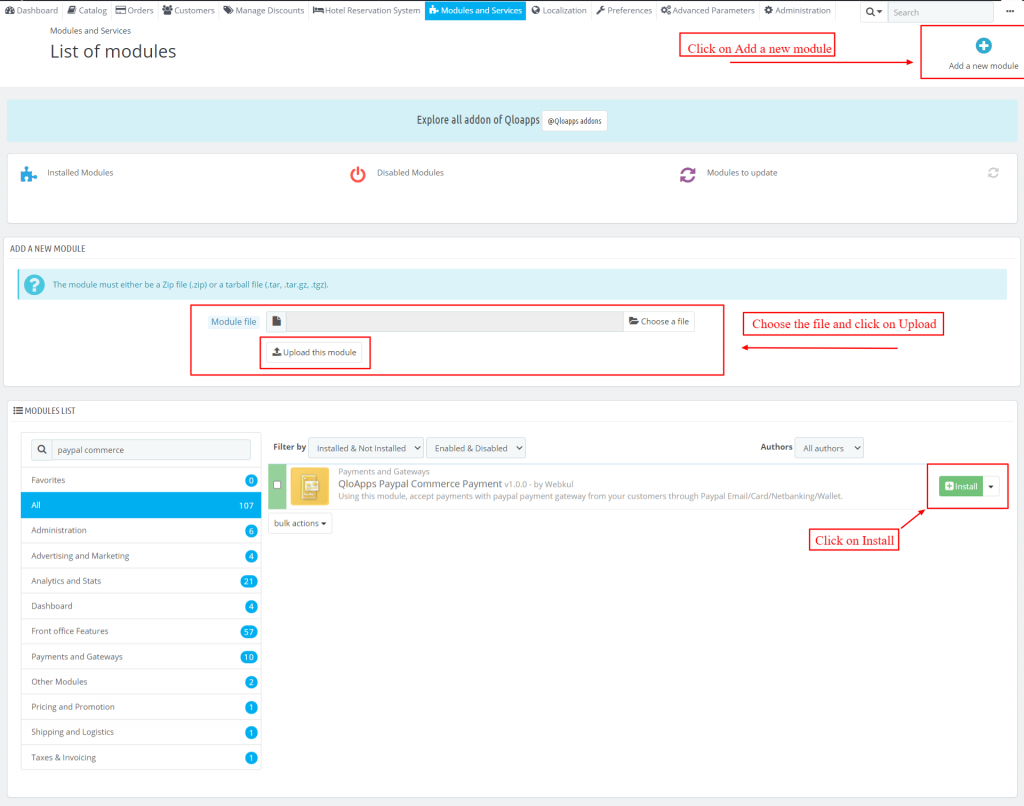
Now you have installed the module. So let’s check how to configure it.
Configuration of QloApps PayPal Checkout Payments
As soon as you install the module the install button will convert into configure button.
And at any course of time if you want to change the configuration then you can go to the Module And Services.
Now to configure the PayPal Checkout on your website you will need to enter:
- Transaction Environment
- SandBox: For testing, select the sandbox.
- Production: For real-live transactions, select the production.
- Merchant ID/Account ID
- Account Email
- Client Id
- Client Secret
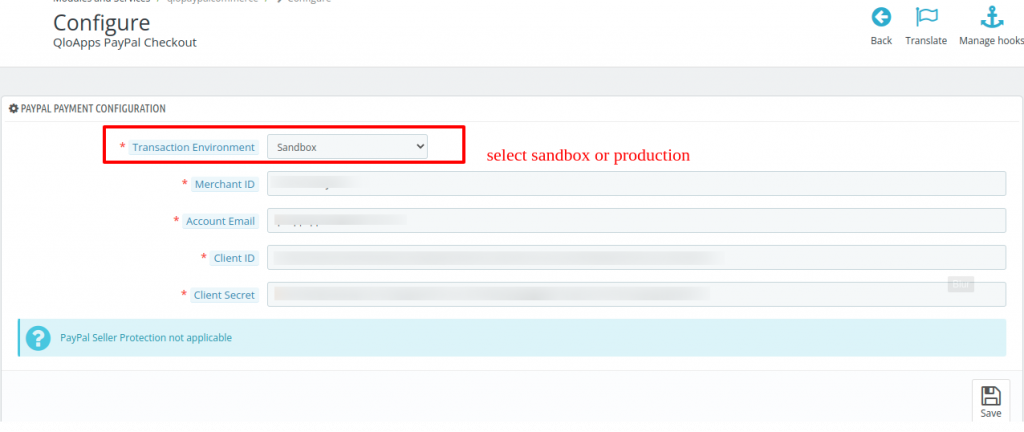
Once you enter and save these details you are ready to go.
Steps to get the client ID, client secret, Account Email
In order to configure the module, you will need to obtain the client ID, client secret & merchant ID/Account ID.
Firstly, visit the PayPal website. After that, proceed to login into your Paypal account.

Enter your login credentials to proceed.

After successfully logging in to the account, go to the “My Apps & credentials” section. Now, click on the ‘Create App” button.
Here you can choose either SandBox or Live to create the account. In the below process, we have chosen the SandBox.
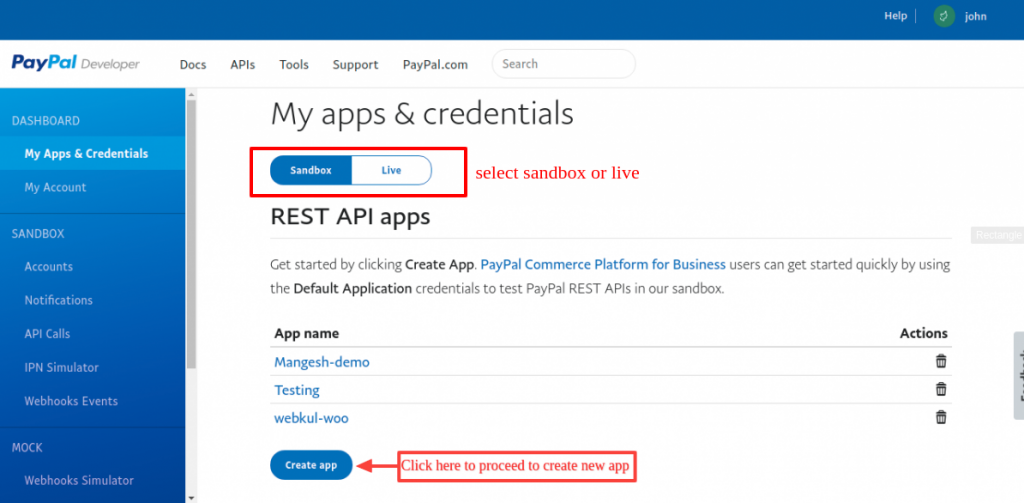
Enter the name of your app & click on the “Create App” button.

After clicking on the button, API credentials will be generated. View your client Id, client secret, and account email here on this page.

In the same way, as above you can create the API credentials for Live mode.
Merchant ID For SandBox Account
Now, to get the merchant ID, firstly go to the accounts section.

Under the accounts section, find the account for which you want to get the merchant ID.
After finding the account, click on the three dots button available against the account name. Now, click on the “View/edit account” button to proceed.

After clicking on that button, the following popup with account details will open. Here, you can find your merchant ID or account ID.

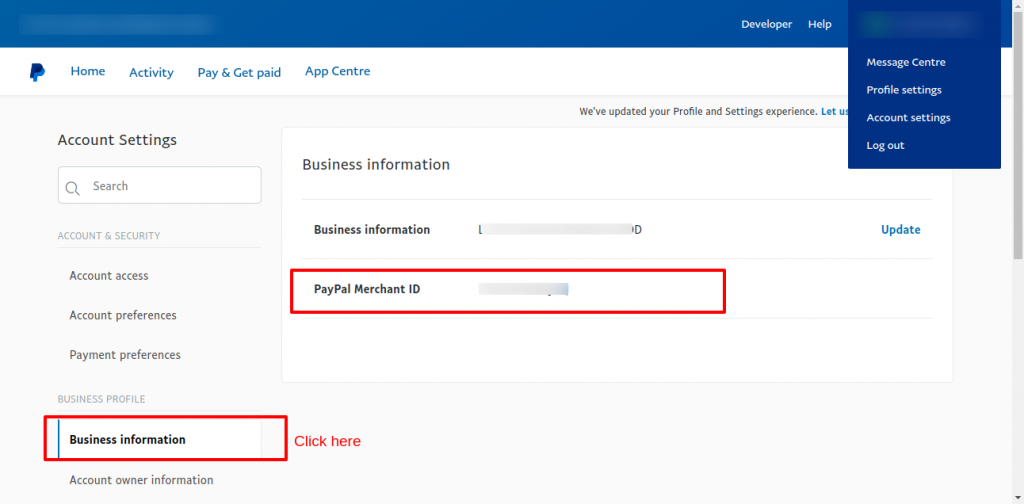
Merchant ID for Live Paypal Account
To find the merchant ID of your PayPal account for live mode, log in to your PayPal account at paypal.com.
After that, click on the Settings icon, Navigate to Account Settings and click on Business information, and look for PayPal Merchant ID.
So, this was all about the process to get the API credentials for the module.
Working
The working of this addon is very simple.
Let us check out how the customer will make the payment on the front end first then we will see how things are going on the back end.
Front End Flow
Once the module is successfully configured the guest will see the option to pay via PayPal on the checkout page.
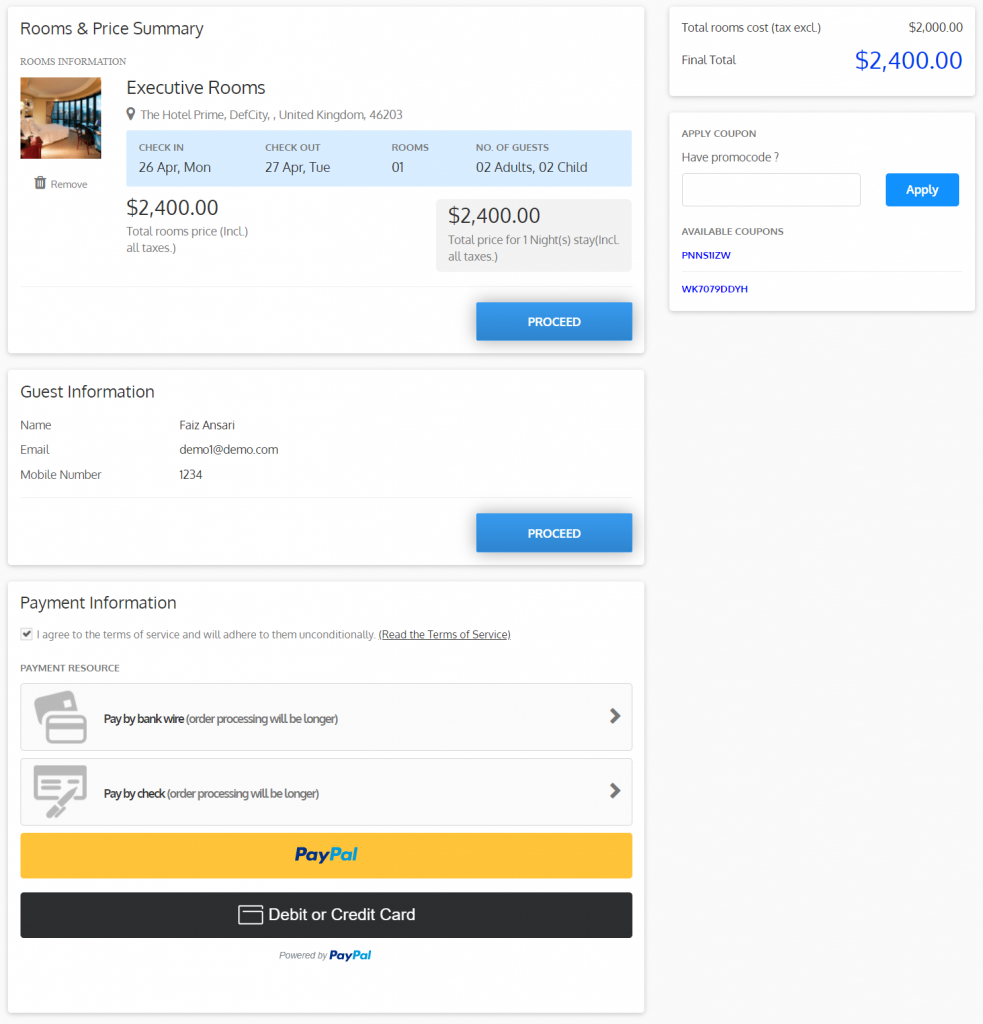
Now the customer has two options, pay via PayPal account or via Card.
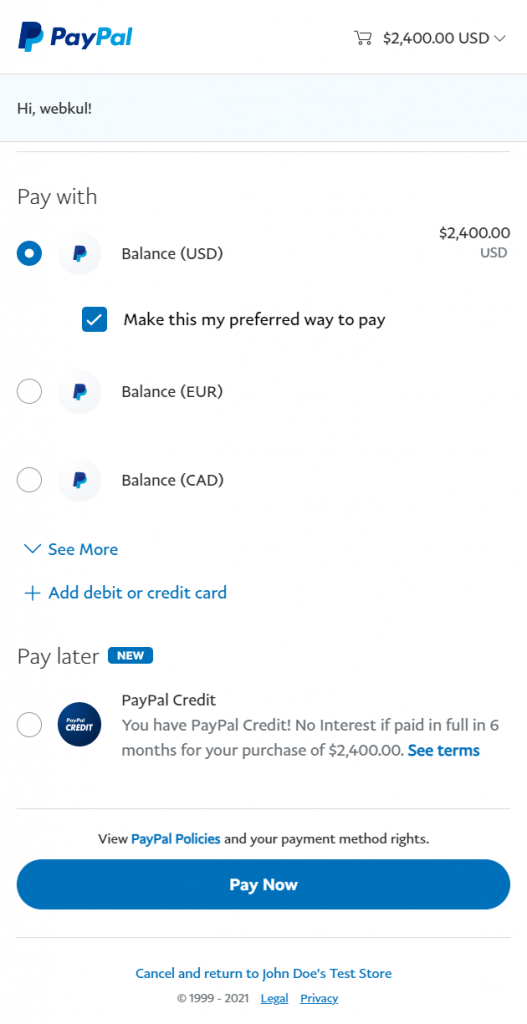
Pay Via PayPal Account
Here the customer will have to login into his account using his credentials.

Once login the customer can use his balance to pay or use PayPal credits.
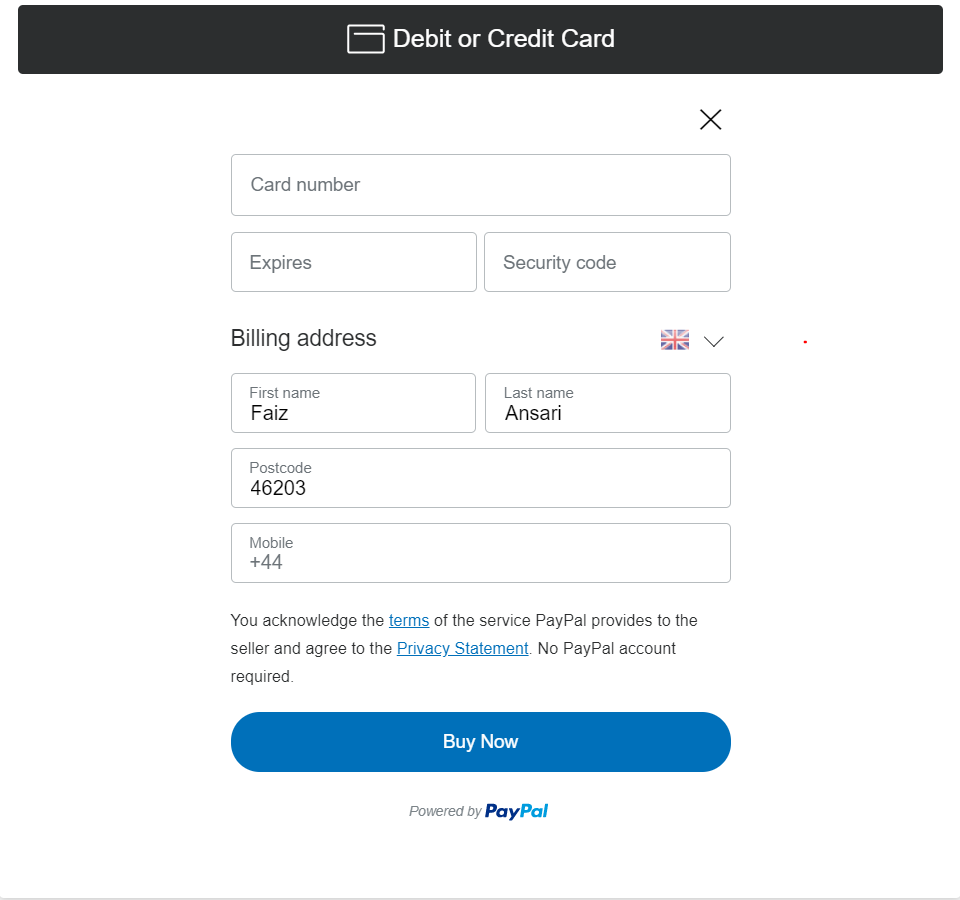
Pay Via Card
If the customer chooses to pay for his booking using his credit or debit card then he can do that too.
As he selects Pay Via Card he will have the fields to enter the details and complete the payment.
After this payment will be done and the booking will be completed.
Back End Flow
After the customer makes the payment on the front, the transaction is recorded on the backend using the PayPal Transaction Tab.
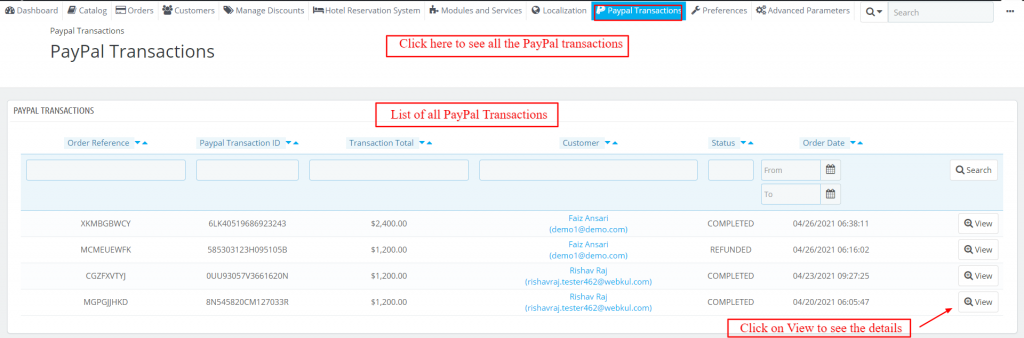
Now the admin can click on the View button to see the details of a particular transaction.
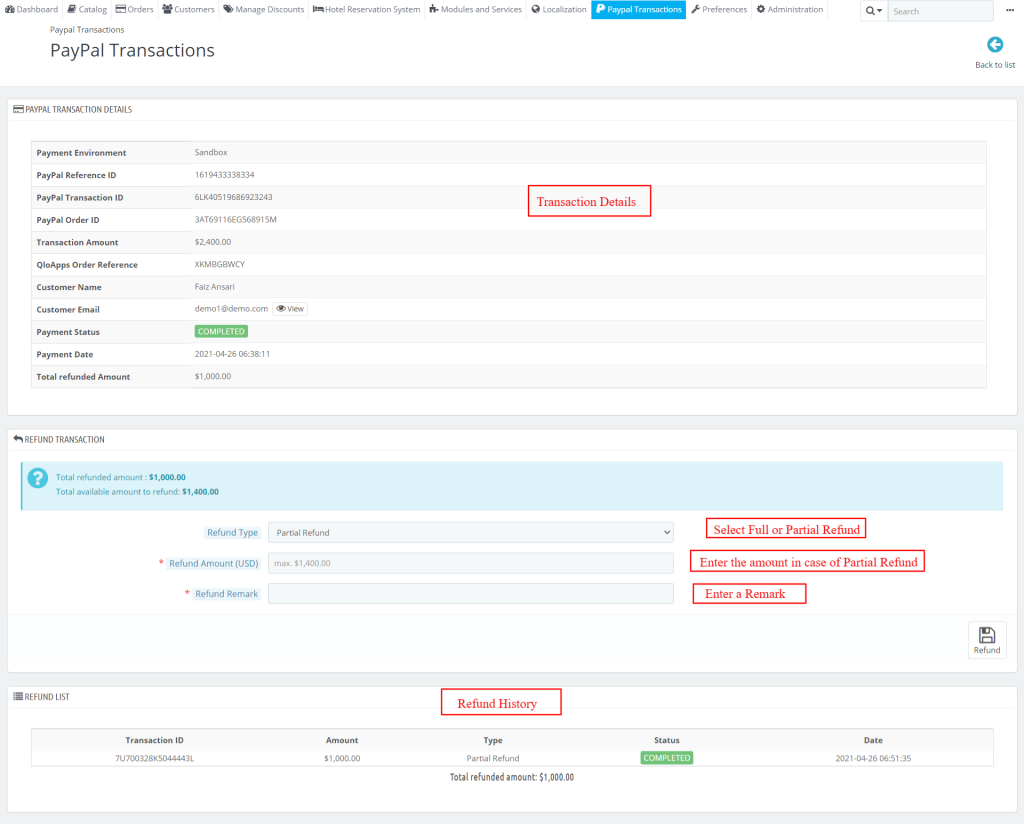
Refund Management
Here he will also have the option to make a refund.
The admin can either make a full refund or he can make a partial refund. In case of a partial refund, he will have to enter the amount he wants to refund.
So this is how you can manage your payments through the QloApps PayPal Checkout payment gateway.
Conclusion
This was all from the QloApps PayPal Checkout Payments. I hope I was able to clarify the functioning of the module for you.
If you want to learn about the functionality of QloApps then you can visit this link: QLO Reservation System – Free Open-Source Hotel Booking & Reservation System.
In case of any query, issue, or requirement please feel free to raise it on QloApps Forum

Be the first to comment.