The QloApps Zoho Books Connector helps businesses connect QloApps with Zoho Books for easy accounting. It manage accounting tasks efficiently and improves workflow for hotel operations smooth.
Additionally, the connector synchronizes records like customer details, invoices, and payments between QloApps and Zoho Books. This reduces manual effort and keeps financial information accurate.
Moreover, hotel owners and administrators can manage accounting tasks efficiently. It helps maintain records, save time, and improve business operations through autos.
Furthermore, this user guide explains the setup process of the QloApps Zoho Books Connector. It covers configuration, connection settings, and usage details to help users manage the integration.
Features of QloApps Zoho Books Connector
- First, connects QloApps with Zoho Books to automate accounting processes and streamline hotel financial management.
- Additionally, the connector automatically synchronizes hotels, room types, service products, customers, currencies, orders, invoices, payments, and credit notes between QloApps and Zoho Books.
- Additionally, administrators can manually synchronize individual records or perform bulk synchronization whenever required.
- Moreover, it provides configurable options to automatically sync, update, or delete records for different data types based on business requirements.
- Furthermore, it supports a CRON job to automatically synchronize data every 5 minutes, ensuring records remain up to date.
- Displays the synchronization status, last sync date, and time for each record, enabling administrators to monitor and manage synchronization efficiently.
- Synchronizes accounting data with Zoho Books. This allows hotel administrators to manage invoices, payments, customers, and other financial records from a single platform.
How to Install the QloApps Zoho Books Connector
To get started, you can install the QloApps Zoho Books Connector easily by performing the following steps:
- At the admin back office panel, go to the Modules and Services tab present in the menu.
- After that, click on Add a new module.
- After that, upload the ZIP file of the module and click on install.
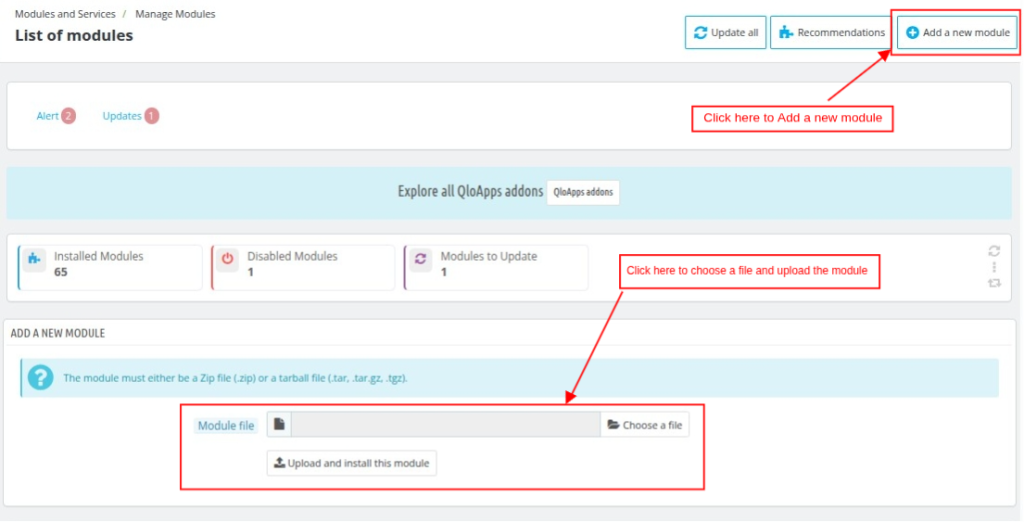
Once the installation is complete, the system will successfully install the module. A new Zoho Books Connector menu will then appear in the admin panel.
Before discussing how you can use this add-on, let’s first discuss how you can configure this add-on.
Configuration of QloApps Zoho Books Connector
To configure this module, search for the QloApps Zoho Books Connector in the Manage Modules tab. Then, click the Configure button.
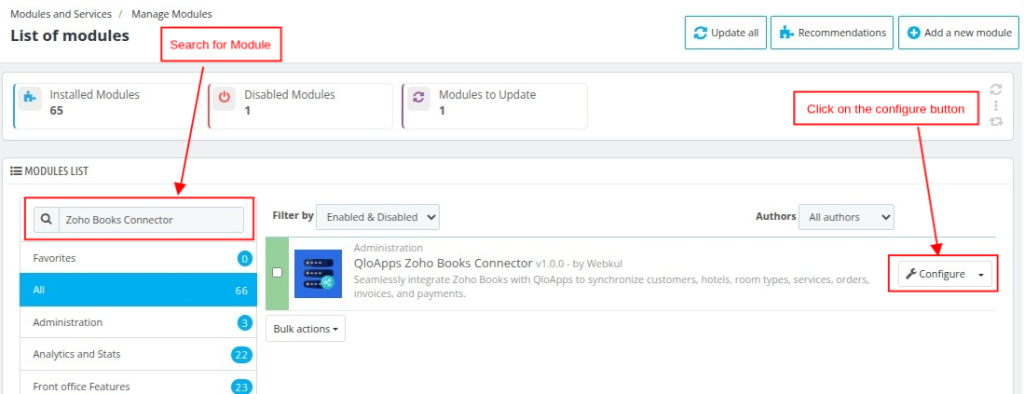
Moreover, you can open the configuration page directly from the Zoho Books Connector menu.
Afterward, the system will open the Configuration page when you click on the Configure button.
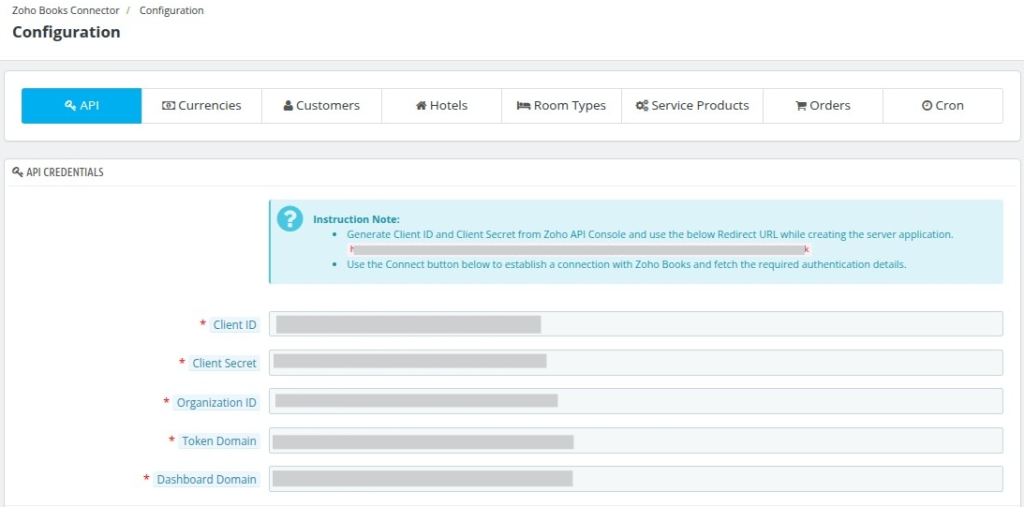
Here, eight configuration sections are available:
- API
- Currencies
- Customers
- Hotels
- Room Type
- Service Product
- Orders
- Cron
How To Get The Required API Details?
First, create an account on the Zoho API Console.
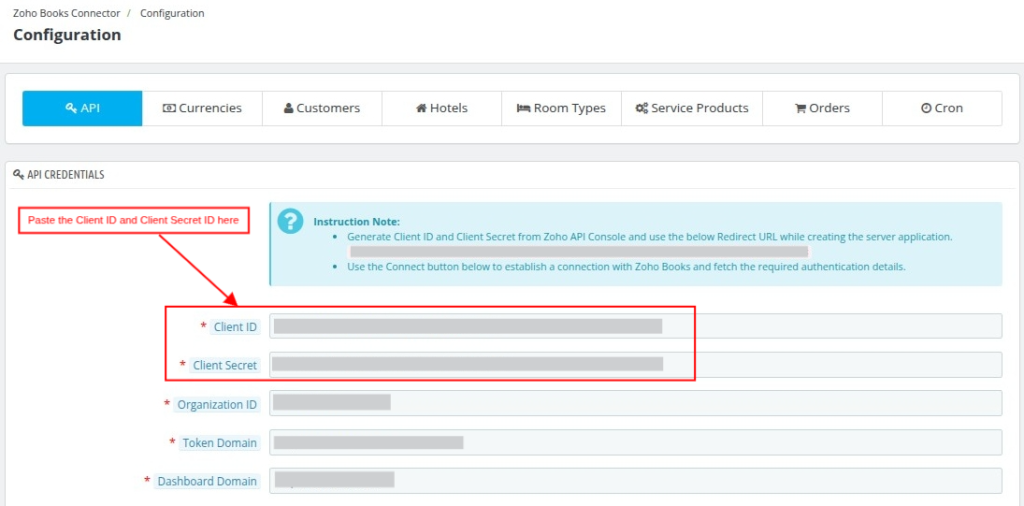
API Credentials
Client ID and Client Secret ID
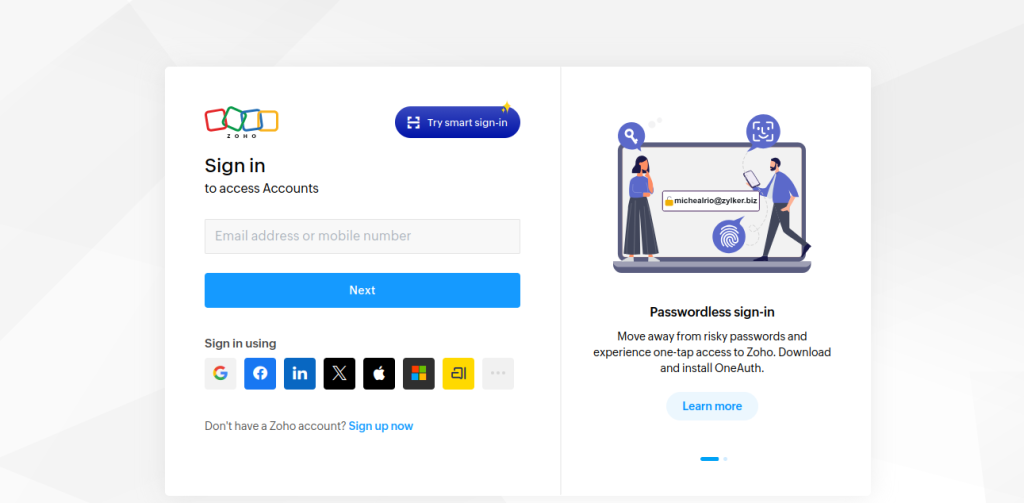
First, log in to your Zoho Books account by entering your Email ID and Password, as shown below.
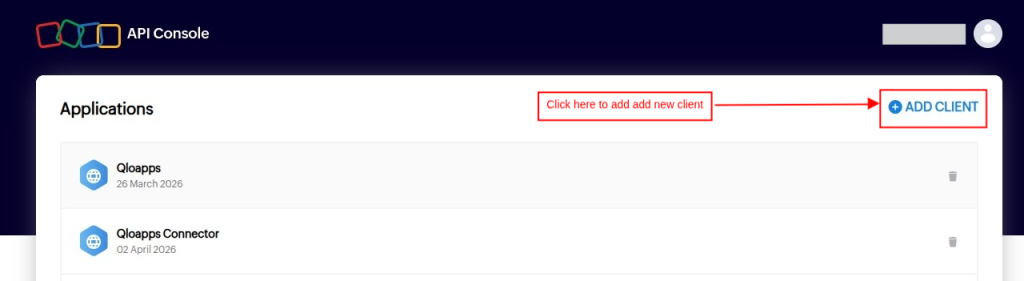
After logging in, you will be redirected to the dashboard screen. Click on the Add Client option to generate the Client ID and Client Secret Key, as shown below.
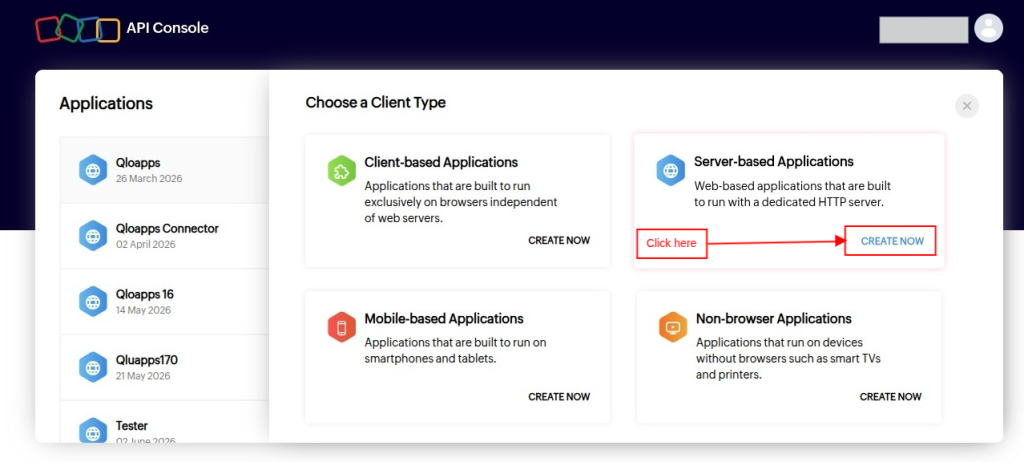
After clicking on Add Client, select the Create Now option under the Server-Based Applications section.
Once you click on Create Now, you need to create a new client, as shown below.
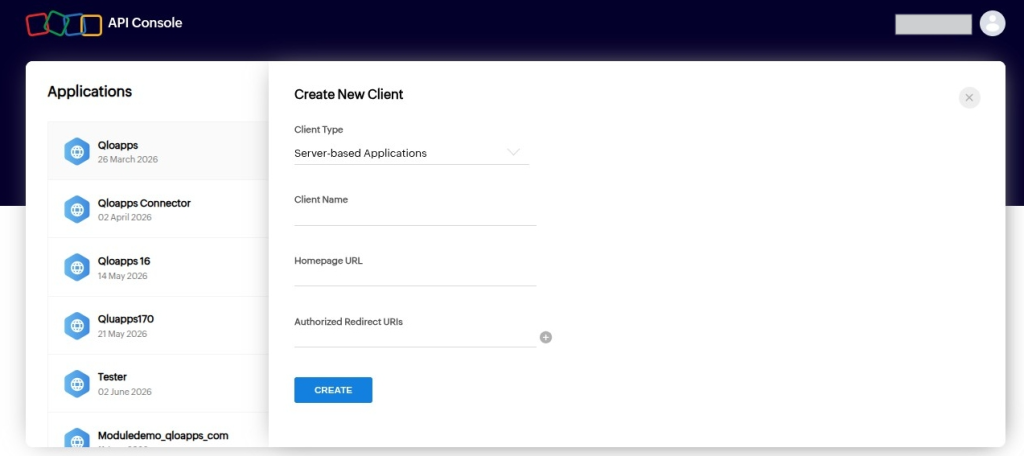
Enter the redirection URL provided in the API Credentials section. This URL is required to generate the Client ID and Client Secret ID, as shown above.
Once the client is created, select the application and copy the Client ID and Client Secret ID
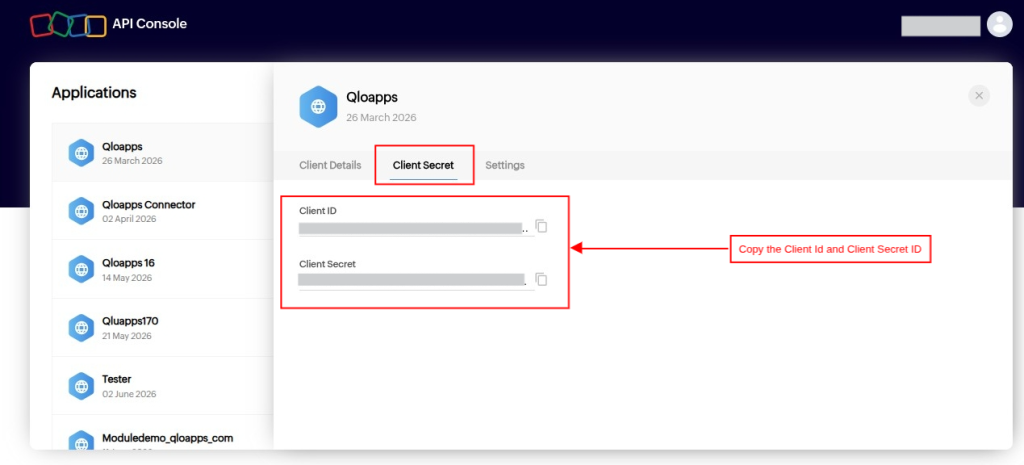
Copy the Client ID and Client Secret ID. Then, paste them into the API Credentials section of the QloApps Zoho Books Connector, as shown below.
Organization ID, Token, and Dashboard Domain
Now, you need to enter the Organization ID. To get this, log in to your Zoho Books Account.
After logging in, you will be redirected to the Zoho Books Home Screen.
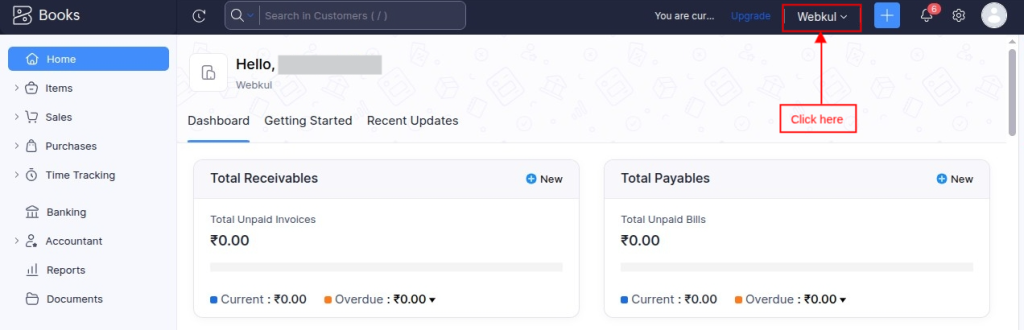
Click on the Organization option to copy the Organization ID.
Once you click on the Organization option, copy the Organization ID as shown below.
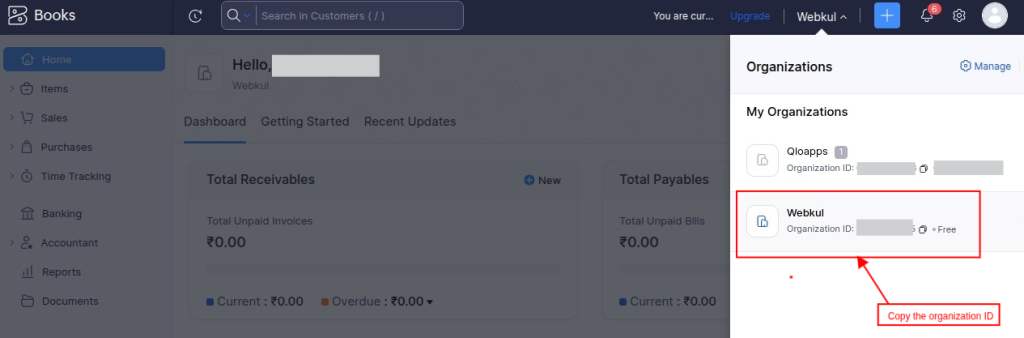
Copy the Organization ID. Then, paste it into the Organization field under the API Credentials section of the QloApps Zoho Books Connector, as shown below.
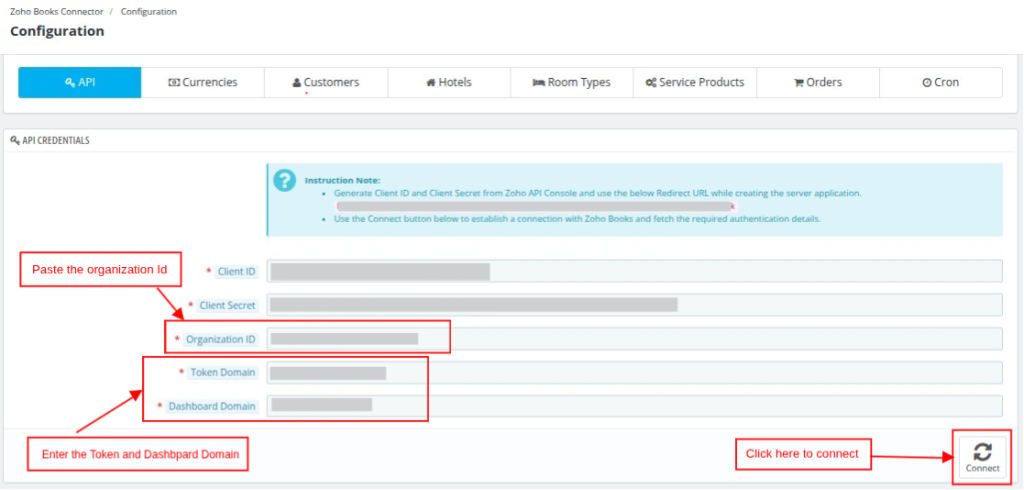
In the Token Domain and Dashboard Domain fields, enter the URLs corresponding to your Zoho Books data center.
Then, find the appropriate domain URLs in the Zoho API Multiple Data Center documentation.
Finally, enter all the required details in the API Credentials section. Then, click Connect to establish the connection with Zoho Books.
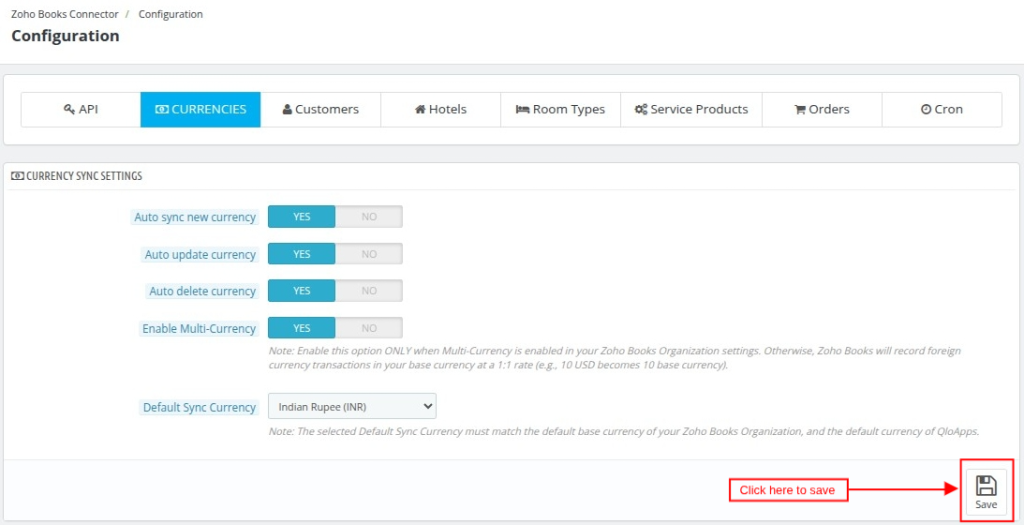
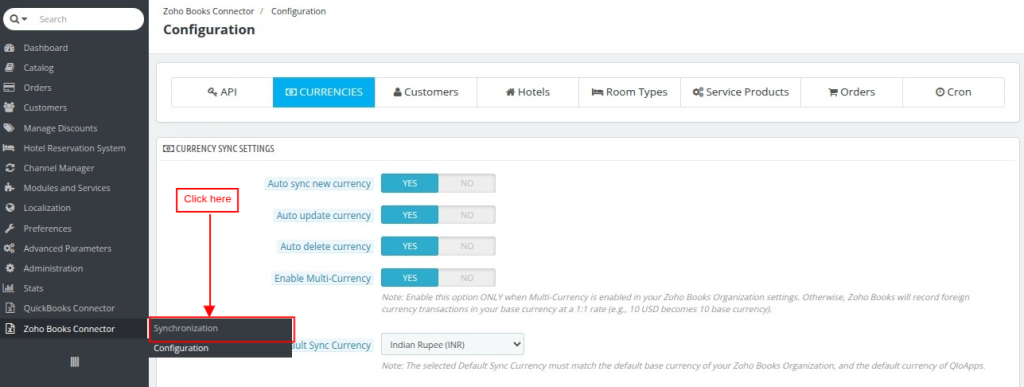
Currencies Sync Settings
To auto sync the currencies details, you need to enable the respective fields which are mentioned below:
- Auto Sync New Currency: Enable this option to automatically synchronize newly added currencies from QloApps to Zoho Books.
- Auto Update Currency: Use this option to automatically update currency details in Zoho Books.
- Auto Delete Currency: This option automatically disables currency records in Zoho Books when required.
- Enable Multi-Currency: Enable this option to use multiple currencies in Zoho Books.
- Default Sync Currency: Select the default currency that you want to synchronize with Zoho Books.
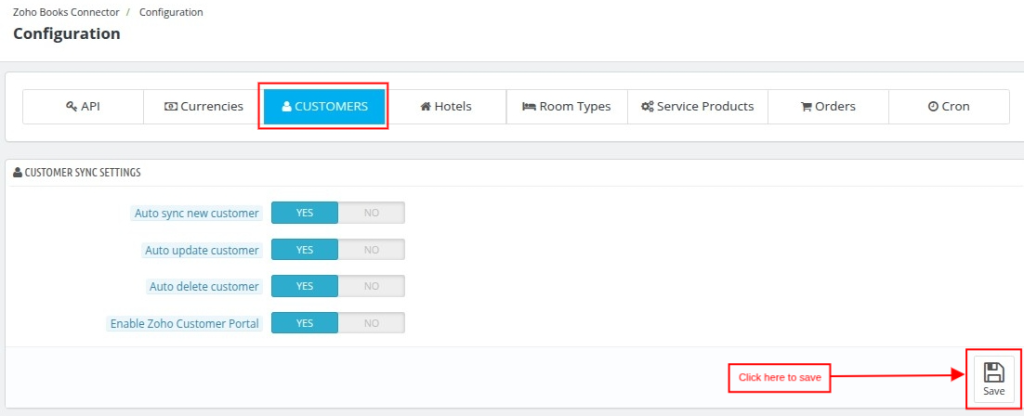
Customers Sync Settings
To auto sync the customer details, you need to enable the respective fields which are mentioned below:
- Auto Sync New Customer: Enable this option to automatically synchronize new customers with Zoho Books after they are added to QloApps.
- Auto Update Customer: Use this option to automatically update customer details in Zoho Books when they are modified in QloApps.
- Auto Delete Customer: This option automatically disables customer records in Zoho Books when they are deleted from QloApps.
- Enable Zoho Customer Portal: Enable this option to allow customers to access their Zoho Books account. They can review invoices, payments, and other details.
Note: Customer synchronization is mandatory. Please make sure one time sync is completed after enabling or disabling this setting.
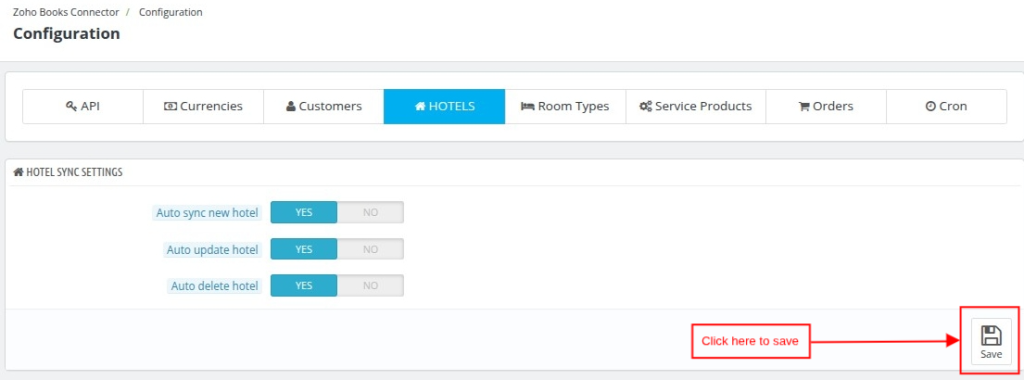
Hotels Sync Settings
To auto sync the hotel details, you need to enable the respective fields which are mentioned below:
- Auto Sync New Hotels: Enable this option to automatically synchronize new hotels from QloApps to Zoho Books.
- Auto Update Hotel: Use this option to automatically update hotel details in Zoho Books.
- Auto Delete Hotel: This option automatically deletes or disables hotel records in Zoho Books.
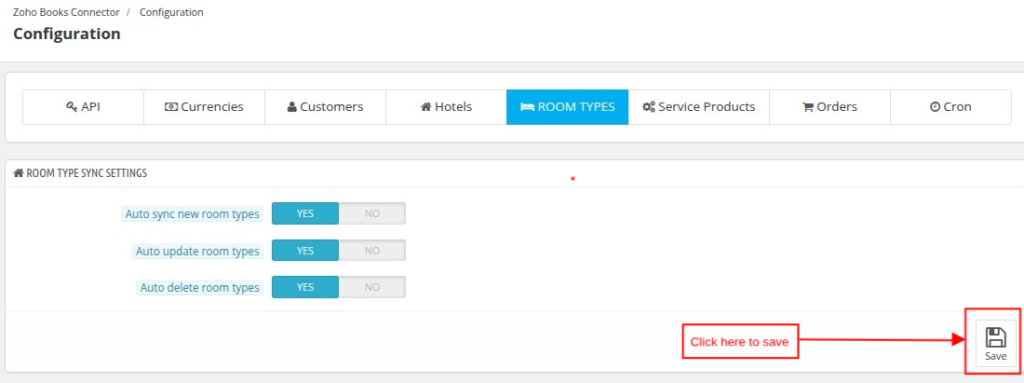
Room Type Sync Settings
To auto sync the room type, you need to enable the respective fields which are mentioned below:
- Auto Sync New Room Types: Enable this option to automatically synchronize new room types from QloApps to Zoho Books.
- Auto Update Room Type: Use this option to automatically update room type details in Zoho Books.
- Auto Delete Room Type: This option automatically deletes or disables room type records in Zoho Books.
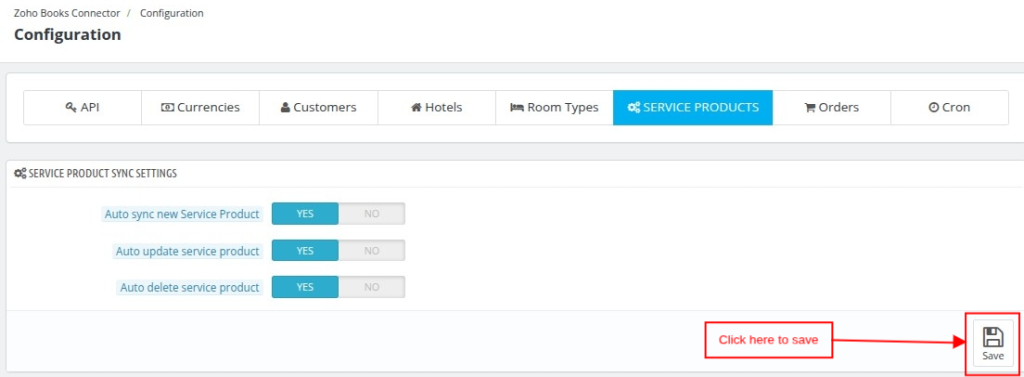
Service Products Sync Settings
To auto sync the service product, you need to enable the respective fields which are mentioned below:
- Auto Sync New Service Product: Enable this option to automatically synchronize new service products from QloApps to Zoho Books.
- Auto Update Service Product: Use this option to automatically update service product details in Zoho Books.
- Auto Delete Service Product: This option automatically deletes or disables service product records in Zoho Books.
Orders Sync Settings
To auto sync the orders, you need to enable the respective fields which are mentioned below:
- Auto Sync New Orders: Enable this option to automatically synchronize new orders from QloApps to Zoho Books.
- Auto Update Order: Use this option to automatically update order details in Zoho Books.
- Auto Sync New Invoices: This option automatically synchronizes new invoices with Zoho Books.
- Auto Sync New Payment: Select this option to automatically synchronize new payments with Zoho Books.
- Auto Sync Credit Notes: Turn on this option to automatically synchronize credit notes with Zoho Books.

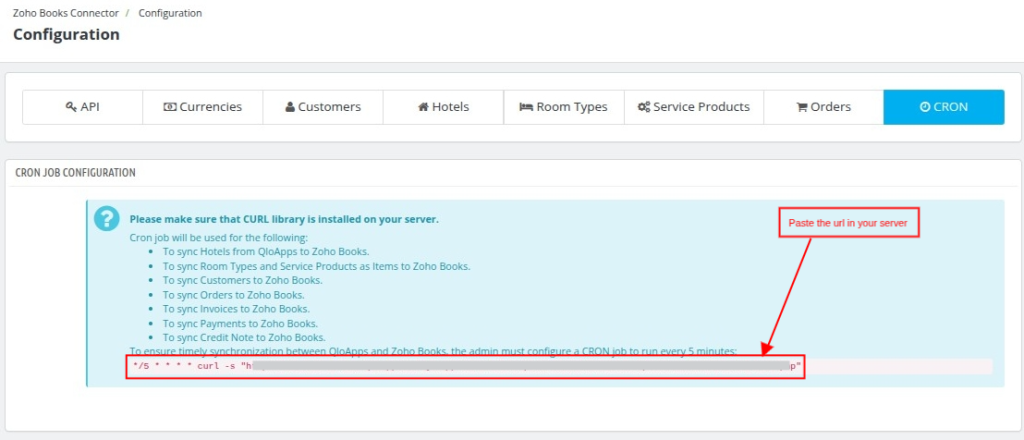
Cron Job Configuration
Configure a CRON job on your server to run every 5 minutes. This ensures timely synchronization between QloApps and Zoho Books.
Note: Please make sure that CURL library is installed on your server
Synchronization of QloApps Zoho Books Connector
After completing the configuration, you can view all synchronization records under the Synchronization section.
Next, access this section from the Zoho Books Connector menu, as shown below.
The Synchronization page contains the following six sections:
- Hotels
- Room Types
- Service Products
- Customers
- Currencies
- Orders
When you open the Synchronization page for the first time, the system displays all six sections as blank.
Then, click Initialize for each section to import and display your existing data on the Zoho Books Synchronization summary screen, as shown below.
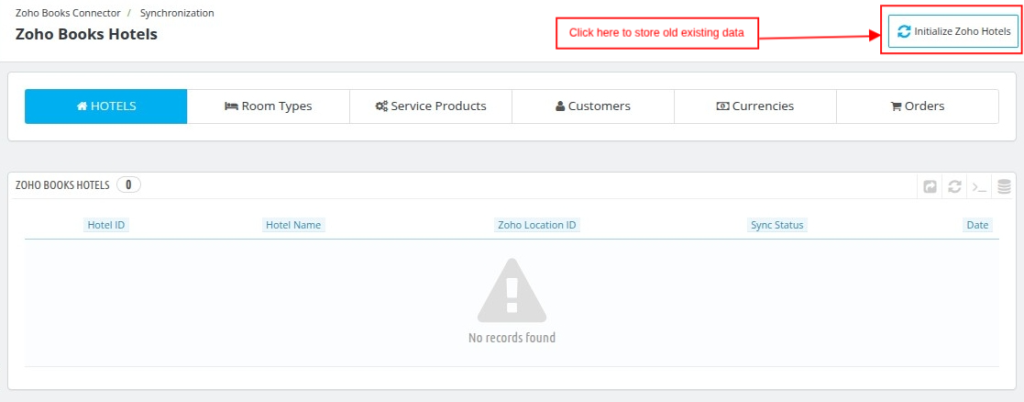
Note: Initialize every section separately to display its existing synchronization data on the summary screen.
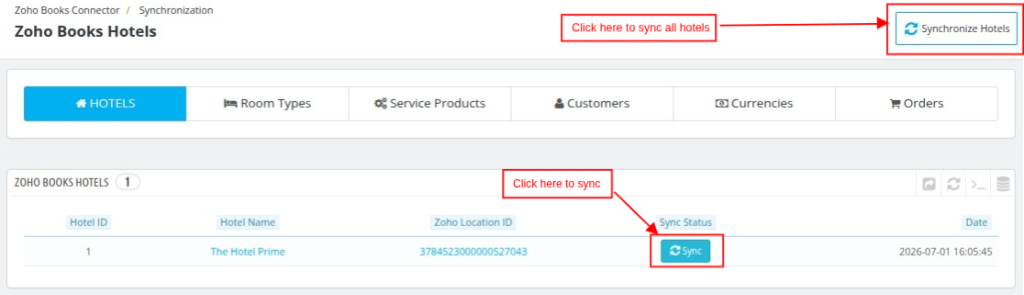
Zoho Books Hotels
This page displays all hotels along with their synchronization status.
Note:
- Enable Auto Sync New Hotel, Auto Update Hotel, and Auto Delete Hotel under the Hotels configuration section to enable automatic synchronization.
- Configure the CRON job on your server. Otherwise, click Sync under the Sync Status column to synchronize hotels manually.
Alternatively, click Sync under the Sync Status column to synchronize a hotel manually.
When the CRON job runs every five minutes, the system automatically synchronizes hotels based on your configuration.
Additionally, click Synchronize Hotels to queue all hotels for synchronization through the CRON job.
After synchronization, the system changes the status to Synced and updates the synchronization date and time automatically.
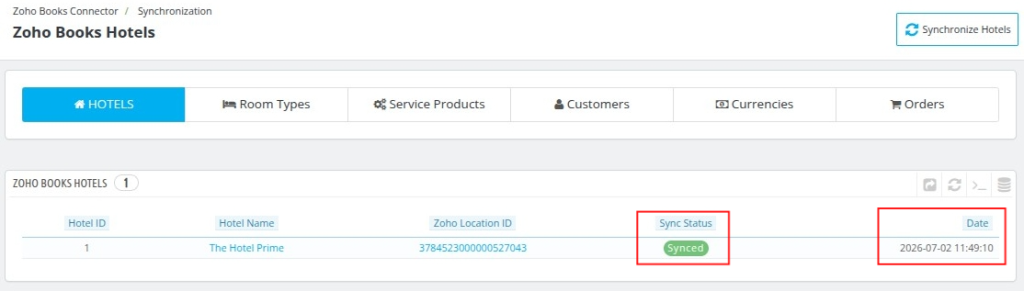
Note: When you disable or delete a hotel in QloApps, the connector also disables that hotel in Zoho Books.
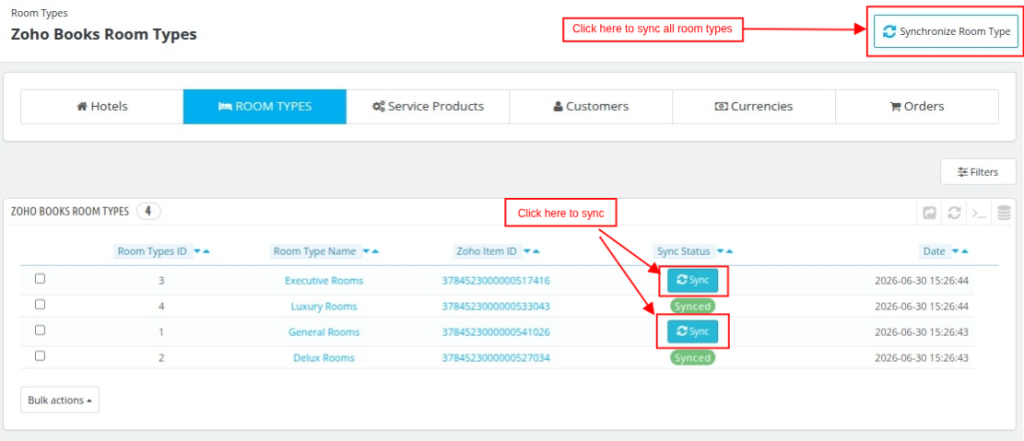
Zoho Books Room Type
This page displays all room types along with their synchronization status.
Note:
- Enable Auto Sync New Room Type, Auto Update Room Type, and Auto Delete Room Type under the Room Types configuration section.
- Configure the CRON job on your server. Otherwise, synchronize room types manually by clicking Sync.
Click Sync to synchronize an individual room type manually.
When the CRON job runs every five minutes, the system automatically synchronizes room types.
Similarly, click Synchronize Room Types to queue all room types for CRON synchronization.
After synchronization, the system changes the status to Synced and updates the synchronization date and time.
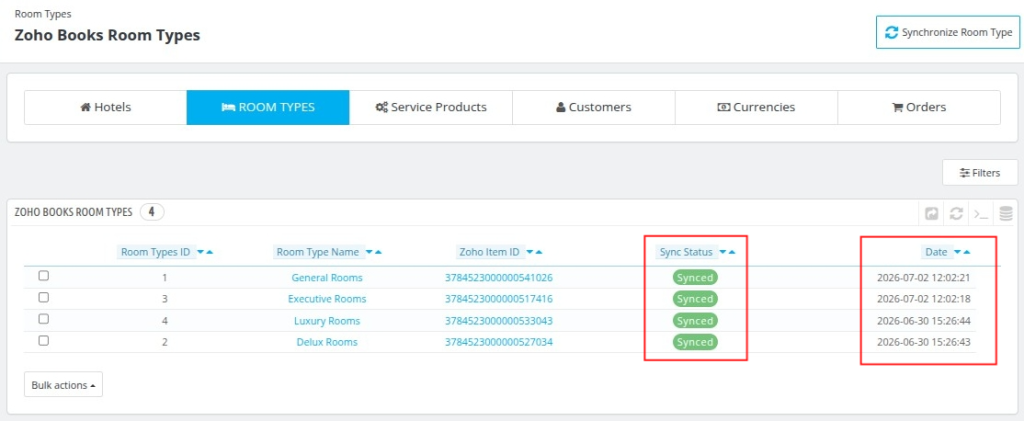
Note: When you disable or delete a room type in QloApps, the connector also disables that room type in Zoho Books.
Zoho Books Service Products
This page displays all service products along with their synchronization status.
Note:
- Enable Auto Sync New Service Product, Auto Update Service Product, and Auto Delete Service Product under the Service Products configuration section.
- Configure the CRON job on your server. Otherwise, synchronize service products manually.
Click Sync to synchronize a service product manually.
When the CRON job runs every five minutes, the system automatically synchronizes service products.
Likewise, click Synchronize Service Products to queue all service products for CRON synchronization.

After synchronization, the system changes the status to Synced and updates the synchronization date and time.
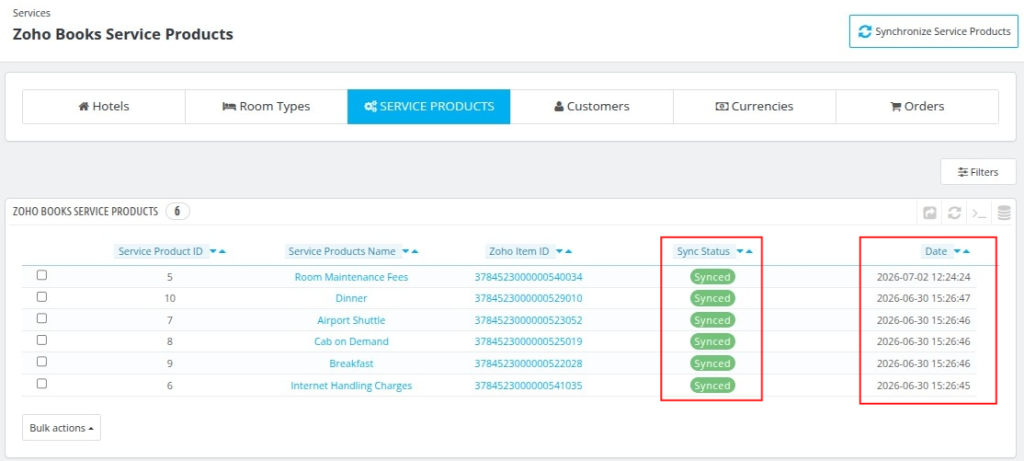
Note: When you disable or delete a service product in QloApps, the connector also disables that service product in Zoho Books.
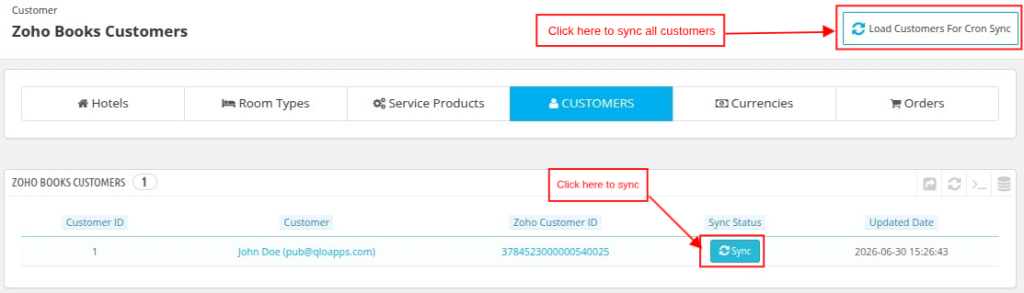
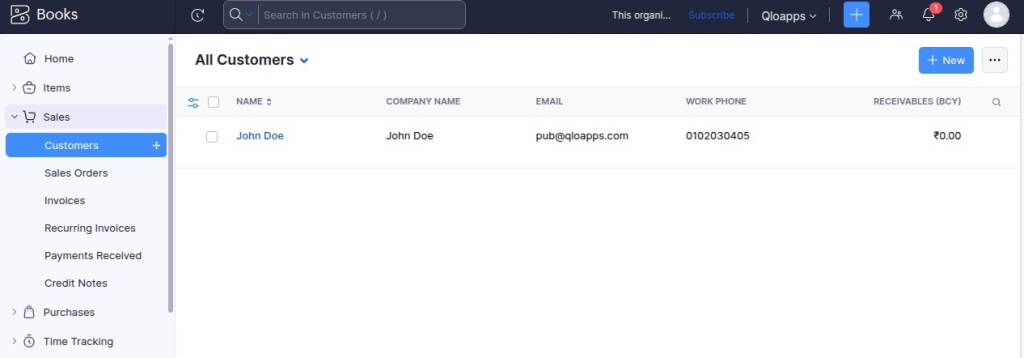
Zoho Books Customers
This page displays all customers along with their synchronization status.
Note:
- Enable Auto Sync New Customer, Auto Update Customer, and Auto Delete Customer under the Customers configuration section.
- Configure the CRON job on your server. Otherwise, synchronize customers manually.
Click Sync to synchronize a customer manually.
When the CRON job runs every five minutes, the system automatically synchronizes customers.
Additionally, click Load Customers for CRON Sync to queue all customers for synchronization.
After synchronization, the system changes the status to Synced and updates the synchronization date and time.
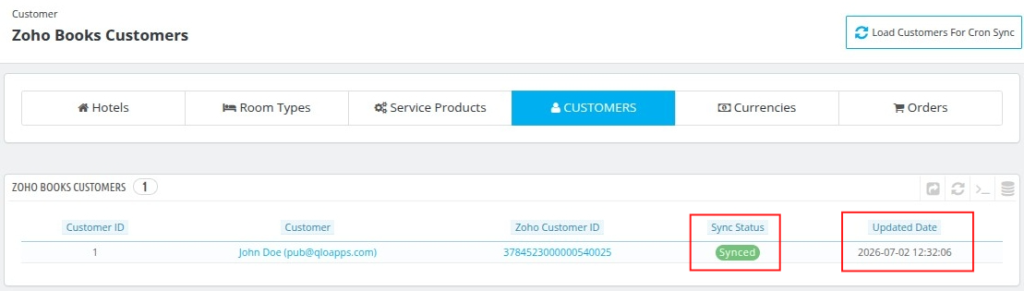
Note: When you delete a customer in QloApps, the connector also disables that customer in Zoho Books.
Zoho Books Currencies
This page displays all currencies along with their synchronization status.
Note:
- Enable Auto Sync New Currency, Auto Update Currency, and Auto Delete Currency under the Currencies configuration section.
- Configure the CRON job on your server. Otherwise, synchronize currencies manually.
Click Sync to synchronize a currency manually.
When the CRON job runs every five minutes, the system automatically synchronizes currencies.
Similarly, click Load Currencies for CRON Sync to queue all currencies for synchronization.
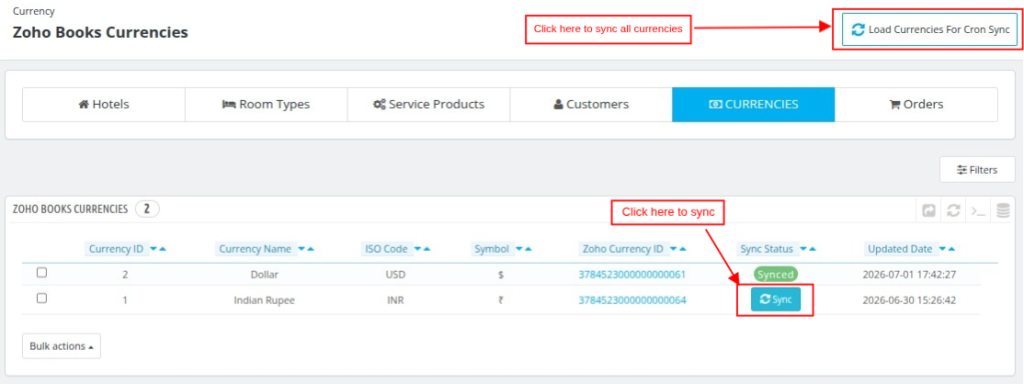
After synchronization, the system changes the status to Synced and updates the synchronization date and time.
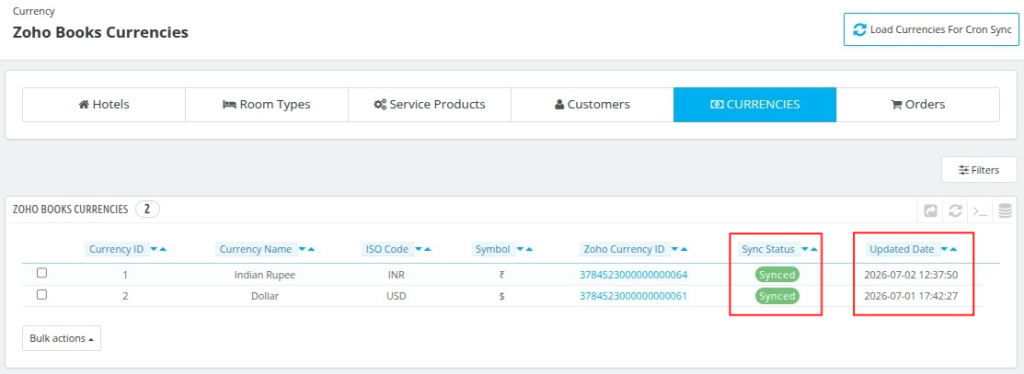
Note: When you disable or delete a currency in QloApps, the connector also disables that currency in Zoho Books.
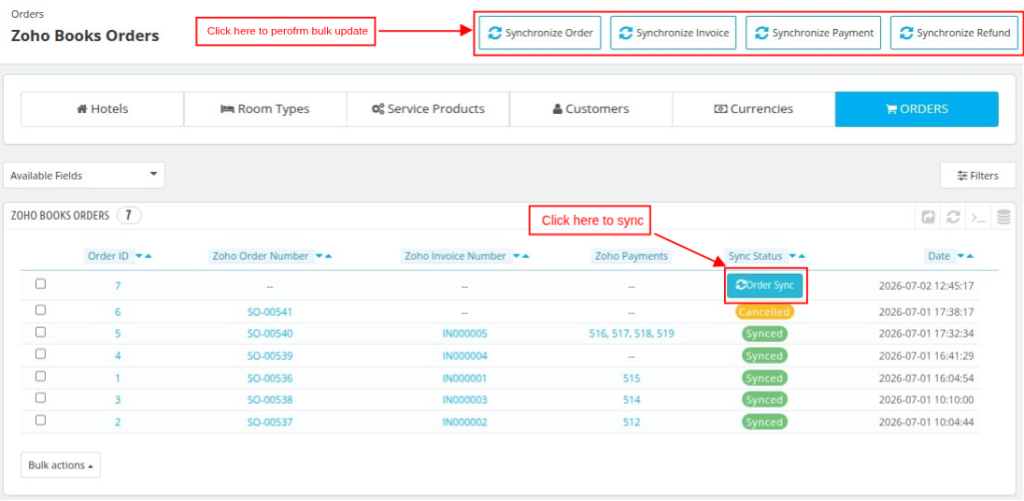
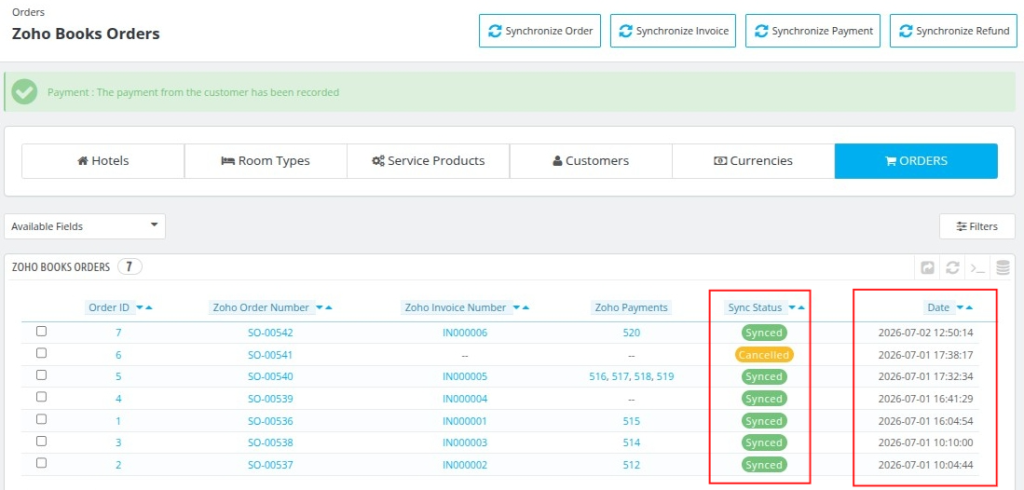
Zoho Books Orders
This page displays all orders along with their synchronization status.
Note:
- Enable the required synchronization options under the Orders configuration section.
- Configure the CRON job on your server. Otherwise, synchronize orders manually.
Click Sync to synchronize an order manually.
When the CRON job runs every five minutes, the system automatically synchronizes orders, invoices, payments, and credit notes.
Finally, click Synchronize Orders, Synchronize Invoices, Synchronize Payments, or Synchronize Refunds to queue records.
After synchronizing the order, the system changes the status to Invoice Sync.
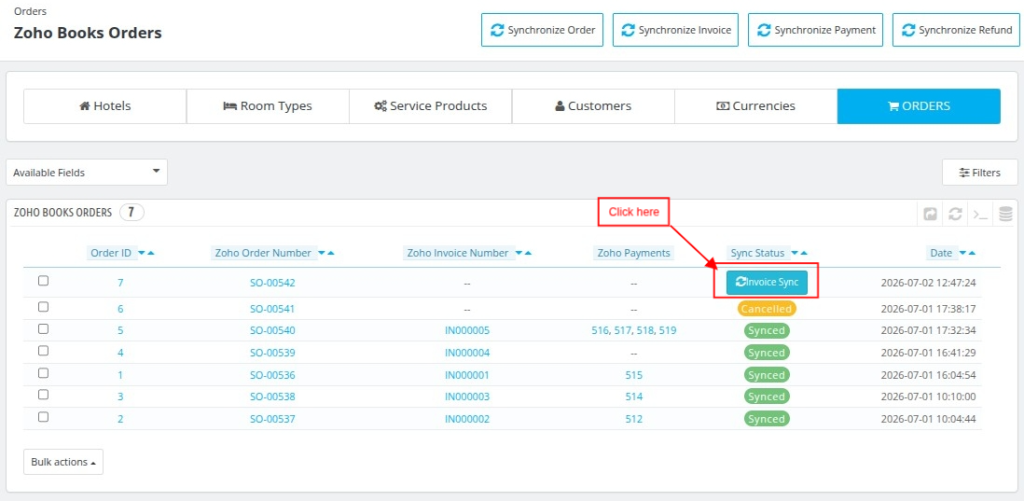
Next, the system changes the status to Payment Sync after synchronizing the invoice.
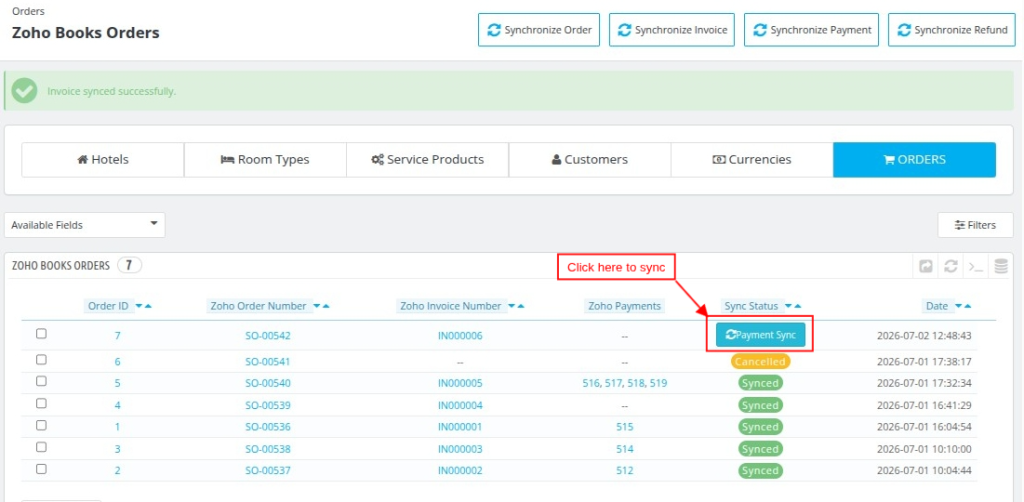
Finally, the system changes the status to Synced after synchronizing the payment. It also updates the synchronization date and time.
Note:
- When you cancel an order, the connector updates the synchronization status to Canceled.
- You can add multiple payments to a single order.
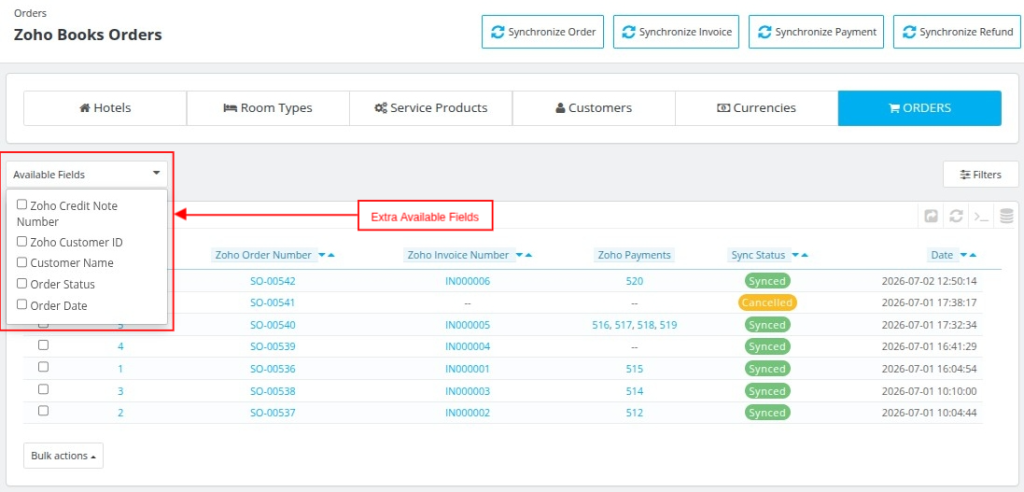
Available Fields in Order
In QloApps Zoho Books connector you can view multiple fields in the order section by enabling it from the Available Field section, as shown below:
Zoho Credit Note Number
After enabling this field, one Zoho Credit Note Number column will be displayed in the Zoho Books Orders summary screen.
Admin can view the Credit Note in their Zoho Books account by clicking on the hyper link provided in the column.
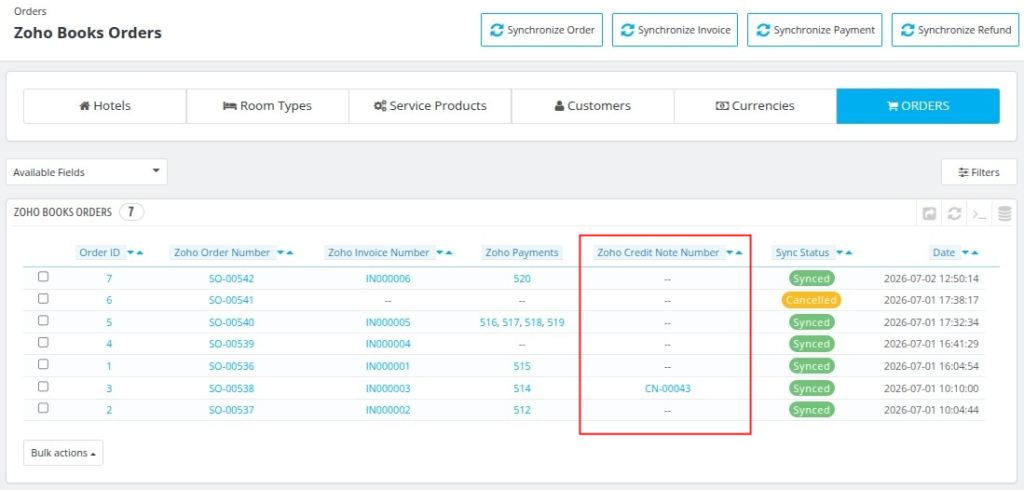
Note:
- Zoho Credit Note Number will only be displayed, when the Credit Slip is generated by the user for the customer.
- If Refund Voucher or Refund Transaction Amount is created then Zoho Credit note will not be displayed in the Zoho Books Order summary screen.
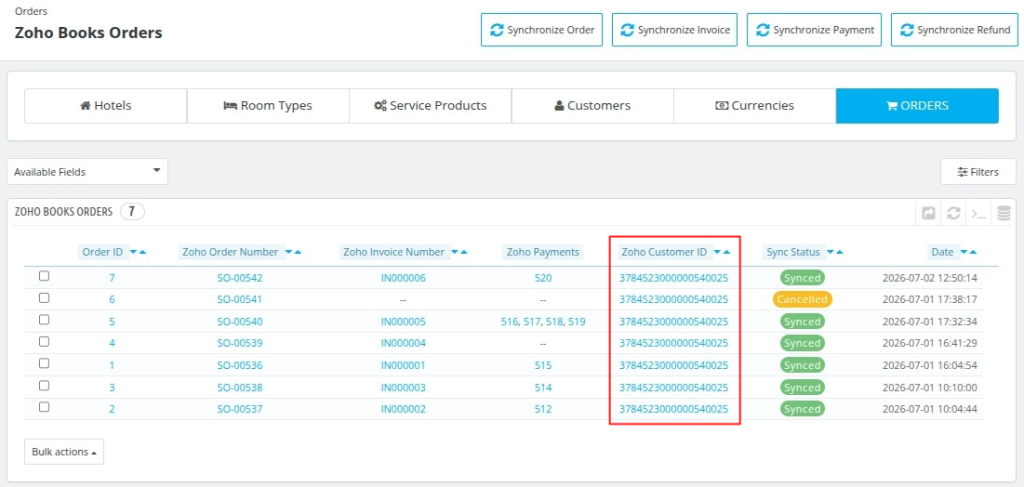
Zoho Customer ID
After enabling this field, one Zoho Customer ID column will be displayed in the Zoho Books Orders summary screen.
Admin can view the Customer booking details in their Zoho Books account by clicking on the hyper link provided in the column.
Admin Screen of Zoho
The admin can also view all synchronized data for their properties by logging in to their Zoho Books account.
Additionally, the synchronized records are available under the Items and Sales sections of the Zoho Books admin panel, as shown below.
Conclusion
The QloApps Zoho Books Connector simplifies hotel accounting by automating the synchronization of important business data between QloApps and Zoho Books, saving time and improving accuracy.
With automatic and manual synchronization options, administrators can easily keep hotels, customers, room types, orders, invoices, payments, and financial records updated and well organized.
Finally, we hope this guide has helped you configure and use the connector with confidence. For any questions or technical assistance, feel free to contact the QloApps Support Team.
Additionally, to learn more about the functionality of QloApps, you can visit this link: All-in-One Property Management System.
In case of any query, issue, or requirement, please feel free to raise it on the QloApps Forum.
Current Product Version: 1.0.0
Supported Framework: 1.6.x and 1.7.x

Be the first to comment.