A Customer Wallet in a hotel system is like a small digital purse. This helps customers to add money in one place for all hotel expenditures.
Customers can add money to their wallet before or during their stay. They can use this money while paying for room, food, and games or other services without using cash.
It also helps hotels to give rewards, discounts, or refunds quickly. This process makes customers happy and gives them a smooth, safe, and fun experience during their stay.
We have developed QloApps Customer Wallet for you.
This module explains how customers can add money to their wallet and use it.
Features of QloApps Customer Wallet Module
- Customers can add money to their wallet via online mode.
- Customers can use the wallet amount for their room booking.
- Customers can earn money in their wallets based on the customer cashback rule.
- Admin has the option to enable or disable the minimum amount for wallet recharge.
- Admin can set the minimum order total required to avail the wallet payment option.
- Admin can configure the wallet display setup and transaction record per page.
- Admin can create the cashback rules.
- Admin can view the customer’s wallet and can credit or debit the customer’s wallet on the customer’s behalf.
- Also, admin can view the customer’s wallet transaction under customer details.
- Admin can also view the list of transactions made by customers.
- If the wallet has insufficient balance to complete the order, the customer can add money into the wallet on run-time without losing its current cart.
- If the wallet has insufficient balance to complete the order, customers have an option to use the available wallet amount and then pay the remaining amount through the other payment option available.
How to Install the QloApps Customer Wallet
You can install the QloApps Customer Wallet easily by performing the following steps:
- At the admin back office panel, Go to the Modules and Services tab present in the menu.
- Click on Add a new module
- Now upload the ZIP File of the module and click on install.
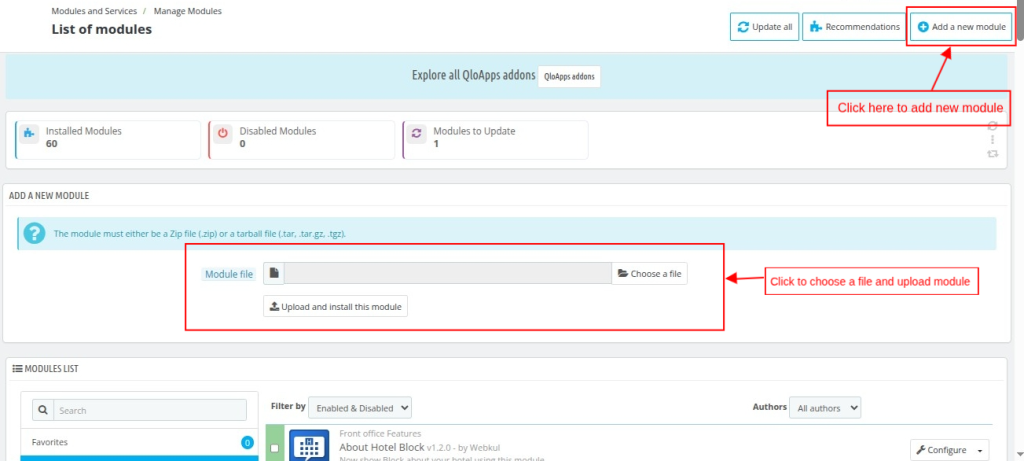
After this process, your module will be successfully installed. A new menu of Customer Wallet will be added to the menu bar through which you can manage customers’ wallets.
Before discussing how you can use this Addon, let’s first discuss how you can configure this addon.
Configuration of QloApps Customer Wallet
To configure this module, search for the Customer Wallet module in the module list on the manage module tab. Now, click on the configure button.
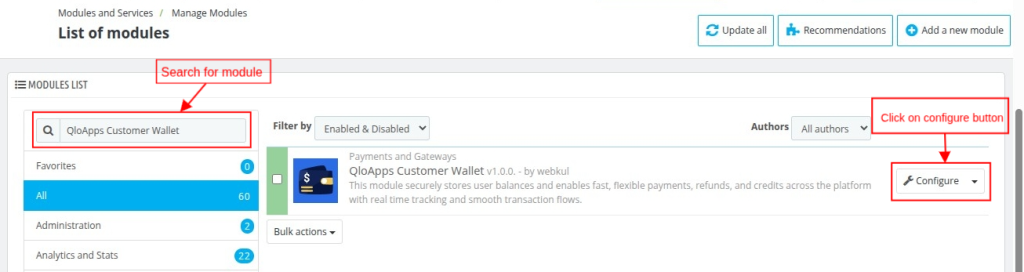
The other way to open the configuration page is to click directly on the configuration button under the Customer Wallet tab.
Once you click on the Configure button, the Configuration page will open. On this page two types of configuration are provided:
- General Configuration
- Display Configuration
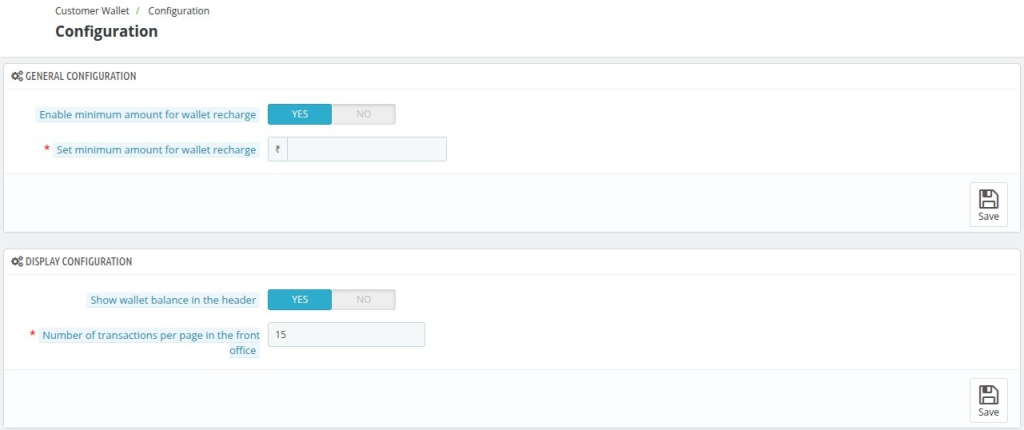
General Configuration
Enable minimum amount for wallet recharge: You can set the minimum amount for wallet recharge by enabling it.
Display Configuration
Show wallet balance in the header: You can enable or disable the wallet balance in the header.
Number of transactions per page in the front office: Also, you can set the number of transactions per page in the front office.
Customer Wallet
Here, the admin can view the transactions that customers make, check transaction KPIs, and credit or debit amounts in the customer’s wallet.
Transaction KPIs:
- Total Wallet Transactions: This KPI shows the total wallet transaction amount for all customers.
- Total Debit Transaction: This KPI shows the total debit transaction amount for all customers.
- Total Credit Transactions: This KPI shows the total credit transaction amount for all customers.
- Total Customers: This KPI shows the total number of customers using the wallet.

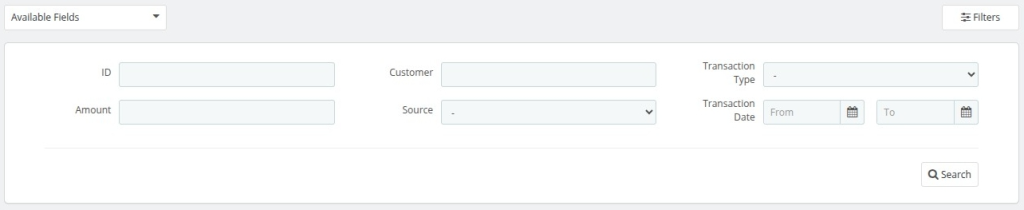
Customer Wallet Filter
Admin can filter out the wallet transactions data based on the selected qualifiers.
Wallet Transactions
In this section, you can see all types of transactions that customers make through the wallet.

If you want to view the details of any transaction, you just need to click on the view option.
Add New Transaction
You can credit or debit the wallet amount on behalf of the customers, by following the simple steps:
- Click on the Add New Transaction button.

- Select the specific customer from the drop-down.
- Select the transaction type.
- Enter the amount.
- Click on Save or Save and Stay.
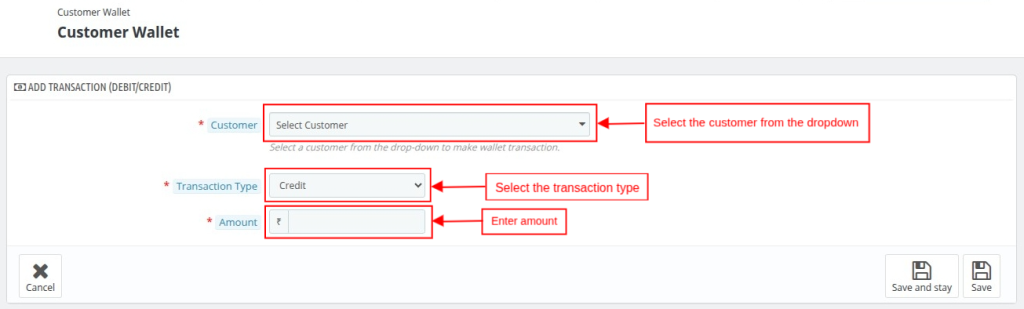
Based on the selections, the system will credit or debit the amount from the customer’s wallet.
Cashback Rule
You can create the cashback rule on behalf of different rule types by which customers can avail themselves of the cashback.
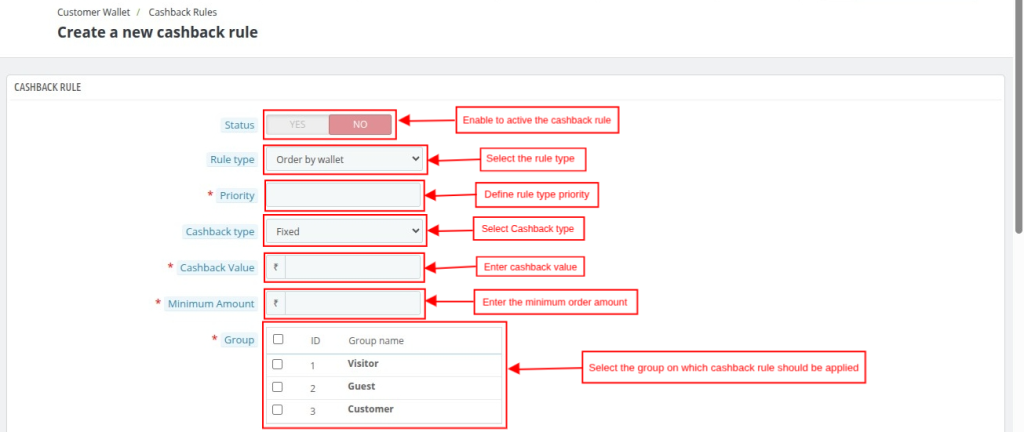
To create the new cashback rule:
- Clicks on the Add new cashback rule

- Select and enter the details as per the cashback rule.
Status: Active/Inactive the cashback rule.
Rule Type: Select the rule type to create a cashback rule for a particular event.
- New User Registration: The defined rule will be applicable to the new user registration.
- Order by Wallet: Apply the rule when a customer places an order using the wallet
- Order Creation: Apply the rule when a customer creates an order.
- Wallet Recharge: Apply the rule when a customer recharges the wallet.
Priority: You can define the cashback priority.
Cashback Type: Select the cashback type, either fixed or percentage, based on the requirement.
Cashback Value: Specify the cashback value on the basis of the cashback type selection, which will be provided to the customer.
Minimum Amount: Define the minimum order amount required for the customer to pay to get the cashback.
Group: Select the group to apply the defined rule.
Title: Enter the cashback rule title.
Text Color: Choose the title text color.
Border Color: Choose the border color of the cashback rule display box.
Pages to show cashback: Select the pages to display the cashback rule.
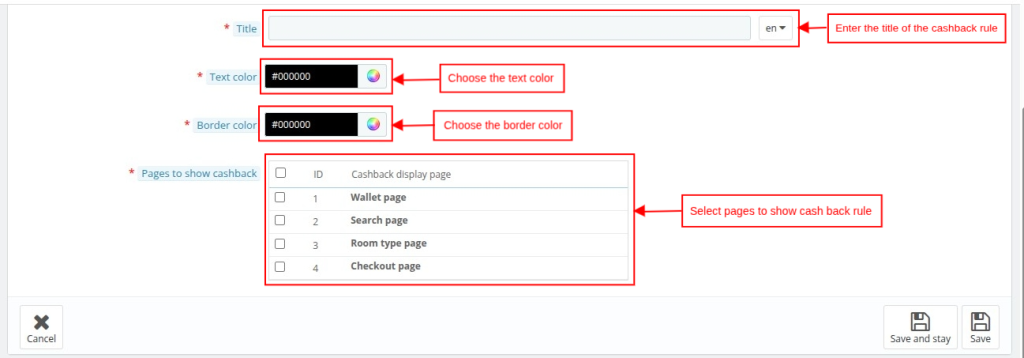
Once you save the Cashback Rule, it appears on the Cashback Rule summary screen.
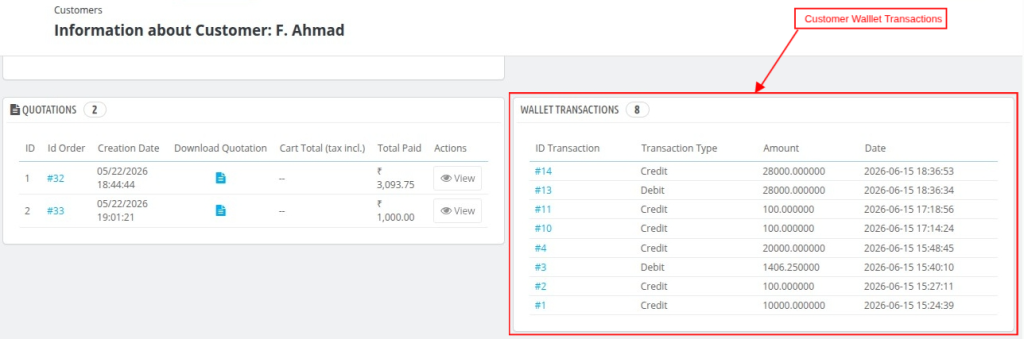
Wallet Transaction
The admin can view the complete list of wallet transactions for an individual customer under the Customer Details page, as shown below:
ID Transaction: Displays the unique transaction ID associated with the customer’s wallet.
Transaction Type: Indicates whether the transaction is a Credit or Debit entry.
Amount: Displays the amount credited to or debited from the customer’s wallet.
Date: Displays the date and time when the transaction was recorded.
Frontend View
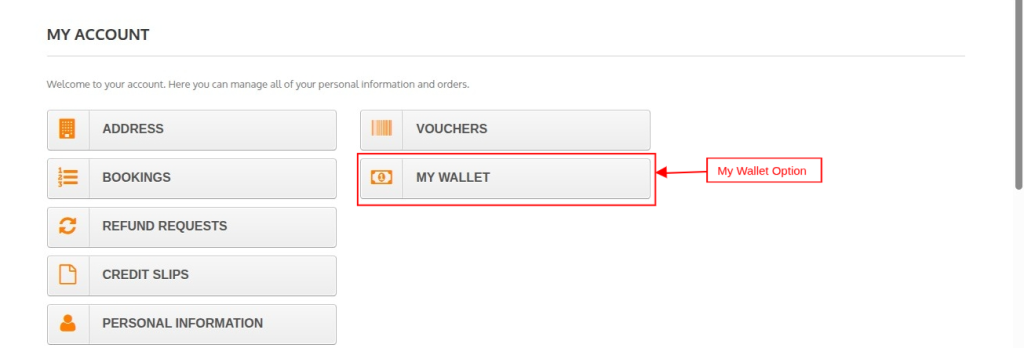
After the installation and configuration of QloApps Customer Wallet. When the customer logs into the application, they will see a wallet icon on the dashboard screen.

Also, the My Account section displays the My Wallet option. To view My Wallet, either click on the My Wallet icon on the dashboard or the My Wallet option in Accounts.
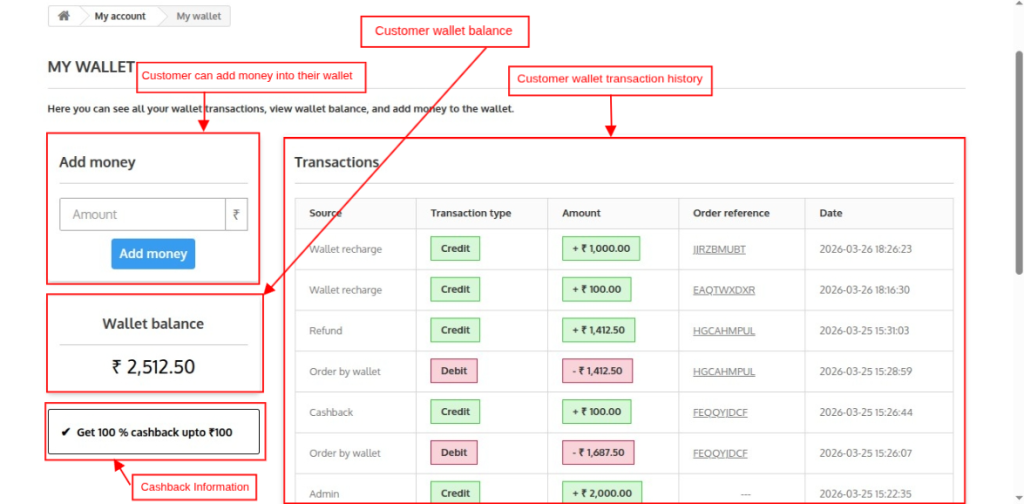
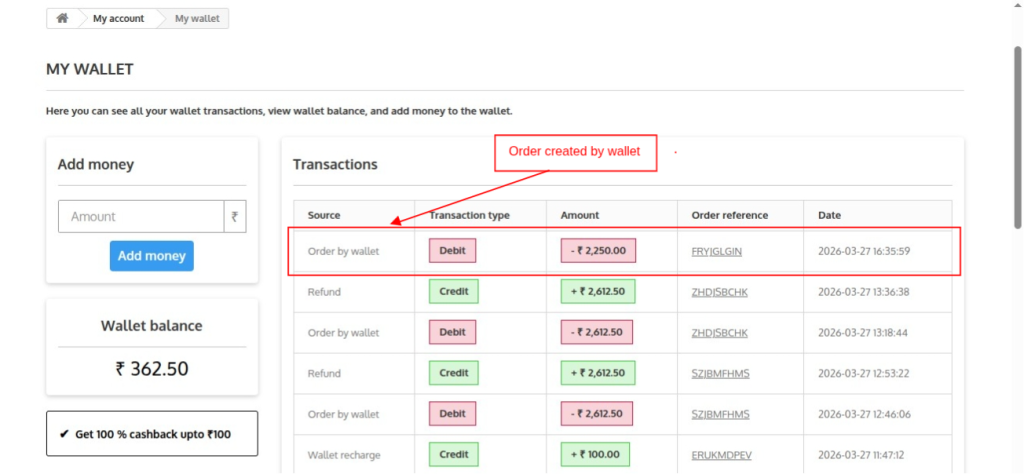
Here, customers can see wallet transactions, wallet balance, and add money to the wallet.
Transaction: Customer can see all transactions made through the wallet.
Wallet Balance: The customer can view the available wallet balance.
Add Money: Customer can add money to their wallet by entering the amount and clicking on the add button.
Add money to the wallet
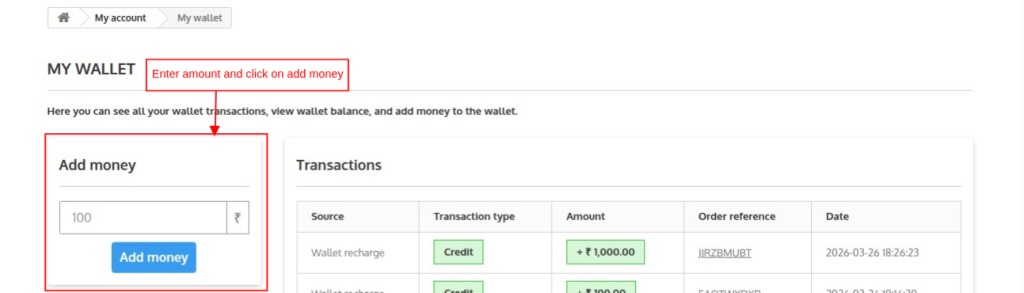
Customer can add money to their wallet by performing the simple steps:
1) Enter the amount that you want to add to the wallet.
2) Click on the Add Money button.
3) After you click the Add Money button, the system redirects you to the payment screen.
4) On the payment screen, select the payment option through which you want to add the money to your wallet.
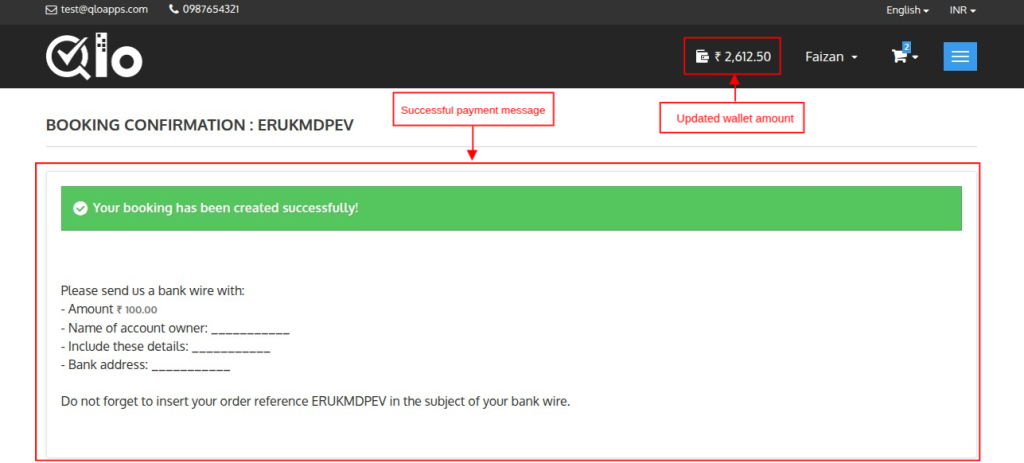
5) Once the payment is successful, you will be able to see the successful payment message.
6) Once the payment succeeds, the wallet balance reflects the amount.
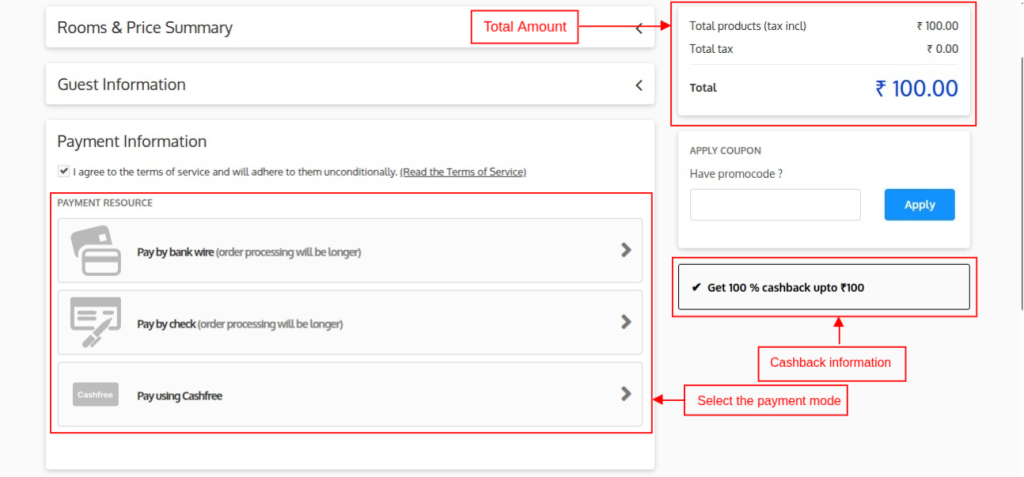
Pay for the order using your wallet
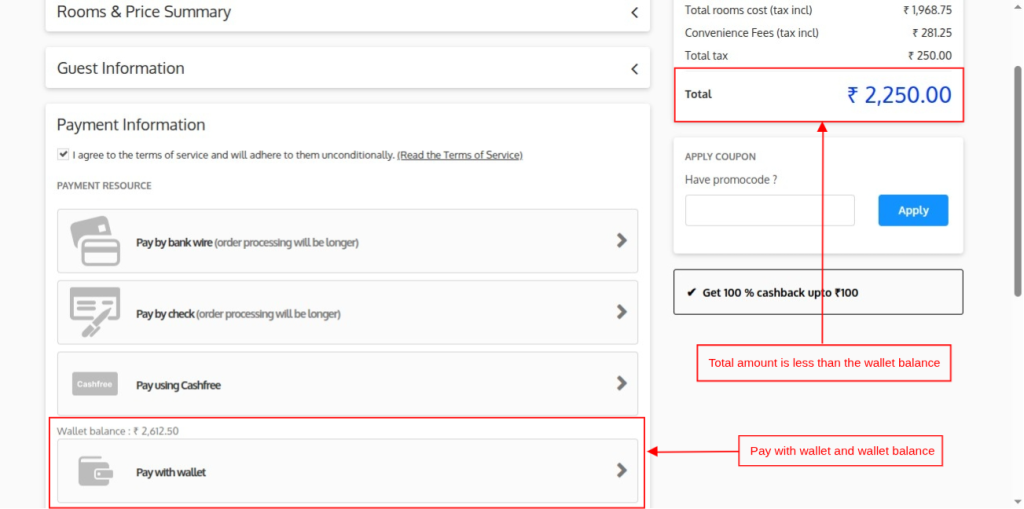
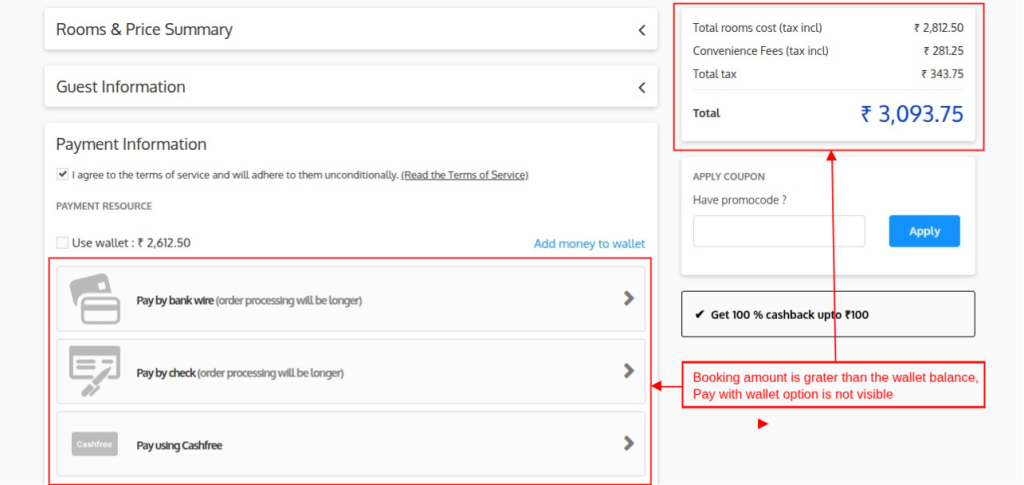
On the checkout screen, the Pay with Wallet option appears under payment information.
This option appears only when the wallet amount exceeds the booking amount.
When the customer clicks the Pay with Wallet option, they go to the order summary screen and see the selected payment options.
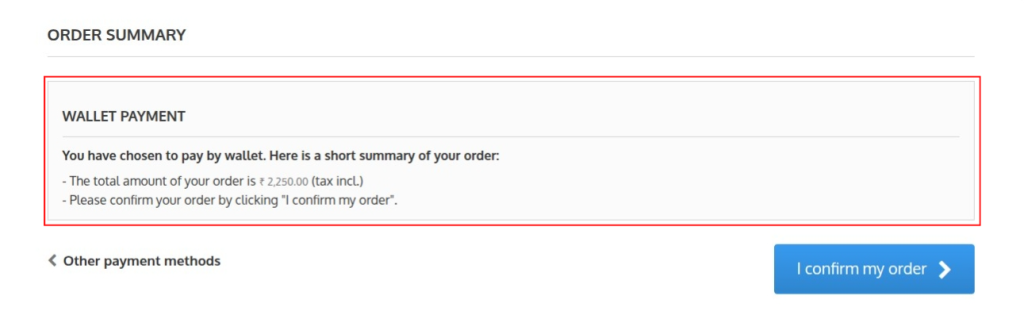
After you click the I Confirm My Order button, the booking confirmation screen appears, showing the payment method under the payment details section.
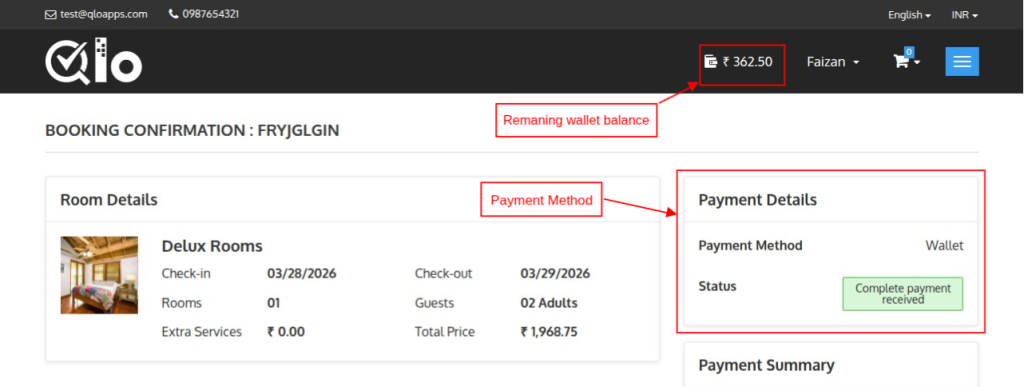
The customer can view the order by wallet source of transaction in the My wallet section.
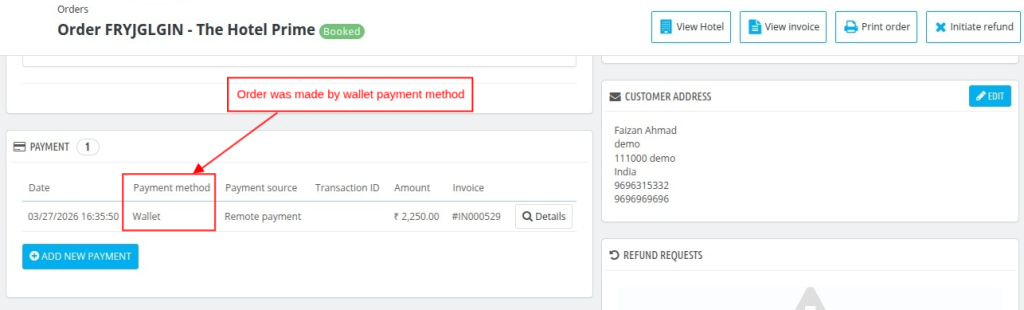
Admin can also see which payment method the customer used to create the order on the order detail page.
If the wallet amount is less than the payment amount, then the Pay with wallet option will not appear.
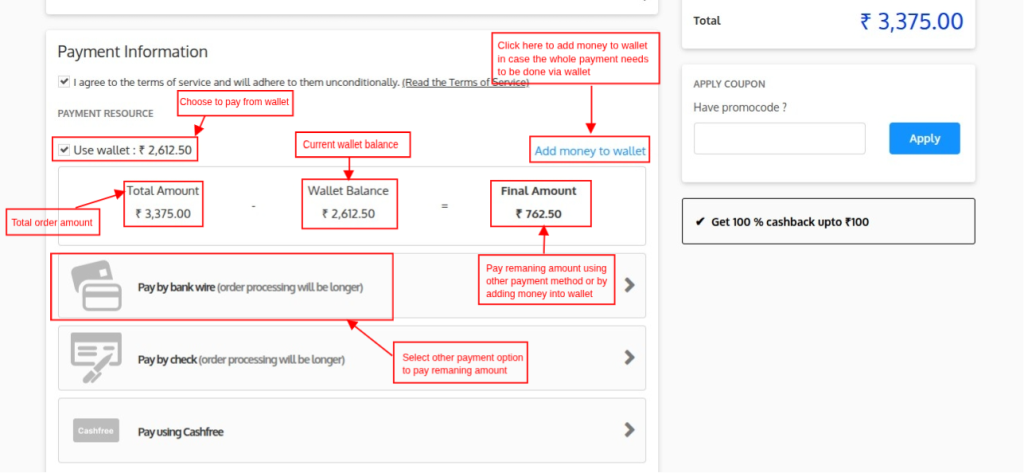
In the Payment Information section, the Use Wallet option will be visible. Users can use their remaining amount from the wallet, or they can add money to their wallet through Add money to wallet.
After the customer clicks the Use Wallet option, they see the final amount they need to pay.
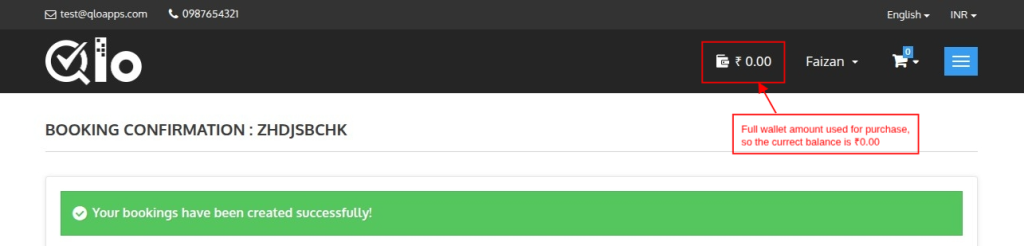
After placing an order, the available balance in the wallet will be 0.00.
Cashback Reward
When the payment is completed and the cashback rule conditions are met, the customer receives the cashback.
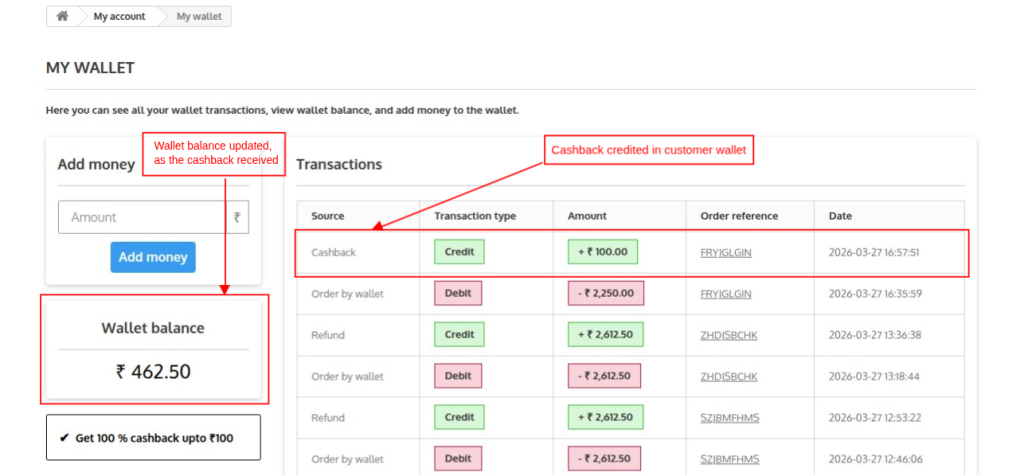
Note: Cashback will be provided to the customer only when the cashback rule meets the condition and when the customer checks out from the hotel.
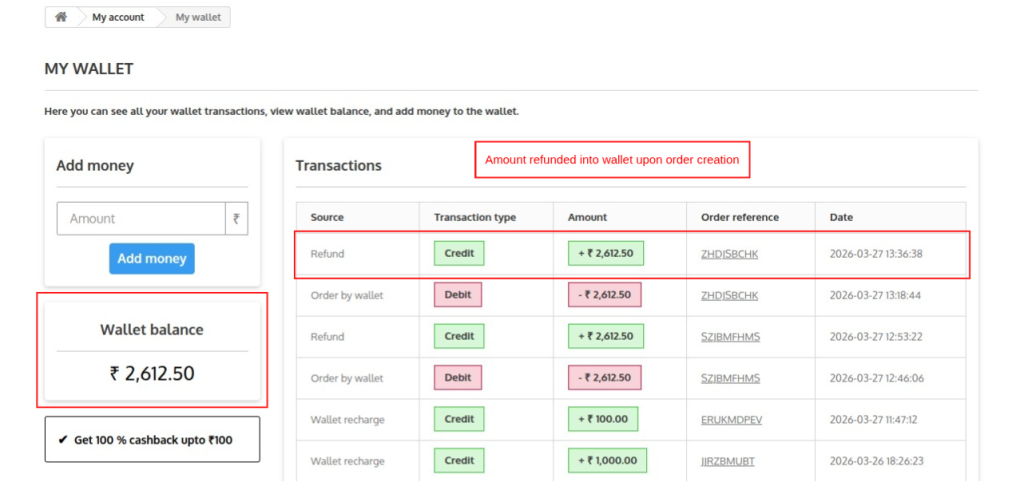
Wallet Refund
If a customer has placed an order from the wallet and the order gets cancelled, a refund is initiated.
Then the amount that is used for placing an order is refunded to the customer’s wallet.
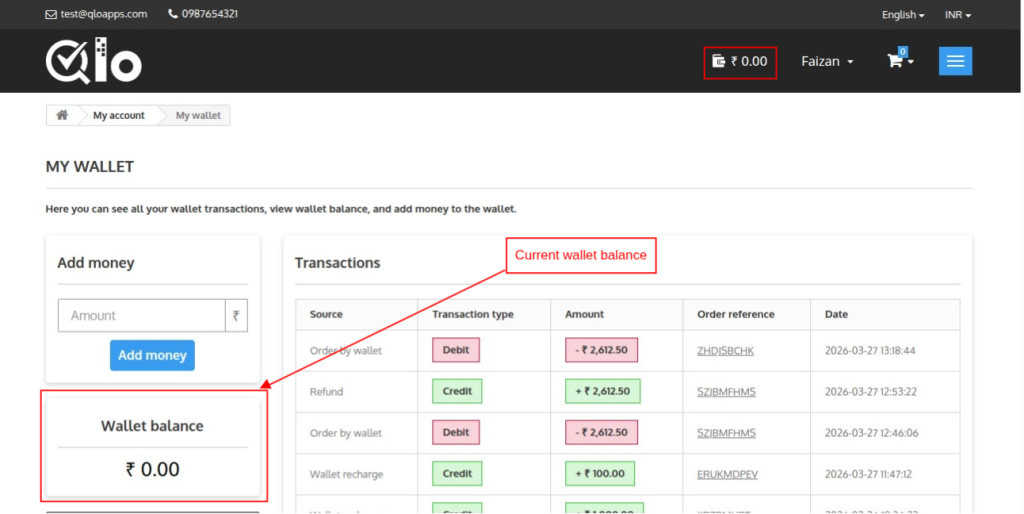
The current wallet balance is 0.00.
Suppose the order amount was 3,375.00, and 2,612.50 is paid through the wallet, and the remaining amount is paid via another medium.
So, when the refund is initiated, only the 2,612.50 amount will be refunded into the customer’s wallet, and the rest of the amount will be paid via another medium.
Conclusion
The QloApps Customer Wallet offers a secure and easy way for customers to manage payments by adding funds, making bookings, and enjoying smooth cashless transactions.
It enhances customer experience with features like instant cashback, quick refunds, and flexible payments, ensuring convenience and satisfaction during their stay.
For admins, it provides full control over transactions, cashback rules, and wallet settings, helping improve operations, transparency, and customer loyalty.
Additionally, to learn more about the functionality of QloApps, you can visit this link: All-in-One Property Management System.
In case of any query, issue, or requirement, please feel free to raise it on the QloApps Forum.
Current Product Version: 1.0.0
Supported Framework: QloApps 1.7.x

Be the first to comment.